
All presentations are available at the Presentations page, alongside with slide-decks and videos (if available).
| Person | Hardware | Comments | Usage |
|---|---|---|---|
| GNUtoo | Galaxy SIII (I9300) with the stock bootloader | Please don't reflash the bootloader or unusual partitions (EFS, etc) | Can run Replicant 6.0 => Can be lent or used for demos |
| Galaxy SIII (I9300) with the stock (signed) OS | Please don't reflash the bootloader or unusual partitions (EFS, etc) | Will be used for demos at the stand: We will monitor what is transmited on the network | |
| Galaxy SIII (I9300) with u-boot | Please don't reflash the modem partitions (EFS, MODEM) | Can run Replicant 9 and GNU/Linux | |
| Other Replicant 6.0 compatible phones: Galaxy SII Galaxy Nexus Galaxy Note |
Please don't reflash the bootloader or unusual partitions (EFS, etc) | Lend them to be able to communicate through the 36C3 phone network |
| Person | Hardware | Comments | Usage |
|---|---|---|---|
| GNUtoo | Serial port cable with variable resistors | Needed for Replicant 9 or GNU/Linux | |
| Screwdriver | Needed by dllud | ||
| Multimeter | Can debug the serial cable if necessary | ||
| Simtrace 1: Can get the dialog between the modem and the SIM card in wireshark | simtrace packaged in Parabola, please do not reflash or trigger the erase jumper (requires old compiler to recompile the firmware) | Do we do demos with it ? | |
| SIM card that is not recognized in Replicant (STK related?) | Testing | ||
| SIM card + phone that can trigger the audio call issue | Testing | ||
| 5 CCC Camp 2019 SIM cards | I've the ADM1 PIN and such if you want to play with it, but I don't have good transportable smartcard reader (only bad transportable or good not transportable) | Will be lent to use the 36C3 phone network |
| Person | Hardware | Comments | Usage |
|---|---|---|---|
| GNUtoo | Blank stickers for labeling the hardware | * Put your name, table, and contact information on the hardware you lend to more easily find you when we need to give it back to you * Put constraints and usage notes on hardware (pinout, settings, what not to reflash) |
|
| FSF | Replicant stickers | Giving some to the attendees |
Link: https://www.sciencedirect.com/science/article/pii/S1742287618300409
file name: 1-s2.0-S1742287618300409-main.pdf
License: CC BY-NC-ND
While this paper directly applies to the Galaxy S6 (SM-G920F) and the Galaxy S7 Edge (SM-G935F) witch uses Exynos System On a Chip, some of its findings seem to be directly applicable to the devices supported by Replicant.
The most interesting part is the analysis of some of the bootloader environment variables:Link: https://www.cl.cam.ac.uk/~rja14/Papers/fr_most15.pdf
Related bug reports: #2096
Presentation pdf: https://downloads.immunityinc.com/infiltrate2018-slidepacks/amat-cama-a-walk-with-shannon/presentation.pdf
Presentation Video: https://www.youtube.com/watch?v=6bpxrfB9ioo
Target device: unclear, Maybe a Galaxy S6 or Galaxy S8
The device used has shared memory between the SOC running Android and the modem.
There are some interesting points in that presentation:The device used seems to use a Qualcomm MSM8974 SOC. What is interesting is that it looks very similar to the "Forensics acquisition - Analysis and circumvention of samsung secure boot enforced common criteria mode" paper, but with another device and SOC.
While the technical information in this research is not directly applicable, it shows that there are systemic trends:Link: https://hardwear.io/netherlands-2020/speakers/grant-hernandez-and-marius-muench.php
Video: https://www.youtube.com/watch?v=ypxgXNtvlgA
[ACPM] Shannon OS [_ShannonOs_3.2_R8_AC5], and we have no such string inside the GT-I9300 RADIO partition.See the ToolsInstallation page for how to install adb.
In the settings, open Developer options. In the Debugging section, enable Android debugging.
In order to allow your host computer to access ADB on the device, it must be allowed on the device. A window should pop up when connecting USB, asking whether to allow USB debugging.
Note: when booting with USB plugged in, the window doesn't pop up and you have to disconnect and reconnect the USB cable to see it happen.
Once allowed, you can access the device shell using:
adb shell
The shell is running as an unprivileged user.
To allow root access, open the Developer options in the settings. There, press Root access. In the pop-up menu, select either ADB only or Apps and ADB. A window with "Allow root access?" might pop up and explains the security tradeoffs of enabling root access. After reading the text, select OK to enable root access.
To finally gain root access, use:
adb root
The following shells will then be run as root.
Replicant is installed on the system partition. By default with most devices, this partition is mounted as read-only and can't be modified.
You can mount the partition as writable filesystem using:
adb remount
Files under /system/ can now be edited.
Sometimes, you need to use Always allow from this computer to give a computer more permanent USB debugging permissions. This for instance the case in the BackupTheEFS instructions.
However once you are done with what needs such permissions, you might want to revoke the permissions if you don't need anymore, to increase security.
To do that you can select Revoke USB debugging authorizations in Developer options in the Settings (Settings > Developer options > Revoke USB debugging authorizations).
This page explains how to enable adb root support by default without any authentication to an existing Replicant release, for instance to get very early logs or to get a shell very early in the boot process, in order to debug or fix boot issues.
That tutorial can also be used to do other things like:Some devices (The Galaxy S (GT-I9000), Galaxy SII (GT-I9100), and Galaxy Note (GT-N7000) uses a zImage because the nonfree bootloader doesn't support the boot.img format. Because of that, this tutorial doesn't cover theses devices (yet).
Keep in mind that once you add adb root support by default without authentication to a Replicant installation (by modifying the boot.img file), your device becomes potentially vulnerable to juice jacking .
So if you want to prevent any issues it might be best to put back the original boot.img once you don't need adb root support by default without any authentication anymore.
If you add adb root support by default without authentication to the recovery instead, the risk is much more limited as the device would probably need to be rebooted into the recovery to be exposed.
Also, we didn't investigate if any supported devices would be exposed during charge mode (when the device is off and you plug an USB cable).
In this tutorial we'll add adb root support to an existing Replicant release. This will gives you adb root during the boot of Replicant. If you want to add adb root to the Replicant 6 recovery, you will need to modify the recovery.img instead of the boot.img file. Like the replicant-*.zip file, the recovery.img file is one of the images releases in the Replicant releases.
You also need to have unbootimg installed. In Parabola this is part of the fso-unbootimg package . It's also possible to compile that tool by hand or to other alternative tools that do exactly the same thing.
You'll need to adapt it slightly for other devices.
First extract the boot.img from the zip
$ mkdir temp
$ cd temp
$ unzip ../replicant-6.0-0004-rc1-maguro.zip
$ file boot.img
boot.img: Android bootimg, kernel, ramdisk, page size: 2048, cmdline (androidboot.hardware=tuna)
Then extract the kernel, and initramfs from the boot.img. Also save the infos such as the load address, etc in boot.txt:
$ unbootimg --kernel kernel.img --ramdisk ramdisk.cpio.gz -i boot.img | tee boot.txt
total image size:   5619712
kernel size:        4604340
kernel load addr:   0x80008000
ramdisk size:       1009915
ramdisk load addr:  0x81000000
2nd boot size:      0
2nd boot load addr: 0x80f00000
kernel tags addr:   0x80000100
page size:          2048
board:              `'
cmdline:            `androidboot.hardware=tuna'
id:                 9b90141066f527ecd3909d2ab8e383ebd995fd40000
Then uncompress the initramfs
$ gunzip ramdisk.cpio.gz
$ file ramdisk.cpio
ramdisk.cpio: ASCII cpio archive (SVR4 with no CRC)
Then edit the default.props, we use sed on the raw cpio image for simplicity (we don't have permissions and username to take care of this way):
$ sed 's#ro.adb.secure=1#               #' -i ramdisk.cpio
$ sed 's#ro.secure=1#ro.secure=0#' -i ramdisk.cpio
$ sed 's#persist.sys.usb.config=none#persist.sys.usb.config=adb #' -i ramdisk.cpio
Then recompress the initramfs
$ gzip ramdisk.cpio
We then recreate the image with the infos we saved in boot.txt. Note that the base is 0x80000000. The kernel has an offset and will be in 0x80008000:
$ mkbootimg --cmdline="androidboot.hardware=tuna" --kernel kernel.img --ramdisk ramdisk.cpio.gz --base 0x80000000 -o boot_new.img
Verify that we got all the arguments right:
$ unbootimg -i boot_new.img | tee boot_new.txt
$ diff -u boot.txt boot_new.txt
$ --- boot.txt    2020-02-18 00:39:59.890285634 +0100
+++ boot_new.txt    2020-02-18 00:44:16.208897037 +0100
@@ -1,7 +1,7 @@
 total image size:   5619712
 kernel size:        4604340
 kernel load addr:   0x80008000
-ramdisk size:       1009915
+ramdisk size:       1010280
 ramdisk load addr:  0x81000000
 2nd boot size:      0
 2nd boot load addr: 0x80f00000
@@ -9,4 +9,4 @@
 page size:          2048
 board:              `'
 cmdline:            `androidboot.hardware=tuna'
-id:                 9b90141066f527ecd3909d2ab8e383ebd995fd40000
+id:                 dd37b2ae1e50be62fe5c94b81b85aa56ffea17be000
You can then reflash the boot.img image.
Don't forget to adjust the heimdall arguments for your device.
If in doubt, it's better to consult the Replicant installation instructions that have the good heimdall arguments, as wrong arguments can completely break your device, making it too complicated to repair (you'd have to un-solder and re-solder resistors that are hardly visible).
heimdall flash --boot boot.img --recovery boot.img
Then you can use adb:
$ adb logcat -b main
For other devices like the GT-I9300, the boot.img (or recovery.img) have other parameters:
 unbootimg -i boot.img
total image size:   4239360
kernel size:        3391376
kernel load addr:   0x40008000
ramdisk size:       844653
ramdisk load addr:  0x41000000
2nd boot size:      0
2nd boot load addr: 0x40f00000
kernel tags addr:   0x40000100
page size:          2048
board:              `'
cmdline:            `console=ttySAC2,115200'
id:                 d34c0412b72d37a2287331e28d902a769c4a86e9000
So we need to adjust the --cmdline and the --base accordingly:
mkbootimg --cmdline="console=ttySAC2,115200" --kernel kernel.img --ramdisk ramdisk.cpio.gz --base 0x40000000 -o boot_new.img
Like with the Galaxy nexus, when we recreate the image with the infos we saved in boot.txt, we need to make sure that the base is right.
Here the base is 0x40000000, which results in the kernel offset (or load address) of 0x40008000.
The Linux kernel has more in depth documentation about initramfs in a file named ramfs-rootfs-initramfs.rst which document how to extract an initramfs and how to recreate one.
However we didn't test that yet. Tests and tutorials are welcome.
We also need to understand if something specific needs to be done for the file permissions when extracting, modifying and rebuilding an initramfs.
This consists in adding minimal support of the Pinephone in Replicant >= 11 by reusing code from GloDroid and other Android distributions, and also isolate the modem.
The idea is also to improve collaboration between various Android distributions that use kernels based on upstream Linux as improvements there are badly needed. We will also try to use these HALS in the devices already supported by Replicant 11 (Galaxy SIII (GT-I9300 and GT-I9305)).
Limitations:Modem isolation: We will most likely use USBGuard to isolate the modem as it might enable other uses and also because the USB gadget whitelist code is hard to validate as there are cases where it doesn't apply the blacklist.
Status: Only evaluation work to produce the funding proposal draft started
nlnet-next branch of GNUtoo's NLnet applications repositoryThe goal here is to add support for AKM8976A to akmd-free (a free rewrite of akmd, the daemon that deals with the accelerometer/magnetometer data for a few chips, including AKM ones).
This page is to coordinate the work around this goal.
| Task | Achievement |
|---|---|
| Modifying the kernel driver to print the requests akmd makes (ioctl, etc) | Done |
| Get an idea of how it works (what akmd does after what) | Done |
| Define the exact steps that akmd follows | Done |
| Implement AKM8976A in akmd-free without any data treatment yet | Done |
| Understand how the data is treated (algorithms, etc) | Work in progress |
| Reproduce the data treatment with standard C code | Work in progress |
| Include the data treatment code in akmd-free | TODO |
| Check that everything is OK on different devices | TODO |
| Task | Global achievement | Understood | Reproduced | Implemented |
|---|---|---|---|---|
| Before the first ECS_IOCTL_GETDATA | Mostly done | Done | Done | TODO |
Note that before everything, coming on our IRC channel #replicant on irc.freenode.net and introducing yourself is essential: you'll be able to get help there and, of course, if you want to join the effort, communication is fundamental.
If you plan to join the effort to achieve this goal, here are the steps:
Note that before you run any of the scripts, you need to start adb server as root:
Here is a list of the scripts, what they do and how to use them:To begin with, here is the trace of the requests akmd does to the kernel driver (using the ioctl system call):
<6>[ 2066.362670] --> ECS_IOCTL_SET_MODE #1
<6>[ 2066.363220] --> ECS_IOCTL_SET_MODE
<6>[ 2066.364074]  --> AKECS_MODE_E2P_READ
<6>[ 2066.381042] --> ECS_IOCTL_READ #1
<6>[ 2066.381317] what is in rwbuf?
<6>[ 2066.381744] --------------------
<6>[ 2066.382019] |    index    |    hdata    |    ddata    |
<6>[ 2066.382263] |    0    |    0x1    |    1    |
<6>[ 2066.382507] |    1    |    0x42    |    66    |
<6>[ 2066.382934] |    2    |    0x0    |    0    |
<6>[ 2066.383178] |    3    |    0x0    |    0    |
<6>[ 2066.383392] |    4    |    0x0    |    0    |
<6>[ 2066.383636] ----------
<6>[ 2066.384063] --> ECS_IOCTL_READ
<6>[ 2066.384979] --> ECS_IOCTL_READ #3
<6>[ 2066.385253] --------------------
<6>[ 2066.385498] |    index    |    hdata    |    ddata    |
<6>[ 2066.385925] |    0    |    0x1    |    1    |
<6>[ 2066.386169] |    1    |    0x66    |    102    |
<6>[ 2066.386383] |    2    |    0x0    |    0    |
<6>[ 2066.386627] |    3    |    0x0    |    0    |
<6>[ 2066.387054] |    4    |    0x0    |    0    |
<6>[ 2066.387268] ----------
<6>[ 2066.387542] --> ECS_IOCTL_SET_MODE #1
<6>[ 2066.387786] --> ECS_IOCTL_SET_MODE
<6>[ 2066.388214]  --> AKECS_MODE_POWERDOWN
<6>[ 2066.401031] --> ECS_IOCTL_GET_OPEN_STATUS
<6>[ 2066.401306] --> ECS_IOCTL_GET_OPEN_STATUS #3
<6>[ 2066.407135] --> ECS_IOCTL_INIT
<6>[ 2066.408020] --> ECS_IOCTL_SET_MODE #1
<6>[ 2066.408294] --> ECS_IOCTL_SET_MODE
<6>[ 2066.408721]  --> AKECS_MODE_E2P_READ
<6>[ 2066.421234] --> ECS_IOCTL_READ #1
<6>[ 2066.421630] what is in rwbuf?
<6>[ 2066.422302] --------------------
<6>[ 2066.422637] |    index    |    hdata    |    ddata    |
<6>[ 2066.423004] |    0    |    0x3    |    3    |
<6>[ 2066.423339] |    1    |    0x46    |    70    |
<6>[ 2066.423950] |    2    |    0x0    |    0    |
<6>[ 2066.424285] |    3    |    0x0    |    0    |
<6>[ 2066.424621] |    4    |    0x0    |    0    |
<6>[ 2066.424957] ----------
<6>[ 2066.425567] --> ECS_IOCTL_READ
<6>[ 2066.426696] --> ECS_IOCTL_READ #3
<6>[ 2066.427062] --------------------
<6>[ 2066.427398] |    index    |    hdata    |    ddata    |
<6>[ 2066.428039] |    0    |    0x3    |    3    |
<6>[ 2066.428375] |    1    |    0x97    |    151    |
<6>[ 2066.428710] |    2    |    0x87    |    135    |
<6>[ 2066.429321] |    3    |    0x19    |    25    |
<6>[ 2066.429656] |    4    |    0x0    |    0    |
<6>[ 2066.429992] ----------
<6>[ 2066.431243] --> ECS_IOCTL_SET_MODE #1
<6>[ 2066.431915] --> ECS_IOCTL_SET_MODE
<6>[ 2066.432250]  --> AKECS_MODE_POWERDOWN
<6>[ 2066.450866] --> ECS_IOCTL_WRITE #1
<6>[ 2066.451385] what is in rwbuf?
<6>[ 2066.452239] --------------------
<6>[ 2066.452697] |    index    |    hdata    |    ddata    |
<6>[ 2066.453186] |    0    |    0x4    |    4    |
<6>[ 2066.454040] |    1    |    0xe8    |    232    |
<6>[ 2066.454498] |    2    |    0x7    |    7    |
<6>[ 2066.454956] |    3    |    0x7    |    7    |
<6>[ 2066.455413] |    4    |    0x9    |    9    |
<6>[ 2066.456268] ----------
<6>[ 2066.456726] --> ECS_IOCTL_WRITE
<6>[ 2066.457916] --> ECS_IOCTL_WRITE #1
<6>[ 2066.458374] what is in rwbuf?
<6>[ 2066.459228] --------------------
<6>[ 2066.459686] |    index    |    hdata    |    ddata    |
<6>[ 2066.460174] |    0    |    0x4    |    4    |
<6>[ 2066.460784] |    1    |    0xe5    |    229    |
<6>[ 2066.461669] |    2    |    0x89    |    137    |
<6>[ 2066.462127] |    3    |    0x0    |    0    |
<6>[ 2066.462615] |    4    |    0x89    |    137    |
<6>[ 2066.463073] ----------
<6>[ 2066.463928] --> ECS_IOCTL_WRITE
<6>[ 2066.465698] --> ECS_IOCTL_SET_MODE #1
<6>[ 2066.466186] --> ECS_IOCTL_SET_MODE
<6>[ 2066.467071]  --> AKECS_MODE_MEASURE_SNG
<6>[ 2066.480468] --> ECS_IOCTL_GETDATA
<6>[ 2066.480987] --> ECS_IOCTL_GETDATA #3
<6>[ 2066.481445] --------------------
<6>[ 2066.482299] |    index    |    hdata    |    ddata    |
<6>[ 2066.482788] gflag1|    0    |    0x70    |    112    |
<6>[ 2066.483245] gflag1|    1    |    0x7f    |    127    |
<6>[ 2066.484100] gflag1|    2    |    0xa5    |    165    |
<6>[ 2066.484588] gflag1|    3    |    0x5c    |    92    |
<6>[ 2066.485046] gflag1|    4    |    0x66    |    102    |
<6>[ 2066.485900] gflag1|    5    |    0x85    |    133    |
<6>[ 2066.486450] gflag1|    6    |    0x5c    |    92    |
<6>[ 2066.486938] gflag1|    7    |    0x85    |    133    |
<6>[ 2066.487792] gflag1|    8    |    0x0    |    0    |
<6>[ 2066.488250] gflag1|    9    |    0x0    |    0    |
<6>[ 2066.488708] gflag1|    10    |    0x0    |    0    |
<6>[ 2066.489196] gflag1|    11    |    0x0    |    0    |
<6>[ 2066.490051] gflag1|    12    |    0x0    |    0    |
<6>[ 2066.490631] gflag1|    13    |    0x0    |    0    |
<6>[ 2066.491119] gflag1|    14    |    0x0    |    0    |
<6>[ 2066.491973] gflag1|    15    |    0x0    |    0    |
<6>[ 2066.492431] gflag1|    16    |    0x0    |    0    |
<6>[ 2066.492919] gflag1|    17    |    0xa5    |    165    |
<6>[ 2066.493774] gflag1|    18    |    0x5c    |    92    |
<6>[ 2066.494262] gflag1|    19    |    0x66    |    102    |
<6>[ 2066.494720] gflag1|    20    |    0x85    |    133    |
<6>[ 2066.495574] gflag1|    21    |    0x5c    |    92    |
<6>[ 2066.496032] gflag1|    22    |    0x85    |    133    |
<6>[ 2066.496520] gflag1|    23    |    0x0    |    0    |
<6>[ 2066.496978] gflag1|    24    |    0x0    |    0    |
<6>[ 2066.497833] gflag1|    25    |    0x0    |    0    |
<6>[ 2066.498291] gflag1|    26    |    0x0    |    0    |
<6>[ 2066.498779] gflag1|    27    |    0x0    |    0    |
<6>[ 2066.499633] gflag1|    28    |    0x0    |    0    |
<6>[ 2066.500122] gflag1|    29    |    0x0    |    0    |
<6>[ 2066.500671] gflag1|    30    |    0x0    |    0    |
<6>[ 2066.501525] gflag1|    31    |    0x0    |    0    |
<6>[ 2066.501983] ----------
<6>[ 2066.509826] --> ECS_IOCTL_GET_NUMFRQ
<6>[ 2066.510559] --> ECS_IOCTL_GET_NUMFRQ #3
<6>[ 2066.511444] --------------------
<6>[ 2066.511901] |    index    |    hdata    |    ddata    |
<6>[ 2066.512390] |    0    |    0x1    |    1    |
<6>[ 2066.513244] |    1    |    0x0    |    0    |
<6>[ 2066.513702] ----------
<6>[ 2066.515655] --> ECS_IOCTL_WRITE #1
<6>[ 2066.516174] what is in rwbuf?
<6>[ 2066.517120] --------------------
<6>[ 2066.517578] |    index    |    hdata    |    ddata    |
<6>[ 2066.518066] |    0    |    0x4    |    4    |
<6>[ 2066.518524] |    1    |    0xee    |    238    |
<6>[ 2066.519378] |    2    |    0x10    |    16    |
<6>[ 2066.519836] |    3    |    0x10    |    16    |
<6>[ 2066.520324] |    4    |    0x10    |    16    |
<6>[ 2066.520904] ----------
<6>[ 2066.521789] --> ECS_IOCTL_WRITE
<6>[ 2066.524230] --> ECS_IOCTL_WRITE #1
<6>[ 2066.524749] what is in rwbuf?
<6>[ 2066.525299] --------------------
<6>[ 2066.526153] |    index    |    hdata    |    ddata    |
<6>[ 2066.526641] |    0    |    0x4    |    4    |
<6>[ 2066.527099] |    1    |    0xeb    |    235    |
<6>[ 2066.527954] |    2    |    0x3    |    3    |
<6>[ 2066.528411] |    3    |    0x7    |    7    |
<6>[ 2066.528869] |    4    |    0x8a    |    138    |
<6>[ 2066.529357] ----------
<6>[ 2066.529815] --> ECS_IOCTL_WRITE
<6>[ 2066.532836] --> ECS_IOCTL_WRITE #1
<6>[ 2066.533355] what is in rwbuf?
<6>[ 2066.533874] --------------------
<6>[ 2066.534729] |    index    |    hdata    |    ddata    |
<6>[ 2066.535186] |    0    |    0x2    |    2    |
<6>[ 2066.535675] |    1    |    0xf4    |    244    |
<6>[ 2066.536132] |    2    |    0x55    |    85    |
<6>[ 2066.537017] |    3    |    0x0    |    0    |
<6>[ 2066.537475] |    4    |    0x0    |    0    |
<6>[ 2066.537933] ----------
<6>[ 2066.538391] --> ECS_IOCTL_WRITE
<6>[ 2066.539947] --> ECS_IOCTL_WRITE #1
<6>[ 2066.540618] what is in rwbuf?
<6>[ 2066.541107] --------------------
<6>[ 2066.541534] |    index    |    hdata    |    ddata    |
<6>[ 2066.542388] |    0    |    0x2    |    2    |
<6>[ 2066.542877] |    1    |    0xf5    |    245    |
<6>[ 2066.543334] |    2    |    0x1b    |    27    |
<6>[ 2066.544219] |    3    |    0x0    |    0    |
<6>[ 2066.544677] |    4    |    0x0    |    0    |
<6>[ 2066.545135] ----------
<6>[ 2066.545623] --> ECS_IOCTL_WRITE
<6>[ 2066.548126] --> ECS_IOCTL_WRITE #1
<6>[ 2066.548370] what is in rwbuf?
<6>[ 2066.548614] --------------------
<6>[ 2066.548858] |    index    |    hdata    |    ddata    |
<6>[ 2066.549285] |    0    |    0x2    |    2    |
<6>[ 2066.549530] |    1    |    0xf6    |    246    |
<6>[ 2066.549743] |    2    |    0x8    |    8    |
<6>[ 2066.549987] |    3    |    0x0    |    0    |
<6>[ 2066.550537] |    4    |    0x0    |    0    |
<6>[ 2066.550781] ----------
<6>[ 2066.551025] --> ECS_IOCTL_WRITE
<6>[ 2066.552398] --> ECS_IOCTL_WRITE #1
<6>[ 2066.552856] what is in rwbuf?
<6>[ 2066.553131] --------------------
<6>[ 2066.553375] |    index    |    hdata    |    ddata    |
<6>[ 2066.553802] |    0    |    0x4    |    4    |
<6>[ 2066.554046] |    1    |    0xf1    |    241    |
<6>[ 2066.554260] |    2    |    0x84    |    132    |
<6>[ 2066.554504] |    3    |    0x87    |    135    |
<6>[ 2066.554931] |    4    |    0x83    |    131    |
<6>[ 2066.555145] ----------
<6>[ 2066.555389] --> ECS_IOCTL_WRITE
<6>[ 2066.557525] --> ECS_IOCTL_GET_CLOSE_STATUS
<6>[ 2066.558074] --> ECS_IOCTL_GET_DELAY
<6>[ 2066.558319] --> ECS_IOCTL_GET_DELAY #3
<6>[ 2066.761016] --> ECS_IOCTL_SET_MODE #1
<6>[ 2066.761932] --> ECS_IOCTL_SET_MODE
<6>[ 2066.762420]  --> AKECS_MODE_MEASURE_SNG
<6>[ 2066.781555] --> ECS_IOCTL_GETDATA
<6>[ 2066.782531] --> ECS_IOCTL_GETDATA #3
<6>[ 2066.783020] --------------------
<6>[ 2066.783477] |    index    |    hdata    |    ddata    |
<6>[ 2066.783935] gflag1|    0    |    0x70    |    112    |
<6>[ 2066.784820] gflag1|    1    |    0x7f    |    127    |
<6>[ 2066.785278] gflag1|    2    |    0xa3    |    163    |
<6>[ 2066.785766] gflag1|    3    |    0x5d    |    93    |
<6>[ 2066.786621] gflag1|    4    |    0x68    |    104    |
<6>[ 2066.787078] gflag1|    5    |    0x86    |    134    |
<6>[ 2066.787567] gflag1|    6    |    0x5c    |    92    |
<6>[ 2066.788421] gflag1|    7    |    0x85    |    133    |
<6>[ 2066.788879] gflag1|    8    |    0x0    |    0    |
<6>[ 2066.789367] gflag1|    9    |    0x0    |    0    |
<6>[ 2066.790222] gflag1|    10    |    0x0    |    0    |
<6>[ 2066.790832] gflag1|    11    |    0x0    |    0    |
<6>[ 2066.791320] gflag1|    12    |    0x0    |    0    |
<6>[ 2066.791778] gflag1|    13    |    0x0    |    0    |
<6>[ 2066.792663] gflag1|    14    |    0x0    |    0    |
<6>[ 2066.793121] gflag1|    15    |    0x0    |    0    |
<6>[ 2066.793579] gflag1|    16    |    0x0    |    0    |
<6>[ 2066.794464] gflag1|    17    |    0xa3    |    163    |
<6>[ 2066.794921] gflag1|    18    |    0x5d    |    93    |
<6>[ 2066.795379] gflag1|    19    |    0x68    |    104    |
<6>[ 2066.796264] gflag1|    20    |    0x86    |    134    |
<6>[ 2066.796722] gflag1|    21    |    0x5c    |    92    |
<6>[ 2066.797210] gflag1|    22    |    0x85    |    133    |
<6>[ 2066.798065] gflag1|    23    |    0x0    |    0    |
<6>[ 2066.798553] gflag1|    24    |    0x0    |    0    |
<6>[ 2066.799041] gflag1|    25    |    0x0    |    0    |
<6>[ 2066.799499] gflag1|    26    |    0x0    |    0    |
<6>[ 2066.800354] gflag1|    27    |    0x0    |    0    |
<6>[ 2066.800903] gflag1|    28    |    0x0    |    0    |
<6>[ 2066.801391] gflag1|    29    |    0x0    |    0    |
<6>[ 2066.802246] gflag1|    30    |    0x0    |    0    |
<6>[ 2066.802703] gflag1|    31    |    0x0    |    0    |
<6>[ 2066.803161] ----------
<6>[ 2066.807067] --> ECS_IOCTL_GET_NUMFRQ
<6>[ 2066.808044] --> ECS_IOCTL_GET_NUMFRQ #3
<6>[ 2066.808502] --------------------
<6>[ 2066.808959] |    index    |    hdata    |    ddata    |
<6>[ 2066.809814] |    0    |    0x1    |    1    |
<6>[ 2066.810302] |    1    |    0x0    |    0    |
<6>[ 2066.810943] ----------
<6>[ 2066.813629] --> ECS_IOCTL_SET_YPR #1
<6>[ 2066.814636] --------------------
<6>[ 2066.815093] |    index    |    hdata    |    ddata    |
<6>[ 2066.815582] gflag2|    0    |    0x55    |    85    |
<6>[ 2066.816467] gflag2|    1    |    0xffffffff    |    -1    |
<6>[ 2066.816925] gflag2|    2    |    0x2    |    2    |
<6>[ 2066.817382] gflag2|    3    |    0x1e    |    30    |
<6>[ 2066.817840] gflag2|    4    |    0x1    |    1    |
<6>[ 2066.818328] gflag2|    5    |    0x0    |    0    |
<6>[ 2066.818786] gflag2|    6    |    0x14    |    20    |
<6>[ 2066.819244] gflag2|    7    |    0xfffffd3b    |    -709    |
<6>[ 2066.820129] gflag2|    8    |    0x11    |    17    |
<6>[ 2066.820770] gflag2|    9    |    0x185    |    389    |
<6>[ 2066.821258] gflag2|    10    |    0xffffffe7    |    -25    |
<6>[ 2066.822113] gflag2|    11    |    0xfffffe20    |    -480    |
<6>[ 2066.822570] ----------
<6>[ 2066.823028] --> ECS_IOCTL_SET_YPR
<6>[ 2066.823913] AKECS_Report_Value: yaw = 85, pitch = -1, roll = 2
<6>[ 2066.824401]                     tmp = 30, m_stat= 1, g_stat=0
<6>[ 2066.825286]           G_Sensor:   x = 20 LSB, y = -709 LSB, z = 17 LSB
<6>[ 2066.825744]                MAG:   MAGV_X = 389, MAGV_Y = -25, MAGV_Z = -480
<6>[ 2066.829833] --> ECS_IOCTL_GET_DELAY
<6>[ 2066.830352] --> ECS_IOCTL_GET_DELAY #3
<6>[ 2067.034759] --> ECS_IOCTL_SET_MODE #1
<6>[ 2067.035705] --> ECS_IOCTL_SET_MODE
<6>[ 2067.036163]  --> AKECS_MODE_MEASURE_SNG
<6>[ 2067.051818] --> ECS_IOCTL_GETDATA
<6>[ 2067.052764] --> ECS_IOCTL_GETDATA #3
<6>[ 2067.053253] --------------------
<6>[ 2067.053741] |    index    |    hdata    |    ddata    |
<6>[ 2067.054595] gflag1|    0    |    0x70    |    112    |
<6>[ 2067.055084] gflag1|    1    |    0x7f    |    127    |
<6>[ 2067.055572] gflag1|    2    |    0xa2    |    162    |
<6>[ 2067.056427] gflag1|    3    |    0x5d    |    93    |
<6>[ 2067.056915] gflag1|    4    |    0x65    |    101    |
<6>[ 2067.057373] gflag1|    5    |    0x86    |    134    |
<6>[ 2067.057861] gflag1|    6    |    0x5b    |    91    |
<6>[ 2067.058715] gflag1|    7    |    0x85    |    133    |
<6>[ 2067.059173] gflag1|    8    |    0x0    |    0    |
<6>[ 2067.059661] gflag1|    9    |    0x0    |    0    |
<6>[ 2067.060577] gflag1|    10    |    0x0    |    0    |
<6>[ 2067.061157] gflag1|    11    |    0x0    |    0    |
<6>[ 2067.061645] gflag1|    12    |    0x0    |    0    |
<6>[ 2067.062500] gflag1|    13    |    0x0    |    0    |
<6>[ 2067.062957] gflag1|    14    |    0x0    |    0    |
<6>[ 2067.063415] gflag1|    15    |    0x0    |    0    |
<6>[ 2067.063873] gflag1|    16    |    0x0    |    0    |
<6>[ 2067.064727] gflag1|    17    |    0xa2    |    162    |
<6>[ 2067.065185] gflag1|    18    |    0x5d    |    93    |
<6>[ 2067.065673] gflag1|    19    |    0x65    |    101    |
<6>[ 2067.066528] gflag1|    20    |    0x86    |    134    |
<6>[ 2067.067016] gflag1|    21    |    0x5b    |    91    |
<6>[ 2067.067474] gflag1|    22    |    0x85    |    133    |
<6>[ 2067.068328] gflag1|    23    |    0x0    |    0    |
<6>[ 2067.068817] gflag1|    24    |    0x0    |    0    |
<6>[ 2067.069274] gflag1|    25    |    0x0    |    0    |
<6>[ 2067.070129] gflag1|    26    |    0x0    |    0    |
<6>[ 2067.070587] gflag1|    27    |    0x0    |    0    |
<6>[ 2067.071136] gflag1|    28    |    0x0    |    0    |
<6>[ 2067.071624] gflag1|    29    |    0x0    |    0    |
<6>[ 2067.072479] gflag1|    30    |    0x0    |    0    |
<6>[ 2067.072937] gflag1|    31    |    0x0    |    0    |
<6>[ 2067.073394] ----------
<6>[ 2067.077880] --> ECS_IOCTL_GET_NUMFRQ
<6>[ 2067.078399] --> ECS_IOCTL_GET_NUMFRQ #3
<6>[ 2067.078857] --------------------
<6>[ 2067.079315] |    index    |    hdata    |    ddata    |
<6>[ 2067.080169] |    0    |    0x1    |    1    |
<6>[ 2067.080657] |    1    |    0x0    |    0    |
<6>[ 2067.081298] ----------
<6>[ 2067.083892] --> ECS_IOCTL_SET_YPR #1
<6>[ 2067.084869] --------------------
<6>[ 2067.085327] |    index    |    hdata    |    ddata    |
<6>[ 2067.085815] gflag2|    0    |    0x54    |    84    |
<6>[ 2067.086700] gflag2|    1    |    0xffffffff    |    -1    |
<6>[ 2067.087158] gflag2|    2    |    0x2    |    2    |
<6>[ 2067.087615] gflag2|    3    |    0x1e    |    30    |
<6>[ 2067.088470] gflag2|    4    |    0x1    |    1    |
<6>[ 2067.088928] gflag2|    5    |    0x0    |    0    |
<6>[ 2067.089416] gflag2|    6    |    0x14    |    20    |
<6>[ 2067.090270] gflag2|    7    |    0xfffffd2b    |    -725    |
<6>[ 2067.090728] gflag2|    8    |    0x11    |    17    |
<6>[ 2067.091400] gflag2|    9    |    0x175    |    373    |
<6>[ 2067.092254] gflag2|    10    |    0xffffffe7    |    -25    |
<6>[ 2067.092742] gflag2|    11    |    0xfffffdef    |    -529    |
<6>[ 2067.093231] ----------
<6>[ 2067.093688] --> ECS_IOCTL_SET_YPR
<6>[ 2067.094543] AKECS_Report_Value: yaw = 84, pitch = -1, roll = 2
<6>[ 2067.095031]                     tmp = 30, m_stat= 1, g_stat=0
<6>[ 2067.095916]           G_Sensor:   x = 20 LSB, y = -725 LSB, z = 17 LSB
<6>[ 2067.096405]                MAG:   MAGV_X = 373, MAGV_Y = -25, MAGV_Z = -529
#define AKECS_MODE_MEASURE    0x00    /* Starts measurement. Please use AKECS_MODE_MEASURE_SNG */
                    /* or AKECS_MODE_MEASURE_SEQ instead of this. */
#define AKECS_MODE_PFFD        0x01    /* Start pedometer and free fall detect. */
#define AKECS_MODE_E2P_READ    0x02    /* E2P access mode (read). */
#define AKECS_MODE_POWERDOWN    0x03    /* Power down mode */

#define AKECS_MODE_MEASURE_SNG    0x10    /* Starts single measurement */
#define AKECS_MODE_MEASURE_SEQ    0x11    /* Starts sequential measurement */
Let's take a look closer at the initialization part: this concerns everything before akmd starts reporting treated values.
So first of all, we have:
<6>[ 2066.362670] --> ECS_IOCTL_SET_MODE #1
<6>[ 2066.363220] --> ECS_IOCTL_SET_MODE
<6>[ 2066.364074]  --> AKECS_MODE_E2P_READ
akmd sets the driver mode to AKECS_MODE_E2P_READ. It's not clear about why it's really necessary but it's there anyway, and it's quite easy to reproduce since there is no data treatment on that and that it's now clear that this call does not change depending of external values.
<6>[ 2066.381042] --> ECS_IOCTL_READ #1
<6>[ 2066.381317] what is in rwbuf?
<6>[ 2066.381744] --------------------
<6>[ 2066.382019] |    index    |    hdata    |    ddata    |
<6>[ 2066.382263] |    0    |    0x1    |    1    |
<6>[ 2066.382507] |    1    |    0x42    |    66    |
<6>[ 2066.382934] |    2    |    0x0    |    0    |
<6>[ 2066.383178] |    3    |    0x0    |    0    |
<6>[ 2066.383392] |    4    |    0x0    |    0    |
<6>[ 2066.383636] ----------
<6>[ 2066.384063] --> ECS_IOCTL_READ
<6>[ 2066.384979] --> ECS_IOCTL_READ #3
<6>[ 2066.385253] --------------------
<6>[ 2066.385498] |    index    |    hdata    |    ddata    |
<6>[ 2066.385925] |    0    |    0x1    |    1    |
<6>[ 2066.386169] |    1    |    0x66    |    102    |
<6>[ 2066.386383] |    2    |    0x0    |    0    |
<6>[ 2066.386627] |    3    |    0x0    |    0    |
<6>[ 2066.387054] |    4    |    0x0    |    0    |
This first part (ECS_IOCTL_READ #1) is the request (READ REQ #1) that akmd sends to the kernel and the second part (ECS_IOCTL_READ #3) is the answer (READ ASW #1) it gets. Its length is 1, so all the 0 values are not to be taken in count.
For this, the request is always { 1, 66 } but the answer may not be the same on different devices.
Though, this value seems not to be used used for any of the next requests, but it may still be the case.
<6>[ 2066.387542] --> ECS_IOCTL_SET_MODE #1
<6>[ 2066.387786] --> ECS_IOCTL_SET_MODE
<6>[ 2066.388214]  --> AKECS_MODE_POWERDOWN
<6>[ 2066.401031] --> ECS_IOCTL_GET_OPEN_STATUS
<6>[ 2066.401306] --> ECS_IOCTL_GET_OPEN_STATUS #3
<6>[ 2066.407135] --> ECS_IOCTL_INIT
<6>[ 2066.408020] --> ECS_IOCTL_SET_MODE #1
<6>[ 2066.408294] --> ECS_IOCTL_SET_MODE
<6>[ 2066.408721]  --> AKECS_MODE_E2P_READ
akmd sets the mode to AKECS_MODE_POWERDOWN, then waits for the kernel to have "open" status. This appears when the accelerometer/magnetometer is requested by the system, so if nothing requests the chip, ECS_IOCTL_GET_OPEN_STATUS
will block until the chip is requested. This also append when the phone is in "sleep" mode.
When ECS_IOCTL_GET_OPEN_STATUS is not blocking (the chip is requested by the system), akmd asks the driver to init the chip, with ECS_IOCTL_INIT. Then, akmd sets the mode to AKECS_MODE_E2P_READ. The reason of that is still unclear.
All this is already implemented in akmd-free.
<6>[ 2066.421234] --> ECS_IOCTL_READ #1
<6>[ 2066.421630] what is in rwbuf?
<6>[ 2066.422302] --------------------
<6>[ 2066.422637] |    index    |    hdata    |    ddata    |
<6>[ 2066.423004] |    0    |    0x3    |    3    |
<6>[ 2066.423339] |    1    |    0x46    |    70    |
<6>[ 2066.423950] |    2    |    0x0    |    0    |
<6>[ 2066.424285] |    3    |    0x0    |    0    |
<6>[ 2066.424621] |    4    |    0x0    |    0    |
<6>[ 2066.424957] ----------
<6>[ 2066.425567] --> ECS_IOCTL_READ
<6>[ 2066.426696] --> ECS_IOCTL_READ #3
<6>[ 2066.427062] --------------------
<6>[ 2066.427398] |    index    |    hdata    |    ddata    |
<6>[ 2066.428039] |    0    |    0x3    |    3    |
<6>[ 2066.428375] |    1    |    0x97    |    151    |
<6>[ 2066.428710] |    2    |    0x87    |    135    |
<6>[ 2066.429321] |    3    |    0x19    |    25    |
<6>[ 2066.429656] |    4    |    0x0    |    0    |
<6>[ 2066.429992] ----------
Here we have a read request, with { 3, 70 } (READ REQ #2) that returns { 3, x, y, z } (READ ASW #2). The answer elements are called x, y, z since these are not constant and my change between devices. We'll refer to these values under the names: READ ASW #2's x, READ ASW #2's y and READ ASW #2's z.
<6>[ 2066.431243] --> ECS_IOCTL_SET_MODE #1
<6>[ 2066.431915] --> ECS_IOCTL_SET_MODE
<6>[ 2066.432250]  --> AKECS_MODE_POWERDOWN
<6>[ 2066.450866] --> ECS_IOCTL_WRITE #1
<6>[ 2066.451385] what is in rwbuf?
<6>[ 2066.452239] --------------------
<6>[ 2066.452697] |    index    |    hdata    |    ddata    |
<6>[ 2066.453186] |    0    |    0x4    |    4    |
<6>[ 2066.454040] |    1    |    0xe8    |    232    |
<6>[ 2066.454498] |    2    |    0x7    |    7    |
<6>[ 2066.454956] |    3    |    0x7    |    7    |
<6>[ 2066.455413] |    4    |    0x9    |    9    |
<6>[ 2066.456268] ----------
<6>[ 2066.456726] --> ECS_IOCTL_WRITE
Here akmd sets the mode to AKECS_MODE_POWERDOWN and writes 4 numbers { 4, 232, x, y, z } to the kernel driver. rwbufr1 is always 232 but the other numbers are changing depending on READ ASW #2's values. The formula to get x, y and z from READ ASW #2's values is:
x = (READ ASW #2's x) % 16
y = (READ ASW #2's y) % 16
z = (READ ASW #2's y) % 16
The way to discover that was to determine what makes these values change and how they change depending on READ ASW #2's values. This was easy since the values are also printed in hex format, so (READ ASW #2's x) % 16 is the last number of the hex representation of READ ASW #2's x.
<6>[ 2066.457916] --> ECS_IOCTL_WRITE #1
<6>[ 2066.458374] what is in rwbuf?
<6>[ 2066.459228] --------------------
<6>[ 2066.459686] |    index    |    hdata    |    ddata    |
<6>[ 2066.460174] |    0    |    0x4    |    4    |
<6>[ 2066.460784] |    1    |    0xe5    |    229    |
<6>[ 2066.461669] |    2    |    0x89    |    137    |
<6>[ 2066.462127] |    3    |    0x0    |    0    |
<6>[ 2066.462615] |    4    |    0x89    |    137    |
<6>[ 2066.463073] ----------
<6>[ 2066.463928] --> ECS_IOCTL_WRITE
<6>[ 2066.465698] --> ECS_IOCTL_SET_MODE #1
<6>[ 2066.466186] --> ECS_IOCTL_SET_MODE
<6>[ 2066.467071]  --> AKECS_MODE_MEASURE_SNG
Here is a write request of the type { 4, 229, x, y, z }. x, y and z values seem to be written to akmd_set_values.txt when akmd quits (this should be confirmed), so on the first start of akmd, x, y and z are 0 since there was no previous session to write the numbers on akmd_set_values.txt.
Anyway, setting x, y and z to 0 doesn't prevent anything to work.
Then akmd also sets the mode to AKECS_MODE_MEASURE_SNG.
The releases are currently signed by the individual developers with their personal gpg keys. During the installation procedure, the people installing the images are very strongly advised to check that kind of signatures. This makes sure that the images that are being installed were really made by the developers that signed them, and that they weren't modified since them. This takes care of the security while installing Replicant releases.
When installing Android applications, there is also a similar system in place, where people or organizations building applications sign their applications. When upgrading an application to a newer version, the signature is checked, and if it matches, the new application version can replace the old version and access the data of the previous application version.
Because of that, when building a Replicant release, we have to generate keys to sign the applications that we build and bundle in the Replicant images. This includes applications like the SMS application, the dialer, the launcher/desktop, etc.
The releases of Replicant 6.0 0001, 0002 and 0003 were all signed by identical keys that were generated by Wolfgang Wiedmeyer.
We don't have access to these keys, so we needed to generate new keys during the build of the images.
However if the keys are not migrated somehow, after the installation, the first boot will never complete, and the second boot will also end up with the launcher/desktop crashing all the time, which not only blocks the usage of the device but also makes it hard to properly shut it down.
We wrote a tool to create a migration script that can be generated from various data (certificates from previous releases, a running image, etc) so that users running custom builds could also migrate back and forth between different images.
We tried various ways to run that script automatically during the first boot, to make it more easy for less technical users to do the key migration, but doing that in a robust way started to be complex as we either had to make the script more complex (and less robust) or lower the security of Android to enable the startup script to delete itself.
So instead we ended up making an extra -transition release to fix that:Doing the later is really necessary as during prolonged use and testing, we found that running the migration script at every boot was unsafe: if the boot is interrupted during the migration, the file that has the information about the keys (/data/system/applications.xml) can be corrupted. That leads to non booting devices (users would need to wipe their data to fix that issue).
If you are using replicant-6.0-0003, and want to test the Replicant 6.0 0004 release, the easiest way to do it would be to first install a replicant-6.0-0004-rc5-transition image and then a replicant-6.0-0004-rc5 image.
If you are using any Replicant 6 0004 Release candidate (RC) images you also need to do the same thing as all the images before the replicant-6.0-0004-rc5 will either not do any miration or migrate the keys on every boot.
| Name | Replicant Bug reports | Data | Scope |
|---|---|---|---|
| Phone number lookup prioviders | #1827 #1903 | Phone numbers being leaked | Companies through Internet |
| Preferred Network Offload leaks known SSIDs | #951 | SSID being leaked | ~100 meters? |
This article is a work in progress. It might (still) contain mistakes at this early stage.
Android is an operating system currently made mainly by Google and various device manufacturers1 to make money either by selling devices2, selling applications that are not necessarily free software, violating people's right to privacy through applications or online services, etc.
Devices often come with a nonfree applications like Google Play (or equivalent software made for/by device vendors) that steer people toward installing applications, which often are nonfree. This has a huge impact on the security model of the applications.
In GNU/Linux many applications are not sandboxed by default, as most of them are free software and don't necessarily pose any threat to users, unless they are vulnerable to security issues like remote code execution. As they are trustworthy, sometimes the application sandbox themselves: at the beginning, when they start running they have access to many files and resources, and very early on once they are done with the resources (like they read the file content for instance), they sandbox themselves through mechanisms like seccomp or privilege drop. Other mechanism like stack protection implemented in compilers like GCC and in the Linux kernel (for features like ALSR) also help making GNU/Linux secure transparently as it just crash the applications when conditions that create security issues are detected, and/or make it very hard to exploit security issues. The advantage of these measures is that it's completely transparent to users and don't restrict them in any way. However they don't protect against untrustworthy application whose code is not available and malicious.
In contrast, with Android, many people run nonfree applications, some of which try to actively exploit the users through surveillance, manipulation (through advertizing or digital addictions , for instance), or even steal money for malwares that are sometimes present in app stores until they are found and removed by the company managing that appstore.
Probably because of the public pressure and to gain a market advantage, since many of the applications that people run cannot be trusted at all, the Android security model had to be adapted to that. This doesn't fix any of the issues at all but rather limits the potential for damage and the probability of such issues, which are still very present.
This has lead to the sandboxing of applications and the Android permission system which is not always clear nor fine grained enough.
As Replicant is based on Android, we inherit this security model.
Android applications (including system applications like the dialer, default SMS application, etc) have an internal name (like fil.libre.repwifiapp for RepWiFi) and they are signed with keys. So the application with its internal name and its public signature gives it access to some internal storage that is dedicated to that application. This is for instance where the contacts are stored.
This has some consequences:This also makes backuping applications data more difficult.
During the build of Replicant, some certificates are generated to sign various applications.
The issue here is that when the developer doing official builds changes, or when users want to run their own build, you end up with different signatures, and the new system applications can't access their data. This can lead to crashes. A Replicant developer verified that by removing all the checks preventing to install of a new Replicant image with system applications signed with different keys: After booting the device, the launcher always crashed, making the device unusable.
Despite the default behavior, it is possible to change the signature expected by an application data. This enables to keep the data of an application while upgrading to a new version of this application that is signed with a new key.
Software to do that is being developed for Replicant.
References:
1 "Developer: Various (mostly Google and the Open Handset Alliance)" from Wikipedia
2 "A group of companies known as the Open Handset Alliance (OHA), led by Google, originated Android. Today, many companies—both original members of the OHA and others—have invested heavily in Android. These companies have allocated significant engineering resources to improve Android and bring Android devices to market." from https://source.android.com/setup#governance-philosophy
Replicant artwork: replicant_artwork.tar.gz
Alternatively, the Replicant artwork is also available in the replicant_artwork git repository .
Copyright 2011 Mirella Vedovetto
Copyright 2012 Paul Kocialkowski
This work is licensed under the Creative Commons Attribution-ShareAlike 3.0 Unported License. To view a copy of this license, visit https://creativecommons.org/licenses/by-sa/3.0/ or send a letter to Creative Commons, 444 Castro Street, Suite 900, Mountain View, California, 94041, USA.
The typeface used in the Replicant logo is League Gothic, from The League of Movable Type.
Copyright (c) 2010, Caroline Hadilaksono & Micah Rich <caroline@hadilaksono, micah@micahrich.com>, with Reserved Font Name: "League Gothic".
This Font Software is licensed under the SIL Open Font License, Version 1.1.
     ___        ___        ___        ___                  ___       ___       ___       ___
    /\  \      /\  \      /\  \      /\__\      ___       /\  \     /\  \     /\__\     /\  \
   /  \  \    /  \  \    /  \  \    / /  /     /\  \     /  \  \   /  \  \   / /| |     \ \  \
  / /\ \  \  / /\ \  \  / /\ \  \  / /  /      \ \  \   / /\ \  \ / /\ \  \ / / | |      \ \  \
 /  \ \ \  \/  \ \ \  \/  \ \ \  \/ /  /       /  \__\ / /  \ \  \  \ \ \  \ /| | |__    /  \  \
/ /\ \ \ \__\/\ \ \ \__\/\ \ \ \__\/__/     __/ /\/__// /__/ \ \__\\ \ \ \__\ | |/\__\  / /\ \__\
\/_|  \/ /  /\ \ \ \/__/  \ \/ /  /\  \    /\/ /  /   \ \  \  \/__/ \ \/ /  /_| / /  / / /  \/__/
   | |  /  /\ \ \ \__\/    \  /  /\ \  \   \  /__/     \ \  \   \/__/\  /  /  |  /  / / /  /
   | |\/__/  \ \ \/__/      \/__/  \ \  \   \ \__\      \ \  \       / /  /   | /  /  \/__/
   | |  |     \ \__\                \ \__\   \/__/       \ \__\     / /  /   / /  /
    \|__|      \/__/                 \/__/                \/__/     \/__/    \/__/
     ___     ___       ___      ___           ___      ___      ___     ___
    /\  \   /\  \     /\  \    /\__\   ___   /\  \    /\  \    /\__\   /\  \
   /  \  \ /  \  \   /  \  \  / /  /  /\  \ /  \  \  /  \  \  / /| |   \ \  \
  / /\ \  \ /\ \  \ / /\ \  \/ /  /   \ \  \ /\ \  \/ /\ \  \/ / | |    \ \  \
 /  \ \ \  \\ \ \  \  \ \ \  \/  /    /  \__\  \ \  \ \ \ \  \/| | |__  /  \  \
/ /\ \ \ \__\\ \ \__\\ \ \ \__\_/  __/ /\/__/_/ \ \__\ \ \ \__\| |/\__\/ /\ \__\
\/_|  \/ /  / \ \/__//\ \/ /  / \ /\/ /  / \  \  \/__/\ \/ /  /| / /  / /  \/__/
   | |  /  / \ \__\//  \  /  /\  \\  /__/ \ \  \  \/__/\  /  / |  /  / /  /
   | |\/__/ \ \/__//    \/__/\ \  \\ \__\  \ \  \      / /  /  | /  /\/__/
   | |  |  \ \__\_/           \ \__\\/__/   \ \__\    / /  /  / /  /
    \|__|   \/__/              \/__/         \/__/    \/__/   \/__/
The AT protocol comes from the Hayes command set used in early Internet modems.
It has been standardized by various standard bodies like the ITU, which then handed it over to the 3GPP. It's now the 27.007 standard at the 3GPP.
In practice device manufacturers often don't respect the standard, and instead do custom changes.
However as their implementation is still based on the standard it's still relatively easy to adapt the userspace modem stack to various modem from various manufacturers.
In the Replicant contributors meetings of July 2019, the "Replicant and modems: introduction" presentation that talks about the AT protocol.
It can be found in the Presentations section of the Replicant contributors meetings of July 2019 page.
It explains the code architecture of the reference RIL which uses AT commands, simply by following what happen in the actual code.
So it's a good idea to look at it if you intend in supporting devices that uses AT commands, if this is the only usable protocol.
As the AT command set has many limitation (which are explained in the conference as well), if the modem supports more than one protocol, it's often better to implement another protocol instead.
Backups can be made using oandbackup or adb backup.
If you created a backup of system applications before switching from the factory image or a different Android distribution to Replicant or before an upgrade to a new major release (e.g. from Replicant 4.2 to Replicant 6.0), restoring this backup will cause issues. The installation pages require a factory reset in these cases because the data is incompatible, so a backup of the data is incompatible as well.
SMS and contacts apps usually provide ways to export contacts and messages. Using these means to backup and restore the data will likely be successful and won't result in misbehaving apps.
Another way to backup application data is to synchronize them with a remote server.
Several applications can do that: As they require a remote servers, you can either:The BackupTheEFS page has instructions to backup the EFS. This page instead tries to document why it is done in that way, and what are the advantages and disadvantages of various other backups methods.
This can also be useful to write more generic backup instructions to do a more complete backup.
Old versions of the EFS backup instructions (up to revision 17) used the following command:
adb shell "cat /dev/block/platform/*/by-name/EFS" > EFS.img
At some point or under some condition, this stopped working and the backup were corrupted.
With something like that:
adb shell "cat /dev/block/platform/*/by-name/EFS > /EFS.img"
adb pull /EFS.img ./
Doing it in two stages like that seem to be widely used in other instructions (like the ones found in XDA forums).
The advantage is that the '*' enables to use the same command across many more devices.
And we need two steps because the '*' is not interpreted by a shell when using adb pull:
$ adb pull /dev/block/platform/*/by-name/EFS
adb: error: remote object '/dev/block/platform/*/by-name/EFS' does not exist
$ adb pull "/dev/block/platform/*/by-name/EFS"
adb: error: remote object '/dev/block/platform/*/by-name/EFS' does not exist
$ adb pull '/dev/block/platform/*/by-name/EFS'
adb: error: remote object '/dev/block/platform/*/by-name/EFS' does not exist
See the part on adb-pull-the-block-device for more details on how to workaround the lack of expansion and have only 1 command to do the job.
This method requires the partition to be small enough. Otherwise it will create several issues:Normally cat should produce a valid backup, however it might be better to use dd for extra safety.
On Replicant 6.0 0004, at least the recoveries for the following devices have 'dd':The following should also work:
adb pull /dev/block/mmcblk0p3 ./EFS.img
The advantage is that it can also backup huge partitions like the user data partition or Replicant system partition.
You cannot do adb pull /dev/block/platform/*/by-name/EFS as the expansion of * will fail.
There are possible workarounds:
part="`adb shell "ls /dev/block/platform/*/by-name/EFS" | head --bytes=-2`"
adb pull "$part" ./EFS.img
head --bytes=-2 which is needed to get rid of the nasty 0x0d 0x0a line ending returned by adb.adb push doesn't handle symlinks properly. For instance, with a Galaxy SIII (GT-I9300) with a Replicant 6 recovery, if we use:
adb pull /dev/block/platform/dw_mmc/by-name/USERDATA ./USERDATA.img
adb: error: failed to copy 'USERDATA.img' to '/dev/block/platform/dw_mmc/by-name/USERDATA': remote No space left on device
USERDATA.img: 0 files pushed. 4.3 MB/s (436154368 bytes in 96.842s)
So here no data has been being written on the data partition and it exhausted the ramdisk of the recovery.
This is because instead of writing to that partition, it deleted the /dev/block/platform/dw_mmc/by-name/USERDATA symlink and recreated a file at the same path (/dev/block/platform/dw_mmc/by-name/USERDATA) with the data from USERDATA.img.
It might be a good idea to have a list of backup applications and/or to ship one with Replicant.
As of 2024, many after market distributions are using SeedVault. It seems a good candidate to ship by default on Replicant.
F-Droid also has other applications. As F-Droid packages are not all FSDG compliant, we would need to make sure that the backup application we recommend or ship are FSDG compliant.
It may also be a good idea to understand if the backup solution chosen is sustainable in the long term. If development stops or upstream decides to make the new version proprietary some users might have a hard time adapting to new backup applications or systems.
See DataPartition for more details.
The data partition is often big as it contains space for user data. For instance on the Galaxy SIII (GT-I9300), its size is about 11.5GiB for the 16GiB versions of that device.
If you don't need to know precisely how much space it's going to take, you could make sure that you have as much space as the internal storage. For instance for a Galaxy SIII (GT-I9300) with 16GiB of internal storage, just make sure you have 16GiB of free space.
If instead you need to know the size more precisely (here 11.5GiB), you could look if your device's page has that information in its Partition section. For instance the Galaxy SIII (GT-I9300) wiki page has a Partitions section with the relevant information, but only for the 16GiB version of that device.
Follow the instructions for setting up ADB on your computer so that you can access a root shell on your device.
NOTE: when prompted on your Replicant device, make sure that you check the box that says Always allow from this computer when you grant your computer USB debugging permissions. Otherwise, you will be unable to obtain root shell access on your Replicant device when you reboot it into the recovery OS to actually perform the backup.
NOTE: for security reasons, you may want to revoke these non-expiring permissions once the backup is complete.
To reboot in the recovery, you can follow the instructions in the RebootIntoTheRecovery wiki page.
First, you need to make sure that the data partition is not mounted.
To do that, you can run this command:
adb shell "umount -l /data"
If the /data partition was mounted, it will unmount it, and your command and its output will look more or less like that:
$ adb shell "umount -l /data"
$
If it was not mounted, it will instead show an error that we can ignore. In this case your command and its output will look more or less like that:
$ adb shell "umount -l /data"
umount: /data: Invalid argument
Once we verified that the data partition isn't mounted, we can finally backup the partition.
For the Galaxy SII (GT-I9100) and the Galaxy Note (GT-N7000), this can be done from your computer with this command:
adb pull /dev/block/platform/dw_mmc/by-name/DATAFS ./USERDATA.img
For the Galaxy S III (GT-I9300), Galaxy S III 4G (GT-I9305), Galaxy Note II (GT-N7100), and Galaxy Note 8.0 (GT-N51xx) you can use the following command:
adb pull /dev/block/platform/dw_mmc/by-name/USERDATA ./USERDATA.img
For the Galaxy Nexus (GT-I9250), you can use the following command:
adb pull /dev/block/platform/omap/omap_hsmmc.0/by-name/userdata ./USERDATA.img
For the Tab 2 (GT-P3100, GT-P3110, GT-P5100, GT-P3510), you can use the following command:
adb pull /dev/block/platform/omap/omap_hsmmc.1/by-name/DATAFS ./USERDATA.img
We don't have instructions yet for other devices yet.
Feel free to request instructions for the device you have on IRC, the mailing list, or to add the instructions here if you're confortable enough with the command line.
Before we did command like that to backup the device:
adb pull /dev/block/platform/dw_mmc/by-name/USERDATA ./USERDATA.img
However if we use the following command:
adb push USERDATA.img /dev/block/platform/dw_mmc/by-name/USERDATA
It will fail to write any data to the partition: Instead of writing to it, it deletes the /dev/block/platform/dw_mmc/by-name/USERDATA symlink and recreate a file at the same path with the data from USERDATA.img.
Since no data is being written on the disk, it most often ends up exhausting the ramdisk of the recovery (which is smaller than the data partition) and we are left with this error:
adb: error: failed to copy 'USERDATA.img' to '/dev/block/platform/dw_mmc/by-name/USERDATA': remote No space left on device
USERDATA.img: 0 files pushed. 4.3 MB/s (436154368 bytes in 96.842s)
So to avoid that we will need to find the path that symlink points to.
The sections below documents how to do if for various devices.
You should also really not skip that part, and make sure that the commands in these sections don't output any error.
For the Galaxy SII (GT-I9100), we can get the symlink path with the following command:
adb shell "readlink /dev/block/platform/dw_mmc/by-name/DATAFS"
On my Galaxy SII (GT-I9100), 16GiB version, it gives the following:
/dev/block/mmcblk0p10
For the Galaxy SIII (GT-I9300), we can get the symlink path with the following command:
adb shell "readlink /dev/block/platform/dw_mmc/by-name/USERDATA"
On my Galaxy SIII (GT-I9300), 16GiB version, it gives the following:
/dev/block/mmcblk0p12
You will then need to down the result (here /dev/block/mmcblk0p12) as we will reuse it later.
For the Galaxy Nexus (GT-I9250) We can get the symlink path with the following command:
adb shell "readlink /dev/block/platform/omap/omap_hsmmc.0/by-name/userdata"
We don't have instructions yet for other devices yet.
Feel free to request instructions for the device you have on IRC, the mailing list, or to add the instructions here if you're confortable enough with the command line.
If you skip the sections above and use the wrong partition, for instance if you blindly copy /dev/block/mmcblk0p12 from this tutorial instead of running the commands above and copying the result of these commands, you could end up breaking your device because some partitions are really needed for the device to work.
So make sure to do that right.
This is also why we have backup instructions (like BackupTheEFS ) to backup important partitions, however other partitions than the EFS are probably crucial too (but less susceptible to data corruption as they are not constantly written to).
To restore the data partition, you could use the following command:
adb push USERDATA.img /dev/block/PARTITION
Make sure to replace /dev/block/PARTITON with the data you just wrote down. The example above uses /dev/block/mmcblk0p12, but it might differ for your device, so make sure to replace /dev/block/mmcblk0p12 with the result you got on your device.
If everything goes fine, the output of the command above should look like this:
USERDATA.img: 1 file pushed. 3.6 MB/s (1760559104 bytes in 466.067s)
Here we will use the udisksctl command instead of the more classical mount and losetup as it integrates better with graphical environments like Gnome or KDE.
As the partition backup is now in a file, to access its data we will make it available as a partition again. This can be done with the following command:
udisksctl loop-setup -f USERDATA.img
If that doesn't work you might need to use sudo like that:
sudo udisksctl loop-setup -f USERDATA.img
Or you may also need to verify that your current users has the right to read and write the file that contains the partition (here USERDATA.img) file.
If this works, it should produce an output that looks more or less like that:
Mapped file USERDATA.img as /dev/loop0.
Here you can see that it made the file content available in the /dev/loop0 partition.
We can then reuse this information to mount that partition. We can do that with the following command:
udisksctl mount -b /dev/loop0 -o ro
The -o ro option will make sure that the partition is mounted in read only mode. This will make sure that we don't accidentally change its content.
The command above should produce an output that looks more or less like that:
Mounted /dev/loop0 at /run/media/gnutoo/2Of967c7-ac7e-7ae0-ef5b-30f0b6e2dc41It most probably change a bit from the output above as:
gnutoo.2Of967c7-ac7e-7ae0-ef5b-30f0b6e2dc41 is a randomly created identifier for the partition that is created when formatting it./run/media/ can change depending on the GNU/Linux distribution and its version. For instance between Parabola and Trisquel 8 it is different.You can write down the location of the directory where this partition is mounted (here /run/media/gnutoo/2Of967c7-ac7e-7ae0-ef5b-30f0b6e2dc41) as we will need it later on.
We will also reuse the partition location (here /dev/loop0) at the end.
Now that this partition is mounted, we will be able to use the RestoreApplicationInternalData tutorial to make a backup of the data of a specific application and restore it.
To do that, locate the following command in the Backuping Silence's data from the old device section of the RestoreApplicationInternalData wiki page:
cd /data/data
You will then need to replace it by a command that looks like that:
cd /run/media/gnutoo/2Of967c7-ac7e-7ae0-ef5b-30f0b6e2dc41/data/
In the command above, you'll need to replace /run/media/gnutoo/2Of967c7-ac7e-7ae0-ef5b-30f0b6e2dc41/ by the location of the directory where the partition is mounted.
In addition you might not have the permissions to access the applications data.
For instance we can look at the permissions of the silence data with the following command:
ls -ld org.smssecure.smssecure/
And it should give you something that looks more or less like that:
drwxr-x--x 9 10063 10063 4096 26 oct. 19:44 org.smssecure.smssecure/
See the How to find which directory holds the internal data of an application section in the RestoreApplicationInternalData wiki page for more details to understand why org.smssecure.smssecure directory has the Silence application's data.
In the output above, the first 10063 is the user ID and the second 10063 is the group id.
This is because Android sandboxes applications as part of their security model: each applications run in their own user and group ID. The result is that theses are most likely present on your phone but not on your GNU/Linux computer.
To fix that you can become root with the following command:
sudo su
Now you can then continue to follow the RestoreApplicationInternalData tutorial.
Once you are finished with the RestoreApplicationInternalData tutorial, it would be a good idea to umount the data partition and make it inaccessible again.
To umount the data partition we can use a command that looks like that:
udisksctl unmount -b /dev/loop0
/dev/loop0 may differ, so make sure to use the partition location you used earlier.
The output of that command will look like that:
Unmounted /dev/loop0.
Once it is unmounted you can make it inaccessible again with the following command:
udisksctl unmount -b /dev/loop0
Again here may will need to replace /dev/loop0 by your partition location if it differs.
The output of that command should then show something that looks like that:
Unmounted /dev/loop0.
Many devices supported by Replicant have a partition with the modem data (IMEI, etc) which is called EFS.
It's a good idea to do a backup of this partition so that you can restore it if it becomes corrupted, which can sometimes happen with Replicant.
The actual backup process is run while the Replicant recovery is booted (rather than Replicant itself) to ensure that the modem data partition is not modified during the backup.
If your device is not listed above, it probably doesn't have a modem data partition. In that case, you don't need to backup something that doesn't exist, so you can ignore these instructions.
This can be the case for devices without a modem like the WiFi versions of the tablets supported by Replicant, or for future devices that aren't supported yet at the time of writing.
Follow the instructions for setting up ADB on your computer so that you can access a root shell on your device.
NOTE: when prompted on your Replicant device, make sure that you check the box that says Always allow from this computer when you grant your computer USB debugging permissions. Otherwise, you will be unable to obtain root shell access on your Replicant device when you reboot it into the recovery OS to actually perform the backup.
NOTE: for security reasons, you may want to revoke these non-expiring permissions once the backup is complete.
To reboot in the recovery, you can follow the instructions in the RebootIntoTheRecovery wiki page.
In order to get a root shell in the recovery, your devices system partition must be mounted.
On certain devices, the system partition is already mounted, so you might already be able to get a root shell without mounting the system partition again.
In any case, it's still best to do the following to make sure that the system partition is mounted:
Also to make sure that they are really executed, you can press the 'enter' key after having pasted them.
Pressing 'enter' twice will not hurt as the command will still be executed only once.
First, create a directory on your computer where you will store the backup data. One way to keep this data organized is with a directory for each device named with its serial number (useful if you have more than one Replicant device):
You can do this with the following commands:
REPLICANT_EFS_BACKUP_DIR=~/replicant_devices/0123456789abcdef/backup_efs
mkdir -p $REPLICANT_EFS_BACKUP_DIR && cd $REPLICANT_EFS_BACKUP_DIR
The remaining steps you must take depends on which device you have.
While inside the backup directory you just created, run the following commands:
adb shell "mkdir /efs"
adb shell "mount /dev/block/platform/*/by-name/EFS /efs"
adb pull /efs/ efs
adb shell "umount /efs"
adb shell "rmdir /efs"
adb shell "cat /dev/block/platform/*/by-name/EFS > /EFS.img"
adb pull /EFS.img ./
While inside the backup directory you just created, run the following commands:
adb shell "mkdir /efs"
adb shell "mount /dev/block/platform/*/*/by-name/efs /efs"
adb pull /efs/ efs
adb shell "umount /efs"
adb shell "rmdir /efs"
adb shell "cat /dev/block/platform/*/*/by-name/efs > /efs.img"
adb pull /efs.img ./
While inside the backup directory you just created, run the following commands:
adb shell "mkdir /efs"
adb shell "mount /dev/block/platform/*/*/by-name/EFS /efs"
adb pull /efs/ efs
adb shell "umount /efs"
adb shell "rmdir /efs"
adb shell "cat /dev/block/platform/*/*/by-name/EFS > /EFS.img"
adb pull /EFS.img ./
This will create a copy of the contents of /efs in the backup directory. It will also backup the full partition.
Keep these files around as a backup in case anything goes wrong.
NOTE: if your device has an EFS and is not mentioned in the instructions above, please contact us through the mailing list so we could add instructions for your device.
Once the backup is done, you can reboot your device into Replicant by one of two ways.
You can reboot by running the following command on your computer:
adb reboot
Or alternatively you can use the Replicant recovery graphical user interface to reboot by selecting Reboot system now.
If you don't need USB debugging permissions anymore, it might be a good idea to remove them. The Revoking all computer's USB debugging permissions section in the ADB wiki page explains how to do that.
That's it! Your device's EFS partition is now backed up. Your device should be running Replicant normally again.
corresponding feature request: #1473
The non-free files holding the GPS infos/code are the following:
/system/vendor/bin/gpsd
/system/vendor/lib/hw/gps.s5pc110.so
/system/vendor/etc/gps.xml
/system/etc/gps.conf
We have tried to change some parameters in gps.xml to see how it behaves:
| Parameter | Original | Changed to | Result |
|---|---|---|---|
| acPortName | /dev/s3c2410_serial1 | /dev/s3c2410_serial42 | The chip wasn't "booted" |
| gpioNStdbyPath | /sys/class/sec/gps/GPS_PWR_EN/value | /sys/class/sec/gps/GPS_PWR_EN/value2 | The chip was booted |
| gpioNResetPath | /sys/class/sec/gps/GPS_nRST/value | /sys/class/sec/gps/GPS_nRST/value2 | The chip was booted |
After all, it seems that when the gpsd binary is running without the gps.s5pc110.so library, the chip isn't started (our test utility doesn't work) whereas when the library is running and connects to the socket when it is created by starting gpsd, the chip is booted.
gps.s5pc110.so will actually order bootup via the socket, when the gps is requested by the Android framework. When it's not used anymore, it will request poweroff as well.
According to the logs obtained from gpsd, the chip seems to be using the MEIF protocol at first, then a patch is sent and it starts using another protocol, which doesn't seem related to MEIF according to the logs (there are basically no more references to MEIF after uploading the patch). However, as we have no information about what MEIF is (it's a binary proprietary undocumented protocol), these are just guesses.
We decided to implement the first protocol under the name MEIF, but it could also be some sort of BCM4751-specific bootloader protocol that is in charge of making the patch upload.
The GPSD component is in charge of translating the second protocol to standard NMEA that is sent to the gps.s5pc110.so lib via the /dev/socket/gps Unix socket, created by GPSD.
Here is a list of the devices that are known to use the BCM4751 chip:
| Device | Vendor | BCM4751 revision |
|---|---|---|
| Nexus S | Google/Samsung | 4751A1 or 4751A2 |
| Note N 7000 | Samsung | ? |
| Galaxy S I9000 | Samsung | 4751A2 |
| Galaxy S 3 I9300 | Samsung | 47511A0 |
| Galaxy Tab P1000 | Samsung | ? |
| Galaxy Tab 8.9 P7300/P7310 | Samsung | 4751A2 |
| Nexus 7 | Google/Asus | 4751A2 |
The BCM4751 chip exists under the following revisions: 4751A0, 4751A1, 4751A2, 47511A0
On January 2012, the work to write a free software implementation that could handle the BCM4751 chip was started.
The main target is the Nexus S, even though it should work with few changes on other BCM4751 devices.
The source code is available at: https://git.replicant.us/contrib/PaulK/bcm4751/
| Part | Status | Comments |
|---|---|---|
| Serial setup | DONE | Magic is: termios.c_cflag = 0x800018b2; |
| MEIF parsing | DONE | |
| MEIF dispatch | DONE | |
| MEIF patch upload | DONE | Nexus S and Galaxy S patches differ |
| Name | Task | Arguments |
|---|---|---|
| bcm4751_gpsd | Main utility, boots the chip, send the patch, switch protocol | None |
| bcm4751_test | Deprecated utility, can be used for poweroff | stop: poweroff the chip |
| bcm4751_hal | Acts as the framework: permits to trace gps.s5pc110.so | None |
| bcm4751_daemon | Acts as (a fake) gpsd to the lib | None |
| bcm4751_lib | Acts as (a fake) lib to gpsd | None |
Sample output log:
Turning the GPS on...
Opening the GPS serial...
Sending autobaud...
Read 17 bytes
Read 32 bytes
MEIF message: MEIF_STATE_REPORT_MSG with 18 bytes of data:
[0000]   01 00 00 00 01 00 00 00   00 00 00 00 00 00 00 00   ........ ........
[0010]   1A 00                                               ..
Got a STATE_REPORT message

Read 23 bytes
Read 32 bytes
Read 16 bytes
Read 7 bytes
MEIF message: MEIF_CONFIG_VALUES_MSG with 70 bytes of data:
[0000]   02 00 01 00 01 00 40 00   01 00 02 00 00 00 00 00   ........ ........
[0010]   01 00 02 00 00 00 00 00   00 00 06 00 81 11 00 09   ........ ........
[0020]   07 07 D9 07 42 52 4F 41   44 43 4F 4D 00 00 00 00   ....BROA DCOM....
[0030]   00 00 00 00 34 37 35 31   41 31 00 00 00 00 00 00   ....4751 A1......
[0040]   00 00 00 00 B3 05                                   ......
Got config values:
    vendor: BROADCOM
    product: 4751A1

Sending the first part of the patch...
Sending 2054 bytes!
MEIF message: MEIF_SEND_PATCH_MSG with 2046 bytes of data:

Read 14 bytes
MEIF message: MEIF_NACK_MSG with 6 bytes of data:
[0000]   03 00 03 00 0F 00                                   ......
Got a NACK message
Reason is: MEIF_NACK_GARBAGE_RECEIVED

Read 12 bytes
MEIF message: MEIF_ACK_MSG with 4 bytes of data:
[0000]   04 01 0B 00                                         ....
Got an ACK message

Sending the second part of the patch...
Sending 706 bytes!
MEIF message: MEIF_SEND_PATCH_MSG with 698 bytes of data:

Read 12 bytes
MEIF message: MEIF_ACK_MSG with 4 bytes of data:
[0000]   05 02 0D 00                                         ....
Got an ACK message

Ready to switch protocol!
Sending unknown bytes!
Read 12 bytes:
[0000]   FE 00 FD 40 00 00 F1 B1   12 20 67 FC               ........ ..g.
In order to use the same protocol as the non-free gpsd, a patch needs to be sent. It is hardcoded in the non-free gpsd binary.
Note that we don't know what that patch exactly is nor what it does. In any case, it must be considered as the propriety of Broadcom (or Samsung maybe) and falls under the non-free gpsd license.
| Device | Source | GPSD MD5 | Offset | Length | dd command |
|---|---|---|---|---|---|
| Nexus S | CM 9.0.0 | 4a6c0027e530b5b8a346153a355ef8e3 | 0x15DDEA | 2738 bytes | dd skip=1433066 count=2738 if=gpsd of=bcm4751a1.fw bs=1 |
| Galaxy S | CM 9.1.0 | 4a6c0027e530b5b8a346153a355ef8e3 | 0x15E89E | 6406 bytes | dd skip=1435806 count=6406 if=gpsd of=bcm4751a2.fw bs=1 |
The bcm4751_gpsd utility will attempt to read the patch from /data/bcm4751a1.fw or /data/bcm4751a2.fw
Sending this string:
"\xfe\x00\xfd\x6f\x3a\x01\x00\x00\x00\x00\x34\xfc"
many times makes some other string appear on the serial port...
fe 00 fd 0f ff 07 06 00 00 01 54 fc
fe 00 fd 0f ff 08 06 00 00 01 1c fc
ff00 = 8bytes
fe00 = 12bytes
fe01 = 16bytes
fe02 = 20bytes
fe03 = 24bytes
fe04 = 28bytes
fe05 = 32bytes
fe06 = 36bytes
fe07 = 40bytes
print "\xfe\x00\xfd\x6f\x3a\x01\x00\x00\x00\x00\x34\xfc"
python foo.py > serial.txt
adb push serial.txt /sdcard/
hexdump -C /dev/s3c2410_serial1
cat /sdcard/serial.txt > /dev/s3c2410_serial1
This page contains data copied from BCM4751.
| Byte | content | |||
|---|---|---|---|---|
| 1 | length 1 | fe | fe | fe |
| 2 | length 2 | 00 | 00 | 00 |
| 3 | fd | fd | fd | |
| 4 | 40 | 0f | 0f | |
| 5 | 00 | ff | ff | |
| 6 | sequence nr. | 00 | 07 | 08 |
| 7 | F1 | 06 | 06 | |
| 8 | B1 | 06 | 06 | |
| 9 | 12 | 00 | 00 | |
| 10 | 20 | 01 | 01 | |
| 11 | checksum | 67 | 54 | 1c |
| 12 | end marker | fc | fc | fc |
| Byte | content | |
|---|---|---|
| 1 | length 1 | fe |
| 2 | length 2 | 00 |
| 3 | fd | |
| 4 | 6f | |
| 5 | 3a | |
| 6 | sequence nr. | 01 |
| 7 | 00 | |
| 8 | 00 | |
| 9 | 00 | |
| 10 | 00 | |
| 11 | checksum | 34 |
| 12 | end marker | fc |
fe00 = 12bytes
fe01 = 16bytes
fe02 = 20bytes
fe03 = 24bytes
fe04 = 28bytes
fe05 = 32bytes
fe06 = 36bytes
fe07 = 40bytes
ff00 =  8bytes
Ready to switch protocol!
Sending unknown bytes!
Read 12 bytes:
[0000]   FE 00 FD 40 00 00 F1 B1   12 20 67 FC               ........ ..g.
Sending this string:
"\xfe\x00\xfd\x6f\x3a\x01\x00\x00\x00\x00\x34\xfc"
many times makes some other string appear on the serial port, sequence 7,8.
| Device | Bootloader | cmdline from boot.img | cmdline from bootloader environment | Compatible with upstream Linux | Flashing protocols | Image formats | filesystems | Loads a TrustZone OS |
|---|---|---|---|---|---|---|---|---|
| N/A | upstream u-boot | ? | Yes | Yes | * DFU * Fastboot * Thor1 * Other? |
* Android Boot.img files * U-boot uImages * RAW / zImage * Other |
Yes, various | Not on 32bit ARM |
| N/A | upstream Barebox | ? | Yes | Yes | * DFU * FAstboot * Other? |
* Android Boot.img files ? * U-boot uImages * RAW / zImage * Other |
Yes, various | Not on 32bit ARM |
| Galaxy S (GT-I9000) | GTI9000Bootloader | ? | * Thor1 | * RAW / zImage | RAW, KERNEL partition only | Probably not | ||
| Galaxy SII (GT-I9100) | GTI9100Bootloader | Probably not | * Thor1 | * RAW / zImage | RAW, ? partition only | Probably not | ||
| Galaxy SII (GT-I9100G_CHN_CHN) | GTI9100GBootloader | ? | * Very unreliable2 Thor1 | ? | RAW, KERNEL partition only | ? | ||
| Galaxy Nexus (GT-I9250) | I9250Bootloader | used | ignored | ? | * Reliable3 Thor1 * Fastboot |
* boot.img | boot and recovery partitions only | ? |
| Galaxy SIII (GT-I9300) Galaxy SIII 4G (GT-I9305) Galaxy Note II (GT-N7100) Galaxy Note II 4G (GT-N7105) |
MidasBootloader | ignored | used | No | * Somewhat reliable4 Thor1 | * boot.img | RAW, BOOT and RECOVERY partitions only | |
| GT-N5100Bootloader | Yes, And the OS is nonfree and signed! | |||||||
| Galaxy Note (GT-N7000) | GTIN7000Bootloader | ? | * Thor1 | * RAW / zImage | RAW, KERNEL partition only | ? | ||
| Galaxy Tab 2 7.0 GSM (GT-P3100) | GalaxyTab2BootloaderInterface | ignored | Yes6? | * Thor1 | * boot.img | RAW, KERNEL and RECOVERY partitions only | ? | |
| PinePhone v1.1 Braveheart (stock?[5]) u-boot | PinePhoneBraveheartBootloader | ? | Yes | Yes (u-boot) | ? | ? | ? | Probably (arm64), fully free software |
1 Thor is the protocol used by Heimdall, Odin, u-boot and several nonfree bootloaders. u-boot has a free software
2 It didn't work on GNUtoo desktop computer at all, while it worked fine on his laptop. With the stock Android 2.6.3 bootloader you could also end up stuck on the PC screen without a computer where heimdall works fine.
3 Under IO (disk or SSD) load, a computer can easily flash SYSTEM or even DATA partitions with heimdall.
4 Under IO (disk or SSD) load, a computer typically fails at flashing SYSTEM or big DATA partitions with heimdall. Boot and recovery partitions are typically fine though.
5 Someone lent me a Pinephone Braveheart and beside testing many distributions, nothing low level was attempted when I got it.
6 Boots upstream with custom dts without patches, unknown if it works for all build configurations (like CONFIG_STACKPROTECTOR_PER_TASK=y)
In order to run free software bootloaders, we need the ability to run the code we want at boot. However in most smartphones and many tablets use code signature at boot, which prevent us to run free software bootloader.
This usually works by hardcoding the hash of a public key either in the rom code that loads the bootloader, or in one time programmable fuses that are then used by the rom code to check the bootloader.
If the signature don't match, the bootloader is not executed, so the device can't boot.
In practice:| Device and documentation | Bootloader freedom situation | Boot order |
|---|---|---|
| Samsung Nexus S (GT-I902x) | Proprietary, Signed on the tested devices | ?->USB->?->eMMC->? |
| Samsung Galaxy S2 (GT-I9100) | Proprietary, probably Signed | ? |
| Samsung Galaxy S2 (GT-I9100G) | Signed on some devices No unsigned devices found yet |
? |
| Samsung Galaxy Tab 2 | Proprietary, signed | ?->USB->?->eMMC->? |
| LG Optimus black (p970) | Unsigned, can be replaced with upstream u-boot | eMMC(MMC2)->USB |
| Galaxy SIII (I9300) Galaxy SIII 4G (I9305) Galaxy Note II (N7100) Galaxy Note II 4G (N7105) |
* Proprietary, Signed * There is work in progress to understand if we can avoid bypass the signature checks |
?->eMMC->?->USB->? |
| Golden Delicous GTA04 | Unsigned, free software | * Aux not pressed during boot: ? * Aux pressed during boot: ?->SD->?->NAND SYS_BOOT0 = 1 SYS_BOOT1 = 1 SYS_BOOT2 = 1 SYS_BOOT3 = 1 SYS_BOOT4 = 1 SYS_BOOT5 = AUX button SYS_BOOT6 = 1 But cannot find Reference manual for the DM370 |
| Pinephone | Unsigned free software | |
| Librem5 | Unsigned bootloader, nonfree DDR4 controller firmware |
| SOC and documentation | Freedom situation |
|---|---|
| OMAP | * No known bug * Some devices are not signed * Undocumented? (probably a very good sign if it's the case) |
| Exynos 4 | * Some or all devices are signed * work in progress to understand if it's possible to bypass the signature |
| Exynos 8890 and 8895 | * Boot from USB is possible thanks to exynos-usbdl (documentation) |
| BroadcomVideoCore | The SOCs have the ability to check signatures |
| TegraBootrom | * Not all devices use code signature * Boot from USB is possible thanks to fusee_gelee * Code can be appended to the bootrom by writing in a fuse area. Could that be used to disable code signature ? |
| IMX 5 and 6 | * Not all devices are signed * Thanks to Ref_QBVR2017-0001.txt it's possible to bypass signatures anyway, and maybe load code through USB too |
Some of the tools below can also be used to find devices that don't have restricted boot.
| Tool | Uses | supported hardware | Pakckages | Howto |
|---|---|---|---|---|
| omap-usb-boot | * checking if the device is has restricted boot * Loading bootloaders from USB * booting on a different boot media |
OMAP3, OMAP4, OMAP5 | Parabola , Archlinux through AUR | * check if the device has restricted boot through USB |
| omap-u-boot-utils | * Loading bootloaders from USB * Loading bootloaders from the UART |
OMAP3, OMAP4 | Parabola , Archlinux through AUR | ? |
| crucible | * checking fuses settings | i.MX53, i.MX6DL, i.MX6DQ, i.MX6SL, i.MX6SLL, i.MX6SX, i.MX6UL, i.MX6ULL, i.MX6ULZ, i.MX7D, i.MX7ULP | TODO | TODO |
| cbootimage | * Generate images * Dump images (including signatures?) |
Tegra ? | Parabola , Archlinux through AUR | |
| tegrarcm | * Load bootloaders from USB | Tegra ? | TODO | TODO |
| 0xFFFF | * Load signed bootloaders (-c) from USB | OMAP3430 and OMAP3630 Might be easy to add more OMAP3 by just commenting code in cold-flash.c |
TODO, patch for libusb1 | TODO |
| sunxi-tools | ? | Allwinner SOCs? | Parabola, Archlinux | TODO |
| ifdtool | * Check if there is a Management Engine firmware | Intel x86 | ? | ? |
| intelmetool | * Check if there is a Management Engine firmware, check if the BIOS region is signed (Bootguard) | Intel x86 | ? | ? |
And upstream Linux won't accept patches to disable the MMU, or the data cache in Linux as they have very good reasons to do that, and they are supposed to be already disabled.
So it's not a viable option in the long run.
However we don't have details yet on what is wrong there (caches, MMU, etc).
1 from #replicant on freenode: <pcercuei> I'm trying to boot a mainline kernel [on the GT-I9100], for some reason it only works if I boot it with u-boot
As u-boot disables the instruction cache in the boot commands before jumping to Linux, we might be able to replace the boot.img by u-boot to workaround the stock bootloader issues.
Having u-boot would also enable many benefits, such as the ability to have Replicant images that run on multiple devices.
As u-boot is capable of running in different ways, when upstreaming the code we will need to make sure that it can run as boot.img but also in other ways depending on the device.
For instance on midas, u-boot can also run with the nonfree and non-redistributable BL1. So it might be interesting to support that as well with the same code because:We will track the upstreaming status for midas in this bug: #2050
The Raspberry PI don't use code signature, but smartphones using the same SOC may have it enabled.
03:00 < clever> ive also cracked the signing keys on the rpi4 fully, and now know how they get generated
03:01 < clever> so i could (in theory) re-extract them from another broadcom product in the future, with less effort
[...]
03:01 < clever> assuming i get execute on the VPU somehow
[...]
03:03 < clever> basically, there is 20 bytes of "salt" in the mask rom, which gets combined with 16 bytes from the OTP, to create the real 20byte hmac-sha1
                key
03:04 < clever> you need to understand how .data gets copied from rom->ram (since its an XIP rom), and then find the code that merges the 2, to know what
                offset in ram to read
[...]
03:08 < clever> GNUtoo: but, ive also heard that the 2nd revision of the mask rom, has proper pub/priv RSA support
03:08 < clever> if they choose to turn that on, we are screwed
[...]
03:15 < clever> all of the broadcom chips in the pi's, have ~60 OTP registers, each 32 bits wide
[...]
03:16 < clever> got a total of ~268 bytes of OTP
03:16 < clever> for*
[...]
< clever> GNUtoo: i do also have some new info on the rpi4 mask rom boot order, that you might
                want in the wiki
03:19 < clever> GNUtoo: the rpi4, can boot from 3 places, in this order: #1 recovery.bin on the SD card,
                #2 a tagged blob in SPI flash, #3 usb-device boot
03:19 < clever> GNUtoo: but, you can use OTP to configure any gpio pin, to disable #1 or #2 (and you can
                set 2 pins, one for each)
[...]
03:22 < clever> 2020-02-21 16:25:14 < clever> for extra confusion, there are 2 sets of numbers for each SoC
03:22 < clever> 2020-02-21 16:27:12 < clever> ali1234: 2838 and 2711 are both rpi4
03:22 < clever> 2020-02-21 16:27:47 < clever> ali1234: 2835 and 2708 are rpi1, i think
03:22 < clever> so the rpi4 is called both bcm2838 and bcm2711
03:22 < clever> i think one is for the base model, and then the other for this specific implementation of the silicon and package
When certain hardware feature break (like buttons for instance), Replicant can remains perfectly usable, however if something goes wrong, it could prevent users from being able to recover their devices or data.
If the volume up button is broken on a device that uses it for the things mentioned above, then it will be complicated to recover it.
Sometimes it's still possible to do it by disassembling the device and shorting the connector that is used to connect to the button.
On several devices, the volume down button is used to go in download mode.
So without it:If the USB connector cannot be used to charge anymore, it might still be possible to charge batteries with external chargers. Some phones dock for instance have that feature. We don't know if data works or not when only the charging pins are broken.
If instead the device has no working data this could lead to additional issues as it is needed for several features:For devices that don't have a microSD slot, installing Replicant becomes even more complicated.
If your USB cable is broken it is best to replace it as you won't be able to use adb at all otherwise.
But with an USB OTG adapter and a male<->male USB cable you could at least manage to get heimdall working: Unlike Linux, the bootloader doesn't the USB port to host mode when an OTG adapter is plugged, so you could abuse that to install a Replicant recovery for instance. Still by default, Replicant recoveries will switch the port to host mode when an OTG cable is detected. So you'll probably need to modify the recovery kernel if you want adb.
Over time, batteries tend to keep less and less charge. So it last less long in hours. When that happens, they also might make the phone reboot or power off when it tires to use too much current at once.
If the phone shuts down at the wrong moment, it could be dangerous for the device:So try to keep working batteries to avoid issues.
You might be able to install a recovery image without a working display, however enabling adb in Replicant will be too complex for most people without a screen.
Howeve it's still possible to modify boot.img and recovery images to add a root shell inside it.
It might also be interesting to find out if it's possible to use some assistive technology (like text to speech) to operate a phone without a working display.
Each revision of Android is meant to be compiled with a specific set of dependencies. No effort is made upstream to support multiple build environments.
Building with different environments often yields build errors due to untested dependencies versions.
So we document here how to recreate these recommended build environments.
Ubuntu support:
          ,2013-10-15 - Lucid   (10.04)
2013-10-15,2015-03-16 - Precise (12.04), probably with 4.4 KitKat - https://web.archive.org/web/20131015123913/http://source.android.com/source/initializing.html
2015-03-16,           - Trusty  (14.04) https://web.archive.org/web/20150316053136/https://source.android.com/source/initializing.html
Java support:
          ,2014-03-31 - Sun JDK 5/6
2014-03-31,           - OpenJDK 7 - https://web.archive.org/web/20140331004436/https://source.android.com/source/initializing.html
lxc-create -n replicant -t download -- -d ubuntu -r trusty -a amd64

lxc-start -n replicant -d
lxc-attach -n replicant

# clean-up non-free sources
sed -i -e 's/ restricted//' -e 's/ multiverse//' /etc/apt/sources.list
apt-get update
wget http://archive.trisquel.info/trisquel/pool/main/d/debootstrap/debootstrap_1.0.59ubuntu0.3+7.0trisquel1.tar.gz
tar xzf debootstrap_1.0.59ubuntu0.3+7.0trisquel1.tar.gz
cp -a debootstrap-1.0.59ubuntu0.3+7.0trisquel1/scripts/{toutatis,trisquel} /usr/share/debootstrap/scripts/
cp -a /usr/share/lxc/templates/lxc-ubuntu /usr/share/lxc/templates/lxc-trisquel
sed -i -e 's/main restricted universe multiverse/main/' \
       -e 's/.*lxcguest/#&/' /usr/share/lxc/templates/lxc-trisquel

lxc-create -n replicant -t trisquel --  -r toutatis -a amd64 --mirror http://archive.trisquel.info/trisquel/ \
  --security-mirror http://archive.trisquel.info/trisquel/
lxc-create -n replicant -t download -- -d ubuntu -r precise -a amd64

lxc-start -n replicant -d
lxc-attach -n replicant

# clean-up non-free sources
sed -i -e 's/ restricted//' -e 's/ multiverse//' /etc/apt/sources.list
apt-get update
wget http://archive.trisquel.info/trisquel/pool/main/d/debootstrap/debootstrap_1.0.59ubuntu0.3+7.0trisquel1.tar.gz
tar xzf debootstrap_1.0.59ubuntu0.3+7.0trisquel1.tar.gz
cp -a debootstrap-1.0.59ubuntu0.3+7.0trisquel1/scripts/{taranis,trisquel} /usr/share/debootstrap/scripts/
cp -a /usr/share/lxc/templates/lxc-ubuntu /usr/share/lxc/templates/lxc-trisquel
sed -i -e 's/main restricted universe multiverse/main/' \
       -e 's/lucid/taranis/' /usr/share/lxc/templates/lxc-trisquel

lxc-create -n replicant -t trisquel --  -r taranis -a amd64 --mirror http://archive.trisquel.info/trisquel/ \
  --security-mirror http://archive.trisquel.info/trisquel/

lxc-start -n replicant -d
lxc-attach -n replicant

# 'lxcguest' fixes a number of issues but seem to disable init..
dhclient
/etc/init.d/ssh restart
You'll need git > 1.7.2 for repo:
cd /usr/src/
apt-get install wget gcc libssl-dev zlib1g-dev libcurl4-gnutls-dev libexpat-dev gettext
wget https://www.kernel.org/pub/software/scm/git/git-2.4.6.tar.gz
tar xf git-2.4.6.tar.gz
cd git-2.4.6/
make -j4  # ~2mn
make install prefix=/usr/local
apt-get install ubuntu-archive-keyring rsync
lxc-create -n replicant -t ubuntu -- -r lucid -a amd64

lxc-start -n replicant -d
lxc-attach -n replicant

# clean-up non-free sources
sed -i -e 's/ restricted//' -e 's/ multiverse//' /etc/apt/sources.list
apt-get update

# 'lxcguest' fixes a number of issues but seem to disable init..
dhclient
/etc/init.d/ssh restart
You'll need git > 1.7.2 for repo:
cd /usr/src/
apt-get install wget gcc libssl-dev zlib1g-dev libcurl4-gnutls-dev libexpat-dev gettext
wget https://www.kernel.org/pub/software/scm/git/git-2.4.6.tar.gz
tar xf git-2.4.6.tar.gz
cd git-2.4.6/
make -j4  # ~2mn
make install prefix=/usr/local
The simplest way to configure LXC is to combine it with libvirt.
Here are instructions tested on a Debian 8 host:
apt-get install lxc debootstrap xz-utils ca-certificates

apt-get install libvirt-bin dnsmasq ebtables
service dnsmasq stop
update-rc.d dnsmasq remove
virsh net-autostart default
service libvirtd restart
cat > /etc/lxc/default.conf <<'EOF'
lxc.network.type = veth
lxc.network.flags = up
lxc.network.link = virbr0
EOF
You now can run the LXC containers instructions above.
This can be used in any environment to prepare a non-root user dedicated to builds.
# prepare build user
apt-get install openssh-server
useradd replicant --shell /bin/bash --create-home
mkdir -p -m 700 ~replicant/.ssh
cat <<EOF >> ~replicant/.ssh/authorized_keys
your public key
EOF
chown -R replicant: ~replicant
If you are new to modems, or to the hardware and software architecture used in smartphones and tablets, it's a good idea to start from the freedom-privacy-security-issues article .
Once this is done, there are more documentation on various aspects of the Cellular modem, from the protocol to implementations details.
The Replicant community has several places where people interact together.
Most Replicant developers are on the mailing list, as it is also used to review patches. Many non-developers that are contributors or that don't contribute to Replicant are also on the mailing list.
It's being used for many things:The volume is moderate but there are sometimes spikes due to the to a huge patch set being sent.
To register you can use the Mailman interface .
The Mailman interface has a non-searchable archive of the list: Replicant Archives
There are independent projects that keep an archive of the list in a searchable format:Most Replicant developers and contributors, as well as people who are interested in our project, are present on the Replicant IRC channel(s). People from other communities are also there as we collaborate on various things, like adding support for devices in Upstream Linux.
IRC, or Internet Relay Chat, is our most ephemeral communication platform, in the sense that we do not publish message logs of the channel, nor are we aware of anyone else that unofficially does so. It is, however, common for channel participants to collect and store IRC message logs on their local machines or a VPS to catch up on recently missed conversations and search older messages by keyword to help remember details of past discussions. As the #replicant channels are public, sometimes conversations with important technical information are saved mostly as-is in bug reports or on the Replicant wiki.
In practice, Replicant has three IRC channels hosted on three separate IRC chat servers, but it appears as through there is only one channel since they are all bridged together. Bridged means that a user can join only one of the channels and send and receive messages with users on all the other channels because all messages are forwarded across every channel.
Our three IRC Channels are:Replicant has taken a number of steps in order to ensure that Tor users who want to connect to our IRC channel are not discriminated against.
Due to Libera.Chat's policies, users who wish to regularly connect and engage with our Libera.Chat IRC channel via Tor need to use the SASL (Simple Authentication and Security Layer) framework for authentication every time they connect to Libera.Chat's server and comply with a couple other restrictions. Additionally, they require all new Libera.Chat accounts to be created over the clearnet, which allows them to tie their user's personal IP addresses to every account on their network. Since the personal identity of a user can often be determined simply by acquiring that user's IP address, we recommend that users who want to preserve their anonymity do not create a Libera.Chat account.
The Freenode IRC channel was our first IRC channel. At the time it had similar policies to those of Libera.Chat regarding Tor users, which didn't meet all of our users' anonymity needs. In order to address this, Replicant created a second IRC channel on the OFTC IRC server. As they clearly state, OFTC "does not require users to first connect in the clear and register with services to allow connecting via Tor". While OFTC was an improvement in some ways over Freenode, it doesn't have an officially supported Tor onion service, so Tor users that require the utilization of such a feature can't connect to OFTC's server.
HackInt IRC server allows anonymous connections via their officially supported Tor onion services and also allows users to register accounts through them. As such, we created a bridged IRC channel on their server as well. As an added benefit, HackInt also utilizes a privacy preserving Hashcash implementation instead of a CAPTCHA in their account creation process, as explained on their Tor page.
The Freenode channel was closed because the network was victim of an "hostile takeover" according to their former volunteer staff members. We can read more about it on the Wikipedia's Freenode page.
There are Matrix rooms which are bridged to our various IRC channels:
#replicant:hackint.org - bridged to HackInt#_oftc_#replicant:matrix.org - bridged to OFTCFortunately you get to see all messages, from all 3 IRC networks, thanks to the bridge bot present on all networks.
The bridges on these rooms only relay multi-line messages up to a certain number of lines. HackInt up to 6 lines and OFTC up to 3 lines. Above that, messages get sent with a tiny preview and a paste link: <matrixsomeone[m]> Hello!... (full message at <https://matrix.org/blahblahblash>)
Edited messages get resent in all or in a substitution-like format s///.
Joins and quits seem to be improperly reflected in the room's user list. As such, it may list users that are now offline and may miss users that are currently online.
#replicant@irc.hackint.org#replicant%irc.oftc.net@irc.cheogram.com#replicant%irc.libera.chat@irc.cheogram.comDo note that all IRC networks are bridged. You just need to enter in one of these MUCs.
Replicant has a Mastodon account .
The main use is to relay the blog posts .
We do not check that account often. If you contact us there it might take us some time to see the message.
We also have a private contact address for the project, for inquiries that are private / confidential.
Very few people receive that list, and the ones that do tend to be very busy. So if your question can be answered on the mailing list, please use the mailing list. Unless you are writing about an explicitly private matter, we will likely advise you to write to the mailing list as we want to respond publicly when answering inquires as often as possible. We also won't forward your mail to the mailing list ourselves as otherwise we could mistakenly publish information that you wanted to keep private. See the PrivateContact page for use case and on how to use such contact address.
If you didn't manage to register to the mailing list, or if it doesn't work for you for some reasons, it's still possible to send a mail to the mailing list address without being registered. In that case we will be notified about it and we will be able to make it go through by manually going to the mailing list interface.
Instructions to run and collect results of the android Compatibility Test Suite for Replicant 4.2
# adb devices
List of devices attached
00090ad763a48f  device
4df1066d14d15fbd        device
# adb devices
List of devices attached
00090ad763a48f  device
4df1066d14d15fbd        device
# cd android-cts-media-1.2
# ./copy_media.sh all -s 00090ad763a48f
It runs in the background and takes about 8 hours. It will display results as they become available. See the usage documentation for more information.
# ./android-cts/tools/cts-tradefed
cts-tf > run cts --plan CTS --disable-reboot
The test results are in ./android-cts/repository/results/ and the logs in ./android-cts/repository/logs/
Note: the --disable-reboot is necessary because of a cm-10.1.3 bug
The meeting took place the 27 and 28 July 2019.
The event took place in the April office. April is an association for the defense and promotion of free software.
Precise location: April, 44/46 rue de l'Ouest, bâtiment 8, 75014 Paris (It's accesible through the "place de la Catalogne", on the left of the "Biocoop" supermarket). Select "April" on the intercomm.
map: https://www.agendadulibre.org/events/19754
Phone number of the April office: 01 78 76 92 80.
The April office is relatively close to the Gare Montparnasse railway station.
In addition to trains, Gare Montparnasse railway station has also, in the same building, there is a metro station where you can access the metro lines 4, 6, 12 and 13.
On Friday, a dinner took place.
Dinner meeting time: From 18h30 to 18h45
Dinner meeting location: Near the Montparnasse tower . The Montparnasse tower is very close to the Montparnasse railway station.
At 18h45 we planned to try to find a restaurant nearby.
The two main airports near Paris are the Roissy Charles de Gaulle International Airport and the Paris Orly Airport.
To get to the Gare Montparnasse railway station from the Roissy Charles de Gaulle International Airport by public transportation, you can take the RER B metro line up to the Denfert-Rochereau station where you can take the line 6 up to the Gare Montparnasse railway station.
To get to the Gare Montparnasse railway station from the Paris Orly Airport by public transportation, you can take the Orlyval up to the Antony stop, and from there take the RER B metro line up to the Denfert-Rochereau station where you can take the line 6 up to the Gare Montparnasse railway station.
It also has pages on the Roissy Charles de Gaulle International Airport and the Paris Orly Airport with more details on the public transportation lines to use to go to Paris, which tickets to buy, etc.
You could use the Replicant private contact mail address in advance to obtain the cellphone number of an organizer to be able to use it in case of issue (like being lost, not finding the location of the meeting, etc).
| Topic | Source code | Slides | Video | Rationale of the talk |
|---|---|---|---|---|
| Replicant history | $ git clone --recursive https://git.replicant.us/GNUtoo/presentations.git $ cd path/to/presentation $ make |
720p ogv The borders had to be cut to preserve the privacy of people passing by in the street. It was also encoded 3 times instead of 2 to save human time. | * Has some context that might be useful for new Replicant contributors * Has information on the relationship between Replicant and GNU/Linux |
|
| Replicant and bootloaders | 720p webm | * The Galaxy SIII (and similar devices) bootloader status is complicated and relevant to Replicant 9 | ||
| Replicant and modems: introduction | 720p webm | * Meant to enable new contributors to work on the modem part | ||
| Replicant and modems: Samsung IPC | 720p webm | |||
| Replicant and oFono based Java RIL | 720p webm | |||
| Porting AOSP for a new device | Made with Libreoffice which leaks metadata | Not recorded | ||
| Graphics acceleration on Replicant | $ git clone https://git.replicant.us/hominoid/graphics-presentation.git $ cd graphics-presentations $ make |
720p webm | * Explains why Replicant needs special care on the graphics stack. * Introduces both graphics' hardware and software architecture. * Dives into the implementation decisions. * Lays out future plans. |
License: CC-BY-SA 4.0 International
The discussions were not recorded for privacy/intimacy reasons but a sumary of some of the important ones are available below on this page.
| Topic | Time and dependencies | Status | Rationale |
|---|---|---|---|
| Discussions on the bootloader situation on the Galaxy SIII and similar smartphones | After the talk on the bootloaders | ||
| Discussions on minimal requirement to accept a device in Replicant: * Do we still accept devices with modems that are not isolated? * Do we have plan to require free software bootloaders? * Do we require replacable batteries? |
After the talk on modems and bootloaders | ||
| Discussions on the future of Replicant: * Which devices do we target * Do we continue focusing on devices with signed bootloaders * Allwinner tablets, upstream Linux, and scalability * Devices with non-replacable batteries |
After the talk on Replicant history | ||
| Discussion about Upstream components, design choices, and cultural re-appropriation of technology * Upstream * Issues when combining together different build systems (Example: Android build system with Kconfig) * Sharing work with GNU/Linux to enable more political control and cultural re-appropriation of mobile device in the long run, and the risk associated with it * Android upstream anti-features and political design choices * How subjective security is, threat models, and the difference between free software and device maker point of view |
Please take a look at Upstream before attending if possible. |
| Person | Hardware | Comments | Usage |
|---|---|---|---|
| GNUtoo | Galaxy SIII (I9300) with the stock bootloader | ||
| Galaxy SIII 4G (I9305) with the stock bootloader | |||
| Galaxy SIII 4G (I9305) with u-boot | |||
| Galaxy Nexus (I9250) with the stock bootloader | |||
| Galaxy SII (I9100) with the stock bootloader | |||
| GTA04 A3 | |||
| GTA04 A4 | |||
| Optimus black (P970) | |||
| GTA01 | Used in a presentation about Replicant history | ||
| GTA02 | |||
| HTC Dream | |||
| N900 | Testing the battery charger driver is still needed but require a heavy PSU | ||
| Fil | Galaxy Note 2 (N7100) stock bootloader | [Working] Available for non-critical tests | * Test the upstream touchkey driver => TODO: * Bring a Parabola microSD (GNUtoo) * Test the patch with an I9300 * Rebase the patch on master or linux-next |
| Galaxy SIII (I9300) stock bootloader | [Working] Test Subject available for any experiment | ||
| Galaxy SIII (I9300) stock bootloader | [Bricked] available for hardware hacking | * Test fixing the phone | |
| Galaxy Tab 2 7.0 (GT P3100) | Property of the Replicant Project | * |
|
| Paulk | Galaxy Note (N7000) | * |
|
| Galaxy Tab 2 10.1 (P5100) | * Add support for it in the BackupTheEFS instructions | ||
| Looking for a Galaxy Note 8.0 (N5100) | * Add support for it in the BackupTheEFS instructions | ||
| Person | Hardware | Comments | Usage |
|---|---|---|---|
| GNUtoo | Serial port cable with variable resistors | ||
| Multimeter | |||
| Simtrace 1: Can get the dialog between the modem and the SIM card in wireshark | |||
| SIM card that is not recognized in Replicant (STK related?) | Test on Replicant 4.2 and on Replicant 6.0 | ||
| SIM card + phone that can trigger the audio call issue | |||
| Sigrok compatible adjustable power supply | Not sure to bring it (heavy) | ||
| Fil | SIM card that is not recognized in Replican 6 |
  For more information about Digital Restrictions Management and the Management Engine,
  see from page 191 [...].
  This chapter tries to justify the usage of Digital Restrictions Management (DRM).
  DRM is totally unacceptable as it requires the users not to be in control of their
  computers to effectively prevent them from exercising their legal rights (such as fair
  use, or being able to copy published works). That chapter clearly shows the link between
  preventing users from controlling their hardware and effective DRM.
  These documents are the propriety of Samsung Electronics and are not
  hosted by the Replicant project. However, some excerpts from these documents
  are provided, for the purpose of providing technical evidence of the facts that
  are mentioned in this page. We believe that this particular use of the copyrighted
  work is fair use.
  The following analysis was conducted using the libsec-ril.so binary file
   (the incriminated proprietary software) as extracted from the CyanogenMod 10.1.3
   system zip for the Galaxy S 3 (I9300), from location system/lib/libsec-ril.so.
  By contrast, to suggest that others use nonfree software opposes the basic
  principles of GNU, so it is not allowed in GNU Project discussions.
  Our community's resources --the forum, documentation, etc--
  are for free software only. Please do not distribute,
  recommend, or support non-free software here.
People in this discussion realized that the forum is relatively small so it's doable to have it moderated.
Plan of action:The microphone was mono, with only a channel from the left. So we need to create mono audio files from the videos.
To make the sound go in both channel, do the following in Audacity:
=> Next time ask if they have a second microphone available for questions.
Kdenlive is being used for that.
Using kdenlive with Nouveau (with default settings), xfce4 under Parabola manage to freeze the screen (there are some messages like "nouveau: kernel rejected pushbuf: Cannot allocate memory" that can be observed when launching kdenlive through SSH).
To workaround that the following was used:=> It's still slow while zomming in the timeline but it manage not to freeze the whole graphics stack.
To edit a video with kdenlive:So really make sure you know what you're doing if you mess with that.
This is not the usual warning that is there just because of legal requirements, in order to prevent potential lawsuits, and that tells you that the documentation may eat your cat.
Batteries issues are real.
Read the Wikipedia page on the Galaxy Note 6 for a famous examples of a battery issue.
Here the cause was due to the fact that the battery was non-removable and that the case didn't have enough extra space for the battery.
It's also a well known fact that messing with the battery charging values can make the battery explode or catch fire.
You may also break your phone's electronics if you mess up with battery charging values. However, compared to the danger of an explosion or fire, ending up with a bricked phone is just a minor issue.
We lack documentation for the Max77693 PMIC (Power Management IC).
The thing we tried enabled us to gain more insights into how it worked.
In order to make things safer, we added the issues our experiments here so you don't need to reproduce them, and can just use the information we gathered with the results of the experiments.
The max77693 driver in the Replicant 6 kernel has a function to enable and disable charging
As this driver is used on a Galaxy SIII we tried to disable the charging by setting the last bit of the MAX77693_CHG_REG_CHG_CNFG_00 register to 0.
# i2cget -f 17 0x66 0xB7
i2cget: WARNING! This program can confuse your I2C bus
Continue? [y/N] y
0x05
# i2cset -f 17 0x66 0xB7 0x4
i2cset: WARNING! This program can confuse your I2C bus
Continue? [y/N] y
This made it stop charging:
# grep POWER_SUPPLY_STATUS /sys/class/power_supply/battery/uevent
POWER_SUPPLY_STATUS=Discharging
We did that while the driver is running, as it is necessary to disable the charger register protection.
However we didn't check if the driver was using that same register while we were trying the i2cset command.
Such could lead to a race condition, where we read a value (e.g. 0x05) and then the driver does some stuff and changes it to 0xf5 for instance, after that we would set it as 0x04, messing up things.
So don't reproduce that experiment if you don't know what you are doing.
We also didn't get any review of what we were doing here, and humans do mistakes.
Also note that we don't have a datasheet for either the battery or the battery charger chip, so doing such experiments is very error prone.
In order to minimize the risk it would be best to have the upstream kernel review the process involved.
To enable it for your device, first you need it to be ported to Replicant 9.
The Galaxy SIII already boots under Replicant 9 and uses a kernel that is very closely based on upstream. So we can even test under GNU/Linux with Replicant 9 kernel.
You can then take advantage of the Linux review process to be extra sure that you didn't mess up.
The max77693_charger driver available upstream already has a function to disable charging (max77693_enable_charger) but it has no way to directly enabled disable charging through a sysfs node.
Finding a way to disable charging through existing sysfs and/or adding a new sysfs node would allow userspace to easily stop the charging process with way less risks.
Note that upstream still requires you to test (and probably understand) the code you are writing, so you still need to know what you are doing.
If you don't know what you are doing, try instead to find someone who does and who is willing to do it for you.
Lithium-ion batteries do break when the charge level is too low. So if you de-charge completely the battery and don't recharge it afterward, you could break it.
The same risk exists if you completely de-charge a battery (because you use you phone while not connected to a power supply) and don't charge again the battery for a long time.
Note that keeping charging the battery all the time also breaks it very fast.
This is why, when the battery reach 100%, it stops being charged.
If it's not possible to power the device from the power supply and leave the battery unconnected, the charging procedure has to let the battery decharge (up to some threshold like 80% for instance) and recharge again.
If the threshold is too high (like 99%), the battery would break very very fast. If the threshold is too low, the battery last less hours if it's at 80% when unconnected.
That process is typically transparent to users, so many users don't know about it.
It probably depends on the devices and the Android versions.
On Replicant 6.0, it contains at least the application internal data: When various applications are installed, they have access to some storage where they can read and write data that is only visible to them and not to other applications. This is part of the Android security model that doesn't trust applications even if they are fully free software. This has serious usability consequences for users as it makes backuping and restoring the application data way more complicated than it should be: this data is tied to the application signatures, so because of that it's not easily portable across different Replicant versions. When application signatures changes (like between Replicant 6.0 0003 and 6.0 0004), the data needs to be migrated from the old signatures to the new ones.
In addition, on some devices it also contains the users data. This location and external microSD cards is where users typically their files like Music, photos, etc. This data is made accessible to the users in various location through a mechanism called fuse. In Replicant 6, this data is stored in the media directory in the data partition. Unlike application data, this data is not tied to any Android version or application signatures, so it can be moved, backed up, restored relatively easily across different devices and operating systems. It uses a similar file permission system than with GNU/Linux (unix DAC + Selinux).
| Location | Content |
| /data/app/<application name>/ | Application apk, native libraries, java cache (base.odex)? |
| /data/data/<application name>/ | Application internal data |
| /data/media/ | User accessible storage to store music, photos, etc Also mounted in /storage/emulated with fuse |
| /data/system/packages.xml | Application and signing key, uid, etc mapping |
| /data/system/appops.xml | Application permissions |
| Location | Content |
| /data/data/org.smsecure.smssecure/ | Silence data |
| /data/data/org.smsecure.smssecure/messages.db | Silence (encrypted?) messages database (sqlite3) |
Here's where the sdcard user accessible storage comes from:
/sdcard -> /storage/self/primary [1]
/storage/self/primary -> /mnt/user/0/primary [2]
/mnt/user/0/primary -> /storage/emulated/0 [3]
root@i9300:/ # readlink /sdcard
/mnt/user/0/primary
root@i9300:/ # readlink /storage/self/primary
/mnt/user/0/primary
root@i9300:/ # readlink /mnt/user/0/primary
/storage/emulated/0
root@i9300:/ # mount | grep "/storage/emulated"
/dev/fuse on /storage/emulated type fuse (rw,nosuid,nodev,noexec,noatime,user_id=1023,group_id=1023,default_permissions,allow_other)
TODO:
This page is for linking to public datasheets and documentation.
If you find confidential markings on a public datasheet it would be very interesting to mention it in the LegalResearch page as we are making a list of such document there in order to show that many legitimate and public document still has such markings.
If the documentation is not under a free software license, it's best not to copy it to the Replicant wiki but only link to it.
It would also be a good idea to archive them with https://archive.org/web as sometimes crucial datasheet disappear.
If we manage to switch to mediawiki, there are bots to do the archival on archive.org automatically, but until then it's probably better to make sure that the document are publically archived by archive.org.
We would also need to research a bit on how to put such datasheets links on wikidata and retrieve that on a mediawiki compatible wiki. This way the link will appear where we need it in the wiki, without having to copy it around many times.
This page is a stub, feel free to improve it
| Dependency | Working version | Potentially compatible versions | Debian 9 | Guix | PureOS | Parabola | Trisquel 7 | Trisquel 8 | Trisquel 91 | Trisquel 10 |
|---|---|---|---|---|---|---|---|---|---|---|
| Android SDK: API Level 23 (Android 6) |
* android-sdk(25.0.0) * android-sdk-platform-23(6.0.1) |
? | OK | Absent (NDK only) as October 2018) | OK | Absent as October 2018 | ? | * android-sdk(24.3.3) * no android-sdk-platform-23 (why? needed?) |
? | |
| gcc | * gcc(6.3.0) | ? | OK:gcc(6.3.0) | OK: gcc 4-9, with gcc-5 the default | OK:gcc-6(6.4.0) | ? | ? | * gcc-5 * gcc-4.9 * gcc-4.8 * gcc-4.7 |
* gcc-4.8 * gcc-5 * gcc-6 * gcc-7: can build the toolchain * gcc-8: fails to build the toolchain |
* gcc-7 * gcc-8 * gcc-9 * gcc-10 |
| Java (jdk and jre) | * openjdk-8-jdk/jre | 7 | OK:openjdk 8 | OK: Icedtea 1-3 (=OpenJDK 6-7), OpenJDK 9-11 | OK:openjdk 8 | openjdk 7, 8, 10 | * openjdk-6-jdk/jre * openjdk-7-jdk/jre * openjdk-8-jdk/jre |
8, 9 | * openjdk-8-jdk/jre | * openjdk-8-jdk/jre * openjdk-11-jdk/jre * openjdk-13-jdk/jre * openjdk-14-jdk/jre * openjdk-16-jdk/jre * openjdk-17-jdk/jre |
| i386 packages feed support | * zlib1g-dev:i386 | ? | OK | ? | No 32bit packages | ? | ? | ? | OK | OK |
| 32bit libc | * libc6-dev-i386 * libc6-i386 |
? | OK | OK: glibc defined in gnu/packages/base.scm | OK | ? | ? | ? | ? | |
| lib32 packages | * lib32z1-dev * lib32readline-dev * lib32ncurses5-dev |
? | OK | ? | OK | ? | ? | ? | ? | |
| ? | libemma-java | ? | OK | ? | missing package (why?) | ? | ? | ? | ? | |
| ? | * libandroidsdk-ddmlib-java * libandroidsdk-sdklib-java |
? | OK | ? | missing package (why?) | ? | ? | ? | ? | |
| ? | libgradle-android-plugin-java:2.2.2-1 | ? | OK | ? | ? | Missing | Missing | Missing | ? | |
| Status | Working but not FSDG compliant | No SDK (NDK only) | Few missing packages | No SDK, no NDK | Based on Ubuntu 14.04 which can build AOSP 6 | The toolchain builds with lots of hacks | ? |
| Dependency | Version | Providers |
|---|---|---|
| Java | 7.0 | Debian 9 |
| GNU/Linux distribution | Ubuntu 14.04 | Trisquel 7.0 |
| Dependency | Version |
|---|---|
| gcc | |
| binutils | |
| llvm-defaults |
| Dependency | Version |
|---|---|
| gcc-arm-none-eabi | |
| cmake | |
| python-dev | |
| swig | |
| ant | |
| bc | |
| proguard | |
| maven-debian-helper | |
| libemma-java | |
| libasm4-java | |
| libguava-java | |
| libnb-platform18-java | |
| libnb-org-openide-util-java | |
| libandroidsdk-ddmlib-java | |
| libmaven-source-plugin-java | |
| libfreemarker-java | |
| libmaven-javadoc-plugin-java | |
| ca-cacert | |
| curl | |
| gawk | |
| libgmp3-dev | |
| libmpfr-dev | |
| libmpc-dev | |
| git-core | |
| gperf | |
| libncurses-dev | |
| squashfs-tools | |
| pngcrush | |
| zip | |
| zlib1g-dev | |
| lzma | |
| libc6-dev-i386 | |
| g++-multilib | |
| lib32z1-dev | |
| lib32readline-dev | |
| lib32ncurses5-dev | |
| zlib1g-dev:i386 | |
| xsltproc | |
| python-mako | |
| schedtool | |
| gradle | |
| dirmngr | |
| libandroidsdk-sdklib-java | |
| eclipse-jdt | |
| libgradle-android-plugin-java | 2.2.2-1 |
| android-sdk-build-tools | |
| android-sdk-platform-23 | |
| aapt | |
| lzop |
Answers from a Guix perspective:
1 A debian build log of gradle "Merged Build-Depends: [...] gradle (>= 3.4)[...]"
h2. Set up mvn repo

Install the jaxb and jaxme libraries into your local maven repo:
<pre>
cd jvending/scripts
./install.sh
cd ..
</pre>

h2. Build JVending

Run:
<pre>
  mvn install
</pre>
This will build jvending. You will find the WAR file that you need to deploy to tomcat or jetty at provisioning-portal/target/provisioning.war

h1. Deploying JVending

Set up a tomcat server and place the war file in the tomcat/webapps directory.

Go to http://localhost:8080/provisioning to verify the installation. You should see "Welcome to a J2EE Content Provisioning Portal".

h1. Stocking JVending with Android Apps

JVending requires that you package your content into a provisioning archive.

The following would be a valid provisioning.xml file for stocking of OMA OTA content.The descriptor-file references the dd2 file relative to the root of the jar (you may also use an http or https URI).

<pre>
<?xml version="1.0" encoding="ISO-8859-1"?>

<provisioning-archive xmlns="http://java.sun.com/xml/ns/j2ee-cp"
                      xmlns:xsi="http://www.w3.org/2001/XMLSchema-instance"
                      xsi:schemaLocation="http://java.sun.com/xml/ns/j2ee-cp Provisioning_1_0.xsd">
   <client-bundle>
      <content-id>
         http://code.google.com/pg/jvending:1
      </content-id>
      <bundle-type>
         APPLICATION
      </bundle-type>
      <descriptor-file mime-type="application/vnd.oma.dd2+xml">
         /sample.dd2
      </descriptor-file>
      <user-descriptions>
         <display-name>
            Sample game
         </display-name>
         <description>
            My description to display
         </description>
         <icon>
            /app.png
         </icon>
      </user-descriptions>
   </client-bundle>
</provisioning-archive>
</pre>

The sample.dd2 contains the relative URI of a deliverable object, which in this case references an Android application. The objectURI/server attribute should reference the apk file relative to the root of the par file.

<pre>
<?xml version="1.0" encoding="UTF-8" standalone="yes"?>
<media DDVersion="2.0" xmlns="urn:oma:xml:dl:dd:2.0">
   <product>
      <mediaObject>
         <meta>
            <name>Sam Application Manager</name>
         </meta>
         <size>2226</size>
         <type>application/x-android</type>
         <objectID>cid:android@jvending.org</objectID>
         <objectURI>
            <server>sam-1.0.apk</server>
         </objectURI>
      </mediaObject>
   </product>
</media>
</pre>

The basic structure of the par file (this is just a zipped archive) is

<pre>
+ app.png
+ sam-1.0.apk
+ sam-1.0.dd2
+ META-INF/provisioning.xml
</pre>

Package this into say, sam.par and submit it to the JVending Server. You should see the content appear under the catalog view.

h2. Stocking Android Content

If you want to stock Android content and have it be compatible with the SAM application manager on an Android client, you will need to include more information in the provisioning.xml file. Note that Android apks are delivered over OMA OTA, so will also need to include a dd2 file.

<pre>
<?xml version="1.0" encoding="ISO-8859-1"?>

<provisioning-archive xmlns="http://java.sun.com/xml/ns/j2ee-cp"
                      xmlns:xsi="http://www.w3.org/2001/XMLSchema-instance"
                      xsi:schemaLocation="http://java.sun.com/xml/ns/j2ee-cp Provisioning_1_0.xsd">
    <client-bundle>
        <content-id>
            google-android:apidemos
        </content-id>
        <version>1.5_r3</version>
        <bundle-type>
            APPLICATION
        </bundle-type>
        <descriptor-file mime-type="application/vnd.oma.dd2+xml">
            /apidemos.dd2
        </descriptor-file>
        <user-descriptions>
            <display-name>
                Android API Demos
            </display-name>
            <description>
                A demonstration of many of the Android APIs and most of them even work.
            </description>
            <icon>
                /android.png
            </icon>
        </user-descriptions>
        <vendor-info>
            <vendor-name>Google</vendor-name>
            <vendor-url>http://google.com</vendor-url>
            <vendor-description/>
        </vendor-info>
        <copyright>All Rights Reserved</copyright>
        <catalog-property>
            <property-name>Price</property-name>
            <property-value>Free</property-value>
        </catalog-property>
        <catalog-property>
            <property-name>Category</property-name>
            <property-value>Developer</property-value>
        </catalog-property>
        <catalog-property>
            <property-name>Short Description</property-name>
            <property-value>A demonstration of many of the Android APIs.</property-value>
        </catalog-property>
    </client-bundle>
</provisioning-archive>
</pre>
Edit:
We have now a temporary git repository at gitorious:
http://gitorious.org/replicant
These instructions assume that you are building replicant in your home directory (~). If you are building it in another directory, modify path names accordingly.
repo is a front-end to git which is used to manage several git repositories.
 mkdir bin
 cd bin
 wget http://android.git.kernel.org/repo
 chmod a+x repo
 cd ..
This step will download the Android source (minus the kernel) and the Replicant patches.
 mkdir replicant
 cd replicant
 ../bin/repo init -u git://gitorious.org/replicant/manifest.git -b replicant
 ../bin/repo sync
By default, the Android build system uses a pre-compiled kernel and wireless driver rather than compiling these components from scratch. If you want to compile your own copy of either of these components, you have to compile both: the wireless driver sources included with Android are incompatible with the pre-compiled kernel.
To download the kernel sources, create a file in your replicant/.repo directory called "local_manifest.xml" containing the following:
<?xml version="1.0" encoding="UTF-8"?>
 <manifest>
  <project path="kernel" name="kernel/msm" revision="refs/heads/android-msm-2.6.27"/>
 </manifest>
Then from the ~/replicant/ directory, run:
../bin/repo sync
This will create a directory called replicant/kernel and download the kernel sources to it.
To build the kernel:
cd ~/replicant/kernel
export ARCH=arm
export CROSS_COMPILE=arm-eabi-
export PATH=$PATH:~/replicant/prebuilt/linux-x86/toolchain/arm-eabi-4.2.1/bin
cp arch/arm/configs/msm_defconfig .config
make oldconfig && make
Wait several hours.
Create a file called ~/replicant/buildspec.mk containing the following:
TARGET_PRODUCT:=htc_dream
TARGET_PREBUILT_KERNEL:=kernel/arch/arm/boot/zImage
This will instruct the build process to use your kernel rather than the pre-compiled kernel.
To build the wifi module:
cd ~/replicant/system/wlan/ti/sta_dk_4_0_4_32
export KERNEL_DIR=~/replicant/kernel/
make
(If make can't find your compiler, re-run same PATH export command you ran before compiling the kernel.)
Replace the pre-built wifi module with the one you just built:
cp wlan.ko ~/replicant/vendor/htc/dream-open
(This section will be removed once these changes are committed to the replicant repository)
<pre>
 PRODUCT_PACKAGES := \
 Calculator \
 Email \
 [[ImProvider]] \
 [[SdkSetup]] \
 [[VoiceDialer]]
</pre>

This will include packages in the build which would otherwise be missing (including the [[SdkSetup]] package, which will enable incoming calls).

<pre>
cd ~/replicant
make
</pre>

Wait and wait and wait.

h2. Flashing the new firmware

[to be written]

h2. Building individual pieces

h3. Each time you want to build something

* open a new console
* Then type:
<pre>
 cd ~/replicant
 source build/envsetup.sh
 export ANDROID_JAVA_HOME=$JAVA_HOME
 lunch htc_dream-eng
 make
</pre>
* The files to flash are in ~/replicant/out/target/product/dream,flash them and then clear the cache
* boot and push the wifi firmware if you want it

h3. If you want to build a particular project

* open a new console
* build everything if it was not done before
* Then type:
<pre>
 cd ~/replicant
 source build/envsetup.sh
 export ANDROID_JAVA_HOME=$JAVA_HOME
 lunch htc_dream-eng
 #go into the directory containing an Android.mk
 mm
</pre>

h2. error workarrounds ==
 hyts_Foo.c ===
if you have:
<pre>
target Java: [[SettingsProvider]] (out/target/common/obj/APPS/SettingsProvider_intermediates/classes)
target Java: Settings (out/target/common/obj/APPS/Settings_intermediates/classes)
java.util.zip.ZipException: duplicate entry: hyts_Foo.c
    at java.util.zip.ZipOutputStream.putNextEntry(ZipOutputStream.java:192)
    at java.util.jar.JarOutputStream.putNextEntry(JarOutputStream.java:109)
    at sun.tools.jar.Main.addFile(Main.java:731)
    at sun.tools.jar.Main.update(Main.java:585)
    at sun.tools.jar.Main.run(Main.java:220)
    at sun.tools.jar.Main.main(Main.java:1167)
make: *** [out/target/common/obj/JAVA_LIBRARIES/core-tests_intermediates/javalib.jar] Error 1
make: *** Deleting file @out/target/common/obj/JAVA_LIBRARIES/core-tests_intermediates/javalib.jar'
make: *** Waiting for unfinished jobs....
Note: frameworks/base/packages/SettingsProvider/src/com/android/providers/settings/DatabaseHelper.java uses or overrides a deprecated API.
Note: Recompile with -Xlint:deprecation for details.
Note: Some input files use or override a deprecated API.
Note: Recompile with -Xlint:deprecation for details.
Note: Some input files use or override a deprecated API.
Note: Recompile with -Xlint:deprecation for details.
Note: Some input files use unchecked or unsafe operations.
Note: Recompile with -Xlint:unchecked for details.
Note: Some input files use or override a deprecated API.
Note: Recompile with -Xlint:deprecation for details.
Note: Some input files use unchecked or unsafe operations.
Note: Recompile with -Xlint:unchecked for details.
</pre>

do that:
<pre>
rm -f dalvik/libcore/luni/src/test/resources/hyts_Foo.c
</pre>
And it will continue to build

Note that that:
<pre>
rm -rf dalvik/libcore/dom/src/test/resources/*
rm -rf dalvik/libcore/xml/src/test/resources/*
</pre>
didn't work

The workarrounds came from "here":http://groups.google.com/group/android-porting/browse_thread/thread/c51d436b2b1edc8d/b320ee78b2ddd0e4 and "here":http://lazyhack.net/tag/emulator/

h3. No rule to make target @development/data/etc/apns-conf_sdk.xml'

if you have:
<pre>
make: *** No rule to make target @development/data/etc/apns-conf_sdk.xml', needed by @out/target/product/dream-open/system/etc/apns-conf.xml'.  Stop.
make: *** Waiting for unfinished jobs....
</pre>
simply re-type make and it should continue
When we first started to work on Replicant, we were looking for a free market replacement app for Android in order to create a Replicant Software Center. Replicant Software Center was to be a fully free software market application to download and manage free software apps on Replicant.
You can still build these apps: see FLOSSDispenserBuild and SlideMeBuild.
We are now using FDroid client. It comes with the latest Replicant images. If you want to install it manually, you can download a compiled libre apk here: http://f-droid.org/FDroid.apk
By default, FDroid downloads libre apps from its own repository. We are working together with our friend Ciaran, the main FDroid developer, to perhaps establish a Replicant repository in the future.
The applications on the list of all known Free Software applications for the Android platform should be incorporated into that.
On Debian/Ubuntu (as root):
apt-get install maven2
Unfortunately, the most convenient way to get the SDK is distributed by the Android Open Source Project, but that copy contains proprietary Google code and is wrapped in a restrictive proprietary license agreement. You can obtain a free SDK by following the directions in our wiki.
temp directory at the top level of your SDK directoryThis will allow us to set up a Maven dependency for particular versions of Android.
export ANDROID_HOME=/path/to/sdk/
mvn install for all platforms or mvn install -P [platform] if you want to install for just one).Add the Android SDK's primary and platform tools directories to your path (to give mvn access to aapt and apkbuilder). Currently, the build process targets Android 1.5, but if you've changed it to target a different platform, use that one in the second export command.
export PATH=${PATH}:<your_sdk_dir>/tools
export PATH=${PATH}:<your_sdk_dir>/platforms/android-1.5/tools
mkdir fd-readonly
cd fd-readonly
git clone git://gitorious.org/replicant/floss-dispenser.git
mvn clean install
This is the list of the proprietary libraries, binaries and firmwares shipped with cyanogenmod or the factory images on the Galaxy S and the status of their replacement.
Note that we don't ship any proprietary binary, library or firmware.
First because our goal is to reach a 100% free Android distribution and also because sometimes, these are not even distributables.
| Library location | Function | Can be replaced or avoided? |
|---|---|---|
| /system/vendor/lib/hw/gps.aries.so | GPS library (sends NMEA output to framework) | Easy to rewrite, doesn't deal with hardware at all |
| /system/lib/libril.so | RIL Lib | Default libril works fine with replacement |
| /system/lib/libsecril-client.so | RIL client (used by libaudio) | Replaced by samsung-ril-client |
| /system/lib/libsec-ril.so | RIL | Replaced by samsung-ril |
| /system/lib/libsamsungcamera.so | dlopened camera lib | Camera is v4l2 and there is a free replacement for ics available |
| /system/lib/egl/libGLES_android.so | graphics | PowerVR-related |
| /system/vendor/lib/egl/libEGL_POWERVR_SGX540_120.so | graphics | PowerVR-related |
| /system/vendor/lib/egl/libGLESv1_CM_POWERVR_SGX540_120.so | graphics | PowerVR-related |
| /system/vendor/lib/egl/libGLESv2_POWERVR_SGX540_120.so | graphics | PowerVR-related |
| /system/vendor/lib/hw/gralloc.aries.so | graphics | PowerVR-related |
| /system/vendor/lib/libakm.so | compass lib | there is libakm_free but it doesn't support this compass |
| /system/vendor/lib/libglslcompiler.so | ? | can be avoided |
| /system/vendor/lib/libIMGegl.so | graphics | PowerVR-related |
| /system/vendor/lib/libpvr2d.so | graphics | PowerVR-related |
| /system/vendor/lib/libpvrANDROID_WSEGL.so | graphics | PowerVR-related |
| /system/vendor/lib/libPVRScopeServices.so | graphics | PowerVR-related |
| /system/vendor/lib/libsrv_init.so | ? | can be avoided |
| /system/vendor/lib/libsrv_um.so | ? | can be avoided |
| /system/vendor/lib/libusc.so | ? | can be avoided |
| /system/vendor/lib/libsensor_yamaha_test.so | sensors | can be avoided |
| /system/vendor/lib/libsensorservice.so | sensors | can be avoided |
| /system/lib/libActionShot.so | camera-related | ? |
| /system/lib/libarccamera.so | camera-related | ? |
| /system/lib/libcamera_client.so | camera-related | ? |
| /system/lib/libcamerafirmwarejni.so | camera-related | ? |
| /system/lib/libcameraservice.so | camera-related | ? |
| /system/lib/libCaMotion.so | camera-related | ? |
| /system/lib/libcaps.so | ? | ? |
| /system/lib/libPanoraMax1.so | ? | ? |
| /system/lib/libPlusMe.so | ? | ? |
| /system/lib/libs3cjpeg.so | jpeg-related | should be free software |
| /system/lib/libseccamera.so | camera-related | ? |
| /system/lib/libseccameraadaptor.so | camera-related | ? |
| /system/lib/libsecjpegencoder.so | jpeg-related | ? |
| /system/lib/libtvout.so | graphics (tv out) | ? |
| /system/lib/lib_tvoutengine.so | graphics (tv out) | ? |
| /system/lib/libtvoutfimc.so | graphics (tv out) | ? |
| /system/lib/libtvouthdmi.so | graphics (tv out) | ? |
| /system/lib/libtvoutservice.so | graphics (tv out) | ? |
| /system/lib/libQmageDecoder.so | decoder ? | ? |
| Binary location | Function | Can be replaced or avoided? |
|---|---|---|
| /system/vendor/bin/gpsd | non-free gpsd | needs to eb replaced to have working gps |
| /system/bin/rild | ril daemon | it's there to run the RIL as root, was replaced easily |
| /radio/modem.bin | modem binary | we don't want to deal with it |
| /system/vendor/bin/pvrsrvinit | graphics | can be avoided with our gralloc |
| /system/vendor/bin/orientationd | sensors | must be replaced by libakm_free |
| /system/vendor/bin/geomagneticd | must be replaced by libakm_free | |
| /system/bin/tvoutserver | graphics | ? |
| /system/bin/charging_mode | ? | ? |
| /system/bin/playlpm | play nice images when charging the phone | was replaced |
| File location | Function | What depends on it? |
|---|---|---|
| /system/etc/gps.conf | gps conf | non-free gps module? |
| /system/vendor/etc/gps.xml | gps conf | non-free gpsd |
| /system/cameradata/datapattern_420sp.yuv | camera-related | non-free camera lib |
| /system/cameradata/datapattern_front_420sp.yuv | camera-related | non-free camera lib |
| /system/media/battery_charging_10.qmg | charging mode screen | charging mode (but was replaced) |
| /system/media/battery_charging_100.qmg | charging mode screen | charging mode (but was replaced) |
| /system/media/battery_charging_15.qmg | charging mode screen | charging mode (but was replaced) |
| /system/media/battery_charging_20.qmg | charging mode screen | charging mode (but was replaced) |
| /system/media/battery_charging_25.qmg | charging mode screen | charging mode (but was replaced) |
| /system/media/battery_charging_30.qmg | charging mode screen | charging mode (but was replaced) |
| /system/media/battery_charging_35.qmg | charging mode screen | charging mode (but was replaced) |
| /system/media/battery_charging_40.qmg | charging mode screen | charging mode (but was replaced) |
| /system/media/battery_charging_45.qmg | charging mode screen | charging mode (but was replaced) |
| /system/media/battery_charging_5.qmg | charging mode screen | charging mode (but was replaced) |
| /system/media/battery_charging_50.qmg | charging mode screen | charging mode (but was replaced) |
| /system/media/battery_charging_55.qmg | charging mode screen | charging mode (but was replaced) |
| /system/media/battery_charging_60.qmg | charging mode screen | charging mode (but was replaced) |
| /system/media/battery_charging_65.qmg | charging mode screen | charging mode (but was replaced) |
| /system/media/battery_charging_70.qmg | charging mode screen | charging mode (but was replaced) |
| /system/media/battery_charging_75.qmg | charging mode screen | charging mode (but was replaced) |
| /system/media/battery_charging_80.qmg | charging mode screen | charging mode (but was replaced) |
| /system/media/battery_charging_85.qmg | charging mode screen | charging mode (but was replaced) |
| /system/media/battery_charging_90.qmg | charging mode screen | charging mode (but was replaced) |
| /system/media/battery_charging_95.qmg | charging mode screen | charging mode (but was replaced) |
| /system/media/chargingwarning.qmg | charging mode screen | charging mode (but was replaced) |
| /system/media/Disconnected.qmg | charging mode screen | charging mode (but was replaced) |
| Firmware location | Function | What depends on it? |
|---|---|---|
| /system/vendor/firmware/bcm4329.hcd | wifi/bt firmware | wifi/bt chip |
| /system/vendor/firmware/nvram_net.txt | wifi/bt firmware | wifi/bt chip |
| /system/vendor/firmware/cypress-touchkey.bin | ? | ? |
| /system/vendor/firmware/samsung_mfc_fw.bin | MFC | hardware video decoding |
| /system/vendor/firmware/CE147F02.bin | ? | ? |
| /system/firmware/CE147F00.bin | ? | ? |
| /system/firmware/CE147F01.bin | ? | ? |
| /system/firmware/CE147F02.bin | ? | ? |
| /system/firmware/CE147F03.bin | ? | ? |
| Variant | Replicant compatible versions | SoC | Bootloader | Modem link | Modem protocol | RAM |
|---|---|---|---|---|---|---|
| Galaxy Tab 2 10.1 (GT-P5100) | Replicant 4.0, 4.2, 6.0 | OMAP 4430 | Signed | Isolated (MIPI) | samsung-ipc | 1G |
| Galaxy Tab 2 10.1 WiFi (GT-P5110) | Replicant 4.0, 4.2, 6.0 | OMAP 4430 | Signed | No modem | 1G | |
This explains how to build Replicant for the Galaxy Tab 2 10.1.
Do not build as root, always build as user.
Setup the build environment:
source build/envsetup.sh
lunch replicant_p5100-userdebug
export ANDROID_JAVA_HOME=$JAVA_HOME
Setup the build environment:
source build/envsetup.sh
lunch replicant_p5110-userdebug
export ANDROID_JAVA_HOME=$JAVA_HOME
Start the build:
parallel_tasks=$(echo "$(grep 'processor' /proc/cpuinfo | wc -l ) + 1" | bc)
make -j$parallel_tasks bacon
The -jn argument is to indicate the number of parallel tasks during the build.
You can remove it from the command line to have only one task at a time. With fast hardware, best results will come with -j9, -j16 and -j32.
out/target/product/p5100/, out/target/product/p5110/out/host/linux-x86/bin/Warning: installing an operating system, such as Replicant, may void your device's warranty and will erase the data stored on the device.
In order to install Replicant on your device, it is assumed that you have a computer running a GNU/Linux operating system and everything necessary to connect your device to the computer through USB available. Moreover, it is assumed that anyone performing the installation knows how to use command lines in a terminal and has basic knowledge about it.
The first step in the installation process is to download and set up the files that will be used to install Replicant to the device. The files must be downloaded on your computer first.
1. Find out what the latest image is: check out the Last image part of the general table on GalaxyTab2101P51xx
2. Download all the files listed for the device (including the checksum and the signatures) on ReplicantImages for the latest image
2. Make sure you have added the Replicant release key to your GPG keyring
3. Check the signature of the files:
gpg --armor --verify path/to/replicant-4.2-p5100.zip.asc path/to/replicant-4.2-p5100.zip
gpg --armor --verify path/to/replicant-4.2-p5110.zip.asc path/to/replicant-4.2-p5110.zip
gpg --armor --verify path/to/recovery.img.asc path/to/recovery.img
md5sum -c p5100.md5
md5sum -c p5110.md5
The heimdall tool is required to flash the recovery image to the device.
Instructions to install heimdall: ToolsInstallation
You can either complete this step by using the device's internal storage or by using an external microSD card.
1. Make sure the device is started up and has an Android system running
2. Connect the USB cable to both the computer and the device
3. Enable USB mass storage on the device
4. Mount the mass storage on the computer
5. Copy the replicant-4.2-p5100.zip or replicant-4.2-p5110.zip file at the origin of the mass storage
6. Safely unmount the mass storage on the computer
7. Disable USB mass storage on the device
1. Connect the microSD card to the computer (e.g. using an USB card reader)
2. Mount the microSD card on the computer
3. Copy the replicant-4.2-p5100.zip or replicant-4.2-p5110.zip file at the origin of the microSD card
4. Safely unmount the microSD card on the computer
5. Disconnect the microSD card from the computer
6. Insert the microSD card in the device (make sure it is turned off before inserting the card)
Instructions to install ADB: ToolsInstallation
The next step in the installation process is to prepare the device for heimdall mode.
1. Make sure the device is completely turned off and the USB cable is disconnected from the device
2. Start the device by holding the following key combination: Volume up, Power
3. Hold the key combination until the device shows a Warning message
4. Confirm that you want to download a custom OS (using volume up)
5. Make sure the device is in Downloading mode
4. Connect the USB cable to both the computer and the device
Now that both the computer and the device are set up, it is time to actually install the images to the device.
1. Install the recovery image to the device:
heimdall flash --KERNEL path/to/recovery.img --RECOVERY path/to/recovery.img
2. Make sure the device reboots to recovery
3. Select install zip (using the volume keys to navigate and the power key to select)
4. Select install zip from sdcard
5. Select the system zip: replicant-4.2-p5100.zip or replicant-4.2-p5110.zip
Note: if your device was running Android 4.2 and later, it may be located in the 0 directory
6. Confirm the installation
4. Select install zip from external sdcard
5. Select the system zip: replicant-4.2-p5100.zip or replicant-4.2-p5110.zip
Note: if your device was running Android 4.2 and later, it may be located in the 0 directory
6. Confirm the installation
4. Select install zip from sideload
5. Back to the host computer, load the system zip with sideload:
adb sideload path/to/replicant-4.2-p5100.zip
adb sideload path/to/replicant-4.2-p5110.zip
8. Select Go Back (if necessary) to get back to the general menu
8. Select wipe data/factory reset
9. Confirm the data wipe by selecting Yes -- delete all user data
10. Select Reboot system now to reboot the device
Your device should now be running Replicant!
Some hardware functionalities require firmwares to be functional.
If you are interested in writing free software replacements for these firmware files, please contact us.
Firmwares are programs that do not run on the main CPU: instead, they run on separate chips. Some firmwares come pre-installed on the chip and some others need to be loaded by the CPU.
Since these firmwares are non-free software, we do not recommend using them nor do we distribute them.
| Firmware location | Related chip | Function |
| /system/vendor/firmware/bcmdhd_sta.bin | BCM4330 | Wi-Fi |
| /system/vendor/firmware/bcmdhd_mfg.bin | BCM4330 | Wi-Fi |
| /system/vendor/firmware/bcmdhd_apsta.bin | BCM4330 | Wi-Fi Host |
| /system/vendor/firmware/bcmdhd_p2p.bin | BCM4330 | Wi-Fi Direct |
| /system/vendor/firmware/nvram_net.txt | BCM4330 | Wi-Fi |
| /system/vendor/firmware/nvram_mfg.txt | BCM4330 | Wi-Fi |
| /system/vendor/firmware/BCM4330.hcd | BCM4330 | Bluetooth |
| /system/vendor/firmware/ducati-m3.bin | Ducati M3 | Hardware media encoding/decoding, Camera |
This explains how to build Replicant for the Galaxy Tab 2 7.0 (P31xx).
Do not build as root, always build as user.
Setup the build environment:
source build/envsetup.sh
lunch replicant_p3100-userdebug
export ANDROID_JAVA_HOME=$JAVA_HOME
Setup the build environment:
source build/envsetup.sh
lunch replicant_p3110-userdebug
export ANDROID_JAVA_HOME=$JAVA_HOME
Start the build:
parallel_tasks=$(echo "$(grep 'processor' /proc/cpuinfo | wc -l ) + 1" | bc)
make -j$parallel_tasks bacon
The -jn argument is to indicate the number of parallel tasks during the build.
You can remove it from the command line to have only one task at a time. With fast hardware, best results will come with -j9, -j16 and -j32.
out/target/product/p3100/, out/target/product/p3110/out/host/linux-x86/bin/Warning: installing an operating system, such as Replicant, may void your device's warranty and will erase the data stored on the device.
In order to install Replicant on your device, it is assumed that you have a computer running a GNU/Linux operating system and everything necessary available to connect your device to the computer through USB. Moreover, it is assumed that anyone performing the installation knows how to use a terminal and has basic knowledge about command line commands.
The first step in the installation process is to download and set up the files that will be used to install Replicant to the device. The files must be downloaded on your computer first.
1. Find out what the latest image is: check out the Last image part of the general table on GalaxyTab270P31xx
2. Download all the files listed for the device (including the checksum and the signatures) on ReplicantImages for the latest image
2. Make sure you have added the Replicant release key to your GPG keyring
3. Check the signature of the files:
gpg --armor --verify path/to/replicant-4.2-p3100.zip.asc path/to/replicant-4.2-p3100.zip
gpg --armor --verify path/to/replicant-4.2-p3110.zip.asc path/to/replicant-4.2-p3110.zip
gpg --armor --verify path/to/recovery.img.asc path/to/recovery.img
md5sum -c p3100.md5
md5sum -c p3110.md5
The heimdall tool is required to flash the recovery image to the device.
Instructions to install heimdall: ToolsInstallation
You can either complete this step by using the device's internal storage or by using an external microSD card.
1. Make sure the device is started up and has an Android system running
2. Connect the USB cable to both the computer and the device
3. Enable USB mass storage on the device
4. Mount the mass storage on the computer
5. Copy the replicant-4.2-p3100.zip or replicant-4.2-p3110.zip file at the origin of the mass storage
6. Safely unmount the mass storage on the computer
7. Disable USB mass storage on the device
1. Connect the microSD card to the computer (e.g. using an USB card reader)
2. Mount the microSD card on the computer
3. Copy the replicant-4.2-p3100.zip or replicant-4.2-p3110.zip file at the origin of the microSD card
4. Safely unmount the microSD card on the computer
5. Disconnect the microSD card from the computer
6. Insert the microSD card in the device (make sure it is turned off before inserting the card)
Instructions to install ADB: ToolsInstallation
The next step in the installation process is to prepare the device for heimdall mode.
1. Make sure the device is completely turned off and the USB cable is disconnected from the device
2. Start the device by holding the following key combination: Volume down, Power
3. Hold the key combination until the device shows a Warning message
4. Confirm that you want to download a custom OS (using volume up)
5. Make sure the device is in Downloading mode
4. Connect the USB cable to both the computer and the device
Now that both the computer and the device are set up, it is time to actually install the images to the device.
1. Install the recovery image to the device:
heimdall flash --KERNEL path/to/recovery.img --RECOVERY path/to/recovery.img
2. Make sure the device reboots to recovery
3. Select install zip (using the volume keys to navigate and the power key to select)
4. Select install zip from sdcard
5. Select the system zip: replicant-4.2-p3100.zip or replicant-4.2-p3110.zip
Note: if your device was running Android 4.2 and later, it may be located in the 0 directory
6. Confirm the installation
4. Select install zip from external sdcard
5. Select the system zip: replicant-4.2-p3100.zip or replicant-4.2-p3110.zip
Note: if your device was running Android 4.2 and later, it may be located in the 0 directory
6. Confirm the installation
4. Select install zip from sideload
5. Back to the host computer, load the system zip with sideload:
adb sideload path/to/replicant-4.2-p3100.zip
adb sideload path/to/replicant-4.2-p3110.zip
8. Select Go Back (if necessary) to get back to the general menu
8. Select wipe data/factory reset
9. Confirm the data wipe by selecting Yes -- delete all user data
10. Select Reboot system now to reboot the device
Your device should now be running Replicant!
Some hardware functionalities require firmwares to be functional.
If you are interested in writing free software replacements for these firmware files, please contact us.
Firmwares are programs that do not run on the main CPU: instead, they run on separate chips. Some firmwares come pre-installed on the chip and some others need to be loaded by the CPU.
Since these firmwares are non-free software, we do not recommend using them nor do we distribute them.
| Firmware location | Related chip | Function |
| /system/vendor/firmware/bcmdhd_sta.bin | BCM4330 | Wi-Fi |
| /system/vendor/firmware/bcmdhd_mfg.bin | BCM4330 | Wi-Fi |
| /system/vendor/firmware/bcmdhd_apsta.bin | BCM4330 | Wi-Fi Host |
| /system/vendor/firmware/bcmdhd_p2p.bin | BCM4330 | Wi-Fi Direct |
| /system/vendor/firmware/nvram_net.txt | BCM4330 | Wi-Fi |
| /system/vendor/firmware/nvram_mfg.txt | BCM4330 | Wi-Fi |
| /system/vendor/firmware/BCM4330.hcd | BCM4330 | Bluetooth |
| /system/vendor/firmware/ducati-m3.bin | Ducati M3 | Hardware media encoding/decoding, Camera |
This is the list of the proprietary libraries, binaries and firmwares shipped on the GeeksPhone One and the status of their replacement.
Note that we don't ship any proprietary binary, library or firmware.
First because our goal is to reach a 100% free Android distribution and also because sometimes, these are not even distributables.
| Library name | Location |
|---|---|
| libcm.so | /system/lib/ |
| libdsm.so | /system/lib/ |
| libdss.so | /system/lib/ |
| libgsdi_exp.so | /system/lib/ |
| libgstk_exp.so | /system/lib/ |
| libmmgsdilib.so | /system/lib/ |
| libnv.so | /system/lib/ |
| liboem_rapi.so | /system/lib/ |
| liboncrpc.so | /system/lib/ |
| libqmi.so | /system/lib/ |
| libqueue.so | /system/lib |
| libril-qc-1.so | /system/lib |
| libwms.so | /system/lib/ |
| libwmsts.so | /system/lib/ |
| libsnd.so | /system/lib/ |
| Library name | Location |
|---|---|
| libmmcamera.so | /system/lib/ |
| libmmcamera_target.so | /system/lib/ |
| libmmjpeg.so | /system/lib/ |
| Library name | Location |
|---|---|
| libmm-adspsvc.so | /system/lib/ |
| libOmxH264Dec.so | /system/lib/ |
| libOmxMpeg4Dec.so | /system/lib/ |
| libOmxVidEnc.so | /system/lib/ |
| Library name | Location |
|---|---|
| hci_qcomm_init | /system/bin/ |
| Firmware location | Function | What depends on it? |
|---|---|---|
| /system/etc/wifi/fw/athwlan.bin.z77 | Wifi | AR6002 (cat /sys/module/ar6000/parameters/tgt_fw) |
| /system/etc/wifi/fw/data.patch.hw2_0.bin | Wifi | AR6002 (cat /sys/module/ar6000/parameters/tgt_patch) |
| /system/etc/wifi/fw/eeprom.bin | Wifi | AR6002 (cat /sys/module/ar6000/parameters/eeprom_bin) |
Note: in /sys/module/ar6000/parameters/ you can change debug level for the driver with the debuglevel parameter.
Here is a link with information about the AR600X architecture, pointing to use ath6kl driver and a new firmware (I've done md5sum on the files on the phone, and on the new firmware and aren't the same files). Please note that AR6002 and AR6001 are not supported by this driver (ath6kl).
Here is a list of FLOSS replacements for the non-free apps that are part of the Google experience. Note that these are not part of Android itself.
| Google app | FLOSS replacement | License | Website | Installed in Replicant | Available in F-Droid? |
|---|---|---|---|---|---|
| Android Market | F-Droid | GPLv2+ | http://f-droid.org/ | Yes | Yes |
| Aptoide | GPLv2 | http://aptoide.org/trac | No | No | |
| GMail | Android Mail | Apache 2 | http://source.android.com/ | Yes | No |
| K9 | Apache 2 | http://code.google.com/p/k9mail/ | No | Yes | |
| Google Maps | OsmAnd | GPLv3 | http://osmand.net/ | No | Yes |
| gvSIG Mini Maps | GPLv2 | https://confluence.prodevelop.es/display/GVMN/Home | No | Yes | |
| OsmDroid | LGPL | http://code.google.com/p/osmdroid/ | No | Yes | |
| Navit | GPLv2 | http://wiki.navit-project.org/index.php/Navit_on_Android | No | Yes | |
| RMaps | GPLv3 | http://robertdeveloper.blogspot.com/2009/08/rmaps.html | No | Yes | |
| Google Talk | CSipsimple (SIP) | GPLv3 | http://code.google.com/p/csipsimple/ | No | Yes |
| Sipdroid (SIP) | GPLv3 | http://code.google.com/p/sipdroid/ | No | Yes | |
| Linphone (SIP) | GPLv2+ | http://www.linphone.org/ | No | Yes | |
| Beem (XMPP) | GPLv3+ | http://beem-project.com/ | No | Yes | |
| Gibberbot (XMPP) | Apache 2 | https://guardianproject.info/apps/gibber/ | No | Yes | |
| YouTube | YouTube mobile website | Not an app | http://m.youtube.com/ | Yes | No |
| Genie Widget, News/Weather widget | Weather notification | GPLv2 | http://code.google.com/p/weather-notification-android/ | No | Yes |
| Forecast widgets | Apache 2 | http://code.google.com/p/android-sky/ | No | Yes | |
| Umbrella Today | BSD | https://github.com/bostonandroid/UmbrellaToday | No | Yes |
This page documents the various tried to get a working kernel for the GTA04 with ICS userspace.
Notes:The TI porting guide for AM37x devices advices to use the rowboat tree with the rowboat-ics.xml manifest.
The kernel in that tree is branch rowboat-ics-kernel-2.6.37 from the rowboat kernel.
Porting the GTA04 board and drivers to this kernel seems possible, however this is a very old kernel revision.
The gta04 kernel based on rowboat kernel is at: http://git.paulk.fr/gitweb/?p=replicant/kernel-gta04.git;a=shortlog;h=refs/heads/rowboat-gta04
Status matrix:
| Component | Status |
| Board file | OK (boots normally) |
| RS232 | OK |
| Modem | Missing |
| Power off/reboot | Reboot works, poweroff leaves led on, power button won't start it after poweroff |
| GPS | Missing |
| WiFi/Bluetooth | Missing |
| LCD | OK |
| Graphics (fb) | OK, fast |
| Touch screen | OK |
| Backlight | Missing |
| Sensors | Missing |
| Audio | Missing |
| Headset | Missing |
| USB | OK, automatic OTG host/device, issue at suspend |
| microSD | OK |
| Buttons | Missing |
| LEDs | Missing |
| Battery | Missing |
Omapzoom (where TI pushes code for Android) has an omap3 kernel that should match ICS userspace.
However, when running on the GTA04, serious power management issues caused characters to be dropped on serial after not touching the phone for a couple of seconds as well as IRQ interrupts being dropped, which caused the touchscreen to not work properly. Suspend/resume and earlysuspend works perfectly though. Maybe this kernel wasn't designed for AM37x OMAP3 devices but another kind of OMAP3 SoCs: there is no support for Android Beagleboard.
Merging AOSP's 3.4 common kernel on top of Neil Brown's 3.4 gta04 kernel and adding the Android options to the defconfig resulted in a non-working kernel where input events didn't seem to be reported correctly to userspace (even with an USB mouse, click events seemed dropped).
| Component | Status |
| Board file | OK (boots normally) |
| RS232 | OK |
| Modem | Untested, should work |
| Power off/reboot | Reboot works, poweroff crashes with adb |
| GPS | Untested, should work |
| WiFi/Bluetooth | Untested, should work |
| LCD | OK, looks strange after suspend |
| Graphics (fb) | OK, fast |
| Touch screen | OK |
| Backlight | Working |
| Sensors | Untested, should work |
| Audio | Untested, should work |
| Headset | Untested, probably needs to be adapted to android |
| USB | OK, adb works but doesn't shut down properly |
| microSD | OK |
| Buttons | works |
| LEDs | Untested, should work |
| Battery | Untested, should work |
| frequency scaling | not working in neil's kernel, waiting for a fix |
h3. Issues
Both branches seem to make trebuchet freeze, on the system log there is:I/WindowManager( 191): Input event dispatching timed out sending to Keyguard
Warning: flashing another operating system like Replicant may void your warranty and will erase the data stored on the device.
This guide assumes your phone is supported by Heimdall and installation is to be done using recovery.
Each device has its own set of keys to enter different boot modes and specific partition names.
Moreover, a specific partition name has to be specified to heimdall when flashing.
| Device | Keys for Download mode | Keys for recovery mode | Kernel partition | Recovery partition |
|---|---|---|---|---|
| Galaxy S | Volume-, Select, Power | Not available | kernel | Not available |
| Galaxy S2 | Volume-, Select, Power | Not available | kernel | Not available |
| Galaxy S3 | Volume-, Select, Power | Volume+, Select, Power | BOOT | RECOVERY |
| Galaxy Tab 2 10.1 | Volume+, Power | Volume-, Power | kernel | recovery |
| Galaxy Tab 2 7.0 | Volume- | Volume+, Power | kernel | recovery |
heimdall flash --[RECOVERY PARTITION] path/to/recovery.img
heimdall flash --[KERNEL PARTITION] path/to/recovery.img
Your device should now be running Replicant!
# ./adb pull /system/etc/wifi/Fw1251r1c.bin ./
# wget http://n0rp.chemlab.org/android/cm-recovery-1.4.img
# ./fastboot boot cm-recovery-1.4.img
./adb shell
# mount -t vfat /dev/block/mmcblk0p1 /sdcard
# ls -d /sdcard/nandroid/*/*
/sdcard/nandroid/HT935NG03334/CBDMRS12-20090917-1455
# exit
# ./adb shell
# mount -t vfat /dev/block/mmcblk0p1 /sdcard
# exit
# ./adb push boot.img /sdcard/nandroid/HT935NG03334/CBDMRS12-20090917-1455
# ./adb push system.img /sdcard/nandroid/HT935NG03334/CBDMRS12-20090917-1455
./adb shell
# md5sum /sdcard/nandroid/HT935NG03334/CBDMRS12-20090917-1455/boot.img
a491db2000489c7fb7c5f7fe4b103b8c  boot.img
# md5sum /sdcard/nandroid/HT935NG03334/CBDMRS12-20090917-1455/system.img
610b10a715ea1a5db4e6badd6a8a2989  system.img
# ./adb pull /sdcard/nandroid/HT935NG03334/CBDMRS12-20090917-1455/nandroid.md5 ./
# ./adb push nandroid.md5 /sdcard/nandroid/HT935NG03936/CBDMRS12-20090917-1455/nandroid.md5
# ./adb shell
umount /sdcard
# ./adb shell
# cd /data/data/com.android.providers.settings/databases
# sqlite3 settings.db
SQLite version 3.5.9
Enter ".help" for instructions
sqlite> INSERT INTO secure (name, value) VALUES ('device_provisioned', 1);
sqlite> .exit
# ./adb remount
# ./adb push Fw1251r1c.bin /system/etc/wifi/
# ./adb shell
reboot
Replicant only supports a few phones. Make sure the phone you want to install Replicant on is on the ReplicantStatus list. If it's not, you won't be able to install Replicant on your device without at least a bit of software hacking.
Some phones come with software that allows the user to flash the memory (replace the content of the memory partitions, like the system or the kernel one), but it's not always the case. Google-branded phones (Nexus One and Nexus S) come with this allowed but for some other devices, you'll certainly have to do some more operations to make this possible (it's required to flash Replicant).
Please, refer to the CyanogenMod wiki to find and follow the instructions to root the phone. Note that instructions for Replicant 2.2 correspond to CyanogenMod 6 and Replicant 2.3 correspond to CyanogenMod 7.
For instance on the HTC Dream page, you'll need to follow the instructions to root the phone and to install DangerSPL.
Note: all the radio images and bootloader images that are provided on these pages are not free software.
dream_sapphire.Replicant 2.2 preview 0009.For instance, if the phone is HTC Dream and the latest image Replicant 2.2 preview 0009, the base location will be: https://download.replicant.us/images/replicant-2.2/preview/0009/.
cd ~/Downloads
If you have downloaded the files in any other place, change ~/Downloads by the location where you downloaded the files.
sudo su
This will ask you to type your password. Note that in most cases, the letters you type won't be shown.
chmod a+x fastboot
Keep this terminal open during the next step.
./fastboot oem unlock Warning: on Nexus One, the operation voids the warranty and is irreversible. On Nexus S and Nexus S 4G, the bootloader can be locked back.
WARNING: This step will erase every data stored on the phone, make sure you copied the data if you don't want to lose it.
./fastboot flash system system.img
./fastboot flash boot boot.img
./fastboot flash userdata userdata.img
./fastboot flash recovery recovery.img
./fastboot erase cache
./fastboot reboot
Your device should reboot with Replicant running. Now you are done, Replicant is installed on your device!
Put the phone in fastboot mode (by holding the Camera button and the Power button, then following on-screen instructions), make sure it's connected to your computer, and run the following commands on your computer. You may need to use sudo.
Note, if you don't have instructions for entering fastboot mode, you may need to install DangerSPL using the CyanogenMod instructions.
Note that it will erase everything on the phone
./fastboot flash system system.img
./fastboot flash boot boot.img
./fastboot flash userdata userdata.img
./fastboot erase cache
./fastboot reboot
The video can be downloaded at http://download.paulk.fr/replicant/introducing_replicant/introducing_replicant_web.webm .
Its quality is bad but unfortunately, I can't provide videos of an higher size (I have a very limited upload bandwidth).
This video shows basic replicant usage: calls, sms, internet, some android standard apps, fdroid, some featured fdroid apps like OsmAnd, terminal emulator.
Note that at some moments, what I'm trying to show doesn't work at first time (multi-touch, URL typing errors, etc) but well, it's part of the game ;)
It's probably better to distribute the subtitles .srt files instead of hard-writing the text in the video: doing things that way permits to have the subtitles in different languages.
Feel free to suggest modifications to the subtitles while these are not approved.

h3. English version

*Approved*: not yet

<pre>
1
00:00:15,840 --> 00:00:20,680
Boot time

2
00:00:20,680 --> 00:00:21,680
0:00

3
00:00:21,680 --> 00:00:22,680
0:01

4
00:00:22,680 --> 00:00:23,680
0:02

5
00:00:23,680 --> 00:00:24,680
0:03

6
00:00:24,680 --> 00:00:25,680
0:04

7
00:00:25,680 --> 00:00:26,680
0:05

8
00:00:26,680 --> 00:00:27,680
0:06

9
00:00:27,680 --> 00:00:28,680
0:07

10
00:00:28,680 --> 00:00:29,680
0:08

11
00:00:29,680 --> 00:00:30,680
0:09

12
00:00:30,680 --> 00:00:31,680
0:10

13
00:00:31,680 --> 00:00:32,680
0:11

14
00:00:32,680 --> 00:00:33,680
0:12

15
00:00:33,680 --> 00:00:34,680
0:13

16
00:00:34,680 --> 00:00:35,680
0:14

17
00:00:35,680 --> 00:00:36,680
0:15

18
00:00:36,680 --> 00:00:37,680
0:16

19
00:00:37,680 --> 00:00:38,680
0:17

20
00:00:38,680 --> 00:00:39,680
0:18

21
00:00:39,680 --> 00:00:40,680
0:19

22
00:00:40,680 --> 00:00:41,680
0:20

23
00:00:41,680 --> 00:00:42,680
0:21

24
00:00:42,680 --> 00:00:43,680
0:22

25
00:00:43,680 --> 00:00:44,680
0:23

26
00:00:44,680 --> 00:00:45,680
0:24

27
00:00:45,680 --> 00:00:46,680
0:25

28
00:00:46,680 --> 00:00:47,680
0:26

29
00:00:47,680 --> 00:00:48,680
0:27

30
00:00:48,680 --> 00:00:49,680
0:28

31
00:00:49,680 --> 00:00:50,680
0:29

32
00:00:50,680 --> 00:00:51,680
0:30

33
00:00:51,680 --> 00:00:52,680
0:31

34
00:00:52,680 --> 00:00:53,680
0:32

35
00:00:53,680 --> 00:00:54,680
0:33

36
00:00:54,680 --> 00:00:55,680
0:34

37
00:00:55,680 --> 00:00:56,680
0:35

38
00:00:56,680 --> 00:00:57,680
0:36

39
00:00:57,680 --> 00:00:58,680
0:37

40
00:00:58,680 --> 00:00:59,680
0:38

41
00:00:59,680 --> 00:01:00,680
0:39

42
00:01:00,680 --> 00:01:01,680
0:40

43
00:01:01,680 --> 00:01:02,680
0:41

44
00:01:02,680 --> 00:01:03,680
0:42

45
00:01:03,680 --> 00:01:04,680
0:43

46
00:01:04,680 --> 00:01:05,680
0:44

47
00:01:05,680 --> 00:01:06,680
0:45

48
00:01:06,680 --> 00:01:07,680
0:46

49
00:01:07,680 --> 00:01:08,680
0:47

50
00:01:08,680 --> 00:01:09,680
0:48

51
00:01:09,680 --> 00:01:10,680
0:49

52
00:01:10,680 --> 00:01:11,680
0:50

53
00:01:11,680 --> 00:01:12,680
0:51

54
00:01:12,680 --> 00:01:13,680
0:52

55
00:01:13,680 --> 00:01:20,680
52 seconds to boot replicant from cold start

56
00:01:20,680 --> 00:01:24,000
Incoming call, using a free Radio Interface Layer (RIL)

57
00:01:24,000 --> 00:01:32,000
Ringtone

58
00:01:32,000 --> 00:01:40,000
Missed call notification

59
00:01:40,000 --> 00:01:55,000
Outgoing call, using a free RIL

60
00:02:03,000 --> 00:02:12,000
Call log

61
00:02:12,000 --> 00:02:16,000
Fast-access icons to call and send SMS

62
00:02:16,000 --> 00:02:22,000
Composing text messages (SMS)

63
00:02:22,000 --> 00:02:25,000
On-screen keyboard

64
00:02:25,000 --> 00:02:28,500
Sending SMS using, a free RIL

65
00:02:28,500 --> 00:02:33,000
Sending SMS using, a free RIL: delivery report

66
00:02:38,000 --> 00:02:48,000
Running the music app

67
00:02:48,000 --> 00:02:54,000
Playing music encoded in the free OGG Vorbis format

68
00:02:54,000 --> 00:03:01,000
Seeking the track

69
00:03:01,000 --> 00:03:06,000
Playing music in background

70
00:03:06,000 --> 00:03:09,000
Clock app

71
00:03:09,000 --> 00:03:11,000
Alarm app

72
00:03:11,000 --> 00:03:18,000
Alarm app: creating a new alarm

73
00:03:23,000 --> 00:03:29,000
Apps launcher

74
00:03:29,000 --> 00:03:35,000
Calculator app

75
00:03:37,000 --> 00:03:50,000
Running the web browser

76
00:04:00,000 --> 00:04:06,000
Connecting to the Internet using USB networking

77
00:04:06,000 --> 00:04:10,000
Zooming using multi-touch

78
00:04:10,000 --> 00:04:23,000
Moving on the web page

79
00:04:23,000 --> 00:04:26,000
Zooming using touble-tap

80
00:04:26,000 --> 00:04:35,500
Scrolling the web page

81
00:04:38,000 --> 00:04:46,500
Using the hardware keyboard

82
00:05:20,000 --> 00:05:26,500
Watching [[YouTube]] videos with a free video decoder

83
00:05:26,500 --> 00:05:45,000
Seeking the video

84
00:06:06,000 --> 00:06:12,000
Using FDroid, the free software apps repository client

85
00:06:12,000 --> 00:06:20,000
The list of avilable free software is quite long!

86
00:06:20,000 --> 00:06:39,500
Let's select one to install

87
00:06:39,500 --> 00:06:43,000
Installed!

88
00:06:43,000 --> 00:07:06,000
Installed and running!

89
00:07:12,000 --> 00:07:18,000
[[OsmAnd]]: the featured free maps app using [[OpenStreetMap]] data

90
00:07:18,000 --> 00:07:22,000
GPS gets activated and works (with a free library)

91
00:07:55,000 --> 00:08:02,000
The terminal emulator app allows you to use command line…

92
00:08:02,000 --> 00:08:06,000
… and get root!

93
00:08:14,000 --> 00:08:20,000
Linux localhost 2.6.35.9-cyanogenmod #4 PREEMPT Thu Jun 23 12:41:17 CEST 2011 armv6l GNU/Linux
</pre>
We would like to list here all known Free Software applications that can be installed on Android devices.
| Application name | Description | Website | Apk | Market | Sources | License | API | Note/Replicant Status | |
| Desk Clock | Clock | Desk Clock | apk | market | git | ||||
| SayMyName | reads out caller's name | roadtoadc | |||||||
| ZXing | Barcode reader | ZXing | |||||||
| Openintents | PIM applications(I didn't check all of them) | openintents | /!\ WARNING not all openintents applications are free software,some have an EULA | ||||||
| SuperGenPass | Password hasher | SuperGenPass | apk | [git://staticfree.info/git/SuperGenPass/ git] | GPLv3 | ||||
| Wiki Dici | Wiktionary | Wiki Dici | |||||||
| APN | Apndroid | ||||||||
| Spell Dial | spelldial | ||||||||
| Astrid | Task recording | Astrid | |||||||
| android-metronome | Metronome | android-metronome | |||||||
| ringdroid | ringdroid | ||||||||
| SMS Popup | android-smspopup | ||||||||
| mandelbrot | Fractal Viewer | mandelbrot | |||||||
| CellFinder | Cell Network Finder | CellFinder | |||||||
| geobeagle | geobeagle | ||||||||
| CIDR Calculator | CIDR subnet calculator | CIDR Calculator | |||||||
| DiskUsage | Disk Usage Viewer | DiskUsage | |||||||
| Contact Owner | Contact Owner | ||||||||
| cyanogen-updater | CM Updater | ||||||||
| pmix | MPD client | pmix | apk | Android 1.5+ | Works with replicant | ||||
| FBReaderJ | e-book reader (fbreader's port) | http://fbreader.org/FBReaderJ/ | apk | [market://search?q=pname:org.geometerplus.zlibrary.ui.android market] | zip | GPL | Android 1.5+ | Works on replicant | |
| AnkiDroid | Flashcard (spaced-)repetition | AnkiDroid | apk | market | git | GPLv3 | Android 1.5+ | ||
| Mnemododo | Flashcard (spaced-)repetition | mnemododo | no | here | GPLv2 | ||||
| Tippy Tipper | tip calculator | tippytipper | here | Apache 2 | |||||
| Proxoid | http proxy for Android | Proxoid | [] | Apache 2 | |||||
| android-wifi-tether | Wireless Tether for Root Users | android-wifi-tether | Apache 2 | ||||||
| android-moderator | A Google Moderator client for Android | android-moderator | Apache 2 |
| Pedometer | A Pedometer for android | Pedometer | GPL3 |
| WebSMS | web sms app | WebSMS | GPL3 |
| chrometophone | Google Chrome to Phone Extension | chrometophone | Apache 2 | I am sure we can use it on chromium too but I see "Chrome to Phone is powered by the Android Cloud to Device Messaging (C2DM) service". Should we list this? |
| TomDroid | note taking | TomDroid | GPLv3 |
Also, WordPlayer is a free-as-in-beer e-book reader that interfaces with the (free-as-in-freedom) calibre e-book manager. Although it does not strictly belong on this list, the developer of WordPlayer has expressed interest in freeing the code if enough developers show interest in contributing.
| Application name | Description | Website | Apk | Market | Sources | License | API | Note/Replicant Status |
| apps for android | Various free software apps pack: apps-for-android apps-for-android |
| Application name | Description | Website | Apk | Market | Sources | License | API | Note/Replicant Status |
| BBC News | BBC News | BBC News | Apache License 2.0. Source code is I here under NewsWidget | |||||
| NPR News | NPR News (National Public Radio) | NPR News | Apache License 2.0 |
| Application name | Description | Website | Apk | Market | Sources | License | API | Note/Replicant Status |
| Yaaic | IRC Client | Yaaic | GNU GPL |
| Sipdroid | SIP client | Sipdroid | apk | [market://search?q=pname:org.sipdroid.sipua market] | svn | GPLv3 | Android 1.5+ | look here for making it work with asterisk instead of the default provider |
| K9 | Email Client | K9 | apk | [market://search?q=pname:com.fsck.k9 market] | svn | Apache 2.0 | Android 1.5+ | |
| Funambol | Android Sync Client | Funambol Client for Android | apk | [market://search?q=pname:com.funambol.android market] | svn | aGPLv3 | Android 2.0+ | |
| ConnectBot | SSH client | ConnectBot | apk | [market://search?q=pname:org.connectbot market] | svn | Apache 2.0 | Android 1.5+ | |
| Libredroid | Libre.fm client | Release Blog Post | apk | [market://search?q=pname:fm.libre.droid market] | ||||
| Mustard | Identi.ca client | Mustard | ||||||
| Denta | Identi.ca client | Denta | ||||||
| Exchange OWA | Mail client | ExchangeIt | ||||||
| yaaic | IRC client | yaaic | apk | on github | GPLv3 | |||
| APG | Android Privacy Guard | APG | apk | [market://search?q=pname:org.thialfihar.android.apg market] | svn | Apache 2.0 | Android 1.5+ |
| Application name | Description | Website | Apk | Market | Sources | License | API | Note/Replicant Status |
| Tux Rider | Tux Rider | can't find its license |
| Fire Taps | music | Fire Taps | GNU GPLv3 | |||||
| Missile Intercept | action | Missile Intercept | GNU GPLv3 | |||||
| Replica Island | platform | Replica Island | Apache License 2.0 | |||||
| Frozen Bubble | Frozen Bubble port | Frozen Bubble | GNU GPL2 | |||||
| !CuckooChess | chess game | CuckooChess | GNU GPL3 | |||||
| Open WordSearch | rod search game | Open WordSearch | GNU GPL3 | |||||
| GL ES Quake | Quake port to OpenGL ES | GL ES Quake | GPLv2 | |||||
| Doom | Doom port | doom-for-android | ||||||
| Solitaire Collection | solitaire-for-android | Apache License 2.0 | ||||||
| Robotic Space Rock | Robotic Space Rock | Robotic Space Rock | Apache License 2.0 | |||||
| TiltMazes | TiltMazes | New BSD License | ||||||
| Scrambled Net | Scrambled Net | GPLv2 with LGPL components | ||||||
| Lexic | Lexic | GPLv3 | ||||||
| Alien Blood bath | Alien Blood Bath | GPLv3 | ||||||
| asquare | asqare | GPLv3 | ||||||
| Android Puzzles | Android Puzzles | Expat License | ||||||
| Knave Arthur's Sword | proof-of-concept 2-player augmented reality swordfighting (virtual swords clink when they intersect) | https://launchpad.net/asword | OpenSourceTownLicense | |||||
| robotfindskitten | robotfindskitten | apk | [git://staticfree.info/git/robotfindskitten/ git] | GPLv3 |
| Guess the Number | A mind game for Android | Guess the Number | Apache License 2.0 |
| Line Follower | Line Follower | Line Follower | GPL3 |
| Application name | Description | Website | Apk | Market | Sources | License | API | Note/Replicant Status |
| Androku | Andoku | GPLv3 | ||||||
| opensudoku | OpenSudoku | GPLv3 |
| Application name | Description | Website | Apk | Market | Sources | License | API | Note/Replicant Status |
| Scummvm | Scummvm port | " | Android 1.5+ | |||||
| Twisty | z-machine emulator | [http://code.google.com/p/twisty/ Twisty":http://sites.google.com/site/scummvmandroid/dev] | GPLv3 |
| Application name | Description | Website | Apk | Market | Sources | License | API | Note/Replicant Status |
| !OsmAnd | Gps navigation program | OsmAnd | " | LGPL | Not supported under Replicant (we have no gps yet) |
| open-gpstracker | A GPS tracking Android App | [https://code.google.com/p/open-gpstracker/ open-gpstracker":https://code.google.com/p/osmand/source/checkout] | GPL3 | Not supported under Replicant (we have no gps yet) |
| GeoBeagle | GeoBeagle: an Android app for geocaching and letterboxing | geobeagle | Apache 2 | Not supported under Replicant (we have no gps yet) |
| Andnav | Gps navigation program | http://www.andnav.org/ http://code.google.com/p/andnav/ | svn | GPLv3 | Android 1.6+ | Not supported under replicant (we have no gps yet), was liberated Dec '09 | ||
| !MyTracks | Gps tracking | http://code.google.com/p/mytracks/ | apk | [market://search?q=pname:com.google.android.maps.mytracks market] | mercurial | Apache 2.0 | Android 1.5+ | No GPS on replicant yet |
| Mixare | Augmented Reality Engine | http://www.mixare.org/ http://code.google.com/p/mixare/ | apk_list | [market://search?q=pname:org.mixare market] | git | GPLv3 | Android 1.5+ | Not supported under replicant (we have no gps yet) |
The OpenStreetMap wiki has a "list of "open source Android applications that support OpenStreetMap.
| Application name | Description | Website | Apk | Market | Sources | License | API | Note/Replicant Status |
| eyes-free | text-to-speech library | eyes-free |
Le Wiki Koumbit also has a list of free/libre apps for Android.
Graziano proposed this logo of a rollerskating android for Replicant, signifying what a carefree, freedom-loving Replicant looks like.
aaronw counterproposes this logo. aaronw's logo is an Android dressed as Pris, a replicant from the movie Bladerunner. In the movie, Pris is a replicant built by the huge, sinister Tyrell corporation. Tyrell has built an army of androids for a life of servitude: hard out-colony labor, combat, and prostitution. Pris, a "pleasure" model, falls in with a small band of renegade replicants which has escaped the colonies and traveled to Earth, seeking freedom. Hunted by a society that misunderstands her, and betrayed by the company that made her, Pris kicks a whole bunch of ass before ultimately dying for her cause.
aaronw proposes this banner for the Replicant project's Trac site.
This page is not ready to be used yet!
This page explains how to configure a 64b native build. The goal is to build Replicant without the need of 32b compatibility libs and to produce 64b host binaries (adb, fastboot, emulator, etc).
Note: This is a quite experimental and long process. Although you don't risk any damage to your computer while trying to set this up, you should better already have basic knowledge about building gcc, dealing with Makefiles and other related stuff, since some errors may append.
Note for the whole page: when a line is prefixed with #, that means that you have to run the command as root. Don't copy the # on the shell.
First, you'll need to download binutils, gcc-core, gcc-g++, gmp and mpfr:
mkdir replicant-toolchain
cd replicant-toolchain
wget http://ftp.gnu.org/gnu/binutils/binutils-2.21.tar.bz2
wget http://ftp.gnu.org/gnu/gcc/gcc-4.4.3/gcc-core-4.4.3.tar.bz2
wget http://ftp.gnu.org/gnu/gcc/gcc-4.4.3/gcc-g++-4.4.3.tar.bz2
wget http://ftp.gnu.org/gnu/gmp/gmp-4.3.2.tar.bz2
wget http://ftp.gnu.org/gnu/mpfr/mpfr-3.0.1.tar.bz2
tar -xf binutils-2.21.tar.bz2
tar -xf gcc-core-4.4.3.tar.bz2
tar -xf gcc-g++-4.4.3.tar.bz2
tar -xf gmp-4.3.2.tar.bz2
tar -xf mpfr-3.0.1.tar.bz2
mv gmp-4.3.2 gcc-4.4.3/
mv mpfr-3.0.1 gcc-4.4.3/
Now, you have to build binutils and gcc for the arm-eabi target.
cd binutils-2.21
./configure --target=arm-eabi --prefix=/usr/local
make
# make install
cd ../gcc-4.4.3
mkdir build
cd build
../configure --target=arm-eabi --prefix=/usr/local --with-mpfr=../mpfr-3.0.1/ --with-gmp=../gmp-4.3.2/ --enable-shared
make
# make install
Now that your toolchain is in place, you need to configure your build for 64b. Here is the list of the modifications you should do:
sed "s/-m32/-m64/g" -i HOST_linux-x86.mk
sed "s/-m32/-m64/g" -i TARGET_linux-x86.mk
sed "s|prebuilt/\$(HOST_PREBUILT_TAG)/toolchain/i686-unknown-linux-gnu-4.2.1/bin/i686-unknown-linux-gnu-|/usr/local/bin/arm-eabi-|g" -i TARGET_linux-x86.mk
sed "s|prebuilt/\$(HOST_PREBUILT_TAG)/toolchain/arm-eabi-4.4.0/bin/arm-eabi-|/usr/local/bin/arm-eabi-|g" -i TARGET_linux-arm.mk
sed "s/-m32/-m64/g" -i Makefile.android
This is the list of the proprietary libraries, binaries and firmwares shipped with cyanogenmod or the factory images on the Nexus S and the status of their replacement.
Note that we don't ship any proprietary binary, library or firmware.
First because our goal is to reach a 100% free Android distribution and also because sometimes, these are not even distributables.
| Library location | Function | Can be replaced or avoided? | ||||
|---|---|---|---|---|---|---|
| /system/lib/libsecril-client.so | client to Samsung's non-free RIL | probably useless when we use another RIL (like a free replacement) | ||||
| /system/vendor/bin/gpsd | GPS daemon | has to be replaced to have working GPS | ||||
| /system/vendor/bin/pvrsrvinit | PowerVR server initializer, 3d-related | can be avoided | ||||
| /system/vendor/lib/egl/libEGL_POWERVR_SGX540_120.so | PowerVR 3d lib | can be avoided | ||||
| /system/vendor/lib/egl/libGLESv1_CM_POWERVR_SGX540_120.so | PowerVR 3d lib | can be avoided | ||||
| /system/vendor/lib/egl/libGLESv2_POWERVR_SGX540_120.so | PowerVR 3d lib | can be avoided | ||||
| /system/vendor/lib/hw/gps.s5pc110.so | GPS lib | has to be replaced to have working GPS | ||||
| /system/vendor/lib/hw/gralloc.s5pc110.so | gralloc lib | cannot be avoided but was replaced by a (free) modified version of AOSP's gralloc | ||||
| /system/vendor/lib/libakm.so | accelerometer + compass | can be avoided but a free replacement (libakm_free) already works with the accelerometer and the magnetic field (compass) will be supported soon | ||||
| /system/vendor/lib/libglslcompiler.so | ? seems graphics-related | can be avoided | ||||
| /system/vendor/lib/libIMGegl.so | ? seems graphics-related | can be avoided | ||||
| /system/vendor/lib/libpvr2d.so | ? seems graphics-related | can be avoided | ||||
| /system/vendor/lib/libpvrANDROID_WSEGL.so | ? seems graphics-related | can be avoided | ||||
| /system/vendor/lib/libPVRScopeServices.so | ? seems graphics-related | can be avoided | ||||
| /system/vendor/lib/libsec-ril.so | Samsung's RIL | has to be replaced to have working telephony and SMS (and data too) | /system/vendor/lib/libsrv_init.so | ? | can be avoided | |
| /system/vendor/lib/libsrv_um.so | ? | can be avoided | ||||
| /system/vendor/lib/libusc.so | ? | can be avoided |
| File location | Function | What depends on it? |
|---|---|---|
| /system/vendor/etc/gps.xml | gps configuration file | GPS. A (free) rewrite of this would probably conclude to producing almost the same file. |
| Firmware location | Function | What depends on it? |
|---|---|---|
| /system/vendor/firmware/fw_bcm4329.bin | wifi firmware | wifi |
| /system/vendor/firmware/fw_bcm4329_apsta.bin | wifi AP firmware | wifi access point |
| /system/lib/libpn544_fw.so | NFC firmware | Near Field Communication |
| /system/vendor/firmware/bcm4329.hcd | bluetooth firmware | bluetooth |
| /system/vendor/firmware/nvram_net.txt | wifi-related firmware | wifi |
| /system/vendor/firmware/samsung_mfc_fw.bin | MFC firmware | Multi Format Codec (hardware video encoding/decoding) |
"
We believe that the following license meets the criteria in www.opensource.org/docs/osd as well as https://help.launchpad.net/Legal/ProjectLicensing ; however, as of this writing, neither of these authorities have certified this license.
Opensourcetown license
VENUES: Android Market.
If the source code was published (i.e. checked into a public source code repository) more than two years ago, than it is under the Affero GPL 3.0 (with none of the clauses mentioned below added).
Otherwise, if the code is more recent, than it is available under a license which is similar to the Affero GPL 3.0 but with the following additional restrictions. These restrictions are not considered to be "further restrictions" as defined in the Affero GPL 3.0, and may not be removed; it is as if they are added as an item (g) in the list in section 7 of that document.
ATTRIBUTION: Descriptions or advertisments of your product in any of the venues listed above ("VENUES:") must contain a prominent note stating that it is based upon our product, clearly stating the name or identifier of our product in that venue so that an unsophisticated reader will understand how to find our product and acquire it in that venue.
EXECUTABLE PRICE RESTRICTION:
If all of the following conditions are true:
In any case, you may (and must, if you distribute your product) still distribute the source code for free in any venue, provided that it is made available only under this license.
RATIONALE:
The idea is that you are not able to just copy our code, compile it, and offer it for sale (or for free). If we only prohibited outright copying, you could make a few quick changes in the code and then claim it was different. Therefore, we require your product to be substantially different from or better than ours.
We don't want to prevent you from improving on our product, or from using our code in other products, so if your product is substantially different from or better than ours, the price restriction doesn't apply.
Although we want to prevent you from depriving us of the profits of our work, we don't want to prevent you from selling modified versions of our product, so this is allowed provided that the price of the modified version is greater than ours, and that you let customers know about our cheaper product before they purchase yours.
This restriction makes the license incompatible with the Affero GPL 3.0. So, for any given piece of code, the extra restrictions expire after two years.
EXAMPLE 1:
For example, if this application is a swordfight game offered for sale in Android Market, and you create a swordfight game by re-skinning our game and adding one or two minor features, and then you offer it for sale in Android Market, the price of your swordfight app must be at least the price of ours, and the description of your game must state that it is based upon ours, using the name of our app as it appears in the Market, and state the price of our game.
EXAMPLE 2:
For example, if this application is a swordfight game offered for sale in Android Market, and you create a swordfight game which, in our opinion (or the opinion of the arbiter's, if you choose that), is a major improvement over ours, then the EXECUTABLE PRICE RESTRICTION doesn't apply.
EXAMPLE 3:
For example, if this application is a swordfight game offered for sale in Android Market, and you take the networking code out of it and reuse it in a different sort of game, then the EXECUTABLE PRICE RESTRICTION doesn't apply.
EXAMPLE 4:
Your product contains only code from our product which is more than two years old. Even if your product is similar to our product, the EXECUTABLE PRICE RESTRICTION doesn't apply.
"
I made up this license. Comments, concerns? -- BayleShanks
Many people bought many different phones, and some of them whish to help replicant and/or to port replicant to their phones or devices.
This guide will show what was done for the htc dream, so these people can understand the process better.
When talking about porting, this page talks about re-using existing product definitions. You will not learn how to
build Android for a device not currently supported by Android. Instead, you will learn how to build a version of
[Cyanogenmod http://www.cyanogenmod.com/] without proprietary parts.
To gain more insight in the Android build system, refer to Android Build System documentation which is part of
Android Platform Developer's Guide. You should find an answer there if you have any questions about the Makefiles referenced in this document.
Note: The Android Build System documentation above has been removed. You can find a mirror of the (outdated) documentation here and here.
The RIL is the radio interface library, that is to say, a library that talks to the modem, usually (but not always) trough AT commands.
Basically the modem runs on a separate CPU,and there is some sort of communication needed between the main CPU and the modem CPU to make telephony work. For instance, the modem must tell you when you've got a call, and you must tell the modem that you want to call someone.
TODO: point to 0707 standard or newer
Keep in mind that on most devices, the full source code of the kernel is released.
However, some userspace libraries, or dlopened libraries (libraries loaded at runtime after the application started) are proprietary software,
so if you're porting to a new CPU/SOC keep in mind that you have the source code to the kernel interfaces.
That can help a lot, and sometimes there is even some sort of documentation in the headers.
The first thing to do is to download the replicant sources:
BuildDream can be used as a reference: download and build the sources for your device.
Let's say the user has a HTC Wildfire. It is useful to know the codename of the device in question, which is "Buzz" in case
of the Wildfire.
You need to configure the build tree for our device. By default, a generic image
for the Android emulator will be built.
In BuildDream, you would use the following command to set up the build:
lunch cyanogen_dream_sapphire-eng
$ source build/envsetup.sh
including device/geeksphone/one/vendorsetup.sh
including device/htc/ace/vendorsetup.sh
including device/htc/bravoc/vendorsetup.sh
including device/htc/bravo/vendorsetup.sh
including device/htc/buzz/vendorsetup.sh
including device/htc/glacier/vendorsetup.sh
including device/htc/heroc/vendorsetup.sh
including device/htc/inc/vendorsetup.sh
including device/htc/legend/vendorsetup.sh
including device/htc/liberty/vendorsetup.sh
including device/htc/supersonic/vendorsetup.sh
including device/htc/vision/vendorsetup.sh
including device/motorola/sholes/vendorsetup.sh
including device/nvidia/harmony/vendorsetup.sh
including vendor/cyanogen/vendorsetup.sh
$ cat vendor/cyanogen/vendorsetup.sh
add_lunch_combo cyanogen_ace-eng
add_lunch_combo cyanogen_bravo-eng
add_lunch_combo cyanogen_bravoc-eng
add_lunch_combo cyanogen_buzz-eng
add_lunch_combo cyanogen_dream_sapphire-eng
add_lunch_combo cyanogen_espresso-eng
add_lunch_combo cyanogen_glacier-eng
add_lunch_combo cyanogen_harmony-eng
add_lunch_combo cyanogen_hero-eng
add_lunch_combo cyanogen_heroc-eng
add_lunch_combo cyanogen_inc-eng
add_lunch_combo cyanogen_legend-eng
add_lunch_combo cyanogen_liberty-eng
add_lunch_combo cyanogen_one-eng
add_lunch_combo cyanogen_passion-eng
add_lunch_combo cyanogen_sholes-eng
add_lunch_combo cyanogen_supersonic-eng
add_lunch_combo cyanogen_vibrant-eng
add_lunch_combo cyanogen_vision-eng
add_lunch_combo cyanogen_z71-eng

PATH=$PATH:$PWD/vendor/cyanogen/tools ; export PATH
lunch cyanogen_buzz-eng
Then build the source, backup what's on your device, including the operating system, and flash the new replicant image.
Then test what works and what doesn't.
The images are located in
out/target/product/dream_sapphire
The source code you just built contains some free replacements for the proprietary
libraries shipped by your phone vendor with the default firmware.
A list of proprietary libraries is available in
device/htc/dream_sapphire/extract-files.sh
I will take the example of how to use the free RIL (Radio Interface Library) to see if it works fine without modifications:
The proprietary RIL library (which you don't have in the phone) location is found looking at the extract-files.sh
here's a part of extract-files.sh:
adb pull /system/lib/libhtc_ril.so ../../../vendor/htc/$DEVICE/proprietary/libhtc_ril.so
/system/lib/libhtc_ril.so
/system/lib/libreference-ril.so
# ./adb remount
# ./adb shell
mv /system/lib/libreference-ril.so /system/lib/libhtc_ril.so
# ./adb shell
# setprop
usage: setprop <key> <value>
./adb shell
setprop rild.libpath /system/lib/libreference-ril.so
setprop rild.libargs -d/dev/smd0
# ./adb shell
# getprop | grep ril
[ro.ril.hsxpa]: r2
[ro.ril.gprsclass]: r10
[rild.libpath]: [/system/lib/libreference-ril.so]
[rild.libargs]: [-d/dev/smd0]
[init.svc.ril-daemon]: [running]
[ro.ril.def.agps.mode]: r2
[gsm.version.ril-impl]: [android reference-ril 1.0]
Then, you can kill the ril daemon:
./adb shell killall rild
./adb logcat -b radio
That's also tested and worked on the gtklocker's HTC Hero, so I suppose it will work for the most HTC devices out there. If your device isn't listed anywhere, don't dare to try it.
On the HTC Dream the following proprietary libraries were replaced:
(Refer to ProprietaryHtcDreamLibsReplacement for more up to date details(or fix it if it's less recent))
The first thing you will have to do is to modify the build system.
The key thing to do is to change
If the RIL you previously tried works fine, why not switching to it...directly in the build system.
Here's the diff between A working RIL and a non-working RIL for the htcdream:
android_device_htc_dream_sapphire$ git diff 5593d2899203ec378c306701788f1c43af9a6935 -- full_dream_sapphire.mk
diff --git a/full_dream_sapphire.mk b/full_dream_sapphire.mk
index 9ec7feb..eb1b956 100644
--- a/full_dream_sapphire.mk
+++ b/full_dream_sapphire.mk
@@ -40,7 +40,8 @@ PRODUCT_PROPERTY_OVERRIDES := \
     ro.media.dec.jpeg.memcap=10000000

 PRODUCT_PROPERTY_OVERRIDES += \
-    rild.libpath=/system/lib/libhtc_ril.so \
+    rild.libpath=/system/lib/libreference-ril.so \
+    rild.libargs=-d/dev/smd0 \
     wifi.interface=tiwlan0

 # Time between scans in seconds. Keep it high to minimize battery drain.
device/htc/dream_sapphire/full_dream_sapphire.mk
In case the RIL need to be modified the sources are in :
hardware/ril/reference-ril
hardware/ril/libhtcgeneric-ril/Android.mk :
BUILD_HTCGENERIC_RIL := false

ifeq ($(TARGET_BOARD_PLATFORM),qsd8k)
  BUILD_HTCGENERIC_RIL := true
else ifeq ($(TARGET_BOARD_PLATFORM),msm7x30)
  BUILD_HTCGENERIC_RIL := true
else ifeq ($(TARGET_BOARD_PLATFORM),msm7k)
  BUILD_HTCGENERIC_RIL := true
endif
Then, on your device configuration, switch:
rild.libpath=/system/lib/libreference-ril.so
to:rild.libpath=/system/lib/libhtcgeneric-ril.so
On the nexus one the proprietary libacoustic libraries are only used for bluetooth(all the rest works if you pushed the firmwares).
On the dream (msm7k), libacoustic has been fully replaced, see "it loads the values from the /system/etc/AudioPara4.csv CSV file to MSM shared memory, which fixes in-call volume regulation and adds support for No Mic Wired Headset. It should also add support for other other things (probably including bluetooth devices) but this has not been tested yet.
The existing replacement code (hardware/msm7k/libaudio/AudioAcoustic.cpp) should work for your msm7k device but it has only been tested on the Dream.
*Note that (even if unconfirmed) it should more likely work the same way for every msm7k device, so try the code without any modification first and do the following steps only if the code does not work for your msm7k device! *
If it does not work, check that your device contains the /system/etc/AudioPara4.csv CSV file. If it does not, the file may have another name, then you should modify replicant code to use the filename of your device and test if it works.
If you don't see any CSV file anywhere, then your device must not work like HTC Dream and you'll probably have to write the code to support acoustic or find another working replacement. You can read jbruneaux's work on audio acoustic for WinCE devices from git://gitorious.org/~jbruneaux/xdandroid/hardware_msm7k_libacoustic.git (userland) and git://gitorious.org/linux-on-qualcomm-s-msm/linux-msm-home-work.git branch htc-msm-2.6.27-libacoustic (kernel-space). Note that audio acoustic is not absolutely necessary to make audio work, it'll just cause some minor issues as written above.
To make sure it parses the CSV file, run adb logcat | grep Audio and find the following lines:
D/AudioAcousticMSM72XX(  122): Successfully opened /system/etc/AudioPara4.csv
D/AudioAcousticMSM72XX(  122): CSV Header: Dream_TMU_20090305
D/AudioAcousticMSM72XX(  122): Read:
D/AudioAcousticMSM72XX(  122): 24 Audio_Path_Table entries
D/AudioAcousticMSM72XX(  122): 24 Audio_Path_Uplink_Table entries
D/AudioAcousticMSM72XX(  122): 35 Phone_Acoustic_Table entries
D/AudioAcousticMSM72XX(  122): 35 BT_Phone_Acoustic_Table entries
D/AudioAcousticMSM72XX(  122): 24 HTC_VOC_CAL_CODEC_TABLE_Table entries
D/AudioAcousticMSM72XX(  122): 0 CE_Acoustic_Table entries
Then, if it parses the file but does not work, it's probably because the addresses (or the size) where the tables must be written in MSM shared memory are not the same for the Dream and for your device.
In order to find the correct addresses, you'll have to use CyanogenMod code with the non-free libhtc_acoustic.so lib that you can get from CyanogenMod downloadable zip for your device.
move the hardware/msm7k/ directory to another place '''not in the build tree''' or it'll fail ( mv hardware/msm7k/ ../msm7k .
Then download CyanogenMod code:git clone git://github.com/CyanogenMod/android_hardware_msm7k.git -b froyo-stable hardware/msm7k/
Now you need to modify the kernel-side driver to print some useful infos on file kernel-msm/arch/arm/mach-msm/htc_acoustic.c, function acoustic_mmap(), add the following code:
D(" -- vma dump start --\n");

D("vm_start=%x (%d)\n", vma->vm_start, vma->vm_start);
D("vm_end=%x (%d)\n", vma->vm_end, vma->vm_end);
D("vm_page_prot=%x (%d)\n", vma->vm_page_prot,vma->vm_page_prot);
D("vm_flags=%x (%d)\n", vma->vm_flags, vma->vm_flags);
D("vm_pgoff=%x (%d)\n", vma->vm_pgoff, vma->vm_pgoff);

D(" -- vma dump end --\n");
Then build the code (make -j9 bootimage && make-j9 systemimage), and flash system.img and boot.img to your device, boot it, copy the libhtc_acoustic.so lib to /system/lib/ (you need to remount /system using adb remount to write under /system) and check the kernel logs with adb shell dmesg | grep acoustic. You should see something like:
<6>[   22.250274] htc-acoustic: open
<6>[   22.252716] htc-acoustic: mmap
<6>[   22.253265] htc-acoustic:  -- vma dump start --
<6>[   22.254028] htc-acoustic: vm_start=4010c000 (1074839552)
<6>[   22.254699] htc-acoustic: vm_end=40119000 (1074892800)
<6>[   22.255310] htc-acoustic: vm_page_prot=38f (911)
<6>[   22.256011] htc-acoustic: vm_flags=400844ff (1074283775)
<6>[   22.256622] htc-acoustic: vm_pgoff=1f4a (8010)
<6>[   22.257293] htc-acoustic:  -- vma dump end --
<6>[   22.742675] htc-acoustic: ioctl
<6>[   22.743103] htc-acoustic: ioctl: ACOUSTIC_ARM11_DONE called 123.
<6>[   22.746612] htc-acoustic: ioctl: ONCRPC_ACOUSTIC_INIT_PROC success.
<6>[   22.747344] htc-acoustic: release
Now you can get the size of the dedicated memory area: vm_end - vm_start = 0x40119000 - 0x4010c000 = 0xd000.
Then, you'll have to dump the entire memory to a file that you need to create: adb shell touch /data/dump. Add a function to AudioHardware.cpp :
void acoustic_mmap_dump(void)
{
    uint8_t *test_map_base;
    uint8_t *ptr, nval;
    int fd, fdd=0;
    off_t [[TargetAddr]];
    int len;

    fd = open("/dev/htc-acoustic", O_RDWR | O_SYNC);
    fdd = open("/data/dump", O_RDWR | O_TRUNC | O_CREAT);

    test_map_base = (uint8_t *)
        mmap(0, 0xd000, PROT_READ | PROT_WRITE, MAP_SHARED, fd,
         0);
//    test_virt_base = test_map_base + (TargetAddr & MAP_MASK);
//    LOGD("virtual base at %p (phys=0x%X)\n", test_virt_base, [[TargetAddr]]);

    LOGD(" -- htc-acoustic memory read -- \n");
    LOGD("beginning adress is@%p\n", test_map_base);
          for (len = 0; len < 0xd000; len++)
        {
            if( write(fdd, test_map_base, sizeof(uint8_t) ) < 0)
            {
                LOGE("write failed");
                break;
            }
            //LOGD("0x%x (%d) @%p",  *(test_map_base), *(test_map_base), test_map_base);
          test_map_base++;
        }

    munmap(test_map_base, 0xd000);
    close(fdd);
    close(fd);
}
replace 0xd000 by the size you found out and call it after int rc = set_acoustic_parameters(); on the AudioHardware::AudioHardware() function.
Build the code (make -j9 systemimage), flash system.img to your device and get /data/dump: adb pull /data/dump. This should copy dump to your current directory. You can try to load that file in MSM shared memory at the exact place where you dumped it. To do that, add the following functions to AudioHardware.cpp (don't forget to replace the size, 0xd000 if it's different for your device):
#define ACOUSTIC_IOCTL_MAGIC 'p'
#define ACOUSTIC_NOTICE        _IOW(ACOUSTIC_IOCTL_MAGIC, 42, unsigned int)
#define ACOUSTIC_ARM11_DONE    _IOW(ACOUSTIC_IOCTL_MAGIC, 22, unsigned int)

void acoustic_mmap(void)
{
    char *test_map_base;
    volatile int *ptr, nval;
    int fd, fdd;
    off_t [[TargetAddr]];
    int len;

    fd = open("/dev/htc-acoustic", O_RDWR | O_SYNC);
    fdd = open("/data/dump", O_RDWR);

    test_map_base = (char *)
        mmap(0, 0xd000, PROT_READ | PROT_WRITE, MAP_SHARED, fd,
         0);
//    test_virt_base = test_map_base + (TargetAddr & MAP_MASK);
//    LOGD("virtual base at %p (phys=0x%X)\n", test_virt_base, [[TargetAddr]]);

    LOGD(" -- htc-acoustic memory write -- \n");
          for (len = 0; len < 0xd000; len++)
        {
          read(fdd, test_map_base, sizeof(char) );
          test_map_base++;
        }

    munmap(test_map_base, 0xd000);
    close(fdd);
    close(fd);
}

void acoustic_done(void)
{
     int fd;
           fd = open("/dev/htc-acoustic",O_RDWR);

               if (fd < 0) {
                LOGE("Cannot open htc-acoustic device");
                close(fd);
                return;
               }

       ioctl(fd,ACOUSTIC_ARM11_DONE, NULL);
       close(fd);
}
Now replace:
    set_acoustic_parameters = (int (*)(void))::dlsym(acoustic, "set_acoustic_parameters");
    if ((*set_acoustic_parameters) == 0 ) {
        LOGE("Could not open set_acoustic_parameters()");
        return;
    }

    int rc = set_acoustic_parameters();
    if (rc < 0) {
        LOGE("Could not set acoustic parameters to share memory: %d", rc);
//        return;
    }
with:
acoustic_mmap();
acoustic_done();
Build system.img: make -j9 systemimage and flash it to your device. Now '''audioacoustic should work''' but it's not a clean way to make it work: the clean way is to parse the CSV file and load it to MSM shared memory with free code. If it does not work, then your device is definitely not working like the Dream and you'll have to find another way to make it work.
Replace the hardware/msm7k/ folder by the replicant one. The next step is to find the right addresses to write the tables in MSM shared memory. To find this out, you have to read the dump and understand where each table begins. So first, you have to hexdump the dump:hexdump -C dump > dump.txt. This will create dump.txt, containing the hexedacimal values of dump as text. So now you should be able to understand where each table begins. As an example, here's how it was done with the dream values: consider the following as the beginning of the dump.txt file:
00000000  35 71 36 61 37 00 38 00  39 03 3a 00 3b 00 3c 00  |5q6a7.8.9.:.;.<.|
00000010  3d 00 3e 00 3f 00 40 00  41 1c 42 00 43 00 44 00  |=.>.?.@.A.B.C.D.|
00000020  45 00 46 00 47 00 48 00  49 00 4a 01 4b 00 4c 00  |E.F.G.H.I.J.K.L.|
00000030  00 00 00 00 00 00 00 00  00 00 00 00 00 00 00 00  |................|
*
00000080  35 71 36 61 37 00 38 00  39 03 3a 00 3b 00 3c 00  |5q6a7.8.9.:.;.<.|
00000090  3d 00 3e 00 3f 00 40 00  41 1c 42 00 43 00 44 00  |=.>.?.@.A.B.C.D.|
000000a0  45 00 46 00 47 00 48 00  49 00 4a 01 4b 00 4c 00  |E.F.G.H.I.J.K.L.|
000000b0  00 00 00 00 00 00 00 00  00 00 00 00 00 00 00 00  |................|
it's the 2 first elements of the table we want to find the address (which will be 00000000, the beginning of the table). Now read AudioPara4.csv. On the dream, you can read:
A0,HTC_VOC_CODEC_EARCUPLE_VOICE,35,71,36,61,37,0,38,0,39,3,3A,0,3B,0,3C,0,3D,0,3E,0,3F,0,40,0,41,1C,42,0,43,0,44,0,45,0,46,0,47,0,48,0,49,0,4A,1,4B,0,4C,0,0,0,0,0,0,0,0,0,0,0,0,0,0,0,0,0,0,0,0
A1,HTC_VOC_CODEC_EARCUPLE_MIDI,35,71,36,61,37,0,38,0,39,3,3A,0,3B,0,3C,0,3D,0,3E,0,3F,0,40,0,41,1C,42,0,43,0,44,0,45,0,46,0,47,0,48,0,49,0,4A,1,4B,0,4C,0,0,0,0,0,0,0,0,0,0,0,0,0,0,0,0,0,0,0,0
you can see that 35 71 36 61 37 00 38 00 39 03 3a 00 3b 00 3c 00 is the same as 35,71,36,61,37,0,38,0,39,3,3A,0,3B,0,3C,0, so 35 71 36 61 37 00 38 00 39 03 3a 00 3b 00 3c 00 is the beginning of the first element of table A. So table A starts at 0.
Now if you read the ParseAudioParaLine function from AudioAcoustic.cpp (on the already existing free audio acoustic code), you can see:
        case 'A':
[…]
            while ( (token = strtok(NULL, ",")) ) {
                Audio_Path_Table[table_num].array[field_count++] = strtol(token, &ps, 16);
            };
            break;
So "A" is for the Audio_Path_Table table.
Now you have to do the same work for every table. You can see that another tables begins when the table-specific characters change e.g.:
00001780  35 00 36 00 37 ff 38 00  39 00 3a 00 3b 00 3c c4  |5.6.7.8.9.:.;.<.|
00001790  3d c4 3e 08 3f 80 40 05  41 00 42 00 43 00 44 00  |=.>.?.@.A.B.C.D.|
000017a0  45 00 46 00 47 00 48 00  49 00 4a 00 4b 00 4c 00  |E.F.G.H.I.J.K.L.|
000017b0  00 00 00 00 00 00 00 00  00 00 00 00 00 00 00 00  |................|
*
00001800  00 00 00 40 13 20 00 00  b2 7f fd 23 00 00 33 2d  |...@. .....#..3-|
00001810  00 00 80 0c 9a ff 80 1d  33 f3 ec 01 ee ff 0a 20  |........3...... |
00001820  65 7f 00 00 00 ed 00 00  00 00 d9 3f 00 00 80 0c  |e..........?....|
00001830  9a ff 0c 1b 33 f3 ec 01  ee ff 0a 20 65 7f ff 7f  |....3...... e...|
00001840  00 08 ff 7f 9f 14 00 00  14 00 00 08 00 20 00 20  |............. . |
00001850  fa 00 46 00 02 00 ff 02  40 00 20 00 50 46 40 00  |..F.....@. .PF@.|
00001860  a0 41 00 08 63 00 ff 4d  ff 4d 02 00 00 3f d0 07  |.A..c..M.M...?..|
00001870  00 00 00 00 00 01 00 01  00 02 50 00 00 03 50 01  |..........P...P.|
00001880  64 00 a8 1c c2 01 e0 2e  a0 0f ff ff 00 00 00 00  |d...............|
00001890  00 00 00 00 00 00 00 00  00 40 00 00 00 00 00 00  |.........@......|
000018a0  00 00 00 00 00 00 00 00  00 00 00 00 00 00 00 00  |................|
You can see that a new table begins at 0x1800.
Note that some tables may not start at easy-to-find addresses such as 0x1800 but may start at in the middle of an hexdump line (so it makes the task even harder).
When you have found all the correct addresses for every table in your CSV file, you should check that your tables have the same size than the tables you got from the dump. If it's not, adjust the tables defined in AudioAcoustic.h and the tables defined at the top of AudioAcoustic.cpp.
When all that stuff is ok, it's possible that there is a necessary footer to make it work. On the Dream, it is:
0000c8e0 78 56 34 12 00 00 00 00 00 00 00 00 00 00 00 00 |xV4.............|
(present at the end of the dump file).
Now that you found out the size of the memory map, the address of each table, adjusted the size of the tables and found the footer, it's time to put the remaining infos on the free code.
Modify with the values you found out, on the file hardware/msm7k/libaudio/AudioAcoustic.cpp:
static int mmap_size = 0xd000;
static int mmap_address_audio_path_table = 0x0;
static int mmap_address_audio_path_uplink_table = 0xc00;
static int mmap_address_phone_acoustic_table = 0x1800;
static int mmap_address_bt_phone_acoustic_table = 0x4a00;
static int mmap_address_htc_voc_cal_codec_table_table = 0xc700;
static int mmap_address_htc_acoustic_end = 0xc8e0;
Then build an image (make -j9 systemimage) and it should work. If it does not, please check that you successfully passed all the required steps.
But the fact is that you replaced Dream values with the correct values for your device, so it will break audio acoustic for Dream.
The solution would be to write a set_device_configuration() which selects the good values for the device we build replciant for and the appropriated tables.
Nothing like that has been written yet since replicant AudioAcoustic hasn't been ported to any other device yet. Please notify replicant developers to write such a function (or do it yourself) before you send the code.
For adding support to libgps you need to enable it like in this commit:
add the following(or modify if it's already there but holds another value) in device/htc/dream_sapphire/BoardConfig.mk (replace dream_saphire by your device code) :
BOARD_HAVE_GPS_HARDWARE := true
BOARD_GPS_LIBRARIES := libhardware
If your device is different from the htc dream you may have to modify the GPS library code to match your device,
Here's the adaptation made for the htc dream:
hardware/libhardware_legacy/gps$ diff -u ../../../../repos_external/phh_libhardware_legacy/gps/gps-rpc.c ./gps-rpc.c
--- ../../../../repos_external/phh_libhardware_legacy/gps/gps-rpc.c    2010-08-15 11:35:03.210095153 +0200
+++ ./gps-rpc.c    2011-01-06 16:46:45.417685002 +0100
@@ -464,8 +464,8 @@
 }

 int init_gps6125() {
-    struct CLIENT *clnt=clnt_create(NULL, 0x3000005B, 0, NULL);
-    struct CLIENT *clnt_atl=clnt_create(NULL, 0x3000001D, 0, NULL);
+    struct CLIENT *clnt=clnt_create(NULL, 0x3000005B, 0x90380d3d, NULL);
+    struct CLIENT *clnt_atl=clnt_create(NULL, 0x3000001D, 0x51c92bd8, NULL);
     int i;
     _clnt=clnt;
     SVCXPRT *svc=svcrtr_create();
@@ -538,33 +538,21 @@

 int init_gps_rpc() {
-    int fd=open("/sys/class/htc_hw/amss", O_RDONLY);
-    char bufr32;
-    bzero(buf, 32);
-    read(fd, buf, 32);
-    if(strncmp(buf, "6125", 4)==0)
-        amss=A6125;
-    else if((strncmp(buf, "5225", 4)==0) || (strncmp(buf, "6150", 4)==0))
-        amss=A5225;
-    else
-        amss=A6125; //Fallback to 6125 ATM
-    if(amss==A6125)
-        init_gps6125();
-    else if(amss==A5225)
-        init_gps5225();
+    amss=A6125;
+    init_gps6125();
     return 0;
 }

 void gps_get_position() {
     int i;
-    for(i=5;i;--i) if(!can_send) sleep(1);//Time out of 5 seconds on can_send
+    for(i=3;i;--i) if(!can_send) sleep(1);//Time out of 5 seconds on can_send
     can_send=0;
     pdsm_get_position(_clnt, 0, 0, 1, 1, 1, 0x3B9AC9FF, 1, 0,0,0,0,0, 0,0,0,0,0, 0,0,0,0,0, 0,0,1,32,2,client_IDsr2);
 }

 void exit_gps_rpc() {
-    if(amss==A6125)
-        pdsm_client_end_session(_clnt, 0, 2);
+    //if(amss==A6125)
+    //    pdsm_client_end_session(_clnt, 0, 2);
     //5225 doesn't seem to like end_session ?
     //Bah it ends session on itself after 10seconds.
 }
so let's go step by steps on that diff:
First we see that:
+    struct CLIENT *clnt=clnt_create(NULL, 0x3000005B, 0x90380d3d, NULL);
+    struct CLIENT *clnt_atl=clnt_create(NULL, 0x3000001D, 0x51c92bd8, NULL);
This corresponds to some devices nodes:
# ls -l /dev/oncrpc
crw-rw----    1 radio    system    253,   0 Jan  6 16:43 00000000:0
crw-rw----    1 radio    system    253,  11 Jan  6 16:43 30000000:5a10cf88
crw-rw----    1 radio    system    253,   9 Jan  6 16:43 30000002:aa2b1a44
crw-rw----    1 radio    system    253,   4 Jan  6 16:43 30000003:94103dec
crw-rw----    1 radio    system    253,  30 Jan  6 16:43 3000000a:71d1094b
crw-rw----    1 radio    system    253,  28 Jan  6 16:43 3000000e:2bf06595
crw-rw----    1 radio    system    253,  26 Jan  6 16:43 3000000f:46d257e5
crw-rw----    1 radio    system    253,  23 Jan  6 16:43 30000013:e94e8f0c
crw-rw----    1 radio    system    253,  22 Jan  6 16:43 30000014:7cfcd2c6
crw-rw----    1 radio    system    253,  21 Jan  6 16:43 30000016:c713bd79
crw-rw----    1 radio    system    253,  19 Jan  6 16:43 30000019:acb4a896
crw-rw----    1 radio    system    253,  18 Jan  6 16:43 3000001b:97d7b24a
crw-rw----    1 radio    system    253,  12 Jan  6 16:43 3000001d:51c92bd8
crw-rw----    1 radio    system    253,   8 Jan  6 16:43 30000021:f330a24e
crw-rw----    1 radio    system    253,  14 Jan  6 16:43 3000003c:03d4377c
crw-rw----    1 radio    system    253,  29 Jan  6 16:43 30000048:0da5b528
crw-rw----    1 radio    system    253,  17 Jan  6 16:43 30000059:00000000
crw-rw----    1 radio    system    253,  16 Jan  6 16:43 3000005a:00000000
crw-rw----    1 radio    system    253,  13 Jan  6 16:43 3000005b:90380d3d
crw-rw----    1 radio    system    253,   7 Jan  6 16:43 3000005f:95d1d9f5
crw-rw----    1 radio    system    253,   5 Jan  6 16:43 30000060:bcfb5d63
crw-rw----    1 radio    system    253,   2 Jan  6 16:43 30000061:fb837d0b
crw-rw----    1 radio    system    253,  31 Jan  6 16:43 30000066:1f4b343e
crw-rw----    1 radio    system    253,  27 Jan  6 16:43 3000006b:0aabc7a4
crw-rw----    1 radio    system    253,  25 Jan  6 16:43 3000006c:00000000
crw-rw----    1 radio    system    253,  20 Jan  6 16:43 30000075:f708938d
crw-rw----    1 radio    system    253,  15 Jan  6 16:43 30000079:00000000
crw-rw----    1 radio    system    253,   1 Jan  6 16:43 30000081:ccc5b439
crw-rw----    1 radio    system    253,  24 Jan  6 16:43 3000fe00:00000000
crw-rw----    1 radio    system    253,  10 Jan  6 16:43 3000fffe:00000000
crw-rw----    1 radio    system    253,   6 Jan  6 16:43 30100001:00000000
crw-rw----    1 radio    system    253,   3 Jan  6 16:43 30100002:00000000
Theses 2 lines should ring a bell:
crw-rw----    1 radio    system    253,  13 Jan  6 16:43 3000005b:90380d3d
crw-rw----    1 radio    system    253,  12 Jan  6 16:43 3000001d:51c92bd8
Next there is that line:
+ for(i=3;i;--i) if(!can_send) sleep(1);//Time out of 5 seconds on can_send
This is the time between 2 requests, if you put it too low it can reboot your phone(it will crashes and reboot)
For adding support for libloc_api you need to modify the BOARD_GPS_LIBRARIES variable
That repository should have newer devices support(like in AOSP) and older too(like rmcc's commits)
cd hardware/libhardware_legacy/tests/gpstest/
mm
Note that messing with GPS can reboot(that is to say your phone crashes and reboots because of that) your phone on certain devices(like the htc dream or the nexus one).
The GPS is attached to the modem on the htc dream and the nexus one.
The only way to request a fix or to activate it is trough a rpc mecanism that is between the modem and the CPU that runs Android.
That RPC mecanism uses shared memory between the modem and the CPU that runs Android.
On the htcdream and the nexusone a serial line is emulated on top of the RPC mecanism: the serial lines can be accesed at /dev/smd0 for the modem(AT commands) and /dev/smd27 for the GPS NMEA.
So compatibility with applications that understand NMEA is garanteed.
Note that the GPS parsing library doesn't require to use NMEA, it could also uses the RPC directly(to be verified)
Devices with an hardware keyboard slide can rotate with the slide of the keyboard, so accelerometers are not strictly necessary. Examples of such device include the HTC dream.
Other devices lack that hardware keyboard, and so the only way to rotate is trough theses accelerometers. Examples of such device include the nexus one.
The nexusone has akmd.free which is the free implementation of akmd, the sensor daemon(which handle rotation)
akmd.free is located in:
hardware/akmd_free
In order to activate the support for it you must add that in your BoardConfig.mk
BUILD_AKMD := true
If you need to add support for other akm sensors you could modify hardware/akmd_free/jni/Android.mk, for instance the nexusone had an issue with rotation beeing done in the reverse sense, so I did that:
+#ifdef TARGET_DEVICE_NEXUSONE
+    abuf[index] = Vector(-bma150_datar0, -bma150_datar1, bma150_datar2);
+#else
     abuf[index] = Vector(bma150_datar0, -bma150_datar1, bma150_datar2);
+#endif
ifeq ($(TARGET_DEVICE),passion)
  LOCAL_CFLAGS += -DTARGET_DEVICE_NEXUSONE
endif
PRODUCT_PROPERTY_OVERRIDES += debug.sf.hw=0
froyo_almond branch.TARGET_LIBAGL_USE_GRALLOC_COPYBITS := true
The previous source code re-used some public source code that was licensed under the Apache 2.0 license.
The ril will also re-use some public source code licensed under Apache 2.0.
That is the advised way to do it as it save some time and is easier to do, however proper credit must be attributed, at least in the commit message.
It is even advised to look at the public apache 2.0 source code of other rils libraries or components of android.
Until now we made some changes in the tree, but we want the changes to land upstream in replicant.
For instance let's say we modified only the ril path like in the ril section in
device/htc/dream_sapphire/full_dream_sapphire.mk
first we save our modifications:
cd device/htc/dream_sapphire/
git diff > git_diff.patch
then we find where is the root of the git repository we are in:
cd replicant-2.2 #top replicant directory where everything is in
cd .repo
cat manifest.xml
and we find that:
<project path="device/htc/buzz" name="CyanogenMod/android_device_htc_buzz" remote="github" />
so...now our repository is in device/htc/buzz
We will now look where the source repository is:
cd device/htc/buzz
cd .git
cat config
We find that:
url = git://github.com/CyanogenMod/android_device_htc_buzz.git
Then create a directory, not under the replicant-2.2 directory that will contain your repositories:
mkdir repo
cd repo
and clone the source:
git clone git://github.com/CyanogenMod/android_device_htc_buzz.git
cd android_device_htc_buzz
apply the previous patch:
git apply path/to/git_diff.patch
commit locally the result:
git commit -s
Note that the commit message should have the following format:
The first line should be a summary
Followed by a linebreak
And then the details explaining the commit
If you made an error writing the commit message do
git commit --amend
TODO: complete for sending the git patch(git format-patch -1,git send-email)
TODO: git remote add+git push
This guide assumes your phone has a S5PC110/Exynos 3110 SoC
Before doing anything, you will need to know the codename of the device. You can find it out on CyanogenMod Wiki or on CyanogenMod download page.
For instance, the Nexus S codename is: crespo.
One very important step is to find out if the device is Tivoized: that means that even though the manufacturer releases the kernel source code for the device, the bootloader checks the kernel signature and will refuse to start it if it's not properly signed by the manufacturer. In other words, if you build the kernel yourself, the device will refuse to run it since it's not signed by the manufacturer. Since the Linux kernel is released under the GPLv2, there are no specific dispositions to counter Tivoization, and so porting the device to Replicant is pointless as it will require a prebuilt and signed kernel from the manufacturer.
First thing to consider before starting a port, when all of the above is assumed, is to see how many non-free components are required by CyanogenMod.
The easiest way to do this is to spot the device repository in CyanogenMod repos and look for the extract-files.sh or proprietary-blobs.txt file.
For instance, the list of non-free components for the Nexus S is extract-files.sh
From that list, spot what is related to what hardware component (audio, camera, sensors, gps, modem, etc): that gives an idea of the amount of work required to add support for the phone.
During the port, you might need to find precise infos about the hardware that is in the phone. A good to do this is by looking at the kernel defconfig for the device, another way is to download the Service Manual for the device.
android_device_vendor_device.android_device_vendor_devices-common.android_kernel_samsung_devices.ics or ask the people who know which branch to use.| Android version | CyanogenMod version | Kernel version |
| Android 2.3 | CM 7.x | 2.6.35 |
| Android 4.0 | CM 9.x | 3.0.8 |
| Android 4.1 | CM 10 | 3.0.31 |
| Android 4.2 | CM 10.1 | 3.4 |
Generally speaking, it is a good idea to ask the members of the CyanogenMod community where to find what (especially for kernel sources and for which branch to use).
Clone these repos in the correct locations and remove the prefix (e.g. android_device_samsung_crespo must be cloned in device/samsung/ and renamed to crespo).
Once you have the kernel sources, read the instructions to find out which defconfig to use.
Since manufacturers usually don't release the git history along with the files, you'll need to recreate a git repo:git add -A) and commit (git commit) with a message explaining what you just imported (e.g. "GT-I9000 GB Opensource Update 2")Now that you have a git repo, you can move it to the Replicant code tree, under the name: kernel/vendor/devices (e.g. kernel/samsung/aries).
Make sure to make the devices name match the devices in android_device_vendor_devices-common if the kernel is shared across these devices or to match the device in android_device_vendor_device.
Some devices are still using a prebuilt kernel. Even though the CyanogenMod team is trying to avoid that, it remains in many repos.
For such devices, you will need to remove the prebuilt binaries and the instructions to copy the prebuilt kernel and its modules.
In the device repository (device/vendor/device) and common repository for your device (if any), remove the prebuilt kernel and modules (usually called kernel and module.ko (replace module with the name of a module) or a modules directory).
Remove the instructions to copy these prebuilts on the makefiles. Remove instructions such as:
PRODUCT_COPY_FILES += \
    $(LOCAL_KERNEL):kernel

LOCAL_KERNEL := $(LOCAL_PATH)/kernel
TARGET_PREBUILT_KERNEL as well as the instructions to copy the prebuilt modules.
The BoardConfig.mk (or BoardConfigCommon.mk in the common directory for your device) will most likely hold a line like:
TARGET_PREBUILT_KERNEL := device/samsung/p5/kernel
Now that the device repository has no prebuilt instructions, you can add the instructions to build the kernel. In the BoardConfig.mk file, add the following lines:
TARGET_KERNEL_SOURCE := kernel/samsung/p3
TARGET_KERNEL_CONFIG := samsung_p5_defconfig
You need to find out which type of kernel image your device uses. Asking people who know about that is the best idea.
This is the easiest case to handle: just make sure the CONFIG_INITRAMFS_SOURCE option in the kernel defonfig is left blank or undefined:
CONFIG_INITRAMFS_SOURCE=""
Building a zImage with a built-in initramfs requires the following steps:
In the kernel defconfig, define the CONFIG_INITRAMFS_SOURCE option that way:
CONFIG_INITRAMFS_SOURCE="../../root"
Once this is done, duplicate the defconfig and add the _recovery prefix before the _defconfig ending (e.g. herring_recovery_defconfig), edit that file and replace CONFIG_INITRAMFS_SOURCE with:
CONFIG_INITRAMFS_SOURCE="../../recovery/root"
Back to the device repository, edit the BoardConfig.mk file and add the following line:
TARGET_KERNEL_RECOVERY_CONFIG := samsung_p5_recovery_defconfig
_recovery_defconfig ending).
Still in the device repository, create a bootimg.mk file containing the following:
LOCAL_PATH := $(call my-dir)

$(INSTALLED_BOOTIMAGE_TARGET): $(INSTALLED_KERNEL_TARGET)
    $(ACP) $(INSTALLED_KERNEL_TARGET) $@

$(INSTALLED_RECOVERYIMAGE_TARGET): $(INSTALLED_RECOVERY_KERNEL_TARGET)
    $(ACP) $(INSTALLED_RECOVERY_KERNEL_TARGET) $@
Edit the BoardConfig.mk file and add the following line:
BOARD_CUSTOM_BOOTIMG_MK := device/vendor/device/bootimg.mk
device/vendor/device/ to the correct path to your device's repository.
Follow the previous instructions (zImage with built-in initramfs) and set the BOARD_USES_UBOOT variable in the BoardConfig.mk file:
BOARD_USES_UBOOT := true
Now that the repos are cloned, you need to modify some makefiles to cope with Replicant paths.
In the device repository (device/vendor/device), modify the file called cm.mk and replace the vendor/cm/ occurrences by vendor/replicant/. Other makefiles may need that as well (in any case, build will fail very early if you missed one). In that same cm.mk file, change the PRODUCT_NAME variable by repalcing the cm prefix with replicant (e.g. change PRODUCT_NAME := cm_crespo to PRODUCT_NAME := replicant_crespo).
Now that your device files are ready, you can declare a new build target: these are held in vendor/replicant/jenkins-build-targets.
Modify that file and add a line (at the end) with the PRODUCT_NAME you set and the -eng suffix (e.g. replicant_crespo-eng).
From now on, everything should be ready to start a build. To check for errors or missed occurrences, start a terminal in the Replicant tree root and lunch:
source build/envsetup.sh
lunch replicant_device-eng
Adapt replicant_device-eng from what you added to the jenkins-build-target (e.g. replicant_crespo-eng).
If an error occurs, it will explicitly report it and you'll need to fix it before doing anything.
If everything works correctly, you should see something like:
============================================
PLATFORM_VERSION_CODENAME=REL
PLATFORM_VERSION=4.0.4
TARGET_PRODUCT=replicant_crespo
TARGET_BUILD_VARIANT=eng
TARGET_BUILD_TYPE=release
TARGET_BUILD_APPS=
TARGET_ARCH=arm
TARGET_ARCH_VARIANT=armv7-a
HOST_ARCH=x86
HOST_OS=linux
HOST_BUILD_TYPE=release
BUILD_ID=IMM76L
============================================
You must repeat these steps everytime before building anything on a freshly-opened terminal.
Remember:
source build/envsetup.sh
lunch replicant_device-eng
Once the devices repos are in place and the build target is configured, you are now able to start building things and the first thing to build is obviously the kernel.
Once your terminal is correctly setup (the lunch command worked correctly), you can start building the kernel:
make -j9 bootimage
It will take a couple of minutes, depending on how fast your setup is. At the end, it should create a boot.img file in out/target/product/device (replace device with your device's product name).
If not, an error will be shown and you'll have to fix it.
Building the kernel with success is a great step, but it is hard to make any use of it (unless your userspace matches the initramfs, but that's not always the case).
That's why you'll have to build recovery next. Furthermore, some devices only allow flashing via recovery, so this is fundamental.
This page contains old build instructions for Replicant 10. The source code is kept to do regression testing. Active development has moved into Replicant 11.
Replicant 9 source code and build instruction have been kept to do regression tracking: Porting Replicant to Android 9.
See RunningReplicant11 before installing Replicant 10 on your device to not break it.
$ repo init -u https://git.replicant.us/replicant-next/manifest.git -b replicant-10-dev
$ repo sync
Alternatively a shallow copy of the source tree can be fetched in order to save on disk space:
$ repo init -u https://git.replicant.us/replicant-next/manifest.git -b replicant-10-dev --depth=1
$ repo sync -c
To unshallow a specific module:
$ cd path/to/module
$ git fetch --unshallow <remote>
sudo apt-get install bc bison build-essential bsdmainutils ccache curl flex g++-multilib gcc-multilib gettext git gnupg gperf imagemagick lib32ncurses5-dev lib32readline-dev lib32z1-dev liblz4-tool libncurses5-dev libsdl1.2-dev libssl-dev libwxgtk3.0-dev libxml2 libxml2-utils lzop python-mako pngcrush rsync schedtool squashfs-tools xsltproc zip zlib1g-dev
sudo apt-get install gcc-5-arm-linux-gnueabi
By default, the Android 10 build system can only use the prebuilt binaries it ships.
While having binary toolchains is better for reproducible builds, and that the binaries are free software, this creates a number of issues:As GNU/Linux distribution's tools can be rebuilt and are easier to trust, we are using that for now.
Setting the following envrionment variable allows to use your distribution tools:
$ export TEMPORARY_DISABLE_PATH_RESTRICTIONS=true
Note that setting this variable does not automatically make the build system use only system binaries: if a prebuilt binary exist, it will use it, if not, it will use your system binary.
Lots of further effort must be put into transitioning to the system binaries and/or creating a scripts that would build all the required tools.
To avoid the following error:
16:20:13 See https://android.googlesource.com/platform/build/+/master/Changes.md#PATH_Tools for more information.
[  3% 2585/70375] build out/target/product/i9305/gen/STATIC_LIBRARIES/libmesa_nir_intermediates/nir/nir_builder_opcodes.h
FAILED: out/target/product/i9305/gen/STATIC_LIBRARIES/libmesa_nir_intermediates/nir/nir_builder_opcodes.h
/bin/bash -c "python external/mesa3d/src/compiler/nir/nir_builder_opcodes_h.py external/mesa3d/src/compiler/nir/nir_opcodes.py > out/target/product/i9305/gen/STATIC_LIBRARIES/libmesa_nir_intermediates/nir/nir_builder_opcodes.h"
Traceback (most recent call last):
  File "external/mesa3d/src/compiler/nir/nir_builder_opcodes_h.py", line 106, in <module>
    from mako.template import Template
ImportError: No module named mako.template
16:20:20 ninja failed with: exit status 1
You need to run the following command:
$ cd prebuilts/build-tools/path/linux-x86/
$ rm python && ln -s /usr/bin/python python
The Java heap size is automatically set according to the available system memory. On machines with 8 GB or less RAM, it is set to a value which is too low, and will result in the following error during the build:
Exception in thread "main" java.lang.OutOfMemoryError: Java heap space
The heap size can be increased with an envirnoment variable:
$ export _JAVA_OPTIONS="-Xmx3g"
Increasing the Java heap space is not enough to get a successful build on machines with 8 GB or less RAM. It is also necessary to reduce the number of parallel jobs, to avoid processes from being killed due to lack of memory. This typically happens during the build of frameworks/base components.
For greater speed, you may let your build run with the defaults, wait for it to fail due to killed processes, and then relunch the build with:
$ make -j1
By default, Ninja, the underlaying build system for Android, used when you run make bacon, computes the number of parallel jobs according to the number of CPUs on your machine (typically #CPUs + 2 parallel jobs).
$ source build/envsetup.sh
$ lunch lineage_i9305-eng
$ make
$ cd out/target/product/i9305
$ sudo heimdall flash --BOOT boot.img --USERDATA userdata.img --SYSTEM system.img
adb remount
adb sync
As the device IDs are the ones given by the Linux kernel, they are not in the adb udev rules, so for now it requires to run adb as root:
$ sudo adb shell
* daemon not running; starting now at tcp:5037
* daemon started successfully
i9305:/ #
$ sudo adb kill-server
$ adb shell
* daemon not running; starting now at tcp:5037
* daemon started successfully
error: no devices/emulators found
$ adb kill-server
$ sudo adb shell
* daemon not running; starting now at tcp:5037
* daemon started successfully
i9305:/ #
You can also follow the boot progress with adb:
adb logcat
adb logcat -b main
Note that the device can go into suspend at any time, so adb might be interrupted. That looks like that:
First you get a shell
$ sudo adb shell
i9305:/ #
Then the connection is interrupted:
$ adb shell
i9305:/ # [randomdev@fullyfreelaptop ]$
The effect with adb logcat is similar.
git push --force as we are trying things out, and don't want to make the commits history look too dirty, so be sure to backup your local changes.git push --force. In that case the following commands will loose all the work you did locally but will make the repository consistent with upstream repositories again:$ rm -rf .repo/manifests .repo/manifests.git .repo/manifest.xml $ repo init -u https://git.replicant.us/replicant-next/manifest.git -b replicant-10-dev $ repo sync --force-sync
$ repo sync --force-sync
If you use Parabola, you may be interested in running Trisquel 8 in LXC.
To do that first debootstrap a Trisquel 8 rootfs.
Parabola's debootstrap does support Trisquel 8 and its manual has an example on how to do that:
$ man debootstrap
[...]
# debootstrap flidas flidas-root http://archive.trisquel.info/trisquel
Then you can use virt-manager to setup the LXC instance.
The advantages of this solution are that:Progress of the graphics related tasks is tracked at GraphicsReplicant10.
First month of full time equivalent work:
| Time estimation | Task | Comments |
|---|---|---|
| DONE | |
Only boots with graphics, not much more |
| |
|
Builds under Trisquel8 |
| |
* * * * * |
Status: * Boots with adb. * Has ultra slow graphics |
| 14h | find, remove and document proprietary software in LineageOS 16 | |
| 21h | find, remove and document privacy issues in LineageOS 16 | |
| 7h | |
applied |
| 7h | |
Now in 5.3 |
| 7h | rebrand LineageOS as Replicant | |
| 70h | |
See the modem status for more details |
| Total: 147h (~1 month) | ||
| * port libsamsung-ril and libsamsung-ipc to Android 9 * Make the modem driver and libsamsung-ipc work together |
157h | See the modem status for more details |
| Total | 157h | ~1 month |
|---|
| Task | Time estimation | Comments |
|---|---|---|
| Look which sensor libraries can be used |
70h | Already done by the unofficial LineageOS port of the Galaxy SIII (i9300), needs testing |
| add support for Audio with the upstream kernel driver | 70h | Might be way faster, depending on what Android 9 uses See also this bugreport |
| |
14h | * The source code on which the work was based changed from AOSP to an unofficial LineageOS port to a port of i9305 support for AOSP by Joonas to the official LineageOS so it's now supported by default * The work to factorize the code between the i9300 and i9305 still need to be done |
| Total | 154h | ~1 month |
| Task | Time estimation | Comments |
|---|---|---|
| create a recovery | 21h | |
| add internal WiFi support and validate the functionality | 6h | |
| add external WiFi dongles support | 20h | External dongles support might be tricky |
| |
|
Mostly done: * The installation instructions are now generic enough. * Some long standing TODO were also done along the way like adding backup instructions for the EFS. * The current instructions are still for Replicant 6.0 and will need to be updated for Replicant 9.0 |
| Task | Time estimation | Comments |
|---|---|---|
| Estimate the amount of work to Reduce the attack surface | ? | |
| Estimate the amount of work to add in-system upgrades | ? |
1 The generic instructions were tested at Install parties in Paris
| Galaxy Note II (N7100) | ||
|---|---|---|
| Task | Time estimation | Comments |
| port the EA8061 LCD Linux driver | 35h | |
| port the S6EVR02 LCD Linux driver | 35h | |
| port the MAX77693 flash led Linux driver | 7h | |
| android: add support for the Note II (N7100) and factorize the code with Galaxy SIII (i9300) and Galaxy SIII 4G (i9305) | 14h | Should be similar to the Galaxy SIII |
| port the sensors libraries and other device specific libraries | 70h | It's difficult to evaluate how much time it could take |
| add support for Audio with the upstream kernel driver | 14h | Should be similar to the Galaxy SIII |
| Galaxy Note 8.0 (N5100) and 8.0 WiFi (N5110) | ||
|---|---|---|
| Task | Time estimation | Comments |
| Evaluate the time required to do the port | 14h | TODO |
| Device | Time estimation | Comments |
|---|---|---|
| Galaxy S II (i9100) | Linux: devboard dts upstream? unknown status | |
| Galaxy Note (N7000) | unknown Linux upstream status | |
| Galaxy Nexus (I9250) | OMAP4, no dts upstream | |
| Galaxy Tab 2 7.0 (P3100), 7.0 WiFi (P3110), 10.1 (P5100), 10.1 WiFi (P5110) | ||
| GTA04 >= A4 | TODO: a RIL needs to be written, userspace GPS support is missing, audio scenarios, etc |
See Replican6Changes.
See the Samsung-ipc page.
| Device(s) | Repository | status | Comments |
|---|---|---|---|
| i9300 | CustomROMs | * February 8 2020 Pie release | |
| i9300 | Team InFusion | * August 20 2019 Pie release | Issues: * Uses a Samsung kernel * Uses too many nonfree libraries => Probably nothing we could reuse from its code |
| n7100 | ComicoTeam | * January 4 2020 Pie release | |
| i9100 | rINanDO | * March 20 2020 Pie release * July 19 2020 Android 10 release |
| Repository | Tree path | Dependencies | Function | Comments |
|---|---|---|---|---|
| https://github.com/CustomROMs/android_hardware_samsung lineage-16.0 branch |
hardware/samsung/macloader | Loads the MAC Address of the WiFi network interface | Might be useful | |
| hardware/samsung/wifiloader | Loads the wifi kernel module (like modprobe) and setup firmware filesystems permissions | May be useful | ||
| hardware/samsung/audio | seems to contains ril related stuff as well | Look if the ril stuff is required, go for standard audio | ||
| hardware/samsung/lineagehw/hidl/livedisplay | livedisplay is a feature similar to what redshift does on GNU/Linux | Not sure if it works with mainline | ||
| hardware/samsung/exynos/multimedia/utils/ | seem meant for audio/video decoding offload | assembly obtimized color conversion and resize code | check assembly code license, not sure if useful | |
| all other directories in hardware/samsung/exynos/ | nonfree firmwares, nonfree software?, smdk kernel? | audio/video decoding offload | Avoid using that | |
| hardware/samsung/exynos3 | nonfree firmwares?, nonfree software?, smdk kernel? | some light libraries, display stuff (gralloc, etc), 2D acceleration (FIMG), camera (FIMC), 3D acceleration, etc | Avoid using that for now | |
| hardware/samsung/exynos4 |
This page contains old build instructions for Replicant 9. The source code is kept to do regression testing. Active development has moved into Replicant 11.
See RunningReplicant11 before installing Replicant 9 on your device to not break it.
$ repo init -u https://git.replicant.us/contrib/replicant-next/manifest.git -b replicant-9-dev
$ repo sync
Alternatively a shallow copy of the source tree can be fetched in order to save on disk space:
$ repo init -u https://git.replicant.us/replicant-next/manifest.git -b replicant-9-dev --depth=1
$ repo sync -c
To `unshallow` a specific module:
$ cd path/to/module
$ git fetch --unshallow <remote>
sudo apt-get install bc bison build-essential bsdmainutils ccache curl flex g++-multilib gcc-multilib gettext git gnupg gperf imagemagick lib32ncurses5-dev lib32readline-dev lib32z1-dev liblz4-tool libncurses5-dev libsdl1.2-dev libssl-dev libwxgtk3.0-dev libxml2 libxml2-utils lzop python-mako pngcrush rsync schedtool squashfs-tools xsltproc zip zlib1g-dev
sudo apt-get install gcc-5-arm-linux-gnueabi
Follow the i9300 manifest instructions:
$ subject='/C=US/ST=California/L=Mountain View/O=Android/OU=Android/CN=Android/emailAddress=android@android.com'
$ mkdir .android-certs
$ for x in releasekey platform shared media testkey; do \
  ./development/tools/make_key .android-certs/$x "$subject"; \
  done
$ parallel_tasks=$(echo "$(grep 'processor' /proc/cpuinfo | wc -l ) + 1" | bc)
$ source build/envsetup.sh
$ lunch lineage_i9305-eng
$ make -j${parallel_tasks} bacon
The images can then be flashed with heimdall. They are then in:
out/target/product/i9305/obj/PACKAGING/target_files_intermediates/lineage_i9305-target_files-eng.replicant/IMAGES/
$ rm -rf .repo/manifests/ # This enables me to force push and rebase the manifest repository as well
$ repo init -u https://git.replicant.us/replicant-next/manifest.git -b replicant-9-dev
$ repo sync --force-sync
$ repo sync --force-sync
$ sudo heimdall flash --BOOT out/target/product/i9305/obj/PACKAGING/target_files_intermediates/lineage_i9305-target_files-eng.replicant/IMAGES/boot.img --USERDATA out/target/product/i9305/obj/PACKAGING/target_files_intermediates/lineage_i9305-target_files-eng.replicant/IMAGES/userdata.img --SYSTEM out/target/product/i9305/obj/PACKAGING/target_files_intermediates/lineage_i9305-target_files-eng.replicant/IMAGES/system.img
As the device IDs are the ones given by the Linux kernel, they are not in the adb udev rules, so for now it requires to run adb as root:
$ sudo adb shell
* daemon not running; starting now at tcp:5037
* daemon started successfully
i9305:/ #
$ sudo adb kill-server
$ adb shell
* daemon not running; starting now at tcp:5037
* daemon started successfully
error: no devices/emulators found
$ adb kill-server
$ sudo adb shell
* daemon not running; starting now at tcp:5037
* daemon started successfully
i9305:/ #
At some point during boot, the device goes into suspend, so you will need to press some buttons like the power or volume button to make the boot continue until the graphical interface.
You can also follow the boot progress with adb:
adb logcat
adb logcat -b main
Note that the device can go into suspend at any time, so adb might be interrupted. That looks like that:
First you get a shell
$ sudo adb shell
i9305:/ #
Then the connection is interrupted:
$ adb shell
i9305:/ # [randomdev@fullyfreelaptop ]$
The effect with adb logcat is similar.
To use SwifShader you need a kernel that supports UDIV/SDIV emulation, you can checkout the branch GNUtoo/udiv-emulation for kernel/replicant/linux. After doing that that run the following commands to use SwiftShader:
$ adb remount
$ adb shell
i9305:/ # rm vendor/lib/egl/libGLES_mesa.so # or move it somewhere safe meanwhile you test SwiftShader
i9305:/ # nano system/build.prop # set ro.hardware.hwcomposer=ranchu and ro.hardware.gralloc=default
$ adb reboot
First get the source code:
$ repo init -u git://git.putti.eu/aosp/manifest_i9305.git -b android-9.0.0
sudo apt-get install git-core gnupg flex bison gperf build-essential zip curl zlib1g-dev gcc-multilib g++-multilib libc6-dev-i386 lib32ncurses5-dev x11proto-core-dev libx11-dev lib32z-dev libgl1-mesa-dev libxml2-utils xsltproc unzip bc python-mako gcc-5-arm-linux-gnueabi
Once this is done, see the device/putti/i9305/README.md for the build instructions.
If your inquiry has to be secret or private, you can contact us directly at: contact@replicant.us
Otheriwse don't contact us trough this mail.
Instead use the mailing list, the forums, or the IRC where you have way more probability of getting help.
The bootloader is signed, and if you flash a modified bootloader(for instance using a recovery) it see that it has been modified and that the signature doesn't match and stop during boot as soon as it finds the modified bootloader(so it won't try other boot sources such as usb, or other devices).
I did exactly that(I tought that it would try other boot methods instead because a user reported that it did that when his NAND was damanged) and I bricked my device.
In order to recovery I removed the xOM5 resistor and didn't do anything else hardware related, then I remounted my phone and used hummingbird-hibl to resurect my phone, this time it worked(with the resistor removed).
According to Rebellos on older revisions of the s5pc110 such thing(removing the resistor and not putting it back) can cause issues such as hanging the CPU.(it's unknown if newer revisions have a protection against that...).
This guide is a step-by-step explanation of the process of porting a new device to Replicant 4.0.
A general good advice when porting a new device to Replicant is to look at how things are done on other devices and look at the commits that were made.
If your device fails to comply with one of these requirements, it won't be possible to port Replicant to it.
If you don't know about whether your device complies or not, you'll probably learn it along the way.
First of all, you'll have to find out the device's codename that was given by its manufacturer. Wikipedia usually has that information on the device's article. For instance, the codename for the European version of the Nexus S given by Samsung is i9023. This codename will help in the process of getting informations about the device.
Then, a second codename (that can turn out the be the same as the previous one) is given to the device at Android-level. If your device is supported by CyanogenMod, you can find it out from the CyanogenMod Wiki or on CyanogenMod download page. For instance, the Nexus S codename is: crespo.
It is useful to have a general idea of what kind of hardware is present in the phone. From the Wikipedia and CyanogenMod pages about the device, it's already possible to know what System on a Chip (SoC) it uses and a couple other details.
To learn more details, you can consider looking for a teardown of the device (for instance on iFixit), that will reveal what chips are used on the device. Looking at the kernel defconfig for the device will also help a lot, you can also try to find the service manual for the device.
You can then compare that to the devices that are already supported in Replicant to get an idea of what will possibly work.
One very important step is to find out if the device is Tivoized: that means that even though the manufacturer releases the kernel source code for the device, the bootloader checks the kernel signature and will refuse to start it if it's not properly signed by the manufacturer. In other words, if you build the kernel yourself, the device will refuse to run it since it's not signed by the manufacturer. Since the Linux kernel is released under the GPLv2, there are no specific dispositions to counter Tivoization, and so porting the device to Replicant is pointless as it will require a prebuilt and signed kernel from the manufacturer.
This is not an easy information to find out, but the developers involved in the CyanogenMod port will probably know that information. It's a good idea to just ask them.
To install the future Replicant image on the device, you have to find out how the device can be flashed with a new operating system. The CyanogenMod Wiki has install guides for the supported devices and you'll probably find install guides for non-official CM ports as well. It is very important to understand the flashing procedure as it will have to be documented on the Replicant wiki.
There are basically two ways of flashing a new operating system:The key information to get before starting the port is the list of the non-free components that are required by CyanogenMod.
The easiest way to do this is to spot the device repository in CyanogenMod repos and look for the extract-files.sh or proprietary-blobs.txt file on the ics branch.
There is usually a link to the device repository from the CyanogenMod Wiki
For instance, the list of non-free components for the Nexus S is extract-files.sh
From that list, spot what is related to what hardware component (audio, camera, sensors, gps, modem, etc): that gives an idea of the amount of work required to add support for the phone.
android_device_vendor_device.android_device_vendor_devices-common.android_kernel_samsung_devices.You can find the device-specific repo from the device's page on the CyanogenMod Wiki.
Make sure you check out the branches that match the CM 9.0 version (the branch may be called ics).
Once you have cloned the device-specific repo for your device and checked out the correct branch, refer to the cm.dependencies file to find what repos are left to clone.
Clone these repos in the correct locations and remove the prefix (e.g. android_device_samsung_crespo must be cloned in device/samsung/ and renamed to crespo).
If your cloned the kernel source for your device, it is likely that the kernel build is already integrated, so you can skip the next sections below.
Once you have the kernel sources, read the instructions to find out which defconfig to use.
Since manufacturers usually don't release the git history along with the files, you'll need to recreate a git repo:git add -A) and commit (git commit) with a message explaining what you just imported (e.g. "GT-I9000 GB Opensource Update 2")Now that you have a git repo, you can move it to the Replicant code tree, under the name: kernel/vendor/devices (e.g. kernel/samsung/aries).
Make sure to make the devices name match the devices in android_device_vendor_devices-common if the kernel is shared across these devices or to match the device in android_device_vendor_device.
Some devices are still using a prebuilt kernel. Even though the CyanogenMod team is trying to avoid that, it remains in many repos.
For such devices, you will need to remove the prebuilt binaries and the instructions to copy the prebuilt kernel and its modules.
In the device repository (device/vendor/device) and common repository for your device (if any), remove the prebuilt kernel and modules (usually called kernel and module.ko (replace module with the name of a module) or a modules directory).
Remove the instructions to copy these prebuilts on the makefiles. Remove instructions such as:
PRODUCT_COPY_FILES += \
    $(LOCAL_KERNEL):kernel

LOCAL_KERNEL := $(LOCAL_PATH)/kernel
TARGET_PREBUILT_KERNEL as well as the instructions to copy the prebuilt modules.
The BoardConfig.mk (or BoardConfigCommon.mk in the common directory for your device) will most likely hold a line like:
TARGET_PREBUILT_KERNEL := device/samsung/p5/kernel
Now that the device repository has no prebuilt instructions, you can add the instructions to build the kernel. In the BoardConfig.mk file, add the following lines:
TARGET_KERNEL_SOURCE := kernel/samsung/p3
TARGET_KERNEL_CONFIG := samsung_p5_defconfig
You need to find out which type of kernel image your device uses. Asking people who know about that is the best idea.
This is the easiest case to handle: just make sure the CONFIG_INITRAMFS_SOURCE option in the kernel defonfig is left blank or undefined:
CONFIG_INITRAMFS_SOURCE=""
Building a zImage with a built-in initramfs requires the following steps:
In the kernel defconfig, define the CONFIG_INITRAMFS_SOURCE option this way:
CONFIG_INITRAMFS_SOURCE="../../root"
Once this is done, duplicate the defconfig and add the _recovery prefix before the _defconfig ending (e.g. herring_recovery_defconfig), edit that file and replace CONFIG_INITRAMFS_SOURCE with:
CONFIG_INITRAMFS_SOURCE="../../recovery/root"
Back to the device repository, edit the BoardConfig.mk file and add the following line:
TARGET_KERNEL_RECOVERY_CONFIG := samsung_p5_recovery_defconfig
_recovery_defconfig ending).
Still in the device repository, create a bootimg.mk file containing the following:
LOCAL_PATH := $(call my-dir)

$(INSTALLED_BOOTIMAGE_TARGET): $(INSTALLED_KERNEL_TARGET)
    $(ACP) $(INSTALLED_KERNEL_TARGET) $@

$(INSTALLED_RECOVERYIMAGE_TARGET): $(INSTALLED_RECOVERY_KERNEL_TARGET)
    $(ACP) $(INSTALLED_RECOVERY_KERNEL_TARGET) $@
Edit the BoardConfig.mk file and add the following line:
BOARD_CUSTOM_BOOTIMG_MK := device/vendor/device/bootimg.mk
device/vendor/device/ to the correct path to your device's repository.
Follow the previous instructions (zImage with built-in initramfs) and set the BOARD_USES_UBOOT variable in the BoardConfig.mk file:
BOARD_USES_UBOOT := true
Now that the repos are cloned, you need to modify some makefiles to cope with Replicant paths.
In the device repository (device/vendor/device), modify the file called cm.mk and replace the vendor/cm/ occurrences by vendor/replicant/. Other makefiles may need that as well (in any case, build will fail very early if you missed one). In that same cm.mk file, change the PRODUCT_NAME variable by replacing the cm prefix with replicant (e.g. change PRODUCT_NAME := cm_crespo to PRODUCT_NAME := replicant_crespo).
Now that your device files are ready, you can declare a new build target: these are held in vendor/replicant/jenkins-build-targets.
Modify that file and add a line (at the end) with the PRODUCT_NAME you set and the -eng suffix (e.g. replicant_crespo-eng).
From now on, everything should be ready to start a build. To check for errors or missed occurrences, start a terminal in the Replicant tree root and lunch:
source build/envsetup.sh
lunch replicant_device-eng
Adapt replicant_device-eng from what you added to the jenkins-build-target (e.g. replicant_crespo-eng).
If an error occurs, it will explicitly report it and you'll need to fix it before doing anything.
If everything works correctly, you should see something like:
============================================
PLATFORM_VERSION_CODENAME=REL
PLATFORM_VERSION=4.0.4
TARGET_PRODUCT=replicant_crespo
TARGET_BUILD_VARIANT=eng
TARGET_BUILD_TYPE=release
TARGET_BUILD_APPS=
TARGET_ARCH=arm
TARGET_ARCH_VARIANT=armv7-a
HOST_ARCH=x86
HOST_OS=linux
HOST_BUILD_TYPE=release
BUILD_ID=IMM76L
============================================
You must repeat these steps everytime before building anything on a freshly-opened terminal.
Remember:
source build/envsetup.sh
lunch replicant_device-eng
Now that everything is set-up, you can build the first image to test on your device: the recovery image.
The build target is recoveryimage, so all you have to do is:
make -j9 recoveryimage
This should trigger the kernel build and the recovery initramfs build and in the end, produce the out/target/product/device/recovery.img file.
Once your image is built (it takes some time), flash it to the recovery partition of your device (if any). It's a good idea to look at the CyanogenMod installation guide to find out how to install that recovery image.
There is usually also a key combination to hold to boot directly to recovery: hopefully, your recovery image will start.
It is time to build a complete set of Replicant images. This includes at least the system and kernel images. Depending on the installation method, an userdata image might be needed too.
Let's start by building the boot image, that is both the kernel and the Android initramfs. The build target is bootimage:
make -j9 bootimage
In the end, the out/target/product/device/boot.img file will be produced.
It is time for you to take a good look at the installation process. Mainly, about whether the images will be flashed using the bootloader or recovery.
Since CyanogenMod uses the zip installation method, that we do not want to use, you're on your own here.
It will be easy to find out the filesystem for the different partitions if the device already runs CyanogenMod:
$ adb shell mount
rootfs / rootfs ro,relatime 0 0
tmpfs /dev tmpfs rw,nosuid,relatime,mode=755 0 0
devpts /dev/pts devpts rw,relatime,mode=600 0 0
proc /proc proc rw,relatime 0 0
sysfs /sys sysfs rw,relatime 0 0
none /acct cgroup rw,relatime,cpuacct 0 0
tmpfs /mnt/asec tmpfs rw,relatime,mode=755,gid=1000 0 0
tmpfs /mnt/obb tmpfs rw,relatime,mode=755,gid=1000 0 0
none /dev/cpuctl cgroup rw,relatime,cpu 0 0
/dev/block/mtdblock2 /system yaffs2 ro,relatime 0 0
/dev/block/mtdblock3 /cache yaffs2 rw,nosuid,nodev,relatime 0 0
/dev/block/mtdblock5 /radio yaffs2 rw,relatime 0 0
/dev/block/mmcblk0p2 /data ext4 rw,nosuid,nodev,noatime,nodiratime,barrier=1,data=ordered,noauto_da_alloc 0 0
/dev/block/mtdblock6 /datadata yaffs2 rw,relatime 0 0
/dev/block/mtdblock4 /efs yaffs2 rw,relatime 0 0
/sys/kernel/debug /sys/kernel/debug debugfs rw,relatime 0 0
/dev/block/vold/179:1 /mnt/sdcard vfat rw,dirsync,nosuid,nodev,noexec,relatime,uid=1000,gid=1015,fmask=0702,dmask=0702,allow_utime=0020,codepage=cp437,iocharset=iso8859-1,shortname=mixed,utf8,errors=remount-ro 0 0
/dev/block/vold/179:1 /mnt/secure/asec vfat rw,dirsync,nosuid,nodev,noexec,relatime,uid=1000,gid=1015,fmask=0702,dmask=0702,allow_utime=0020,codepage=cp437,iocharset=iso8859-1,shortname=mixed,utf8,errors=remount-ro 0 0
tmpfs /mnt/sdcard/.android_secure tmpfs ro,relatime,size=0k,mode=000 0 0
So we can deduce that system is yaffs2 and data is ext4. Don't bother about the other partitions and mount-points, only /system and /data matter for now.
You have to modify the BoardConfig.mk file on the main device repository (it might be delegated to BoardConfigCommon.mk on the common repos).
To build ext4 system and userdata images, make sure you have:
TARGET_USERIMAGES_USE_EXT4 := true
TARGET_USERIMAGES_USE_EXT4 := false
If the images have to be flashed using recovery, you must make sure they are built in yaffs2 format, with the default page and spare sizes.
Make sure to remove the following lines from BoardConfig.mk (even though the values might be different):
BOARD_NAND_PAGE_SIZE := 4096
BOARD_NAND_SPARE_SIZE := 128
TARGET_USERIMAGES_USE_EXT4 := false
Even though the images are built as yaffs2, it doesn't mean that the filesystem on the device will be yaffs2: you have to set the correct filesystem, amongst: ext4, yaffs2 in the built image file name.
That means you have to change the target images names. This is done by adding the following line (adapted for your device) on BoardConfig.mk:
BOARD_CUSTOM_USERIMG_MK := device/vendor/device/userimg.mk
userimg.mk file on the device main repository, with the following contents (adapt the target name):
INSTALLED_SYSTEMIMAGE_TARGET := $(PRODUCT_OUT)/system.ext4.img

$(INSTALLED_SYSTEMIMAGE_TARGET): $(INSTALLED_SYSTEMIMAGE)
    @echo -e ${CL_INS}"Install system fs image: $@"${CL_RST}
    $(hide) mv $(INSTALLED_SYSTEMIMAGE) $(INSTALLED_SYSTEMIMAGE_TARGET)

systemimage: $(INSTALLED_SYSTEMIMAGE_TARGET)
Building the system is the longest task. The build target is systemimage:
make -j9 systemimage
You might encounter build errors due to the lack of non-free libs. You'll need to find clean workarounds for that. Removing options from BoardConfig.mk can help solve the situation.
For instance, the following error:
make: *** No rule to make target `out/target/product/i9300/obj/lib/libTVOut.so', needed by `out/target/product/i9300/obj/EXECUTABLES/mediaserver_intermediates/LINKED/mediaserver'. Stop.
BOARD_USE_SECTVOUT to false:BOARD_USE_SECTVOUT := false
Once the systemimage is built, you have to build the userdataimage if you're going to flash using the bootloader:
make -j9 userdataimageWhen all the images are built, you're ready for flashing the images.
md5sum system.ext4.img boot.img > checksum.md5If everything was correctly setup, this should succeed. The best way to make sure it booted is to run adb logcat and wait for an output.
That early, it is very likely that graphics will be broken, so don't expect anything to show up on the screen: only adb is a reliable way of knowing whether it worked.
Keep in mind that all the make (and such) commands must be run in a terminal where lunch has been executed before.
Once you have a Replicant image installed on the device, there is no need to rebuild a whole image everytime you make a change (but it's a good idea to do it from time to time): you can instead rebuild only a single module by using (where module is the module's name):
make module
Even better, you can build the module that sits in the current directory by simply using mm. To push the new library to the device, use adb push (you'll need to adb remount the first time).
Moreover, instead of rebooting, you can kill the Android applications (zygote, surfaceflinger, rild) depending on what you are working on.
For instance for audio:
adb shell killall zygote
adb shell killall surfaceflinger
adb shell killall rild
Be sure to always look what's going on in logs.
For the main buffer:
adb logcat
adb logcat -b radio
Generally speaking, libEGL is non-free while gralloc and hwcomposer might be free software (but they often rely on non-free blobs). On most Replicant-supported phones, we use the default gralloc, the software libEGL and no hwcomposer. We modified the gralloc so that is uses RGB565 on framebuffer, which turns out to be faster than any other format we tried.
However, to have a fluid-enough experience, you need to disable most hardware-accelerated features of Android to enable Software GL.
This is done by modifying the cm.mk Makefile on the device repository. Add the following lines after the others inherit calls:
# Inherit Software GL configuration.
$(call inherit-product, vendor/replicant/config/software_gl.mk)
Moreover, you might need to add the Software GL configuration on the egl.cfg file, that is located somewhere in the device repository (perhaps under config/).
Add the following line at the beginning of the file (if it's not there already):
0 0 android
This will prevent surfaceflinger from doing a SEGFAULT.
To find out whether your device uses ALSA or not, look if you have the /dev/snd/pcmC0D0c and /dev/snd/pcmC0D0p nodes available. A non-standard interface aside might be indicated by the presence of the /dev/snd/hwC0D0 node.
If your device is standard ALSA, you can use the tinyalsa-audio library (located under hardware/tinyalsa-audio) with a configuration file (an example of such a file is available at device/samsung/galaxys2/configs/tinyalsa-audio.xml). You can find the propers controls to set on which scenario by running tinymix (found under external/tinyalsa) with the non-free blob in place in the different scenarios.
If your device involves a non-standard interface or if it completely relies a non-standard interface, there is no readily available guide to find out how it works, but you can start by looking at the kernel driver and adding debug prints (with printk) there and figure out what is going on.
Remember to add the working audio module to the build targets (on the makefiles in the device repo).
In order to support telephony, messaging (SMS) and other network-related features (data as well), you need to make the modem work with Replicant. The modem is often called the radio in Android terminology.
The modem uses a protocol to communicate with the CPU. You need to find out which protocol the modem for your device is using. There are several possible cases:To find out which protocol your phone uses, it is a good idea to look at the radio log buffer in CyanogenMod and try to find out from the messages (it may be verbose).
The protocol itself is implemented in the RIL (Radio Interface Layer): it is a good idea to take a look at the non-free ril the device uses (get its path with getprop rild.libpath).
If the modem uses the AT protocol, there are many available RIL implementations out there: Android has a reference-ril (hardware/ril/reference-ril) that implements AT and there is the hayes-ril library (located under hardware/ril/hayes-ril/) that makes it easier for you to add support for your device. Though, it is possible that the modem of your device implements undocumented commands, so you'll have to figure these out: the radio log might help a lot if it's verbose, else you'll have to trace the RIL somehow.
If the protocol is not AT, it might still be supported: the FreeSmartphone.Org (FSO) project implements some undocumented protocols. You can also look at oFono.
If your phone was manufactured by Samsung, there is a very good chance that it uses the Samsung-IPC protocol, which is implemented in libsamsung-ipc and Samsung-RIL. You will need to add support for your device in libsamsung-ipc (Samsung-RIL is device-independent: all the abstraction is done by libsamsung-ipc), which may be more or less easy depending on whether your modem type is already supported. In any case, you'll need to trace the RIL to find out. There may also be a separate daemon (often called cbd) that is in charge of the modem bootup (that's the biggest part you need to figure out), so that's the thing to trace.
If the protocol implementation is nowhere to be found, you'll have to write a free implementation yourself if you want to have free software support for the modem. It's a good idea to ask around whether other people from other communities, such as XDA or CyanogenMod, would be interested in helping you.
After finding a RIL that may work, add it to the build targets (in the device makefiles) and specify the path to the RIL with rild.libpath (it is often already declared in system.prop in the device repo).
Once the RIL is working, you may need the audio module cooperation to have sound during calls. For instance with Samsung-RIL, you need to use an Audio-RIL-Interface that implements the Samsung-RIL-Socket interface.
Note that sensors may require daemons aside, such as orientationd, geomagneticd, etc. You will most likely need to replace these as well.
If the implementation is incomplete, you will have to write a replacement for the non-free library that is used. For instance, samsung-sensors replaces the non-free libakm and provides free software acceleration sensor results for many Samsung devices.
If there is nothing available, you will have to write a sensors module for you device. You can reuse one from another device and add support for your sensors there.
For instance, here is a reference commit of the Galaxy S3 Exynos Sensors module that you may reuse.
Remember to add the working sensors module to the build targets (on the makefiles in the device repo) like it is done on the reference commit.
When there is no free software for your sensors, you have to figure out: how to enable/disable the sensor and set the poll delay (it's often done via sysfs or via ioctl on a dev node). Reading the kernel-side driver of the sensor is a very good idea, you can add debug prints and force values there. You can also find datasheets about your sensor online, which may help you understanding how it works.
The really big part is to figure out how to convert the values that are out of the device (and generally passed through by the kernel driver) into the standard units that the Android framework requires.
An effective way to do this is to print the values passed by the kernel driver and look what the non-free sensors module returns. Better yet, you can also trace the non-free module and see exactly what it does, though that won't give you the details of the maths involved.
To find out the maths, open a spreadsheet software, then add the matching kernel values and the one out of the non-free module and try to find an equation that gives the values in standard units from the one returned by the kernel driver. For instance, you might find something like (this is for the LSM330DLC accelerometer):
f(x)=0,0095768072 * x
Once you have this, you may want to find out where that value comes from. In that case, we can see that:
0,0095768072 = 9.80665 / 1024
9.80665 being the standard gravity on Earth. Hence, we have:f(x)=x * GRAVITY_EARTH / 1024
Once you have this equation figured out, you're ready to implement this in your free sensors module!
In the first case, you will only have to adjust the preview format to RGB565 and it is also a good idea to lower the preview frame rate. Depending on whether the library already has code to handle RGB565, the difficulty of doing this will change. Here are reference commits that introduce these changes for the Nexus S: libcamera: Use RGB565 preview format libcamera: Set preview framerate to 20fps
We cannot use YUV formats directly because the Android software EGL implementation used in Replicant only supports dealing with the first YUV plane: thus, preview would be black and white only, and probably slower than RGB565.
In both cases, you'll need to add lots of debug prints to the relevant kernel drivers to figure out how it works. It will be easier if it uses V4L2, as you can already find many implementations of V4L2 out there, but it will very likely need a custom procedure and controls. In the case of a non-standard interface, you're on your own, except if you can find an implementation for a similar interface used on another other device.
Here is a reference commit of the Galaxy S3 Exynos Camera module that uses the Samsung FIMC engine. While it uses V4L2, it needs a custom procedure and custom controls to work properly.
Beware: some camera drivers require the cooperation of the GPU (that seems to be the case on OMAP4). In that case, even a free camera module implementation cannot work on Replicant. Camera drivers may also need to load a non-free firmware, that cannot be distributed with Replicant: hence, you must make sure that the driver will use the pre-installed version of the firmware (if any), burnt on the camera chip in the case loading the non-free firmware from the system fails.
It is very likely that your device requires loaded firmwares for some components of the hardware. These are non-free programs that run separately from the CPU, on other chips. Since Replicant respects its users' freedom, no non-free firmwares are shipped with Replicant. It is possible that CyanogenMod includes shareable non-free firmwares in its tree: you must remove them.
Sometimes, components will crash (and may restart in an endless loop) when attempting to load a firmware that is not shipped with Replicant: you have to spot the code that loads the firmware and make it properly handle the case where the firmware is not available.
Though, you should keep in mind that some users may want to use that firmware, so you have to make the firmware loading possible. There are some exceptions to this however, especially when this involves blocking a free software alternative (this is the case with OMX media decoding). Moreover, firmwares should always be located under /system/vendor/firmware/ so that they are easy to spot and remove when the user decides to get rid of them (after installing them previously).
For instance, the Wi-Fi firmwares path (often declared in the BoardConfig.mk file) have to be changed with the /system/vendor/firmware prefix. The bluetooth firmware path is often declared in the init files (such as init.herring.rc). Make sure to document the new firmwares locations on the wiki: see the Developer guide.
The Linux kernel comes with its own share of firmware: you have to get rid of them too. Mostly, this is about removing the firmwares directory and modifying the Makefile to make it avoid firmwares.
Since the procedure is nearly exactly the same on all kernels, here is a reference commit for the changes to add to Makefile: Removed non-free firmwares and related instructions
Most of the time, there is a chip dedicated to decoding media files (audio and video) and it very often requires a non-free loaded firmware. Moreover, it prevents software-only solutions from working, so you need to get rid of the libraries (even though they may be free software) that handle hardware media decoding. This is implemented in the OMX and stagefrighthw libraries. You need to spot and remove these products from the build targets of your device (in the device makefiles).
For reference, here is the commit that removes hardware media decoding on Nexus S (crespo): OMX: Disable SEC OMX libraries to permit software decoding
Not every hardware feature can be supported by Replicant: there are some areas where there is simply no free software available. If this is about a critical component (audio, graphics too slow, telephony) and there is no solution in sight, you might as well consider the port a failure. On the other hand, there are lacks we can leave with, for instance 3D, camera or GPS support: don't let that get in the way of releasing images for your device!
Once your device works, or during the development process (it is recommended to do it as soon as it appears that the port will be successful), you have to push all your work to Replicant repositories.
You need to ask for commit access to our repositories to be allowed to push your work. This means creating the repositories for your device, pushing your work to these and to the other repositories you modified and adding the new repositories to the manifest.
The Developer guide hold all the rules for naming repositories: make sure to act accordingly with these requirements!
The manifest holds the list of the repositories we use in each Replicant version. Its syntax is xml, so it's easy to add your new repositories.
Once your device is usable, you have to create documentation on the Replicant wiki to let others know about relevant material concerning the device, especially build and installation instructions. This is absolutely required before we can publish any image for your device!
The process is described in the Developer guide.
See feature #657 for the discussion about a ADT for Replicant and this page.
The Android 4.2 source code ships a sdk/eclipse/ directory with ADT build scripts.
The build script will also download Eclipse 3.6.2 files as build dependencies.
Note: as of 2015-07, ADT is deprecated in favor of Android Studio, based on IntelliJ.
Replicant 4.2 is based on CyanogenMod 10.1 which is based on AOSP 4.2.2, released 2013-02.
The build environment used by NDK release managers should be Ubuntu LTS 10.04.
# Based on https://web.archive.org/web/20121201011547/http://source.android.com/source/initializing.html
# git recompiled manually, mingw32 dropped
apt-get install wget gnupg flex bison gperf build-essential \
  zip curl zlib1g-dev libc6-dev lib32ncurses5-dev ia32-libs \
  x11proto-core-dev libx11-dev lib32readline5-dev lib32z-dev \
  libgl1-mesa-dev g++-multilib python-markdown \
  libxml2-utils xsltproc
apt-get install openjdk-6-jdk libasm-java
Login as user replicant and prepare the Replicant 4.2 source code as described in ReplicantSourceCode.
.
. build/envsetup.sh
cd sdk/eclipse/

# Complies with setup_eclipse.sh and fix download URL
sudo mkdir -p /buildbot/eclipse-android
sudo chown replicant /buildbot/eclipse-android
sed -i -e '/eclipse-rcp-helios-SR2/ s/download.eclipse.org/archive.eclipse.org/' \
  scripts/setup_eclipse.sh
# Note: I tried with 'apt-get install eclipse-rcp eclipse-pde' and ECLIPSE_HOME=/usr/lib/eclipse
# but it lacks org.eclipse.wst.* plugins aka eclipse-wtp-xmltools

mkdir ~/adt/
scripts/build_server.sh ~/adt
# 15mn with 4 cores, 32GB (inc. 17GB .repo)
The ADK release is in ~/adt/android-eclipse-v201507252158.zip :)
By default, Eclipse display on install:
Warning: You are installing software that contains unsigned content.
The authenticity or validity of this software cannot be established. Do
you want to continue with the installation?
Let's sign the package.
Make sure you have keytool (openjdk-6-jre-headless) and jarsigner (openjdk-6-jdk), and:
# generate self-signed certificate
keytool -genkey -dname 'cn=Builder,ou=ADT,o=Replicant,c=FR' -keystore ~/adt/cacerts -validity 3650 -storepass 'changeme' -keypass 'changeme' -alias 'replicant'
# sign the JARs and repack
unzip -d t/ android-eclipse-v201507261317.zip
find t/features/ t/plugins/ -name "*.jar" -exec jarsigner -keystore ~/adt/cacerts -storepass 'changeme' -verbose {} 'replicant' \;
(cd t/ && zip -r ../android-eclipse-v201507261317.zip *)
rm -rf t/
At install time, Eclipse will ask the user if she trusts "Builder; ADT; Replicant".
See the nice Eclipse tutorial at SDK.
This version of the rendering library is more recent than your version of ADT plug-in. Please update ADT plug-in
Replicant can only be built on 64 bit x86 architectures, building on 32 bit x86 systems is no longer supported.
However, some prebuilt tools are still 32 bit x86 executables and some host tools are generated as 32 bit x86 executables.
Debian 9
Packages installation:
dpkg --add-architecture i386 ; apt-get update
apt-get build-dep gcc binutils llvm-defaults
apt-get install gcc-arm-none-eabi cmake python-dev swig ant bc proguard maven-debian-helper libemma-java libasm4-java libguava-java libnb-platform18-java libnb-org-openide-util-java libandroidsdk-ddmlib-java libmaven-source-plugin-java libfreemarker-java libmaven-javadoc-plugin-java repo curl gawk libgmp3-dev libmpfr-dev libmpc-dev git-core gperf libncurses-dev squashfs-tools pngcrush zip zlib1g-dev lzma libc6-dev-i386 g++-multilib lib32z1-dev lib32readline-dev lib32ncurses5-dev zlib1g-dev:i386 xsltproc python-mako schedtool gradle dirmngr libandroidsdk-sdklib-java eclipse-jdt libgradle-android-plugin-java android-sdk-build-tools android-sdk-platform-23 aapt lzop
Trisquel 7.0
Packages installation:
apt-get install git gnupg flex bison gperf build-essential zip curl openjdk-7-jre openjdk-7-jdk libc6-dev libncurses5-dev:i386 x11proto-core-dev libx11-dev:i386 libreadline6-dev:i386 libgl1-mesa-glx:i386 libgl1-mesa-dev g++-multilib mingw32 tofrodos python-markdown libxml2-utils xsltproc zlib1g-dev:i386
Debian 8
Packages installation:
dpkg --add-architecture i386 ; apt-get update
apt-get install  bison flex git-core gperf libncurses-dev build-essential curl squashfs-tools openjdk-7-jre openjdk-7-jdk pngcrush wget zip zlib1g-dev lzma libxml2-utils libc6-dev-i386 g++-multilib lib32z1-dev lib32readline-gplv2-dev lib32ncurses5-dev zlib1g-dev:i386 xsltproc
Tweaks
lib32readline5-dev being missing, it has to be replaced with lib32readline-gplv2-dev in the command line./usr/lib/zconf.h header is missing, a symlink has to be created:ln -s /usr/include/x86_64-linux-gnu/zconf.h /usr/lib/zconf.h
sudo ln -s /usr/lib32/libstdc++.so.6.0.14 /usr/lib32/libstdc++.so
sudo ln -s /usr/lib32/libz.so.1.2.3.4 /usr/lib32/libz.so
Parabola
Base packages (from the Parabola repositories) installation:
pacman -S --needed core/bison core/flex core/make core/ncurses core/xz core/zlib extra/bc extra/git extra/gperf extra/gperftools libre/jdk7-openjdk extra/openjdk7-src libre/jre7-openjdk extra/wget extra/zip community/squashfs-tools community/pngcrush libre/unzip
Some additional repositories are required to retrieve some of the build dependencies.
To enable those repositories, the following should be added to /etc/pacman.conf:
[libre-multilib]
Include = /etc/pacman.d/mirrorlist

[multilib]
Include = /etc/pacman.d/mirrorlist
For these changes to take effect, the packages database should be updated:
pacman -Syu
Additional packages installation:
pacman -S --needed multilib/lib32-glibc multilib/gcc-multilib multilib/lib32-readline multilib/lib32-ncurses multilib/lib32-zlib
Tweaks
ln -s /usr/bin/python2 /usr/local/bin/python
If you think you can cope with the requirements, then developing on Replicant should cause you no particular issue.
Writing free software replacements for non-free components may require more skills depending on what you're trying to achieve, though there may be people with the adequate knowledge to help you and from whom you will likely learn a lot.
Replicant's source code is hosted at git.replicant.us. If you plan to regularly contribute to Replicant and if you don't yet have a code hosting provider that satisfies your needs, you are welcome to host your Replicant-related projects there under your own username, You only need to contact one of Replicant's developers and ask for an account. Please include in your request the name, username and Email address that should be used for creating your account.
Replicant currently doesn't accept merge requests. There are two ways to get your patches included: You can either send them to the mailing list or open an issue on the issue tracker and attach the patches to the issue. Replicant developers will then review your changes.
See the Git documentation for creating a patch. Patches can be send with git send-email. If it's too much hassle for you to set up git send-email, sending the patches with your favorite mail client should be fine, too.
When working with Replicant repos, make sure to avoid breaking things. For instance, if you push a commit introducing a compilation error, it will break the whole build process.
It is better to create separate branches (that are not used by the official manifest branches) when your work is still in progress.
Creating branches that add debug infos on a particular topic is usually a good idea since it will save you time next time you want to debug the same component.
In order to keep repo naming consistent, please name repositories by their name on the tree, replacing the / by _.
For instance, when forking the LineageOS repo: android_device_samsung_crespo, rename it to device_samsung_crespo on the Replicant repos.
This creates a more consistent way of naming repositories and makes it easier when pushing: just look at the location in the source tree and replace / by _.
replicant- prefixSuch as: replicant-2.3 This should be used on the projects repositories as well as the manifest repository.
Any other branch should be considered as Work In Progress (WIP) and thus not be part of any official branch of the manifest.
There is although one exception, with the master branch, that can be used by any project and be in any manifest given that the code held in the master branch will work on any Replicant version.
It is generally a good idea to send some changes back to upstream, assuming that they will benefit from it as well.
When it is about the replacement of a non-free component present in the upstream systems, make sure that your replacement is reliable and complete.
Contact the interested developers on the upstream projects before attempting to send your replacement.
The LineageOS team uses Gerrit to manage patch submissions. The process to get your patch included in LineageOS repos is explained on their wiki: Gerrit
You can also push directly using git using the following scheme (untested):
git push ssh://<sshusername>@review.lineageos.org:29418/LineageOS/<projectname> HEAD:refs/for/<branchname>
The Android Open Source Project uses Gerrit to manage patch submissions. Some information about submitting patches to AOSP is available: https://source.android.com/source/submit-patches.html
You can push to AOSP's review using:
git push https://android-review.googlesource.com/platform/system/core HEAD:refs/for/master
strings, objdump and radare2 against the non-free binary to have a better idea of how things work. (Make sure this is legal where you live!)strace and analyze the trace to understand what the program does.printk and show them via the dmesg tool).In order the keep the wiki simple and consistent, a few guidelines must be followed when editing.
Regarding the content:Galaxy S 3 (I9300) is not to be called Samsung S3 GT-I9300 or Galaxy S III).audio HAL as the audio modulecd path/to/replicant-6.0/vendor/replicant edit CHANGELOG.mkdn git add CHANGELOG.mkdn git commit -sS -m "Replicant 6.0 0001 images release" git push git@git.replicant.us:replicant/vendor_replicant.git replicant-6.0
cd path/to/release-scripts edit release.sh edit releasetag.sh git add release.sh releasetag.sh git commit -sS -m "Replicant 6.0 0001 images release" git push git@git.replicant.us:replicant/release-scripts.git replicant-6.0
path/to/release-scripts/releasetag.sh path/to/replicant-6.0
cd path/to/manifest git tag -u 16D1FEEE4A80EB23 -s replicant-6.0-0001 -m "Replicant 6.0 0001 images release" git push git@git.replicant.us:replicant/manifest.git replicant-6.0-0001
mkdir -p path/to/images/replicant-6.0/0001 path/to/release-scripts/release.sh path/to/replicant-6.0 path/to/images/replicant-6.0/0001
path/to/release-scripts/release.sh path/to/replicant-6.0 path/to/images/replicant-6.0/0001 signatures
cd path/to/images/replicant-6.0 tar -cjf 0001.tar.bz2 0001
scp 0001.tar.bz2 root@replicantserver0.fsf.org:/srv/ftp/images/replicant-6.0/
scp 0001.tar.bz2 replicant@ftp-osl.osuosl.org:/home/replicant/data/images/replicant-6.0/
6. Add new issues categories to the Replicant project Redmine
 |
Device | Galaxy Note 2 (N7100) |
| Manufacturer | Samsung | |
| Release date | September 2012 | |
| Codename | n7100 |
|
| Status | Maintained | |
| Maintainer(s) | Paul Kocialkowski | |
| Wolfgang Wiedmeyer | ||
| Supported models | GSM: N7100 | |
| Latest images | Replicant 4.2 0004 |
Replicant status for the Galaxy Note 2 (N7100): ReplicantStatus Replicant 6.0
Replicant installation for the Galaxy Note 2 (N7100): Replicant60GalaxyNote2N7100Installation
Replicant build for the Galaxy Note 2 (N7100): Replicant60GalaxyNote2N7100Build
Privacy/security issues on the Galaxy Note 2 (N7100): GalaxyNote2N7100PrivacySecurityIssues
This explains how to build Replicant for the Galaxy Note 2 (N7100).
Do not build as root, always build as user.
First, the toolchain needs to be built:
./vendor/replicant/build-toolchain
If you have executed any of the commands below and you want to run the toolchain build again, you will need to open a new shell.
Then, prepare the shell environment for the Replicant build:
. build/envsetup.sh lunch replicant_n7100-userdebug
Start the build:
parallel_tasks=$(echo "$(grep 'processor' /proc/cpuinfo | wc -l ) + 1" | bc) make -j$parallel_tasks bacon
The -jn argument is to indicate the number of parallel tasks during the build.
You can remove it from the command line to have only one task at a time. With fast hardware, best results will come with -j9, -j16 and -j32.
Finally, sign the resulting images:
./vendor/replicant/sign-build n7100
The first time you run the script, it will ask you a few questions that are needed to generate the necessary signing keys.
out/dist/n7100/out/host/linux-x86/bin/Warning: installing an operating system, such as Replicant, may void your device's warranty and will erase the data stored on the device.
In order to install Replicant on your device, it is assumed that you have a computer running a GNU/Linux operating system and everything necessary to connect your device to the computer through USB available. Moreover, it is assumed that anyone performing the installation knows how to use command lines in a terminal and has basic knowledge about it.
The first step in the installation process is to download and set up the files that will be used to install Replicant to the device. The files must be downloaded on your computer first.
1. Find out what the latest image is: check out the Last image part of the general table on Replicant60GalaxyNote2N7100
2. Download all the files listed for the device (including the checksum and the signatures) on ReplicantImages for the latest image
2. Make sure you have added the Replicant release key to your GPG keyring
3. Check the signature of the files:
gpg --armor --verify path/to/replicant-6.0-n7100.zip.asc path/to/replicant-6.0-n7100.zip gpg --armor --verify path/to/recovery-n7100.img.asc path/to/recovery-n7100.img
sha256sum -c n7100.sha256
The heimdall tool is required to flash the recovery image to the device.
Instructions to install heimdall: ToolsInstallation
You can either complete this step by using the device's internal storage or by using an external microSD card.
1. Make sure the device is started up and has an Android system running
2. Connect the USB cable to both the computer and the device
3. Enable USB mass storage on the device
4. Mount the mass storage on the computer
5. Copy the replicant-6.0-n7100.zip file at the origin of the mass storage
6. Safely unmount the mass storage on the computer
7. Disable USB mass storage on the device
1. Connect the microSD card to the computer (e.g. using an USB card reader)
2. Mount the microSD card on the computer
3. Copy the replicant-6.0-n7100.zip file at the origin of the microSD card
4. Safely unmount the microSD card on the computer
5. Disconnect the microSD card from the computer
6. Insert the microSD card in the device (make sure it is turned off before inserting the card)
Instructions to install ADB: ToolsInstallation
The next step in the installation process is to prepare the device for heimdall mode.
1. Make sure the device is completely turned off and the USB cable is disconnected from the device
2. Start the device by holding the following key combination: Volume down, Select, Power
3. Hold the key combination until the device shows a Warning message
4. Confirm that you want to download a custom OS (using volume up)
5. Make sure the device is in Downloading mode
4. Connect the USB cable to both the computer and the device
Now that both the computer and the device are set up, it is time to actually install the images to the device.
1. Install the recovery image to the device:
heimdall flash --BOOT path/to/recovery-n7100.img --RECOVERY path/to/recovery-n7100.img
2. Make sure the device reboots to recovery
A factory reset is necessary if you switch from the factory image or a different Android distribution to Replicant. You also need to do a factory reset when upgrading to a new major release (e.g. from Replicant 4.2 to Replicant 6.0). Only when updating to a new minor release (e.g. from Replicant 6.0 0001 to Replicant 6.0 0002), a factory reset is usually not required.
3. Select Factory reset
4. Select Wipe data (keep media)
5. Confirm the data wipe by selecting Yes
6. Press the back key (if necessary) to get back to the general menu
7. Select Apply update
8. Select Choose from emulated
9. Select the system zip: replicant-6.0-n7100.zip
Note: if your device was running Android 4.2 and later, it may be located in the 0 directory
10. Confirm the installation
8. Select Choose from sdcard1
9. Select the system zip: replicant-6.0-n7100.zip
Note: if your device was running Android 4.2 and later, it may be located in the 0 directory
10. Confirm the installation
8. Select Apply from ADB
9. Back to the host computer, load the system zip with sideload:
adb sideload path/to/replicant-6.0-n7100.zip
11. Press the back key (if necessary) to get back to the general menu
12. Select Reboot system now to reboot the device
Your device should now be running Replicant!
 |
Device | Galaxy S 2 (I9100) |
| Manufacturer | Samsung | |
| Release date | May 2011 | |
| Codename | i9100 |
|
| Status | Maintained | |
| Maintainer(s) | Paul Kocialkowski | |
| Wolfgang Wiedmeyer | ||
| Supported models | GSM: I9100 | |
| Latest images | Replicant 4.2 0004 |
Galaxy S 2 (I9100) installation
Galaxy S 2 (I9100) Privacy/security issues
| Component | Name | Source | Status |
|---|---|---|---|
| SoC | Samsung Exynos 4210 | Linux kernel | Linux kernel support |
| GPU | Mali 400 | https://secure.wikimedia.org/wikipedia/en/wiki/Exynos | Linux kernel support, proprietary userspace |
| Audio Codec | Yamaha MC1N2 | Linux kernel | Linux kernel support (ALSA), free userspace: Yamaha-MC1N2-Audio/Tinyalsa-Audio |
| Modem | XMM6260 | Linux kernel | Free userspace implementation: Samsung-RIL/libsamsung-ipc |
| Wi-Fi | BCM4330 | Linux kernel | Linux kernel support, proprietary loaded firmware |
| Bluetooth | BCM4330 | Linux kernel | Linux kernel support, proprietary loaded firmware |
| NFC | PN544 | Linux kernel | Linux kernel support |
| GPS | GSD4t | http://www.csr.com/news/pr/release/455/en | Proprietary userspace, no free implementation: GSD4t |
| Accelerometer | K3DH | Linux kernel | Linux kernel support, free userspace |
| Compass | AKM8975 | Kernel sources | Linux kernel support, free userspace |
| Light | Capella CM3663 | Linux kernel support, free userspace | |
| Proximity | Capella CM3663 | Linux kernel support, free userspace | |
| FM Radio | SI4709 | Linux kernel | Linux kernel support |
| Camera (back) | Fujitsu M5MO | Linux kernel support, free userspace | |
| Camera (front) | Samsung S5K5BAFX | Linux kernel support, free userspace | |
| Touchscreen | Atmel MXT224 | Linux kernel support | |
| Display | LD9040 | Linux kernel support |
These documents are the propriety of Samsung Electronics and are not hosted by the Replicant project.
There is no need to build as root, building as a regular user should be preferred.
All of the following build commands need to be run in the source tree root folder.
First, the toolchain needs to be built:
./vendor/replicant/build-toolchain
If you have executed any of the commands below and you want to run the toolchain build again, you will need to open a new shell.
Then, prepare the shell environment for the Replicant build:
. build/envsetup.sh lunch replicant_i9100-userdebug
Now you can start the build:
parallel_tasks=$(echo "$(grep 'processor' /proc/cpuinfo | wc -l ) + 1" | bc) make -j$parallel_tasks bacon
The -jn argument indicates the number of parallel tasks during the build (you can remove it from the command line to have only one task at a time).$parallel_tasks holds an optimized number of parallel tasks for your hardware. You may want to reduce this number if e.g. the computer runs out of RAM during the build.
Finally, sign the resulting images:
./vendor/replicant/sign-build i9100
The first time you run the script, it will ask you a few questions that are needed to generate the necessary signing keys.
out/dist/i9100/ for the targetout/host/linux-x86/bin/ for the hostWarning: installing an operating system, such as Replicant, may void your device's warranty and will erase the data stored on the device.
In order to install Replicant on your device, it is assumed that you have a computer running a GNU/Linux operating system and everything necessary to connect your device to the computer through USB available. Moreover, it is assumed that anyone performing the installation knows how to use command lines in a terminal and has basic knowledge about it.
The first step in the installation process is to download and set up the files that will be used to install Replicant to the device. The files must be downloaded on your computer first.
1. Find out what the latest image is: check out the Last image part of the general table on Replicant60GalaxyS2I9100
2. Download all the files listed for the device (including the checksum and the signatures) on ReplicantImages for the latest image
2. Make sure you have added the Replicant release key to your GPG keyring
3. Check the signature of the files:
gpg --armor --verify path/to/replicant-6.0-i9100.zip.asc path/to/replicant-6.0-i9100.zip gpg --armor --verify path/to/recovery-i9100.img.asc path/to/recovery-i9100.img
sha256sum -c i9100.sha256
The heimdall tool is required to flash the recovery image to the device.
Instructions to install heimdall: ToolsInstallation
You can either complete this step by using the device's internal storage or by using an external microSD card.
1. Make sure the device is started up and has an Android system running
2. Connect the USB cable to both the computer and the device
3. Enable USB mass storage on the device
4. Mount the mass storage on the computer
5. Copy the replicant-6.0-i9100.zip file at the origin of the mass storage
6. Safely unmount the mass storage on the computer
7. Disable USB mass storage on the device
1. Connect the microSD card to the computer (e.g. using an USB card reader)
2. Mount the microSD card on the computer
3. Copy the replicant-6.0-i9100.zip file at the origin of the microSD card
4. Safely unmount the microSD card on the computer
5. Disconnect the microSD card from the computer
6. Insert the microSD card in the device (make sure it is turned off before inserting the card)
Instructions to install ADB: ToolsInstallation
The next step in the installation process is to prepare the device for heimdall mode.
1. Make sure the device is completely turned off and the USB cable is disconnected from the device
2. Start the device by holding the following key combination: Volume down, Select, Power
3. Hold the key combination until the device shows a Warning message
4. Confirm that you want to download a custom OS (using volume up)
5. Make sure the device is in Downloading mode
4. Connect the USB cable to both the computer and the device
Now that both the computer and the device are set up, it is time to actually install the images to the device.
1. Install the recovery image to the device:
heimdall flash --KERNEL path/to/recovery-i9100.img
2. Make sure the device reboots to recovery
A factory reset is necessary if you switch from the factory image or a different Android distribution to Replicant. You also need to do a factory reset when upgrading to a new major release (e.g. from Replicant 4.2 to Replicant 6.0). Only when updating to a new minor release (e.g. from Replicant 6.0 0001 to Replicant 6.0 0002), a factory reset is usually not required.
3. Select Factory reset
4. Select Wipe data (keep media)
5. Confirm the data wipe by selecting Yes
6. Press the back key (if necessary) to get back to the general menu
7. Select Apply update
8. Select Choose from sdcard0
9. Select the system zip: replicant-6.0-i9100.zip
Note: if your device was running Android 4.2 and later, it may be located in the 0 directory
10. Confirm the installation
8. Select Choose from sdcard1
9. Select the system zip: replicant-6.0-i9100.zip
Note: if your device was running Android 4.2 and later, it may be located in the 0 directory
10. Confirm the installation
8. Select Apply from ADB
9. Back to the host computer, load the system zip with sideload:
adb sideload path/to/replicant-6.0-i9100.zip
11. Press the back key (if necessary) to get back to the general menu
12. Select Reboot system now to reboot the device
Your device should now be running Replicant!
 |
Device | Galaxy S 3 (I9300) |
| Manufacturer | Samsung | |
| Release date | May 2012 | |
| Codename | i9300 |
|
| Status | Maintained | |
| Maintainer(s) | Paul Kocialkowski | |
| Wolfgang Wiedmeyer | ||
| Supported models | GSM: I9300 | |
| Latest images | Replicant 4.2 0004 |
Replicant status for the Galaxy S 3 (I9300): ReplicantStatus Replicant 6.0
Replicant installation for the Galaxy S 3 (I9300): Replicant60GalaxyS3I9300Installation
Replicant build for the Galaxy S 3 (I9300): Replicant60GalaxyS3I9300Build
See GalaxyS3I9300PrivacySecurityEvaluation for more details.
| Component | Name | Source | Status |
|---|---|---|---|
| SoC | Samsung Exynos 4412 | iFixit | Linux kernel support |
| GPU | Mali 400 | https://secure.wikimedia.org/wikipedia/en/wiki/Exynos | Linux kernel and secret userspace |
| Audio Codec | WM8994 | Linux kernel | Linux kernel support (ALSA) |
| Modem | XMM6260 | Linux kernel | Free userspace implementation: Samsung-RIL/libsamsung-ipc |
| Wi-Fi | BCM4334 | Linux kernel | Linux kernel support, proprietary loaded firmware |
| Bluetooth | BCM4334 | Linux kernel | Linux kernel support, proprietary loaded firmware |
| NFC | PN544 | Linux kernel | Linux kernel support |
| GPS | BCM4751 | iFixit | Proprietary userspace, no free implementation: BCM4751 |
| Accelerometer | LSM330DLC | Linux kernel | Linux kernel support, free userspace |
| Compass | AKM8975 | Kernel sources | Linux kernel support, free userspace |
| Light/proximity sensor | CM36651 | Kernel sources | Linux kernel support, free userspace |
| Gyroscope | LSM330DLC | Kernel sources | Linux kernel support, free userspace |
| Barometer | LPS331AP | Kernel sources | Linux kernel support, free userspace |
| Camera (back) | S5C73M3 | Linux kernel | Linux kernel support, free userspace |
| Camera (front) | S5K6A3 | Linux kernel | Linux kernel support, free userspace, proprietary loaded firmware |
This explains how to build Replicant for the Galaxy S 3 (I9300).
Do not build as root, always build as user.
All of the following build commands need to be run in the source tree root folder.
First, the toolchain needs to be built:
./vendor/replicant/build-toolchain
If you have executed any of the commands below and you want to run the toolchain build again, you will need to open a new shell.
Then, prepare the shell environment for the Replicant build:
. build/envsetup.sh lunch replicant_i9300-userdebug
Start the build:
parallel_tasks=$(echo "$(grep 'processor' /proc/cpuinfo | wc -l ) + 1" | bc) make -j$parallel_tasks bacon
The -jn argument is to indicate the number of parallel tasks during the build.
You can remove it from the command line to have only one task at a time. With fast hardware, best results will come with -j9, -j16 and -j32.
Finally, sign the resulting images:
./vendor/replicant/sign-build i9300
The first time you run the script, it will ask you a few questions that are needed to generate the necessary signing keys.
out/dist/i9300/out/host/linux-x86/bin/Warning: installing an operating system, such as Replicant, may void your device's warranty and will erase the data stored on the device.
In order to install Replicant on your device, it is assumed that you have a computer running a GNU/Linux operating system and everything necessary to connect your device to the computer through USB available. Moreover, it is assumed that anyone performing the installation knows how to use command lines in a terminal and has basic knowledge about it.
The first step in the installation process is to download and set up the files that will be used to install Replicant to the device. The files must be downloaded on your computer first.
1. Find out what the latest image is: check out the Last image part of the general table on Replicant60GalaxyS3I9300
2. Download all the files listed for the device (including the checksum and the signatures) on ReplicantImages for the latest image
2. Make sure you have added the Replicant release key to your GPG keyring
3. Check the signature of the files:
gpg --armor --verify path/to/replicant-6.0-i9300.zip.asc path/to/replicant-6.0-i9300.zip gpg --armor --verify path/to/recovery-i9300.img.asc path/to/recovery-i9300.img
sha256sum -c i9300.sha256
The heimdall tool is required to flash the recovery image to the device.
Instructions to install heimdall: ToolsInstallation
You can either complete this step by using the device's internal storage or by using an external microSD card.
1. Make sure the device is started up and has an Android system running
2. Connect the USB cable to both the computer and the device
3. Enable USB mass storage on the device
4. Mount the mass storage on the computer
5. Copy the replicant-6.0-i9300.zip file at the origin of the mass storage
6. Safely unmount the mass storage on the computer
7. Disable USB mass storage on the device
1. Connect the microSD card to the computer (e.g. using an USB card reader)
2. Mount the microSD card on the computer
3. Copy the replicant-6.0-i9300.zip file at the origin of the microSD card
4. Safely unmount the microSD card on the computer
5. Disconnect the microSD card from the computer
6. Insert the microSD card in the device (make sure it is turned off before inserting the card)
Instructions to install ADB: ToolsInstallation
The next step in the installation process is to prepare the device for heimdall mode.
1. Make sure the device is completely turned off and the USB cable is disconnected from the device
2. Start the device by holding the following key combination: Volume down, Select, Power
3. Hold the key combination until the device shows a Warning message
4. Confirm that you want to download a custom OS (using volume up)
5. Make sure the device is in Downloading mode
4. Connect the USB cable to both the computer and the device
Now that both the computer and the device are set up, it is time to actually install the images to the device.
1. Install the recovery image to the device:
heimdall flash --BOOT path/to/recovery-i9300.img --RECOVERY path/to/recovery-i9300.img
2. Make sure the device reboots to recovery
A factory reset is necessary if you switch from the factory image or a different Android distribution to Replicant. You also need to do a factory reset when upgrading to a new major release (e.g. from Replicant 4.2 to Replicant 6.0). Only when updating to a new minor release (e.g. from Replicant 6.0 0001 to Replicant 6.0 0002), a factory reset is usually not required.
3. Select Factory reset
4. Select Wipe data (keep media)
5. Confirm the data wipe by selecting Yes
6. Press the back key (if necessary) to get back to the general menu
7. Select Apply update
8. Select Choose from emulated
9. Select the system zip: replicant-6.0-i9300.zip
Note: if your device was running Android 4.2 and later, it may be located in the 0 directory
10. Confirm the installation
8. Select Choose from sdcard1
9. Select the system zip: replicant-6.0-i9300.zip
Note: if your device was running Android 4.2 and later, it may be located in the 0 directory
10. Confirm the installation
8. Select Apply from ADB
9. Back to the host computer, load the system zip with sideload:
adb sideload path/to/replicant-6.0-i9300.zip
11. Press the back key (if necessary) to get back to the general menu
12. Select Reboot system now to reboot the device
Your device should now be running Replicant!
A few wiki pages need to be updated for Replicant 6.0 and updating these pages would overwrite information for the current release Replicant 4.2. Such pages are listed on this page. The workflow for updating a page is as follows:
After the release of Replicant 6.0, the original pages can be overwritten with the content from the pages linked below and all pages with the prefix "Replicant60" can be renamed by adding the prefix Deprecated.
The Replicant source code is currently hosted by the FSF at: git.replicant.us
There is one branch per Replicant version, such as replicant-2.2.
Before downloading the Replicant source code, make sure there is a considerable amount of disk space left on the drive you intend to build Replicant on.
It is advised to have 60-70GiB available for the Replicant source code and the produced files for one device. If you intend to build for multiple devices, every additional device will need ca. 17GiB.
The path to the source tree root folder must not contain spaces.
To be able download the complete source code, the repo tool needs to be installed. The distribution you are using may already have the tool packaged and it may already been installed as part of the Build dependencies installation.
If the repo tool is not available on your system, you can download and install it locally:
mkdir tools cd tools wget https://commondatastorage.googleapis.com/git-repo-downloads/repo chmod a+x repo cd ../
In the following, the local installation in ../tools/repo is assumed. If you have installed repo from your system's package manager, replace
../tools/repo
with just
repo
at the beginning of the following commands.
The source manifest is the list of all the git repositories that are present in the Replicant tree.
Each Replicant version has a dedicated branch with the proper source manifest.
mkdir replicant-6.0 cd replicant-6.0 ../tools/repo init -u https://git.replicant.us/replicant/manifest.git -b replicant-6.0
mkdir replicant-6.0-dev cd replicant-6.0-dev ../tools/repo init -u https://git.replicant.us/replicant/manifest.git -b replicant-6.0-dev
mkdir replicant-4.2 cd replicant-4.2 ../tools/repo init -u https://git.replicant.us/replicant/manifest.git -b replicant-4.2
mkdir replicant-4.0 cd replicant-4.0 ../tools/repo init -u https://git.replicant.us/replicant/manifest.git -b replicant-4.0
mkdir replicant-2.3 cd replicant-2.3 ../tools/repo init -u https://git.replicant.us/replicant/manifest.git -b replicant-2.3
mkdir replicant-2.2 cd replicant-2.2 ../tools/repo init -u https://git.replicant.us/replicant/manifest.git -b replicant-2.2
Now that you have configured repo, you can start downloading Replicant sources for the desired version.
This step is very long and can take hours to complete!
../tools/repo sync
Once the source code is ready, you need to get the prebuilt applications (they are downloaded from F-Droid). Since Replicant 6.0, the prebuilt applications are checked if they were signed with the F-Droid signing key. The signing key can be retrieved and added to your GPG keyring using:
gpg --recv-key 7A029E54DD5DCE7A
Then you can download the prebuilts:
vendor/replicant/get-prebuilts
You must redo these steps each time you want to sync your tree, in order to keep it up to date. Future syncs are faster than the first one.
This page explains how to connect your Replicant device to the Internet via an USB connection to a computer connected to the Internet.
Replicant USB Networking requires a script: usb_networking_device.sh
Make sure to have ADB installed and to have the host daemon running as root.
Push the script on the device, make it executable and run the first part of the script:
adb push usb_networking_device.sh /data/ adb shell chmod a+x /data/usb_networking_device.sh adb shell /data/usb_networking_device.sh start1
The network manager applet on your PC (usually accessible through the network icon on your taskbar) should now display the device as a new wired interface. Below the name of the device should be a list of available connections. Depending on your network configuration, the list might be empty or offers one or more entries.
If your PC is connected to the Internet via Ethernet, a connection with the name "Auto-Ethernet" or a similar name could be available. Selecting this option should be enough to configure the connection and you can skip most of the steps below and continue with step 5. If there are issues with your connection, you will have to start again and do the rest of the steps, too.
If your PC uses Wi-Fi and Ethernet-based connections are suggested for your device, selecting one of them will likely not work. You will have to set up a new Ethernet-based connection.
The following steps are required to set up a new network connection for the device:
1. In the network manager applet, create a new "Ethernet" or "Wired" connection.
2. In the tab for IPv4 settings, select the method "Shared to other computers".
3. Save the connection, preferably with a distinguishable name (The name can be changed at the top of the edit window).
4. Select this connection for your device.
5. Now run the second part of the script on the device:
adb shell /data/usb_networking_device.sh start2
The connection should now work.
The new connection is saved on your PC and you don't have to recreate it when connecting the device again. It is then only necessary to run the first part of the script, selecting the network connection for the device in case it is not auto-selected and to run the second part of the script.
To disconnect the device, run:
adb shell /data/usb_networking_device.sh stop
Some apps won't connect to the Internet if cellular data is disabled. In other apps, like in the latest version of F-Droid, some parts of the app connect to the internet, while other parts of it do not. (see this issue). A workaround is to enable cellular data before doing the configuration steps for usb tethering. The previously described configuration steps will overwrite the cellular data connection and the connection via USB tethering will be used.
If you are not able to enable cellular data, you will have to downgrade F-Droid to version 0.101 to make it usable.
The reverse_tether.sh script is part of AOSP and can be downloaded from: reverse_tether.sh
In order to start basic NAT networking between the host and the device, make sure to have installed ADB and to have the host daemon running as root. Then, use reverse_tether.sh the following way:
./reverse_tether.sh rndis ./reverse_tether.sh nat
Replicant USB Networking requires two scripts: usb_networking_device.sh usb_networking_host.sh
However, you can avoid the host part if your network manager can manage a shared connection.
Make sure to have installed ADB and to have the host daemon running as root.
Push the device part on the device and make it executable:
adb push usb_networking_device.sh /data/ adb shell chmod a+x /data/usb_networking_device.sh
Using a network manager shared connection
1. On your Linux PC, in the network manager applet (where you normally set up wired or wireless network connections), create a new "Shared" "Wired" connection, with default settings (connection type = Shared). (This is independent of the device, and only needs to be created once.)
2. Disconnect any other network connections (Wifi, 3G data) on the device.
3. Run the first part of the device-side script:
adb shell /data/usb_networking_device.sh start1 dhcp
adb shell /data/usb_networking_device.sh start2 dhcp
The connection should now work. To disconnect the device, run:
adb shell /data/usb_networking_device.sh stop
Using the host script
1. Disconnect any other network connections (Wifi, 3G data) on the device.
2. Run the first part of the device-side script:
adb shell /data/usb_networking_device.sh start1 static
adb shell /data/usb_networking_device.sh start2 static
sudo ./usb_networking_host.sh start
The connection should now work. To disconnect the device, run:
adb shell /data/usb_networking_device.sh stop
sudo ./usb_networking_host.sh stop
Was to be the next default device to port Replicant to.
bug 11829 need to be solved before continuing
Sim unlocked.
Obtaining full root privilegies is possible using a command but will VOID THE WARRANTY.
This is the phone where Google suggest you to do your development now.
The current default device to test Replicant.
Sim unlocked, full root privilegies by default.
You can buy it after paying 25$ fee to subscribe to the Android Developer Program.
Sim unlocked, full root privilegies by default.
You can buy it after paying 25$ fee to subscribe to the Android Developer Program.
In Europe it is sim unlocked but it LACKS root privilegies.
On some versions you can obtain them with an hack.
In Europe it is sim unlocked but it LACKS root privilegies.
On some versions you can obtain them with an hack.
Very similar to the htcdream, has a different wifi chip and driver.
On Debian/Ubuntu (as root):
apt-get install maven2
Unfortunately, the most convenient way to get the SDK is distributed by the Android Open Source Project, but that copy contains proprietary Google code and is wrapped in a restrictive proprietary license agreement. You can obtain a free SDK by following the directions in our wiki.
temp directory at the top level of your SDK directoryThis will allow us to set up a Maven dependency for particular versions of Android.
export ANDROID_HOME=/path/to/sdk/
mvn install for all platforms or mvn install -P [platform] if you want to install for just one).Add the Android SDK's primary and platform tools directories to your path (to give mvn access to aapt and apkbuilder). Currently, the build process targets Android 1.5, but if you've changed it to target a different platform, use that one in the second export command.
export PATH=${PATH}:<your_sdk_dir>/tools
export PATH=${PATH}:<your_sdk_dir>/platforms/android-1.5/tools
mkdir fd-readonly cd fd-readonly git clone git://gitorious.org/replicant/floss-dispenser.git
mvn clean install
*This is a basic replicant test plan. Use this as a checklist to test Replicant builds. *
AUDIO
VIBRATOR
RIL
SMS
DATA
WIFI
USB NETWORKING
APPLICATION INSTALL
BLUETOOTH
GPS
ACCELEROMETER / ROTATION
CAMERA
FM RADIO (N1)
We are relicensing the wiki to the Creative Commons BY-SA license (http://creativecommons.org/licenses/by-sa/3.0/)
Mean of communication:
Proof: By editing this page and adding himself here.
Mean of communication: private mail
Proof:
[…] On Mon, 2011-02-28 at 00:25 +0100, Denis 'GNUtoo' Carikli wrote: > Hi, > I discovered that the wiki has no license. > > I propose choosing the same license than wikipedia: > http://creativecommons.org/licenses/by-sa/3.0/ > > What do you think? No complaints. Consider my stuff relicensed (users "Broam" or "Benanov", I tend to use them interchangably). […]
Mean of communication: Replicant IRC channel
Proof:
Mar 30 23:18:05 <GNUtoo> hi johnsu01 did you agree for cc-by-sa? Mar 30 23:18:11 <GNUtoo> I can't find the agreement Mar 30 23:18:24 <GNUtoo> (relicense your wiki edits to cc-by-sa) Mar 30 23:18:25 <johnsu01> GNUtoo: I did in the channel, do I need to put it somewhere else? Mar 30 23:18:34 <GNUtoo> no need Mar 30 23:18:51 <johnsu01> okay
Mean of communication: Replicant IRC channel
Proof:
Feb 28 22:46:41 * aaronw (~aaronw@2001:470:8a52:67:216:d3ff:fe35:aa9f) has joined #replicant Feb 28 22:47:03 <GNUtoo|laptop> aaronw, hi Feb 28 22:47:09 <aaronw> hi GNUtoo|laptop Feb 28 22:47:15 <GNUtoo|laptop> aaronw, 2 things: Feb 28 22:47:27 <GNUtoo|laptop> *)we've got phone calls working in US but not DATA yet Feb 28 22:47:48 <aaronw> great! Feb 28 22:47:48 <GNUtoo|laptop> *)we've a *little* cough....problem with the wiki.... Feb 28 22:47:58 <GNUtoo|laptop> no license was added at the beginning Feb 28 22:48:06 <GNUtoo|laptop> so I'm seeking for everybody's agreement Feb 28 22:48:20 <aaronw> Right, ok Feb 28 22:48:23 <GNUtoo|laptop> everybody seem to want CC-BY-SA Feb 28 22:48:28 <GNUtoo|laptop> I'm ok with it Feb 28 22:48:30 <aaronw> Sounds good to me. Feb 28 22:48:34 <GNUtoo|laptop> there is a mail thread about it Feb 28 22:48:34 <aaronw> I agree. Feb 28 22:48:37 <GNUtoo|laptop> ok thanks
Mean of communication: Replicant IRC channel
Proof:
Mar 31 13:46:35 <GNUtoo> hi graziano Mar 31 13:46:59 <GNUtoo> did you already accept the relicensing of your replicant wiki editions to cc-by-sa? Mar 31 13:47:57 <graziano> I think I did it here on IRC, do you need me to do something else? Mar 31 13:49:00 <graziano> I am Graziano Sorbaioli, "graziano" on the Replicant wiki and I accept the relicensing of all my replicant wiki editions to cc-by-sa Mar 31 13:50:03 <GNUtoo> ok thianks
Mean of communication: Replicant IRC channel
Proof:
Mar 31 21:22:17 <GNUtoo> laga, hi Mar 31 21:22:22 <GNUtoo> 1)how Mar 31 21:22:39 <GNUtoo> 2) did you agree to relicenses your replicant wiki edits under cc-by-sa? Mar 31 21:22:45 <Broam> http://trac.osuosl.org/trac/replicant/wiki/TestReplicant Mar 31 21:22:48 <laga> no Mar 31 21:22:53 <laga> 2) how do i do that Mar 31 21:23:15 <GNUtoo> just tell here that you agree or add yourself to the agree wiki page Mar 31 21:23:20 <laga> i agree Mar 31 21:23:24 <GNUtoo> ok thanks

Welcome to the Replicant project wiki, that provides information about Replicant, supported devices and some research about other mobile devices and platforms.
You can request wiki editor privileges if you wish to edit pages, but please bear in mind that Replicant is a free software project. In addition, make sure to read, understand and follow our wiki guidelines
Unless specified otherwise, the information displayed in this wiki is only relevant to the latest Replicant version. Do not assume backwards compatibility of the instructions with old versions of Replicant.
List of tasks to improve Replicant: Tasks
If you think you can cope with the requirements, then developing on Replicant should cause you no particular issue.
The porting guides provide instructions for porting a new device to Replicant and also offer some tips for developing on Replicant.
Have a look at the Tasks page and feel free to ask around for help to get started.
Writing free software replacements for non-free components may require more skills depending on what you're trying to achieve, though there may be people with the adequate knowledge to help you and from whom you will likely learn a lot.
Replicant's source code is hosted at git.replicant.us. If you plan to contribute to Replicant, you are welcome to host your Replicant-related projects there under your own username. You only need to contact one of Replicant's developers and ask for an account. Please include the name, username and email address that should be used to create your account. Your repos will then show up on the contributor repos page.
Replicant developers will then review your changes on the mailing list.
There are many ways to send patches to the mailing listgit send-email to send patches directly from it . If it's too much hassle for you to set up git send-email, sending the patches with your favorite mail client should be fine, too.git imap-send can do thatgit format-patch -1 --subject-prefix="PATCH][v3][Replicant 6.0][vendor_replicant"
Subject: [PATCH][v3][Replicant 6.0][vendor_replicant] Add build script to simplify the build procedure.
Creating and sending patches can be hard the first time.
While there is a recording of talk on the topic on how to do it right, for Replicant you don't need to do it right the first time.
When you have done some modification that you want to be integrated in Replicant, if you're not confident enough with git, make a copy of the repository with the changes in some safe place.
We will take a real example on how to do a modification. For that we will use the Replicant www.replicant.us git repository.
The replicant.us website source code and content is in git. It contains the following:Let's suppose that a new Replicant 6.0 release is out but that everybody forgot to send a patch to the website and that the website has the following:
Latest images: Replicant 6.0 0003. Replicant supports up to 13 different devices!
and that instead we want to have the following:
Latest images: Replicant 6.0 0004. Replicant supports up to 13 different devices!
So the first thing to do would be to verify both on the bug tracker and on the mailing list that there isn't already a patch for that. If there isn't any we can safely go on.
To do the patch, we need to get the source code. This can be done with the following command:
git clone https://git.replicant.us/infrastructure/www.replicant.us
We then go into the website directory that has all the source code:
cd www.replicant.us
We then look where the text we want to modify is:
git grep "Replicant 6.0 0003."
It can potentially return many lines, but it will have somewhere a line that looks like this one:
index.php: <div class="alert alert-success" role="alert">Latest images: <strong>Replicant 6.0 0003</strong>. Replicant supports up to <strong>13</strong> different devices!</div>
We can open this index.php file with a text editor and change "Replicant 6.0 0003" to "Replicant 6.0 0004".
We can see that git know that we modified the index.php file:
git diff
It will then have something like that:
diff --git a/index.php b/index.php
index 080510a..fd6a8c9 100644
--- a/index.php
+++ b/index.php
@@ -2,7 +2,7 @@
<?php include_once("include/autoloader.php"); ?>
<div class="container" role="main">
- <div class="alert alert-success" role="alert">Latest images: <strong>Replicant 6.0 0003</strong>. Replicant supports up to <strong>13</strong> different devices!</div>
+ <div class="alert alert-success" role="alert">Latest images: <strong>Replicant 6.0 0004</strong>. Replicant supports up to <strong>13</strong> different devices!</div>
<div class="row">
<div class="col-md-8">
<div class="panel panel-default">
However even if git know about it, we still need to make it record the modification in what is called a commit.
A commit contains a record of what has been changed, along with an explanation of why the change was necessary.
To create a commit, the 'git commit' command can be used, however since we're going to write an explanation of why the change was necessary we will first need to tell git which text editor to use for that.
To do that you can do something like that in the command line:
export GIT_EDITOR=your-favorite-editor
For instance if you like gedit, you can do something like that to make git use gedit in the current shell:
export GIT_EDITOR=gedit
We also need to give git a valid email and a name. Both will appear in the commit.
Else git will refuse to create the commit message and will output an error that looks like this one:
*** Please tell me who you are. Run git config --global user.email "you@example.com" git config --global user.name "Your Name" to set your account's default identity. Omit --global to set the identity only in this repository.
So we then need to run something like that:
git config --global user.email "you@example.com" git config --global user.name "Your Name"
Then in the same shell you can run the following command:
git commit -s
It will then open the text editor you choose and let you write text that describes why the change was necessary.
The convention is to have a first line that is not too long which summarize why that change is needed.
Then you can write longer text to describe the change details or have more in depth argumentation of why the change is needed.
Since here Replicant releases have already been made in the past, it's very likely that similar changes have already been made before.
We will take advantage of that and look what message the previous contributor wrote.
To do that, we can open a new shell, and go in the www.replicant.us directory and run the 'git log' command in there:
git log
This will show many commits. You can navigate with the keyboard arrows and quit by pressing the 'q' key.
Among the many commits you can see this one:
commit 526edccd8d688544602ae3da1c4d9c5ffdc058ca
Author: Denis 'GNUtoo' Carikli <GNUtoo@no log.org>
Date: Thu Dec 14 12:37:21 2017 +0100
index: Replicant 6.0 0003 images have been released
Signed-off-by: Denis 'GNUtoo' Carikli <GNUtoo@no log.org>
The sumarry is this line:
index: Replicant 6.0 0003 images have been released
And it doesn't contain a more in depth explanation because it was not deemed necessary.
The line with "Signed-off-by: Denis 'GNUtoo' Carikli <GNUtoo@no log.org>" has been automatically generated by git when using '-s' in the 'git commit -s' command.
It means that you certify that you have the (legal) right to publish the patch.
For more details on it, you can see the "Developer's Certificate of Origin" in the Linux kernel documentation on submirting patches
So you can write something like "index: Replicant 6.0 0004 images have been released" to tell that the change is needed because new images have been released.
After saving and closing your text editor, git has now a new commit.
You can now generate a file from it with
git format-patch -1
The easiest way is then to write an email to the mailing list and attaching the patch in it.
As Replicant has many many git repository it's also good not to forget to mention for which repository is the patch. Here the patch is for the www.replicant.us git repository.
An email like that would be good enough for that:
Hi, I've here's a patch that I attached for the www.replicant.us repository.
As there are sometimes different versions of Replicant being worked on in parallel it's also a good idea to also mention the version it is meant for, when it is relevant.
For instance here as there isn't one website per Replicant version it's not relevant here.
Once the patch has been sent you will need to wait for people to review it. You can also try to find people on IRC that are willing to review your patch to speed things up.
As Replicant contributors are sometime very busy it can take some time.
If you get no response in one week, you can try to respond to your patch asking again people to review it.
If you get some response, you will typically get some comments on the patch.
This usually mean that your patch is good and that people are interested in it, but that you still need to fixes some things before it can be integrated in Replicant.
Once you fixed what needed to be fixed, you then need to send a second version of the patch with the fixes inside.
When doing that it's best to try to indicate in some way that the patch you send is the second version.
You could for instance mention it in the mail subject for instance.
The patch will then need to be reviewed again, and if everything is good it will be merged. If not you will probably get some more comments that you need to address in a third version of the patch.
If you already have the ability to push patches into the main Replicant repositories, you still need to send your patches to the mailing list if they are to be applied on a Replicant version that is currently supported, or if they apply to the Replicant website.
You will then need to wait either for:string to try to find out the command line debug options, list of commands, etc.strace and analyze the trace to understand what the program does.printk and show them via the dmesg tool).It is generally a good idea to send some changes back to upstream, assuming that they will benefit from it as well.
When it is about the replacement of a non-free component present in the upstream systems, make sure that your replacement is reliable and complete.
Contact the interested developers on the upstream projects before attempting to send your replacement.
The LineageOS project has a checklist of requirements for adding support for a device.
As the LineageOS developers have to make sure that the checklist requirements are met, make sure that your replacement is complete enough to either meet the checklist requirements, or that the LineageOS developers are interested in working together with you to make sure that the free software replacement meets such requirements.
The LineageOS team uses Gerrit to manage patch submissions. The process to get your patch included in LineageOS repos is explained on their wiki: Gerrit
You can also push directly using git using the following scheme (untested):
git push ssh://<sshusername>@review.lineageos.org:29418/LineageOS/<projectname> HEAD:refs/for/<branchname>
The Android Open Source Project uses Gerrit to manage patch submissions. Some information about submitting patches to AOSP is available: https://source.android.com/source/submit-patches.html
You can push to AOSP's review using:
git push https://android-review.googlesource.com/platform/system/core HEAD:refs/for/master
audio HAL as the audio moduleIn order the keep the wiki simple and consistent, a few guidelines must be followed when editing.
Regarding the content:[[Index]], it's possible to link to the start page of the wiki.Galaxy S 3 (I9300) is not to be called Samsung S3 GT-I9300 or Galaxy S III).When working with Replicant repos, make sure to avoid breaking things. For instance, if you push a commit introducing a compilation error, it will break the whole build process.
It is better to create separate branches (that are not used by the official manifest branches) when your work is still in progress.
Creating branches that add debug infos on a particular topic is usually a good idea since it will save you time next time you want to debug the same component.
See SourceCodeRepositories for more details about how to create or mirror repositories on Replicant server.
In order to keep repo naming consistent, please name repositories by their name on the tree, replacing the / by _.
For instance, when forking the LineageOS repo: android_device_samsung_crespo, rename it to device_samsung_crespo on the Replicant repos.
This creates a more consistent way of naming repositories and makes it easier when pushing: just look at the location in the source tree and replace / by _.
You need to ask someone with SSH access to git.replicant.us to do that.
Creating a symlink has several side effects:So instead it's better to edit the /etc/apache2/sites-enabled/git.replicant.us.conf configuration file.
For instance if you want to rename user-scripts.git in vendor_replicant-scripts.git (because some of the scripts will start being shipped on the devices), you can run mv user-scripts.git vendor_replicant-scripts.git and then add the following line in the git.replicant.us.conf apache configuration file:
Redirect /replicant/user-scripts.git /replicant/vendor_replicant-scripts.git
replicant- prefixSuch as: replicant-2.3 This should be used on the projects repositories as well as the manifest repository.
Any other branch should be considered as Work In Progress (WIP) and thus not be part of any official branch of the manifest.
There is although one exception, with the master branch, that can be used by any project and be in any manifest given that the code held in the master branch will work on any Replicant version.
cd path/to/replicant-6.0/vendor/replicant
edit CHANGELOG.mkdn
git add CHANGELOG.mkdn
git commit -sS -m "Replicant 6.0 0001 images release"
git push git@git.replicant.us:replicant/vendor_replicant.git replicant-6.0
cd path/to/release-scripts edit releasevars.sh git add releasevars.sh git commit -sS -m "Replicant 6.0 0001 images release" git push git@git.replicant.us:replicant/release-scripts.git replicant-6.0
path/to/release-scripts/releasetag.sh path/to/replicant-6.0
cd path/to/manifest git checkout replicant-6.0 git merge replicant-6.0-dev edit default.xml git add default.xml git commit -sS -m "Replicant 6.0 0001 images release" git push git@git.replicant.us:replicant/manifest.git replicant-6.0
git tag -u 5816A24C10757FC4 replicant-6.0-0001 -m "Replicant 6.0 0001 images release" git push git@git.replicant.us:replicant/manifest.git replicant-6.0-0001
cd .repo/manifests
git verify-tag $(git describe)
cd ../..
repo forall -ec ' { echo "Verifying $REPO_PROJECT" && git verify-tag $(git describe) 2>/dev/null; } || { echo "Error: verification failed!" && exit 1; } '
path/to/release-scripts/releasebuild.sh path/to/replicant-6.0
rm -rf path/to/images/replicant-6.0/0001 mkdir -p path/to/images/replicant-6.0/0001 path/to/release-scripts/release.sh path/to/replicant-6.0 path/to/images/replicant-6.0/0001
path/to/release-scripts/release.sh path/to/replicant-6.0 path/to/images/replicant-6.0/0001 signatures
cd path/to/images/replicant-6.0
tar -cjf 0001.tar.bz2 0001
rsync -P -4 -ze ssh 0001.tar.bz2 root@replicantserver0.fsf.org:/srv/ftp/images/replicant-6.0/
rsync -P -4 -ze ssh 0001.tar.bz2 replicant@ftp-osl.osuosl.org:/home/replicant/data/images/replicant-6.0/
trigger-replicant script6. Add new issues categories to the Replicant project Redmine
7. Add the device to the Supported devices page on the website
There is a lot of data and information on supported devices that is scattered around the Repicant wiki, git repositories and even Wikidata. So it's a good idea to have a checklist on what to add.
When we will have migrated to Mediawiki, we could automatically generate part of that list as we will be able to tag pages with Cathegories.
In addition if you can send a patch for the data repository to add the PIT if your device has a PIT. Additionally you can just push the commit if you have push access.
It would be a really good idea to try to look if there is some unknown data at the end of the PIT like for the GT-I9300 and the GT-I9305. We found this issue thanks to people that uploaded their PIT in that repository. The issue with unknown data is that it could contain privacy sensitive data. It could also be a legal issue if it contain code but it's way more likely to contain data. Some devices like the GT-I9100 don't have that issue.
For instance you can easily check the GT-I9100 with the following command:
hexdump -C PIT/GT-I9100/stock/16G.pit | tail -n 8
And that gives:
00000710 00 00 00 00 68 69 64 64 65 6e 2e 69 6d 67 00 00 |....hidden.img..| 00000720 00 00 00 00 00 00 00 00 00 00 00 00 00 00 00 00 |................| * 00000750 00 00 00 00 01 00 00 00 01 00 00 00 09 00 00 00 |................| 00000760 00 00 00 00 00 00 00 00 00 00 00 00 00 00 00 00 |................| * 000007d0 00 00 00 00 00 00 00 00 |........| 000007d8
Here we see that the address of last where data is being displayed is 0x00000750, and that it only contains 00. The asterisk and the 0x000007d0 address is a notation that express the fact that between 0x00000760 and 0x000007d0, there are only 00.
If your device (also) has more classical partition tables like GPT or MBR, it is also a good idea to send a patch adding them to this repository as well. With the PIT, GPT and/or MBR anyone can write documentation on the partition table of the device. In the future that documentation could even be generated from that data.
In addition it might be a good idea to boot that device under Replicant and publish the output of the mount command as root. This way we will know for sure which partitions are mounted, which is important for debugging boot issues and checking if there aren't obvious security issues that could happen if partitions that should not be mounted are mounted in the wrong location. We can also find out that information by looking at various fstab files in the Replicant source code but as it is scattered around, it is faster and more reliable to just run the mount command as root to find out how partitions are mounted.
If your device has a modem and has a modem data partition, it is also a good idea to add the list of files and their permissions to the wiki like in the GT-I9300EFSContent page. This enables to restore the file permissions. Note that while publishing the file names and permissions look safe, the file content might contain privacy or security sensitive information like the IMEI.
It might also be a good idea to contribute to ImagesIdentification page that explains how to identify various Replicant releases for specific devices. Earlier Replicant images don't have the Replicant stored anywhere. Because of that users might know they are running Replicant 6.0 but will not know if they run Replicant 6.0 0001, Replicant 6.0 0002 or Replicant 6.0 0003. However these older images export some information like the build date, so it's possible to correlate that information to the precise Replicant release. Helping filling the missing information for the Replicant 6.0 0003 release would help users understand if they are running the latest version or if they can/should upgrade. Older releases than that are less important.
Additionally some projectsWhile Replicant has some money to buy devices, and from time to time does use it to do that, it's very time consuming to look and find the devices we are looking for.
Giving devices directly to Replicant's (paid and volunteer) developers enables them to focus as much of their time as possible on development instead.
To this end, we very much welcome device donations.
Since we spend a lot of time researching which devices would be good for our project to port to, the types of devices we are interested in obtaining is somewhat limited.
If you have any of the devices below, please contact the Replicant project or developers.
Replicant developers can typically be found on the #replicant IRC channel on Freenode, or in the mailing list. It's a good idea to contact them through such means to donate devices. We also have a contact address for the project but it's often better to post to the mailing list, as more people might be interested in specific devices for doing specific work, especially when some Replicant developers already have the device you want to donate.
As Replicant developers also go to conferences, it's also possible to meet them there and give the devices directly. This saves time and money, as it can avoid shipping the devices.
As the Replicant project evolves, and developers comes and leave, it is hard to precisely predict in advance which device models we will need and how many we need at a given point in time. However, it's still possible to have a rough idea of which devices are needed or might be useful.
To make a Replicant release, it's a very good idea to make sure that at least one developer that is actively working on the release has at least every supported devices.
Without that we would need to wait (potentially indefinitely) for someone to test the release before it's released, or hope that the other devices are similar enough and that everything will work fine.
A list of maintained devices is available on the supported-devices page
Denis 'GNUtoo' Carikli still lacks the following devices:However this is not crucial as he already has a Galaxy Tab 2 7.0 (P3100) and a Galaxy Note 8.0 (GT-N5100).
Replicant has been tested on very few variants of a given device. For instance for the Galaxy Note II, we only support the GT-N7100 variant. Having more variants would enable us to test Replicant on them, and if some more work is needed and that we can find the time to do it, to also port Replicant to them. Though right now most people are probably busy with Replicant 6.0 or Replicant 10.
Some Replicant developers also probably lack the Galaxy SIII 4G (GT-I9305) and are really needing one to work on the Replicant 10 port and/or the modem.
Two new Replicant developers (juri and clever) are working to understand if we can find a way to run fully free software bootloaders on the devices that have an Exynos 4412 like the Galaxy SIII (GT-I9300). Even devices with broken screens or completely broken devices are useful for them.
In addition, Denis 'GNUtoo' Carikli would also be interested if the devices PCB are working (no screen needed) and already have wires soldered to get a direct UART and a JTAG connection, as, unlike the two new developers, he's not confident enough with micro-soldering to try that (the connections are really tiny).
In our research to understand if it's possible to run fully free bootloaders on devices with the Exynos 4412, it would be interesting to be able to use the JTAG to understand if code is being run or not at very early stages.
The following Single Board Computers have an Exynos 4412 and seem to have a connector for the JTAG:References:
1 https://wiki.odroid.com/old_product/odroid-x_u_q/odroid-xq
2 http://odroid.us/mediawiki/index.php?title=ODROID-Q2
Both devkits have an mPCIe connector, which enables to test way more easily the modem isolation by replacing the modem with an mPCIe to USB adapter and plugging various peripherals like a keyboard for instance.
Once Replicant 10 will be ready we will be able to add support for new devices.
We're really interested in the following devices:Some developers are probably interested in getting them before having a Replicant 10 release as it's possible to add support for them in parallel.
The following developers are also interested in getting them after the Replicant 10 release:Sending them before the release also works, but the work will probably not start before the release.
The Galaxy S (GT-I9000) and the Nexus S (GT-I902x) are supported by Replicant 4.2 that still builds with Trisquel7.
This could help testing libsamsung-ipc with such devices.
Denis 'GNUtoo' Carikli is interested in getting the following devices, but it's not crucial as he will get a Galaxy S (GT-I9000) that will most probably be sufficient for testing.When the devices are paid for by Replicant's money, it is common practice to ship devices to people that are already working on Replicant or related projects, to limit the risk of not having any work done.
However, if the devices are donated by individuals or companies, it's up to them to decide whom to give the device to.
If you need a device to work on specific tasks, you can ask packetup[m] from Insurgo on the #replicant IRC channel. It's however up to packetup[m] to decide if it's worth spending time and money to find, buy and ship the device(s).
The advantage of this method is that it saves Replicant developers lot of time.
It's also possible to use Replicant funds to buy devices as it was done before.
The people on the Steering Committee have to approve the usage of the funds for that.
Once it is approved there are several possibilities:If it's not urgent, you could also add yourself to that page stating why you need the devices (so the donors would be able to decide if it's worth shipping / giving the device or not): We occasionally have some people that want to donate specific devices to Replicant, but we don't always need them. Lately (Around 2019/2020) we had offers on the mailing list for a tablet with 512M of RAM, non replaceable battery but a free bootloader and a Galaxy Note II (I think it was a N7100), but no one was interested as most people already working on Replicant seemed to already have enough Galaxy Note II (for instance I've already got one and I don't need a second one for working on Replicant so far), and for the tablet people seemed busy with other tasks already.
While that Android feature is called "Device encryption", it doesn't encrypt everything.
For instance, on a Galaxy SIII, enabling "Device encryption" only encrypts the USERDATA partition.
As the encrypted partitions have to be opened, and that the user need to type a password, code has to run to prompt user for the password and open the encrypted partition. That code cannot come from within the encrypted partition.
This is why "full disk encryption" or "device encryption" schemes often have parts that are unencrypted.
By default on Android, the encryption password is the same as the lockscreen password. As users tend to use a simple PIN, password or pattern for the lockscreen, the encryption can be easily circumvented with a brute-force attack.
Replicant allows to set an encryption password that is not tied to the lockscreen:If a separate encryption password is in place and a PIN or password is set for the lockscreen, another security measure is active: After five unsuccessful attempts to unlock the screen, the device is rebooted and the attacker is faced with the much stronger encryption passphrase. This makes brute-force attacks on the lockscreen much harder.
As Android uses cryptsetup, most or all the Cryptsetup FAQ also apply to Replicant as well.
That FAQ has a Security Aspects section where it details the cost of breaking a passphrase in a table like this one:
| Passphrase entropy | Cost to break |
|---|---|
| 50 bit | EUR/USD 600k |
| 55 bit | EUR/USD 20M |
| 70 bit | EUR/USD 600B |
| 75 bit | EUR/USD 20T |
Be sure to look at the FAQ for potentially more up to date figures and the details that goes with them.
As for calculating the passphrase entropy, tools like keepassxc (which is available in Parabola) have a password generator that is able to calculate the entropy. At the time of writing, in keepassxc, this can be found in Tools->Password generator.
Replicant as a password is a very bad idea for several reasons:
This guide is a step-by-step explanation of the process of porting a new device to Replicant 6.0.
A general good advice when porting a new device to Replicant is to look at how things are done on other devices and look at the commits that were made, especially in the device-specific repositories that are prefixed with "device_".
If your device fails to comply with one of the last two requirements, it won't be possible to port Replicant to it. If one of the first two requirements can't be fulfilled, porting the device to Replicant will be very hard.
You can search the XDA forum for non-official LOS 13 ports. Usually, the developers put a link to the source code of their port in their post. If not, you will have to ask them for the source code.
If your device is supported by a different LineageOS release or an older version of CyanogenMod and there is no non-official LOS 13 port, a port is still possible, but you will have to do the extra work of making your device compatible with LineageOS 13 first. Many parts of this guide will help you for this task, too.
If you don't know whether your device complies or not, you will probably learn it along the way.
First of all, you'll have to find out the device's codename that was given by its manufacturer. Wikipedia usually has that information on the device's article. For instance, the codename for the European version of the Galaxy Nexus given by Samsung is i9250. This codename will help in the process of getting information about the device.
Then, a second codename (that can turn out the be the same as the previous one) is given to the device at Android-level. If your device is supported by LineageOS, you can find it out from the LineageOS Wiki or on the LineageOS download page. For instance, the Galaxy Nexus codename is: maguro.
It is useful to have a general idea of what kind of hardware is present in the phone. From the Wikipedia and LineageOS pages about the device, it's already possible to know what System on a Chip (SoC) it uses and a couple other details.
To learn more details, you can consider looking for a teardown of the device (for instance on iFixit), that will reveal what chips are used on the device. Looking at the kernel defconfig for the device will also help a lot, you can also try to find the service manual for the device.
You can then compare that to the devices that are already supported in Replicant to get an idea of what will possibly work.
One very important step is to find out if the device is Tivoized: that means that even though the manufacturer releases the kernel source code for the device, the bootloader checks the kernel signature and will refuse to start it if it's not properly signed by the manufacturer. In other words, if you build the kernel yourself, the device will refuse to run it since it's not signed by the manufacturer. Since the Linux kernel is released under the GPLv2, there are no specific dispositions to counter Tivoization, and so porting the device to Replicant is pointless as it will require a prebuilt and signed kernel from the manufacturer.
This is not an easy information to find out, but the developers involved in the LineageOS port will probably know that information. It's a good idea to just ask them.
To install the future Replicant image on the device, you have to find out how the device can be flashed with a new operating system. The LineageOS Wiki has install guides for the supported devices and you'll probably find install guides for non-official LOS ports as well. It is very important to understand the flashing procedure as it will have to be documented on the Replicant wiki.
There are basically two ways of flashing a new operating system:The key information to get before starting the port is the list of the non-free components that are required by LineageOS.
The easiest way to do this is to spot the device repository in LineageOS repos and look for the proprietary-files.txt or extract-files.sh file on the cm-13.0 branch.
There is usually a link to the device repository from the device's build page in the LineageOS Wiki. There may not be a proprietary-files.txt file, but there should be a file with a similar name that lists the non-free blobs.
Some devices share additional common device repositories with other devices. You can identify these by looking at the lineage.dependencies file. These have their own proprietary-files.txt or extract-files.sh files. You will also have to look at these to get a full picture of all the used non-free components.
For instance, the list of non-free components for the Galaxy Nexus is device-proprietary-files.txt
From that list, spot what is related to what hardware component (audio, camera, sensors, gps, modem, etc): That gives an idea of the amount of work required to add support for the phone.
android_device_vendor_device.android_device_vendor_devices-common.android_kernel_vendor_devices.You can find the device-specific repo from the device's page on the LineageOS Wiki.
Make sure you check out the branches that match the LOS 13.0 version (cm-13.0).
Once you have cloned the device-specific repo for your device and checked out the correct branch, refer to the lineage.dependencies file to find what repos are left to clone.
Clone these repos in the correct locations and remove the prefix (e.g. android_device_samsung_maguro must be cloned in device/samsung/ and renamed to maguro).
If you cloned the kernel source for your device, it is likely that the kernel build is already integrated, so you can skip the next sections below and continue with setting up the build environment.
Once you have the kernel sources, read the instructions to find out which defconfig to use.
Since manufacturers usually don't release the git history along with the files, you'll need to recreate a git repo:git add -A) and commit (git commit) with a message explaining what you just imported (e.g. "GT-I9000 GB Opensource Update 2")Now that you have a git repo, you can move it to the Replicant code tree, under the name: kernel/vendor/devices (e.g. kernel/samsung/aries).
Make sure to make the devices name match the devices in android_device_vendor_devices-common if the kernel is shared across these devices or to match the device in android_device_vendor_device.
Some devices may still use a prebuilt kernel.
For such devices, you will need to remove the prebuilt binaries and the instructions to copy the prebuilt kernel and its modules.
In the device repository (device/vendor/device) and common repository for your device (if any), remove the prebuilt kernel and modules (usually called kernel and module.ko (replace module with the name of a module) or a modules directory).
Remove the instructions to copy these prebuilts on the makefiles. Remove instructions such as:
PRODUCT_COPY_FILES += \
$(LOCAL_KERNEL):kernel
LOCAL_KERNEL := $(LOCAL_PATH)/kernel
TARGET_PREBUILT_KERNEL as well as the instructions to copy the prebuilt modules.
The BoardConfig.mk (or BoardConfigCommon.mk in the common directory for your device) will most likely hold a line like:
TARGET_PREBUILT_KERNEL := device/samsung/p5/kernel
Now that the device repository has no prebuilt instructions, you can add the instructions to build the kernel. In the BoardConfig.mk file, add the following lines:
TARGET_KERNEL_SOURCE := kernel/samsung/p3 TARGET_KERNEL_CONFIG := samsung_p5_defconfig
You need to find out which type of kernel image your device uses. Asking people who know about that is the best idea.
This is the easiest case to handle: just make sure the CONFIG_INITRAMFS_SOURCE option in the kernel defonfig is left blank or undefined:
CONFIG_INITRAMFS_SOURCE=""
Building a zImage with a built-in initramfs requires the following steps:
In the kernel defconfig, define the CONFIG_INITRAMFS_SOURCE option this way:
CONFIG_INITRAMFS_SOURCE="../../root"
Once this is done, duplicate the defconfig and add the _recovery prefix before the _defconfig ending (e.g. herring_recovery_defconfig), edit that file and replace CONFIG_INITRAMFS_SOURCE with:
CONFIG_INITRAMFS_SOURCE="../../recovery/root"
Back to the device repository, edit the BoardConfig.mk file and add the following line:
TARGET_KERNEL_RECOVERY_CONFIG := samsung_p5_recovery_defconfig
_recovery_defconfig ending).
Still in the device repository, create a bootimg.mk file containing the following:
LOCAL_PATH := $(call my-dir)
$(INSTALLED_BOOTIMAGE_TARGET): $(INSTALLED_KERNEL_TARGET)
$(ACP) $(INSTALLED_KERNEL_TARGET) $@
$(INSTALLED_RECOVERYIMAGE_TARGET): $(INSTALLED_RECOVERY_KERNEL_TARGET)
$(ACP) $(INSTALLED_RECOVERY_KERNEL_TARGET) $@
Edit the BoardConfig.mk file and add the following line:
BOARD_CUSTOM_BOOTIMG_MK := device/vendor/device/bootimg.mk
device/vendor/device/ with the correct path to your device's repository.
Follow the previous instructions (zImage with built-in initramfs) and set the BOARD_USES_UBOOT variable in the BoardConfig.mk file:
BOARD_USES_UBOOT := true
Now that the repos are cloned, you need to modify some makefiles to cope with Replicant paths.
In the device repository (device/vendor/device), modify the file called lineage.mk and replace the vendor/cm/ occurrences by vendor/replicant/. Other makefiles may need that as well (in any case, build will fail very early if you missed one). In that same lineage.mk file, change the PRODUCT_NAME variable by replacing the lineage prefix with replicant (e.g. change PRODUCT_NAME := lineage_maguro to PRODUCT_NAME := replicant_maguro).
Now that your device files are ready, you can declare a new build target: these are held in vendor/replicant/targets.
Modify that file and add a line (at the end) with the PRODUCT_NAME you set and the -userdebug suffix (e.g. replicant_maguro-userdebug).
From now on, everything should be ready to start a build. All of the following build commands need to be run in the source tree root folder.
First, the toolchain needs to be built:
./vendor/replicant/build-toolchain
If you have executed any of the commands below and you want to run the toolchain build again, you will need to open a new shell.
To check for errors or missed occurrences in your device config, start a terminal in the Replicant tree root and lunch:
. build/envsetup.sh lunch replicant_device-userdebug
Adapt replicant_device-userdebug from what you added to the targets (e.g. replicant_maguro-userdebug).
If an error occurs, it will explicitly report it and you'll need to fix it before doing anything.
If everything works correctly, you should see something like:
============================================ PLATFORM_VERSION_CODENAME=REL PLATFORM_VERSION=6.0.1 REPLICANT_VERSION="replicant-6.0" TARGET_PRODUCT=replicant_n7100 TARGET_BUILD_VARIANT=userdebug TARGET_BUILD_TYPE=release TARGET_BUILD_APPS= TARGET_ARCH=arm TARGET_ARCH_VARIANT=armv7-a-neon TARGET_CPU_VARIANT=cortex-a9 TARGET_2ND_ARCH= TARGET_2ND_ARCH_VARIANT= TARGET_2ND_CPU_VARIANT= HOST_ARCH=x86_64 HOST_OS=linux HOST_OS_EXTRA=Linux-4.9.0-2-grsec-amd64-x86_64-with-debian-9.0 HOST_BUILD_TYPE=release BUILD_ID=MOB31K OUT_DIR=/home/wolfi/replicant/6.0-romsrc-official/out WITH_SU=true ============================================
This is the output for the Galaxy Note 2 (n7100).
You must repeat these steps everytime before building anything on a freshly-opened terminal.
Remember:
. build/envsetup.sh lunch replicant_device-userdebug
(Make sure to replace device by your device's product name)
Now that everything is set-up, you can build the first image to test on your device: the recovery image.
The build target is recoveryimage, so all you have to do is:
mka -j9 recoveryimage
This should trigger the kernel build and the recovery initramfs build and in the end, produce the out/target/product/device/recovery.img file.
Once your image is built (it takes some time), flash it to the recovery partition of your device (if any). It's a good idea to look at the LineageOS installation guide to find out how to install that recovery image.
There is usually also a key combination to hold to boot directly to recovery: hopefully, your recovery image will start.
It is time to build a complete set of Replicant images. This includes the system and kernel images.
Let's start by building the boot image, that is both the kernel and the Android initramfs. The build target is bootimage:
mka -j9 bootimage
In the end, the out/target/product/device/boot.img file will be produced.
Building the system is the longest task. The build target is systemimage:
mka -j9 systemimage
You might encounter build errors due to the lack of non-free libs. You'll need to find clean workarounds for that. Removing options from BoardConfig.mk can help solve the situation.
For instance, the following error:
make: *** No rule to make target `out/target/product/i9300/obj/lib/libTVOut.so', needed by `out/target/product/i9300/obj/EXECUTABLES/mediaserver_intermediates/LINKED/mediaserver'. Stop.
BOARD_USE_SECTVOUT to false:BOARD_USE_SECTVOUT := false
When all the images are built, you're ready to install your Replicant build to the device. Create a flashable zip:
make -j9 bacon
The final zip is located at out/target/product/device/replicant-6.0.zip
adb sideload to sideload the zip from your PC (most convenient way for development)Make sure to do a factory reset before rebooting.
If everything was correctly setup, this should succeed. The best way to make sure it booted is to run adb devices and see if the device is listed.
That early, it is very likely that graphics will be broken, so don't expect anything to show up on the screen: only adb is a reliable way of knowing whether it worked.
It is possible to access adb logcat without fully booting the device and enabling ADB access in the developer settings. However, changes to the build properties of the device and possibly source code changes are needed.
If you can't manage to access the device with ADB, you will need to figure out how a serial console via UART can be established.
Keep in mind that all the make (and such) commands must be run in a terminal where lunch has been executed before.
Once you have a Replicant image installed on the device, there is no need to rebuild a whole image everytime you make a change (but it's a good idea to do it from time to time): you can instead rebuild only a single module by using (where module is the module's name):
make module
Even better, you can build the module that sits in the current directory by simply using mm. To push the new library to the device, use adb push (you'll need to adb root and adb remount the first time).
Moreover, instead of rebooting, you can kill the Android applications (zygote, surfaceflinger, rild) depending on what you are working on.
For instance for audio:
adb shell killall zygote
adb shell killall surfaceflinger
adb shell killall rild
Be sure to always look what's going on in logs.
For the main buffer:
adb logcat
For the radio (RIL) buffer:
adb logcat -b radio
See BuildTips for more tips.
Generally speaking, libEGL is non-free while gralloc and hwcomposer might be free software (but they often rely on non-free blobs). On most Replicant-supported phones, we use the default gralloc, the software libEGL (libagl) and no hwcomposer. We modified the gralloc so that is uses RGB565 on framebuffer, which turns out to be faster than any other format we tried.
To have a fluid-enough experience, you need to disable most hardware-accelerated features of Android and enable Software GL.
In BoardConfig.mk (or BoardConfigCommon.mk in the common directory for your device), you may find the following lines:
USE_OPENGL_RENDERER := true BOARD_EGL_NEEDS_HANDLE_VALUE := true TARGET_REQUIRES_SYNCHRONOUS_SETSURFACE := true
Set USE_OPENGL_RENDERER to false and remove the other lines. There may be more settings related to GPU-accelerated Graphics. You will need to remove these, too.
Replicant 6.0 has experimental support for a more complete software renderer implementation: llvmpipe from Mesa. To be able to use llvmpipe, add this line to the BoardConfig.mk (or BoardConfigCommon.mk in the common directory for your device):
BOARD_GPU_DRIVERS := swrast
To find out whether your device uses ALSA or not, look if you have the /dev/snd/pcmC0D0c and /dev/snd/pcmC0D0p nodes available. A non-standard interface aside might be indicated by the presence of the /dev/snd/hwC0D0 node.
If your device is standard ALSA, you can use the tinyalsa-audio library (located under hardware/tinyalsa-audio) with a configuration file (an example of such a file is available at device/samsung/galaxys2-common/configs/tinyalsa-audio.xml). You can find the proper controls to set on which scenario by running tinymix (found under external/tinyalsa) with the non-free blob in place in the different scenarios.
If your device involves a non-standard interface or if it completely relies on a non-standard interface, there is no readily available guide to find out how it works, but you can start by looking at the kernel driver and adding debug prints (with printk) and figure out what is going on.
Remember to add the working audio module to the build targets (on the makefiles in the device repo).
In order to support telephony, messaging (SMS) and other network-related features (data as well), you need to make the modem work with Replicant. The modem is often called the radio in Android terminology.
The modem uses a protocol to communicate with the CPU. You need to find out which protocol the modem for your device is using. There are several possible cases:To find out which protocol your phone uses, it is a good idea to look at the radio log buffer in LineageOS and try to find out from the messages (it may be verbose).
The protocol itself is implemented in the RIL (Radio Interface Layer): it is a good idea to take a look at the non-free RIL the device uses (get its path with getprop rild.libpath). If LineageOS developers have implemented a wrapper for the proprietary RIL, you will get the path of the wrapper. Look at the RIL wrapper source code in the device repo to find out the path to the non-free RIL.
If the modem uses the AT protocol, there are many available RIL implementations out there: Android has a reference-ril (hardware/ril/reference-ril) that implements AT and there is the hayes-ril library that makes it easier for you to add support for your device. Though, it is possible that the modem of your device implements undocumented commands, so you'll have to figure these out: the radio log might help a lot if it's verbose, else you'll have to trace the RIL somehow.
If the protocol is not AT, it might still be supported: the FreeSmartphone.Org (FSO) project implements some undocumented protocols. You can also look at oFono.
If your phone was manufactured by Samsung, there is a very good chance that it uses the Samsung-IPC protocol, which is implemented in libsamsung-ipc and Samsung-RIL. You will need to add support for your device in libsamsung-ipc (Samsung-RIL is device-independent: all the abstraction is done by libsamsung-ipc), which may be more or less easy depending on whether your modem type is already supported. In any case, you'll need to trace the RIL to find out. There may also be a separate daemon (often called cbd) that is in charge of the modem bootup (that's the biggest part you need to figure out), so that's the thing to trace.
If the protocol implementation is nowhere to be found, you'll have to write a free implementation yourself if you want to have free software support for the modem. It's a good idea to ask around whether other people from other communities, such as XDA or LineageOS, would be interested in helping you.
After finding a RIL that may work, add it to the build targets (in the device makefiles) and specify the path to the RIL with rild.libpath (it is often already declared in system.prop in the device repo).
Once the RIL is working, you may need the audio module cooperation to have sound during calls. For instance with Samsung-RIL, you need to use an Audio-RIL-Interface that implements the Samsung-RIL-Socket interface.
Note that sensors may require daemons aside, such as orientationd, geomagneticd, etc. You will most likely need to replace these as well.
If the implementation is incomplete, you will have to write a replacement for the non-free library that is used.
If there is nothing available, you will have to write a sensors module for you device. You can reuse one from another device and add support for your sensors there.
For instance, here is a reference commit of the SMDK4x12 Sensors module that you may reuse.
Remember to add the working sensors module to the build targets (on the makefiles in the device repo) like it is done on the reference commit.
When there is no free software for your sensors, you have to figure out: how to enable/disable the sensor and set the poll delay (it's often done via sysfs or via ioctl on a dev node). Reading the kernel-side driver of the sensor is a very good idea, you can add debug prints and force values there. You can also find datasheets about your sensor online, which may help you understanding how it works.
The really big part is to figure out how to convert the values that are out of the device (and generally passed through by the kernel driver) into the standard units that the Android framework requires.
An effective way to do this is to print the values passed by the kernel driver and look what the non-free sensors module returns. Better yet, you can also trace the non-free module and see exactly what it does, though that won't give you the details of the maths involved.
To find out the maths, open a spreadsheet software, then add the matching kernel values and the one out of the non-free module and try to find an equation that gives the values in standard units from the one returned by the kernel driver. For instance, you might find something like (this is for the LSM330DLC accelerometer):
f(x)=0,0095768072 * x
Once you have this, you may want to find out where that value comes from. In that case, we can see that:
0,0095768072 = 9.80665 / 1024
9.80665 being the standard gravity on Earth. Hence, we have:f(x)=x * GRAVITY_EARTH / 1024
Once you have this equation figured out, you're ready to implement this in your free sensors module!
In the first case, you will only have to adjust the preview format to RGB565 and it may also a good idea to lower the preview frame rate. Depending on whether the library already has code to handle RGB565, the difficulty of doing this will change. Here are reference commits that introduce these changes for the Nexus S: camera: RGB565 preview format
We cannot use YUV formats directly because the Android software EGL implementation used in Replicant does not support it.
In both cases, you'll need to add lots of debug prints to the relevant kernel drivers to figure out how it works. It will be easier if it uses V4L2, as you can already find many implementations of V4L2 out there, but it will very likely need a custom procedure and controls. In the case of a non-standard interface, you are on your own, except if you can find an implementation for a similar interface used on an other device.
Here is a reference commit of the SMDK4x12 Camera module that uses the Samsung FIMC engine. While it uses V4L2, it needs a custom procedure and custom controls to work properly.
Beware: some camera drivers require the cooperation of the GPU (that seems to be the case on OMAP4). In that case, even a free camera module implementation cannot work on Replicant. Camera drivers may also need to load a non-free firmware, that cannot be distributed with Replicant: hence, you must make sure that the driver will use the pre-installed version of the firmware (if any), burnt on the camera chip in the case loading the non-free firmware from the system fails.
It is very likely that your device requires loaded firmwares for some components of the hardware. These are non-free programs that run separately from the CPU, on other chips. Since Replicant respects its users' freedom, no non-free firmwares are shipped with Replicant. It is possible that LineageOS includes shareable non-free firmwares in its tree: you must remove them.
Sometimes, components will crash (and may restart in an endless loop) when attempting to load a firmware that is not shipped with Replicant: you have to spot the code that loads the firmware and make it properly handle the case where the firmware is not available.
Though, you should keep in mind that some users may want to use that firmware, so you have to make the firmware loading possible. There are some exceptions to this however, especially when this involves blocking a free software alternative (this is the case with OMX media decoding). Moreover, firmwares should always be located under /system/vendor/firmware/ so that they are easy to spot and remove when the user decides to get rid of them (after installing them previously).
For instance, the Wi-Fi firmwares path (often declared in the BoardConfig.mk file) have to be changed with the /system/vendor/firmware prefix. The bluetooth firmware path is often declared in the init files (such as init.herring.rc). Make sure to document the new firmwares locations on the wiki: see the Developer guide.
The Linux kernel comes with its own share of firmware: you have to get rid of them too. Mostly, this is about removing the firmwares directory and modifying the Makefile to make it avoid firmwares.
Since the procedure is nearly exactly the same on all kernels, here is a reference commit for the changes to add to Makefile: Get rid of proprietary firmwares and related instructions
Most of the time, there is a chip dedicated to decoding media files (audio and video) and it very often requires a non-free loaded firmware. Moreover, it prevents software-only solutions from working, so you need to get rid of the libraries (even though they may be free software) that handle hardware media decoding. This is implemented in the OMX and lstagefrighthw libraries. You need to spot and remove these products from the build targets of your device (in the device makefiles).
For reference, here is the commit that removes hardware media decoding on Nexus S (crespo): Disable hardware video encoding/decoding
Not every hardware feature can be supported by Replicant: there are some areas where there is simply no free software available. If this is about a critical component (audio, graphics too slow, telephony) and there is no solution in sight, you might as well consider the port a failure. On the other hand, there are lacks we can leave with, for instance 3D, camera or GPS support: don't let that get in the way of releasing images for your device!
Once your device works, or during the development process (it is recommended to do it as soon as it appears that the port will be successful), you have to push all your work to Replicant repositories.
You need to ask for commit access to our repositories to be allowed to push your work. This means creating the repositories for your device, pushing your work to these and to the other repositories you modified and adding the new repositories to the manifest.
The Developer guide hold all the rules for naming repositories: make sure to act accordingly with these requirements!
The manifest holds the list of the repositories we use in each Replicant version. Its syntax is xml, so it's easy to add your new repositories.
Once your device is usable, you have to create documentation on the Replicant wiki to let others know about relevant material concerning the device, especially build and installation instructions. This is absolutely required before we can publish any image for your device!
The process is described in the Developer guide.
Not all the devices in this pages are supported by Replicant.
However it's still useful to keep track of some devices characteristics and information for various reasons.
| Vendor | Product | Formfactor |
|---|---|---|
| Asus | Nexus 7 (2012) | Tablet |
| Goldelico | GTA04 | Smartphone |
| Hardkernel | Odroid U3 | Devboard |
| LG | OptimusBlack | Smartphone |
| Necunos | Necuno_NX_1 | PDA |
| Pine64 | Pinephone | Smartphone |
| Purism | Librem5 | Smartphone |
| Samsung | Galaxy S | Smartphone |
| Galaxy S II | Smartphone | |
| Galaxy S III | Smartphone | |
| Galaxy Note | Smartphone | |
| Galaxy Note II | Smartphone | |
| Galaxy Nexus | Smartphone | |
| Galaxy Tab | Tablet | |
| Galaxy Tab 2 | Tablet | |
| Galaxy Note 8.0 | Tablet | |
| Nexus S | Smartphone |
This page lists device pages which in turn point to the different variant or versions of the device.
Example of Device: Galaxy SIII
Example of Device variant: Galaxy SIII (GT-I9300)
| Device | Location | Picture or link | License | Comments |
|---|---|---|---|---|
| Galaxy SII (GT-I9100) | Bottom PCB | GT-I9100G_PCB_BACK | CC-BY-SA | Medium resolution |
| Galaxy SIII (GT-I9300) | Bottom PCB | i9300_pcb_bottom | CC-BY-SA | * PNG, Very high resolution * Components marking not easy to see * Made with a scanner |
| Galaxy SIII (GT-I9300) | Top PCB | upload TODO | ||
| Galaxy Note II (GT-N7100) | Bottom PCB | n7100_pcb_bottom | ||
| Galaxy Note II (GT-N7100) | Top PCB | n7100_pcb_top | ||
| Galaxy Note II 4G (GT-N7105) | Bottom PCB | n7105_pcb_bottom | ||
| Galaxy Note II 4G (GT-N7105) | Top PCB | n7105_pcb_top |
A port of Replicant to Android 11 is being worked on.
See the PortingToAndroid11 wiki page for more in depth technical details and progress.
Potentially supported devices:| Device | 2D graphics | 3D graphics | Audio | Telephony | Mobile data | Wi-Fi | Bluetooth | NFC | GPS | Sensors | Camera | Hardware media encoding/decoding |
|---|---|---|---|---|---|---|---|---|---|---|---|---|
| Galaxy S 2 (I9100) | Working, fast | Missing | Working, except Bluetooth and USB audio | Working | Missing without non-free firmwares1 | Working? (bug #1928) | Missing | Missing | Working | Working | Missing without non-free firmware | |
| Galaxy Note (N7000) | Working | Working, except Bluetooth and USB audio | Missing | Working | Missing | |||||||
| Galaxy Nexus (I9250) | Working | Missing without non-free firmwares | Working | Missing | Missing | |||||||
| Galaxy Tab 2 7.0 (P31xx) | N/A | Missing | Missing | |||||||||
| Galaxy Tab 2 10.1 (P51xx) | N/A | Missing | Missing | |||||||||
| Galaxy S 3 (I9300) | Working | Working (back) | Missing without non-free firmware | |||||||||
| Missing without non-free firmwares (front) | ||||||||||||
| Galaxy Note 2 (N7100) | Working | Working (back) | Missing | |||||||||
| Missing without non-free firmwares (front) | ||||||||||||
| Galaxy Note 8.0 (N51xx) | N/A | Working | Missing without non-free firmware | |||||||||
| Galaxy S 3 4G (I9305) | Missing | Working | Working (back) | Missing without non-free firmware | ||||||||
| Missing without non-free firmwares (front) | ||||||||||||
1 Wi-Fi can be enabled using a USB Wi-Fi adapter.
| Device | 2D graphics | 3D graphics | Audio | Telephony | Mobile data | Wi-Fi | Bluetooth | NFC | GPS | Sensors | Camera | Hardware media encoding/decoding |
|---|---|---|---|---|---|---|---|---|---|---|---|---|
| Nexus S (I902x) | Working | Missing | Working | Working | Working | Missing without non-free firmwares | Missing without non-free firmwares | Working | Missing | Working | Working | Missing |
| Galaxy S (I9000) | Working | Missing | Working | Working | Working | Missing without non-free firmwares | Missing without non-free firmwares | N/A | Missing | Working | Working | Missing |
| Galaxy S 2 (I9100) | Working, fast | Missing | Working, except Bluetooth and USB audio | Working | Working | Missing without non-free firmwares | Missing without non-free firmwares | Missing | Missing | Working | Working | Missing |
| Galaxy Note (N7000) | Working, slow | Missing | Working, except Bluetooth and USB audio | Working | Working | Missing without non-free firmwares | Missing without non-free firmwares | Missing | Missing | Working | Working | Missing |
| Galaxy Nexus (I9250) | Working | Missing | Working | Working | Working | Missing without non-free firmwares | Missing without non-free firmwares | Working | Missing | Working | Missing | Missing |
| Galaxy Tab 2 7.0 (P31xx) | Working, fast | Missing | Working | Working | Working | Missing without non-free firmwares | Missing without non-free firmwares | N/A | Missing | Working | Missing | Missing |
| Galaxy Tab 2 10.1 (P51xx) | Working, slow | Missing | Working | Working | Working | Missing without non-free firmwares | Missing without non-free firmwares | N/A | Missing | Working | Missing | Missing |
| Galaxy S 3 (I9300) | Working | Missing | Working | Working | Working | Missing without non-free firmwares | Missing without non-free firmwares | Working | Missing | Working | Working (back) | Missing |
| Missing without non-free firmwares (front) | ||||||||||||
| Galaxy Note 2 (N7100) | Working | Missing | Working | Working | Working | Missing without non-free firmwares | Missing without non-free firmwares | Working | Missing | Working | Working (back) | Missing |
| Missing without non-free firmwares (front) | ||||||||||||
| GTA04 | Working | Missing | Working | Missing | Missing | Missing without non-free firmwares | Broken | N/A | Working | Missing | Missing | Missing |
| Device | 2D Graphics | 3D Graphics | Audio | Telephony | Mobile data | Wi-Fi | Bluetooth | GPS | Sensors | Camera | Hardware media encoding/decoding |
|---|---|---|---|---|---|---|---|---|---|---|---|
| Nexus S (I902x) | Working | Missing | Working | Working | Working | Missing without non-free firmwares | Missing without non-free firmwares | Missing | Working (light, proximity, accelerometer, gyroscope) | Working | Missing |
| Missing (magnetic field, orientation) | |||||||||||
| Galaxy S (I9000) | Working | Missing | Working | Working | Working | Missing without non-free firmwares | Missing without non-free firmwares | Missing | Working (light, proximity, accelerometer) | Working | Missing |
| Missing (magnetic field, orientation) | |||||||||||
| Galaxy S 2 (I9100) | Working, fast | Missing | Working, except Bluetooth and USB audio | Working | Working | Missing without non-free firmwares | Missing without non-free firmwares | Missing | Working (magnetic field is unreliable) | Working | Missing |
| Galaxy Note (N7000) | Working | Missing | Working, except Bluetooth and USB audio | Working | Working | Missing without non-free firmwares | Missing without non-free firmwares | Missing | Working (magnetic field is unreliable) | Working | Missing |
| Galaxy Nexus (I9250) | Working, fast | Missing | Working | Working | Working | Missing without non-free firmwares | Missing without non-free firmwares | Missing | Working | Missing | Missing |
| Galaxy S 3 (I9300) | Working, fast | Missing | Working | Working | Working | Missing without non-free firmwares | Missing without non-free firmwares | Missing | Working | Working (back) | Missing |
| Missing without non-free firmwares (front) | |||||||||||
| Galaxy Tab 2 7.0 (P31xx) | Working, fast | Missing | Working | Working | Working | Missing without non-free firmwares | Missing without non-free firmwares | Missing | Working | Missing | Missing |
| Galaxy Tab 2 10.1 (P51xx) | Working | Missing | Working | Working | Working | Missing without non-free firmwares | Missing without non-free firmwares | Missing | Working | Missing | Missing |
| Device | 2D graphics | 3D graphics | Audio | Telephony | Mobile data | Wi-Fi | Bluetooth | GPS | Sensors | Camera | Hardware media encoding/decoding |
|---|---|---|---|---|---|---|---|---|---|---|---|
| Nexus One | Working, fast | Missing | Missing without non-free firmwares | Working (calls depend on audio) | Untested | Missing without non-free firmwares | Missing without non-free firmwares | Working, without AGPS | Working (accelerometer, proximity, light) | Missing | Missing |
| Untested (magnetometer) | |||||||||||
| Nexus S (I902x) | Working, fast | Missing | Working | Working | Working | Missing without non-free firmwares | Missing without non-free firmwares | Missing | Working (accelerometer, gyroscope, proximity, light) | Working (black and white preview) | Missing |
| Missing (magnetometer) | |||||||||||
| GTA04 | Working, fast | Missing | Working | Missing | Missing | Missing | Missing | Missing | Missing | Missing | Missing |
| Device | 2D graphics | 3D graphics | Audio | Telephony | Mobile data | Wi-Fi | Bluetooth | GPS | Sensors | Camera | Hardware media encoding/decoding |
|---|---|---|---|---|---|---|---|---|---|---|---|
| Dream/Magic | Working, fast | Missing | Working | Working | Broken | Missing without non-free firmwares | Missing without non-free firmwares | Working, without AGPS | Working (accelerometer) | Missing | Missing |
| Missing (magnetometer) | |||||||||||
| Nexus One | Working, fast | Missing | Missing without non-free firmwares | Working (calls depend on audio) | Broken | Missing without non-free firmwares | Missing without non-free firmwares | Working, without AGPS | Working (accelerometer, proximity, light) | Missing | Missing |
| Untested (magnetometer) |
 |
Device | Dream/Magic |
| Manufacturer | Google/HTC | |
| Release date | October 2008 | |
| Codename | dream_sapphire |
|
| Status | Unmaintained | |
| Supported models | ADP1, G1, Dream, Magic 32B | |
| Latest images | Replicant 2.2 0009 |
Replicant status for the Dream/Magic: ReplicantStatus Replicant 2.2
Status of efforts to replace proprietary libraries, binaries and firmwares: NexusOneProprietary: HTCDreamHTCMagicProprietary
Replicant installation for the Dream/Magic: DreamMagicInstallation
Replicant build for the Dream/Magic: HTCMagicBuild
Privacy/security issues on the Dream/Magic: DreamMagicPrivacySecurityIssues
Warning: flashing another operating system like Replicant may void your warranty and will erase the data stored on the device.
If your device is a T-Mobile G1, a Google ADP1 or an HTC Magic, you can switch to flashing the images right away.
On the other hand, if it's an HTC Dream, you will need to flash a particular bootloader (DangerSPL) and a matching radio image.
These files are non-free and the procedure to install them on your device is out of the scope of the Replicant project. However, flashing them are required for Replicant to work.
You can find the files to download and instructions on the CyanogenMod wiki: https://web.archive.org/web/20160607055054/https://wiki.cyanogenmod.org/w/Dream_sapphire_Info
Follow the procedure described in: FastbootInstallation
Several devices have fixes or workarounds in vendor kernels for data corruptions in the eMMC. This can lead to non-working devices as it could potentially corrupt the bootloaders for instance.
The bug #2104 has more details for the Galaxy SIII.
Affected devices: Some Galaxy SIII (GT-I9300)
Vendor kernel patch: mmc: Soft-patch MoviNAND VTU00M (16GB) eMMC failure
Upstream status: not upstream
Replicant >=9 status: In Replicant 11 only
As this patch shows:
+ if (!strncmp(host->card->cid.prod_name, "VTU00M", 6) && + (host->card->cid.prod_rev == 0xf1) && + (mmc_start_movi_smart(host->card) == 0x2)) + host->card->movi_ops = 0x2;
With Replicant > 6 we can find the eMMC name like that:
$ adb root $ adb shell i9300:/ # cat /sys/bus/mmc/devices/mmc2:0001/name VTU00M
As for the prod_rev, we have this code in the Replicant 6 kernel:
case 4: /* MMC v4 */
[...]
card->cid.prod_rev = UNSTUFF_BITS(resp, 48, 8);
[...]
break;
So it's a MMC v4 and uses UNSTUFF_BITS(resp, 48, 8);
In upstream Linux we have that instead:
case 4: /* MMC v4 */
[...]
card->cid.prv = UNSTUFF_BITS(resp, 48, 8);
[...]
So we should be able to get the revision in this way:
$ adb root $ adb shell i9300:/ # cat /sys/bus/mmc/devices/mmc2:0001/prv 0xf7
Here I've the 0xf7 revision and not the problematic 0xf1 revision, so I should probably be ok.
Here this has been tested with a GT-I9300 with a work in progress Replicant 10 image that uses a kernel closely based on upstream Linux.
The mmc: Soft-patch MoviNAND VTU00M (16GB) eMMC failure patch patches the eMMC firmware at runtime (it patches the firmware in RAM).
The eMMC firmware patch makes the eMMC hang when a corruption is about to happen.
Giving root access to an application enables that application to do almost anything on your device. So it's a very bad idea to do that if you do not trust that application. Giving root access to applications is sometimes necessary because certain operating system features are not available by default to applications that don't run as root.
For instance applications there are applications that emulates mass storage USB devices with your smartphone, or applications that use a firewall to block or redirect other applications (to use Tor for instance).
Enabling users to get a root shell is also very useful as they can therefor access all their data.
To allow root access, open the Developer options in the settings. There, press Root access. In the pop-up menu, select either Apps only, ADB only or Apps and ADB, depending on how you want to restrict root access. See ADB for more information about root access with ADB.
This was tested with an USB Ethernet adapter compatible with the asix Linux driver.
It probably works with more adapters as more drivers were enabled .
It probably also work with cdc_ethernet, as the drivers for that are also enabled. If it works, it should also be compatible with other Replicant smartphones (with the USB tethering), Single board computers having USB OTG ports, etc.
When everything works fine, and that an Ethernet cable is connected, the GUI will show a new icon and the Android system will automatically do a DHCP on the ethernet interface. The icon is like "<--->" but with small dots instead of dashes.
| Device | Cable | Comments |
|---|---|---|
| Galaxy S 2 (GT-I9100) | Standard micro-USB host cable | |
| Galaxy S 3 (GT-I9300) | ||
| Galaxy S 3 4G (GT-I9305) | ||
| Galaxy Note (GT-N7000) | ||
| Galaxy Note 2 (GT-N7100) | ||
| Galaxy Nexus (GT-I9250) | * Ethernet works with the GUI, but seem to require to be plugged at boot * It also probably works through the command line |
|
| Galaxy Tab 2 7.0 (GT-P3100) | Device specific adapter | |
| Galaxy Tab 2 10.1 (GT-P5100) | ||
| Galaxy Tab 2 7.0 Wi-Fi (GT-P3110) | ||
| Galaxy Tab 2 10.1 Wi-Fi (GT-P5110) | ||
| Galaxy Note 8.0 (GT-N5100) | ? | |
| Galaxy Note 8.0 Wi-Fi (GT-N5110) |
Since the initial Replicant 9 port will include a number of devices based on Exynos4412 this page has been created to evaluate whether or not we can reuse this work on devices with the same SoC and, if so, what modifications would need to be made to add these other devices.
The content of this page might be more properly located in Upstream but is being added here first, while it is still a "work in progress" stage.
These resources were used to make this chart:S3 devices that don't have the Exynos4412 SoC were intentionally left off the list
| GT-i9300 | GT-i9305 | SHV-E210K | SHV-E210L | SHV-E210S | SCH-i939D | SGH-N035 (SC-03E) | GT-I9308 | SCH-I939 | GT-i9305T | GT-i9305N | |
|---|---|---|---|---|---|---|---|---|---|---|---|
| Codename | m0 | m3 | c1ktt | c1lgt | c1skt | m0ctcduos (Duos) | m3dcm (Alpha Gravity Quad) | ? | m0ctc | m3 | m3 |
| Board Family | Midas | ? | ? | ? | |||||||
| RAM | 1GB | 2GB | 1GB | 2GB | |||||||
| CPU speed | 1.4GHz | 1.6GHz | 1.4GHz | ||||||||
| Firmware | |||||||||||
| 3G Bands | |||||||||||
| 4g Bands | NA | 3, 7, 20 | 3 | 1, 5 | 5 | NA | 1, (21?) | NA | NA | 3, 7 | 3, 7, 8 |
| Carriers | |||||||||||
| Countries | International | South Korea | ? | Japan | China, Japan? | China, Taiwan | Australia | Sweden | |||
| NFC | |||||||||||
| Compass | |||||||||||
| Touchscreen | MMS114 | ? | ? | ? | ? | ? | ? | ||||
| LCD | S6E8AA0 | ? | ? | ? | ? | ? | ? | ||||
| MHL | supported in upstream Linux (name?) | ? | ? | ? | ? | ||||||
| Magnetometer | AK8975 | ? | ? | ? | ? | ? | ? | ||||
| Accelerometer/Gyroscope | LSM330DLC | ? | ? | ? | ? | ? | ? | ||||
| Proximity/Light sensor | CM36651 | ? | ? | ? | ? | ? | ? | ||||
| Barometer | LPS331 | ? | ? | ? | ? | ? | ? | ||||
| MFD | MAX77693 | ? | ? | ? | ? | ? | ? | ||||
| Fuelgauge | MAX17047 | ? | ? | ? | ? | ? | ? | ||||
| Touchkey | Cypress ??? | ? | ? | ? | ? | ? | ? | ||||
| Audio Codec | WM1811 | ? | ? | ? | ? | ||||||
| WiFi/BT | BCM4334 | ? | ? | ? | ? | ? | ? | ||||
| Cell Modem / GPS | XMM6262 | MDM9615 | CMC221 | ? | ? | ? | ? | ? | ? | ||
| Notification LED | AN30259A | ? | ? | ? | ? | ? | ? | ||||
| Rear Camera | S5C73M3 | ? | ? | ? | ? | ? | ? | ||||
| Front Camera | S5K6A3 | ? | ? | ? | ? | ? | ? | ||||
| Flash LED | AAT1290 | ? | ? | ? | ? | ? | ? | ||||
| Notes | |||||||||||
TODO: Add other devices variants from https://en.wikipedia.org/wiki/Galaxy_SIII#Model_variants
1 This enables to check rapidly if a given device variant has an Exynos 4412, or if it's not documented yet here.
2 https://www.gsmarena.com/samsung_galaxy_s_iii_cdma-4799.php
Note II devices that didn't have an Exynos4412 SoC were intentionally left off
| GT-N7100 | GT-N7105 | SCH-i605 | SCH-R950 | SGH-i317 | SGH-i317M | SGH-T889 | SGH-T889V | SPH-L900 | SCH-N719 | GT-N7102 | GT-N7108 | GT-N7108D | SGH-N025 (SC-02E) | SHV-E250K | SHV-E250L | SHV-E250S | GT-N7105T | |
|---|---|---|---|---|---|---|---|---|---|---|---|---|---|---|---|---|---|---|
| Codename | t03g | t0lte | t0ltevzw | t0lteusc | t0lteatt | t0ltecan | t0ltetmo | t0ltecan | t0ltespr | t03gctc | t03gchnduos | t03gcmcc | t0ltecmcc | t0ltedcm (Sailor) | t0ltektt | t0ltelgt | t0lteskt | t0lte |
| Board Family | midas | t0ltecdma ? LOS Kernel | ||||||||||||||||
| RAM | 2GB | |||||||||||||||||
| CPU speed | 1.6 | |||||||||||||||||
| Firmware | ||||||||||||||||||
| 3G Bands | ||||||||||||||||||
| 4g Bands | NA | 3, 7, 20 | 13 | NA | 2, 4, 5, 17 | 4, 5, 17 | 4, 17 | 4, 17 | 25 | NA | NA | NA | 3, 7, 39, 40, 41 | 1, 21 | 3, 8 | 3, 5 | 3, 5 | 3, 7 |
| Carriers | Verizon | US Cellular | ATT | ? | T-Mobile | ? | Sprint | |||||||||||
| Countries | EU | USA | Canada | USA | Canada | USA | ||||||||||||
| NFC | ||||||||||||||||||
| Compass | ||||||||||||||||||
| Touchscreen | MMS152 | MELFAS_NOTE? | ||||||||||||||||
| LCD | S6EVR02 | |||||||||||||||||
| MHL | SII9244BO | SII9244BO | ||||||||||||||||
| Magnetometer | AK8963C | AK8963C | ||||||||||||||||
| Accelerometer/Gyroscope | LSM330DLC | LSM330DLC | ||||||||||||||||
| Proximity/Light sensor | CM36651 | |||||||||||||||||
| Barometer | ||||||||||||||||||
| MFD | MAX77686 | MAX77686 | ||||||||||||||||
| Fuelgauge | MAX17047 | MAX17047? | MAX14607? | MAX14607 | ||||||||||||||
| Touchkey | Cypress?? | |||||||||||||||||
| Audio Codec | WM1811 | ? | WM1811 | |||||||||||||||
| WiFi/BT | BCM4334 | |||||||||||||||||
| Cell Modem / GPS | XMM6262 | MDM9615 | MDM9X15? | MDM9215M v4 | ? | MDM8215M | ? | ? | ? | ? | ? | ? | ? | ? | ? | ? | ? | |
| Notification LED | AN30259A | AN30259A | ||||||||||||||||
| Rear Camera | S5C73M3 | S5C73M3 | ||||||||||||||||
| Front Camera | S5K6A3 | |||||||||||||||||
| Flash LED | MAX77693 | MAX77693 | ||||||||||||||||
| Notes | midas on mainline | midas on mainline | FCC Schematics | FCC Schematics | Factory kernel dump | |||||||||||||
| GT-N5100 | GT-N5105 | GT-N5110 | GT-N5120 | SGH-i467 | SGH-i467M | SHW-M500W | |
|---|---|---|---|---|---|---|---|
| Codename | kona3g | kona3g | konawifi | konalte | konalteatt | konaltecan | konawifiany |
| Board Family | kona | ||||||
| RAM | |||||||
| CPU speed | |||||||
| Firmware | |||||||
| 3G Bands | NA | NA | |||||
| 4g Bands | NA | 7, 20 | NA | 3, 7, 8, 20 | 2, 4, 5, 17 | 4, 5, 7, 17 | NA |
| Carriers | ATT | ||||||
| Countries | USA | Canada | |||||
| NFC | |||||||
| Compass | |||||||
| Touchscreen | S7301 | S7301 | |||||
| LCD | NT71391 | ||||||
| MHL | SII9244BO | SII9244BO | |||||
| Magnetometer | YAS532B | YAS532? | |||||
| Accelerometer/Gyroscope | K2DHTR | K2DH? | |||||
| Proximity/Light sensor | K3DH? | ||||||
| Barometer | YAS532? | ||||||
| MFD | MAX77686? | MAX77686? or MAX77693? | |||||
| Fuelgauge | MAX17047_C | ||||||
| Touchkey | |||||||
| Audio Codec | WM1811 | WM1811 | |||||
| WiFi/BT | BCM4334 | BCM4334 | |||||
| Cell Modem | XMM6262 | NA | MDM9X15 | ||||
| GPS | BCM4752 | BCM4752 | |||||
| Notification LED | |||||||
| Rear Camera | ISX012 | ||||||
| Front Camera | SR130PC20 | ||||||
| Flash LED | MAX77693 | MAX77693 | |||||
| Notes | LOS kernel | LOS kernel | |||||
| GT-N8000 | GT-N8005 | GT-N8010 | GT-N8013 | GT-N8020 | SCH-I925 | SCH-I925U | SPH-P600 | SHW-M480W | SHW-M480S | SHW-M480K | SHV-E230S | SHV-E230K | SHV-E230L | SHW-M485W | SHW-M486W | |
|---|---|---|---|---|---|---|---|---|---|---|---|---|---|---|---|---|
| Codename | p4noterf | p4noterf | p4notewifiww | p4notewifi | p4notelte | p4noteltevzw | p4notelteusc | p4noteltespr | p4notewifiany | p4noterfskt | p4noterfktt | p4notelteskt | p4noteltektt | p4noteltelgt | p4notewifiktt | p4notewifi43241any |
| Board Family | p4note | |||||||||||||||
| RAM | 2GB | |||||||||||||||
| CPU speed | 1.4 GHz | |||||||||||||||
| Firmware | ||||||||||||||||
| 3G Bands | ? | ? | NA | NA | ? | ? | ? | ? | NA | ? | ? | ? | ? | ? | NA | NA |
| 4g Bands | NA | NA | NA | NA | ? | 13 | NA | 25 | NA | NA | NA | 3, 5 | 3, 8 | 1, 5 | NA | NA |
| Carriers | Verizon | US Cellular | Sprint | *1 | KT Roaming | *1 | KT Roaming | LG U+ | KT Roaming | |||||||
| Countries | International | Turkey | International | USA | International | USA | USA | USA | South Korea | South Korea | South Korea | South Korea | South Korea | South Korea | South Korea | |
| NFC | NA | |||||||||||||||
| Compass | AKM AK8975C | |||||||||||||||
| Touchscreen | ATMEL_MXT1664S | |||||||||||||||
| LCD | SEC LTL101AL01-002/003 | |||||||||||||||
| MHL | SII9244 | |||||||||||||||
| Magnetometer | ||||||||||||||||
| Accelerometer/Gyroscope | STM LSM330DLC | |||||||||||||||
| Proximity/Light sensor | ROHM BH1721FVC / LIGHTON AL3201? | |||||||||||||||
| Barometer | NA | |||||||||||||||
| MFD | MAX77686 | |||||||||||||||
| Fuelgauge | MAX17042 | |||||||||||||||
| Touchkey | ||||||||||||||||
| Audio Codec | WM1811 | |||||||||||||||
| WiFi/BT | BCM4334 | |||||||||||||||
| Cell Modem | XMM6262 | XMM6262? | NA | NA | ? | MDM9X15 | XMM6262 | QC USB serial | QC USB serial | QC USB serial | ||||||
| GPS | BCM47511 | BRCM_475X | BRCM_475X | BRCM_475X | NA | NA | NA | |||||||||
| Notification LED | NA | |||||||||||||||
| Rear Camera | ISX012 | |||||||||||||||
| Front Camera | S5K6A3 | |||||||||||||||
| Flash LED | ||||||||||||||||
| Notes | LOS Kernel | OFW has no voice calls |
LOS kernel | LOS kernel | ||||||||||||
| EK-GC100 | EK-GC110 | EK-GC120 | EK-GC200 | |
|---|---|---|---|---|
| Codename | gd1 | gd1wifi | gd1ltevzw | sf2wifi |
| Board Family | ||||
| RAM | ||||
| CPU speed | ||||
| Firmware | ||||
| 3G Bands | ||||
| 4g Bands | ||||
| Carriers | ||||
| Countries | ||||
| NFC | ||||
| Compass | ||||
| Touchscreen | ||||
| LCD | ||||
| MHL | ||||
| Magnetometer | ||||
| Accelerometer/Gyroscope | ||||
| Proximity/Light sensor | ||||
| Barometer | ||||
| MFD | ||||
| Fuelgauge | ||||
| Touchkey | ||||
| Audio Codec | ||||
| WiFi/BT | ||||
| Cell Modem / GPS | ||||
| Notification LED | ||||
| Rear Camera | ||||
| Front Camera | ||||
| Flash LED | ||||
| Notes |
1 https://wiki.odroid.com/old_product/odroid-x_u_q/odroid-xq
fn2. http://odroid.us/mediawiki/index.php?title=ODROID-Q2
| ODROID-Q | ODROID-Q2 | ODROID-U2 | ODROID-U3 | ODROID-X | ODROID-X2 | Origen 4 Quad | |
|---|---|---|---|---|---|---|---|
| RAM | 2G | 1G | 2G | 1G | |||
| WiFi/BT | both | ||||||
| eMMC | odroid? connector | yes | |||||
| SD | microSD | SD | |||||
| JTAG | Yes | Yes | No | ? | ? | yes | |
| UART | * specific connector for console Settings: ttySAC1, 115200 8N1 | * Header for a second UART Settings: ttySAC0 | yes | ||||
| Linux dts | Not upstream | Not upstream | exynos4412-odroidu3.dts | exynos4412-odroidx.dts | exynos4412-odroidx2.dts | exynos4412-origen.dts | |
| Linux defconfigs | |||||||
| u-boot defconfig | Unsure which ODROID devices this is for https://gitlab.denx.de/u-boot/u-boot/blob/master/configs/odroid_defconfig | ||||||
| Documentation | wiki | liliputing | |||||
The Replicant project wants to support devices with free software bootloaders, but most/all the smartphones and tablets supported by Replicant do check the signature of the first stage bootloader.
A presentation on the situation of some of the devices supported by Replicant was made at the Replicant contributors meeting in July 2019. The presentation slides and video are available.
xboot is an OS that is supposed to run as the BL1 on a board that has the the Exynos 4412.
There is an attempt to port it and run it on the Galaxy SIII but it didn't succeed yet.
If the xboot attempt doesn't work we could also try to understand with qemu2 or a developement board that has JTAG, if func_ptr_BaseAddr is somehow used by the bootrom when verifying the BL1.
Testing with qemu2 is probably way more easy than using the JTAG.
If it is we might be able to replace the bootrom check function.
1 https://fredericb.info/2018/03/emulating-exynos-4210-bootrom-in-qemu.html
2 https://github.com/frederic/qemu-exynos-bootrom
According to a post on the gsmhosting.com forum :
Threr are 2 types of devices exist.
1. EXYNOS Devices with JTAG Disabled ( GT-I9300,GT-I9500,GT-N7100 etc.)
KNOX Warranty bit are stored inside of RPMB area in eMMC
Downgrade protection byte are stored in RPMB.
So if that's true for most common devices and that we don't find a way to re-enable the JTAG we probably cannot use it to load bootloaders and/or to experiement with the hardware on these devices.
However it's probably still possible to use JTAG on some devboards.
The thing we can learn from this post is also that unlocking the device probably don't change the Exynos 4 fuses. I wonder why it is implemented this way when other devices use fuses. And for the devices that use fuses, what is the fuse bit used for? Is it to prevent the fuses to have all bits be modified to zero or 1 and which would make it easier to compute the private key? Does the Qualcomm SOCs have a more granular approach to fuses? How does the Management Engine which also burn fuses at runtime handle that?
There has been some work from new Replicant contributor to package a qemu version that can run the Galaxy SII (GT-I9100) bootrom.
It's a docker file based on Ubuntu 16.04 LTS (Xenial Xerus), but it's probably possible to use Trisquel 8.0 LTS (Flidas) instead.
See the Emulating Exynos 4210 BootROM in QEMU for more background information on the topic.
On several SOCs families you can override the boot pins through register writes.
For instance on the OMAP 3630 you have a register for that at 0x48002910 which is publicly documented in its technical reference manual.
Not all the system on a chip have something like that.
If registers to do that are found for the Exynos 4412, rebooting directly to u-boot from s-boot should be pretty easy to do.
The i9300_emmc_toolbox project can execute code in s-boot, and we can easily write C code to be executed in it.
Some examples are provided in the shellcode directory.
So it would be trivial to write to a register and use the already provided reboot function.
TODO:Note that this has not been seen in use yet, including in the Galaxy SIII repair manual , which shorts a resistor to change the boot modes. Though the Samsung branch that does the smartphones and tablets is separate from the branch doing the System on a chip. So for instance the System on a chip branch was providing SOCs to Apple for its Iphones while consumer electronics branch was at (legal) war against Apple.
When booting Parabola with a Replicant 10 kernel on a Galaxy SIII (i9300), it is possible to erase the bootloader to make the device boot from the microSD instead.
This could be used to do some testing, for instance to see if the BL1 signature can somehow be bypassed, however as no free software bootloaders do exist yet (u-boot relies on nonfree and non-redistributable software), this is not very useful yet.
If you really want to erase the bootloader (your device will be broken and will never boot anymore), you could run the following:
# echo 0 > /sys/class/block/mmcblk2boot0/force_ro
# ddrescue -f /dev/zero /dev/mmcblk2boot0
GNU ddrescue 1.24
Press Ctrl-C to interrupt
ipos: 4194 kB, non-trimmed: 0 B, current rate: 4194 kB/s
opos: 4194 kB, non-scraped: 0 B, average rate: 4194 kB/s
non-tried: 9223 PB, bad-sector: 0 B, error rate: 0 B/s
rescued: 4194 kB, bad areas: 0, run time: 0s
pct rescued: 0.00%, read errors: 0, remaining time: n/a
time since last successful read: n/a
Copying non-tried blocks... Pass 1 (forwards)
ddrescue: Write error: No space left on device
And then verify that it's erased:
# hexdump -C /dev/mmcblk2boot0 00000000 00 00 00 00 00 00 00 00 00 00 00 00 00 00 00 00 |................| * 00400000Also verify that the following partitions are also erased:
I'm not sure what BOTA0 and BOTA1 are but they were already blank in my case.
Note that I didn't manage yet to go from u-boot to s-boot.
Requirements:
$ on(){ sigrok-cli -d korad-kaxxxxp:conn=/dev/ttyACM0 --set --config enabled=on ;}
$ off(){ sigrok-cli -d korad-kaxxxxp:conn=/dev/ttyACM0 --set --config enabled=off ;}
$ off
$ sleep 10 ; on
You then should have u-boot running which can boot Parabola, so you can then easily recover.
Note that to run Parabola you need to make sure that you use an MBR and no gpt as u-boot is to be put at the second 512B block.
This article talks about a very serious freedom, privacy and security issue we found during Replicant development on several devices.
On some devices, we found that the modem wasn't isolated and was potentially able to read and write part of the RAM used by Replicant.
Note that the versions of Replicant that are still being maintained don't support any of the affected devices anymore.
However some of these devices are still supported in libsamsung-ipc as Replicant has to maintain libsamsung-ipc and that other projects are interested in supporting such devices.
There also might be a way to completely prevent the issue, by making sure that the RAM chip shared with the modem is not used for other things than communicating with the modem, but so far no one succeded yet.
At least the following devices are affected:
Other similar devices that are not supported by Replicant are probably affected as well.
| Chip | Controlled by the CPU | Controlled by the modem | Connected to the modem |
|---|---|---|---|
| GPS | Yes | No | No? |
| Audio CODEC | Yes | No | Yes |
| NAND | Yes | No | No |
| RAM | Yes | Yes (96Mib at least) | Yes |
| WiFi/Bluetooth | Yes | No | No |
| Sensors | Yes | No | No |
| NFC | Yes | No | No |
| Camera | Yes | No | No |
The modem (XMM 6160) is separated from the System on a chip and communicates with it over 16Mib of shared memory that comes from a 96MiB RAM chip.
The issue is that the remaining 80M of this RAM chip are also used as normal RAM by the CPU running Replicant.
Because of that, we don't have any assurance that the modem cannot read and write all the memory in that RAM chip, enabling it to either passively monitor what is going on, and/or to take control of the CPU running Replicant.
While the hardware design could ensure that only some lines of the data address are made accessible to the modem, we don't have enough documentation to verify that, and even if it was the case it couldn't be guaranteed for every single device used with Replicant.
This is bad: it means that RAM in general is potentially compromised.
Regarding audio, the modem is connected to the CODEC but cannot control it (the SoC has to enable routing from/to the modem).
There is no evidence that the GPS is connected to the modem, but since we cannot check on the hardware, there is no proof it's not connected to it either. The SoC is able to control the GPS power though, so we can keep it off.
Since the SoC has to load the modem firmware over the (fake) serial, and following the datasheets, the modem is not connected to the NAND.
The Linux kernel is being loaded at the beginning of the shared memory bank (0x30000000), however the kernel should be off when it loads.
In kernel-crespo/arch/arm/mach-s5pv210/dev-herring-phone.c we have:
static struct resource mdmctl_res[] = {
[...]
[2] = {
.name = "onedram",
.start = (S5PV210_PA_SDRAM + 0x05000000),
.end = (S5PV210_PA_SDRAM + 0x05000000 + SZ_16M - 1),
.flags = IORESOURCE_MEM,
},
};
static struct platform_device modemctl = {
.name = "modemctl",
.id = -1,
.num_resources = ARRAY_SIZE(mdmctl_res),
.resource = mdmctl_res,
.dev = {
.platform_data = &mdmctl_data,
},
};
And in the board file, in kernel-crespo/arch/arm/mach-s5pv210/mach-herring.c we have:
static void __init herring_fixup(struct machine_desc *desc,
struct tag *tags, char **cmdline,
struct meminfo *mi)
{
mi->bank[0].start = 0x30000000;
mi->bank[0].size = 80 * SZ_1M;
mi->bank[0].node = 0;
[...]
}
So for this RAM chip we have:
| CPU physical address range | Usage |
|---|---|
| 0x30000000 -> 0x30000000 + 80MiB -1 | System RAM |
| 0x30000000 + 80MiB -> 0x30000000 + 80MiB + 16MiB - 1 | Modem shared memory |
So we can suppose that there is at least one ram chip that is shared between the modem and the main CPU. Avoiding the use of this memory bank would result in loosing at least 80Mib of memory.
In arch/arm/mach-s5pv210/dev-s1-phone.c we have:
static struct resource onedram_res[] = {
[...]
[0] = {
.start = (S5PV210_PA_SDRAM + 0x05000000),
.end = (S5PV210_PA_SDRAM + 0x05000000 + SZ_16M - 1),
.flags = IORESOURCE_MEM,
},
};
static struct platform_device onedram = {
.name = "onedram",
.id = -1,
.num_resources = ARRAY_SIZE(onedram_res),
.resource = onedram_res,
.dev = {
.platform_data = &onedram_data,
},
};
And in the board file, in arch/arm/mach-s5pv210/mach-aries.c we have:
static void __init aries_fixup(struct machine_desc *desc,
struct tag *tags, char **cmdline,
struct meminfo *mi)
{
mi->bank[0].start = 0x30000000;
mi->bank[0].size = 80 * SZ_1M;
[...]
}
So for this RAM chip we have:
| CPU physical address range | Usage |
|---|---|
| 0x30000000 -> 0x30000000 + 80MiB -1 | System RAM |
| 0x30000000 + 80MiB -> 0x30000000 + 80MiB + 16MiB - 1 | Modem shared memory |
So we can suppose that there is at least one ram chip that is shared between the modem and the main CPU. Avoiding the use of this memory bank would result in loosing at least 80Mib of memory.
It might be possible to limit the amount of damage by relying on the fact that the modem has to be booted by Replicant, and make sure that the RAM chip that is shared with the modem isn't used for other things than this memory sharing.
This would make us lose about 80Mib of RAM, and the shared memory would still be used for SoC/Modem communication but as the RAM chip would be used only for that, so the modem would not be able read and write problematic data on it.
We would also need to make sure that the booloader doesn't load the kernel in that region or that the kernel is relocated to some other region before intializing the modem.
The current diff with the Nexus S kernel is here, but it doesn't boot at all with the following changes (and mkbootimg changes):
diff --git a/arch/arm/configs/herring_defconfig b/arch/arm/configs/herring_defconfig
old mode 100755
new mode 100644
index 11abbf0..99bf3f5
--- a/arch/arm/configs/herring_defconfig
+++ b/arch/arm/configs/herring_defconfig
@@ -1,7 +1,7 @@
#
# Automatically generated make config: don't edit
# Linux kernel version: 2.6.35.7
-# Fri Jun 3 07:07:08 2011
+# Sun Apr 8 14:40:16 2012
#
CONFIG_ARM=y
CONFIG_HAVE_PWM=y
@@ -418,8 +418,8 @@ CONFIG_ALIGNMENT_TRAP=y
#
CONFIG_ZBOOT_ROM_TEXT=0
CONFIG_ZBOOT_ROM_BSS=0
-CONFIG_CMDLINE="console=ttyFIQ0"
-# CONFIG_CMDLINE_FORCE is not set
+CONFIG_CMDLINE="console=ttyFIQ0 no_console_suspend earlyprintk=serial,ttySAC2,115200 androidboot.serialno=3733BAB66DE200EC androidboot.bootloader=I9020XXKA3 androidboot.baseband=I9020XXKB3 androidboot.info=0x4,0x0,1 androidboot.carrier=EUR gain_code=3 s3cfb.bootloaderfb=0x34a00000 mach-herring.lcd_type=0x00000000 oem_state=unlocked"
+CONFIG_CMDLINE_FORCE=y
# CONFIG_XIP_KERNEL is not set
# CONFIG_KEXEC is not set
@@ -823,8 +823,6 @@ CONFIG_UEVENT_HELPER_PATH=""
CONFIG_STANDALONE=y
CONFIG_PREVENT_FIRMWARE_BUILD=y
# CONFIG_FW_LOADER is not set
-# CONFIG_FIRMWARE_IN_KERNEL is not set
-CONFIG_EXTRA_FIRMWARE=""
# CONFIG_DEBUG_DRIVER is not set
# CONFIG_DEBUG_DEVRES is not set
# CONFIG_SYS_HYPERVISOR is not set
@@ -835,7 +833,7 @@ CONFIG_MTD=y
CONFIG_MTD_CONCAT=y
CONFIG_MTD_PARTITIONS=y
# CONFIG_MTD_REDBOOT_PARTS is not set
-# CONFIG_MTD_CMDLINE_PARTS is not set
+CONFIG_MTD_CMDLINE_PARTS=y
# CONFIG_MTD_AFS_PARTS is not set
# CONFIG_MTD_AR7_PARTS is not set
@@ -1191,6 +1189,7 @@ CONFIG_DEVKMEM=y
CONFIG_SERIAL_SAMSUNG=y
CONFIG_SERIAL_SAMSUNG_UARTS_4=y
CONFIG_SERIAL_SAMSUNG_UARTS=4
+# CONFIG_SERIAL_SAMSUNG_DEBUG is not set
CONFIG_SERIAL_SAMSUNG_CONSOLE=y
CONFIG_SERIAL_S5PV210=y
# CONFIG_SERIAL_MAX3100 is not set
@@ -2046,7 +2045,9 @@ CONFIG_HAVE_ARCH_KGDB=y
CONFIG_DEBUG_USER=y
CONFIG_DEBUG_ERRORS=y
# CONFIG_DEBUG_STACK_USAGE is not set
-# CONFIG_DEBUG_LL is not set
+CONFIG_DEBUG_LL=y
+CONFIG_EARLY_PRINTK=y
+# CONFIG_DEBUG_ICEDCC is not set
CONFIG_OC_ETM=y
CONFIG_DEBUG_S3C_UART=2
diff --git a/arch/arm/mach-s5pv210/dev-herring-phone.c b/arch/arm/mach-s5pv210/dev-herring-phone.c
index f8798b3..ecef636 100755
--- a/arch/arm/mach-s5pv210/dev-herring-phone.c
+++ b/arch/arm/mach-s5pv210/dev-herring-phone.c
@@ -48,8 +48,8 @@ static struct resource mdmctl_res[] = {
},
[2] = {
.name = "onedram",
- .start = (S5PV210_PA_SDRAM + 0x05000000),
- .end = (S5PV210_PA_SDRAM + 0x05000000 + SZ_16M - 1),
+ .start = (0x30000000 + 0x05000000),
+ .end = (0x30000000 + 0x05000000 + SZ_16M - 1),
.flags = IORESOURCE_MEM,
},
};
diff --git a/arch/arm/mach-s5pv210/mach-herring.c b/arch/arm/mach-s5pv210/mach-herring.c
index c3a0182..67fa1cf 100755
--- a/arch/arm/mach-s5pv210/mach-herring.c
+++ b/arch/arm/mach-s5pv210/mach-herring.c
@@ -5494,21 +5494,17 @@ static void __init herring_fixup(struct machine_desc *desc,
struct tag *tags, char **cmdline,
struct meminfo *mi)
{
- mi->bank[0].start = 0x30000000;
- mi->bank[0].size = 80 * SZ_1M;
+ mi->bank[0].start = 0x40000000;
+ mi->bank[0].size = 256 * SZ_1M;
mi->bank[0].node = 0;
- mi->bank[1].start = 0x40000000;
- mi->bank[1].size = 256 * SZ_1M;
- mi->bank[1].node = 1;
-
- mi->bank[2].start = 0x50000000;
+ mi->bank[1].start = 0x50000000;
/* 1M for ram_console buffer */
- mi->bank[2].size = 127 * SZ_1M;
- mi->bank[2].node = 2;
- mi->nr_banks = 3;
+ mi->bank[1].size = 127 * SZ_1M;
+ mi->bank[1].node = 1;
+ mi->nr_banks = 2;
- ram_console_start = mi->bank[2].start + mi->bank[2].size;
+ ram_console_start = mi->bank[1].start + mi->bank[1].size;
ram_console_size = SZ_1M - SZ_4K;
pm_debug_scratchpad = ram_console_start + ram_console_size;
diff --git a/BoardConfigCommon.mk b/BoardConfigCommon.mk index fff6d1b..c09d935 100755 --- a/BoardConfigCommon.mk +++ b/BoardConfigCommon.mk @@ -51,10 +51,10 @@ DEFAULT_FB_NUM := 2 BOARD_NAND_PAGE_SIZE := 4096 -s 128 -BOARD_KERNEL_BASE := 0x30000000 +BOARD_KERNEL_BASE := 0x40000000 BOARD_KERNEL_PAGESIZE := 4096 -BOARD_KERNEL_CMDLINE := console=ttyFIQ0 no_console_suspend - +BOARD_KERNEL_CMDLINE := console=ttyFIQ0 no_console_suspend earlyprintk=serial,ttySAC2,115200 bootmem_debug +BOARD_FORCE_RAMDISK_ADDRESS := 0x41000000 #TARGET_RECOVERY_UI_LIB := librecovery_ui_crespo TARGET_RELEASETOOLS_EXTENSIONS := device/samsung/crespo
F-Droid has been removed in Replicant 6.0 0004 because it contains many applications that are not FSDG compliant.
The only maintenance burden here would be to work with upstream to make sure that the packages are tagged correctly in f-droid data.
Without an upstream project, each Replicant user would need do the work of reviewing each application she want to use.
As this is very time consuming and would lead to a lot of work duplication, it's best for Replicant to provide some space to share the result of the reviews.
At the same time the reviews would also be tremendously useful to help fixing f-droid data.
Since there are free versions of the Android SDK (see the SDK wiki page for more details), we can assume that all the applications that don't require microG to run build fine under at least one of the FSDG compliant GNU/Linux distributions with one of the SDK mentioned in the SDK wiki page.
It might still be useful to mention if we managed to rebuild them with an FSDG distribution and what we used to do that.
We can then review applications in a similar way than how we review packages for FSDG compliant GNU/Linux distributions.
There is also the Criteria for Android applications that was started to clarify the FSDG requirements for Android applications in general but that also applies to third party repositories in existing FSDG GNU/Linux distributions.
| Application and version | Download link | Source code Review comments | Build test |
|---|---|---|---|
| android-modem-tools | * The README.md has licensing information. * This application has no external dependencies. |
* Builds on PureOS byzantium | |
| hello-world-debian-android | * The README.md has licensing information. * This application has no external dependencies. |
* Trisquel 9 (etiona): Builds and runs fine (GT-I9300, Replicant 6.0 0004). * Trisquel 10 (nabia): Builds fails2 * PureOS 10 (byzantium): Builds and runs fine (GT-I9300, Replicant 6.0 0004). |
|
1 The test being done on Trisquel 10 (nabia) were made by following more or less the "Building apps with these packages" instructions in https://bits.debian.org/2017/03/build-android-apps-with-debian.html
2 The build fails due to some Trisquel packaging issues or Java versions:
/usr/lib/android-sdk/build-tools/debian/dx --dex --verbose --min-sdk-version=19 --output=dex/classes.dex src
Error: A JNI error has occurred, please check your installation and try again
Exception in thread "main" java.lang.UnsupportedClassVersionError: com/android/dx/command/Main has been compiled by a more recent version of the Java Runtime (class file version 55.0), this version of the Java Runtime only recognizes class file versions up to 52.0
at java.lang.ClassLoader.defineClass1(Native Method)
at java.lang.ClassLoader.defineClass(ClassLoader.java:756)
at java.security.SecureClassLoader.defineClass(SecureClassLoader.java:142)
at java.net.URLClassLoader.defineClass(URLClassLoader.java:473)
at java.net.URLClassLoader.access$100(URLClassLoader.java:74)
at java.net.URLClassLoader$1.run(URLClassLoader.java:369)
at java.net.URLClassLoader$1.run(URLClassLoader.java:363)
at java.security.AccessController.doPrivileged(Native Method)
at java.net.URLClassLoader.findClass(URLClassLoader.java:362)
at java.lang.ClassLoader.loadClass(ClassLoader.java:418)
at sun.misc.Launcher$AppClassLoader.loadClass(Launcher.java:352)
at java.lang.ClassLoader.loadClass(ClassLoader.java:351)
at sun.launcher.LauncherHelper.checkAndLoadMain(LauncherHelper.java:601)
make: *** [Makefile:25: dex/classes.dex] Error 1
The source code of these applications has been reviewed but someone still needs to see if they can be built on FSDG compliant distributions like Trisquel or PureOS:
| Application and version | Download link | Source code Review comments | Build test |
|---|---|---|---|
| Imagepipe | de.kaffeemitkoffein.imagepipe_46_src.tar.gz | * The COPYING has all the licensing information on the source code and contains only free licenses * The application has no external dependencies that are not in the source code * It can build with a free Android SDK from https://codeberg.org/Starfish/SDK-Rebuilds |
Not tested yet |
| TinyWeatherForecastGermany | de.kaffeemitkoffein.tinyweatherforecastgermany_47_src.tar.gz | * The COPYING has all the licensing information on the source code and contains only free licenses * The application has no external dependencies that are not in the source code * It can build with a free Android SDK from https://codeberg.org/Starfish/SDK-Rebuilds |
Not tested yet |
| GNU Emacs | Version 30.0.50 | Being reviewed, but should be OK: The INSTALL.Android file states that: * "Emacs is known to run on Android 2.2 (API version 8) or later, with the NDK r10b or later." * "Building Emacs with an old version of the Android NDK requires special setup. This is because there is no separate C compiler binary for each version of Android in those versions of the NDK. [instructions for doing that]". However nobody tried to built it with the Replicant 4.2 SDK yet. PureOS and Trisquel also have an SDK but lack an NDK. So someone needs to try to build emacs and it'd be OK. |
|
| RepWiFi | Version 0.6.2 | Being reviewed: * GPLv3 * Doesn't seem to have any (nonfree) dependency * Doesn't seem to promote nonfree software or actively push users toward the installation of nonfree software * TODO: Try to build, though it was probably built as part of Replicant long time ago |
|
| Silence | Version 0.15.16 | Being reviewed: * GPLv3 (probably GPLv3-only) * Build systems: Android.mk (has instructions on how to produce a standalone APK), gradle * Has some dependencies (git submodule): - libs/com.amulyakhare.textdrawable: MIT - libs/gradle-witness: MIT - libs/org.greenrobot.eventbus: Apache 2.0 - libs/org.whispersystems.jobmanager: GPLv3 (build.gradle has "name 'GPLv3'", no mention of GPLv3+ or GPLv3-only) - libs/org.whispersystems.libpastelog: GPLv3 (build.gradle has "name 'GPLv3'", no mention of GPLv3+ or GPLv3-only) - libs/org.whispersystems.libsignal: GPLv3 (build.gradle has "name 'GPLv3'", no mention of GPLv3+ or GPLv3-only) * Doesn't seem to promote nonfree software or actively push users toward the installation of nonfree software * TODO: Try to build and see if it downloads all the dependencies source code and their dependencies dependencies source code if any |
Trisquel 10 (nabia): Failed: Requires gradle version is 4.10.1 instead of 4.4.11. |
| termux | Trisquel 10 (nabia): Failed: Requires gradle version is 6.7.1 instead of 4.4.11. |
| Application | upstream anti-features | Issues | Upstream status |
| F-Droid | None | * Its repositories that are configured in by default (and enabled by default as well) have non compliant packages like Yalp, making F-Droid itself non compliant. | * There is no automatic way to deduce that it's not FSDG compliant * Upstream probably would not like having F-droid tagged with anti-features * No current F-droid anti-features apply to that case |
| Yalp | * NonFreeNet | Yalp is a package manager that is setup to download applications from a repository that is not FSDG compliant | * There is no automatic way to deduce that it's not FSDG compliant * NonFreeNet is only about non-Free network service and not the license of the packages in the repository * No current F-droid anti-features apply to that case |
The Free software Directory has a list of applications that run on Replicant.
We need to see with them how to handle the collaboration between both projects in the long run:The Free Software Directory (FSD) seems to have way more fields seems to be able to store explanations along with the information. For instance there is a "License note" text form that could have detailed information about the license. It could probably tell which files or which parts are under which license for instance. Wikidata can't do that (it's not meant for text explanations). The Free Software Directory (FSD) also has fields and checkboxes for a lot of information, so Wikidata is probably currently lacking ways to store all that information.
Here's an example for Guix
So it might make more sense to contribute directly to the Free Software Directory (FSD) instead of Wikidata. If you still want to use Wikidata to do query on software, you could for instance:F-Droid is a community-maintained software repository for Android based operating systems. It is similar to the Google Play store.
Replicant has depended very heavily on F-Droid for a long time now. End users expect app "stores" on their smart phones.
Unfortunately, F-Droid is not currently compliant with the FSF's Free Software Distribution Guidelines, which required Replicant to remove F-Droid from its upcoming 6.0 0004 release so that Replicant can continue to be FSDG compliant.
Much discussion has already been had within Replicant and between Replicant and F-Droid about how F-Droid can be modified in order to make it FSDG compliant so that it can be included again in Replicant in future releases.
F-Droid's build server has not purely free from proprietary blobs for a while now: https://gitlab.com/fdroid/fdroidserver/-/issues/383
It is important for F-Droid to be built using free tools.
Android has a decentralized app building process. This can be a very positive thing, fostering a much more diverse and playful ecosystem than app stores that Google and Apple provide on their smartphones's OSes.
Due to the freedom issues in the F-Droid build system though, a threat exists to user privacy and security.
One of these freedom issues is the fact that far too many pre-builds exist.
Replicant wants an app distribution system that runs a free toolchain so that users can rely on a fully free ecosystem.
One way of achieving this might be to utilize beuc's rebuilds: https://android-rebuilds.beuc.net/
Replicant wants to write environment setup bash scripts to build FDroid with beuc's version of the SDK in order to be able to provide a reproducible build environment that others can test.
Another freedom issue with F-Droid is that F-Droid includes apps with anti-features that are not compatible with the GNU FSDG. These apps are available alongside apps that are compatible and they are only marked with these anti-features. See #1629 for development efforts and further information on this topic. https://redmine.replicant.us/projects/replicant/wiki/FDroid
Define what to work on:
1. Cleanup this draft
2. Fill the missing information that can easily be found
Rationale: we need a rough idea of what needs to be worked on.
In parallel for Replicant:
a1. Precise how the people want to be paid (per tasks, hours, per months, etc) and the amount
a2. Find a way to report the progress if not paid by the task (quick blog post, wiki status, very fast mail on the mailing list, etc). /!\ It can take up to 1/2 day per week, as for the crowdfunding to free and upstream the Allwinner VPU. => Find a way to do it that suits people.
a3. Find out how to do it legally (employment, contract work, grant, etc)
a4. Steering commitee vote on that
a5. Find a way to legally formalize it through the FSF if needed
In parallel for NLnet:
a1. Write a very rough proposal and send it, don't wait too much as we might get a shot sooner. Make sure to be accepted in round 1 before starting to work on it or make sure to have a backup (like Replicant money).
a2. Fill the budget by calculating hours x price per hour. Keep in mind that it's a grant so you don't have the usual taxes (you need to check how to declare grants with your state) but the usual employee stuff is not covered (social security, state welfare, hollidays, extra time where you don't do productive work in an office but get paid, time spent on responding to email, or filling or preparing the MOU for NLnet etc)
a3. Send the MOU
a4. Sign it
a6. Finish a big task group, send a request for payment + bank details the first time and get paid, and redo that until everything is finished.
For the request for payment you need to point to resources that proves that the task is done. The reporting is done this way.
Example: git.replicant.us/GNUtoo/kernel_replicant_linux.git in this branch + build howto
Example2: post on the bugtracker of F-Droid with the agreed specification for the properties
| Task | Budget | Comments | Deliverable |
|---|---|---|---|
| Define with F-Droid upstream which properties we can use in package definition to comply with the FSDG guidelines | Hard to predict as it depends on the outcome of the discussion with F-Droid => Replicant funding | Specifications that are ready to be implemented by Fil bergamo | |
| Discuss how to implement build time whitelists and blacklists | Hard to predict as it depends on the outcome of the discussion with F-Droid => Replicant funding | Precise specifications that are ready to be implemented by Fil bergamo | |
| Some light coding tasks (I don't remember which one) | Nlnet? Replicant? Can time be predicted? |
Person: Fil Bergamo
| Task | Budget | Comments | Deliverable |
|---|---|---|---|
| Implement the parsing of the properties | Hard to predict as it depends on the outcome of the discussion with F-Droid => Replicant funding | ||
| Build F-Droid from an FSDG compliant distribution | Hard to predict => Replicant funding | Replicant 6 can't be built with FSDG compliant distros but Replicant 4.2, 9.0 and probably 10.0 too can => We need F-Droid to be built from an FSDG compliant distributions | Building F-Droid from an FSDG compliant distribution + a quick HOWTO |
| Implement build time whitelists / blacklists | Nlnet? Rough number of hours | Can build F-Droid with custom blacklist and whitelists + quick HOWTO | |
| Replicant F-Droid fork package in F-Droid | Nlnet? Rough number of hours | Package can be built with F-Droid tools, ideally upstream it |
| Your name | Fil Bergamo and Kurtis Hanna |
|---|---|
| Email address | contact address at the replicant.us domain |
| Phone numbers | The phone number of Fil Bergamo which is in European union |
| Organisation | Replicant |
| Country | Italy(Fil Bergamo), USA (Kurtis Hanna) |
| Project name | Make F-Droid FSDG compliant |
|---|---|
| Website / wiki | https://redmine.replicant.us/projects/replicant/wiki/MakeFdroidFSDGCompliant |
| Abstract: Can you explain the whole project and its expected outcome(s).in 1200 characters | Replicant is a fully free software Android distribution that has to be compliant with the FSF distribution guidelines (FSDG) ( https://www.gnu.org/distros/free-system-distribution-guidelines.html ) F-Droid has non-compliant applications like Yalp. To fix it we need discuss with upstream to add define new anti-feature tags in FDroid metadata, that can describe if a package is FSDG compliant, in the most generic way possible as requested by upstream. Once that is done we will discuss with upstream to define package and/or anti-feature whitelist/blacklist to be implemented in the F-Droid client in the most generic way possible. The new tags and the whitelist/blacklist will be implemented in the F-Droid client. The whitelist/blacklist will need to be configurable at build time, to enable building a different FSDG F-Droid from the same source code. F-Droid has already build time branding options. We will then add that FSDG compliant F-Droid to the Fdroid metadata repository. This way we have near 0 maintenance and users of other distributions could also use this FDroid. We will also need to work with other projects to build FDroid on FSDG distributions without any nonfree dependencies. |
| Have you been involved with projects or organizations relevant to this project before? And if so, can you tell us a bit about your contributions? |
Fil Bergamo and Kurtis Hanna are involved in Replicant since a very long time. <add a rough date> Fil Bergamo * Developed RepWiFi. * Is part of the Replicant steering committee. Kurtis Hanna: * Is heavily involved in Replicant public relations, especially with other people working to upstream support for smartphones in Linux or u-boot for other Android or GNU/Linux distributions. * Is involved a lot in the Replicant documentation in the wiki. |
| Requested Amount (Between 5000 and 50000 Euros) | Something rough works too, I've added 50000 by mistake and it was re-defined later |
|---|---|
| Does the project have other funding sources, both past and present? | The Replicant project has about 200000 dollars at disposition: * The Replicant project has a donation page https://crm.fsf.org/civicrm/contribute/transact?reset=1&id=19. Part of the donations were used for buying devices and reimburse conference attendances. We have about 20000 dollars remaining from the donation. * The Replicant project recently received 200000 dollars from Handshake: https://www.fsf.org/news/free-software-foundation-receives-1-million-from-handshake As the FSF takes 10% that leaves us 180000 dollars * Denis Carikli is being funded by NLnet to port Replicant to Android 9 * David "dllud" Ludovino and Ricardo "Grim" Cabrita are being funded by NLnet to work on the Replicant 9 graphic stack |
The budget will only be used to fund Fil Bergamo and Kurtis Hanna to work on this task. TODO: Do you need a budget for other stuff? Like hardware or conference if Covid confinment ends, or whatever is necessary to work on that? Replicant will also complete the funding as we don't know how much time talking with F-Droid can take, so it's hard to budget for it. TODO: We think it will take something between <3> and <6> months of work for one full time developer. <- Very rough estimation, more precise one can be done in stage2 However it is always difficult to evaluate precisely the amount of time that this kind of project would take as it depends on how much time the discussions with upstream will take and what exact implementation is chosen. <Maybe E/month * months > The 2 people here are long time contributors to Replicant and have a direct interest in making the project succeed. Over time we will document the progress and add more information here: https://redmine.replicant.us/projects/replicant/wiki/FDroidFSDGCompliance
The first attempt was done by Wolfgang Weidermeier, and patches were merged, then reverted. The patches also addressed the problem very partially so, even if they were merged they wound't have been sufficent to fix the issue. In the next attempt, people from Replicant (including Fil Bergamo, Kurtis Hanna and Denis Carikli) tried to discuss with upstream to avoid incomplete fixes, but that failed because the people involved on Replicant side could only find the time to discuss it for short period of times. So after several attempts like that we stopped trying and planned to fund the task instead as it would give people involved enough time to really fix it for good. TODO: Point point to the bugreport in Replicant, in F-Droid + the old bugreport and reverted patch.
The most complicated challenges are not technical but human: we need to discuss with upstream to find the right solution.
Explain the first step with F-Droid data and that we will open a bugreport there, after having carefully read the FSDG compliance specification and checked with the FSF lawyers if something is unclear. Other Replicant developers will most probably help a bit as there is a big interest in getting that issue fixed and that we already spent a big ammount of time discussing plans on how to fix it at various conferences like FOSDEM <2018?>
| Attachments | None |
|---|
| What should we do in the other case, e.g. when your project is not immediately selected? |
Feel free to choose whatever you want here |
|---|---|
| Send me a copy of this application. | check-box checked |
| PGP pubkey | None (if we use Replicant contact address, we can't encrypt to it) |
Warning: flashing another operating system like Replicant may void your warranty and will erase the data stored on the device.
This guide assumes your phone is supported by fastboot.
First, you need to have fastboot already installed. If not you can follow the ToolsInstallation page to install it.
| Device | Keys (held together) |
| HTC Dream/HTC Magic | BACK, POWER |
| Nexus One | Trackball, POWER |
| Nexus S | VOL+, POWER |
| Galaxy Nexus | VOL-, VOL+, POWER |
If this is the first time you reflash your phone, you will need to unlock the bootloader. This is done using fastboot:
./fastboot oem unlock
Warning: This will erase all the data stored on the phone, including the data stored on the internal memory!
./fastboot flash boot boot.img ./fastboot flash recovery recovery.img ./fastboot flash system system.img ./fastboot flash userdata userdata.img
./fastboot erase cache
./fastboot reboot
Your device should now be running Replicant!
Replicant includes F-Droid, the market application that provides free software.
The F-Droid Privileged Extension is shipped as well and makes background updates possible. Automatic background updates can be enabled in the settings of the F-Droid app.
Replicant is supported, recommended by the FSF and listed as a fully free software distribution that respects the GNU Free System Distribution Guidelines. However, F-Droid includes apps with anti-features that are not compatible with the GNU FSDG. These apps are available alongside apps that are compatible and they are only marked with these anti-features. See #1629 for development efforts and further information on this topic.
Not all F-Droid anti-features violate the GNU FSDG. The ones that do are explained below. We do not recommend the installation and usage of apps that have these anti-features.
NonFreeDep
Definition: the application depends on a non-free application (e.g. Google Maps) - i.e. it requires it to be installed on the device, but does not include it.
NonFreeAdd
Definition: the application promotes non-free add-ons, such that the app is effectively an advert for other non-free software.
NonFreeAssets
Definition: the application contains and makes use of non-free assets. The most common case is apps using artwork - images, sounds, music, etc - under a non-commercial license.
Tracking
Definition: the application tracks and reports your activity to somewhere without your consent. It’s commonly used for when developers obtain crash logs without the user’s consent, or when an app is useless without some kind of authentication
Given the huge number of devices out there, buying each device and checking it doesn't scale. Especially as there are multiple variants and even multiple versions of the variants.
For instance for the Galaxy SII we have the GT-I9100 that has an Exynos4 and GT-I9100G that has an OMAP4. And for the GT-I9100G, there are multiple versions.
The first step would be to document what tools already exist to do that and the ones that are lacking.
Some tools enable to check that.
We could make it easy to use such tools to do that by making sure that they are packaged and writing tutorials on how to do the check and report the result as well.
See BootloadersFreedom#Tools for more details.
Notes:The idea would be to find a way to get a very large number of stock images for Android devices make tests on the images and automatically check if the bootloaders are signed.
If the bootloaders are under a free software license and are unsigned, once we get and identify the corresponding source code we could publish them.
For the signed bootloaders under a free software license we'd better check with the FSF what is best to do as we need not to redistribute any software that is practically nonfree.
Constraints:Several smartphones and tablets that have an OMAP System On a Chip (SOC) are configured by hardware to try to load the bootloader from USB before loading it from the internal storage.
So far this includes at least the following deviecs:As it might apply to other devices too, we could try to use that to find out if some devices we don't know about yet have the ability to run unsigned bootloaders.
If we do that, we get the following in the kernel log of your laptop:
usb 1-1: new high-speed USB device number 24 using ehci-pci usb 1-1: unable to get BOS descriptor or descriptor too short usb 1-1: New USB device found, idVendor=0451, idProduct=d00f, bcdDevice= 0.00 usb 1-1: New USB device strings: Mfr=33, Product=37, SerialNumber=0 usb 1-1: Product: OMAP4430 usb 1-1: Manufacturer: Texas Instruments
Note that your kernel might need to be compiled with CONFIG_USB_ANNOUNCE_NEW_DEVICES=y
to print that. In Parabola CONFIG_USB_ANNOUNCE_NEW_DEVICES=y is enabled.
We can also try to get a bit more infos with omap-usb-boot:
$ sudo omap-usb-boot -v -w boot invalidbootmedia Finding and opening USB device Found and opened omap4 USB device: OMAP4430 ASIC device id: 4430, HS device Booting from device invalidbootmedia... Booting device invalidbootmedia not found Booting from device failed
Here we know the device is signed because it's a "HS device".
If it was not signed it would print "GP device" instead.
This tutorial is a work in progress. Remove this warning when it will be tested (and somehow indicate on which devices it was tested on).
Follow the instructions for setting up ADB on your computer so that you can access a root shell on your device.
NOTE: when prompted on your Replicant device, make sure that you check the box that says Always allow from this computer when you grant your computer USB debugging permissions. Otherwise, you will be unable to obtain root shell access on your Replicant device when you reboot it into the recovery OS to actually perform the backup.
NOTE: for security reasons, you may want to revoke these non-expiring permissions once the backup is complete.
To reboot in the recovery, you can follow the instructions in the RebootIntoTheRecovery wiki page.
First we need to find the real path of the partition. On the Galaxy SII (GT-I9100) we can use the following command:
adb shell "realpath /dev/block/platform/dw_mmc/by-name/UMS"
On my device it gave me the following result: /dev/block/mmcblk0p11
To download it you can use the following command:
adb pull /dev/block/mmcblk0p11 ./mmcblk0p11.img
Note that this can take hours as the partition is usually quite big. You will also need to have the space to store it.
As it takes most of the space in the internal storage already, make sure to have at least as much space as the device internal storage size. For instance if the internal storage size is 16G, you will need at least 16G of free space (computers tend to slowly use space with things like logs and so on so it's a good idea to have a bit more space than needed).
First verify which filesystem you have:
file mmcblk0p11.img
If the filesystem is a vfat filesystem and that it is damaged, you can try to repair it with the following command:
fsck.vfat -a -w mmcblk0p11.img
If you want to recreate it from scratch (your data will be lost) you can do the following:
fsck.vfat -a -w mmcblk0p11.img
To restore your repaired/recreated/modified image on your device you can run the following:
adb push mmcblk0p11.img /dev/block/mmcblk0p11
Make sure that you're restoring it to the right device and that mmcblk0p11 is the right partition otherwise it could break your device for good and you might never be able to repair it.
Once that's done you can reboot your device by selecting "reboot system now"
| Replicant repository name | Upstream repository |
|---|---|
| replicant/bootable_recovery.git | https://github.com/LineageOS/android_bootable_recovery |
| replicant/build.git | https://github.com/LineageOS/android_build |
| replicant/device_samsung_espresso3g.git | https://github.com/LineageOS/android_device_samsung_espresso3g |
| replicant/device_samsung_espressowifi.git | https://github.com/LineageOS/android_device_samsung_espressowifi |
| replicant/device_samsung_galaxys2-common.git | https://github.com/LineageOS/android_device_samsung_galaxys2-common |
| replicant/device_samsung_i9100.git | https://github.com/LineageOS/android_device_samsung_i9100 |
| replicant/device_samsung_i9300.git | https://github.com/LineageOS/android_device_samsung_i9300 |
| replicant/device_samsung_i9305.git | https://github.com/LineageOS/android_device_samsung_i9305 |
| replicant/device_samsung_kona-common.git | https://github.com/LineageOS/android_device_samsung_kona-common |
| replicant/device_samsung_maguro.git | https://github.com/LineageOS/android_device_samsung_maguro |
| replicant/device_samsung_n5100.git | https://github.com/LineageOS/android_device_samsung_n5100 |
| replicant/device_samsung_n5110.git | https://github.com/LineageOS/android_device_samsung_n5110 |
| replicant/device_samsung_n7000.git | |
| replicant/device_samsung_n7100.git | https://github.com/LineageOS/android_device_samsung_n7100 |
| replicant/device_samsung_smdk4412-common.git | https://github.com/LineageOS/android_device_samsung_smdk4412-common |
| replicant/device_samsung_tuna.git | https://github.com/LineageOS/android_device_samsung_tuna |
| replicant/external_boringssl.git | https://github.com/LineageOS/android_external_boringssl |
| replicant/external_chromium-webview.git | |
| replicant/external_drm_gralloc.git | git://git.osdn.jp/gitroot/android-x86/platform/external/drm_gralloc |
| replicant/external_heimdall.git | |
| replicant/external_libsamsung-ipc.git | |
| replicant/external_llvm.git | |
| replicant/external_mesa3d.git | |
| replicant/external_parameter-framework.git | |
| replicant/external_protobuf.git | |
| replicant/frameworks_av.git | https://github.com/LineageOS/android_frameworks_av |
| replicant/frameworks_base.git | https://github.com/LineageOS/android_frameworks_base |
| replicant/frameworks_native.git | https://github.com/LineageOS/android_frameworks_native |
| replicant/hardware_broadcom_wlan.git | https://github.com/LineageOS/android_hardware_broadcom_wlan |
| replicant/hardware_libhardware.git | https://github.com/LineageOS/android_hardware_libhardware |
| replicant/hardware_libhardware_legacy.git | |
| replicant/hardware_ril_samsung-ril.git | |
| replicant/hardware_ti_omap4.git | https://github.com/LineageOS/android_hardware_ti_omap4 |
| replicant/hardware_tinyalsa-audio.git | |
| replicant/kernel_samsung_espresso10.git | https://github.com/LineageOS/android_kernel_samsung_espresso10 |
| replicant/kernel_samsung_smdk4412.git | https://github.com/LineageOS/android_kernel_samsung_smdk4412 |
| replicant/kernel_samsung_tuna.git | https://github.com/LineageOS/android_kernel_samsung_tuna |
| replicant/libcore.git | https://github.com/LineageOS/android_libcore |
| replicant/manifest.git | https://github.com/LineageOS/android |
| replicant/packages_apps_Browser.git | https://github.com/LineageOS/android_packages_apps_Browser |
| replicant/packages_apps_LegacyCamera.git | |
| replicant/packages_apps_repwifi.git | |
| replicant/packages_apps_replicantwallpapers.git | |
| replicant/packages_apps_Settings.git | https://github.com/LineageOS/android_packages_apps_Settings |
| replicant/packages_apps_SetupWizard.git | https://github.com/LineageOS/android_packages_apps_SetupWizard |
| replicant/packages_apps_ThemeChooser.git | https://github.com/LineageOS/android_packages_apps_ThemeChooser |
| replicant/packages_providers_ContactsProvider.git | https://github.com/LineageOS/android_packages_providers_ContactsProvider |
| replicant/prebuilts_ndk.git | |
| replicant/prebuilts_sdk.git | |
| replicant/sdk.git | |
| replicant/system_core.git | https://github.com/LineageOS/android_system_core |
| replicant/toolchain_binutils.git | https://android.googlesource.com/toolchain/binutils |
| replicant/toolchain_gcc.git | https://android.googlesource.com/toolchain/gcc |
| replicant/toolchain_jack.git | |
| replicant/toolchain_jill.git | |
| replicant/vendor_cmsdk.git | https://github.com/LineageOS/cm_platform_sdk |
| replicant/vendor_replicant.git |
| Event | FOSDEM |
| Date | 2 & 3 February 2019 |
| Location | Brussels, Belgium, Europe |
| Website | https://fosdem.org/2019/ |
The goal of this event is to discuss some of the project directions and issues.
For instance:When: 3rd of February at 11:00-13:00
Where: Room J.1.106 at FOSDEM
Meeting Report: https://redmine.replicant.us/attachments/download/1597/formatted-report.pdf
More info on the FOSDEM website: https://fosdem.org/2019/schedule/event/bof_replicant/
Framadate planning: https://framadate.org/replicant-fosdem2019-meeting
The goal of this event is to help potential contributors to contribute to Replicant.
For instance:When: Saturday, 2nd February 2019, 16:00 CET
Where: Meet us at the Cafeteria, at FOSDEM. We will then decide where to hold the workshop.
Framadate planning: https://framadate.org/replicant-fosdem2019-workshop
| Event | FOSDEM |
| Date | 1 & 2 February 2020 |
| Location | Brussels, Belgium, Europe |
| Website | https://fosdem.org/2020/ |
Replicant will share a little corner on Technoethical’s stand. There will be flyers, stickers and some phones running demo versions of Replicant 9.
Replicant is having a Birds of a Feather (BoF) meeting:
There will be a talk at the Hardware Enablement devroom on the topic of “Extending the lifetime of smartphones with Replicant”:
The origin of the song comes from Fil Bergamo, who also has a melody associated with it.
The idea is to enable people to modify the song on this wiki page, to fix it, improve it, complete it, etc.
Through the valley of buggy code,
Up to the hill where the kernel <>
We've walked a long way
we've built for hours
just to boot a mobile phone.
Missing features is not our creed
it's just the way it turns to be
when we reject
when we refuse
to give away our all liberty
GNUtoo wanted to have a play part for his Extending the lifetime of smartphones with Replicant presentation at the 36C3, but it didn't work out. It was too long, the end was boring, and it wasn't finished.
Thanks to the huge interest from dllud and GrimKriegor, he picked up and manage to finish it 2 or 3 minutes before his talk at FOSDEM 2020, and it was presented there. Note that the beginning of the talk looks like a regular presentation, but at some point the play begins, and at the end of the play, the regular presentation continues.
Part of the Replicant crew at 37C3 got a jingle stuck in their heads: "We are Replicants and we wanna free your phone!"
This task aims to fix all these severe issues by putting together a new graphics stack for the Android 9 port. This new graphics stack must be compatible with Android 9 Hardware Abstraction Layers (HAL) and provide at least GLES 2.0 rendering. It should be flexible enough to do software rendering with Mesa or SwiftShader (Google's current software renderer), and also GPU rendering on devices where a free GPU driver is available.
Joonas Kylmälä has done some introductory work on the Android 9 port for the i9305, and found a way to have it rendering to the screen. He put together a graphics stack composed of: gbm_gralloc (Gralloc HAL) + drm_hwcomposer (Hardware Composer HAL) + Mesa with kms_swrast driver with softpipe backend (CPU software renderer for GLES). This will be the starting point for this task.
Joonas' prototype shows that Replicant can use gbm_gralloc, an existing graphics memory allocator (gralloc) HAL maintained(ish) by Android-x86, in conjunction with drm-hwcomposer, a libre implementation of Android's Hardware Composer HAL based on Linux's DRM, to achieve software rendering with Mesa. This solution avoids the need to write a custom gralloc for Replicant, and takes advantage of the hardware acceleration for composition provided by drm-hwcomposer on devices with a free software DRM driver (e.g. exynos-based smartphones and tablets).
Much more testing is needed to confirm that gbm_gralloc can be the definitive gralloc HAL on Replicant 9. It still wasn't tried with SwiftShader, or even Mesa's llvmpipe backend, which is a must since the softpipe backend is too slow to be usable.
Joonas' tests showed that some other components will need our attention, mostly the drm/exynos driver. In order to make drm/exynos work with gbm_gralloc and drm-hwcomposer Joonas had to disable DRM-Auth and hack some missing pixel formats into it by using the default pixel format for everything. Besides drm/exynos, we will also have to make the graphics stack work with the virtual GEM (vGEM) driver, in order to support devices that lack a real drm driver.
The major and first goal of this task is thus to build upon Joonas's prototype and put together a stable and fully free graphics stack, compatible with GLES 2.0, that does software rendering through Mesa's llvmpipe with a decent performance.
Hardware requirements: A computer that is able to build Replicant. A Samsung Galaxy S3 or S3 4G to run the current Replicant 9 port.
Difficulty: Medium / Hard
Requirements/Prerequisites: Knowledge of C++, kernel interfaces knowledge or the ability to learn them
Expected outcomes:Time estimation:
| Step | man-hours |
|---|---|
| Set up the development environment, including the current Replicant 9 port on the test device. | 24 |
| Read AOSP documentation and understand all details of the graphics stack. | 16 |
| Adapt the build files to use Mesa's llvmpipe backend instead of softpipe. Fix potential LLVM version incompatibilities between Mesa and Android. | 40 |
| Properly implement the missing pixel formats in drm/exynos and try to have it merged into upstream. | 72 |
| Find a proper way to use DRM-Master and DRM-Auth with gbm_gralloc and drm-hwcomposer. | 40 |
| Create test scenarios and check if the graphics stack works as expected. Consider alternative grallocs if necessary. | 40 |
| Make the graphics stack work with vGEM driver besides drm/exynos. | 40 |
| Document the design decisions. | 16 |
| TOTAL | 288 |
SwiftShader is Google's current software renderer that is capable of GLES 2.0 and is now under work to support Vulkan.
Mesa is the preferred renderer on Replicant for several reasons such as its support for both software and hardware (GPU) rendering, and its big community, with hundreds of active contributors. However, Mesa lacks a Vulkan software renderer. With Vulkan soon becoming a requirement for new Android versions, we must make sure that Replicant's graphics stack can use SwiftShader in order to become futureproof. Furthermore, SwiftShader was built with performance in mind, specially for ARM CPUs, and may bring speed improvements on some devices.
The goal of this sub-task is thus to create a compile-time or run-time option that allows using Replicant 9 with SwiftShader as it's software renderer instead of Mesa.
Hardware requirements: A computer that is able to build Replicant. A smartphone or tablet that is supported by Replicant to be able to test the result.
Difficulty: Medium
Requirements/Prerequisites: Knowledge of C++, Makefiles and git. Android's graphics stack knowledge or the ability to learn them.
Expected outcomes:Time estimation: 40 man-hours.
Mesa is a highly versatile library that can be extended with device drivers to allow it to be used in different environments ranging from software emulation to complete hardware acceleration. One such driver is the Gallium llvmpipe driver, which is a software rasterizer that uses LLVM to do runtime code generation. It only needs a CPU to run graphics computations and thus brings full GLES support to all Replicant devices.
llvmpipe has been integrated in Replicant 6 but it's not activated by default yet as it is very slow. It is also not fully complete.
To fix that, llvmpipe and/or the integration of it in Replicant should be optimized. We should first start by configuring llvmpipe and/or Mesa to not implement very expensive OpenGL operations. If that's not sufficient, or if that breaks application compatibility, various software or hardware features (ARM NEON, hardware 2D acceleration, etc) could be used to improve the speed.
Considerable speed improvements may be achieved with a fine-tuned emulation for division instructions. The ARM cores on many Replicant devices do not have hardware support for the SDIV/UDIV instructions. We should profile some apps and check whether GLES functions requiring divisions are to blame for the poor performance.
Hardware requirements : A computer that is able to build Replicant. A smartphone or tablet that is supported by Replicant to be able to test the result.
Difficulty: Medium / Hard (depending on the amount of optimizations required)
Requirements/Prerequisites: See with Mesa project
Expected outcomes: faster llvmpipe on ARM devices, able to run apps such as Fennec F-Droid (Firefox).
Time estimation:
| Step | man-hours |
|---|---|
| Setup a testing and benchmarking environment | 40 |
| Disable expensive OpenGL operations. Check speedup and stability. | 24 |
| Recap matrix operations (Linear Algebra) and study ARM NEON. | 48 |
| Do a profiling of several apps to find the most used GLES operations. | 32 |
| Use Ne10 library or Neon Intrinsics for the most used GLES operations. | 80 |
| Fix bugs, re-write the code where needed, get it stable. | 80 |
| TOTAL | 304 |
Lima is a free software Mesa driver for ARM Mali-4xx (Utgard) GPUs. These GPUs are present in several Replicant supported devices such as Galaxy S2, S3, S3 4G, Note and Note 2.
Lima aims to full GLES support but it is still in development. However the current implementation status already allows the hardware acceleration of several tasks. GPU-based hardware acceleration is faster and less power hungry than software rendering, both by several orders of magnitude. It would allow Replicant devices to run applications with a performance close to that of non-free devices.
Hardware requirements : A computer that is able to build Replicant. A Replicant device with a Mali-4xx GPU that can run mainline Linux (e.g. Galaxy S3 or Note 2).
Difficulty: Medium
Requirements/Prerequisites: See with Lima project
Expected outcomes: Lima driver being used for GLES rendering on a supported device.
| Step | man-hours |
|---|---|
| Rebase Lima's Linux kernel DRM driver on top of forkbomb's Midas on Mainline kernel. | 80 |
| Replace mainline Mesa for Lima's Mesa (with their driver). | 16 |
| Build and test thoroughly with synthetic and real applications. | 40 |
| Create a fallback mechanism that uses the software renderer for GLES functions not yet implemented in Lima. | 100 |
| TOTAL | 236 |
| Project name | Graphics acceleration on Replicant |
|---|---|
| Website / wiki | https://redmine.replicant.us/projects/replicant/wiki/Tasks_funding#Graphics-acceleration |
Abstract: Can you explain the whole project and its expected outcome(s) in 1200 characters
Replicant is a fully free software Android distribution which is approved by the FSF. All supported devices on Replicant currently lack a free software driver for their GPU. As such, OpenGL ES (GLES) rendering must be done on the CPU through software rendering (SR). Replicant's current renderer is both incomplete and slow. It causes essential apps like web browsers to crash due to lack of GLES 2.0, and many other apps run too slow to be usable. This project aims to fix this by complementing Android's 9 graphics stack. Adding a few missing components will created of a fully-free, fast and compliant graphics stack. First we will write a gralloc (graphics memory allocator) tailored for SR that is compatible with drm-hwcomposer (a libre implementation of Android's Hardware Composer HAL). This gralloc enables drm-hwcomposer to work with SurfaceFlinger and SwiftShader, creating a stack capable of GLES 2.0 on the CPU of all Replicant devices. Afterwards we will integrate and optimize Mesa's llvmpipe SR, which offers better community support than SwiftShader. As last step we will add support for the Lima driver, which will bring an even faster GPU-backed GLES to at least 5 devices.
| Have you been involved with projects or organizations relevant to this project before? And if so, can you tell us a bit about your contributions? |
SEE TEMPLATE |
|---|
| Requested Amount (Between 5000 and 50000 Euros) | 50000 Euros |
|---|---|
| Does the project have other funding sources, both past and present? | SEE TEMPLATE |
Explain what the requested budget will be used for?
The budget will only be used to fund this project through contract work. We estimate that this project should take 868 man-hours to reach full completion, with 632 man-hours being enough to reach all software rendering goals, leaving only the GPU rendering to be done. A detailed run-down of this estimate is available at https://redmine.replicant.us/projects/replicant/wiki/Tasks_funding#Graphics-acceleration So far we have a team of two people interested on working on this project (the two authors and submitters of this application). Both can commit to the project on a part-time regime (17.5 hours per week), which means that the project should be fully completed in about 6 months. We will make sure that everybody has a chance to apply for doing contract work. If we take the cost of a freelance developer in the USA (75 to 150 USD per hour) as a basis, to enable people living in Europe and the USA to apply, we can fund between 380 and 760 man-hours with the 50000 EUR budget. This should be enough to cover all work on software rendering plus the initial work on GPU rendering. As happens on all software projects, getting a precise time/effort evaluation is a difficult endeavour, specially when dealing with a project that is heavy on research such as this one. If the software rendering goals are not reached when the 50000 EUR budget runs out, or if the Replicant project deems it necessary to have GPU rendering, it will use its existing funds to pay for contract work if no volunteers are found to finish the project. The Replicant project will also make sure that the people working on this project have the necessary hardware to do it, for instance by shipping or reimbursing the purchase of a compatible smartphone with the Replicant project funds.
Compare your own project with existing or historical efforts.
Past Replicant versions have relied on patches to the Android framework to make software rendering work. These patches were quite specific for Replicant and had no use elsewhere. This made them unfit for upstreaming or sharing with any other project. Android's Project Treble new graphics stack allows us to follow a different approach this time. Instead of patching the Android framework, we will implement one of the well defined Android HALs (Hardware Abstraction Layer): the gralloc HAL. The end result will be a software library that can prove to be useful on several projects besides Replicant (e.g. Android-x86 project) and thus fit for upstreaming. Furthermore, past Replicant versions relied on Google's software renderers (ligAGL and libpixelflinger) for OpenGL ES support. As quite a few other Google's open-source projects, these two had no community behind them and got stalled as soon as Google deprecated them. This time will we take a different approach. Although our first graphics stack will rely on Google's SwiftShader renderer, we will then move our efforts into Mesa. Mesa is a big community project, with hundreds of active contributors and great community support. It includes the llvmpipe software renderer along with new drivers in development for GPUs present on current and future Replicant devices. Mesa should provide a stable and maintained platform for years to come.
What are significant technical challenges you expect to solve during the project, if any?
We expect to solve significant technical challenges during this project: 1. Implementation of the first Android gralloc library compatible with software rendering. 2. Development of free-software benchmarks for OpenGL ES on Android, used to test our optimizations to llvmpipe. 3. Optimization of llvmpipe by at least one order of magnitude. 4. Running an exynos based smartphone with fully free-software GPU graphics acceleration.
Describe the ecosystem of the project, and how you will engage with relevant actors and promote the outcomes?
This project will re-use code from several projects such as Android, drm-hwcomposer, Mesa and Lima driver. Whenever possible we will foster collaboration with these projects and submit our changes upstream. The Replicant project contributors and the FSF will supervise contractors to do the work. A blog post will announce that the Replicant project has got some funding for this specific task, and that it is looking for a contractor to work on it. This is to make sure that everyone has equal chances in the application process. Then the most suited contractor will be selected. Only contractors that already have worked on similar tasks as part of free and open source software projects will be chosen. This way we can look at their existing contributions and make sure that they are able to do the task before engaging with them. The Replicant project will also make sure that the contractor has or gets the hardware required to work on the task, before starting to work on it.
| Attachments | SEE TEMPLATE |
|---|
| Report | Comments |
|---|---|
| 01/2019 | "As of 11/2014 Paul Kocialkowski had Petty Cash of €36.00" is outdated as that was handled over in a sealed envelope to Denis Carikli who keeps them for the Replicant project |
| Price | What | People and/or location | Rationale | Result |
|---|---|---|---|---|
| €45.00 | 1x Odroid-U3 | David 'dllud' Ludovino | He needs it to test the hardware bringup and set-up of the Mali GPU with the mainline Lima kernel driver. According to him, people have been reporting some difficulty on the Galaxy SIII, while things seem to be working ok with ODROID U3. Also, at least one core Lima developer has access to one ODROID U3, and used it to add support for the Exynos4412 SoC. If he or GrimKriegor who works with him stumble upon many unknowns in the Galaxy SIII they can use the ODROID for some testing. |
* Denis 'GNUtoo' Carikli: Agreed * Joonas Kylmälä: Agreed * Filippo Bergamo: Agreed |
| €39.00 | 1x Odroid-U3 | Denis 'GNUtoo' Carikli | We have now someone IRC who is working to understand if it's possible to run a fully free bootloader on the Galaxy SIII. Since she knows a lot of people that could help as well, including people that know how to find bootrom exploits, we have increased a lot the probability of having a fully free bootloader on the Galaxy SIII and other devices with the Exynos 4412. There is also an u-boot port for the Galaxy SIII and similar devices by Simon Shields, which currently depends on a nonfree and non-redistributable first stage. When he sent that code upstream, it broke booting on the Odroid U3[1], so the code was not merged. This would allow GNUtoo or other Replicant contributors[2] get the support for the Galaxy SIII and similar devices merged upstream. References: ----------- [1]http://u-boot.10912.n7.nabble.com/PATCH-0-7-Exynos4412-SPL-support-td341181.html [2]GNUtoo could also bring it at the FOSDEM and pass it on to someone who would be interested in doing that work. |
* Denis 'GNUtoo' Carikli: Agreed * Joonas Kylmälä: Agreed * Filippo Bergamo: Agreed |
| Date | What | Provenance | Location |
|---|---|---|---|
| N/A | Money | Various donnations | FSF |
| Before 2020 (I don't remember precisely) | €36.00 in coins and/or cash in a sealed envelope | Donnations during the Capitole du libre conference in France. | At Denis Carikli's address |
| January 2020 | * 1 Odroid-U3 with eMMC * 1 plastic case for the Odroid-U3 * 1 power supply for the Odroid-U3 |
Bought with Replicant's money | At Denis Carikli's address |
| January 2020 | * 1 Odroid U3 * 1 plastic case for the Odroid-U3 * 1 power supply for the Odroid-U3 |
Bought with Replicant's money | At David Ludovino's address |
| 01/02/2020 | €74.25 in cash | Technoethical t-shirt sales | At Denis Carikli's address |
| December 2019 | * 1 Tarpaulin banner * 1 roll of plotter paper * 1 wide tip marker pen * 2 telescopic poles |
Bought with NLnet's funds. | At Denis Carikli's address |
| December 2020 | Flyers | Printed with NLnet's funds. | At Denis Carikli's address |
| February 2020 | Rectangular stickers with Replicant's logo | FSF | At Denis Carikli's address |
| February 2020 | Hexagonal stickers with Replicant's logo | NLnet | At Denis Carikli's address |
| ? | Maybe some other smartphones and tablets, not clear | Donations and purchases from Replicant's money | Former or current Replicant developers |
| December 2022 | 1 Galaxy Note II (GT-N7100) that looks new (in its original box with everything, looks never opened) | A Replicant user | At Denis Carikli's address |
Several devices were bought with Replicant's money.
They were typically used to do new ports, or to make sure that the new main Replicant developer doing most of the work could continue supporting a given device.
If GNUtoo's memory is good, one probably has been resold (with the money going to Replicant) because the port was too complicated (graphics were too slow).
Other devices were donated to the Replicant project and/or individuals working on it. It's not always clear to whom the devices are donated but donors typically donate them to enable to work on them and/or do something useful with them.
Even if it's not always clear who the device belongs to, at the end of the day it's not very important as the convention is, when meeting other developers that need the device to work on it, to bring and to pass it along there.
Developers having devices passed to them are typically Replicant developers, but potential other developers were not excluded if they wanted to work on things that were aligned with the goals of Replicant or freedom.
Here are the known devices where it is unclear if the device belongs to the individual or the Replicant project:
| Date | What | Provenance | Location | Comments |
|---|---|---|---|---|
| Before 2020 | GTA04 A4 | Individual donation during a conference (FOSDEM?) | Denis Carikli's address | |
| July 2019 | Galaxy Note (N7000) | Donation from Paul Kocialkowski at the Contributors Meeting in Paris. | Denis Carikli's address | |
| Before 2020 | Nexus One | Google's donation to Replicant when we were based on AOSP. | Paul Kocialkowski's address | This device no longer meets the freedom requirement of Replicant. Unless future advances make it possible to liberate it, or use it for other tasks that can improve freedom, it's not interesting anymore for anything beside Replicant's History. |
| Before 2020 | ? | ? | Paul Kocialkowski's address | |
| Before 2020 | ? | ? | Wolfgang Weidermeier address | |
| Around 2020 | Device(s) to work on ofono RIL | ? | Joey's address | |
| November 2019 | PinePhone | Donated by PINE64 | adjtm's address | |
| End of February 2020 | GalaxySIIGTI9100G CHN version with signed bootloader | Donation by packetup[m] from Insurgo | Denis Carikli's address | It was initially intended for doing some research, and ask Samsung for the u-boot code but GNUtoo forgot to check if there were signed versions of the device, and instead of ending with an unsigned device, he got a signed one. Still this enabled to spot the issue and document the device. |
| March 2020 | GalaxySGTI9000 | Donation by packetup[m] from Insurgo | Being shippped Denis Carikli's address | It will be used to keep XMM616 working on libsamsung-ipc as Replicant is the libsamsung-ipc upstream and that other projects are using it as well |
| Variant | Replicant compatible versions | SoC | Bootloader | Modem link | Modem protocol | RAM |
|---|---|---|---|---|---|---|
| Galaxy Nexus (GT-I9250) | Replicant 4.0, 4.2, 6.0 | OMAP 4460 | Signed | Isolated (MIPI) | samsung-ipc | 1G |
 |
Device | Galaxy Nexus (GT-I9250) |
| Manufacturer | Google/Samsung | |
| Release date | November 2011 | |
| Codename | maguro |
|
| Status | Maintained | |
| Variants | GSM: GT-I9250 | |
| Latest images | Replicant 6.0 0003 |
Replicant status for the Galaxy Nexus (GT-I9250): ReplicantStatus Replicant 6.0
To install Replicant on the Galaxy Nexus (GT-I9250), see the RecoveryInstallationWithHeimdall and MinorVersionUpgrade wiki pages.
Replicant build for the Galaxy Nexus (GT-I9250): GalaxyNexusI9250Build
Privacy/security issues on the Galaxy Nexus (GT-I9250): GalaxyNexusI9250PrivacySecurityIssues
| Component | Name | Source | Status |
|---|---|---|---|
| SoC | TI OMAP 4460 | Linux kernel | Linux kernel support |
| GPU | PowerVR SGX540 | https://wiki.lineageos.org/devices/maguro | Linux kernel support, proprietary userspace |
| Audio Codec | TWL6040 | Linux kernel, ifixit | Linux kernel support (ALSA) |
| Power management chip | Linux kernel support | ||
| Modem | XMM6260 | Linux kernel | Free userspace implementation: Samsung-RIL/libsamsung-ipc |
| Wi-Fi | BCM4330 | Linux kernel | Linux kernel support, proprietary loaded firmware |
| Bluetooth | |||
| NFC | PN544 | Android userspace | Linux kernel support |
| GPS | GSD4t | Android userspace | Proprietary userspace, no free implementation: GSD4t |
| Accelerometer | BMA250 | Linux kernel | Linux kernel support, free userspace |
| Compass | YAS530 | Kernel sources | Linux kernel support, free userspace |
In an Ifixit teardown of the device the Step 12 we can see the following comments: "Samsung KMVYL000LM Multichip Memory Package, which we believe to house 512 MB of RAM in addition to the main processor." While the device has 1G of RAM, the SOC is probably in this chip package through techniques like package on package or using wire bonding to put different chips together in a single package.
See GalaxyNexusI9250Pit for PIT partition table.
| PIT | Linux name | mount point | partition type | block device | Description |
|---|---|---|---|---|---|
| system | /system | ext4 | mmcblk0p10 | system partition | |
| boot | None | bootimage (mkbootimg) | mmcblk0p7 | boot.img partition | |
| recovery | None | bootimage (mkbootimg) | mmcblk0p8 | recovery partition | |
| userdata | /data | ext4 | mmcblk0p12 | data partition | |
| efs | /factory | ext4 | mmcblk0p3 | modem data partition (content) | |
This page explains how to build Replicant for the Galaxy Nexus (I9250).
Do not build as root, always build as user.
See the build tips if you are facing issues.
All of the following build commands need to be run in the source tree root folder.
First, the toolchain needs to be built for replicant 6:
./vendor/replicant/build-toolchain
If you have executed any of the commands below and you want to run the toolchain build again, you will need to open a new shell.
Then, prepare the shell environment for the Replicant build:
. build/envsetup.sh lunch replicant_maguro-userdebug
Now you can start the build:
parallel_tasks=$(echo "$(grep 'processor' /proc/cpuinfo | wc -l ) + 1" | bc) make -j$parallel_tasks bacon
The -jn argument indicates the number of parallel tasks during the build. You can remove it from the command line to have only one task at a time.$parallel_tasks holds an optimized number of parallel tasks for your hardware. You may want to reduce this number if e.g. the computer runs out of RAM during the build.
Finally, sign the resulting images for replicant 6:
./vendor/replicant/sign-build maguro
The first time you run the script, it will ask you a few questions that are needed to generate the necessary signing keys.
out/dist/maguro/out/host/linux-x86/bin/Warning: installing an operating system, such as Replicant, may void your device's warranty and will erase the data stored on the device.
In order to install Replicant on your device, it is assumed that you have a computer running a GNU/Linux operating system and everything necessary to connect your device to the computer through USB available. Moreover, it is assumed that anyone performing the installation knows how to use command lines in a terminal and has basic knowledge about it.
Some preliminary steps may be necessary to achieve best compatibility with your device. These steps may require more advanced technical skills than the rest of the process: make sure you know what you are doing!
If your device was SIM-unlocked (using a code or another procedure), you must keep the nv_data.bin file from your current installation. Make sure ADB is running as root.
adb shell mount -o remount,rw /factory mkdir galaxy_nexus_efs_backup && cd galaxy_nexus_efs_backup adb pull /factory/ adb shell "cat /data/radio/nv_data.bin > /factory/nv_data.bin" adb shell "cat /data/radio/nv_data.bin.md5 > /factory/nv_data.bin.md5"
This will create a copy of the contents of /factory in the galaxy_nexus_efs_backup directory. Keep these files around as a backup in case anything goes wrong with nv_data.bin.
The first step in the installation process is to download and set up the files that will be used to install Replicant to the device. The files must be downloaded on your computer first.
1. Find out what the latest image is: check out the Last image part of the general table on GalaxyNexusI9250
2. Download all the files listed for the device (including the checksum and the signatures) on ReplicantImages for the latest image
2. Make sure you have added the Replicant release key to your GPG keyring
3. Check the signature of the files:
gpg --armor --verify path/to/replicant-6.0-maguro.zip.asc path/to/replicant-6.0-maguro.zip gpg --armor --verify path/to/recovery-maguro.img.asc path/to/recovery-maguro.img
sha256sum -c maguro.sha256
The fastboot tool is required to flash the recovery image to the device.
Instructions to install fastboot: ToolsInstallation
1. Make sure the device is started up and has an Android system running
2. Connect the USB cable to both the computer and the device
3. Enable USB mass storage on the device
4. Mount the mass storage on the computer
5. Copy the replicant-6.0-maguro.zip file at the origin of the mass storage
6. Safely unmount the mass storage on the computer
7. Disable USB mass storage on the device
Instructions to install ADB: ToolsInstallation
The next step in the installation process is to prepare the device for fastboot mode.
1. Make sure the device is completely turned off and the USB cable is disconnected from the device
2. Start the device by holding the following key combination: Volume down, Volume up, Power
3. Hold the key combination until the device shows Fastboot mode
4. Connect the USB cable to both the computer and the device
If this is the first time you are flashing an operating system to your device, you'll have to unlock it first. If this is not the case, you can skip that part.
Beware: all data stored on the internal storage will be lost during that operation.
1. Unlock the bootloader:
fastboot oem unlock
Now that both the computer and the device are set up, it is time to actually install the images to the device.
1. Install the recovery image to the device:
fastboot flash recovery path/to/recovery-maguro.img
2. Select recovery mode (using the volume keys to navigate and the power key to select)
3. Make sure the device reboots to recovery
A data wipe is necessary if you switch from the factory image or a different Android distribution to Replicant. You also need to do a data wipe when upgrading to a new major release (e.g. from Replicant 4.2 to Replicant 6.0). Only when updating to a new minor release (e.g. from Replicant 6.0 0001 to Replicant 6.0 0002), a data wipe is usually not required.
4. Select Factory reset
5. Select Wipe data (keep media)
6. Confirm the data wipe by selecting Yes
7. Press the back key (if necessary) to get back to the general menu
8. Select Apply update
9. Select Choose from emulated
10. Select the system zip: replicant-6.0-maguro.zip
Note: if your device was running Android 4.2 and later, it may be located in the 0 directory
11. Confirm the installation
9. Select Apply from ADB
10. Back to the host computer, load the system zip with sideload:
adb sideload path/to/replicant-6.0-maguro.zip
12. Press the back key (if necessary) to get back to the general menu
If you did the data wipe after step 2, you will need to do a factory reset as well:
13. Select Factory reset
14. Select Full factory reset
15. Confirm the factory reset by selecting Yes
16. Press the back key (if necessary) to get back to the general menu
17. Select Reboot system now to reboot the device
Your device should now be running Replicant!
Some hardware functionalities require firmwares to be functional.
If you are interested in writing free software replacements for these firmware files, please contact us.
Firmwares are programs that do not run on the main CPU: instead, they run on separate chips. Some firmwares come pre-installed on the chip and some others need to be loaded by the CPU.
Since these firmwares are non-free software, we do not recommend using them nor do we distribute them.
| Firmware location | Related chip | Function |
| /system/vendor/firmware/fw_bcmdhd.bin | BCM4330 | Wi-Fi |
| /system/vendor/firmware/fw_bcmdhd_apsta.bin | BCM4330 | Wi-Fi Host |
| /system/vendor/firmware/bcmdhd.cal | BCM4330 | Wi-Fi calibration |
| /system/vendor/firmware/bcm4330.hcd | BCM4330 | Bluetooth |
| /system/vendor/firmware/libpn544_fw.so This file contains non-free software that will also be executed by the CPU! | PN544 | NFC |
| /system/vendor/firmware/ducati-m3.bin | Ducati M3 | Hardware media encoding/decoding, Camera |
$ heimdall print-pit Heimdall v1.4.2 Copyright (c) 2010-2017 Benjamin Dobell, Glass Echidna http://www.glassechidna.com.au/ This software is provided free of charge. Copying and redistribution is encouraged. If you appreciate this software and you would like to support future development please consider donating: http://www.glassechidna.com.au/donate/ Initialising connection... Detecting device... Claiming interface... Setting up interface... Initialising protocol... Protocol initialisation successful. Beginning session... Some devices may take up to 2 minutes to respond. Please be patient! Session begun. Downloading device's PIT file... PIT file download successful. Entry Count: 18 Unknown 1: 0 Unknown 2: 0 Unknown 3: 0 Unknown 4: 0 Unknown 5: 0 Unknown 6: 0 Unknown 7: 0 Unknown 8: 0 --- Entry #0 --- Binary Type: 0 (AP) Device Type: 2 (MMC) Identifier: 0 Attributes: 0 (Read-Only) Update Attributes: 0 Partition Block Size/Offset: 0 Partition Block Count: 0 File Offset (Obsolete): 0 File Size (Obsolete): 0 Partition Name: gang Flash Filename: emmc.img FOTA Filename: --- Entry #1 --- Binary Type: 0 (AP) Device Type: 2 (MMC) Identifier: 1 Attributes: 0 (Read-Only) Update Attributes: 0 Partition Block Size/Offset: 0 Partition Block Count: 0 File Offset (Obsolete): 0 File Size (Obsolete): 0 Partition Name: gpt Flash Filename: partition-table.img FOTA Filename: --- Entry #2 --- Binary Type: 0 (AP) Device Type: 2 (MMC) Identifier: 2 Attributes: 0 (Read-Only) Update Attributes: 0 Partition Block Size/Offset: 0 Partition Block Count: 0 File Offset (Obsolete): 0 File Size (Obsolete): 0 Partition Name: xloader Flash Filename: xloader.img FOTA Filename: --- Entry #3 --- Binary Type: 0 (AP) Device Type: 2 (MMC) Identifier: 3 Attributes: 0 (Read-Only) Update Attributes: 0 Partition Block Size/Offset: 0 Partition Block Count: 0 File Offset (Obsolete): 0 File Size (Obsolete): 0 Partition Name: sbl Flash Filename: sbl.img FOTA Filename: --- Entry #4 --- Binary Type: 0 (AP) Device Type: 2 (MMC) Identifier: 4 Attributes: 1 (Read/Write) Update Attributes: 0 Partition Block Size/Offset: 8192 Partition Block Count: 40960 File Offset (Obsolete): 0 File Size (Obsolete): 0 Partition Name: efs Flash Filename: efs.img FOTA Filename: --- Entry #5 --- Binary Type: 0 (AP) Device Type: 2 (MMC) Identifier: 5 Attributes: 0 (Read-Only) Update Attributes: 0 Partition Block Size/Offset: 49152 Partition Block Count: 16384 File Offset (Obsolete): 0 File Size (Obsolete): 0 Partition Name: param Flash Filename: FOTA Filename: --- Entry #6 --- Binary Type: 0 (AP) Device Type: 2 (MMC) Identifier: 6 Attributes: 0 (Read-Only) Update Attributes: 0 Partition Block Size/Offset: 65536 Partition Block Count: 8192 File Offset (Obsolete): 0 File Size (Obsolete): 0 Partition Name: misc Flash Filename: FOTA Filename: --- Entry #7 --- Binary Type: 0 (AP) Device Type: 2 (MMC) Identifier: 7 Attributes: 0 (Read-Only) Update Attributes: 0 Partition Block Size/Offset: 73728 Partition Block Count: 8192 File Offset (Obsolete): 0 File Size (Obsolete): 0 Partition Name: dgs Flash Filename: FOTA Filename: --- Entry #8 --- Binary Type: 0 (AP) Device Type: 2 (MMC) Identifier: 8 Attributes: 0 (Read-Only) Update Attributes: 0 Partition Block Size/Offset: 81920 Partition Block Count: 16384 File Offset (Obsolete): 0 File Size (Obsolete): 0 Partition Name: boot Flash Filename: boot.img FOTA Filename: --- Entry #9 --- Binary Type: 0 (AP) Device Type: 2 (MMC) Identifier: 9 Attributes: 0 (Read-Only) Update Attributes: 0 Partition Block Size/Offset: 98304 Partition Block Count: 24448 File Offset (Obsolete): 0 File Size (Obsolete): 0 Partition Name: recovery Flash Filename: recovery.img FOTA Filename: --- Entry #10 --- Binary Type: 1 (CP) Device Type: 2 (MMC) Identifier: 10 Attributes: 0 (Read-Only) Update Attributes: 0 Partition Block Size/Offset: 122880 Partition Block Count: 32768 File Offset (Obsolete): 0 File Size (Obsolete): 0 Partition Name: radio Flash Filename: radio.img FOTA Filename: --- Entry #11 --- Binary Type: 0 (AP) Device Type: 2 (MMC) Identifier: 11 Attributes: 1 (Read/Write) Update Attributes: 0 Partition Block Size/Offset: 155648 Partition Block Count: 1339392 File Offset (Obsolete): 0 File Size (Obsolete): 0 Partition Name: system Flash Filename: system.img FOTA Filename: --- Entry #12 --- Binary Type: 0 (AP) Device Type: 2 (MMC) Identifier: 12 Attributes: 1 (Read/Write) Update Attributes: 0 Partition Block Size/Offset: 1495040 Partition Block Count: 884736 File Offset (Obsolete): 0 File Size (Obsolete): 0 Partition Name: cache Flash Filename: cache.img FOTA Filename: --- Entry #13 --- Binary Type: 0 (AP) Device Type: 2 (MMC) Identifier: 13 Attributes: 1 (Read/Write) Update Attributes: 0 Partition Block Size/Offset: 2379776 Partition Block Count: 28397534 File Offset (Obsolete): 0 File Size (Obsolete): 0 Partition Name: userdata Flash Filename: userdata.img FOTA Filename: --- Entry #14 --- Binary Type: 0 (AP) Device Type: 2 (MMC) Identifier: 14 Attributes: 1 (Read/Write) Update Attributes: 0 Partition Block Size/Offset: 33554432 Partition Block Count: 0 File Offset (Obsolete): 0 File Size (Obsolete): 0 Partition Name: efs-cdma Flash Filename: efs-cdma.img FOTA Filename: --- Entry #15 --- Binary Type: 0 (AP) Device Type: 1 (File/FAT) Identifier: 15 Attributes: 1 (Read/Write) Update Attributes: 0 Partition Block Size/Offset: 33554432 Partition Block Count: 0 File Offset (Obsolete): 0 File Size (Obsolete): 0 Partition Name: radio-cdma Flash Filename: radio-cdma.img FOTA Filename: --- Entry #16 --- Binary Type: 0 (AP) Device Type: 2 (MMC) Identifier: 16 Attributes: 0 (Read-Only) Update Attributes: 0 Partition Block Size/Offset: 0 Partition Block Count: 0 File Offset (Obsolete): 0 File Size (Obsolete): 0 Partition Name: bootloader Flash Filename: bootloader.img FOTA Filename: --- Entry #17 --- Binary Type: 0 (AP) Device Type: 2 (MMC) Identifier: 17 Attributes: 0 (Read-Only) Update Attributes: 0 Partition Block Size/Offset: 122752 Partition Block Count: 128 File Offset (Obsolete): 0 File Size (Obsolete): 0 Partition Name: metadata Flash Filename: FOTA Filename: Ending session... Rebooting device... Releasing device interface...
See SamsungSerial for the hardware setup.
Adding loglevel=8 fiq_debugger.console_enable=1 fiq_debugger.no_sleep=1 to the kernel command line enables to see some of the boot of the kernel without having to recompile the kernel.
Though it requires to repack a boot.img to add the commandline arguments.
IMAGE ?= boot.img
EXTRA_CMDLINE ?= loglevel=8 fiq_debugger.console_enable=1 fiq_debugger.no_sleep=1
.PHONY: $(IMAGE) flash
$(IMAGE):
unbootimg --kernel kernel \
--ramdisk ramdisk \
-i ../$(IMAGE)
mkbootimg \
--kernel kernel \
--ramdisk ramdisk \
--base 0x80000000 \
--cmdline "androidboot.hardware=tuna ${EXTRA_CMDLINE}" \
-o $(IMAGE)
flash:
fastboot flash boot $(IMAGE)
fastboot flash recovery $(IMAGE)
fastboot boot $(IMAGE)
At boot we then have the following:
[sbl_board_charger_init_post] : Succeed set model data : 0x78!!!!! ====== VCELL : 402500, SOC : 92, nType : 4 ====== [Charger] nScaledVCELL : 402500000, nDesriedSOC, : 90, nMaxSOC : 110, nMinSOC : 70 [ omap_power_get_reset_source :47] PRM_RSTST : 0x1 [ __omap_usbacc_test_donwload_by_musb :280] nDeviceType : 0x4 [ omap_usbacc_get_reboot_reason :333] nJigStatus = 0x00000001 [ __sbl_board_hw_init_late :706] final reboot mode in cable = 0x20000 [ __sbl_board_hw_init_late :717] Wake up by TA / USB / JIG * FB base addr = 0xbea70000! * PANEL_S6E8AA0_ID_READ : 0x12, 0x8e, 0x9b. [ omap_power_get_reset_source :47] PRM_RSTST : 0x1 message.command = message.status = message.recovery = �<hit enter to activate fiq debugger> [ 0.000000] Initializing cgroup subsys cpu [ 0.000000] Linux version 3.0.101-replicant (wolfi@machinist) (gcc version 5.4.1 20160919 (15:5.4.1+svn241155-1) ) #1 SMP PREEMPT Sun Dec 10 11:40:22 UTC 2017 [ 0.000000] CPU: ARMv7 Processor [412fc09a] revision 10 (ARMv7), cr=10c5387d [ 0.000000] CPU: VIPT nonaliasing data cache, VIPT aliasing instruction cache [ 0.000000] Machine: Tuna [ 0.000000] android_display: setting default resolution 720*1280, bpp=4 [ 0.000000] android_display: tiler1d 29491200 [ 0.000000] android_display: setting fb0.vram to 7864320 [ 0.000000] android_display: setting vram to 7864320 at address 0xbea00000 [ 0.000000] android_display: ion carveouts: 104726528 tiler2d, 0 nonsecure [ 0.000000] omap4_total_ram_size = 0x40000000 [ 0.000000] omap4_smc_size = 0x300000 [ 0.000000] omap4_ion_heap_secure_input_size = 0x900000 [ 0.000000] omap4_ion_heap_secure_output_wfdhdcp_size = 0x0 [ 0.000000] omap4_ducati_heap_size = 0x6900000 [ 0.000000] omap4_ion_heap_tiler_mem_size = 0x0 [ 0.000000] omap4_ion_heap_nonsec_tiler_mem_size = 0x0 [ 0.000000] omap4_smc_addr = 0xbfd00000 [ 0.000000] omap4_ion_heap_secure_input_addr = 0xba300000 [ 0.000000] omap4_ion_heap_secure_output_wfdhdcp_addr = 0xba300000 [ 0.000000] omap4_ducati_heap_addr = 0xb3a00000 [ 0.000000] omap4_ion_heap_tiler_mem_addr = 0xb3a00000 [ 0.000000] omap4_ion_heap_nonsec_tiler_mem_addr = 0xb3a00000 [ 0.000000] Reserving CMA IPU + RPMSG region at address = 0xb3800000 with size = 0x7800000 [ 0.000000] cma: CMA: reserved 120 MiB at b3800000 [ 0.000000] CMA RPMSG region: address = 0xb3a00000, size = 0x8c000 [ 0.000000] CMA IPU region: address = 0xb3a8c000, size = 0x7174000 [ 0.000000] omap_ion_init: secure_input id=2 [ba300000-bac00000] size=900000 [ 0.000000] omap_ion_init: secure_output_wfdhdcp id=5 [ba300000-ba300000] size=0 [ 0.000000] omap_ion_init: tiler id=1 [b3a00000-b3a00000] size=0 [ 0.000000] omap_ion_init: nonsecure_tiler id=3 [b3a00000-b3a00000] size=0 [ 0.000000] omap_ion_init: system id=0 [0-0] size=0 [ 0.000000] omap_ion_init: tiler_reservation id=4 [0-0] size=0 [ 0.000000] Reserving 8388608 bytes SDRAM for VRAM [ 0.000000] Memory policy: ECC disabled, Data cache writealloc [ 0.000000] OMAP4460 ES1.1 [ 0.000000] SRAM: Mapped pa 0x4030d000 to va 0xfe40d000 size: 0x1000 [ 0.000000] On node 0 totalpages: 259584 [ 0.000000] free_area_init_node: node 0, pgdat c09580a0, node_mem_map c09e3000 [ 0.000000] Normal zone: 256 pages used for memmap [ 0.000000] Normal zone: 0 pages reserved [ 0.000000] Normal zone: 32512 pages, LIFO batch:7 [ 0.000000] HighMem zone: 1792 pages used for memmap [ 0.000000] HighMem zone: 225024 pages, LIFO batch:31 [ 0.000000] PERCPU: Embedded 7 pages/cpu @c11ea000 s7744 r8192 d12736 u32768 [ 0.000000] pcpu-alloc: s7744 r8192 d12736 u32768 alloc=8*4096 [ 0.000000] pcpu-alloc: [0] 0 [0] 1 [ 0.000000] Built 1 zonelists in Zone order, mobility grouping on. Total pages: 257536 [ 0.000000] Kernel command line: console=ttyFIQ0 androidboot.console=ttyFIQ0 mem=1G vmalloc=768M omap_wdt.timer_margin=30 no_console_suspend androidboot.hardware=tuna loglevel=8 fiq_debugger.console_enable=1 fiq_debugger.no_sleep=1 androidboot.serialno=016B756D14021016 androidboot.bootloader=PRIMELA03 androidboot.baseband=I9250XXLA2 lcd_bootfb=0xbea70000 mms_ts.panel_id=18 androidboot.macaddr= [ 0.000000] PID hash table entries: 512 (order: -1, 2048 bytes) [ 0.000000] Dentry cache hash table entries: 16384 (order: 4, 65536 bytes) [ 0.000000] Inode-cache hash table entries: 8192 (order: 3, 32768 bytes) [ 0.000000] allocated 4194304 bytes of page_cgroup [ 0.000000] please try 'cgroup_disable=memory' option if you don't want memory cgroups [ 0.000000] Memory: 512MB 488MB 14MB = 1014MB total [ 0.000000] Memory: 891864k/891864k available, 156712k reserved, 784384K highmem [ 0.000000] Virtual kernel memory layout: [ 0.000000] vector : 0xffff0000 - 0xffff1000 ( 4 kB) [ 0.000000] fixmap : 0xfff00000 - 0xfffe0000 ( 896 kB) [ 0.000000] DMA : 0xff000000 - 0xffe00000 ( 14 MB) [ 0.000000] vmalloc : 0xc8800000 - 0xf8000000 ( 760 MB) [ 0.000000] lowmem : 0xc0000000 - 0xc8000000 ( 128 MB) [ 0.000000] pkmap : 0xbfe00000 - 0xc0000000 ( 2 MB) [ 0.000000] modules : 0xbf000000 - 0xbfe00000 ( 14 MB) [ 0.000000] .init : 0xc0008000 - 0xc0068000 ( 384 kB) [ 0.000000] .text : 0xc0068000 - 0xc08f0000 (8736 kB) [ 0.000000] .data : 0xc08f0000 - 0xc095a400 ( 425 kB) [ 0.000000] .bss : 0xc095a424 - 0xc09e2cf0 ( 547 kB) [ 0.000000] SLUB: Genslabs=13, HWalign=32, Order=0-3, MinObjects=0, CPUs=2, Nodes=1 [ 0.000000] Preemptible hierarchical RCU implementation. [ 0.000000] NR_IRQS:410 [ 0.000000] omap_hwmod: dpll_mpu_m2_ck: missing clockdomain for dpll_mpu_m2_ck. [ 0.000000] OMAP clockevent source: GPTIMER1 at 32768 Hz [ 0.000000] sched_clock: 32 bits at 32kHz, resolution 30517ns, wraps every 131071999ms [ 0.000061] Calibrating delay loop... 1194.24 BogoMIPS (lpj=4665344) [ 0.015686] pid_max: default: 32768 minimum: 301 [ 0.070648] Security Framework initialized [ 0.070648] SELinux: Initializing. [ 0.070648] SELinux: Starting in permissive mode [ 0.070648] Mount-cache hash table entries: 512 [ 0.070648] Initializing cgroup subsys debug [ 0.070648] Initializing cgroup subsys cpuacct [ 0.070648] Initializing cgroup subsys memory [ 0.071960] Initializing cgroup subsys freezer [ 0.071960] Initializing cgroup subsys bfqio [ 0.071990] CPU: Testing write buffer coherency: ok [ 0.071990] ftrace: allocating 23423 entries in 69 pages [ 0.099975] hw perfevents: enabled with ARMv7 Cortex-A9 PMU driver, 7 counters available [ 0.100128] L310 cache controller enabled [ 0.100128] l2x0: 16 ways, CACHE_ID 0x410000c7, AUX_CTRL 0x5e470000, Cache size: 1048576 B [ 0.178161] CPU1: Booted secondary processor [ 0.209411] Brought up 2 CPUs [ 0.209411] SMP: Total of 2 processors activated (2388.48 BogoMIPS). [ 0.209686] omap_hwmod: _populate_mpu_rt_base found no _mpu_rt_va for emif_fw [ 0.213470] omap_hwmod: _populate_mpu_rt_base found no _mpu_rt_va for l3_instr [ 0.213500] omap_hwmod: _populate_mpu_rt_base found no _mpu_rt_va for l3_main_1 [ 0.213500] omap_hwmod: _populate_mpu_rt_base found no _mpu_rt_va for l3_main_2 [ 0.213531] omap_hwmod: _populate_mpu_rt_base found no _mpu_rt_va for l4_abe [ 0.213531] omap_hwmod: _populate_mpu_rt_base found no _mpu_rt_va for l4_cfg [ 0.213562] omap_hwmod: _populate_mpu_rt_base found no _mpu_rt_va for l4_per [ 0.213562] omap_hwmod: _populate_mpu_rt_base found no _mpu_rt_va for l4_wkup [ 0.213592] omap_hwmod: _populate_mpu_rt_base found no _mpu_rt_va for mpu_private [ 0.213592] omap_hwmod: _populate_mpu_rt_base found no _mpu_rt_va for sl2if [ 0.213592] omap_hwmod: _populate_mpu_rt_base found no _mpu_rt_va for thermal_sensor [ 0.213775] omap_hwmod: _populate_mpu_rt_base found no _mpu_rt_va for usbhs_ehci [ 0.213775] omap_hwmod: l3_div_ck: missing clockdomain for l3_div_ck. [ 0.213775] omap_hwmod: l4_div_ck: missing clockdomain for l4_div_ck. [ 0.217193] _omap4_module_wait_ready: Timeout waiting for module enable (mcpdm_fck: clkctrl = 0x30002) [ 0.222106] omap_hwmod: mcpdm: cannot be enabled (3) [ 0.224426] print_constraints: dummy: [ 0.225006] NET: Registered protocol family 16 [ 0.231140] GPMC revision 6.0 [ 0.231140] EMIF0 is enabled with IRQ142 [ 0.231140] EMIF1 is enabled with IRQ143 [ 0.231140] Last reset was cold reset (PRM_RSTST=0x1) [ 0.232452] HSI: device registered as omap_hwmod: hsi [ 0.233001] OMAP GPIO hardware version 0.1 [ 0.233886] omap_mux_init: Add partition: #1: core, flags: 2 [ 0.235565] omap_mux_init: Add partition: #2: wkup, flags: 2 [ 0.235809] Tuna HW revision: 09 (Maguro 8th Sample), cpu OMAP4460 ES1.1 [ 0.237884] Using [ 0.241577] _omap_mux_init_gpio: Multiple gpio paths (2) for gpio102 [ 0.241577] omap_mux_init_gpio: Could not set gpio102 [ 0.242065] _omap_mux_init_gpio: Multiple gpio paths (2) for gpio101 [ 0.242095] omap_mux_init_gpio: Could not set gpio101 [ 0.242248] _omap_mux_init_gpio: Multiple gpio paths (2) for gpio100 [ 0.242309] omap_mux_init_gpio: Could not set gpio100 [ 0.242309] hw-breakpoint: found 6 breakpoint and 1 watchpoint registers. [ 0.242950] hw-breakpoint: 1 breakpoint(s) reserved for watchpoint single-step. [ 0.242950] hw-breakpoint: maximum watchpoint size is 4 bytes. [ 0.247924] OMAP DMA hardware revision 0.0 [ 0.248443] omap_rproc_get_pool: carveout memory is unavailable: 0x0, 0x0 [ 0.257873] bio: create slab <bio-0> at 0 [ 0.258270] print_constraints: vwl1271: 2000 mV [ 0.258270] i2c-core: driver [twl] using legacy suspend method [ 0.259094] i2c-core: driver [twl] using legacy resume method [ 0.259094] SCSI subsystem initialized [ 0.260345] usbcore: registered new interface driver usbfs [ 0.260833] usbcore: registered new interface driver hub [ 0.260925] usbcore: registered new device driver usb [ 0.261993] i2c-gpio i2c-gpio.5: using pins 98 (SDA) and 99 (SCL) [ 0.262237] omap_i2c omap_i2c.1: bus 1 rev4.0 at 400 kHz [ 0.262237] Skipping twl internal clock init and using bootloader value (unknown osc rate) [ 0.266479] twl6030: PIH (irq 39) chaining IRQs 368..387 [ 0.268676] print_constraints: VUSB: 3300 mV normal standby [ 0.269256] print_constraints: VMMC: 1800 mV normal standby [ 0.270019] print_constraints: VPP: 1800 <--> 2500 mV at 1900 mV normal standby [ 0.270385] print_constraints: VUSIM: 2200 mV normal standby [ 0.270385] print_constraints: VCXIO: 1800 mV normal standby [ 0.270385] print_constraints: VDAC: 1800 mV normal standby [ 0.271881] print_constraints: VAUX1_6030: 3000 mV normal standby [ 0.272674] print_constraints: VAUX2_6030: 1200 <--> 2800 mV at 1800 mV normal standby [ 0.273071] print_constraints: VAUX3_6030: 3100 mV normal standby [ 0.273925] print_constraints: VDD3: [ 0.274627] print_constraints: VMEM: at 1250 mV [ 0.275482] print_constraints: V2V1: 2100 mV normal standby [ 0.276245] print_constraints: VANA: 2100 mV normal standby [ 0.276947] print_constraints: CLK32KG: [ 0.277984] print_constraints: CLK32KAUDIO: [ 0.278198] omap_i2c omap_i2c.2: bus 2 rev4.0 at 400 kHz [ 0.278564] omap_i2c omap_i2c.3: bus 3 rev4.0 at 400 kHz [ 0.278869] omap_i2c omap_i2c.4: bus 4 rev4.0 at 400 kHz [ 0.279815] omap-rproc omap-rproc.0: dsp is available [ 0.280334] omap-rproc omap-rproc.1: ipu is available [ 0.280334] Advanced Linux Sound Architecture Driver Version 1.0.24. [ 0.280334] Bluetooth: Core ver 2.16 [ 0.280334] NET: Registered protocol family 31 [ 0.281280] Bluetooth: HCI device and connection manager initialized [ 0.281280] Bluetooth: HCI socket layer initialized [ 0.281311] Bluetooth: L2CAP socket layer initialized [ 0.281311] Bluetooth: SCO socket layer initialized [ 0.281799] cfg80211: Calling CRDA to update world regulatory domain [ 0.281951] Switching to clocksource 32k_counter [ 0.287506] Switched to NOHz mode on CPU #0 [ 0.287536] Switched to NOHz mode on CPU #1 [ 0.304016] musb-hdrc: version 6.0, musb-dma, otg (peripheral+host) [ 0.304565] musb-hdrc: ConfigData=0xde (UTMI-8, dyn FIFOs, bulk combine, bulk split, HB-ISO Rx, HB-ISO Tx, SoftConn) [ 0.304626] musb-hdrc: MHDRC RTL version 2.0 [ 0.304656] musb-hdrc: setup fifo_mode 4 [ 0.304656] musb-hdrc: 28/31 max ep, 16384/16384 memory [ 0.304901] musb-hdrc musb-hdrc: USB OTG mode controller at fc0ab000 using DMA, IRQ 124 [ 0.305206] NET: Registered protocol family 2 [ 0.305206] IP route cache hash table entries: 4096 (order: 2, 16384 bytes) [ 0.306427] TCP established hash table entries: 16384 (order: 5, 131072 bytes) [ 0.307037] TCP bind hash table entries: 16384 (order: 5, 196608 bytes) [ 0.307037] TCP: Hash tables configured (established 16384 bind 16384) [ 0.307403] TCP reno registered [ 0.307403] UDP hash table entries: 128 (order: 0, 4096 bytes) [ 0.307403] UDP-Lite hash table entries: 128 (order: 0, 4096 bytes) [ 0.307952] NET: Registered protocol family 1 [ 0.307952] Trying to unpack rootfs image as initramfs... [ 0.388488] Freeing initrd memory: 984K [ 0.854309] PHOENIX_LAST_TURNOFF_STS: 0x01 [ 1.973510] console [ttyFIQ0] enabled [ 1.973510] Registered FIQ tty driver c7908b40 [ 1.982574] ram_console: got buffer at a0000000, size 200000 [ 1.988281] ram_console: uncorrectable error in header [ 1.993713] ram_console: no valid data in buffer (sig = 0xc0c4c0c0) [ 2.024993] console [ram-1] enabled [ 2.036987] omap-iommu omap-iommu.0: ducati registered [ 2.036987] omap-iommu omap-iommu.1: tesla registered [ 2.050048] audit: initializing netlink socket (disabled) [ 2.050048] type=2000 audit(2.023:1): initialized [ 2.061523] highmem bounce pool size: 64 pages [ 2.080383] NTFS driver 2.1.30 [Flags: R/O]. [ 2.088287] fuse init (API version 7.16) [ 2.088287] msgmni has been set to 451 [ 2.097930] SELinux: Registering netfilter hooks [ 2.105377] io scheduler noop registered [ 2.109436] io scheduler deadline registered [ 2.113922] io scheduler cfq registered (default) [ 2.114044] io scheduler bfq registered [ 2.114044] BFQ I/O-scheduler: v7r8 [ 2.127624] OMAP DSS rev 4.0 [ 2.133148] Keyboard driver not present [ 2.137634] dsscomp: initializing. [ 2.137634] misc dsscomp: display0=s6e8aa0 [ 2.145965] misc dsscomp: display1=hdmi_panel [ 2.150177] misc dsscomp: found 2 displays and 4 overlays, WB overlay 1 [ 2.157562] could not allocate slot [ 2.172393] omap-rproc omap-rproc.1: powering up ipu [ 2.178192] virtio_rpmsg_bus virtio0: rpmsg backend virtproc probed successfully [ 2.178192] virtio_rpmsg_bus virtio1: rpmsg backend virtproc probed successfully [ 2.193939] omap_uart.0: ttyO0 at MMIO 0x4806a000 (irq = 104) is a OMAP UART0 [ 2.202362] omap_uart.1: ttyO1 at MMIO 0x4806c000 (irq = 105) is a OMAP UART1 [ 2.210235] omap_uart.3: ttyO3 at MMIO 0x4806e000 (irq = 102) is a OMAP UART3 [ 2.218048] omap_ion_probe: adding heap secure_input of type 2 with ba300000@900000 [ 2.226226] omap_ion_probe: adding heap secure_output_wfdhdcp of type 2 with ba300000@0 [ 2.234436] omap_ion_probe: adding heap tiler of type 4 with b3a00000@0 [ 2.234466] omap_ion_probe: adding heap nonsecure_tiler of type 4 with b3a00000@0 [ 2.248992] omap_ion_probe: adding heap system of type 0 with 0@0 [ 2.255249] omap_ion_probe: adding heap tiler_reservation of type 5 with 0@0 [ 2.267364] brd: module loaded [ 2.275177] loop: module loaded [ 2.275177] zram: Created 1 device(s) ... [ 2.284790] input: barometer as /devices/virtual/input/input0 [ 2.291107] sec_jack_probe : Registering jack driver [ 2.296752] i2c i2c-4: mpu_probe: 0 [ 2.329528] i2c i2c-4: Installing irq using 205 [ 2.334350] i2c i2c-4: Module Param interface = mpuirq [ 2.339691] i2c-core: driver [mpu3050] using legacy suspend method [ 2.346282] i2c-core: driver [mpu3050] using legacy resume method [ 2.346282] mpu_init: Probe name mpu3050 [ 2.346282] i2c i2c-4: bma250_mod_probe: bma250 [ 2.356781] i2c i2c-4: Installing Accel irq using 282 [ 2.386566] i2c i2c-4: mpu3050: +bma250 [ 2.390594] bma250_mod_init: Probe name bma250_mod [ 2.390594] i2c i2c-4: yas530_mod_probe: yas530 [ 2.400299] i2c i2c-4: Installing Compass irq using 336 [ 2.429687] i2c i2c-4: mpu3050: +yas530 [ 2.429687] yas530_mod_init: Probe name yas530_mod [ 3.376159] asoc: null-codec-dai <-> MultiMedia1 mapping ok [ 3.383300] asoc: null-codec-dai <-> MultiMedia2 mapping ok [ 3.390747] asoc: null-codec-dai <-> Voice mapping ok [ 3.397583] asoc: null-codec-dai <-> Tones mapping ok [ 3.404449] asoc: null-codec-dai <-> Vibra mapping ok [ 3.410614] asoc: null-codec-dai <-> MODEM mapping ok [ 3.416778] asoc: null-codec-dai <-> MultiMedia1 LP mapping ok [ 3.424682] asoc: FM Digital <-> omap-mcbsp-dai.1 mapping ok [ 3.431976] asoc: twl6040-dl1 <-> mcpdm-dl mapping ok [ 3.438537] asoc: dit-hifi <-> omap-mcasp-dai mapping ok [ 3.446563] twl6040-codec twl6040-codec: ASoC: Failed to create Aux/FM Stereo In debugfs file [ 3.456329] asoc: twl6040-dl1 <-> mcpdm-dl1 mapping ok [ 3.462860] asoc: twl6040-ul <-> mcpdm-ul1 mapping ok [ 3.468109] mmc0: new high speed MMC card at address 0001 [ 3.468994] asoc: twl6040-dl2 <-> mcpdm-dl2 mapping ok [ 3.469909] asoc: twl6040-vib <-> mcpdm-vib mapping ok [ 3.470947] asoc: Bluetooth <-> omap-mcbsp-dai.0 mapping ok [ 3.471923] asoc: Bluetooth <-> omap-mcbsp-dai.0 mapping ok [ 3.472900] asoc: FM Digital <-> omap-mcbsp-dai.1 mapping ok [ 3.473907] asoc: MODEM <-> omap-mcbsp-dai.1 mapping ok [ 3.474884] asoc: null-codec-dai <-> omap-abe-vxrec-dai mapping ok [ 3.476959] input: Tuna Headset Jack as /devices/platform/soc-audio/sound/card0/input5 [ 3.521820] mmcblk0: mmc0:0001 VYL00M 14.6 GiB [ 3.523712] asoc: hdmi-audio-codec <-> hdmi-audio-dai mapping ok [ 3.524230] ALSA device list: [ 3.524261] #0: TI OMAP4 Board [ 3.524261] #1: OMAP4HDMI [ 3.524383] GACT probability NOT on [ 3.524414] Mirror/redirect action on [ 3.524414] u32 classifier [ 3.524414] Actions configured [ 3.524444] Netfilter messages via NETLINK v0.30. [ 3.524505] nf_conntrack version 0.5.0 (15870 buckets, 63480 max) [ 3.526245] ctnetlink v0.93: registering with nfnetlink. [ 3.526275] NF_TPROXY: Transparent proxy support initialized, version 4.1.0 [ 3.526306] NF_TPROXY: Copyright (c) 2006-2007 BalaBit IT Ltd. [ 3.526794] xt_time: kernel timezone is -0000 [ 3.529449] ip_tables: (C) 2000-2006 Netfilter Core Team [ 3.529632] arp_tables: (C) 2002 David S. Miller [ 3.529693] TCP bic registered [ 3.529724] TCP cubic registered [ 3.529724] TCP westwood registered [ 3.529724] TCP htcp registered [ 3.529754] Initializing XFRM netlink socket [ 3.531097] NET: Registered protocol family 10 [ 3.539703] Mobile IPv6 [ 3.539764] ip6_tables: (C) 2000-2006 Netfilter Core Team [ 3.540130] IPv6 over IPv4 tunneling driver [ 3.547515] NET: Registered protocol family 17 [ 3.547576] NET: Registered protocol family 15 [ 3.547851] Bluetooth: RFCOMM TTY layer initialized [ 3.547882] Bluetooth: RFCOMM socket layer initialized [ 3.547882] Bluetooth: RFCOMM ver 1.11 [ 3.547912] Bluetooth: BNEP (Ethernet Emulation) ver 1.3 [ 3.547912] Bluetooth: HIDP (Human Interface Emulation) ver 1.2 [ 3.548095] NET: Registered protocol family 35 [ 3.548919] VFP support v0.3: implementor 41 architecture 3 part 30 variant 9 rev 4 [ 3.682220] ThumbEE CPU extension supported. [ 3.682250] mmcblk0boot0: mmc0:0001 VYL00M partition 1 512 KiB [ 3.692718] Registering SWP/SWPB emulation handler [ 3.692749] mmcblk0boot1: mmc0:0001 VYL00M partition 2 512 KiB [ 3.703613] Registering SDIV/UDIV emulation handler [ 3.713989] mmcblk0: p1 p2 p3 p4 p5 p6 p7 p8 p9 p10 p11 p12 p13 [ 3.722625] Reprogramming LPDDR2 timings to 400000000 Hz [ 3.728424] sr_init: No PMIC hook to init smartreflex [ 3.733673] mmcblk0boot1: unknown partition table [ 3.733825] smartreflex smartreflex.0: omap_sr_probe: SmartReflex driver initialized [ 3.734008] smartreflex smartreflex.1: omap_sr_probe: SmartReflex driver initialized [ 3.734191] smartreflex smartreflex.2: omap_sr_probe: SmartReflex driver initialized [ 3.762451] SmartReflex class 1.5 driver: initialized (86400000ms) [ 3.769134] mmcblk0boot0: unknown partition table [ 3.769439] Power Management for TI OMAP4. [ 3.769561] OMAP4 PM: Static dependency added between MPUSS and DUCATI <-> L4_PER/CFG and L3_1. [ 3.787384] HSI DRIVER BUS : hsi_bus_match SUCCESS : ctrl:0 (mask:ffffffff), port:0, ch:0 (mask:ff) [ 3.796844] HSI DRIVER BUS : hsi_bus_match SUCCESS : ctrl:0 (mask:ffffffff), port:0, ch:1 (mask:ff) [ 3.806213] HSI DRIVER BUS : hsi_bus_match SUCCESS : ctrl:0 (mask:ffffffff), port:0, ch:2 (mask:ff) [ 3.815460] sr_class1p5_calib_work: mpu: Calibration complete: Voltage:Nominal=1203000 Calib=990000 margin=0 [ 3.825622] HSI DRIVER BUS : hsi_bus_match SUCCESS : ctrl:0 (mask:ffffffff), port:0, ch:3 (mask:ff) [ 3.835021] sr_class1p5_calib_work: core: Calibration complete: Voltage:Nominal=1127000 Calib=1063480 margin=13000 [ 3.845703] HSI DRIVER BUS : hsi_bus_match SUCCESS : ctrl:0 (mask:ffffffff), port:0, ch:4 (mask:ff) [ 3.855102] HSI DRIVER BUS : hsi_bus_match SUCCESS : ctrl:0 (mask:ffffffff), port:0, ch:5 (mask:ff) [ 3.864379] HSI DRIVER BUS : hsi_bus_match SUCCESS : ctrl:0 (mask:ffffffff), port:0, ch:6 (mask:ff) [ 3.873626] HSI DRIVER BUS : hsi_bus_match SUCCESS : ctrl:0 (mask:ffffffff), port:0, ch:7 (mask:ff) [ 3.884552] sr_class1p5_calib_work: iva Stop sampling: Voltage Nominal=950000 samples=3 [ 3.900268] sr_class1p5_calib_work: iva: Calibration complete: Voltage:Nominal=950000 Calib=860920 margin=13000 [ 3.913970] clock: disabling unused clocks to save power [ 3.920440] cannot apply mgr(lcd) on inactive device [ 3.925598] omapfb omapfb: failed to apply dispc config [ 3.930908] cannot apply mgr(tv) on inactive device [ 3.935974] omapfb omapfb: failed to apply dispc config [ 3.941284] cannot apply mgr(lcd2) on inactive device [ 3.946441] omapfb omapfb: failed to apply dispc config [ 3.954681] regulator_init_complete: VDAC: disabling [ 3.961853] fsa9480 4-0025: cable detect change, from 'unknown/none' to 'jig' AST_POWERON
I the kenrel, board-tuna-connector.c does nothing for FSA9480_DETECT_UART so it might be interesting to test FSA9480_DETECT_UART by finding the right resistor value for FSA9480_DETECT_UART in the FSA9480 datasheet that is mentioned in the UART wiki page.
diff --git a/arch/arm/mach-omap2/board-tuna.c b/arch/arm/mach-omap2/board-tuna.c
index a022a43..7098227 100644
--- a/arch/arm/mach-omap2/board-tuna.c
+++ b/arch/arm/mach-omap2/board-tuna.c
@@ -1001,6 +1001,8 @@ static inline void __init board_serial_init(void)
omap_serial_init_port_pads(0, uart1_pads, uart1_pads_sz, NULL);
omap_serial_init_port_pads(1, tuna_uart2_pads,
ARRAY_SIZE(tuna_uart2_pads), &tuna_uart2_info);
+ omap_serial_init_port_pads(2,tuna_uart3_pads,
+ ARRAY_SIZE(tuna_uart3_pads), NULL);
omap_serial_init_port_pads(3, tuna_uart4_pads,
ARRAY_SIZE(tuna_uart4_pads), NULL);
}
CONFIG_CMDLINE="console=ttyO2 androidboot.console=ttyO2 [...]"
CONFIG_CMDLINE="console=ttyFIQ0 androidboot.console=ttyFIQ0 [...]"
CONFIG_CMDLINE="kgdboc=ttyO2,115200 console=ttyO2 androidboot.console=ttyO2 [...]"
Don't add kgdbwait tough because it result in that:
(gdb) set remotebaud 115200
(gdb) target remote /dev/ttyUSB0
/dev/ttyUSB0: Device or resource busy.
(gdb) target remote /dev/ttyUSB0
Remote debugging using /dev/ttyUSB0
kgdb_breakpoint ()
at /home/gnutoo/embedded/android/replicant-4.0/kernel/samsung/tuna/kernel/debug/debug_core.c:954
954 arch_kgdb_breakpoint();
(gdb) c
Continuing.
Program received signal SIGSEGV, Segmentation fault.
__raw_spin_lock_irqsave (lock=0x288)
at /home/gnutoo/embedded/android/replicant-4.0/kernel/samsung/tuna/kernel/spinlock.c:112
112 BUILD_LOCK_OPS(spin, raw_spinlock);
(gdb) bt
#0 __raw_spin_lock_irqsave (lock=0x288)
at /home/gnutoo/embedded/android/replicant-4.0/kernel/samsung/tuna/kernel/spinlock.c:112
#1 0xc061aecc in _raw_spin_lock_irqsave (lock=0x288)
at /home/gnutoo/embedded/android/replicant-4.0/kernel/samsung/tuna/kernel/spinlock.c:145
#2 0xc0098620 in try_to_wake_up (p=0x0, state=1611595795, wake_flags=1)
at /home/gnutoo/embedded/android/replicant-4.0/kernel/samsung/tuna/kernel/sched.c:2681
#3 0xc009897c in wake_up_process (p=0x288)
at /home/gnutoo/embedded/android/replicant-4.0/kernel/samsung/tuna/kernel/sched.c:2785
#4 0xc00e2090 in proc_dohung_task_timeout_secs (table=<value optimized out>, write=<value optimized out>,
buffer=<value optimized out>, lenp=<value optimized out>, ppos=0xc782bf70)
at /home/gnutoo/embedded/android/replicant-4.0/kernel/samsung/tuna/kernel/hung_task.c:190
#5 0xc0174178 in proc_sys_call_handler (filp=<value optimized out>, buf=0x24808, count=1, ppos=0xc782bf70,
write=1) at /home/gnutoo/embedded/android/replicant-4.0/kernel/samsung/tuna/fs/proc/proc_sysctl.c:158
#6 0xc01741b0 in proc_sys_write (filp=0x288, buf=0x600f0013 <Address 0x600f0013 out of bounds>, count=1,
ppos=0xc782a000)
at /home/gnutoo/embedded/android/replicant-4.0/kernel/samsung/tuna/fs/proc/proc_sysctl.c:176
#7 0xc0126420 in vfs_write (file=0xc73be500, buf=0x24808 "0", count=<value optimized out>, pos=0xc782bf70)
at /home/gnutoo/embedded/android/replicant-4.0/kernel/samsung/tuna/fs/read_write.c:377
#8 0xc0126590 in sys_write (fd=<value optimized out>, buf=0x24808 "0", count=1)
at /home/gnutoo/embedded/android/replicant-4.0/kernel/samsung/tuna/fs/read_write.c:429
#9 0xc0055a00 in ?? ()
Cannot access memory at address 0x0
#10 0xc0055a00 in ?? ()
Cannot access memory at address 0x0
Backtrace stopped: previous frame identical to this frame (corrupt stack?)
then open a root console and do:
echo g > /proc/sysrq-trigger
gnutoo@gnutoo-laptop:~/embedded/android/replicant-4.0$ . build/envsetup.sh
including device/ti/panda/vendorsetup.sh
including vendor/replicant/vendorsetup.sh
including sdk/bash_completion/adb.bash
gnutoo@gnutoo-laptop:~/embedded/android/replicant-4.0$ lunch replicant_maguro-eng
============================================
PLATFORM_VERSION_CODENAME=REL
PLATFORM_VERSION=4.0.4
TARGET_PRODUCT=replicant_maguro
TARGET_BUILD_VARIANT=eng
TARGET_BUILD_TYPE=release
TARGET_BUILD_APPS=
TARGET_ARCH=arm
TARGET_ARCH_VARIANT=armv7-a-neon
HOST_ARCH=x86
HOST_OS=linux
HOST_BUILD_TYPE=release
BUILD_ID=IMM76L
============================================
gnutoo@gnutoo-laptop:~/embedded/android/replicant-4.0$ arm-linux-androideabi-gdb
GNU gdb (GDB) 7.1-android-gg2
Copyright (C) 2010 Free Software Foundation, Inc.
License GPLv3+: GNU GPL version 3 or later <http://gnu.org/licenses/gpl.html>
This is free software: you are free to change and redistribute it.
There is NO WARRANTY, to the extent permitted by law. Type "show copying"
and "show warranty" for details.
This GDB was configured as "--host=i686-linux-gnu --target=arm-elf-linux".
For bug reporting instructions, please see:
<http://www.gnu.org/software/gdb/bugs/>.
(gdb) file /home/gnutoo/embedded/android/replicant-4.0/out/target/product/maguro/obj/KERNEL_OBJ/vmlinux
Reading symbols from /home/gnutoo/embedded/android/replicant-4.0/out/target/product/maguro/obj/KERNEL_OBJ/vmlinux...done.
(gdb) set remotebaud 115200
(gdb) target remote /dev/ttyUSB0
Remote debugging using /dev/ttyUSB0
kgdb_breakpoint ()
at /home/gnutoo/embedded/android/replicant-4.0/kernel/samsung/tuna/kernel/debug/debug_core.c:954
954 arch_kgdb_breakpoint();
(gdb) bt
#0 kgdb_breakpoint ()
at /home/gnutoo/embedded/android/replicant-4.0/kernel/samsung/tuna/kernel/debug/debug_core.c:954
#1 0xc00df764 in sysrq_handle_dbg (key=-29306880)
at /home/gnutoo/embedded/android/replicant-4.0/kernel/samsung/tuna/kernel/debug/debug_core.c:745
#2 0xc02f2e18 in __handle_sysrq (key=103, check_mask=false)
at /home/gnutoo/embedded/android/replicant-4.0/kernel/samsung/tuna/drivers/tty/sysrq.c:522
#3 0xc02f2ec4 in write_sysrq_trigger (file=<value optimized out>, buf=<value optimized out>, count=2,
ppos=0xc4a01f70)
at /home/gnutoo/embedded/android/replicant-4.0/kernel/samsung/tuna/drivers/tty/sysrq.c:870
#4 0xc016ba88 in proc_reg_write (file=0xc49ea3c0, buf=0x137fc84 "g\n\f@", count=2, ppos=0xc4a01f70)
at /home/gnutoo/embedded/android/replicant-4.0/kernel/samsung/tuna/fs/proc/inode.c:200
#5 0xc0126420 in vfs_write (file=0xc49ea3c0, buf=0x137fc84 "g\n\f@", count=<value optimized out>,
pos=0xc4a01f70) at /home/gnutoo/embedded/android/replicant-4.0/kernel/samsung/tuna/fs/read_write.c:377
#6 0xc0126590 in sys_write (fd=<value optimized out>, buf=0x137fc84 "g\n\f@", count=2)
at /home/gnutoo/embedded/android/replicant-4.0/kernel/samsung/tuna/fs/read_write.c:429
#7 0xc0055a00 in ?? ()
Cannot access memory at address 0x0
#8 0xc0055a00 in ?? ()
Cannot access memory at address 0x0
Backtrace stopped: previous frame identical to this frame (corrupt stack?)
(gdb)
since we have only 1 serial port, you can also use agent proxy to get kgdb and the console at the same time....
git clone git://git.kernel.org/pub/scm/utils/kernel/kgdb/agent-proxy.git cd agent-proxy ; make
diff --git a/su.c b/su.c
index d36eaed..51137d4 100644
--- a/su.c
+++ b/su.c
@@ -494,11 +494,13 @@ int main(int argc, char *argv[])
deny(&ctx);
}
+#if 0
// disallow su in a shell if appropriate
if (ctx.from.uid == AID_SHELL && (atoi(enabled) == 1)) {
LOGE("Root access is disabled by a system setting - enable it under settings -> developer options");
deny(&ctx);
}
+#endif
}
if (ctx.from.uid == AID_ROOT || ctx.from.uid == AID_SHELL)
busybox chmod +s /system/xbin/su
| Variant | Replicant compatible versions | SoC | Bootloader | Modem link | Modem protocol | RAM |
|---|---|---|---|---|---|---|
| Galaxy Note (GT-N7000) | Replicant 4.0, 4.2, 6.0 | Exynos 4210 | Signed | Isolated (HSIC) | samsung-ipc | 1G |
 |
Device | Galaxy Note II (GT-N7100) |
| Manufacturer | Samsung | |
| Release date | September 2012 | |
| Codename | n7100 |
|
| Status | Maintained | |
| Variants | GSM: GT-N7100 | |
| Latest images | Replicant 6.0 0003 |
Replicant status for the Galaxy Note II (GT-N7100): ReplicantStatus Replicant 6.0
To install Replicant on the the Galaxy Note II (GT-N7100), see the RecoveryInstallationWithHeimdall and MinorVersionUpgrade wiki pages.
Replicant build for the Galaxy Note II (GT-N7100): GalaxyNote2N7100Build
| Component | Name | Source | Status |
|---|---|---|---|
| SoC | Samsung Exynos 4412 Quad | wikipedia | Linux kernel support |
TODO: complete this hardware table
| Component | Name | data | Status |
|---|---|---|---|
| Bootloader interface | ? | ? | supported by heimdall |
WARNING some content may not be the same on your device
| PIT | Linux name | block device | mount point | partition type | Description | size or size@location for 16G eMMC |
|---|---|---|---|---|---|---|
| BOOTLOADER | mmcblk0boot0, not visible on Replicant 6.0 | The bootloader | 867.0KiB@0 | |||
| TZSW | The signed TrustZone OS | 156.0KiB@867.0KiB | ||||
| Not visible in the PIT |
mmcblk0boot1, not visible on Replicant 6.0 | empty | Unused? | |||
| PIT | No partition on Replicant 6.0 |
on mmcblk0 (use print-pit to find the location) |
None | The PIT partition table | 8.0KiB@17.0KiB | |
| MD5HDR | No partition on Replicant 6.0 |
on mmcblk0 (use print-pit to find the location) |
None | Used during boot to validate partitions? | 1.0MiB@25.0KiB | |
| BOTA0 | mmcblk0p1 | None | empty2 | ? | 4.0MiB@4.0MiB[1] | |
| BOTA1 | mmcblk0p2 | 4.0MiB@8.0MiB[1] | ||||
| EFS | mmcblk0p3 | /efs | ext4 | modem data partition (content) | 20.0MiB@12.0MiB | |
| m9kefs1 | mmcblk0p4 | None | empty2 | ? | 4.0MiB@32.0MiB | |
| m9kefs2 | mmcblk0p5 | 4.0MiB@36.0MiB | ||||
| m9kefs3 | mmcblk0p6 | 4.0MiB@40.0MiB | ||||
| PARAM | mmcblk0p7 | None | Bootloader settings? [3] | 8.0MiB@44.0MiB | ||
| BOOT | mmcblk0p8 | None | bootimage (mkbootimg) | boot.img partition | 8.0MiB@52.0MiB | |
| RECOVERY | mmcblk0p9 | None | bootimage (mkbootimg) | recovery partition | 8.0MiB@60.0MiB | |
| RADIO | mmcblk0p10 | None | modem OS partition | 88.0MiB@68.0MiB | ||
| TOMBSTONES | mmcblk0p11 | None | Probably used to save crashes | 4.0MiB@156.0MiB | ||
| CACHE | mmcblk0p12 | /cache | ext4 | cache partition | 1368.0MiB@160.0MiB | |
| SYSTEM | mmcblk0p13 | /system | ext4 | system partition | 2.0GiB@1528.0MiB | |
| HIDDEN | mmcblk0p14 | /preload | ext4 | S Note, video and audio files | 560.0MiB@3576.0MiB | |
| OTA | mmcblk0p15 | None | empty2 | probably only used during OTA updates? | 8.0MiB@4136.0MiB | |
| USERDATA | mmcblk0p16 | /data | ext4 | data partition | 0@4144.0MiB | |
1 Foi the MiB see https://en.wikipedia.org/wiki/Mebibyte
2 hexdump -C only gives zeros
3 It's probably the same content than with the GT-I9300 (bootloader settings, etc). See GalaxySIIIGTI9300 for more information.
Privacy/security issues on the Galaxy Note II (GT-N7100): GalaxyNote2N7100PrivacySecurityIssues
This page explains how to build Replicant for the Galaxy Note 2 (N7100).
Do not build as root, always build as user.
See the build tips if you are facing issues.
All of the following build commands need to be run in the source tree root folder.
First, the toolchain needs to be built for replicant 6:
./vendor/replicant/build-toolchain
If you have executed any of the commands below and you want to run the toolchain build again, you will need to open a new shell.
Then, prepare the shell environment for the Replicant build:
. build/envsetup.sh
lunch replicant_n7100-userdebug
Now you can start the build:
parallel_tasks=$(echo "$(grep 'processor' /proc/cpuinfo | wc -l ) + 1" | bc)
make -j$parallel_tasks bacon
The -jn argument indicates the number of parallel tasks during the build. You can remove it from the command line to have only one task at a time.$parallel_tasks holds an optimized number of parallel tasks for your hardware. You may want to reduce this number if e.g. the computer runs out of RAM during the build.
Finally, sign the resulting images for replicant 6:
./vendor/replicant/sign-build n7100
The first time you run the script, it will ask you a few questions that are needed to generate the necessary signing keys.
out/dist/n7100/out/host/linux-x86/bin/The compass sensor is calculated from both the accelerometer and magnetic field sensors, which needs calibration to be accurate.
If the values reported by the compass sensor are not right, you can recalibrate the magnetic field sensor with the following steps:
Then start an application using the compass sensor and move the device in every direction, with a rotation around each axis: the device should now be calibrated.
Warning: installing an operating system, such as Replicant, may void your device's warranty and will erase the data stored on the device.
In order to install Replicant on your device, it is assumed that you have a computer running a GNU/Linux operating system and everything necessary to connect your device to the computer through USB available. Moreover, it is assumed that anyone performing the installation knows how to use command lines in a terminal and has basic knowledge about it.
The first step in the installation process is to download and set up the files that will be used to install Replicant to the device. The files must be downloaded on your computer first.
1. Find out what the latest image is: check out the Last image part of the general table on GalaxyNote2N7100
2. Download all the files listed for the device (including the checksum and the signatures) on ReplicantImages for the latest image
2. Make sure you have added the Replicant release key to your GPG keyring
3. Check the signature of the files:
gpg --armor --verify path/to/replicant-6.0-n7100.zip.asc path/to/replicant-6.0-n7100.zip
gpg --armor --verify path/to/recovery-n7100.img.asc path/to/recovery-n7100.img
sha256sum -c n7100.sha256
The heimdall tool is required to flash the recovery image to the device.
Instructions to install heimdall: ToolsInstallation
You can either complete this step by using the device's internal storage or by using an external microSD card.
1. Make sure the device is started up and has an Android system running
2. Connect the USB cable to both the computer and the device
3. Enable USB mass storage on the device
4. Mount the mass storage on the computer
5. Copy the replicant-6.0-n7100.zip file at the origin of the mass storage
6. Safely unmount the mass storage on the computer
7. Disable USB mass storage on the device
1. Connect the microSD card to the computer (e.g. using an USB card reader)
2. Mount the microSD card on the computer
3. Copy the replicant-6.0-n7100.zip file at the origin of the microSD card
4. Safely unmount the microSD card on the computer
5. Disconnect the microSD card from the computer
6. Insert the microSD card in the device (make sure it is turned off before inserting the card)
Instructions to install ADB: ToolsInstallation
The next step in the installation process is to prepare the device for heimdall mode.
1. Make sure the device is completely turned off and the USB cable is disconnected from the device
2. Start the device by holding the following key combination: Volume down, Select, Power
3. Hold the key combination until the device shows a Warning message
4. Confirm that you want to download a custom OS (using volume up)
5. Make sure the device is in Downloading mode
4. Connect the USB cable to both the computer and the device
Now that both the computer and the device are set up, it is time to actually install the images to the device.
1. Install the recovery image to the device:
heimdall flash --BOOT path/to/recovery-n7100.img --RECOVERY path/to/recovery-n7100.img
2. Make sure the device reboots to recovery
A data wipe is necessary if you switch from the factory image or a different Android distribution to Replicant. You also need to do a data wipe when upgrading to a new major release (e.g. from Replicant 4.2 to Replicant 6.0). Only when updating to a new minor release (e.g. from Replicant 6.0 0001 to Replicant 6.0 0002), a data wipe is usually not required.
3. Select Factory reset
4. Select Wipe data (keep media)
5. Confirm the data wipe by selecting Yes
6. Press the back key (if necessary) to get back to the general menu
7. Select Apply update
8. Select Choose from emulated
9. Select the system zip: replicant-6.0-n7100.zip
Note: if your device was running Android 4.2 and later, it may be located in the 0 directory
10. Confirm the installation
8. Select Choose from sdcard1
9. Select the system zip: replicant-6.0-n7100.zip
Note: if your device was running Android 4.2 and later, it may be located in the 0 directory
10. Confirm the installation
8. Select Apply from ADB
9. Back to the host computer, load the system zip with sideload:
adb sideload path/to/replicant-6.0-n7100.zip
11. Press the back key (if necessary) to get back to the general menu
If you did the data wipe after step 2, you will need to do a factory reset as well:
12. Select Factory reset
13. Select Full factory reset
14. Confirm the factory reset by selecting Yes
15. Press the back key (if necessary) to get back to the general menu
16. Select Reboot system now to reboot the device
Your device should now be running Replicant!
Your SSP firmware may not be flashed to what Replicant's kernel is expecting, which may cause issues like the screen not rotating or the screen not turning off when held to your face. As such, you need to flash stock Android and then reflash Replicant. To flash stock Android for the N7100, download it here or here and run this command in the terminal:
heimdall flash --BOOT boot.img --CACHE cache.img --HIDDEN hidden.img --RADIO modem.bin --PARAM param.bin --RECOVERY recovery.img --BOOTLOADER sboot.bin --SYSTEM system.img --TZSW tz.img
Here's a comprehensive list of the Galaxy Note 2 (N7100) firmwares: https://redmine.replicant.us/projects/replicant/wiki/GalaxyNote2N7100LoadedFirmwares
Finally, you can get more information about this problem here: #1755.
Some hardware functionalities require firmwares to be functional.
If you are interested in writing free software replacements for these firmware files, please contact us.
Firmwares are programs that do not run on the main CPU: instead, they run on separate chips. Some firmwares come pre-installed on the chip and some others need to be loaded by the CPU.
Since these firmwares are non-free software, we do not recommend using them nor do we distribute them.
| Firmware location | Related chip | Function |
| /system/vendor/firmware/bcmdhd_apsta.bin_b2 | BCM4334 | Wi-Fi Host |
| /system/vendor/firmware/bcmdhd_mfg.bin_b2 | BCM4334 | Wi-Fi |
| /system/vendor/firmware/bcmdhd_p2p.bin_b2 | BCM4334 | Wi-Fi Direct |
| /system/vendor/firmware/bcmdhd_sta.bin_b2 | BCM4334 | Wi-Fi |
| /system/vendor/firmware/nvram_mfg.txt | BCM4334 | Wi-Fi |
| /system/vendor/firmware/nvram_mfg.txt_murata | BCM4334 | Wi-Fi |
| /system/vendor/firmware/nvram_mfg.txt_semcosh | BCM4334 | Wi-Fi |
| /system/vendor/firmware/nvram_net.txt | BCM4334 | Wi-Fi |
| /system/vendor/firmware/nvram_net.txt_murata | BCM4334 | Wi-Fi |
| /system/vendor/firmware/nvram_net.txt_semcosh | BCM4334 | Wi-Fi |
| /system/vendor/firmware/bcm4334.hcd | BCM4334 | Bluetooth |
| /system/vendor/firmware/bcm4334_murata.hcd | BCM4334 | Bluetooth |
| /system/vendor/firmware/bcm4334_semco.hcd | BCM4334 | Bluetooth |
| /system/vendor/firmware/bcm4334_semcosh.hcd | BCM4334 | Bluetooth |
| /system/vendor/firmware/mfc_fw.bin | MFC | Hardware media encoding/decoding |
| /system/vendor/firmware/SlimISP_BH.bin | S5C73M3 | Back camera |
| /system/vendor/firmware/SlimISP_GD.bin | S5C73M3 | Back camera |
| /system/vendor/firmware/SlimISP_GH.bin | S5C73M3 | Back camera |
| /system/vendor/firmware/SlimISP_GK.bin | S5C73M3 | Back camera |
| /system/vendor/firmware/SlimISP_JH.bin | S5C73M3 | Back camera |
| /system/vendor/firmware/SlimISP_PH.bin | S5C73M3 | Back camera |
| /system/vendor/firmware/SlimISP_WH.bin | S5C73M3 | Back camera |
| /system/vendor/firmware/SlimISP_ZD.bin | S5C73M3 | Back camera |
| /system/vendor/firmware/SlimISP_ZH.bin | S5C73M3 | Back camera |
| /system/vendor/firmware/SlimISP_ZK.bin | S5C73M3 | Back camera |
| /system/vendor/firmware/SlimISP_ZM.bin | S5C73M3 | Back camera |
| /system/vendor/firmware/fimc_is_fw.bin | FIMC-IS | Front camera |
| /system/vendor/firmware/setfile.bin | FIMC-IS | Front camera |
| ssp.fw | AT32UC3L0128 | Sensors coprocessor. This file is only requested if the firmware version in the AT32UC3L0128 memory (probably flash) doesn't match the version number coded into the kernel. See drivers/sensorhub/stm/ssp_firmware.c and #1755. |
$ heimdall print-pit Heimdall v1.4.2 Copyright (c) 2010-2017 Benjamin Dobell, Glass Echidna http://www.glassechidna.com.au/ This software is provided free of charge. Copying and redistribution is encouraged. If you appreciate this software and you would like to support future development please consider donating: http://www.glassechidna.com.au/donate/ Initialising connection... Detecting device... Claiming interface... Setting up interface... Initialising protocol... Protocol initialisation successful. Beginning session... Some devices may take up to 2 minutes to respond. Please be patient! Session begun. Downloading device's PIT file... PIT file download successful. Entry Count: 20 Unknown 1: 1598902083 Unknown 2: 844251476 Unknown 3: 30797 Unknown 4: 19757 Unknown 5: 19780 Unknown 6: 0 Unknown 7: 0 Unknown 8: 0 --- Entry #0 --- Binary Type: 0 (AP) Device Type: 2 (MMC) Identifier: 80 Attributes: 2 (STL Read-Only) Update Attributes: 1 (FOTA) Partition Block Size/Offset: 0 Partition Block Count: 1734 File Offset (Obsolete): 0 File Size (Obsolete): 0 Partition Name: BOOTLOADER Flash Filename: sboot.bin FOTA Filename: --- Entry #1 --- Binary Type: 0 (AP) Device Type: 2 (MMC) Identifier: 81 Attributes: 5 (Read/Write) Update Attributes: 1 (FOTA) Partition Block Size/Offset: 1734 Partition Block Count: 312 File Offset (Obsolete): 0 File Size (Obsolete): 0 Partition Name: TZSW Flash Filename: tz.img FOTA Filename: --- Entry #2 --- Binary Type: 0 (AP) Device Type: 2 (MMC) Identifier: 70 Attributes: 5 (Read/Write) Update Attributes: 1 (FOTA) Partition Block Size/Offset: 34 Partition Block Count: 16 File Offset (Obsolete): 0 File Size (Obsolete): 0 Partition Name: PIT Flash Filename: t0.pit FOTA Filename: --- Entry #3 --- Binary Type: 0 (AP) Device Type: 2 (MMC) Identifier: 71 Attributes: 5 (Read/Write) Update Attributes: 1 (FOTA) Partition Block Size/Offset: 50 Partition Block Count: 2048 File Offset (Obsolete): 0 File Size (Obsolete): 0 Partition Name: MD5HDR Flash Filename: md5.img FOTA Filename: --- Entry #4 --- Binary Type: 0 (AP) Device Type: 2 (MMC) Identifier: 1 Attributes: 5 (Read/Write) Update Attributes: 1 (FOTA) Partition Block Size/Offset: 8192 Partition Block Count: 8192 File Offset (Obsolete): 0 File Size (Obsolete): 0 Partition Name: BOTA0 Flash Filename: - FOTA Filename: --- Entry #5 --- Binary Type: 0 (AP) Device Type: 2 (MMC) Identifier: 2 Attributes: 5 (Read/Write) Update Attributes: 1 (FOTA) Partition Block Size/Offset: 16384 Partition Block Count: 8192 File Offset (Obsolete): 0 File Size (Obsolete): 0 Partition Name: BOTA1 Flash Filename: - FOTA Filename: --- Entry #6 --- Binary Type: 0 (AP) Device Type: 2 (MMC) Identifier: 3 Attributes: 5 (Read/Write) Update Attributes: 5 (FOTA) Partition Block Size/Offset: 24576 Partition Block Count: 40960 File Offset (Obsolete): 0 File Size (Obsolete): 0 Partition Name: EFS Flash Filename: efs.img FOTA Filename: --- Entry #7 --- Binary Type: 0 (AP) Device Type: 2 (MMC) Identifier: 4 Attributes: 5 (Read/Write) Update Attributes: 1 (FOTA) Partition Block Size/Offset: 65536 Partition Block Count: 8192 File Offset (Obsolete): 0 File Size (Obsolete): 0 Partition Name: m9kefs1 Flash Filename: - FOTA Filename: --- Entry #8 --- Binary Type: 0 (AP) Device Type: 2 (MMC) Identifier: 5 Attributes: 5 (Read/Write) Update Attributes: 1 (FOTA) Partition Block Size/Offset: 73728 Partition Block Count: 8192 File Offset (Obsolete): 0 File Size (Obsolete): 0 Partition Name: m9kefs2 Flash Filename: - FOTA Filename: --- Entry #9 --- Binary Type: 0 (AP) Device Type: 2 (MMC) Identifier: 6 Attributes: 5 (Read/Write) Update Attributes: 1 (FOTA) Partition Block Size/Offset: 81920 Partition Block Count: 8192 File Offset (Obsolete): 0 File Size (Obsolete): 0 Partition Name: m9kefs3 Flash Filename: - FOTA Filename: --- Entry #10 --- Binary Type: 0 (AP) Device Type: 2 (MMC) Identifier: 7 Attributes: 5 (Read/Write) Update Attributes: 1 (FOTA) Partition Block Size/Offset: 90112 Partition Block Count: 16384 File Offset (Obsolete): 0 File Size (Obsolete): 0 Partition Name: PARAM Flash Filename: param.bin FOTA Filename: --- Entry #11 --- Binary Type: 0 (AP) Device Type: 2 (MMC) Identifier: 8 Attributes: 5 (Read/Write) Update Attributes: 1 (FOTA) Partition Block Size/Offset: 106496 Partition Block Count: 16384 File Offset (Obsolete): 0 File Size (Obsolete): 0 Partition Name: BOOT Flash Filename: boot.img FOTA Filename: --- Entry #12 --- Binary Type: 0 (AP) Device Type: 2 (MMC) Identifier: 9 Attributes: 5 (Read/Write) Update Attributes: 1 (FOTA) Partition Block Size/Offset: 122880 Partition Block Count: 16384 File Offset (Obsolete): 0 File Size (Obsolete): 0 Partition Name: RECOVERY Flash Filename: recovery.img FOTA Filename: --- Entry #13 --- Binary Type: 0 (AP) Device Type: 2 (MMC) Identifier: 10 Attributes: 5 (Read/Write) Update Attributes: 1 (FOTA) Partition Block Size/Offset: 139264 Partition Block Count: 180224 File Offset (Obsolete): 0 File Size (Obsolete): 0 Partition Name: RADIO Flash Filename: modem.bin FOTA Filename: --- Entry #14 --- Binary Type: 0 (AP) Device Type: 2 (MMC) Identifier: 11 Attributes: 5 (Read/Write) Update Attributes: 5 (FOTA) Partition Block Size/Offset: 319488 Partition Block Count: 8192 File Offset (Obsolete): 0 File Size (Obsolete): 0 Partition Name: TOMBSTONES Flash Filename: - FOTA Filename: --- Entry #15 --- Binary Type: 0 (AP) Device Type: 2 (MMC) Identifier: 12 Attributes: 5 (Read/Write) Update Attributes: 5 (FOTA) Partition Block Size/Offset: 327680 Partition Block Count: 2801664 File Offset (Obsolete): 0 File Size (Obsolete): 0 Partition Name: CACHE Flash Filename: cache.img FOTA Filename: --- Entry #16 --- Binary Type: 0 (AP) Device Type: 2 (MMC) Identifier: 13 Attributes: 5 (Read/Write) Update Attributes: 5 (FOTA) Partition Block Size/Offset: 3129344 Partition Block Count: 4194304 File Offset (Obsolete): 0 File Size (Obsolete): 0 Partition Name: SYSTEM Flash Filename: system.img FOTA Filename: --- Entry #17 --- Binary Type: 0 (AP) Device Type: 2 (MMC) Identifier: 14 Attributes: 5 (Read/Write) Update Attributes: 5 (FOTA) Partition Block Size/Offset: 7323648 Partition Block Count: 1146880 File Offset (Obsolete): 0 File Size (Obsolete): 0 Partition Name: HIDDEN Flash Filename: hidden.img FOTA Filename: --- Entry #18 --- Binary Type: 0 (AP) Device Type: 2 (MMC) Identifier: 15 Attributes: 5 (Read/Write) Update Attributes: 1 (FOTA) Partition Block Size/Offset: 8470528 Partition Block Count: 16384 File Offset (Obsolete): 0 File Size (Obsolete): 0 Partition Name: OTA Flash Filename: - FOTA Filename: --- Entry #19 --- Binary Type: 0 (AP) Device Type: 2 (MMC) Identifier: 16 Attributes: 5 (Read/Write) Update Attributes: 5 (FOTA) Partition Block Size/Offset: 8486912 Partition Block Count: 0 File Offset (Obsolete): 0 File Size (Obsolete): 0 Partition Name: USERDATA Flash Filename: userdata.img FOTA Filename: remained Ending session... Rebooting device... Releasing device interface...
 |
Device | Galaxy Note II 4G (GT-N7105) |
| Manufacturer | Samsung | |
| Release date | None as this model is not supported yet | |
| Codename | n7105 |
|
| Status | The GT-N7105 is not supported yet | |
| Supported models | ||
| Latest images |
While that device is Very similar to the Galaxy Note II (GT-N7100), some peripherals are wired differently on the two boards, and the two boards have different cellular modems.
As it uses the same dts as the GT-N7100, it might just be possible to make an image without modem support for it, however the GT-N7100 also need to be added in Replicant 9, which requires to port (and upstream!) some display drivers.
TODO
| Component | Name | Source | Status |
|---|---|---|---|
| SoC | Samsung Exynos 4412 Quad | wikipedia | Linux kernel support |
TODO: complete this hardware table
| Component | Name | data | Status |
|---|---|---|---|
| Bootloader interface | ? | ? | supported by heimdall |
TODO
Privacy/security issues on the Galaxy Note II 4G (N7105): GalaxyNote2N7105PrivacySecurityIssues
 |
Device | Galaxy Note II (SGH-T889) |
| Manufacturer | Samsung | |
| Release date | ? | |
| Codename | ? | |
| Status | Not supported yet | |
| models | SGH-T889 | |
| Latest images | None |
Work in progress by scintill to support its modem with the Ofono RIL
TODO
TODO
TODO
| Component | Name | Source | Status |
|---|---|---|---|
| SoC | Samsung Exynos 4412 Quad | wikipedia | Linux kernel support |
TODO: complete this hardware table
| Component | Name | data | Status |
|---|---|---|---|
| Bootloader interface | ? | ? | supported by heimdall? |
TODO: Add the PIT, the fstab, and the recovery fstab
TODO
TODO
Privacy/security issues on the Galaxy Note II (SGH-T889): GalaxyNote2SGHT889PrivacySecurityIssues
TODO: find other project resources on this device
| Variant | Replicant compatible versions | SoC | Bootloader | Modem link | Modem protocol | RAM |
|---|---|---|---|---|---|---|
| Galaxy Note 8.0 (GT-N5100) | Replicant 6.0 | Exynos 4412 | Signed | Isolated (MIPI) | samsung-ipc | 2G |
| Galaxy Note 8.0 WiFi (GT-N5110) | Replicant 6.0 | Exynos 4412 | Signed | No modem | 2G | |
 |
Device | Galaxy Note 8.0 (GT-N51xx) |
| Manufacturer | Samsung | |
| Release date | April 2013 | |
| Codename | n5100 (GSM), n5110 (Wi-Fi) |
|
| Status | Maintained | |
| Variants | GSM: GT-N5100, Wi-Fi: GT-N5110 | |
| Latest images | Replicant 6.0 0003 |
Replicant status for the Galaxy Note 8.0 (GT-N51xx): ReplicantStatus Replicant 6.0
To install Replicant on the the Galaxy Note 8.0 (GT-N51xx), see the RecoveryInstallationWithHeimdall and MinorVersionUpgrade wiki pages.
Replicant build for the Galaxy Note 8.0 (GT-N51xx): GalaxyNote80N51xxBuild
| LineageOS/CyanogenMod port | SoC | Graphics | Sound | Modem | Camera | GPS | Sensors |
|---|---|---|---|---|---|---|---|
| CM 14.1 (Android 7.1) | Exynos 4412 | Free gralloc, hwcomposer, non-free 3d | Free module | Samsung IPC, XMM6262 | Free module | BCM4751: secret protocol | Partly free module |
| PIT | Linux name | mount point | partition type | block device | Description |
|---|---|---|---|---|---|
| SYSTEM | SYSTEM | /system | ext4 | system partition | |
| EFS | EFS | /efs | ext4 | modem data partition |
Privacy/security issues on the Galaxy Note 8.0 (GT-N51xx): GalaxyNote80N51xxPrivacySecurityIssues
This page explains how to build Replicant for the Galaxy Note 8.0 models.
Do not build as root, always build as user.
See the build tips if you are facing issues.
All of the following build commands need to be run in the source tree root folder.
First, the toolchain needs to be built for replicant 6:
./vendor/replicant/build-toolchain
If you have executed any of the commands below and you want to run the toolchain build again, you will need to open a new shell.
Then, prepare the shell environment for the Replicant build:
. build/envsetup.sh lunch replicant_n5100-userdebug
. build/envsetup.sh lunch replicant_n5110-userdebug
Now you can start the build:
parallel_tasks=$(echo "$(grep 'processor' /proc/cpuinfo | wc -l ) + 1" | bc) make -j$parallel_tasks bacon
The -jn argument indicates the number of parallel tasks during the build. You can remove it from the command line to have only one task at a time.$parallel_tasks holds an optimized number of parallel tasks for your hardware. You may want to reduce this number if e.g. the computer runs out of RAM during the build.
Finally, sign the resulting images for replicant 6:
./vendor/replicant/sign-build n5100
./vendor/replicant/sign-build n5110
The first time you run the script, it will ask you a few questions that are needed to generate the necessary signing keys.
out/dist/n5100/ or out/dist/n5110/out/host/linux-x86/bin/Warning: installing an operating system, such as Replicant, may void your device's warranty and will erase the data stored on the device.
In order to install Replicant on your device, it is assumed that you have a computer running a GNU/Linux operating system and everything necessary available to connect your device to the computer through USB. Moreover, it is assumed that anyone performing the installation knows how to use a terminal and has basic knowledge about command line commands.
The first step in the installation process is to download and set up the files that will be used to install Replicant to the device. The files must be downloaded on your computer first.
1. Find out what the latest image is: check out the Last image part of the general table on GalaxyNote80N51xx
2. Download all the files listed for the device (including the checksum and the signatures) on ReplicantImages for the latest image
2. Make sure you have added the Replicant release key to your GPG keyring
3. Check the signature of the files:
gpg --armor --verify path/to/replicant-6.0-n5100.zip.asc path/to/replicant-6.0-n5100.zip
or
gpg --armor --verify path/to/replicant-6.0-n5110.zip.asc path/to/replicant-6.0-n5110.zip
gpg --armor --verify path/to/recovery-n5100.img.asc path/to/recovery-n5100.img
or
gpg --armor --verify path/to/recovery-n5110.img.asc path/to/recovery-n5110.img
sha256sum -c n5100.sha256
or
sha256sum -c n5110.sha256
6. Make sure the check succeeds, do not install anything if it doesn't!
The heimdall tool is required to flash the recovery image to the device.
Instructions to install heimdall: ToolsInstallation
You can either complete this step by using the device's internal storage or by using an external microSD card.
1. Make sure the device is started up and has an Android system running
2. Connect the USB cable to both the computer and the device
3. Enable USB mass storage on the device
4. Mount the mass storage on the computer
5. Copy the replicant-6.0-n5100.zip or replicant-6.0-n5110.zip file at the origin of the mass storage
6. Safely unmount the mass storage on the computer
7. Disable USB mass storage on the device
1. Connect the microSD card to the computer (e.g. using an USB card reader)
2. Mount the microSD card on the computer
3. Copy the replicant-6.0-n5100.zip or replicant-6.0-n5110.zip file at the origin of the microSD card
4. Safely unmount the microSD card on the computer
5. Disconnect the microSD card from the computer
6. Insert the microSD card in the device (make sure it is turned off before inserting the card)
Instructions to install ADB: ToolsInstallation
The next step in the installation process is to prepare the device for heimdall mode.
1. Make sure the device is completely turned off and the USB cable is disconnected from the device
2. Start the device by holding the following key combination: Volume down, Select, Power
3. Hold the key combination until the device shows a Warning message
4. Confirm that you want to download a custom OS (using volume up)
5. Make sure the device is in Downloading mode
4. Connect the USB cable to both the computer and the device
Now that both the computer and the device are set up, it is time to actually install the images to the device.
1. Install the recovery image to the device:
heimdall flash --BOOT path/to/recovery-n5100.img --RECOVERY path/to/recovery-n5100.img
or
heimdall flash --BOOT path/to/recovery-n5110.img --RECOVERY path/to/recovery-n5110.img
2. Make sure the device reboots to recovery
A data wipe is necessary if you switch from the factory image or a different Android distribution to Replicant. You also need to do a data wipe when upgrading to a new major release (e.g. from Replicant 4.2 to Replicant 6.0). Only when updating to a new minor release (e.g. from Replicant 6.0 0001 to Replicant 6.0 0002), a data wipe is usually not required.
3. Select Factory reset
4. Select Wipe data (keep media)
5. Confirm the data wipe by selecting Yes
6. Press the back key (if necessary) to get back to the general menu
7. Select Apply update
8. Select Choose from emulated
9. Select the system zip: replicant-6.0-n5100.zip or replicant-6.0-n5110.zip
Note: if your device was running Android 4.2 and later, it may be located in the 0 directory
10. Confirm the installation
8. Select Choose from sdcard1
9. Select the system zip: replicant-6.0-n5100.zip or replicant-6.0-n5110.zip
Note: if your device was running Android 4.2 and later, it may be located in the 0 directory
10. Confirm the installation
8. Select Apply from ADB
9. Back to the host computer, load the system zip with sideload:
adb sideload path/to/replicant-6.0-n5100.zip
or
adb sideload path/to/replicant-6.0-n5110.zip
10. Make sure the file is being transfered
11. Press the back key (if necessary) to get back to the general menu
If you did the data wipe after step 2, you will need to do a factory reset as well:
12. Select Factory reset
13. Select Full factory reset
14. Confirm the factory reset by selecting Yes
15. Press the back key (if necessary) to get back to the general menu
16. Select Reboot system now to reboot the device
Your device should now be running Replicant!
Some hardware functionalities require firmwares to be functional.
If you are interested in writing free software replacements for these firmware files, please contact us.
Firmwares are programs that do not run on the main CPU: instead, they run on separate chips. Some firmwares come pre-installed on the chip and some others need to be loaded by the CPU.
Since these firmwares are non-free software, we do not recommend using them nor do we distribute them.
| Firmware location | Related chip | Function |
| /system/vendor/firmware/bcmdhd_apsta.bin_b2 | BCM4334 | Wi-Fi Host |
| /system/vendor/firmware/bcmdhd_mfg.bin_b2 | BCM4334 | Wi-Fi |
| /system/vendor/firmware/bcmdhd_p2p.bin_b2 | BCM4334 | Wi-Fi Direct |
| /system/vendor/firmware/bcmdhd_sta.bin_b2 | BCM4334 | Wi-Fi |
| /system/vendor/firmware/nvram_mfg.txt | BCM4334 | Wi-Fi |
| /system/vendor/firmware/nvram_mfg.txt_murata | BCM4334 | Wi-Fi |
| /system/vendor/firmware/nvram_net.txt | BCM4334 | Wi-Fi |
| /system/vendor/firmware/nvram_net.txt_murata | BCM4334 | Wi-Fi |
| /system/vendor/firmware/bcm4334.hcd | BCM4334 | Bluetooth |
| /system/vendor/firmware/bcm4334_murata.hcd | BCM4334 | Bluetooth |
| /system/vendor/firmware/bcm4334_semco.hcd | BCM4334 | Bluetooth |
| /system/vendor/firmware/bcm4334_semcosh.hcd | BCM4334 | Bluetooth |
| /system/vendor/firmware/mfc_fw.bin | MFC | Hardware media encoding/decoding |
$ heimdall print-pit Heimdall v1.4.2 Copyright (c) 2010-2017 Benjamin Dobell, Glass Echidna http://www.glassechidna.com.au/ This software is provided free of charge. Copying and redistribution is encouraged. If you appreciate this software and you would like to support future development please consider donating: http://www.glassechidna.com.au/donate/ Initialising connection... Detecting device... Claiming interface... Setting up interface... Initialising protocol... Protocol initialisation successful. Beginning session... Some devices may take up to 2 minutes to respond. Please be patient! Session begun. Downloading device's PIT file... PIT file download successful. Entry Count: 16 Unknown 1: 1598902083 Unknown 2: 844251476 Unknown 3: 20299 Unknown 4: 16718 Unknown 5: 18227 Unknown 6: 0 Unknown 7: 0 Unknown 8: 0 --- Entry #0 --- Binary Type: 0 (AP) Device Type: 2 (MMC) Identifier: 80 Attributes: 2 (STL Read-Only) Update Attributes: 1 (FOTA) Partition Block Size/Offset: 0 Partition Block Count: 1734 File Offset (Obsolete): 0 File Size (Obsolete): 0 Partition Name: BOOTLOADER Flash Filename: sboot.bin FOTA Filename: --- Entry #1 --- Binary Type: 0 (AP) Device Type: 2 (MMC) Identifier: 81 Attributes: 5 (Read/Write) Update Attributes: 1 (FOTA) Partition Block Size/Offset: 1734 Partition Block Count: 312 File Offset (Obsolete): 0 File Size (Obsolete): 0 Partition Name: TZSW Flash Filename: tz.img FOTA Filename: --- Entry #2 --- Binary Type: 0 (AP) Device Type: 2 (MMC) Identifier: 70 Attributes: 5 (Read/Write) Update Attributes: 1 (FOTA) Partition Block Size/Offset: 34 Partition Block Count: 16 File Offset (Obsolete): 0 File Size (Obsolete): 0 Partition Name: PIT Flash Filename: kona3g.pit FOTA Filename: --- Entry #3 --- Binary Type: 0 (AP) Device Type: 2 (MMC) Identifier: 71 Attributes: 5 (Read/Write) Update Attributes: 1 (FOTA) Partition Block Size/Offset: 50 Partition Block Count: 2048 File Offset (Obsolete): 0 File Size (Obsolete): 0 Partition Name: MD5HDR Flash Filename: md5.img FOTA Filename: --- Entry #4 --- Binary Type: 0 (AP) Device Type: 2 (MMC) Identifier: 1 Attributes: 5 (Read/Write) Update Attributes: 1 (FOTA) Partition Block Size/Offset: 8192 Partition Block Count: 8192 File Offset (Obsolete): 0 File Size (Obsolete): 0 Partition Name: BOTA0 Flash Filename: - FOTA Filename: --- Entry #5 --- Binary Type: 0 (AP) Device Type: 2 (MMC) Identifier: 2 Attributes: 5 (Read/Write) Update Attributes: 1 (FOTA) Partition Block Size/Offset: 16384 Partition Block Count: 8192 File Offset (Obsolete): 0 File Size (Obsolete): 0 Partition Name: BOTA1 Flash Filename: - FOTA Filename: --- Entry #6 --- Binary Type: 0 (AP) Device Type: 2 (MMC) Identifier: 3 Attributes: 5 (Read/Write) Update Attributes: 5 (FOTA) Partition Block Size/Offset: 24576 Partition Block Count: 40960 File Offset (Obsolete): 0 File Size (Obsolete): 0 Partition Name: EFS Flash Filename: efs.img FOTA Filename: --- Entry #7 --- Binary Type: 0 (AP) Device Type: 2 (MMC) Identifier: 4 Attributes: 5 (Read/Write) Update Attributes: 1 (FOTA) Partition Block Size/Offset: 65536 Partition Block Count: 16384 File Offset (Obsolete): 0 File Size (Obsolete): 0 Partition Name: PARAM Flash Filename: param.bin FOTA Filename: --- Entry #8 --- Binary Type: 0 (AP) Device Type: 2 (MMC) Identifier: 5 Attributes: 5 (Read/Write) Update Attributes: 1 (FOTA) Partition Block Size/Offset: 81920 Partition Block Count: 16384 File Offset (Obsolete): 0 File Size (Obsolete): 0 Partition Name: BOOT Flash Filename: boot.img FOTA Filename: --- Entry #9 --- Binary Type: 0 (AP) Device Type: 2 (MMC) Identifier: 6 Attributes: 5 (Read/Write) Update Attributes: 1 (FOTA) Partition Block Size/Offset: 98304 Partition Block Count: 16384 File Offset (Obsolete): 0 File Size (Obsolete): 0 Partition Name: RECOVERY Flash Filename: recovery.img FOTA Filename: --- Entry #10 --- Binary Type: 0 (AP) Device Type: 2 (MMC) Identifier: 7 Attributes: 5 (Read/Write) Update Attributes: 1 (FOTA) Partition Block Size/Offset: 114688 Partition Block Count: 65536 File Offset (Obsolete): 0 File Size (Obsolete): 0 Partition Name: RADIO Flash Filename: modem.bin FOTA Filename: --- Entry #11 --- Binary Type: 0 (AP) Device Type: 2 (MMC) Identifier: 8 Attributes: 5 (Read/Write) Update Attributes: 5 (FOTA) Partition Block Size/Offset: 180224 Partition Block Count: 3145728 File Offset (Obsolete): 0 File Size (Obsolete): 0 Partition Name: CACHE Flash Filename: cache.img FOTA Filename: --- Entry #12 --- Binary Type: 0 (AP) Device Type: 2 (MMC) Identifier: 9 Attributes: 5 (Read/Write) Update Attributes: 5 (FOTA) Partition Block Size/Offset: 3325952 Partition Block Count: 5242880 File Offset (Obsolete): 0 File Size (Obsolete): 0 Partition Name: SYSTEM Flash Filename: system.img FOTA Filename: --- Entry #13 --- Binary Type: 0 (AP) Device Type: 2 (MMC) Identifier: 10 Attributes: 5 (Read/Write) Update Attributes: 5 (FOTA) Partition Block Size/Offset: 8568832 Partition Block Count: 1146880 File Offset (Obsolete): 0 File Size (Obsolete): 0 Partition Name: HIDDEN Flash Filename: hidden.img FOTA Filename: --- Entry #14 --- Binary Type: 0 (AP) Device Type: 2 (MMC) Identifier: 11 Attributes: 5 (Read/Write) Update Attributes: 1 (FOTA) Partition Block Size/Offset: 9715712 Partition Block Count: 16384 File Offset (Obsolete): 0 File Size (Obsolete): 0 Partition Name: OTA Flash Filename: - FOTA Filename: --- Entry #15 --- Binary Type: 0 (AP) Device Type: 2 (MMC) Identifier: 12 Attributes: 5 (Read/Write) Update Attributes: 5 (FOTA) Partition Block Size/Offset: 9732096 Partition Block Count: 0 File Offset (Obsolete): 0 File Size (Obsolete): 0 Partition Name: USERDATA Flash Filename: userdata.img FOTA Filename: remained Ending session... Rebooting device... Releasing device interface...
 |
Device | Galaxy Note (GT-N7000) |
| Manufacturer | Samsung | |
| Release date | October 2011 | |
| Codename | n7000 |
|
| Status | Maintained | |
| Variants | GSM: GT-N7000 | |
| Latest images | Replicant 6.0 0003 |
Replicant status for the Galaxy Note (GT-N7000): ReplicantStatus Replicant 6.0
To install Replicant on the the Galaxy Note (GT-N7000), see the RecoveryInstallationWithHeimdall and MinorVersionUpgrade wiki pages.
Replicant build for the Galaxy Note (N7000): GalaxyNoteN7000Build
Privacy/security issues on the Galaxy Note (GT-N7000): GalaxyNoteN7000PrivacySecurityIssues
| Component | Name | Source | Status |
|---|---|---|---|
| SoC | Samsung Exynos 4210 | Linux kernel | Linux kernel support |
| GPU | Mali 400 | https://secure.wikimedia.org/wikipedia/en/wiki/Exynos | Linux kernel support, proprietary userspace |
| Audio Codec | Yamaha MC1N2 | Linux kernel | Linux kernel support (ALSA), free userspace: Yamaha-MC1N2-Audio/Tinyalsa-Audio |
| Modem | XMM6260 | Linux kernel | Free userspace implementation: Samsung-RIL/libsamsung-ipc |
| Wi-Fi | BCM4330 | Linux kernel | Linux kernel support, proprietary loaded firmware |
| Bluetooth | BCM4330 | Linux kernel | Linux kernel support, proprietary loaded firmware |
| NFC | PN544 | Linux kernel | Linux kernel support |
| GPS | BCM4751 | CyanogenMod blob | Proprietary userspace, no free implementation: BCM4751 |
| Accelerometer | K3DH | Linux kernel | Linux kernel support, free userspace |
| Compass | AKM8975 | Kernel sources | Linux kernel support, free userspace |
| Camera | M5MO/S5K5BAFX | Linux kernel | Linux kernel support, free userspace |
WARNING some content may not be the same on your device
| PIT | Linux name | mount point | partition type | block device | Description |
|---|---|---|---|---|---|
| GANG | None | None | ? | ? | ? |
| BOOT | None | None | ? | ? | ? |
| EFS | /efs/ | ext4 | mmcblk0p1 | modem data partition (content) | |
| SBL1 | mmcblk0p2 | Bootloader | |||
| SBL2 | mmcblk0p3 | Bootloader | |||
| PARAM | mmcblk0p4 | ||||
| KERNEL | None | zImage | mmcblk0p5 | boot partition, See IsorecRecoveryIssue for more details | |
| RECOVERY | None | zImage | mmcblk0p6 | recovery partition, See IsorecRecoveryIssue for more details | |
| CACHE | mmcblk0p7 | ||||
| MODEM | mmcblk0p8 | ||||
| FACTORYFS | mmcblk0p9 | ||||
| DATAFS | mmcblk0p10 | ||||
| UMS | mmcblk0p11 | ||||
| HIDDEN | mmcblk0p12 | ||||
| None | None | None | None | 0 size partition at the end of the EFS that has "Unused: Yes" | |
| Variant | Replicant compatible versions | SoC | Bootloader | Modem link | Modem protocol | RAM |
|---|---|---|---|---|---|---|
| Galaxy Note II (GT-N7100) | Replicant 4.2, 6.0 | Exynos 4412 | Signed | Isolated (HSIC) | samsung-ipc | 2G |
| Galaxy Note II (SGH-T889) | Not supported yet | Exynos 4412 | Signed? | ? | QMI | 2G |
| Galaxy Note II (SGH-i317) | Not supported yet | Exynos 4412 | Signed? | ? | QMI | 2G |
| Galaxy Note II (SGH-i317M) | Not supported yet | Exynos 4412 | Signed? | ? | QMI | 2G |
| Galaxy Note II 4G (GT-N7105) | None yet | Exynos 4412 | Signed | Isolated (HSIC? USB?) | QMI | 2G |
This page explains how to build Replicant for the Galaxy Note (N7000).
Do not build as root, always build as user.
See the build tips if you are facing issues.
All of the following build commands need to be run in the source tree root folder.
First, the toolchain needs to be built for replicant 6:
./vendor/replicant/build-toolchain
If you have executed any of the commands below and you want to run the toolchain build again, you will need to open a new shell.
Then, prepare the shell environment for the Replicant build:
. build/envsetup.sh lunch replicant_n7000-userdebug
Now you can start the build:
parallel_tasks=$(echo "$(grep 'processor' /proc/cpuinfo | wc -l ) + 1" | bc) make -j$parallel_tasks bacon
The -jn argument indicates the number of parallel tasks during the build. You can remove it from the command line to have only one task at a time.$parallel_tasks holds an optimized number of parallel tasks for your hardware. You may want to reduce this number if e.g. the computer runs out of RAM during the build.
Finally, sign the resulting images for replicant 6:
./vendor/replicant/sign-build n7000
The first time you run the script, it will ask you a few questions that are needed to generate the necessary signing keys.
out/dist/n7000/out/host/linux-x86/bin/The compass sensor is calculated from both the accelerometer and magnetic field sensors, which needs calibration to be accurate.
If the values reported by the compass sensor are not right, you can recalibrate the magnetic field sensor with the following steps:
Then start an application using the compass sensor and move the device in every direction, with a rotation around each axis: the device should now be calibrated.
Warning: installing an operating system, such as Replicant, may void your device's warranty and will erase the data stored on the device.
In order to install Replicant on your device, it is assumed that you have a computer running a GNU/Linux operating system and everything necessary to connect your device to the computer through USB available. Moreover, it is assumed that anyone performing the installation knows how to use command lines in a terminal and has basic knowledge about it.
The first step in the installation process is to download and set up the files that will be used to install Replicant to the device. The files must be downloaded on your computer first.
1. Find out what the latest image is: check out the Last image part of the general table on GalaxyNoteN7000
2. Download all the files listed for the device (including the checksum and the signatures) on ReplicantImages for the latest image
2. Make sure you have added the Replicant release key to your GPG keyring
3. Check the signature of the files:
gpg --armor --verify path/to/replicant-6.0-n7000.zip.asc path/to/replicant-6.0-n7000.zip gpg --armor --verify path/to/recovery-n7000.img.asc path/to/recovery-n7000.img
sha256sum -c n7000.sha256
The heimdall tool is required to flash the recovery image to the device.
Instructions to install heimdall: ToolsInstallation
You can either complete this step by using the device's internal storage or by using an external microSD card.
1. Make sure the device is started up and has an Android system running
2. Connect the USB cable to both the computer and the device
3. Enable USB mass storage on the device
4. Mount the mass storage on the computer
5. Copy the replicant-6.0-n7000.zip file at the origin of the mass storage
6. Safely unmount the mass storage on the computer
7. Disable USB mass storage on the device
1. Connect the microSD card to the computer (e.g. using an USB card reader)
2. Mount the microSD card on the computer
3. Copy the replicant-6.0-n7000.zip file at the origin of the microSD card
4. Safely unmount the microSD card on the computer
5. Disconnect the microSD card from the computer
6. Insert the microSD card in the device (make sure it is turned off before inserting the card)
Instructions to install ADB: ToolsInstallation
The next step in the installation process is to prepare the device for heimdall mode.
1. Make sure the device is completely turned off and the USB cable is disconnected from the device
2. Start the device by holding the following key combination: Volume down, Select, Power
3. Hold the key combination until the device shows a Warning message
4. Confirm that you want to download a custom OS (using volume up)
5. Make sure the device is in Downloading mode
4. Connect the USB cable to both the computer and the device
Now that both the computer and the device are set up, it is time to actually install the images to the device.
1. Install the recovery image to the device:
heimdall flash --KERNEL path/to/recovery-n7000.img
2. Make sure the device reboots to recovery
A data wipe is necessary if you switch from the factory image or a different Android distribution to Replicant. You also need to do a data wipe when upgrading to a new major release (e.g. from Replicant 4.2 to Replicant 6.0). Only when updating to a new minor release (e.g. from Replicant 6.0 0001 to Replicant 6.0 0002), a data wipe is usually not required.
3. Select Factory reset
4. Select Wipe data (keep media)
5. Confirm the data wipe by selecting Yes
6. Press the back key (if necessary) to get back to the general menu
7. Select Apply update
8. Select Choose from sdcard0
9. Select the system zip: replicant-6.0-n7000.zip
Note: if your device was running Android 4.2 and later, it may be located in the 0 directory
10. Confirm the installation
8. Select Choose from sdcard1
9. Select the system zip: replicant-6.0-n7000.zip
Note: if your device was running Android 4.2 and later, it may be located in the 0 directory
10. Confirm the installation
8. Select Apply from ADB
9. Back to the host computer, load the system zip with sideload:
adb sideload path/to/replicant-6.0-n7000.zip
11. Press the back key (if necessary) to get back to the general menu
If you did the data wipe after step 2, you will need to do a factory reset as well:
12. Select Factory reset
13. Select Full factory reset
14. Confirm the factory reset by selecting Yes
15. Press the back key (if necessary) to get back to the general menu
16. Select Reboot system now to reboot the device
Your device should now be running Replicant!
Some hardware functionalities require firmwares to be functional.
If you are interested in writing free software replacements for these firmware files, please contact us.
Firmwares are programs that do not run on the main CPU: instead, they run on separate chips. Some firmwares come pre-installed on the chip and some others need to be loaded by the CPU.
Since these firmwares are non-free software, we do not recommend using them nor do we distribute them.
| Firmware location | Related chip | Related function |
| /system/vendor/firmware/bcmdhd_apsta.bin | Broadcom BCM4330 | Wi-Fi host |
| /system/vendor/firmware/bcmdhd.cal | Broadcom BCM4330 | Wi-Fi calibration |
| /system/vendor/firmware/bcmdhd_mfg.bin | Broadcom BCM4330 | Wi-Fi |
| /system/vendor/firmware/bcmdhd_p2p.bin | Broadcom BCM4330 | Wi-Fi direct |
| /system/vendor/firmware/bcmdhd_sta.bin | Broadcom BCM4330 | Wi-Fi |
| /system/vendor/firmware/nvram_mfg.txt | Broadcom BCM4330 | Wi-Fi configuration |
| /system/vendor/firmware/nvram_mfg.txt_murata | Broadcom BCM4330 | Wi-Fi configuration |
| /system/vendor/firmware/nvram_mfg.txt_semcove | Broadcom BCM4330 | Wi-Fi configuration |
| /system/vendor/firmware/nvram_net.txt | Broadcom BCM4330 | Wi-Fi configuration |
| /system/vendor/firmware/nvram_net.txt_murata | Broadcom BCM4330 | Wi-Fi configuration |
| /system/vendor/firmware/nvram_net.txt_semcove | Broadcom BCM4330 | Wi-Fi configuration |
| /system/vendor/firmware/bcm4330B1.hcd | Broadcom BCM4330 | Bluetooth |
| /system/vendor/firmware/bcm4330B1_murata.hcd | Broadcom BCM4330 | Bluetooth |
| /system/vendor/firmware/bcm4330B1_semcosh.hcd | Broadcom BCM4330 | Bluetooth |
| /system/vendor/firmware/mfc_fw.bin | Samsung Exynos 4210 MFC | Hardware media encoding/decoding |
# heimdall print-pit --verbose
Heimdall v1.3.1, Copyright (c) 2010-2011, Benjamin Dobell, Glass Echidna
http://www.glassechidna.com.au
This software is provided free of charge. Copying and redistribution is
encouraged.
If you appreciate this software and you would like to support future
development please consider donating:
http://www.glassechidna.com.au/donate/
Initialising connection...
Detecting device...
Manufacturer: "SAMSUNG"
Product: "Gadget Serial"
Serial No: "?"
length: 18
device class: 2
S/N: 0
VID:PID: 04E8:685D
bcdDevice: 021B
iMan:iProd:iSer: 1:2:0
nb confs: 1
interface[0].altsetting[0]: num endpoints = 1
Class.SubClass.Protocol: 02.02.01
endpoint[0].address: 83
max packet size: 0010
polling interval: 09
interface[1].altsetting[0]: num endpoints = 2
Class.SubClass.Protocol: 0A.00.00
endpoint[0].address: 81
max packet size: 0200
polling interval: 00
endpoint[1].address: 02
max packet size: 0200
polling interval: 00
Claiming interface...
Attempt failed. Detaching driver...
Claiming interface again...
Setting up interface...
Checking if protocol is initialised...
Protocol is not initialised.
Initialising protocol...
Handshaking with Loke...
Beginning session...
Session begun with device of type: 131072
Downloading device's PIT file...
PIT file download sucessful
Entry Count: 15
Unknown 1: 0
Unknown 2: 0
Unknown 3: 0
Unknown 4: 0
Unknown 5: 0
Unknown 6: 0
Unknown 7: 0
Unknown 8: 0
--- Entry #0 ---
Unused: No
Partition Type: 2 (EXT4)
Partition Identifier: 0
Partition Flags: 0 (R)
Unknown 1: 0
Partition Block Size: 0
Partition Block Count: 0
Unknown 2: 0
Unknown 3: 0
Partition Name: GANG
Filename: emmc.img
--- Entry #1 ---
Unused: No
Partition Type: 2 (EXT4)
Partition Identifier: 1
Partition Flags: 0 (R)
Unknown 1: 0
Partition Block Size: 0
Partition Block Count: 0
Unknown 2: 0
Unknown 3: 0
Partition Name: BOOT
Filename: boot.bin
--- Entry #2 ---
Unused: No
Partition Type: 2 (EXT4)
Partition Identifier: 4
Partition Flags: 1 (R)
Unknown 1: 0
Partition Block Size: 8192
Partition Block Count: 40960
Unknown 2: 0
Unknown 3: 0
Partition Name: EFS
Filename: efs.img
--- Entry #3 ---
Unused: No
Partition Type: 2 (EXT4)
Partition Identifier: 2
Partition Flags: 0 (R)
Unknown 1: 0
Partition Block Size: 49152
Partition Block Count: 2560
Unknown 2: 0
Unknown 3: 0
Partition Name: SBL1
Filename: Sbl.bin
--- Entry #4 ---
Unused: No
Partition Type: 2 (EXT4)
Partition Identifier: 3
Partition Flags: 0 (R)
Unknown 1: 0
Partition Block Size: 53248
Partition Block Count: 2560
Unknown 2: 0
Unknown 3: 0
Partition Name: SBL2
Filename:
--- Entry #5 ---
Unused: No
Partition Type: 2 (EXT4)
Partition Identifier: 5
Partition Flags: 0 (R)
Unknown 1: 0
Partition Block Size: 57344
Partition Block Count: 16384
Unknown 2: 0
Unknown 3: 0
Partition Name: PARAM
Filename: param.lfs
--- Entry #6 ---
Unused: No
Partition Type: 2 (EXT4)
Partition Identifier: 6
Partition Flags: 0 (R)
Unknown 1: 0
Partition Block Size: 73728
Partition Block Count: 16384
Unknown 2: 0
Unknown 3: 0
Partition Name: KERNEL
Filename: zImage
--- Entry #7 ---
Unused: No
Partition Type: 2 (EXT4)
Partition Identifier: 7
Partition Flags: 0 (R)
Unknown 1: 0
Partition Block Size: 90112
Partition Block Count: 16384
Unknown 2: 0
Unknown 3: 0
Partition Name: RECOVERY
Filename:
--- Entry #8 ---
Unused: No
Partition Type: 2 (EXT4)
Partition Identifier: 8
Partition Flags: 1 (R)
Unknown 1: 0
Partition Block Size: 106496
Partition Block Count: 409600
Unknown 2: 0
Unknown 3: 0
Partition Name: CACHE
Filename: cache.img
--- Entry #9 ---
Unused: No
Partition Type: 2 (EXT4)
Partition Identifier: 9
Partition Flags: 0 (R)
Unknown 1: 0
Partition Block Size: 516096
Partition Block Count: 32768
Unknown 2: 0
Unknown 3: 0
Partition Name: MODEM
Filename: modem.bin
--- Entry #10 ---
Unused: No
Partition Type: 2 (EXT4)
Partition Identifier: 10
Partition Flags: 1 (R)
Unknown 1: 0
Partition Block Size: 548864
Partition Block Count: 1744896
Unknown 2: 0
Unknown 3: 0
Partition Name: FACTORYFS
Filename: factoryfs.img
--- Entry #11 ---
Unused: No
Partition Type: 2 (EXT4)
Partition Identifier: 11
Partition Flags: 1 (R)
Unknown 1: 0
Partition Block Size: 2293760
Partition Block Count: 4194304
Unknown 2: 0
Unknown 3: 0
Partition Name: DATAFS
Filename: data.img
--- Entry #12 ---
Unused: No
Partition Type: 2 (EXT4)
Partition Identifier: 12
Partition Flags: 2 (R/W)
Unknown 1: 0
Partition Block Size: 6488064
Partition Block Count: 23232512
Unknown 2: 0
Unknown 3: 0
Partition Name: UMS
Filename: ums.rfs
--- Entry #13 ---
Unused: No
Partition Type: 2 (EXT4)
Partition Identifier: 13
Partition Flags: 1 (R)
Unknown 1: 0
Partition Block Size: 29720576
Partition Block Count: 1048576
Unknown 2: 0
Unknown 3: 0
Partition Name: HIDDEN
Filename: hidden.img
--- Entry #14 ---
Unused: Yes
Partition Type: 1 (Unknown)
Partition Identifier: 9
Partition Flags: 0 (R)
Unknown 1: 0
Partition Block Size: 0
Partition Block Count: 0
Unknown 2: 0
Unknown 3: 0
Partition Name:
Filename:
Ending session...
Rebooting device...
Re-attaching kernel driver...
| Variant | Replicant compatible versions | SoC | Bootloader | Modem link | Modem protocol | RAM |
|---|---|---|---|---|---|---|
| Galaxy S (GT-I9000) | Replicant 2.3, 4.0, 4.2 | Exynos 31101 | Signed | Not isolated (RAM) | samsung-ipc | 512M |
1 This system on a chip was was previously known as Hummingbird or S5PC110
This page explains how to build Replicant for the Galaxy S 2 (I9100).
Do not build as root, always build as user.
See the build tips if you are facing issues.
All of the following build commands need to be run in the source tree root folder.
First, the toolchain needs to be built for replicant 6:
./vendor/replicant/build-toolchain
If you have executed any of the commands below and you want to run the toolchain build again, you will need to open a new shell.
Then, prepare the shell environment for the Replicant build:
. build/envsetup.sh
lunch replicant_i9100-userdebug
Now you can start the build:
parallel_tasks=$(echo "$(grep 'processor' /proc/cpuinfo | wc -l ) + 1" | bc)
make -j$parallel_tasks bacon
The -jn argument indicates the number of parallel tasks during the build. You can remove it from the command line to have only one task at a time.$parallel_tasks holds an optimized number of parallel tasks for your hardware. You may want to reduce this number if e.g. the computer runs out of RAM during the build.
Finally, sign the resulting images for replicant 6:
./vendor/replicant/sign-build i9100
The first time you run the script, it will ask you a few questions that are needed to generate the necessary signing keys.
out/dist/i9100/out/host/linux-x86/bin/The compass sensor is calculated from both the accelerometer and magnetic field sensors, which needs calibration to be accurate.
If the values reported by the compass sensor are not right, you can recalibrate the magnetic field sensor with the following steps:
Connect to the device via ADB with sufficient permissions and run:
adb shell stop zygote adb shell rm /data/misc/akfs.txt adb shell start zygote
Then start an application using the compass sensor and move the device in every direction, with a rotation around each axis: the device should now be calibrated.
Warning: installing an operating system, such as Replicant, may void your device's warranty and will erase the data stored on the device.
In order to install Replicant on your device, it is assumed that you have a computer running a GNU/Linux operating system and everything necessary to connect your device to the computer through USB available. Moreover, it is assumed that anyone performing the installation knows how to use command lines in a terminal and has basic knowledge about it.
The first step in the installation process is to download and set up the files that will be used to install Replicant to the device. The files must be downloaded on your computer first.
1. Find out what the latest image is: check out the Last image part of the general table on GalaxyS2I9100
2. Download all the files listed for the device (including the checksum and the signatures) on ReplicantImages for the latest image
2. Make sure you have added the Replicant release key to your GPG keyring
3. Check the signature of the files:
gpg --armor --verify path/to/replicant-6.0-i9100.zip.asc path/to/replicant-6.0-i9100.zip
gpg --armor --verify path/to/recovery-i9100.img.asc path/to/recovery-i9100.img
sha256sum -c i9100.sha256
The heimdall tool is required to flash the recovery image to the device.
Instructions to install heimdall: ToolsInstallation
You can either complete this step by using the device's internal storage or by using an external microSD card.
1. Make sure the device is started up and has an Android system running
2. Connect the USB cable to both the computer and the device
3. Enable USB mass storage on the device
4. Mount the mass storage on the computer
5. Copy the replicant-6.0-i9100.zip file at the origin of the mass storage
6. Safely unmount the mass storage on the computer
7. Disable USB mass storage on the device
1. Connect the microSD card to the computer (e.g. using an USB card reader)
2. Mount the microSD card on the computer
3. Copy the replicant-6.0-i9100.zip file at the origin of the microSD card
4. Safely unmount the microSD card on the computer
5. Disconnect the microSD card from the computer
6. Insert the microSD card in the device (make sure it is turned off before inserting the card)
Instructions to install ADB: ToolsInstallation
The next step in the installation process is to prepare the device for heimdall mode.
1. Make sure the device is completely turned off and the USB cable is disconnected from the device
2. Start the device by holding the following key combination: Volume down, Select, Power
3. Hold the key combination until the device shows a Warning message
4. Confirm that you want to download a custom OS (using volume up)
5. Make sure the device is in Downloading mode
4. Connect the USB cable to both the computer and the device
Now that both the computer and the device are set up, it is time to actually install the images to the device.
1. Install the recovery image to the device:
heimdall flash --KERNEL path/to/recovery-i9100.img
2. Make sure the device reboots to recovery
A data wipe is necessary if you switch from the factory image or a different Android distribution to Replicant. You also need to do a data wipe when upgrading to a new major release (e.g. from Replicant 4.2 to Replicant 6.0). Only when updating to a new minor release (e.g. from Replicant 6.0 0001 to Replicant 6.0 0002), a data wipe is usually not required.
3. Select Factory reset
4. Select Wipe data (keep media)
5. Confirm the data wipe by selecting Yes
6. Press the back key (if necessary) to get back to the general menu
7. Select Apply update
8. Select Choose from sdcard0
9. Select the system zip: replicant-6.0-i9100.zip
Note: if your device was running Android 4.2 and later, it may be located in the 0 directory
10. Confirm the installation
8. Select Choose from sdcard1
9. Select the system zip: replicant-6.0-i9100.zip
Note: if your device was running Android 4.2 and later, it may be located in the 0 directory
10. Confirm the installation
8. Select Apply from ADB
9. Back to the host computer, load the system zip with sideload:
adb sideload path/to/replicant-6.0-i9100.zip
11. Press the back key (if necessary) to get back to the general menu
If you did the data wipe after step 2, you will need to do a factory reset as well:
12. Select Factory reset
13. Select Full factory reset
14. Confirm the factory reset by selecting Yes
15. Press the back key (if necessary) to get back to the general menu
16. Select Reboot system now to reboot the device
Your device should now be running Replicant!
The various integrated circuits found on a mobile device run small pieces of dedicated software that are called firmwares, when powerful enough.
Thus, these programs do not run on the main processor: instead, they are executed on other integrated circuits.
Some firmwares come pre-installed on the integrated circuit while some others have to be loaded to the circuit by the main processor and are usually distributed along with the system.
When those firmwares are proprietary, they are not distributed along with Replicant, nor do we recommend using them.
| Firmware location | Related chip | Related functionality |
| /system/vendor/firmware/bcmdhd_apsta.bin | Broadcom BCM4330 | Wi-Fi host |
| /system/vendor/firmware/bcmdhd.cal | Broadcom BCM4330 | Wi-Fi calibration |
| /system/vendor/firmware/bcmdhd_mfg.bin | Broadcom BCM4330 | Wi-Fi |
| /system/vendor/firmware/bcmdhd_p2p.bin | Broadcom BCM4330 | Wi-Fi direct |
| /system/vendor/firmware/bcmdhd_sta.bin | Broadcom BCM4330 | Wi-Fi |
| /system/vendor/firmware/nvram_mfg.txt | Broadcom BCM4330 | Wi-Fi configuration |
| /system/vendor/firmware/nvram_mfg.txt_murata | Broadcom BCM4330 | Wi-Fi configuration |
| /system/vendor/firmware/nvram_net.txt | Broadcom BCM4330 | Wi-Fi configuration |
| /system/vendor/firmware/nvram_net.txt_murata | Broadcom BCM4330 | Wi-Fi configuration |
| /system/vendor/firmware/bcm4330B1.hcd | Broadcom BCM4330 | Bluetooth |
| /system/vendor/firmware/bcm4330B1_murata.hcd | Broadcom BCM4330 | Bluetooth |
| /system/vendor/firmware/bcm4330B1_semcosh.hcd | Broadcom BCM4330 | Bluetooth |
| /system/vendor/firmware/mfc_fw.bin | Samsung Exynos 4210 MFC | Hardware media encoding/decoding |
$ heimdall print-pit Heimdall v1.4.2 Copyright (c) 2010-2017 Benjamin Dobell, Glass Echidna http://www.glassechidna.com.au/ This software is provided free of charge. Copying and redistribution is encouraged. If you appreciate this software and you would like to support future development please consider donating: http://www.glassechidna.com.au/donate/ Initialising connection... Detecting device... Claiming interface... Setting up interface... Initialising protocol... Protocol initialisation successful. Beginning session... Some devices may take up to 2 minutes to respond. Please be patient! Session begun. Downloading device's PIT file... PIT file download successful. Entry Count: 15 Unknown 1: 0 Unknown 2: 0 Unknown 3: 0 Unknown 4: 0 Unknown 5: 0 Unknown 6: 0 Unknown 7: 0 Unknown 8: 0 --- Entry #0 --- Binary Type: 0 (AP) Device Type: 2 (MMC) Identifier: 0 Attributes: 0 (Read-Only) Update Attributes: 0 Partition Block Size/Offset: 0 Partition Block Count: 0 File Offset (Obsolete): 0 File Size (Obsolete): 0 Partition Name: GANG Flash Filename: emmc.img FOTA Filename: --- Entry #1 --- Binary Type: 0 (AP) Device Type: 2 (MMC) Identifier: 1 Attributes: 0 (Read-Only) Update Attributes: 0 Partition Block Size/Offset: 0 Partition Block Count: 0 File Offset (Obsolete): 0 File Size (Obsolete): 0 Partition Name: BOOT Flash Filename: boot.bin FOTA Filename: --- Entry #2 --- Binary Type: 0 (AP) Device Type: 2 (MMC) Identifier: 4 Attributes: 1 (Read/Write) Update Attributes: 0 Partition Block Size/Offset: 8192 Partition Block Count: 40960 File Offset (Obsolete): 0 File Size (Obsolete): 0 Partition Name: EFS Flash Filename: efs.img FOTA Filename: --- Entry #3 --- Binary Type: 0 (AP) Device Type: 2 (MMC) Identifier: 2 Attributes: 0 (Read-Only) Update Attributes: 0 Partition Block Size/Offset: 49152 Partition Block Count: 2560 File Offset (Obsolete): 0 File Size (Obsolete): 0 Partition Name: SBL1 Flash Filename: Sbl.bin FOTA Filename: --- Entry #4 --- Binary Type: 0 (AP) Device Type: 2 (MMC) Identifier: 3 Attributes: 0 (Read-Only) Update Attributes: 0 Partition Block Size/Offset: 53248 Partition Block Count: 2560 File Offset (Obsolete): 0 File Size (Obsolete): 0 Partition Name: SBL2 Flash Filename: FOTA Filename: --- Entry #5 --- Binary Type: 0 (AP) Device Type: 2 (MMC) Identifier: 5 Attributes: 0 (Read-Only) Update Attributes: 0 Partition Block Size/Offset: 57344 Partition Block Count: 16384 File Offset (Obsolete): 0 File Size (Obsolete): 0 Partition Name: PARAM Flash Filename: param.lfs FOTA Filename: --- Entry #6 --- Binary Type: 0 (AP) Device Type: 2 (MMC) Identifier: 6 Attributes: 0 (Read-Only) Update Attributes: 0 Partition Block Size/Offset: 73728 Partition Block Count: 16384 File Offset (Obsolete): 0 File Size (Obsolete): 0 Partition Name: KERNEL Flash Filename: zImage FOTA Filename: --- Entry #7 --- Binary Type: 0 (AP) Device Type: 2 (MMC) Identifier: 7 Attributes: 0 (Read-Only) Update Attributes: 0 Partition Block Size/Offset: 90112 Partition Block Count: 16384 File Offset (Obsolete): 0 File Size (Obsolete): 0 Partition Name: RECOVERY Flash Filename: FOTA Filename: --- Entry #8 --- Binary Type: 0 (AP) Device Type: 2 (MMC) Identifier: 8 Attributes: 1 (Read/Write) Update Attributes: 0 Partition Block Size/Offset: 106496 Partition Block Count: 204800 File Offset (Obsolete): 0 File Size (Obsolete): 0 Partition Name: CACHE Flash Filename: cache.img FOTA Filename: --- Entry #9 --- Binary Type: 0 (AP) Device Type: 2 (MMC) Identifier: 9 Attributes: 0 (Read-Only) Update Attributes: 0 Partition Block Size/Offset: 311296 Partition Block Count: 32768 File Offset (Obsolete): 0 File Size (Obsolete): 0 Partition Name: MODEM Flash Filename: modem.bin FOTA Filename: --- Entry #10 --- Binary Type: 0 (AP) Device Type: 2 (MMC) Identifier: 10 Attributes: 1 (Read/Write) Update Attributes: 0 Partition Block Size/Offset: 344064 Partition Block Count: 1048576 File Offset (Obsolete): 0 File Size (Obsolete): 0 Partition Name: FACTORYFS Flash Filename: factoryfs.img FOTA Filename: --- Entry #11 --- Binary Type: 0 (AP) Device Type: 2 (MMC) Identifier: 11 Attributes: 1 (Read/Write) Update Attributes: 0 Partition Block Size/Offset: 1392640 Partition Block Count: 4194304 File Offset (Obsolete): 0 File Size (Obsolete): 0 Partition Name: DATAFS Flash Filename: data.img FOTA Filename: --- Entry #12 --- Binary Type: 0 (AP) Device Type: 2 (MMC) Identifier: 12 Attributes: 2 (STL Read-Only) Update Attributes: 0 Partition Block Size/Offset: 5586944 Partition Block Count: 24133632 File Offset (Obsolete): 0 File Size (Obsolete): 0 Partition Name: UMS Flash Filename: FOTA Filename: --- Entry #13 --- Binary Type: 0 (AP) Device Type: 2 (MMC) Identifier: 13 Attributes: 1 (Read/Write) Update Attributes: 0 Partition Block Size/Offset: 29720576 Partition Block Count: 1048576 File Offset (Obsolete): 0 File Size (Obsolete): 0 Partition Name: HIDDEN Flash Filename: hidden.img FOTA Filename: --- Entry #14 --- Binary Type: 1 (CP) Device Type: 1 (File/FAT) Identifier: 9 Attributes: 0 (Read-Only) Update Attributes: 0 Partition Block Size/Offset: 0 Partition Block Count: 0 File Offset (Obsolete): 0 File Size (Obsolete): 0 Partition Name: Flash Filename: FOTA Filename: Ending session... Rebooting device... Releasing device interface...
This page explains how to build Replicant for the Galaxy S 3 (I9300).
Do not build as root, always build as user.
See the build tips if you are facing issues.
All of the following build commands need to be run in the source tree root folder.
First, the toolchain needs to be built for replicant 6:
./vendor/replicant/build-toolchain
If you have executed any of the commands below and you want to run the toolchain build again, you will need to open a new shell.
Then, prepare the shell environment for the Replicant build:
. build/envsetup.sh
lunch replicant_i9300-userdebug
Now you can start the build:
parallel_tasks=$(echo "$(grep 'processor' /proc/cpuinfo | wc -l ) + 1" | bc)
make -j$parallel_tasks bacon
The -jn argument indicates the number of parallel tasks during the build. You can remove it from the command line to have only one task at a time.$parallel_tasks holds an optimized number of parallel tasks for your hardware. You may want to reduce this number if e.g. the computer runs out of RAM during the build.
Finally, sign the resulting images for replicant 6:
./vendor/replicant/sign-build i9300
The first time you run the script, it will ask you a few questions that are needed to generate the necessary signing keys.
out/dist/i9300/out/host/linux-x86/bin/The compass sensor is calculated from both the accelerometer and magnetic field sensors, which needs calibration to be accurate.
If the values reported by the compass sensor are not right, you can recalibrate the magnetic field sensor with the following steps:
Then start an application using the compass sensor and move the device in every direction, with a rotation around each axis: the device should now be calibrated.
Warning: installing an operating system, such as Replicant, may void your device's warranty and will erase the data stored on the device.
In order to install Replicant on your device, it is assumed that you have a computer running a GNU/Linux operating system and everything necessary to connect your device to the computer through USB available. Moreover, it is assumed that anyone performing the installation knows how to use command lines in a terminal and has basic knowledge about it.
The first step in the installation process is to download and set up the files that will be used to install Replicant to the device. The files must be downloaded on your computer first.
1. Find out what the latest image is: check out the Last image part of the general table on GalaxyS3I9300
2. Download all the files listed for the device (including the checksum and the signatures) on ReplicantImages for the latest image
2. Make sure you have added the Replicant release key to your GPG keyring
3. Check the signature of the files:
gpg --armor --verify path/to/replicant-6.0-i9300.zip.asc path/to/replicant-6.0-i9300.zip
gpg --armor --verify path/to/recovery-i9300.img.asc path/to/recovery-i9300.img
sha256sum -c i9300.sha256
The heimdall tool is required to flash the recovery image to the device.
Instructions to install heimdall: ToolsInstallation
You can either complete this step by using the device's internal storage or by using an external microSD card.
1. Make sure the device is started up and has an Android system running
2. Connect the USB cable to both the computer and the device
3. Enable USB mass storage on the device
4. Mount the mass storage on the computer
5. Copy the replicant-6.0-i9300.zip file at the origin of the mass storage
6. Safely unmount the mass storage on the computer
7. Disable USB mass storage on the device
1. Connect the microSD card to the computer (e.g. using an USB card reader)
2. Mount the microSD card on the computer
3. Copy the replicant-6.0-i9300.zip file at the origin of the microSD card
4. Safely unmount the microSD card on the computer
5. Disconnect the microSD card from the computer
6. Insert the microSD card in the device (make sure it is turned off before inserting the card)
Instructions to install ADB: ToolsInstallation
The next step in the installation process is to prepare the device for heimdall mode.
1. Make sure the device is completely turned off and the USB cable is disconnected from the device
2. Start the device by holding the following key combination: Volume down, Select, Power
3. Hold the key combination until the device shows a Warning message
4. Confirm that you want to download a custom OS (using volume up)
5. Make sure the device is in Downloading mode
4. Connect the USB cable to both the computer and the device
Now that both the computer and the device are set up, it is time to actually install the images to the device.
1. Install the recovery image to the device:
heimdall flash --BOOT path/to/recovery-i9300.img --RECOVERY path/to/recovery-i9300.img
2. Make sure the device reboots to recovery
A data wipe is necessary if you switch from the factory image or a different Android distribution to Replicant. You also need to do a data wipe when upgrading to a new major release (e.g. from Replicant 4.2 to Replicant 6.0). Only when updating to a new minor release (e.g. from Replicant 6.0 0001 to Replicant 6.0 0002), a data wipe is usually not required.
3. Select Factory reset
4. Select Wipe data (keep media)
5. Confirm the data wipe by selecting Yes
6. Press the back key (if necessary) to get back to the general menu
7. Select Apply update
8. Select Choose from emulated
9. Select the system zip: replicant-6.0-i9300.zip
Note: if your device was running Android 4.2 and later, it may be located in the 0 directory
10. Confirm the installation
8. Select Choose from sdcard1
9. Select the system zip: replicant-6.0-i9300.zip
Note: if your device was running Android 4.2 and later, it may be located in the 0 directory
10. Confirm the installation
8. Select Apply from ADB
9. Back to the host computer, load the system zip with sideload:
adb sideload path/to/replicant-6.0-i9300.zip
11. Press the back key (if necessary) to get back to the general menu
If you did the data wipe after step 2, you will need to do a factory reset as well:
12. Select Factory reset
13. Select Full factory reset
14. Confirm the factory reset by selecting Yes
15. Press the back key (if necessary) to get back to the general menu
16. Select Reboot system now to reboot the device
Your device should now be running Replicant!
Some hardware functionalities require firmwares to be functional.
If you are interested in writing free software replacements for these firmware files, please contact us.
Firmwares are programs that do not run on the main CPU: instead, they run on separate chips. Some firmwares come pre-installed on the chip and some others need to be loaded by the CPU.
Since these firmwares are non-free software, we do not recommend using them nor do we distribute them.
| Firmware location | Related chip | Function |
| /system/vendor/firmware/bcmdhd_apsta.bin_b2 | BCM4334 | Wi-Fi Host |
| /system/vendor/firmware/bcmdhd_mfg.bin_b2 | BCM4334 | Wi-Fi |
| /system/vendor/firmware/bcmdhd_p2p.bin_b2 | BCM4334 | Wi-Fi Direct |
| /system/vendor/firmware/bcmdhd_sta.bin_b2 | BCM4334 | Wi-Fi |
| /system/vendor/firmware/nvram_mfg.txt | BCM4334 | Wi-Fi |
| /system/vendor/firmware/nvram_mfg.txt_murata | BCM4334 | Wi-Fi |
| /system/vendor/firmware/nvram_mfg.txt_semcosh | BCM4334 | Wi-Fi |
| /system/vendor/firmware/nvram_net.txt | BCM4334 | Wi-Fi |
| /system/vendor/firmware/nvram_net.txt_murata | BCM4334 | Wi-Fi |
| /system/vendor/firmware/nvram_net.txt_semcosh | BCM4334 | Wi-Fi |
| /system/vendor/firmware/bcm4334.hcd | BCM4334 | Bluetooth |
| /system/vendor/firmware/bcm4334_murata.hcd | BCM4334 | Bluetooth |
| /system/vendor/firmware/bcm4334_semco.hcd | BCM4334 | Bluetooth |
| /system/vendor/firmware/bcm4334_semcosh.hcd | BCM4334 | Bluetooth |
| /system/vendor/firmware/mfc_fw.bin | MFC | Hardware media encoding/decoding |
| /system/vendor/firmware/SlimISP_BH.bin | S5C73M3 | Back camera |
| /system/vendor/firmware/SlimISP_GD.bin | S5C73M3 | Back camera |
| /system/vendor/firmware/SlimISP_GH.bin | S5C73M3 | Back camera |
| /system/vendor/firmware/SlimISP_GK.bin | S5C73M3 | Back camera |
| /system/vendor/firmware/SlimISP_JH.bin | S5C73M3 | Back camera |
| /system/vendor/firmware/SlimISP_PH.bin | S5C73M3 | Back camera |
| /system/vendor/firmware/SlimISP_WH.bin | S5C73M3 | Back camera |
| /system/vendor/firmware/SlimISP_ZD.bin | S5C73M3 | Back camera |
| /system/vendor/firmware/SlimISP_ZH.bin | S5C73M3 | Back camera |
| /system/vendor/firmware/SlimISP_ZK.bin | S5C73M3 | Back camera |
| /system/vendor/firmware/SlimISP_ZM.bin | S5C73M3 | Back camera |
| /system/vendor/firmware/fimc_is_fw.bin | FIMC-IS | Front camera |
| /system/vendor/firmware/setfile.bin | FIMC-IS | Front camera |
$ heimdall print-pit Heimdall v1.4.2 Copyright (c) 2010-2017 Benjamin Dobell, Glass Echidna http://www.glassechidna.com.au/ This software is provided free of charge. Copying and redistribution is encouraged. If you appreciate this software and you would like to support future development please consider donating: http://www.glassechidna.com.au/donate/ Initialising connection... Detecting device... Claiming interface... Setting up interface... Initialising protocol... Protocol initialisation successful. Beginning session... Some devices may take up to 2 minutes to respond. Please be patient! Session begun. Downloading device's PIT file... PIT file download successful. Entry Count: 16 Unknown 1: 1598902083 Unknown 2: 844251476 Unknown 3: 30797 Unknown 4: 0 Unknown 5: 0 Unknown 6: 0 Unknown 7: 0 Unknown 8: 0 --- Entry #0 --- Binary Type: 0 (AP) Device Type: 2 (MMC) Identifier: 80 Attributes: 2 (STL Read-Only) Update Attributes: 1 (FOTA) Partition Block Size/Offset: 0 Partition Block Count: 1734 File Offset (Obsolete): 0 File Size (Obsolete): 0 Partition Name: BOOTLOADER Flash Filename: sboot.bin FOTA Filename: --- Entry #1 --- Binary Type: 0 (AP) Device Type: 2 (MMC) Identifier: 81 Attributes: 5 (Read/Write) Update Attributes: 1 (FOTA) Partition Block Size/Offset: 1734 Partition Block Count: 312 File Offset (Obsolete): 0 File Size (Obsolete): 0 Partition Name: TZSW Flash Filename: tz.img FOTA Filename: --- Entry #2 --- Binary Type: 0 (AP) Device Type: 2 (MMC) Identifier: 70 Attributes: 5 (Read/Write) Update Attributes: 1 (FOTA) Partition Block Size/Offset: 34 Partition Block Count: 16 File Offset (Obsolete): 0 File Size (Obsolete): 0 Partition Name: PIT Flash Filename: mx.pit FOTA Filename: --- Entry #3 --- Binary Type: 0 (AP) Device Type: 2 (MMC) Identifier: 71 Attributes: 5 (Read/Write) Update Attributes: 1 (FOTA) Partition Block Size/Offset: 50 Partition Block Count: 2048 File Offset (Obsolete): 0 File Size (Obsolete): 0 Partition Name: MD5HDR Flash Filename: md5.img FOTA Filename: --- Entry #4 --- Binary Type: 0 (AP) Device Type: 2 (MMC) Identifier: 1 Attributes: 5 (Read/Write) Update Attributes: 1 (FOTA) Partition Block Size/Offset: 8192 Partition Block Count: 8192 File Offset (Obsolete): 0 File Size (Obsolete): 0 Partition Name: BOTA0 Flash Filename: - FOTA Filename: --- Entry #5 --- Binary Type: 0 (AP) Device Type: 2 (MMC) Identifier: 2 Attributes: 5 (Read/Write) Update Attributes: 1 (FOTA) Partition Block Size/Offset: 16384 Partition Block Count: 8192 File Offset (Obsolete): 0 File Size (Obsolete): 0 Partition Name: BOTA1 Flash Filename: - FOTA Filename: --- Entry #6 --- Binary Type: 0 (AP) Device Type: 2 (MMC) Identifier: 3 Attributes: 5 (Read/Write) Update Attributes: 5 (FOTA) Partition Block Size/Offset: 24576 Partition Block Count: 40960 File Offset (Obsolete): 0 File Size (Obsolete): 0 Partition Name: EFS Flash Filename: efs.img FOTA Filename: --- Entry #7 --- Binary Type: 0 (AP) Device Type: 2 (MMC) Identifier: 4 Attributes: 5 (Read/Write) Update Attributes: 1 (FOTA) Partition Block Size/Offset: 65536 Partition Block Count: 16384 File Offset (Obsolete): 0 File Size (Obsolete): 0 Partition Name: PARAM Flash Filename: param.bin FOTA Filename: --- Entry #8 --- Binary Type: 0 (AP) Device Type: 2 (MMC) Identifier: 5 Attributes: 5 (Read/Write) Update Attributes: 1 (FOTA) Partition Block Size/Offset: 81920 Partition Block Count: 16384 File Offset (Obsolete): 0 File Size (Obsolete): 0 Partition Name: BOOT Flash Filename: boot.img FOTA Filename: --- Entry #9 --- Binary Type: 0 (AP) Device Type: 2 (MMC) Identifier: 6 Attributes: 5 (Read/Write) Update Attributes: 1 (FOTA) Partition Block Size/Offset: 98304 Partition Block Count: 16384 File Offset (Obsolete): 0 File Size (Obsolete): 0 Partition Name: RECOVERY Flash Filename: recovery.img FOTA Filename: --- Entry #10 --- Binary Type: 0 (AP) Device Type: 2 (MMC) Identifier: 7 Attributes: 5 (Read/Write) Update Attributes: 1 (FOTA) Partition Block Size/Offset: 114688 Partition Block Count: 65536 File Offset (Obsolete): 0 File Size (Obsolete): 0 Partition Name: RADIO Flash Filename: modem.bin FOTA Filename: --- Entry #11 --- Binary Type: 0 (AP) Device Type: 2 (MMC) Identifier: 8 Attributes: 5 (Read/Write) Update Attributes: 5 (FOTA) Partition Block Size/Offset: 180224 Partition Block Count: 2097152 File Offset (Obsolete): 0 File Size (Obsolete): 0 Partition Name: CACHE Flash Filename: cache.img FOTA Filename: --- Entry #12 --- Binary Type: 0 (AP) Device Type: 2 (MMC) Identifier: 9 Attributes: 5 (Read/Write) Update Attributes: 5 (FOTA) Partition Block Size/Offset: 2277376 Partition Block Count: 3145728 File Offset (Obsolete): 0 File Size (Obsolete): 0 Partition Name: SYSTEM Flash Filename: system.img FOTA Filename: --- Entry #13 --- Binary Type: 0 (AP) Device Type: 2 (MMC) Identifier: 10 Attributes: 5 (Read/Write) Update Attributes: 5 (FOTA) Partition Block Size/Offset: 5423104 Partition Block Count: 1146880 File Offset (Obsolete): 0 File Size (Obsolete): 0 Partition Name: HIDDEN Flash Filename: hidden.img FOTA Filename: --- Entry #14 --- Binary Type: 0 (AP) Device Type: 2 (MMC) Identifier: 11 Attributes: 5 (Read/Write) Update Attributes: 1 (FOTA) Partition Block Size/Offset: 6569984 Partition Block Count: 16384 File Offset (Obsolete): 0 File Size (Obsolete): 0 Partition Name: OTA Flash Filename: - FOTA Filename: --- Entry #15 --- Binary Type: 0 (AP) Device Type: 2 (MMC) Identifier: 12 Attributes: 5 (Read/Write) Update Attributes: 5 (FOTA) Partition Block Size/Offset: 6586368 Partition Block Count: 0 File Offset (Obsolete): 0 File Size (Obsolete): 0 Partition Name: USERDATA Flash Filename: userdata.img FOTA Filename: remained Ending session... Rebooting device... Releasing device interface...
Note that this information may or may not be exhaustive.
It also may or may not contain all known issues or good point about this device.
This page explains how to build Replicant for the Galaxy S 3 4G (I9305).
Do not build as root, always build as user.
See the build tips if you are facing issues.
All of the following build commands need to be run in the source tree root folder.
First, the toolchain needs to be built:
./vendor/replicant/build-toolchain
If you have executed any of the commands below and you want to run the toolchain build again, you will need to open a new shell.
Then, prepare the shell environment for the Replicant build:
. build/envsetup.sh lunch replicant_i9305-userdebug
Now you can start the build:
parallel_tasks=$(echo "$(grep 'processor' /proc/cpuinfo | wc -l ) + 1" | bc) make -j$parallel_tasks bacon
The -jn argument indicates the number of parallel tasks during the build. You can remove it from the command line to have only one task at a time.$parallel_tasks holds an optimized number of parallel tasks for your hardware. You may want to reduce this number if e.g. the computer runs out of RAM during the build.
Finally, sign the resulting images:
./vendor/replicant/sign-build i9305
The first time you run the script, it will ask you a few questions that are needed to generate the necessary signing keys.
out/dist/i9305/out/host/linux-x86/bin/Warning: installing an operating system, such as Replicant, may void your device's warranty and will erase the data stored on the device.
In order to install Replicant on your device, it is assumed that you have a computer running a GNU/Linux operating system and everything necessary to connect your device to the computer through USB available. Moreover, it is assumed that anyone performing the installation knows how to use command lines in a terminal and has basic knowledge about it.
The first step in the installation process is to download and set up the files that will be used to install Replicant to the device. The files must be downloaded on your computer first.
1. Find out what the latest image is: check out the Last image part of the general table on GalaxyS3I9305
2. Download all the files listed for the device (including the checksum and the signatures) on ReplicantImages for the latest image
2. Make sure you have added the Replicant release key to your GPG keyring
3. Check the signature of the files:
gpg --armor --verify path/to/replicant-6.0-i9305.zip.asc path/to/replicant-6.0-i9305.zip gpg --armor --verify path/to/recovery-i9305.img.asc path/to/recovery-i9305.img
sha256sum -c i9305.sha256
The heimdall tool is required to flash the recovery image to the device.
Instructions to install heimdall: ToolsInstallation
You can either complete this step by using the device's internal storage or by using an external microSD card.
1. Make sure the device is started up and has an Android system running
2. Connect the USB cable to both the computer and the device
3. Enable USB mass storage on the device
4. Mount the mass storage on the computer
5. Copy the replicant-6.0-i9305.zip file at the origin of the mass storage
6. Safely unmount the mass storage on the computer
7. Disable USB mass storage on the device
1. Connect the microSD card to the computer (e.g. using an USB card reader)
2. Mount the microSD card on the computer
3. Copy the replicant-6.0-i9305.zip file at the origin of the microSD card
4. Safely unmount the microSD card on the computer
5. Disconnect the microSD card from the computer
6. Insert the microSD card in the device (make sure it is turned off before inserting the card)
Instructions to install ADB: ToolsInstallation
The next step in the installation process is to prepare the device for heimdall mode.
1. Make sure the device is completely turned off and the USB cable is disconnected from the device
2. Start the device by holding the following key combination: Volume down, Select, Power
3. Hold the key combination until the device shows a Warning message
4. Confirm that you want to download a custom OS (using volume up)
5. Make sure the device is in Downloading mode
4. Connect the USB cable to both the computer and the device
Now that both the computer and the device are set up, it is time to actually install the images to the device.
1. Install the recovery image to the device:
heimdall flash --BOOT path/to/recovery-i9305.img --RECOVERY path/to/recovery-i9305.img
2. Make sure the device reboots to recovery
A factory reset is necessary if you switch from the factory image or a different Android distribution to Replicant. You also need to do a factory reset when upgrading to a new major release (e.g. from Replicant 4.2 to Replicant 6.0). Only when updating to a new minor release (e.g. from Replicant 6.0 0001 to Replicant 6.0 0002), a factory reset is usually not required.
3. Select Factory reset
4. Select Full factory reset
5. Confirm the data wipe by selecting Yes
6. Press the back key (if necessary) to get back to the general menu
7. Select Apply update
8. Select Choose from emulated
9. Select the system zip: replicant-6.0-i9305.zip
Note: if your device was running Android 4.2 and later, it may be located in the 0 directory
10. Confirm the installation
8. Select Choose from sdcard1
9. Select the system zip: replicant-6.0-i9305.zip
Note: if your device was running Android 4.2 and later, it may be located in the 0 directory
10. Confirm the installation
8. Select Apply from ADB
9. Back to the host computer, load the system zip with sideload:
adb sideload path/to/replicant-6.0-i9305.zip
11. Press the back key (if necessary) to get back to the general menu
12. Select Reboot system now to reboot the device
Your device should now be running Replicant!
$ heimdall print-pit Heimdall v1.4.2 Copyright (c) 2010-2017 Benjamin Dobell, Glass Echidna http://www.glassechidna.com.au/ This software is provided free of charge. Copying and redistribution is encouraged. If you appreciate this software and you would like to support future development please consider donating: http://www.glassechidna.com.au/donate/ Initialising connection... Detecting device... Claiming interface... Setting up interface... Initialising protocol... Protocol initialisation successful. Beginning session... Some devices may take up to 2 minutes to respond. Please be patient! Session begun. Downloading device's PIT file... PIT file download successful. Entry Count: 20 Unknown 1: 1598902083 Unknown 2: 844251476 Unknown 3: 30797 Unknown 4: 19757 Unknown 5: 19780 Unknown 6: 0 Unknown 7: 0 Unknown 8: 0 --- Entry #0 --- Binary Type: 0 (AP) Device Type: 2 (MMC) Identifier: 80 Attributes: 2 (STL Read-Only) Update Attributes: 1 (FOTA) Partition Block Size/Offset: 0 Partition Block Count: 1734 File Offset (Obsolete): 0 File Size (Obsolete): 0 Partition Name: BOOTLOADER Flash Filename: sboot.bin FOTA Filename: --- Entry #1 --- Binary Type: 0 (AP) Device Type: 2 (MMC) Identifier: 81 Attributes: 5 (Read/Write) Update Attributes: 1 (FOTA) Partition Block Size/Offset: 1734 Partition Block Count: 312 File Offset (Obsolete): 0 File Size (Obsolete): 0 Partition Name: TZSW Flash Filename: tz.img FOTA Filename: --- Entry #2 --- Binary Type: 0 (AP) Device Type: 2 (MMC) Identifier: 70 Attributes: 5 (Read/Write) Update Attributes: 1 (FOTA) Partition Block Size/Offset: 34 Partition Block Count: 16 File Offset (Obsolete): 0 File Size (Obsolete): 0 Partition Name: PIT Flash Filename: m3.pit FOTA Filename: --- Entry #3 --- Binary Type: 0 (AP) Device Type: 2 (MMC) Identifier: 71 Attributes: 5 (Read/Write) Update Attributes: 1 (FOTA) Partition Block Size/Offset: 50 Partition Block Count: 2048 File Offset (Obsolete): 0 File Size (Obsolete): 0 Partition Name: MD5HDR Flash Filename: md5.img FOTA Filename: --- Entry #4 --- Binary Type: 0 (AP) Device Type: 2 (MMC) Identifier: 1 Attributes: 5 (Read/Write) Update Attributes: 1 (FOTA) Partition Block Size/Offset: 8192 Partition Block Count: 8192 File Offset (Obsolete): 0 File Size (Obsolete): 0 Partition Name: BOTA0 Flash Filename: - FOTA Filename: --- Entry #5 --- Binary Type: 0 (AP) Device Type: 2 (MMC) Identifier: 2 Attributes: 5 (Read/Write) Update Attributes: 1 (FOTA) Partition Block Size/Offset: 16384 Partition Block Count: 8192 File Offset (Obsolete): 0 File Size (Obsolete): 0 Partition Name: BOTA1 Flash Filename: - FOTA Filename: --- Entry #6 --- Binary Type: 0 (AP) Device Type: 2 (MMC) Identifier: 3 Attributes: 5 (Read/Write) Update Attributes: 5 (FOTA) Partition Block Size/Offset: 24576 Partition Block Count: 40960 File Offset (Obsolete): 0 File Size (Obsolete): 0 Partition Name: EFS Flash Filename: efs.img FOTA Filename: --- Entry #7 --- Binary Type: 0 (AP) Device Type: 2 (MMC) Identifier: 4 Attributes: 5 (Read/Write) Update Attributes: 1 (FOTA) Partition Block Size/Offset: 65536 Partition Block Count: 8192 File Offset (Obsolete): 0 File Size (Obsolete): 0 Partition Name: m9kefs1 Flash Filename: m9kefs1.bin FOTA Filename: --- Entry #8 --- Binary Type: 0 (AP) Device Type: 2 (MMC) Identifier: 5 Attributes: 5 (Read/Write) Update Attributes: 1 (FOTA) Partition Block Size/Offset: 73728 Partition Block Count: 8192 File Offset (Obsolete): 0 File Size (Obsolete): 0 Partition Name: m9kefs2 Flash Filename: m9kefs2.bin FOTA Filename: --- Entry #9 --- Binary Type: 0 (AP) Device Type: 2 (MMC) Identifier: 6 Attributes: 5 (Read/Write) Update Attributes: 1 (FOTA) Partition Block Size/Offset: 81920 Partition Block Count: 8192 File Offset (Obsolete): 0 File Size (Obsolete): 0 Partition Name: m9kefs3 Flash Filename: m9kefs3.bin FOTA Filename: --- Entry #10 --- Binary Type: 0 (AP) Device Type: 2 (MMC) Identifier: 7 Attributes: 5 (Read/Write) Update Attributes: 1 (FOTA) Partition Block Size/Offset: 90112 Partition Block Count: 16384 File Offset (Obsolete): 0 File Size (Obsolete): 0 Partition Name: PARAM Flash Filename: param.bin FOTA Filename: --- Entry #11 --- Binary Type: 0 (AP) Device Type: 2 (MMC) Identifier: 8 Attributes: 5 (Read/Write) Update Attributes: 1 (FOTA) Partition Block Size/Offset: 106496 Partition Block Count: 16384 File Offset (Obsolete): 0 File Size (Obsolete): 0 Partition Name: BOOT Flash Filename: boot.img FOTA Filename: --- Entry #12 --- Binary Type: 0 (AP) Device Type: 2 (MMC) Identifier: 9 Attributes: 5 (Read/Write) Update Attributes: 1 (FOTA) Partition Block Size/Offset: 122880 Partition Block Count: 16384 File Offset (Obsolete): 0 File Size (Obsolete): 0 Partition Name: RECOVERY Flash Filename: recovery.img FOTA Filename: --- Entry #13 --- Binary Type: 0 (AP) Device Type: 2 (MMC) Identifier: 10 Attributes: 5 (Read/Write) Update Attributes: 1 (FOTA) Partition Block Size/Offset: 139264 Partition Block Count: 180224 File Offset (Obsolete): 0 File Size (Obsolete): 0 Partition Name: RADIO Flash Filename: modem.bin FOTA Filename: --- Entry #14 --- Binary Type: 0 (AP) Device Type: 2 (MMC) Identifier: 11 Attributes: 5 (Read/Write) Update Attributes: 5 (FOTA) Partition Block Size/Offset: 319488 Partition Block Count: 524288 File Offset (Obsolete): 0 File Size (Obsolete): 0 Partition Name: TOMBSTONES Flash Filename: tombstones.img FOTA Filename: --- Entry #15 --- Binary Type: 0 (AP) Device Type: 2 (MMC) Identifier: 12 Attributes: 5 (Read/Write) Update Attributes: 5 (FOTA) Partition Block Size/Offset: 843776 Partition Block Count: 2097152 File Offset (Obsolete): 0 File Size (Obsolete): 0 Partition Name: CACHE Flash Filename: cache.img FOTA Filename: --- Entry #16 --- Binary Type: 0 (AP) Device Type: 2 (MMC) Identifier: 13 Attributes: 5 (Read/Write) Update Attributes: 5 (FOTA) Partition Block Size/Offset: 2940928 Partition Block Count: 3145728 File Offset (Obsolete): 0 File Size (Obsolete): 0 Partition Name: SYSTEM Flash Filename: system.img FOTA Filename: --- Entry #17 --- Binary Type: 0 (AP) Device Type: 2 (MMC) Identifier: 14 Attributes: 5 (Read/Write) Update Attributes: 5 (FOTA) Partition Block Size/Offset: 6086656 Partition Block Count: 1146880 File Offset (Obsolete): 0 File Size (Obsolete): 0 Partition Name: HIDDEN Flash Filename: hidden.img FOTA Filename: --- Entry #18 --- Binary Type: 0 (AP) Device Type: 2 (MMC) Identifier: 15 Attributes: 5 (Read/Write) Update Attributes: 1 (FOTA) Partition Block Size/Offset: 7233536 Partition Block Count: 16384 File Offset (Obsolete): 0 File Size (Obsolete): 0 Partition Name: OTA Flash Filename: - FOTA Filename: --- Entry #19 --- Binary Type: 0 (AP) Device Type: 2 (MMC) Identifier: 16 Attributes: 5 (Read/Write) Update Attributes: 5 (FOTA) Partition Block Size/Offset: 7249920 Partition Block Count: 0 File Offset (Obsolete): 0 File Size (Obsolete): 0 Partition Name: USERDATA Flash Filename: userdata.img FOTA Filename: remained Ending session... Rebooting device... Releasing device interface...
 |
Device | Galaxy S (GT-I9000) |
| Manufacturer | Samsung | |
| Release date | June 2010 | |
| Codename | galaxysmtd |
|
| Status | Replicant: Not supported anymore Last Replicant version: Replicant 4.2 libsamsung-ipc: still supported libsamsung-ril: still supported |
|
| Variants | GSM: GT-I9000 | |
| Latest images | Replicant 4.2 0004 |
The device has a modem that is not isolated. Because of that, the Replicant project isn't interested in officially supporting that device anymore until that issue is fixed.
More details on the issue and how to potentially fix it are available in the ExynosModemIsolation wiki page.
However even if that issue isn't fixed or can't be fixed, the Replicant project still wants to collaborate with other projects or people wanting to add support for it in various other projects.
To make it easier for other projects to support that device, Replicant can still try to make sure that libsamsung-ipc and libsamsung-ril work for that device.
It's also still possible to build Replicant 4.2, which support this device with a recent libsamsung-ipc and libsamsung-ril.
To do that you need to install Trisquel 7, which is not supported anymore by Trisquel.
It's possible to do that from within Parabola with debootstrap and run the resulting rootfs in lxc through libvirt.
There is also work going on to continue the support of this device. For instance there are some repositories being worked on here:See also the Upstream wiki page about it.
References:
1 TODO: point to the linux driver that has the details
Galaxy S (GT-I9000) installation
Galaxy S (GT-I9000) Privacy/security issues
Details about the S5PC110 hardware design used in the Galaxy S (GT-I9000): S5PC110HardwareDesign
| Component | Name | Source | Status |
|---|---|---|---|
| SoC | Samsung S5PC110/S5PV210 | Linux kernel | Linux kernel support |
| GPU | PowerVR SGX540 | https://secure.wikimedia.org/wikipedia/en/wiki/Exynos | Linux kernel support, proprietary userspace |
| Audio Codec | WM8994 | Linux kernel | Linux kernel support (ALSA), free userspace |
| Modem | XMM6160 | XDA-Developers | Free userspace implementation: Samsung-RIL/libsamsung-ipc |
| Wi-Fi | BCM4329 | Linux kernel | Linux kernel support, proprietary loaded firmware |
| Bluetooth | BCM4329 | Linux kernel | Linux kernel support, proprietary loaded firmware |
| GPS | BCM4751 | https://plus.google.com/+StephenShankland/posts/CJ3bqa1x2Ek | Proprietary userspace, no free implementation: BCM4751 |
| Accelerometer | SMB380 | Android module | Linux kernel support, free userspace |
| Compass | MS3C | Android module | Linux kernel support, free userspace |
| Light | Sharp GP2A | Linux kernel support, free userspace | |
| Proximity | Sharp GP2A | Linux kernel support, free userspace | |
| FM Radio | SI4709 | Linux kernel | Linux kernel support |
| Camera (back) | NEC CE147 | Linux kernel support, free userspace | |
| Camera (front) | Samsung S5KA3DFX | Linux kernel support, free userspace | |
| Touchscreen | Atmel MXT224 | Linux kernel support | |
| Display | TL2796 | Linux kernel support |
A PIT of the Galaxy S (GT-I9000) can be found in the GalaxySGTI9000Pit page.
The PIT is a partition table used at least by the bootloader in the odin mode that Heimdal uses.
| PIT | Linux name | mount point | partition type | block device | Description |
|---|---|---|---|---|---|
| IBL+PBL | |||||
| PIT | |||||
| EFS | modem data partition | ||||
| SBL1 | |||||
| SBL2 | |||||
| PARAM | |||||
| KERNEL | None | zImage | boot partition, See IsorecRecoveryIssue for more details | ||
| RECOVERY | None | recovery partition, See IsorecRecoveryIssue for more details | |||
| FACTORYFS | Android system partition | ||||
| DBDATAFS | Android application data ? | ||||
| CACHE | Android cache partition | ||||
| MODEM | modem firmware partition | ||||
| No name but entry present | user data (music, pictures, etc) |
These documents are the propriety of Samsung Electronics and are not hosted by the Replicant project.
$ sudo heimdall print-pit Heimdall v1.4.2 Copyright (c) 2010-2017 Benjamin Dobell, Glass Echidna http://www.glassechidna.com.au/ This software is provided free of charge. Copying and redistribution is encouraged. If you appreciate this software and you would like to support future development please consider donating: http://www.glassechidna.com.au/donate/ Initialising connection... Detecting device... Claiming interface... Attempt failed. Detaching driver... Claiming interface again... Setting up interface... Initialising protocol... Protocol initialisation successful. Beginning session... Some devices may take up to 2 minutes to respond. Please be patient! Session begun. Downloading device's PIT file... PIT file download successful. Entry Count: 13 Unknown 1: 1 Unknown 2: 0 Unknown 3: 7508 Unknown 4: 65 Unknown 5: 64224 Unknown 6: 18 Unknown 7: 55304 Unknown 8: 67 --- Entry #0 --- Binary Type: 0 (AP) Device Type: 0 (OneNAND) Identifier: 0 Attributes: 0 (Read-Only) Update Attributes: 0 Partition Block Size/Offset: 256 Partition Block Count: 1 File Offset (Obsolete): 6684783 File Size (Obsolete): 2097268 Partition Name: IBL+PBL Flash Filename: boot.bin FOTA Filename: --- Entry #1 --- Binary Type: 0 (AP) Device Type: 0 (OneNAND) Identifier: 1 Attributes: 0 (Read-Only) Update Attributes: 0 Partition Block Size/Offset: 256 Partition Block Count: 1 File Offset (Obsolete): 0 File Size (Obsolete): 0 Partition Name: PIT Flash Filename: FOTA Filename: --- Entry #2 --- Binary Type: 0 (AP) Device Type: 0 (OneNAND) Identifier: 20 Attributes: 2 (STL Read-Only) Update Attributes: 0 Partition Block Size/Offset: 256 Partition Block Count: 40 File Offset (Obsolete): 0 File Size (Obsolete): 0 Partition Name: EFS Flash Filename: efs.rfs FOTA Filename: --- Entry #3 --- Binary Type: 0 (AP) Device Type: 0 (OneNAND) Identifier: 3 Attributes: 0 (Read-Only) Update Attributes: 0 Partition Block Size/Offset: 256 Partition Block Count: 5 File Offset (Obsolete): 0 File Size (Obsolete): 0 Partition Name: SBL Flash Filename: sbl.bin FOTA Filename: --- Entry #4 --- Binary Type: 0 (AP) Device Type: 0 (OneNAND) Identifier: 4 Attributes: 0 (Read-Only) Update Attributes: 0 Partition Block Size/Offset: 256 Partition Block Count: 5 File Offset (Obsolete): 0 File Size (Obsolete): 0 Partition Name: SBL2 Flash Filename: sbl.bin FOTA Filename: --- Entry #5 --- Binary Type: 0 (AP) Device Type: 0 (OneNAND) Identifier: 21 Attributes: 2 (STL Read-Only) Update Attributes: 0 Partition Block Size/Offset: 256 Partition Block Count: 20 File Offset (Obsolete): 0 File Size (Obsolete): 0 Partition Name: PARAM Flash Filename: param.lfs FOTA Filename: --- Entry #6 --- Binary Type: 0 (AP) Device Type: 0 (OneNAND) Identifier: 6 Attributes: 0 (Read-Only) Update Attributes: 0 Partition Block Size/Offset: 256 Partition Block Count: 30 File Offset (Obsolete): 0 File Size (Obsolete): 0 Partition Name: KERNEL Flash Filename: zImage FOTA Filename: --- Entry #7 --- Binary Type: 0 (AP) Device Type: 0 (OneNAND) Identifier: 7 Attributes: 0 (Read-Only) Update Attributes: 0 Partition Block Size/Offset: 256 Partition Block Count: 30 File Offset (Obsolete): 0 File Size (Obsolete): 0 Partition Name: RECOVERY Flash Filename: zImage FOTA Filename: --- Entry #8 --- Binary Type: 0 (AP) Device Type: 0 (OneNAND) Identifier: 22 Attributes: 2 (STL Read-Only) Update Attributes: 0 Partition Block Size/Offset: 256 Partition Block Count: 1146 File Offset (Obsolete): 0 File Size (Obsolete): 0 Partition Name: FACTORYFS Flash Filename: factoryfs.rfs FOTA Filename: --- Entry #9 --- Binary Type: 0 (AP) Device Type: 0 (OneNAND) Identifier: 23 Attributes: 2 (STL Read-Only) Update Attributes: 0 Partition Block Size/Offset: 256 Partition Block Count: 536 File Offset (Obsolete): 0 File Size (Obsolete): 0 Partition Name: DBDATAFS Flash Filename: dbdata.rfs FOTA Filename: --- Entry #10 --- Binary Type: 0 (AP) Device Type: 0 (OneNAND) Identifier: 24 Attributes: 2 (STL Read-Only) Update Attributes: 0 Partition Block Size/Offset: 256 Partition Block Count: 140 File Offset (Obsolete): 0 File Size (Obsolete): 0 Partition Name: CACHE Flash Filename: cache.rfs FOTA Filename: --- Entry #11 --- Binary Type: 0 (AP) Device Type: 0 (OneNAND) Identifier: 11 Attributes: 0 (Read-Only) Update Attributes: 0 Partition Block Size/Offset: 256 Partition Block Count: 50 File Offset (Obsolete): 0 File Size (Obsolete): 0 Partition Name: MODEM Flash Filename: modem.bin FOTA Filename: --- Entry #12 --- Binary Type: 1 (CP) Device Type: 1 (File/FAT) Identifier: 11 Attributes: 0 (Read-Only) Update Attributes: 0 Partition Block Size/Offset: 0 Partition Block Count: 0 File Offset (Obsolete): 0 File Size (Obsolete): 0 Partition Name: Flash Filename: FOTA Filename: Ending session... Rebooting device... Releasing device interface... Re-attaching kernel driver...
There is no need to build as root, building as a regular user should be preferred.
In the source tree root folder, run:
source build/envsetup.sh lunch replicant_galaxysmtd-userdebug
Then, start the build:
parallel_tasks=$(echo "$(grep 'processor' /proc/cpuinfo | wc -l ) + 1" | bc) make -j$parallel_tasks bacon
-jn argument indicates the number of parallel tasks during the build (you can remove it from the command line to have only one task at a time).$parallel_tasks holds an optimized number of parallel tasks for your hardware. You may want to reduce this number if e.g. the computer runs out of RAM during the build.
out/target/product/galaxysmtd/ for the targetout/host/linux-x86/bin/ for the hostThe compass sensor is calculated from both the accelerometer and magnetic field sensors, which needs calibration to be accurate.
If the values reported by the compass sensor are not right, you can recalibrate the magnetic field sensor with the following steps:
Connect to the device via ADB with sufficient permissions and run:
# adb shell stop geomagneticd # adb shell rm /data/system/yas529.cfg # adb shell start geomagneticd
Then start an application using the compass sensor and move the device in every direction, with a rotation around each axis: the device should now be calibrated.
Warning: installing an operating system, such as Replicant, may void your device's warranty and will erase the data stored on the device.
In order to install Replicant on your device, it is assumed that you have a computer running a GNU/Linux operating system and everything necessary to connect your device to the computer through USB available. Moreover, it is assumed that anyone performing the installation knows how to use command lines in a terminal and has basic knowledge about it.
Some preliminary steps may be necessary to achieve best compatibility with your device. These steps may require more advanced technical skills than the rest of the process: make sure you know what you are doing!
If your phone is currently running Android 2.2, you need to upgrade it to a newer version, at least Android 2.3 or it will be impossible to flash Replicant to the device.
It is required to install CyanogenMod prior to Replicant as it'll solve possible issues with the modem image (the modem image must me installed in /radio/modem.bin and symlinked to /dev/block/bml12).
You can find official CyanogenMod installation instructions at: https://web.archive.org/web/20160607042845/https://wiki.cyanogenmod.org/w/Install_CM_for_galaxysmtd
The first step in the installation process is to download and set up the files that will be used to install Replicant to the device. The files must be downloaded on your computer first.
1. Find out what the latest image is: check out the Last image part of the general table on GalaxySI9000
2. Download all the files listed for the device (including the checksum and the signatures) on ReplicantImages for the latest image
2. Make sure you have added the Replicant release key to your GPG keyring
3. Check the signature of the files:
gpg --armor --verify path/to/replicant-4.2-galaxysmtd.zip.asc path/to/replicant-4.2-galaxysmtd.zip gpg --armor --verify path/to/recovery.img.asc path/to/recovery.img
md5sum -c galaxysmtd.md5
The heimdall tool is required to flash the recovery image to the device.
Instructions to install heimdall: ToolsInstallation
You can either complete this step by using the device's internal storage or by using an external microSD card.
1. Make sure the device is started up and has an Android system running
2. Connect the USB cable to both the computer and the device
3. Enable USB mass storage on the device
4. Mount the mass storage on the computer
5. Copy the replicant-4.2-galaxysmtd.zip file at the origin of the mass storage
6. Safely unmount the mass storage on the computer
7. Disable USB mass storage on the device
1. Connect the microSD card to the computer (e.g. using an USB card reader)
2. Mount the microSD card on the computer
3. Copy the replicant-4.2-galaxysmtd.zip file at the origin of the microSD card
4. Safely unmount the microSD card on the computer
5. Disconnect the microSD card from the computer
6. Insert the microSD card in the device (make sure it is turned off before inserting the card)
Instructions to install ADB: ToolsInstallation
The next step in the installation process is to prepare the device for heimdall mode.
1. Make sure the device is completely turned off and the USB cable is disconnected from the device
2. Start the device by holding the following key combination: Volume down, Select, Power
3. Hold the key combination until the device shows Downloading
4. Connect the USB cable to both the computer and the device
Now that both the computer and the device are set up, it is time to actually install the images to the device.
1. Install the recovery image to the device:
heimdall flash --KERNEL path/to/recovery.img
2. Make sure the device reboots to recovery
3. Select install zip (using the volume keys to navigate and the power key to select)
4. Select install zip from sdcard
5. Select the system zip: replicant-4.2-galaxysmtd.zip
Note: if your device was running Android 4.2 and later, it may be located in the 0 directory
6. Confirm the installation
4. Select install zip from external sdcard
5. Select the system zip: replicant-4.2-galaxysmtd.zip
Note: if your device was running Android 4.2 and later, it may be located in the 0 directory
6. Confirm the installation
4. Select install zip from sideload
5. Back to the host computer, load the system zip with sideload:
adb sideload path/to/replicant-4.2-galaxysmtd.zip
7. Select Go Back (if necessary) to get back to the general menu
8. Select wipe data/factory reset
9. Confirm the data wipe by selecting Yes -- delete all user data
10. Select Reboot system now to reboot the device
Your device should now be running Replicant!
The various integrated circuits found on a mobile device run small pieces of dedicated software that are called firmwares, when powerful enough.
Thus, these programs do not run on the main processor: instead, they are executed on other integrated circuits.
Some firmwares come pre-installed on the integrated circuit while some others have to be loaded to the circuit by the main processor and are usually distributed along with the system.
When those firmwares are proprietary, they are not distributed along with Replicant, nor do we recommend using them.
| Firmware name | Related chip | Related functionality |
| fw_bcmdhd.bin | Broadcom BCM4329 | Wi-Fi |
| fw_bcmdhd_apsta.bin | Broadcom BCM4329 | Wi-Fi host |
| nvram_net.txt | Broadcom BCM4329 | Wi-Fi configuration |
| bcm4329.hcd | Broadcom BCM4329 | Bluetooth |
| samsung_mfc_fw.bin | Samsung S5PC110/S5PV210 MFC | Hardware media encoding/decoding |
| Variant | Replicant compatible versions | SoC | Bootloader | Modem link | Modem protocol | RAM |
|---|---|---|---|---|---|---|
| Galaxy S II (GT-I9100) | Replicant 4.0, 4.2, 6.0 | Exynos 4210 | Signed | Isolated (HSIC) | samsung-ipc | 1G |
| Galaxy S II (GT-I9100G) | None yet | OMAP 4430 | Signed | Isolated (MIPI) | samsung-ipc | 1G |
 |
Device | Galaxy S II (GT-I9100) |
| Manufacturer | Samsung | |
| Release date | May 2011 | |
| Codename | i9100 |
|
| Status | Maintained | |
| Variants | GSM: GT-I9100 | |
| Latest images | Replicant 6.0 0004 |
To install Replicant on the Galaxy S II (GT-I9100), see the RecoveryInstallationWithHeimdall and MinorVersionUpgrade wiki pages.
Galaxy S 2 (I9100) Privacy/security issues
| Component | Name | Source | Status |
|---|---|---|---|
| SoC | Samsung Exynos 4210 | Linux kernel | Linux kernel support |
| GPU | Mali 400 | https://secure.wikimedia.org/wikipedia/en/wiki/Exynos | Linux kernel support, proprietary userspace |
| Audio Codec | Yamaha MC1N2 | Linux kernel | Linux kernel support (ALSA), free userspace: Yamaha-MC1N2-Audio/Tinyalsa-Audio |
| Modem | XMM6260 | Linux kernel | Free userspace implementation: Samsung-RIL/libsamsung-ipc |
| Wi-Fi | BCM4330 | Linux kernel | Linux kernel support, proprietary loaded firmware |
| Bluetooth | BCM4330 | Linux kernel | Linux kernel support, proprietary loaded firmware |
| NFC | PN544 | Linux kernel | Linux kernel support |
| GPS | GSD4t | http://www.csr.com/news/pr/release/455/en | Proprietary userspace, no free implementation: GSD4t |
| Accelerometer | K3DH | Linux kernel | Linux kernel support, free userspace |
| Compass | AKM8975 | Kernel sources | Linux kernel support, free userspace |
| Light | Capella CM3663 | Linux kernel support, free userspace | |
| Proximity | Capella CM3663 | Linux kernel support, free userspace | |
| FM Radio | SI4709 | Linux kernel | Linux kernel support |
| Camera (back) | Fujitsu M5MO | Linux kernel support, free userspace | |
| Camera (front) | Samsung S5K5BAFX | Linux kernel support, free userspace | |
| Touchscreen | Atmel MXT224 | Linux kernel support | |
| Display | LD9040 | Linux kernel support | |
| Power Management IC (PMIC) | Maxim MAX8997 | Kernel sources | Linux kernel support |
WARNING some content may not be the same on your device
| PIT | Linux name | block device | mount point | partition type | Description | size or size@location for 16G eMMC |
|---|---|---|---|---|---|---|
| GANG | No visible under Replicant 6.0 | EMMC related? | ||||
| BOOT | No visible under Replicant 6.0 | Bootloader related? | ||||
| EFS | mmcblk0p1 | /efs | ext4 | modem data partition (content) | 20 MiB @ 4MiB | |
| SBL1 | mmcblk0p2 | None | Bootloader related? | 1280 KiB | ||
| SBL2 | mmcblk0p3 | None | Bootloader related? | 1280 KiB | ||
| PARAM | mmcblk0p4 | None | ? | 8 MiB | ||
| KERNEL | mmcblk0p5 | None | zImage | boot partition, See IsorecRecoveryIssue for more details | 8 MiB | |
| RECOVERY | mmcblk0p6 | None | recovery partition, See IsorecRecoveryIssue for more details | 8 MiB | ||
| CACHE | mmcblk0p7 | /cache | ext4 | Android cache partition | 100 MiB | |
| MODEM | mmcblk0p8 | None | modem firmware partition | 16 MiB | ||
| FACTORYFS | mmcblk0p9 | /system | ext4 | Android system partition | 512 MiB | |
| DATAFS | mmcblk0p10 | /data | ext4 | Android application data | 2 GiB | |
| UMS | mmcblk0p11 | /mnt/media_rw/xxxx-xxxx | vfat | user data (music, pictures, etc) | 11784 MiB | |
| HIDDEN | mmcblk0p12 | /preload | ext4 | contains some data, and Samsung APK | 512 MiB | |
On two GT-I9100, the following procedure was successfully tested:
(1) Backup the eMMC (/dev/block/mmcblk0) on a microSD
(2) resize some partitions (DATAFS, UMS, and the cache partition was deleted and moved right before HIDDEN) under GNU/Linux with udisksctl loop-setup -f mmcblk0.img and gparted
(3) reboot several times to recovery
(4) restore the modified mmcblk0.img
This means that there is no checks preventing modifications on mmcblk0 (for instance some cryptographic value that is written to the eMMC at each boot to prevent installing old dump of the eMMC). There might be some checks outside of that (like in mmcblk0boot0 or mmcblk0boot1 though).
Also restoring the mmmcblk0.img on another device worked but it didn't make the modem take the IMEI of the first device. So something in the EFS is really device specific.
These documents are the propriety of Samsung Electronics and are not hosted by the Replicant project.
 |
Device | Galaxy S II (GT-I9100G) |
| Manufacturer | Samsung | |
| Release date | ? | |
| Codename | i9100G ? |
|
| Status | Not supported yet | |
| Variants | GSM: GT-I9100G | |
| Latest images | None |
Long time ago, we had reports that the "Galaxy SII" had an unsigned bootloader, but we didn't manage to confirm to which exact model it applied to, or if people assumed that the bootloader of the GT-I9100 was unsigned because it uses Xloader which is GPLv2. Samsung also published the source code of various Xloader versions they used on the GT-I9100G for different Android versions. However until now we weren't able to confirm that any device were able to run unsigned bootloaders. Though we verified that at least the bootloader of the I9100G_CHN_CHN is signed.
(08:47:20 PM) sensiblemn: GNUtoo: i just got a report from a postmarketOS developer saying that booting works with that free software x-loader repo for the i9100G that I found. they had to make a one line commit to get it building, but it boots. https://github.com/hpagseddy/i9100g_xloader/commit/0505138dd163959443f09b7178142c0472f60582
(08:48:24 PM) sensiblemn: so early reports suggest that we found a Galaxy S2 that has a free software bootloader. they said it doesn't even need to be signed with signGP.c.
(10:36:35 PM) hpagseddy[m]: So i have an i9100g and compiled this without any errors in case you guys are interested https://github.com/hpagseddy/i9100g_xloader
(10:49:32 PM) freekurt: thanks for jumping in here hpagseddy. we have been trying for quite some time to find a way to liberate the first stage bootloader on Exynos4 SoC based i9100 and i9300 devices. this is great news that the i9100G seems to have a free software first stage bootloader.
(10:51:08 PM) hpagseddy[m]: Yep, also there is a thing that i9100g is based on TI OMAP
(11:01:27 PM) hpagseddy[m]: Btw Droid 4 has mainline
(11:02:42 PM) hpagseddy[m]: i9100g uses same display and digitizer with i9100, has a broadcom wifi but sadly a PowerVR GPU
(11:10:48 PM) hpagseddy[m]: Since it uses same display and even same connectors
(11:11:06 PM) hpagseddy[m]: I know it because i am using i9100 display on my i9100g :)
(11:11:17 PM) hpagseddy[m]: Besides capacitive buttons, all functional
(11:11:48 PM) hpagseddy[m]: Even capacitive connector plugged in so if i do some kernel hacks i can get them working too
(11:11:50 PM) freekurt: we really appreciate your willingness to do testing if we decide to proceed with trying to mainline this device, which has yet to be determined.
(11:14:38 PM) freekurt: it seems as though this device would be quite attractive to other pmOS devs as well, now that the freedom of the bootloader appears to have been determined.
(11:15:19 PM) hpagseddy[m]: I hope so, i was the only maintainer over 2 years :)
(11:15:27 PM) hpagseddy[m]: Of this device
(11:15:37 PM) freekurt: :-) thanks for holding down the fort!
(11:15:52 PM) hpagseddy[m]: But if the device gets mainlined, things will definitely change
(07:17:23 PM) sensiblemn: GNUtoo: ah, it seems like some OMAP devices are GP and others are HS, so the question is whether we can find smartphones and tablets that are GP. Looks like the Blaze Tablet released by TI is GP. https://wiki.tizen.org/Tizen_IVI_Getting_Started_Guide_For_PandaBoard#x-loader_config_files [...]
(07:22:26 PM) sensiblemn: also this very odd looking OMAP Blaze cell phone seems to be GP rather than HS. https://www.slashgear.com/texas-instruments-omap-blaze-on-sale-now-1485657/
(07:23:30 PM) sensiblemn: https://www.ebay.com/itm/TI-Stereo-Camera-Blaze-development-Plattform-im-Wert-von-1-800USD/131690215016
(07:24:04 PM) sensiblemn: https://web.archive.org/web/20180903060622/http://omapedia.org/wiki/OMAP4_Blaze
TODO: add the blaze, zoom1 (omap3), zoom2 to the reviewd devices and to wikidata
(10:58:08 PM) freekurt: 512 MB of RAM seems rough for AOSP 10, especially when we are trying to get it to work with 2D acceleration. 1GB should be much better.
=> TODO: check Android 10 requirements and add them to the wiki
(12:51:55 AM) forkbomb: the i9300T is just a Telstra branded i9300 afaik
(12:52:49 AM) hpagseddy[m]: <freekurt "yeah, that might be it. https://"> i9300T has the same SP6260 naming as i9100g as this shows
(12:53:10 AM) sensiblemn: you're correct
(12:54:16 AM) sensiblemn: also, not sure if this is the correct defconfig, but this kernel from samsung suggests it is xmm6260 also https://github.com/LineageOS/android_kernel_samsung_t1/blob/10ca03795f659f6f1fa995e8c300a08c3a133354/arch/arm/configs/android_t1_omap4430_r03_eng_defconfig#L1097
(12:55:09 AM) hpagseddy[m]: t1, thats correct
(12:55:18 AM) hpagseddy[m]: but the defconfig isnt
(12:55:48 AM) hpagseddy[m]: https://github.com/LineageOS/android_kernel_samsung_t1/blob/10ca03795f659f6f1fa995e8c300a08c3a133354/arch/arm/configs/cyanogenmod_i9100g_defconfig
(12:55:52 AM) hpagseddy[m]: this is for the device
(01:00:57 AM) sensiblemn: forkbomb: did you hear that we seem to have found a free software first stage bootloader for the i9100G and that it doesn't seem to require any signature checks?
(01:01:27 AM) hpagseddy[m]: yes i compiled and ran it on my device with no problem
(01:01:59 AM) hpagseddy[m]: also fixed the old build a bit
(01:02:02 AM) hpagseddy[m]: >So i have an i9100g and compiled this without any errors in case you guys are interested https://github.com/hpagseddy/i9100g_xloader
(01:05:55 AM) forkbomb: no, i didn't. very nice!
(01:06:35 AM) hpagseddy[m]: well i dont know how to use it so just compiled and flashed with odin
(01:06:45 AM) hpagseddy[m]: also one line fix hehe
(01:07:33 AM) hpagseddy[m]: it compiled with no problem on 4.6 gcc
(01:14:47 AM) sensiblemn: hpagseddy: it is my understanding that, since x-loader is EOL, and since Replicant wants to upstream as much code as we can, we would have to upstream what x-loader is doing into u-boot SPL, which i don't know how long it would take to do. the fact that very similar devices are already in upstream u-boot likely will help though, if we decide to pursue it.
(01:16:01 AM) hpagseddy[m]: Since it is open source, it is ok to keep it untill we have the device booted in my opinion
(01:16:17 AM) sensiblemn: yes, for sure.
(01:17:00 AM) hpagseddy[m]: but well last decision is yours since you guys are the replicant devs :)
(01:22:29 AM) sensiblemn: hpagseddy: have you tested LineageOS 13 on the device before? https://forum.xda-developers.com/galaxy-s2/development/rom-lineageos-13-0-t3620246
(01:23:21 AM) hpagseddy[m]: yes it had several issues but performance was good
(01:23:33 AM) hpagseddy[m]: it had audio error which was so annoying
(01:23:41 AM) hpagseddy[m]: 12.1 was best
(01:24:22 AM) sensiblemn: what kind of audio error?
(01:25:51 AM) hpagseddy[m]: audio was some kind of disorted
(01:39:01 AM) sensiblemn: hpagseddy: did you notice any other issues?
(01:39:11 AM) sensiblemn: with 13?
(01:40:13 AM) hpagseddy[m]: Gps doesnt work
(01:40:18 AM) hpagseddy[m]: Night mode doesnt work
01:56 <@GNUtoo> Did LineageOS or Cyanogenmod support it at some point?
01:57 < hpagseddy[m]> Cyanogenmod untill 13.0
01:57 < hpagseddy[m]> Omnirom 4.4 and 5.0.2
01:57 <@GNUtoo> ok, that explains why LineageOS has some stuff on it but nothing on the wiki
01:57 < hpagseddy[m]> thats all i remember and tested
[...]
01:58 < hpagseddy[m]> GNUtoo: yeah they just forked it and it just stays there
[...]
01:59 < hpagseddy[m]> but 12.1 is still cyanogen
02:00 < sensiblemn> there was an attempt made at 14.1 but it seems like it was unsuccessful because it wouldn't boot
02:00 < sensiblemn> https://github.com/xdaamg/android_device_samsung_i9100g/tree/cm-14.1
02:00 < hpagseddy[m]> also someone rebased cm11 to lineage 11
(01:19:56 AM) sensiblemn: GNUtoo: this looks like omap-usb-tool but it was recently updated https://github.com/LukasTomek/omapboot
(01:21:37 AM) hpagseddy[m]: hmm, he forked this repo from https://github.com/kousu/omapboot
(01:22:03 AM) hpagseddy[m]: so he added sd card booting
(01:22:09 AM) hpagseddy[m]: and some fixed
(01:22:13 AM) hpagseddy[m]: fixes*
(01:22:25 AM) GNUtoo: https://git.paulk.fr/omap-usb-boot.git
(01:22:29 AM) GNUtoo: but it seems down right nw
(01:22:32 AM) GNUtoo: *right now
hpagseddy's fork consists of Samsung source code with the addition of a fix to enable to build it .
The PIT of the Galaxy SII (GT-I9100G) can be found in the GalaxySIII9100GPit page.
| PIT | Linux name | mount point | partition type | block device | Description |
|---|---|---|---|---|---|
| MLO | Not visible on Linux | First stage of bootloader | |||
| EFS | mmcblk0p1 | modem data partition | |||
| SBL1 | mmcblk0p2 | Second Bootloader(?) | |||
| SBL2 | Empty | mmcblk0p3 | |||
| PARAM | mmcblk0p4 | ||||
| KERNEL | None | zImage | mmcblk0p5 | boot partition, See IsorecRecoveryIssue for more details | |
| RECOVERY | None | mmcblk0p6 | recovery partition, See IsorecRecoveryIssue for more details | ||
| CACHE | mmcblk0p7 | Android cache partition | |||
| MODEM | mmcblk0p8 | modem firmware partition | |||
| FACTORYFS | mmcblk0p9 | Android system partition | |||
| DATAFS | mmcblk0p10 | Android application data | |||
| UMS | mmcblk0p11 | user data (music, pictures, etc) | |||
| HIDDEN | mmcblk0p12 | contains some data, and Samsung APK | |||
This was constructed from the PIT, TODO: check the partitions content
On a I9100G_CHN_CHN with Android 2.3.6 with the OMAP reported as being in HS mode we have:
--- Entry #0 --- Binary Type: 0 (AP) Device Type: 2 (MMC) Identifier: 1 Attributes: 0 (Read-Only) Update Attributes: 0 Partition Block Size/Offset: 0 Partition Block Count: 0 File Offset (Obsolete): 0 File Size (Obsolete): 0 Partition Name: X-loader Flash Filename: MLO FOTA Filename:
This doesn't give any indication of where is MLO, but it's clearly visible with an hexadecimal editor like vbindiff.
| Offset from mmcblk0 | size | comments |
|---|---|---|
| 0x20000 (256k) | 256k | MLO + potentially other stuff |
| 0x40000 (512k) | 256k | MLO + potentially less other stuff |
Though SBL1 and SBL2 have location and size reported my the bootloader with heimdall print-pit:
--- Entry #2 --- Binary Type: 0 (AP) Device Type: 2 (MMC) Identifier: 2 Attributes: 0 (Read-Only) Update Attributes: 0 Partition Block Size/Offset: 49152 Partition Block Count: 4096 File Offset (Obsolete): 0 File Size (Obsolete): 0 Partition Name: SBL1 Flash Filename: Sbl.bin FOTA Filename:
--- Entry #3 --- Binary Type: 0 (AP) Device Type: 2 (MMC) Identifier: 3 Attributes: 0 (Read-Only) Update Attributes: 0 Partition Block Size/Offset: 53248 Partition Block Count: 4096 File Offset (Obsolete): 0 File Size (Obsolete): 0 Partition Name: SBL2 Flash Filename: FOTA Filename:
The device is not supported by TWRP, but it was supported by cyanogenmod recoveries:
https://web.archive.org/web/20190328070606/http://download.cyanogenmod.org:80/?device=i9100g
That recovery is a zImage. Note that this recovery may not be FSDG compliant, so the first step would be to make a Replicant recovery for this device/
According to the I9100G CyanogenMod installation instructions , "Users running Android 2.3 on their I9100G MUST first upgrade to stock Android 4.x before installing CyanogenMod, or the device won't boot into the system due to it relying on a newer bootloader. A 4.1 bootloader is recommended."
However this approach has several issues.
The update doesn't work anymore.
It also requires you to put a SIM card in the device, which results in privacy issues.
In addition to that, it requires you to give the device a network connection, knowing that the device is running a proprietary Android distribution.
Once you do that it still fails with "Processing failed".
Right before the failure you can see "Signup for a Samsung account" on the top of the window with "Terms and conditions".
So it probably tries to access some page like https://bada.com/contents/deviceterms/china/208.txt which doesn't exist anymore, and it probably does that to show terms and conditions which were probably unacceptable.
They might also have legally prevented you to work on some part of Replicant if you agreed to them, depending on the country you are located in or you intend to travel to.
This is most probably not an issue with the versions that don't have a signed bootloader as the first stage bootloader could simply be replaced by a free software xloader.
See GTI9100GBootloaderFreedom and GTI9100GBootloaderInterface
| Component | Name | Source | Status |
|---|---|---|---|
| SoC | OMAP4430 | TODO | TODO |
| GPU | OMAP => PowerVR | ? | Offuscated Linux pipe driver, proprietary userspace |
| Audio Codec | TWL6040A2 | ? | In linux upstream https://github.com/torvalds/linux/blob/master/sound/soc/codecs/twl6040.c |
| Modem | XMM6260 | Linux kernel | TODO: Add support for the I9100G libsamsung-ipc and BoardConfig.mk |
| Wi-Fi | BCM4330 | Linux kernel | ? |
| Bluetooth | BCM4330 | Linux kernel | ? |
| NFC | None | None | Linux kernel support |
| GPS | ? | ? | ? |
| Accelerometer | ? | ? | ? |
| Compass | ? | ? | ? |
| Light | ? | ? | |
| Proximity | ? | ? | ? |
| FM Radio | ? | ? | ? |
| Camera (back) | ? | ? | ? |
| Camera (front) | ? | ? | ? |
| Touchscreen | Same as Galaxy S2 | ? | ? |
| Display | Same as Galaxy S2 | ? | ? |
| Power Management IC (PMIC) | TWL something | ? | ? |
As far is we get from what we've seen on the motherboard itself, here are our guesses about chips and what they do:
Chips markings:
Ti logo 6030B1A5 21ZEDL9G2 G1
TI logo TWL6040A2 22AH9SW G2 G1
I'm not sure about G1, maybe it's Gi or G|
Modem:
I9811 V 1.0B XG626 H1207
There is a small battery soldered. That might be interesting if it's able to keep the correct time when the battery is removed.
If not you need to run disable-modem.sh then to turn off the phone and remove the battery, and then put on the battery, set the correct time, and then enable-modem.sh
SAMSUNG 210 K3PF7E700 XGC1 GKB2609G
There are with many capacitors around
Links about similar chips:The links talk about things like LPDDR2. The links are not for the same chip but, for the second part number, the reference is pretty close ( K3PE7E700M-XGC1 )
The third link has a description with "Mobile DRAM LPDDR2" and "Package: FBGA"
FBGA is "Fine Ball Grid Array based on ball grid array technology. It has thinner contacts and is mainly used in system-on-a-chip designs" according to wikipedia
SOC (and eMMC?):
SAMSUNG 210 KMVYLOOOLM-B503 CrBM60E1 Maybe MDL5 15
I'm not 100% sure of the last line (Maybe MDL5 15) as there are stuff printed with a blue ink on top (040321)
| Variant | Replicant compatible versions | SoC | Bootloader | Modem link | Modem protocol | RAM |
|---|---|---|---|---|---|---|
| Galaxy S III (GT-I9300) | Replicant 4.0, 4.2, 6.0 | Exynos 4412 | Signed | Isolated (HSIC) | samsung-ipc | 1G |
| Galaxy S III 4G (GT-I9305) | Incomplete support in Replicant 6.0 | Exynos 4412 | Signed | Isolated (USB? HSIC?) | samsung-ipc | 2G |
 |
Device | Galaxy S III 4G (GT-I9305) |
| Manufacturer | Samsung | |
| Release date | September 2012 | |
| Codename | i9305 |
|
| Status | Uncompleted | |
| Supported models | GT-I9305 | |
| Latest images | Replicant 6.0 0002 |
Replicant status for the Galaxy S III 4G (GT-I9305): ReplicantStatus Replicant 6.0
Also, the Galaxy S3 4G (I9305) has an issue that makes it suddenly reboot. See the related bugreport for more details.
Replicant installation for the Galaxy S III 4G (GT-I9305): ReplicantStatus Replicant 6.0
Replicant build for the Galaxy S III 4G (GT-I9305): GalaxyS3I9305Build
See GalaxyS3I9305PrivacySecurityEvaluation for more details.
| Component | Name | Source | Status |
|---|---|---|---|
| SoC | Samsung Exynos 4412 | iFixit | Linux kernel support |
| GPU | Mali 400 | The Exynos Wikipedia page | Linux kernel and secret userspace |
| Audio Codec | WM8994 | Linux kernel | Linux kernel support (ALSA) |
| Modem | Qualcomm MDM9615 | Linux kernel | free library for QMI protocol, no free RIL yet |
| Wi-Fi | BCM4334 | Linux kernel | Linux kernel support, proprietary loaded firmware |
| Bluetooth | BCM4334 | Linux kernel | Linux kernel support, proprietary loaded firmware |
| NFC | PN544 | Linux kernel | Linux kernel support |
| GPS | Qualcomm MDM9615 | Linux kernel | partly free userspace |
| Accelerometer | LSM330DLC | Linux kernel | Linux kernel support, free userspace |
| Compass | AKM8975 | Kernel sources | Linux kernel support, free userspace |
| Light/proximity sensor | CM36651 | Kernel sources | Linux kernel support, free userspace |
| Gyroscope | LSM330DLC | Kernel sources | Linux kernel support, free userspace |
| Barometer | LPS331AP | Kernel sources | Linux kernel support, free userspace |
| Camera (back) | S5C73M3 | Linux kernel | Linux kernel support, free userspace |
| Camera (front) | S5K6A3 | Linux kernel | Linux kernel support, free userspace, proprietary loaded firmware |
WARNING some content may not be the same on your device
| PIT | Linux name | block device | mount point | partition type | Description | size or size@location for 16G eMMC |
|---|---|---|---|---|---|---|
| BOOTLOADER | mmcblk0boot0, not visible on Replicant 6.0 | Unknown, raw data? | The bootloader | 2M | ||
| TZSW | Unknown, raw data? | The signed TrustZone OS | ||||
| Not visible in the PIT | mmcblk0boot1, not visible on Replicant 6.0 | empty | Unused | 2M | ||
| PIT | No partition on Replicant 6.0 |
on mmcblk0 (use print-pit to find the location) |
None | The PIT partition table | 8KiB2@17KiB2 | |
| BOTA0 | mmcblk0p1 | None | empty | ? | 4 MiB3 | |
| BOTA1 | mmcblk0p2 | |||||
| EFS | mmcblk0p3 | /efs | ext4 | modem data partition | ||
| ? | mkefs1 | mmcblk0p4 | ? | not empty, doesn't mount | ? | |
| ? | mkefs2 | mmcblk0p5 | ? | not empty, doesn't mount | ? | |
| ? | mkefs3 | mmcblk0p6 | ? | not empty, doesn't mount | ? | |
| ? | PARAM | mmcblk0p7 | ? | ? | ? | |
| BOOT | mmcblk0p8 | None | bootimage (mkbootimg) | boot.img partition | ||
| RECOVERY | mmcblk0p9 | None | bootimage (mkbootimg) | recovery partition | ||
| RADIO | mmcblk0p10 | /firmware | vfat | modem firmware partition | ||
| TOMBSTONES | mmcblk0p11 | /tombstones | ext4 | crash logs ? | ||
| CACHE | mmcblk0p12 | /cache | ? | cache partition | ||
| SYSTEM | mmcblk0p13 | /system | ext4 | system partition | ||
| HIDDEN | mmcblk0p14 | ? | ext4 | Samsung promotional medias in INTERNAL_SDCARD/Samsung: * Over_the_horizon.mp3 * Wonders_of_Nature.mp4 Many nonfree APKs in symlink/system/app/ |
||
| OTA | mmcblk0p15 | None | empty | ? | ||
| USERDATA | mmcblk0p16 | /data | ext4 | data partition | ||
2 For the Kib see https://en.wikipedia.org/wiki/Kibibyte
See https://wiki.postmarketos.org/wiki/Samsung_Galaxy_SIII_LTE_(samsung-i9305)#Mainline_Kernel, https://blog.forkwhiletrue.me/pages/midas-mainline/. The mainline kernel probably needs the equivalent of https://github.com/LineageOS/android_kernel_samsung_smdk4412/blob/b7ffe7f2aea2391737cdeac2a33217ee0ea4f2ba/arch/arm/mach-exynos/mdm_hsic_pm.c#L1003 for the modem to work.
$ sudo heimdall print-pit Heimdall v1.4.2 Copyright (c) 2010-2017 Benjamin Dobell, Glass Echidna http://www.glassechidna.com.au/ This software is provided free of charge. Copying and redistribution is encouraged. If you appreciate this software and you would like to support future development please consider donating: http://www.glassechidna.com.au/donate/ Initialising connection... Detecting device... Claiming interface... Setting up interface... Initialising protocol... Protocol initialisation successful. Beginning session... Some devices may take up to 2 minutes to respond. Please be patient! Session begun. Downloading device's PIT file... PIT file download successful. Entry Count: 15 Unknown 1: 20764672 Unknown 2: 1 Unknown 3: 0 Unknown 4: 0 Unknown 5: 7703 Unknown 6: 314 Unknown 7: 62960 Unknown 8: 18 --- Entry #0 --- Binary Type: 0 (AP) Device Type: 2 (MMC) Identifier: 1 Attributes: 0 (Read-Only) Update Attributes: 0 Partition Block Size/Offset: 0 Partition Block Count: 0 File Offset (Obsolete): 0 File Size (Obsolete): 0 Partition Name: X-loader Flash Filename: MLO FOTA Filename: --- Entry #1 --- Binary Type: 0 (AP) Device Type: 2 (MMC) Identifier: 4 Attributes: 1 (Read/Write) Update Attributes: 0 Partition Block Size/Offset: 8192 Partition Block Count: 40960 File Offset (Obsolete): 0 File Size (Obsolete): 0 Partition Name: EFS Flash Filename: efs.img FOTA Filename: --- Entry #2 --- Binary Type: 0 (AP) Device Type: 2 (MMC) Identifier: 2 Attributes: 0 (Read-Only) Update Attributes: 0 Partition Block Size/Offset: 49152 Partition Block Count: 4096 File Offset (Obsolete): 0 File Size (Obsolete): 0 Partition Name: SBL1 Flash Filename: Sbl.bin FOTA Filename: --- Entry #3 --- Binary Type: 0 (AP) Device Type: 2 (MMC) Identifier: 3 Attributes: 0 (Read-Only) Update Attributes: 0 Partition Block Size/Offset: 53248 Partition Block Count: 4096 File Offset (Obsolete): 0 File Size (Obsolete): 0 Partition Name: SBL2 Flash Filename: FOTA Filename: --- Entry #4 --- Binary Type: 0 (AP) Device Type: 2 (MMC) Identifier: 5 Attributes: 0 (Read-Only) Update Attributes: 0 Partition Block Size/Offset: 57344 Partition Block Count: 16384 File Offset (Obsolete): 0 File Size (Obsolete): 0 Partition Name: PARAM Flash Filename: param.lfs FOTA Filename: --- Entry #5 --- Binary Type: 0 (AP) Device Type: 2 (MMC) Identifier: 6 Attributes: 0 (Read-Only) Update Attributes: 0 Partition Block Size/Offset: 73728 Partition Block Count: 16384 File Offset (Obsolete): 0 File Size (Obsolete): 0 Partition Name: KERNEL Flash Filename: zImage FOTA Filename: --- Entry #6 --- Binary Type: 0 (AP) Device Type: 2 (MMC) Identifier: 7 Attributes: 0 (Read-Only) Update Attributes: 0 Partition Block Size/Offset: 90112 Partition Block Count: 16384 File Offset (Obsolete): 0 File Size (Obsolete): 0 Partition Name: RECOVERY Flash Filename: FOTA Filename: --- Entry #7 --- Binary Type: 0 (AP) Device Type: 2 (MMC) Identifier: 8 Attributes: 1 (Read/Write) Update Attributes: 0 Partition Block Size/Offset: 106496 Partition Block Count: 204800 File Offset (Obsolete): 0 File Size (Obsolete): 0 Partition Name: CACHE Flash Filename: cache.img FOTA Filename: --- Entry #8 --- Binary Type: 0 (AP) Device Type: 2 (MMC) Identifier: 9 Attributes: 0 (Read-Only) Update Attributes: 0 Partition Block Size/Offset: 311296 Partition Block Count: 40960 File Offset (Obsolete): 0 File Size (Obsolete): 0 Partition Name: MODEM Flash Filename: modem.bin FOTA Filename: --- Entry #9 --- Binary Type: 0 (AP) Device Type: 2 (MMC) Identifier: 10 Attributes: 1 (Read/Write) Update Attributes: 0 Partition Block Size/Offset: 352256 Partition Block Count: 2097152 File Offset (Obsolete): 0 File Size (Obsolete): 0 Partition Name: FACTORYFS Flash Filename: factoryfs.img FOTA Filename: --- Entry #10 --- Binary Type: 0 (AP) Device Type: 2 (MMC) Identifier: 11 Attributes: 1 (Read/Write) Update Attributes: 0 Partition Block Size/Offset: 2449408 Partition Block Count: 4194304 File Offset (Obsolete): 0 File Size (Obsolete): 0 Partition Name: DATAFS Flash Filename: data.img FOTA Filename: --- Entry #11 --- Binary Type: 0 (AP) Device Type: 2 (MMC) Identifier: 12 Attributes: 2 (STL Read-Only) Update Attributes: 0 Partition Block Size/Offset: 6643712 Partition Block Count: 23076796 File Offset (Obsolete): 0 File Size (Obsolete): 0 Partition Name: UMS Flash Filename: ums.rfs FOTA Filename: --- Entry #12 --- Binary Type: 0 (AP) Device Type: 2 (MMC) Identifier: 13 Attributes: 1 (Read/Write) Update Attributes: 0 Partition Block Size/Offset: 29720508 Partition Block Count: 1048576 File Offset (Obsolete): 0 File Size (Obsolete): 0 Partition Name: HIDDEN Flash Filename: hidden.img FOTA Filename: --- Entry #13 --- Binary Type: 0 (AP) Device Type: 2 (MMC) Identifier: 0 Attributes: 0 (Read-Only) Update Attributes: 0 Partition Block Size/Offset: 0 Partition Block Count: 0 File Offset (Obsolete): 0 File Size (Obsolete): 0 Partition Name: GANG Flash Filename: emmc.bin FOTA Filename: --- Entry #14 --- Binary Type: 1 (CP) Device Type: 1 (File/FAT) Identifier: 9 Attributes: 0 (Read-Only) Update Attributes: 0 Partition Block Size/Offset: 0 Partition Block Count: 0 File Offset (Obsolete): 0 File Size (Obsolete): 0 Partition Name: Flash Filename: FOTA Filename: Ending session... Rebooting device... Releasing device interface...
 |
Device | Galaxy S III (GT-I9300) |
| Manufacturer | Samsung | |
| Release date | May 2012 | |
| Replicant codename | i9300 |
|
| Status | Replicant 6.0: Maintained Replicant 10: work in progress |
|
| Variants | GSM: GT-I9300 | |
| Latest images | Replicant 6.0 0003 |
Replicant status for the Galaxy S III (GT-I9300): ReplicantStatus Replicant 6.0
Replicant 11: Work in progress
To install Replicant on the Galaxy S III (GT-I9300), see the RecoveryInstallationWithHeimdall and MinorVersionUpgrade wiki pages.
Replicant build for the Galaxy S III (GT-I9300): GalaxyS3I9300Build
See GalaxyS3I9300PrivacySecurityEvaluation for more details.
| Component | Name | Source | Status |
|---|---|---|---|
| SoC | Samsung Exynos 4412 | iFixit | Linux kernel support |
| GPU | Mali 400 | wikipedia | Linux kernel and secret userspace |
| Audio Codec | WM8994 | Linux kernel | Linux kernel support (ALSA) |
| Modem | XMM6260 | Linux kernel | Free userspace implementation: Samsung-RIL/libsamsung-ipc |
| Wi-Fi | BCM4334 | Linux kernel | Linux kernel support, proprietary loaded firmware |
| Bluetooth | BCM4334 | Linux kernel | Linux kernel support, proprietary loaded firmware |
| NFC | PN544 | Linux kernel | Linux kernel support |
| GPS | BCM47511 | iFixit | Proprietary userspace, no free implementation: BCM4751 |
| Accelerometer | LSM330DLC | Linux kernel | Linux kernel support, free userspace |
| Compass | AKM8975 | Kernel sources | Linux kernel support, free userspace |
| Light/proximity sensor | CM36651 | Kernel sources | Linux kernel support, free userspace |
| Gyroscope | LSM330DLC | Kernel sources | Linux kernel support, free userspace |
| Barometer | LPS331AP | Kernel sources | Linux kernel support, free userspace |
| Camera (back) | S5C73M3 | Linux kernel | Linux kernel support, free userspace |
| Camera (front) | S5K6A3 | Linux kernel | Linux kernel support, free userspace, proprietary loaded firmware |
See also GT-I9300StorageSpeedTests for information about the speed of the eMMC and potential microSDs.
The PIT of a 16G version of the Galaxy SIII (GT-I9300) can be found in the GalaxyS3I9300Pit page.
The PIT is a partition table used at least by the bootloader in the odin mode that Heimdal uses.
If we look at the BOTA0 partition entry in the PIT we have:
--- Entry #4 --- Binary Type: 0 (AP) Device Type: 2 (MMC) Identifier: 1 Attributes: 5 (Read/Write) Update Attributes: 1 (FOTA) Partition Block Size/Offset: 8192 Partition Block Count: 8192 File Offset (Obsolete): 0 File Size (Obsolete): 0 Partition Name: BOTA0 Flash Filename: - FOTA Filename:
As for what the fields can mean:
Binary Type: 0 (AP)
Partition Block Size/Offset: 8192 Partition Block Count: 8192
Partition Name: BOTA0
Identifier: 1
For instance if we loot at BOOTLOADER we have Identifier: 80 and for TZSW we have Identifier: 81. Both partitions are located on a different hardware partition of the eMMC (which is considered like a different block device in Linux).
The mmcblk0 block device also has a GPT.
See the GalaxySIIIGTI9300PartitionsResearch page for an attempt to locate the PIT and the MD5HDR partitions.
| PIT | Linux name | block device | mount point | partition type | Description | size or size@location for 16G eMMC |
|---|---|---|---|---|---|---|
| BOOTLOADER | mmcblk0boot0, not visible on Replicant 6.0 | Unknown, raw data? | The bootloader | 4M | ||
| TZSW | Unknown, raw data? | The signed TrustZone OS | ||||
| Not visible in the PIT |
mmcblk0boot1, not visible on Replicant 6.0 | empty | Unused | 4M | ||
| PIT | No partition on Replicant 6.0 | on mmcblk0 (use print-pit to find the location) |
None | The PIT partition table | 8KiB2@17KiB2 | |
| MD5HDR | No partition Replicant 6.0 | on mmcblk0 (use print-pit to find the location) |
None | Unknown, raw data? | Used during boot to validate partitions? | 1MiB3@25KiB2 |
| BOTA0 | mmcblk0p1 | None | empty | ? | 4 MiB3 | |
| BOTA1 | mmcblk0p2 | |||||
| EFS | mmcblk0p3 | /efs | ext4 | modem data partition (content) |
20M | |
| PARAM | mmcblk0p4 | None | tar file, can be unpacked with gnu tar |
* Bootloader settings1 * Boot modes1 * Splash screen1 * several JPGs regarding download mode, loading empty battery, hardware/watchdog reset and other See GTI9300PARAM for more details |
8M | |
| BOOT | mmcblk0p5 | None | bootimage (mkbootimg) | boot.img partition | 8M | |
| RECOVERY | mmcblk0p6 | None | bootimage (mkbootimg) | recovery partition | 8M | |
| RADIO | mmcblk0p7 | None | Unknown, raw data? | Modem OS partition | 32M | |
| CACHE | mmcblk0p8 | /cache | f2fs | cache partition | 1G | |
| SYSTEM | mmcblk0p9 | /system | ext4 | system partition | 1.5G | |
| HIDDEN | mmcblk0p10 | /preload | ext4 | Samsung promotional medias: * Over_the_horizon.mp3 * Wonders_of_Nature.mp4 |
560M | |
| OTA | mmcblk0p11 | None | empty | probably only used during OTA updates? | 8M | |
| USERDATA | mmcblk0p12 | /data | ext4 | data partition | 11.5G | |
1 According to a forum thread on XDA developers "About Params: The params contains the splash screens you see when you turn your phone on and settings which control boot. These settings include UART output, kernel parmeters, and boot modes."
2 For the Kib see https://en.wikipedia.org/wiki/Kibibyte
3 Foi the MiB see https://en.wikipedia.org/wiki/Mebibyte
FCC ID: A3LGTI9300A (Grantee code: A3L, Product code: GTI9300A)
URL: https://www.fcc.gov/oet/ea/fccid/ Enter grantee, and product code and click on search.
Schematics: Block diagram operational description and schematics not made public through the FCC.
Device URL: https://www.ifixit.com/Device/Samsung_Galaxy_S_III#Section_Documents
Repair manuals and very partial schematics: https://www.ifixit.com/Device/Samsung_Galaxy_S_III#Section_Documents
$ dd if=mmcblk0 skip=34 count=16 of=PIT 16+0 records in 16+0 records out 8192 bytes (8.2 kB, 8.0 KiB) copied, 0.000364642 s, 22.5 MB/s
$ heimdall print-pit --file PIT Heimdall v1.4.2 Copyright (c) 2010-2017 Benjamin Dobell, Glass Echidna http://www.glassechidna.com.au/ This software is provided free of charge. Copying and redistribution is encouraged. If you appreciate this software and you would like to support future development please consider donating: http://www.glassechidna.com.au/donate/ Entry Count: 16 Unknown 1: 1598902083 Unknown 2: 844251476 Unknown 3: 30797 Unknown 4: 0 Unknown 5: 0 Unknown 6: 0 Unknown 7: 0 Unknown 8: 0 --- Entry #0 --- Binary Type: 0 (AP) Device Type: 2 (MMC) Identifier: 80 Attributes: 2 (STL Read-Only) Update Attributes: 1 (FOTA) Partition Block Size/Offset: 0 Partition Block Count: 1734 File Offset (Obsolete): 0 File Size (Obsolete): 0 Partition Name: BOOTLOADER Flash Filename: sboot.bin FOTA Filename: --- Entry #1 --- Binary Type: 0 (AP) Device Type: 2 (MMC) Identifier: 81 Attributes: 5 (Read/Write) Update Attributes: 1 (FOTA) Partition Block Size/Offset: 1734 Partition Block Count: 312 File Offset (Obsolete): 0 File Size (Obsolete): 0 Partition Name: TZSW Flash Filename: tz.img FOTA Filename: --- Entry #2 --- Binary Type: 0 (AP) Device Type: 2 (MMC) Identifier: 70 Attributes: 5 (Read/Write) Update Attributes: 1 (FOTA) Partition Block Size/Offset: 34 Partition Block Count: 16 File Offset (Obsolete): 0 File Size (Obsolete): 0 Partition Name: PIT Flash Filename: mx.pit FOTA Filename: --- Entry #3 --- Binary Type: 0 (AP) Device Type: 2 (MMC) Identifier: 71 Attributes: 5 (Read/Write) Update Attributes: 1 (FOTA) Partition Block Size/Offset: 50 Partition Block Count: 2048 File Offset (Obsolete): 0 File Size (Obsolete): 0 Partition Name: MD5HDR Flash Filename: md5.img FOTA Filename: --- Entry #4 --- Binary Type: 0 (AP) Device Type: 2 (MMC) Identifier: 1 Attributes: 5 (Read/Write) Update Attributes: 1 (FOTA) Partition Block Size/Offset: 8192 Partition Block Count: 8192 File Offset (Obsolete): 0 File Size (Obsolete): 0 Partition Name: BOTA0 Flash Filename: - FOTA Filename: --- Entry #5 --- Binary Type: 0 (AP) Device Type: 2 (MMC) Identifier: 2 Attributes: 5 (Read/Write) Update Attributes: 1 (FOTA) Partition Block Size/Offset: 16384 Partition Block Count: 8192 File Offset (Obsolete): 0 File Size (Obsolete): 0 Partition Name: BOTA1 Flash Filename: - FOTA Filename: --- Entry #6 --- Binary Type: 0 (AP) Device Type: 2 (MMC) Identifier: 3 Attributes: 5 (Read/Write) Update Attributes: 5 (FOTA) Partition Block Size/Offset: 24576 Partition Block Count: 40960 File Offset (Obsolete): 0 File Size (Obsolete): 0 Partition Name: EFS Flash Filename: efs.img FOTA Filename: --- Entry #7 --- Binary Type: 0 (AP) Device Type: 2 (MMC) Identifier: 4 Attributes: 5 (Read/Write) Update Attributes: 1 (FOTA) Partition Block Size/Offset: 65536 Partition Block Count: 16384 File Offset (Obsolete): 0 File Size (Obsolete): 0 Partition Name: PARAM Flash Filename: param.bin FOTA Filename: --- Entry #8 --- Binary Type: 0 (AP) Device Type: 2 (MMC) Identifier: 5 Attributes: 5 (Read/Write) Update Attributes: 1 (FOTA) Partition Block Size/Offset: 81920 Partition Block Count: 16384 File Offset (Obsolete): 0 File Size (Obsolete): 0 Partition Name: BOOT Flash Filename: boot.img FOTA Filename: --- Entry #9 --- Binary Type: 0 (AP) Device Type: 2 (MMC) Identifier: 6 Attributes: 5 (Read/Write) Update Attributes: 1 (FOTA) Partition Block Size/Offset: 98304 Partition Block Count: 16384 File Offset (Obsolete): 0 File Size (Obsolete): 0 Partition Name: RECOVERY Flash Filename: recovery.img FOTA Filename: --- Entry #10 --- Binary Type: 0 (AP) Device Type: 2 (MMC) Identifier: 7 Attributes: 5 (Read/Write) Update Attributes: 1 (FOTA) Partition Block Size/Offset: 114688 Partition Block Count: 65536 File Offset (Obsolete): 0 File Size (Obsolete): 0 Partition Name: RADIO Flash Filename: modem.bin FOTA Filename: --- Entry #11 --- Binary Type: 0 (AP) Device Type: 2 (MMC) Identifier: 8 Attributes: 5 (Read/Write) Update Attributes: 5 (FOTA) Partition Block Size/Offset: 180224 Partition Block Count: 2097152 File Offset (Obsolete): 0 File Size (Obsolete): 0 Partition Name: CACHE Flash Filename: cache.img FOTA Filename: --- Entry #12 --- Binary Type: 0 (AP) Device Type: 2 (MMC) Identifier: 9 Attributes: 5 (Read/Write) Update Attributes: 5 (FOTA) Partition Block Size/Offset: 2277376 Partition Block Count: 3145728 File Offset (Obsolete): 0 File Size (Obsolete): 0 Partition Name: SYSTEM Flash Filename: system.img FOTA Filename: --- Entry #13 --- Binary Type: 0 (AP) Device Type: 2 (MMC) Identifier: 10 Attributes: 5 (Read/Write) Update Attributes: 5 (FOTA) Partition Block Size/Offset: 5423104 Partition Block Count: 1146880 File Offset (Obsolete): 0 File Size (Obsolete): 0 Partition Name: HIDDEN Flash Filename: hidden.img FOTA Filename: --- Entry #14 --- Binary Type: 0 (AP) Device Type: 2 (MMC) Identifier: 11 Attributes: 5 (Read/Write) Update Attributes: 1 (FOTA) Partition Block Size/Offset: 6569984 Partition Block Count: 16384 File Offset (Obsolete): 0 File Size (Obsolete): 0 Partition Name: OTA Flash Filename: - FOTA Filename: --- Entry #15 --- Binary Type: 0 (AP) Device Type: 2 (MMC) Identifier: 12 Attributes: 5 (Read/Write) Update Attributes: 5 (FOTA) Partition Block Size/Offset: 6586368 Partition Block Count: 0 File Offset (Obsolete): 0 File Size (Obsolete): 0 Partition Name: USERDATA Flash Filename: userdata.img FOTA Filename: remained
| Variant | Replicant compatible versions | SoC | Bootloader | Modem link | Modem protocol | RAM |
|---|---|---|---|---|---|---|
| Galaxy Tab 7.0 GSM (GT-P1000) | None | Exynos 3310 | ? | RAM | smasung-ipc | 512M1 |
| Galaxy Tab 7.0 WiFi (GT-P1010) | None | OMAP 3630 | ? | No modem | 592M2 | |
| Galaxy Tab 7.0 Verizon (SCH-I800) | None | |||||
| Galaxy Tab 10.1 3G (GT-P7500) | None | |||||
| Galaxy Tab 10.1 WiFi (GT-P7510) | None | Tegra T204 | 1G4 | |||
| Galaxy Tab 10.1 WiFi (GT-P7510) | None | Tegra T205 | 1G5 | |||
| Galaxy Tab 10.1 Verizon (SCH-I905) | None | |||||
| Galaxy Tab 10.1v (GT-P7100) | None | |||||
| Galaxy Tab 8.9 3G (GT-P7300) | None | Tegra T203 | ? | ? | ? | 1G3 |
| Galaxy Tab 8.9 WiFi (GT-P7310) | None | |||||
| Galaxy Tab 8.9 AT&T (SGH-I957) | None | |||||
1 https://www.gsmarena.com/samsung_p1000_galaxy_tab-3370.php
2 https://www.gsmarena.com/samsung_p1010_galaxy_tab_wi_fi-3919.php
3 https://www.gsmarena.com/samsung_galaxy_tab_8_9_p7300-3891.php
4 https://www.gsmarena.com/samsung_p7500_galaxy_tab_10_1_3g-3892.php
5 https://www.gsmarena.com/samsung_galaxy_tab_10_1_p7510-3894.php
| Variant | Replicant compatible versions | SoC | Bootloader | Modem link | Modem protocol | RAM |
|---|---|---|---|---|---|---|
| Galaxy Tab 2 7.0 (GT-P3100) | Replicant 4.0, 4.2, 6.0 | OMAP 4430 | Signed | Isolated (MIPI) | samsung-ipc | 1G |
| Galaxy Tab 2 7.0 WiFi (GT-P3110) | Replicant 4.0, 4.2, 6.0 | OMAP 4430 | Signed | No modem | 1G | |
| Galaxy Tab 2 7.0 WiFi (GT-P3113) | Replicant 4.0, 4.2, 6.0 | OMAP 4430 | Signed? | No modem? | 1G? | |
| Galaxy Tab 2 10.1 (GT-P5100) | Replicant 4.0, 4.2, 6.0 | OMAP 4430 | Signed | Isolated (MIPI) | samsung-ipc | 1G |
| Galaxy Tab 2 10.1 WiFi (GT-P5110) | Replicant 4.0, 4.2, 6.0 | OMAP 4430 | Signed | No modem | 1G | |
 |
Device | Galaxy Tab 2 10.1 (GT-P51xx) |
| Manufacturer | Samsung | |
| Release date | April 2012 | |
| Codename | espresso3g (GSM), espressowifi (Wi-Fi) |
|
| Status | Maintained | |
| Variants | GSM: GT-P5100, Wi-Fi: GT-P5110 | |
| Latest images | Replicant 6.0 0003 |
Replicant status for the Galaxy Tab 2 10.1 (GT-P51xx): ReplicantStatus Replicant 6.0
To install Replicant on the Galaxy Tab 2 10.1 (GT-P51xx), see the RecoveryInstallationWithHeimdall and MinorVersionUpgrade wiki pages.
Replicant build for the Galaxy Tab 2 10.1 (GT-P51xx): GalaxyTab2Px1xxBuild
Privacy/security issues on the Galaxy Tab 2 10.1 (GT-P51xx): GalaxyTab2101P51xxPrivacySecurityIssues
The compass sensor is calculated from both the accelerometer and magnetic field sensors, which needs calibration to be accurate.
If the values reported by the compass sensor are not right, you can recalibrate the magnetic field sensor with the following steps:
Then start an application using the compass sensor and move the device in every direction, with a rotation around each axis: the device should now be calibrated.
 |
Device | Galaxy Tab 2 7.0 (GT-P31xx) |
| Manufacturer | Samsung | |
| Release date | April 2012 | |
| Codename | espresso3g (GSM), espressowifi (Wi-Fi) |
|
| Status | Maintained | |
| Variants | GSM: GT-P3100, Wi-Fi: GT-P3110, GT-P3113 | |
| Latest images | Replicant 6.0 0003 |
Replicant status for the Galaxy Tab 2 7.0 (GT-P31xx): ReplicantStatus Replicant 6.0
To install Replicant on the Galaxy Galaxy Tab 2 7.0 (GT-P31xx), see the RecoveryInstallationWithHeimdall and MinorVersionUpgrade wiki pages.
Replicant build for the Galaxy Tab 2 7.0 (GT-P31xx): GalaxyTab2Px1xxBuild
| PIT | Linux name | block device | mount point | partition type | Description | size or size@location for ?GiB |
|---|---|---|---|---|---|---|
| X-loader | ||||||
| EFS | mmcblk0p1 | /efs | ext4 | modem data partition (content) | ||
| SBL1 | mmcblk0p2 | |||||
| SBL2 | mmcblk0p3 | |||||
| PARAM | mmcblk0p4 | |||||
| KERNEL | mmcblk0p5 | |||||
| RECOVERY | mmcblk0p6 | |||||
| CACHE | mmcblk0p7 | /cache | ||||
| MODEM | mmcblk0p8 | |||||
| FACTORYFS | mmcblk0p9 | /system | ||||
| DATAFS | mmcblk0p10 | /data | ||||
| HIDDEN | mmcblk0p11 | |||||
| GANG | ||||||
| MODEM | ||||||
Privacy/security issues on the Galaxy Tab 2 7.0 (GT-P31xx): GalaxyTab270P31xxPrivacySecurityIssues
The compass sensor is calculated from both the accelerometer and magnetic field sensors, which needs calibration to be accurate.
If the values reported by the compass sensor are not right, you can recalibrate the magnetic field sensor with the following steps:
Then start an application using the compass sensor and move the device in every direction, with a rotation around each axis: the device should now be calibrated.
If we do that, we get the following in the kernel log of your laptop:
usb 1-1: new high-speed USB device number 3 using ehci-pci usb 1-1: unable to get BOS descriptor or descriptor too short usb 1-1: New USB device found, idVendor=0451, idProduct=d010, bcdDevice= 0.00 usb 1-1: New USB device strings: Mfr=33, Product=37, SerialNumber=0 usb 1-1: Product: OMAP4440 usb 1-1: Manufacturer: Texas Instruments usb 1-1: USB disconnect, device number 3
We can also try to get a bit more infos with omap-usb-boot:
# omap-usb-boot -w -v load u-boot.img Finding and opening USB device Found and opened omap4 USB device: OMAP4440 ASIC device id: 4440, HS device Loading and executing u-boot.img... Loading data with length 369176 bytes Bulk USB transfer failed Loading and executing failed
Here we know the device is signed because it's a "HS device".
If it was not signed it would print "GP device" instead.
If we do that, we get the following in the kernel log of your laptop:
usb 1-1: new high-speed USB device number 6 using ehci-pci usb 1-1: unable to get BOS descriptor or descriptor too short usb 1-1: New USB device found, idVendor=0451, idProduct=d00f, bcdDevice= 0.00 usb 1-1: New USB device strings: Mfr=33, Product=37, SerialNumber=0 usb 1-1: Product: OMAP4430 usb 1-1: Manufacturer: Texas Instruments usb 1-1: USB disconnect, device number 6
We can also try to get a bit more infos with omap-usb-boot:
omap-usb-boot -w -v load u-boot.img Finding and opening USB device Found and opened omap4 USB device: OMAP4430 ASIC device id: 4430, HS device Loading and executing u-boot.img... Loading data with length 369176 bytes Bulk USB transfer failed Loading and executing failed
Here we know the device is signed because it's a "HS device".
If it was not signed it would print "GP device" instead.
There might be some pointers and interesting infos in the following link: https://www.lukastomek.info/2018/11/05/UnBrick-Samsung-Galaxy-Tab/
That link also points to an u-boot port for the P5100.
TODO:At boot, when pressing the power button for a short time we get:
$ picocom -b 115200 /dev/ttyUSB1 picocom v3.1 port is : /dev/ttyUSB1 flowcontrol : none baudrate is : 115200 parity is : none databits are : 8 stopbits are : 1 escape is : C-a local echo is : no noinit is : no noreset is : no hangup is : no nolock is : no send_cmd is : sz -vv receive_cmd is : rz -vv -E imap is : omap is : emap is : crcrlf,delbs, logfile is : none initstring : none exit_after is : not set exit is : no Type [C-a] [C-h] to see available commands Terminal ready Texas Instruments X-Loader 1.41 (Jun 13 2012 - 22:11:09) Uboot-loading from Emmc Starting OS Bootloader from EMMC ...
Here the device boots, but if the button isn't pressed long enough it shuts down.
When pressing it for a longer time we get:
$ picocom -b 115200 /dev/ttyUSB1 picocom v3.1 port is : /dev/ttyUSB1 flowcontrol : none baudrate is : 115200 parity is : none databits are : 8 stopbits are : 1 escape is : C-a local echo is : no noinit is : no noreset is : no hangup is : no nolock is : no send_cmd is : sz -vv receive_cmd is : rz -vv -E imap is : omap is : emap is : crcrlf,delbs, logfile is : none initstring : none exit_after is : not set exit is : no Type [C-a] [C-h] to see available commands Terminal ready Texas Instruments X-Loader 1.41 (Jun 13 2012 - 22:11:09) Uboot-loading from Emmc Starting OS Bootloader from EMMC ... g_nRebootReason = 0x100000 Kernel @ 81808000 (4524144 bytes) Ramdisk @ 82800000 (994957 bytes) set_lcd_panel_id: panel_adc=805 *** ltn070nl01_power_on *** lcd_pannel_id=3 AST_POWERON
AST_POWERON probably means that there is a GPIO that can switch between the OMAP4 UART and the modem UART, and that at some point during the boot it's switched to the modem.
I tried to type AT commands like AT but I got no response. Maybe it's because I use the wrong voltage for the UART. Maybe I need to reset the modem through AT commands.
Note that there is no u-boot here despite what the print says: the Galaxy Tab 2 use xloader, and the source code of xloader is available for the Galaxy Tab 2, and its prints mention u-boot regardless of the bootloader that it loads.
Unfortunately the xloader it uses is signed, so even if it's license is free software we can't change it.
As users are denied the right to run modified versions, we consider the result nonfree even if the license is free.
See the GalaxyTab2AndGalaxyNexusBootloaderFreedom page for more technical details on that.
$ heimdall print-pit Heimdall v1.4.2 Copyright (c) 2010-2017 Benjamin Dobell, Glass Echidna http://www.glassechidna.com.au/ This software is provided free of charge. Copying and redistribution is encouraged. If you appreciate this software and you would like to support future development please consider donating: http://www.glassechidna.com.au/donate/ Initialising connection... Detecting device... Claiming interface... Setting up interface... Initialising protocol... Protocol initialisation successful. Beginning session... Some devices may take up to 2 minutes to respond. Please be patient! Session begun. Downloading device's PIT file... PIT file download successful. Entry Count: 14 Unknown 1: 0 Unknown 2: 0 Unknown 3: 0 Unknown 4: 0 Unknown 5: 0 Unknown 6: 0 Unknown 7: 0 Unknown 8: 0 --- Entry #0 --- Binary Type: 0 (AP) Device Type: 2 (MMC) Identifier: 1 Attributes: 0 (Read-Only) Update Attributes: 0 Partition Block Size/Offset: 0 Partition Block Count: 0 File Offset (Obsolete): 0 File Size (Obsolete): 0 Partition Name: X-loader Flash Filename: MLO FOTA Filename: --- Entry #1 --- Binary Type: 0 (AP) Device Type: 2 (MMC) Identifier: 4 Attributes: 1 (Read/Write) Update Attributes: 0 Partition Block Size/Offset: 8192 Partition Block Count: 40960 File Offset (Obsolete): 0 File Size (Obsolete): 0 Partition Name: EFS Flash Filename: efs.img FOTA Filename: --- Entry #2 --- Binary Type: 0 (AP) Device Type: 2 (MMC) Identifier: 2 Attributes: 0 (Read-Only) Update Attributes: 0 Partition Block Size/Offset: 49152 Partition Block Count: 4096 File Offset (Obsolete): 0 File Size (Obsolete): 0 Partition Name: SBL1 Flash Filename: Sbl.bin FOTA Filename: --- Entry #3 --- Binary Type: 0 (AP) Device Type: 2 (MMC) Identifier: 3 Attributes: 0 (Read-Only) Update Attributes: 0 Partition Block Size/Offset: 53248 Partition Block Count: 4096 File Offset (Obsolete): 0 File Size (Obsolete): 0 Partition Name: SBL2 Flash Filename: FOTA Filename: --- Entry #4 --- Binary Type: 0 (AP) Device Type: 2 (MMC) Identifier: 5 Attributes: 0 (Read-Only) Update Attributes: 0 Partition Block Size/Offset: 57344 Partition Block Count: 16384 File Offset (Obsolete): 0 File Size (Obsolete): 0 Partition Name: PARAM Flash Filename: param.lfs FOTA Filename: --- Entry #5 --- Binary Type: 0 (AP) Device Type: 2 (MMC) Identifier: 6 Attributes: 0 (Read-Only) Update Attributes: 0 Partition Block Size/Offset: 73728 Partition Block Count: 16384 File Offset (Obsolete): 0 File Size (Obsolete): 0 Partition Name: KERNEL Flash Filename: boot.img FOTA Filename: --- Entry #6 --- Binary Type: 0 (AP) Device Type: 2 (MMC) Identifier: 7 Attributes: 0 (Read-Only) Update Attributes: 0 Partition Block Size/Offset: 90112 Partition Block Count: 16384 File Offset (Obsolete): 0 File Size (Obsolete): 0 Partition Name: RECOVERY Flash Filename: recovery.img FOTA Filename: --- Entry #7 --- Binary Type: 0 (AP) Device Type: 2 (MMC) Identifier: 8 Attributes: 1 (Read/Write) Update Attributes: 0 Partition Block Size/Offset: 106496 Partition Block Count: 1433600 File Offset (Obsolete): 0 File Size (Obsolete): 0 Partition Name: CACHE Flash Filename: cache.img FOTA Filename: --- Entry #8 --- Binary Type: 0 (AP) Device Type: 2 (MMC) Identifier: 9 Attributes: 0 (Read-Only) Update Attributes: 0 Partition Block Size/Offset: 1540096 Partition Block Count: 40960 File Offset (Obsolete): 0 File Size (Obsolete): 0 Partition Name: MODEM Flash Filename: modem.bin FOTA Filename: --- Entry #9 --- Binary Type: 0 (AP) Device Type: 2 (MMC) Identifier: 10 Attributes: 1 (Read/Write) Update Attributes: 0 Partition Block Size/Offset: 1581056 Partition Block Count: 2867200 File Offset (Obsolete): 0 File Size (Obsolete): 0 Partition Name: FACTORYFS Flash Filename: system.img FOTA Filename: --- Entry #10 --- Binary Type: 0 (AP) Device Type: 2 (MMC) Identifier: 11 Attributes: 1 (Read/Write) Update Attributes: 0 Partition Block Size/Offset: 4448256 Partition Block Count: 25280478 File Offset (Obsolete): 0 File Size (Obsolete): 0 Partition Name: DATAFS Flash Filename: userdata.img FOTA Filename: --- Entry #11 --- Binary Type: 0 (AP) Device Type: 2 (MMC) Identifier: 13 Attributes: 1 (Read/Write) Update Attributes: 0 Partition Block Size/Offset: 29728734 Partition Block Count: 1048576 File Offset (Obsolete): 0 File Size (Obsolete): 0 Partition Name: HIDDEN Flash Filename: hidden.img FOTA Filename: --- Entry #12 --- Binary Type: 0 (AP) Device Type: 2 (MMC) Identifier: 0 Attributes: 0 (Read-Only) Update Attributes: 0 Partition Block Size/Offset: 0 Partition Block Count: 0 File Offset (Obsolete): 0 File Size (Obsolete): 0 Partition Name: GANG Flash Filename: emmc.bin FOTA Filename: --- Entry #13 --- Binary Type: 1 (CP) Device Type: 1 (File/FAT) Identifier: 9 Attributes: 0 (Read-Only) Update Attributes: 0 Partition Block Size/Offset: 0 Partition Block Count: 0 File Offset (Obsolete): 0 File Size (Obsolete): 0 Partition Name: MODEM Flash Filename: FOTA Filename: Ending session... Rebooting device... Releasing device interface...
This page explains how to build Replicant for the Galaxy Tab 2 models.
Do not build as root, always build as user.
See the build tips if you are facing issues.
All of the following build commands need to be run in the source tree root folder.
First, the toolchain needs to be built for replicant 6:
./vendor/replicant/build-toolchain
If you have executed any of the commands below and you want to run the toolchain build again, you will need to open a new shell.
Then, prepare the shell environment for the Replicant build:
. build/envsetup.sh lunch replicant_espresso3g-userdebug
. build/envsetup.sh lunch replicant_espressowifi-userdebug
Now you can start the build:
parallel_tasks=$(echo "$(grep 'processor' /proc/cpuinfo | wc -l ) + 1" | bc) make -j$parallel_tasks bacon
The -jn argument indicates the number of parallel tasks during the build. You can remove it from the command line to have only one task at a time.$parallel_tasks holds an optimized number of parallel tasks for your hardware. You may want to reduce this number if e.g. the computer runs out of RAM during the build.
Finally, sign the resulting images for replicant 6:
./vendor/replicant/sign-build espresso3g
./vendor/replicant/sign-build espressowifi
The first time you run the script, it will ask you a few questions that are needed to generate the necessary signing keys.
out/dist/espresso3g/ or out/dist/espressowifi/out/host/linux-x86/bin/Warning: installing an operating system, such as Replicant, may void your device's warranty and will erase the data stored on the device.
In order to install Replicant on your device, it is assumed that you have a computer running a GNU/Linux operating system and everything necessary available to connect your device to the computer through USB. Moreover, it is assumed that anyone performing the installation knows how to use a terminal and has basic knowledge about command line commands.
The first step in the installation process is to download and set up the files that will be used to install Replicant to the device. The files must be downloaded on your computer first.
1. Find out what the latest image is: check out the Last image part of the general table on GalaxyTab270P31xx or GalaxyTab2101P51xx
2. Download all the files listed for the device (including the checksum and the signatures) on ReplicantImages for the latest image
2. Make sure you have added the Replicant release key to your GPG keyring
3. Check the signature of the files:
gpg --armor --verify path/to/replicant-6.0-espresso3g.zip.asc path/to/replicant-6.0-espresso3g.zip
gpg --armor --verify path/to/replicant-6.0-espressowifi.zip.asc path/to/replicant-6.0-espressowifi.zip
gpg --armor --verify path/to/recovery-espresso3g.img.asc path/to/recovery-espresso3g.img
gpg --armor --verify path/to/recovery-espressowifi.img.asc path/to/recovery-espressowifi.img
sha256sum -c espresso3g.sha256
sha256sum -c espressowifi.sha256
6. Make sure the check succeeds, do not install anything if it doesn't!
The heimdall tool is required to flash the recovery image to the device.
Instructions to install heimdall: ToolsInstallation
You can either complete this step by using the device's internal storage or by using an external microSD card.
1. Make sure the device is started up and has an Android system running
2. Connect the USB cable to both the computer and the device
3. Enable USB mass storage on the device
4. Mount the mass storage on the computer
5. Copy the replicant-6.0-espresso3g.zip or replicant-6.0-espressowifi.zip file at the origin of the mass storage
6. Safely unmount the mass storage on the computer
7. Disable USB mass storage on the device
1. Connect the microSD card to the computer (e.g. using an USB card reader)
2. Mount the microSD card on the computer
3. Copy the replicant-6.0-espresso3g.zip or replicant-6.0-espressowifi.zip file at the origin of the microSD card
4. Safely unmount the microSD card on the computer
5. Disconnect the microSD card from the computer
6. Insert the microSD card in the device (make sure it is turned off before inserting the card)
Instructions to install ADB: ToolsInstallation
The next step in the installation process is to prepare the device for heimdall mode.
1. Make sure the device is completely turned off and the USB cable is disconnected from the device
2. Start the device by holding the following key combination: Volume down, Power
3. Hold the key combination until the device shows a Warning message
4. Confirm that you want to download a custom OS (using volume up)
5. Make sure the device is in Downloading mode
4. Connect the USB cable to both the computer and the device
Now that both the computer and the device are set up, it is time to actually install the images to the device.
1. Install the recovery image to the device:
heimdall flash --KERNEL path/to/recovery-espresso3g.img --RECOVERY path/to/recovery-espresso3g.img
heimdall flash --KERNEL path/to/recovery-espressowifi.img --RECOVERY path/to/recovery-espressowifi.img
2. Make sure the device reboots to recovery
A data wipe is necessary if you switch from the factory image or a different Android distribution to Replicant. You also need to do a data wipe when upgrading to a new major release (e.g. from Replicant 4.2 to Replicant 6.0). Only when updating to a new minor release (e.g. from Replicant 6.0 0001 to Replicant 6.0 0002), a data wipe is usually not required.
3. Select Factory reset
4. Select Wipe data (keep media)
5. Confirm the data wipe by selecting Yes
6. Press the back key (if necessary) to get back to the general menu
7. Select Apply update
8. Select Choose from emulated
9. Select the system zip: replicant-6.0-espresso3g.zip or replicant-6.0-espressowifi.zip
Note: if your device was running Android 4.2 and later, it may be located in the 0 directory
10. Confirm the installation
8. Select Choose from sdcard1
9. Select the system zip: replicant-6.0-espresso3g.zip or replicant-6.0-espressowifi.zip
Note: if your device was running Android 4.2 and later, it may be located in the 0 directory
10. Confirm the installation
8. Select Apply from ADB
9. Back to the host computer, load the system zip with sideload:
adb sideload path/to/replicant-6.0-espresso3g.zip
or
adb sideload path/to/replicant-6.0-espressowifi.zip
10. Make sure the file is being transfered
11. Press the back key (if necessary) to get back to the general menu
If you did the data wipe after step 2, you will need to do a factory reset as well:
12. Select Factory reset
13. Select Full factory reset
14. Confirm the factory reset by selecting Yes
15. Press the back key (if necessary) to get back to the general menu
16. Select Reboot system now to reboot the device
Your device should now be running Replicant!
Some hardware functionalities require firmwares to be functional.
If you are interested in writing free software replacements for these firmware files, please contact us.
Firmwares are programs that do not run on the main CPU: instead, they run on separate chips. Some firmwares come pre-installed on the chip and some others need to be loaded by the CPU.
Since these firmwares are non-free software, we do not recommend using them nor do we distribute them.
| Firmware location | Related chip | Function |
| /system/vendor/firmware/bcmdhd_apsta.bin | BCM4330 | Wi-Fi Host |
| /system/vendor/firmware/bcmdhd_p2p.bin | BCM4330 | Wi-Fi Direct |
| /system/vendor/firmware/bcmdhd_sta.bin | BCM4330 | Wi-Fi |
| /system/vendor/firmware/nvram_net.txt | BCM4330 | Wi-Fi |
| /system/vendor/firmware/BCM4330.hcd | BCM4330 | Bluetooth |
| /system/vendor/firmware/ducati-m3.bin | Ducati M3 | Hardware media encoding/decoding, Camera |
The Galaxy Tab and Galaxy Tab 2 tablets have a custom 30 pin connector.
The goal is to get access to the SOC UART to interact with the bootloader, get kernel boot logs, etc.
To make it easier we want to reuse existing cables without much modifications to the cables.
While this is being tested on the Galaxy Tab 2, it should also work on the Galaxy Tab.
link: shop page
Exported pins: USB D+, USB D-, USB VCC, USB GND, SOC UART RX, SOC UART TX. The ID pin isn't exported.
The USB cable can be plugged in a regular computer.
The RX and TX and GND are exported on the RJ45 cable.
With the clip on the bottom, we have the following pinout on the RJ45:
+-----------------------------------------------------+
| [] [] [RX or TX?] [RX or TX?] [] [] [] [GND] [] [] |
| |
| |
| |
| |
| |
| |
| |
.......................................................
| |
| |
| |
| |
| |
| |
| |
| |
Inside the middle of the cable we have a tiny PCB that is just for soldering the pins and conducting them.
Top view with the plastic cover that has i-pmart removed.
On the bottom plastic cover, there is a white sticker with the following writings:
USB-021
SAMP1000 (RJ45+USB) cable
And here's the PCB pinout:
To Galaxy Tab (2) connector
SOC UART RX or TX? ----+
SOC UART RX or TX? -+ |
USB GND----------+ | |
USB VCC ------+ | | |
USB D- ----+ | | | |
USB D+ -+ | | | | |
| | | | | |
[NC?] [+][+][+][+][+][+] [NC?]
| | | | | |
[NC?] [ ][ ][ ][ ][ ][ ] [NC?]
To USB and RJ45 cables
On the Galaxy Tab connector, there is a gold connector only for certain pin numbers:
| 1 | 2 | 3 | 4 | 5 | 6 | 7 | 8 | 9 | 10 | 11 | 12 | 13 | 14 | 15 | 16 | 17 | 18 | 19 | 20 | 21 | 22 | 23 | 24 | 25 | 26 | 27 | 28 | 29 | 30 |
| NC | NC | D+ | D- | NC | NC | USB + | USB+ | NC | NC | NC | NC | NC | NC | GND | GND | NC | NC | NC | RX | TX | NC | NC | NC | NC | NC | NC | NC | NC | GND |
The instructions below need to be tested if they still work with a current Replicant release and these notes for Replicant 6.0 should be added, but with more details.
Here are some notes on debugging with GDB:
adb shell gdbserver 127.0.0.1:8022 --attach $(pidof mediaserver )
adb forward tcp:8022 tcp:8022
. build/envsetup.sh lunch replicant_maguro-eng $ arm-linux-androideabi-gdb GNU gdb (GDB) 7.1-android-gg2 Copyright (C) 2010 Free Software Foundation, Inc. License GPLv3+: GNU GPL version 3 or later <http://gnu.org/licenses/gpl.html> This is free software: you are free to change and redistribute it. There is NO WARRANTY, to the extent permitted by law. Type "show copying" and "show warranty" for details. This GDB was configured as "--host=i686-linux-gnu --target=arm-elf-linux". For bug reporting instructions, please see: <http://www.gnu.org/software/gdb/bugs/>. (gdb) set sysroot ./out/target/product/maguro/symbols/ (gdb) set solib-search-path ./out/target/product/maguro/symbols/system/lib/:./out/target/product/maguro/symbols/system/lib/hw/:./out/target/product/maguro/symbols/system/vendor/lib/hw/ (gdb) file ./out/target/product/maguro/symbols/system/bin/mediaserver (gdb) target remote 127.0.0.1:8022
This page explains how to build Replicant 6.0 for supported devices.
Do not build as root, always build as user.
See the build tips if you are facing issues.
All of the following build commands need to be run in the source tree root folder.
First, the toolchain needs to be built for replicant 6. To do that open a new shell and run the following command:
./vendor/replicant/build-toolchain
Once the toolchain has been built, you can then start building an image for a specific device.
Use the command corresponding to your device in this table to do that:
| Device(s) | Command |
|---|---|
| Galaxy S 2 (I9100) | ./vendor/replicant/build.sh i9100 |
| Galaxy S 3 (I9300) | ./vendor/replicant/build.sh i9300 |
| Galaxy S 3 4G (I9305) | ./vendor/replicant/build.sh i9305 |
| Galaxy Note (N7000) | ./vendor/replicant/build.sh n7000 |
| Galaxy Note 2 (N7100) | ./vendor/replicant/build.sh n7100 |
| Galaxy Nexus (I9250) | ./vendor/replicant/build.sh maguro |
| Galaxy Tab 2 7.0 (P3100) | ./vendor/replicant/build.sh espresso3g |
| Galaxy Tab 2 10.1 (P5100) | |
| Galaxy Tab 2 7.0 Wi-Fi (P3110) | ./vendor/replicant/build.sh espressowifi |
| Galaxy Tab 2 10.1 Wi-Fi (P5110) | |
| Galaxy Note 8.0 (N5100) | ./vendor/replicant/build.sh n5100 |
| Galaxy Note 8.0 Wi-Fi (N5110) | ./vendor/replicant/build.sh n5110 |
For instance to build for the Galaxy S3 (I9300) you need to type the following command:
./vendor/replicant/build.sh i9300
The first time you build an image it might ask you a few questions at various points during the build process as it needs then to build the images and generate the necessary signing keys near the end of the building process.
For the built host tools, the produced files are at: out/host/linux-x86/bin/
For the built target images, you can use the following table to find the directory that has the produced files:
| Device(s) | Output directory |
|---|---|
| Galaxy S 2 (I9100) | out/dist/i9100/ |
| Galaxy S 3 (I9300) | out/dist/i9300/ |
| Galaxy S 3 4G (I9305) | out/dist/i9305/ |
| Galaxy Note (N7000) | out/dist/n7000/ |
| Galaxy Note 2 (N7100) | out/dist/n7100/ |
| Galaxy Nexus (I9250) | out/dist/maguro/ |
| Galaxy Tab 2 7.0 (P3100) | out/dist/espresso3g/ |
| Galaxy Tab 2 10.1 (P5100) | |
| Galaxy Tab 2 7.0 Wi-Fi (P3110) | out/dist/espressowifi/ |
| Galaxy Tab 2 10.1 Wi-Fi (P5110) | |
| Galaxy Note 8.0 (N5100) | out/dist/n5100/ |
| Galaxy Note 8.0 Wi-Fi (N5110) | out/dist/n5110/ |
For instance, for the Galaxy S 3 (I9300), the built target images are in out/dist/i9300/
The file names can change from version to version.
For Replicant 6.0 0004 RC2 the zip file name is replicant-6.0-0004-rc2-i9300.zip, whereas for replicant-6.0-dev branch or other previous releases the resulting zip file name will be replicant-6.0-i9300.zip.
A way to be sure of what file was just built is to use ls -l to show the time which represents the last time of modification:
For instance:
[...]out/dist/i9300$ ls -latr total 1113288 [...] 6660096 Jan 1 2009 recovery-i9300.img [...] 4096 Jul 22 00:50 .. [...] 278175479 Aug 21 04:13 replicant-6.0-0004-rc2-i9300.zip [...] 565995550 Sep 8 20:01 signed-target_files-i9300.zip [...] 278261021 Sep 8 20:02 replicant-6.0-i9300.zip [...] 10889357 Sep 8 20:02 signed-img-i9300.zip [...] 4096 Sep 8 20:02 .
At the time of writing, it's the 9th September 2020, and I built images yesterday, so the resulting file is replicant-6.0-i9300.zip and not replicant-6.0-0004-rc2-i9300.zip.
The Android logging subsystem uses different log buffers: events, main, radio and system.
Generally speaking, when the issue you encountered concerned telephony, including data (3G), the buffer you want is radio. In any other case, that's the main buffer you want.
In some cases, the information provided by the Android log buffers is not sufficient and the message buffer of the Linux kernel is additionally required for investigating the issue.
There are various ways to obtain the logs:
First you need to had adb installed.
If you don't you can follow the ToolsInstallation page to install it.
Display a buffer from the Android logging subsystem:
adb logcat -b BUFFER
To prepare a new issue report, you need to save the output to a file:
adb logcat -b BUFFER -d > path/to/file
Display the kernel message buffer:
adb shell dmesg
To prepare a new issue report, you need to save the output to a file:
adb shell dmesg > path/to/file
aLogcat is a (free) Android app that will collect logs and save them to a file, either regularly or when you press the Save button from the app menu.
You can set the desired buffer from the Preferences.
After saving the log, you can get it from a file stored in the alogcat folder on the root of storage.
You can simply attach the log file to the issue report.
Logs from the radio buffer can contain privacy-sensitive information. If you don't want to have this information publicly available on the issue tracker, you can encrypt the radio log, so only Replicant developers can view it.
Encrypting logs has the disadvantage that very likely no other contributors besides the main Replicant developers will be able to help in order to solve the issue.
First, you need to retrieve the GPG keys of the active Replicant developers. They are listed on the People page. It is recommended to retrieve them using
gpg --recv-keys KEY_ID
and replacing KEY_ID with the listed key IDs. If you have issues retrieving a key of a developer, you can still continue and encrypt the log for the other developers.
Then, you can encrypt the log file:
gpg --recipient KEY_ID_1 --recipient KEY_ID_2 ... --encrypt LOG_FILE
Replace KEY_ID_1 and KEY_ID_2 with the key IDs of the developers and add more --recipient options replacing ... until the key IDs of all active developers are listed. Replace LOG_FILE with the path to the log file you want to encrypt. The command should produce a file with the same name as your log file, but with the file ending gpg. This is the encrypted log file. Attach this file to the issue report.
Replicant developers will not share publicly entire unencrypted logs, but they might include unencrypted snippets of the logs in the issue discussion if it helps to fix the issue. The developers will make sure that these snippets do not contain privacy-sensitive information or that all privacy-sensitive information was removed.
Research into satellite navigation, aka SatNav or Global Navigation Satellite Systems (GNSS) and related technologies.
Example systems: GPS, GLONASS, Galileo, BeiDou.
Also known as Assisted GPS (A-GPS). Greatly improves the Time To First Fix (TTFF) by downloading almanac and ephemeris data via mobile broadband or WiFi, instead of waiting for the slow download via the GNSS signal.
SUPL (Secure User Plane Location) is the most common protocol used to retrieve the current almanac and ephemeris data.
There are no free software SUPL servers that we know off. Android uses Google's servers (supl.google.com) by default. Most carriers also default to supl.google.com on their APN. GrapheneOS runs a proxy to Google at supl.grapheneos.org.
xtrapath1.izatcloud.net, xtrapath2.izatcloud.net, or xtrapath3.izatcloud.netReplicant intends to apply to GSoC 2018 as part of the FSF umbrella. This page lists suggested projects for GSoC students. This list is a draft!
Note: Working on most of these projects requires a sufficiently powerful computer with enough disk space to build Replicant.
Tablets with Allwinner SOCs are an interesting targets because they do not use signed bootloaders and the SOCs and various devices using them have good Linux and u-boot mainline support. If not much work is required for that, once the code is merged, the candidate is also required to work on the generic abstraction layer project which is also documented in this page.
The chosen tablet should have:It would be better if the chosen tablet doesn't use an AllWinner SOC with a PowerVR GPU, as MALI GPU have more probability to be usable with free software in the future.
Difficulty: Medium
Requirements/Prerequisites: C programming language, driver development
Expected Outcomes/Deliverables: Replicant support for a tablet using an Allwinner SOC, with free software bootloader and mainline based Linux kernel.
Possible Mentors: Paul (confirmed), GNUtoo (confirmed, backup)
The Optimus Black from LG is an interesting device from the perspective of freedom and privacy/security. It has the ability to run a free bootloader and uses an OMAP3 SoC that is well-documented and supported in upstream U-Boot (bootloader) and Linux (kernel). Its modem is well-isolated from the rest of the device, ensuring a sane base for privacy/security. Currently, the device-specific parts of the mainline U-Boot and Linux ports are still at an early stage, where they are functional with a very limited set of supported hardware.
Advancing the Optimus Black U-Boot and Linux mainline ports would allow using the device with free, up-to-date and maintainable software and would pave the way for support in GNU/Linux systems as well as Replicant. A list of priorities in hardware support will be defined, with the objective of tackling as many as possible.
Difficulty: Medium
Requirements/Prerequisites: C programming language, driver development
Expected Outcomes/Deliverables: Improved hardware support for the Optimus Black in U-Boot and Linux
Possible Mentors: Paul (confirmed), GNUtoo (confirmed, backup)
The Galaxy S3 and Galaxy Note 2 currently use a vendor fork of Linux, which poses a maintainability and security issue. Forkbomb has done some initial work on porting these devices to use mainline Linux. You can help by continuing this work. This would also enable these devices to use generic hardware abstraction layers (HAL) when abstractions layers are ready, and to do some research on whether the TrustZone operating system can be removed from such devices.
Difficulty: Medium to Hard
Requirements/Prerequisites: Knowledge of C
Expected Outcomes/Deliverables: Audio working, modem working, and Replicant or LineageOS booting with mainline Linux.
Possible Mentors: Forkbomb (confirmed), GNUtoo (confirmed)
The Kindle Fire (first generation) from Amazon is an interesting device from the perspective of freedom and privacy/security. It has the ability to run a free bootloader and uses an OMAP4 SoC that is well-documented and supported in upstream U-Boot (bootloader) and Linux (kernel). It does not embed a modem, ensuring a sane base for privacy/security. Currently, the device-specific parts of the mainline U-Boot and Linux ports are still at an early stage, where they are functional with a very limited set of supported hardware.
Advancing the Kindle Fire (first generation) U-Boot and Linux mainline ports would allow using the device with free, up-to-date and maintainable software and would pave the way for support in GNU/Linux systems as well as Replicant. A list of priorities in hardware support will be defined, with the objective of tackling as many as possible.
Difficulty: Medium
Requirements/Prerequisites: C programming language, driver development
Expected Outcomes/Deliverables: Improved hardware support for the Kindle Fire (first generation) in U-Boot and Linux
Possible Mentors: Paul (confirmed), GNUtoo (confirmed, backup)
Currently, Replicant uses a dedicated Hardware Abstraction Layer per device, because device manufacturers implemented non-standard kernel interfaces. However, Android works with mainline kernels and supports plug-n-play hardware nowadays, so it makes sense to have generic Hardware Abstraction Layers for the standard interfaces of the Linux kernel (ALSA, V4L2, etc). In particular, this would allow supporting external Wi-Fi dongles such as the ones supported by the ath9k_htc driver and free firmwares without the need for a specific application or configuration.
Difficulty: Medium
Requirements/Prerequisites: C programming language, kernel interfaces knowledge
Expected Outcomes/Deliverables: A collection of generic HALs for Android and Replicant
Possible Mentors: Forkbomb (confirmed), Paul (confirmed, backup), GNUtoo (confirmed)
Samsung-RIL is the RIL (Radio Interface Layer) that many Replicant devices use to communicate with the modem. It is a free, reverse-engineered replacement for the proprietary RIL that the Samsung phones ship with by default (which has been found to have backdoors).
Right now, Samsung-RIL mostly implements only the protocol features that are absolutely necessary for the phone to be operable. As a result, many more rarely used protocol features are unimplemented, which decreases functionality compared to the proprietary RIL. You can help by implementing the missing features of Samsung-RIL.
It would also be nice to fix most the reported bugs involving samsung-ril and libsamsung-ipc that are impacting users very seriously. This includes the bugs about the SIM card not being detected, and the issue about having metallic sound quality when doing voice calls over 3G (bug #1773). It would also be nice to be able to recover from EFS (the modem filesystem) corruptions (Bug #1869).
Difficulty: Medium to Hard
Requirements/Prerequisites: Knowledge of C.
Expected Outcomes/Deliverables: Implement the missing features listed at Samsung-RIL.
Possible Mentors: Forkbomb (confirmed), Wolfgang?
The LTE variants of the Samsung Galaxy S3 and Samsung Galaxy Note 2 use a different modem from the non-LTE variants that Replicant currently supports. You can help Replicant support those modems by implementing a QMI-RIL, which performs a similar role on the LTE variants as what Samsung-RIL performs on the currently-supported non-LTE variants. Wolfgang has done some preliminary work on this, so you'll probably be picking up where he left off.
Difficulty: Hard
Requirements/Prerequisites: Knowledge of C.
Expected Outcomes/Deliverables: A QMI-RIL that supports voice calls, SMS, and data, with as complete a protocol implementation as possible.
Possible Mentors: Forkbomb (confirmed), Wolfgang?
RepWifi is Replicant's app for using an external USB WiFi adapter. RepWifi is useful for Replicant because there exist USB WiFi adapters with free firmware, while the built-in WiFi chipsets in mobile phones do not have free firmware. Right now, RepWifi doesn't support acting as an access point (e.g. for WiFi tethering purposes); you can help by adding this functionality to RepWifi.
Note that, if we receive high-quality student proposals for both this project and Implementing generic Hardware Abstraction Layers (HALs), we will probably prioritize Implementing generic Hardware Abstraction Layers (HALs) over this project.
Difficulty: Easy to Medium
Requirements/Prerequisites: Knowledge of Java and basic shell scripting. Basic knowledge about wpa_supplicant and general network management in POSIX environments.
Required knowledge builds up very fast by trial and error, no need to be experts in networking, it's mostly about researching and learning.
Expected Outcomes/Deliverables: Make wpa_supplicant run in "Access Point mode", allowing another device to connect to the phone via WiFi, and use its mobile data connection to access the internet. Integrate the needed GUI functions into RepWifi.
Possible Mentors: Fil (confirmed)
Replicant is currently based on LineageOS 13. It would be desirable to upgrade Replicant to a newer release of LineageOS. While at it, it would be useful for a Replicant device to be able to update itself to a new version of Replicant without requiring being connected to a PC. LineageOS already supports this; we suspect that it should be possible to adapt this LineageOS functionality to Replicant. Whenever possible, it would be useful to complete and submit some of the code written for Replicant to LineageOS.
Difficulty: Medium
Requirements/Prerequisites: Knowledge of C, C++, and Java.
Expected Outcomes/Deliverables: Remove all proprietary components of LineageOS, port all the changes needed to successfully boot without any blobs, rebrand LineageOS as Replicant and support in-system updates
Possible Mentors: Forkbomb (confirmed), Wolfgang?
All devices currently supported by Replicant have WiFi chips that requires a non-free firmware to work. So to have WiFi working with free software, users need to use external WiFi adapters. They typically use tiny ath9k_htc compatible USB WiFi adapter along with a tiny USB OTG Host adapter.
Such external USB WiFi adapters used with Replicant are originally intended for laptops, not phones. As a result, they tend to consume a lot of power. According to lsusb some ath9k_htc compatible devices can consume up to 500mA.
This poses several issues:Such USB WiFi adapters can also randomly stop working completely on some devices (e.g. needing to unplug and replug the adapter periodically to keep it operational).
You will need to investigate reliability issues such as the one mentioned above and look how power consumption can be improved in the adapter firmware and/or kernel driver.
You will also need to investigate how much miliampers USB devices can use, at the hardware level, on the smartphones and tablets Replicant supports.
Difficulty: Medium/Hard
Requirements/Prerequisites: Knowledge of C
Expected Outcomes/Deliverables: Reliable WiFi with external WiFi adapter
Possible Mentors: GNUtoo (confirmed)
Replicant is plagued by various security issues, that are mostly due to using a downstream codebase. One of the most crucial issues is that Replicant uses an old version of the Android WebView (from circa 2015), which is also a functionality drawback.
An initial evaluation of the security issues in Replicant should be conducted, followed by the integration or update of the concerned components of the system.
It would also be nice to do the same for privacy issues. Since Replicant indirectly depends on the "Android Open Source Project" and directly depends on LineageOS, not all privacy issues might have been found fixed by Replicant. Once security issues have been fixed, it would be nice to try to identify as many privacy issues as possible, and in a second time to fix them.
Difficulty: Medium-Hard
Requirements/Prerequisites: Android build system, knowledge of system security, advanced git
Expected Outcomes/Deliverables: Integration or update of components of Replicant to tackle security issues
Possible Mentors: Wolfgang?
Replicant has some issues with FSDG compliance: F-droid repository is not FSDG compliant anymore (Bug #1629), and Replicant can't be built from an FSDG distribution (Bug #1861). This ought to be fixed. Replicant should also be fixed to build without issue.
It would also be nice to have the build system not depend on pre-built dependencies anymore, and to document which FSDG compliant F-droid applications crash because Replicant's incomplete EGL implementation (#705) and tag such applications as incompatible (so they are greyed out) until the EGL implemetation is fixed. Ideally Replicant builds should also be made reproducible if they are not already.
Difficulty: Easy
Requirements/Prerequisites: Knowledge of shell scripts and the ability to learn the Android build system
Expected Outcomes/Deliverables: The ability to compile Replicant from an FSDG distribution, F-droid only showing FSDG compliant software.
Possible Mentors: GNUtoo (confirmed)
Project description: Replicant's EGL is implementation is incomplete (This has many consequences: #705). The goal is to make llvmpipe usable under Replicant and replace the incomplete EGL implemetation with that. The advantage of this solution over other solutions is that it is supposed to work on all Replicant supported devices and is also used within GNU/Linux.
See also the wiki page about llvmpipe for more details about the issue. Other solutions fixing the problem might be acceptable too, if it makes more sense.
Difficulty: See with the MESA project
Requirements/Prerequisites: See with the MESA project
Expected Outcomes/Deliverables: Working EGL implementation, fast enough graphics, F-droid applications not crashing anymore because of EGL.
Possible Mentors: Mesa would probably be a good organization for mentoring this project. If interested in working on this project, please propose it to Mesa. (Replicant contributors would also be happy to help.)
The Replicant project sometimes needs to take decisions. The decisions are currently taken by the steering commitee.
It would be better to include more people in it to make the decisions more horizontal:Project governance can work in completely horizontal way, however to do that projects typically need to implement some rules1.
Examples:The decision we take impact the whole Replicant community and potentially beyond as well. So it's a good practice to explain why a decision was taken.
For instance if we decide not to support devices with non-replaceable battery we need to explain the rationale behind that very clearly, this way people can understand the rationale and challenge it if necessary. For instance the Minimal-requirements explain why this choice was made.
Not doing that could be very violent for people directly affected by the decision, as they would probably feel that the decision is imposed on them in an arbitrary way, when in reality the Replicant had to do it for the reasons stated (which can be challenged).
It's also a good practice to add the rationale with the decision as people are sure not to miss it and understand the decision better.
Since we took the decision on not supporting devices with non-replaceable battery we explained the decision at several occasions, such as the report from the Replicant conference in Paris, the FOSDEM BoF meetings, on the mailing list, on the IRC. If we had found interesting argumentation challenging that decisions we would have been forced to take it into account and document it.
For instance, if many new smartphones with non-replaceable batteries are added in Linux (that situation may or may not reflect the reality), we could add: "Complete support for many new smartphones were added in Linux and could work in Replicant if we support devices with non-replaceable battery, however despite that we still decided not to support them due to the increased difficulty to support them for a long time, as we expect to support devices for years after they started shipping."
In a case like that, we could also encourage interested people to fork Replicant to collectively maintain them for as long as possible, and see how well it worked for them, and see if their experience in doing that could be taken back into account in such policy to potentially change it. In a case like that it could also depend if maintainers could all be willing to work on and/or use devices with non-replaceable batteries as well.
We cannot expect all Replicant users and contributors to know git or programming, and enabling as much people as possible to participate as much as possible is a good thing.
In order to fix specific issues in the documentation that is on our wiki (duplication, no automation, no integration with Wikidata), we decided to migrate to Mediawiki and not to documention systems like Sphinx in order to make sure that people that were already contributing to the wiki, and other potential contributors weren't excluded.
With mediawiki we can use both programming (through various ways) and simple wiki syntax in the same system, which enables both users that don't know git nor programming to participate, while trying to keep the maintenance cost low enough by automatizing many tasks and not duplicating information.
However if we want to enable people to be paid to work on projects as part of Replicant, and that they need to be able to send patches as part of that, we could ask them to send a specific project description as a patch, as they are already expected to know how to send patches, or at least to learn that for the occasion.
Another area of inclusion would be to use tools that offer several interfaces. For instance if some people are used to forums, while other are used to mail, if that's not too much work, it would be a good idea to have tools that bridge both by exposing a forum interface to the mailing list.
Ideally we should enable people without ultra powerful computers and ultra fast Internet connection to also be able to build Replicant. However while some effort on our side is made to keep the requirements as low as possible (for instance #2056), we still depend on the design choices made by Android which doesn't make that easy. To radically improve in this area, we would probably need to do a huge amount of work by packaging all the Android components in a GNU/Linux distribution in order to enable people to not have to download and build the whole source code just to modify one library. While this could be done, we would also need to have more people involved in such project to maintain it and adapt it to newer Android versions.
As for the Internet connection, we can increase the speed of the fetch by using clone bundles, however we still need to find how this was made to make more clone bundles.
We can also host some repositories for contributors working on Replicant or project closely related to it.
People should be able to contribute to Replicant with laptops and desktops that run fully free software, and that run fully free software distributions.
In practice that means that we should be able to only use FSDG compliant distributions on Respect your freedom certified on such laptops and desktops to use and contribute to Replicant.
We should also work toward using system that don't force users to run JavaScript even if the code is free software, as forcing people to run code through arbitrary execution of code in a browser is not a good idea. The GNU ethical repository criteria also stated that not forcing users to run JavaScript is a good thing: "All important site functions work correctly (though may not look as nice) when the user disables execution of JavaScript and other code sent by the site. (A0)"
As not everybody runs FSDG compliant distributions we also try our best to enable people running other distributions to participate as well. For instance many Replicant versions can be build in Trisquel lxc chroot. The only exception is probably Replicant 6.0, as we didn't manage to fix that, despite trying hard. As more work went into Replicant 9 and 10, we starting investing more and more effort on Replicant 9 and 10 as they already build with Trisquel 8.0.
Contributing to Replicant should not require people to break any laws as everyone is not necessarily in position to take legal risks.
Replicant has access to FSF lawyers to help the Replicant project and its contributors to stay away from legal risk.
The fact that Replicant is fully free software also limits the liability risks as we don't have to redistribute any nonfree software.
1 https://en.wikipedia.org/wiki/Elinor_Ostrom
fn2. https://media.ccc.de/v/Camp2019-10204-participatory_art_event_tools_co-creation_and_silk_road_networks
Replicant doesn't rely on the dedicated graphics processor (GPU) for accelerated graphics rendering. Instead it uses the CPU with a technique known as software rendering. Software rendering is the reason why Replicant devices appear slow at times and is responsible for a lot of crashes that can happen during usage.
At the beginning of Replicant, using the GPU required non-free software on all of the supported devices. As of today free-software replacements exist for some (but not all) the GPUs used in Replicant compatible devices, but the drivers are not ready yet for Replicant.
These drivers implement a subset of the OpenGL ES (GLES) API, and don't support Vulkan, which is now the default for the latest Android versions. They still need to be integrated in Replicant in a way that doesn't make things worse. For instance, due to their incomplete implementation of GLES, it may be needed to configure Replicant to use software rendering for specific apps or system components.
There are more details on the various options we are considering in the GraphicsResearch and GraphicsReplicant9 wiki pages.
Until version 6.0 0003, Replicant used libagl. libagl is fast, but caused several issues due to lack of GLES 2.0 support.
As of Replicant 6.0 0004 rc1, llvmpipe is used as the default software renderer. llvmpipe has a more complete GLES implementation than libagl (see #705), so more apps work with it, like Firefox-based browsers or more recent WebViews (see #1780). Unfortunately, llvmpipe is too slow for certain system components, which may also be true for some apps. Furthermore, certain apps still crash with llvmpipe, although less frequently. Usually the screen stays black if an app does not work with llvmpipe.
To cater for these issues, Replicant 6.0 0004 includes a mechanism to choose between llvmpipe and ligagl, on a per process basis. Such mechanism is actually used on the Replicant 6.0 0004 images to force some system components (bootanimation, SurfaceFlinger and system_server) to use libagl.
The script should be shipped in Replicant 6.0 0004 RC2.
If you run a Replicant version that is before 6.0 0004 RC2, you will need to install the scripts.
To do that, from your PC, clone the user-scripts repository:
git clone https://git.replicant.us/replicant/vendor_replicant-scripts -b replicant-6.0
For the next steps, ADB needs to be set up and running as root. Connect the device to your PC. The scripts are in the networking/modem folder. Run the setup script from that folder to push the scripts to the device:
cd vendor_replicant-scripts cd display/renderer/ ./setup.sh
Then disconnect the device. Make sure root access for apps is enabled.
Open a terminal emulator. If the terminal is not running as root, you can gain root by running:
su
To switch everything back to libagl, run the following command:
graphics.sh faster
To switch back use llvmpipe by default, run the following command:
graphics.sh compatible
If you don't want to install any scripts, you can use the following command line to switch back and forth between llvmpipe and libagl:
adb shell "grep -q "ro.libagl=1" /system/build.prop && sed "s/ro.libagl=1/ro.libagl=0/" -i /system/build.prop || sed "s/ro.libagl=0/ro.libagl=1/" -i /system/build.prop"
Then, you will need to reboot the device. To switch back to previous renderer, you can run the above command again and reboot the device again.
This method works on both Replicant 6.0 0003 and 0004. Do note that: on 0003 you will start with libagl by default, whereas on 0004 the default is llvmpipe.
org.gnu.icecatlibGLES_android on it's data directory (e.g. /data/data/org.gnu.icecat/). Example command:adb shell touch /data/data/org.gnu.icecat/libGLES_android
libGLES_mesa.adb shell rm /data/data/org.gnu.icecat/libGLES_android
This method only works for Replicant 6.0 0004.
The following method only works for Replicant 6.0 0004.
System components usually lack a directory in the data partition. Thus, another method must be used to switch their software renderer.
ps or pidof and then looking at /proc/<pid>/cmdline. root@i9300:/ $ pidof surfaceflinger 1984 root@i9300:/ $ cat /proc/1984/cmdline ; echo /system/bin/surfaceflinger
/system/bin/surfaceflinger.root@i9300:/ $ pidof system_server 2362 root@i9300:/ $ cat /proc/2362/cmdline ; echo system_server
system_server./system/etc/libGLES_android/<process_name>.adb shell mkdir -p /system/etc/libGLES_android/system/bin adb shell touch /system/etc/libGLES_android/system/bin/surfaceflinger
adb shell mkdir -p /system/etc/libGLES_android/ adb shell touch /system/etc/libGLES_android/system_server
/system/etc/libGLES_mesa/.adb shell rm /system/etc/libGLES_android/system/bin/surfaceflinger
adb shell rm /system/etc/libGLES_android/system_server
There is a page about GraphicsResearch that gathers information to improve graphics support.
This page documents the current progress and future plans for the graphics acceleration on Replicant 11. The original plan can be found at TasksFunding. Since then, through more in depth research and hands-on experience, several things have diverged.
The full effort of Porting Replicant to Android 11 can be tracked at: PortingToAndroid11.
Background information, as well as details on the software components and acronyms used on this document, can be found at GraphicsResearch.
| status | origin | short description | notes | estimated man-hours | actual man-hours |
|---|---|---|---|---|---|
| done | original plan | Set up the development environment. | Required: i9305 phones, LXC Trisquel container (systemd nspawn fails due to old systemd on Trisquel 8), larger SSDs, 1.8V serial-USB adapters (BS101P FT232RL) plus makeshift resistors' banks. | 24 | 24 |
| ongoing | new | Update development environment for Replicant 11. | Android 11 has higher resource consumption during builds. Hacks and workarounds had to be found to be able to build in our machines. Build servers will be set up to get faster builds. |
0 | 8 |
| ongoing | original plan | Read graphics related AOSP documentation. | Never-ending task that, besides actual documentation, involves scouring through source-code, bug trackers, mailing lists and IRC logs. | 16 | 48 |
| ongoing | new | Ask for help. | Bothering free-software developers1 that have experience with or contribute to graphics sub-systems has been the most fruitful way to clear most roadblocks. | 0 | 0 |
| done | original plan | Use Mesa's llvmpipe backend instead of softpipe. | Merge requests on Mesa: !1402 and !1403. There was no need to update LLVM version. | 40 | 28 |
| todo | new | Find out why we are getting away without using the libEGL patch. | Android 11 no longer needs EGL? Take a look at frameworks/native/opengl/libs/EGL/Loader.cpp |
0 | 0 |
| ongoing | original plan | Implement the missing pixel formats in drm/exynos. | Joonas created a patch that allows selecting the BGR format for Exynos FIMD through a boot time module parameter. It uses the VIDCON0 register, which can be set to either VIDCON0_PNRMODE_RGB or VIDCON0_PNRMODE_BGR. Both formats cannot co-exist. TODO: use a string in the module parameter and send upstream. GNUtoo proposed another approach with runtime checks like .atomic_check(...){ if (using RGB && asked for BGR) => return NOT_POSSIBLE; If application A starts using RGB, and application B asks for BGR, the kernel refuses. As if the BGR format is removed from the list at runtime. Once no more applications use the display engine, then it's like if it was re-added to the list. There seems to be no practical use for this extra flexibility, as once booted both Android and GNU/Linux will stick to their preferred pixel format. However, at #dri-devel, emersion told us that listing all formats and then failing at the atomic check is preferable upstream. |
72 | 1 |
| todo | new | Get entire stack to use RGB555 pixel format. | Had a huge performance boost on Replicant 6. | 0 | 0 |
| abandonned | original plan | Proper way to use DRM-Master and DRM-Auth with gbm_gralloc and drm_hwcomposer. | DRM-Auth is no longer needed for gbm_gralloc because, on December 2019, DRM_AUTH was dropped from PRIME_TO/FROM_HANDLE ioctls. drm_hwcomposer and gbm_gralloc can now share the display/kms node with no need for DRM Auth. drm_hwcomposer, which uses KMS ioctls, must attach to the node first, in order to become DRM Master. gbm_gralloc should attach after it. Before DRM_AUTH had been dropped, we had tried: 1. Auth hack (both on /dev/dri/card0)2. vGEM (gbm gralloc on /dev/dri/card1) - gbm gralloc cannot take advantage of exynos hardware planes; memory may not be properly allocated.3. Allow dumb buffers on render node (gbm gralloc on /dev/dri/renderD128) - Dumb buffers are used for scanout. Should not be created on a render node. |
40 | 8 |
| done | new | Start gbm_gralloc service after drm_hwcomposer. | Android init is quite primitive, but Joonas accomplished this by disabling the gralloc service. It seems that gralloc is later started automatically when needed. | 0 | 2 |
| ongoing | new | Use hardware planes for better composer performance. | Enabling HW planes with drm_hwcomposer was straightforward but led to severe graphics corruption. Disabling devfreq fixed the corruption. Tentative explanation: display controller frequency gets too low for timely DMA transfer of overlays. Reported upstream. Devfreq on Exynos is known to be a little bit broken. TODO: * Lock display controller frequencies through sysfs and re-enable devfreq, or try to remove low freq OPP steps. * Make sure that drm_hwcomposer is using all 4 available HW planes on exynos (1 primary, 3 overlay). Joonas used dumpsys and added prints to validateDisplay, finding at most 3 planes in use: avail_planes is how many HW planes we have and layers_.size() is how many are in the composition.* Add support for rotation. * Debug drm-hwcomposer-intermittent-alpha.mp4 (Dim Layer sent by SurfaceFlinger). * Enable the cursor plane. |
0 | 17 |
| ongoing | new | Use Skia instead of HWUI to render the Canvas. | Unlike Replicant 6, none of the usual system props (e.g. ro.kernel.qemu=1, ro.config.avoid gfx accel=1) would yield the expected performance.Got there by forcing hardwareAccelerated=false on all apps.TODO: * Turn this dirty hack into a system property that can be toggled on the device tree. * Test ro.kernel.qemu.gles=0 |
0 | 22 |
| ongoing | original plan | Create test scenarios and check if the graphics stack works as expected. | Stock apps work. Check Tested apps bellow for the current status with apps that require advanced graphics features. TODO: compliance tests. |
40 | 14 |
| ongoing | original plan | Make the graphics stack work with vGEM driver besides drm/exynos. | vGEM seem to be the proper dri node for Mesa's kms_swrast driver We are currently using a simple hack that kms_swrast to use drm/exynos instead. Should rather use vGEM. |
40 | 4 |
| tentative | new | Combine kmsro with kms_swrast on vGEM render node? | Is kms_swrast working on top of the vGEM render node able to share PRIME buffers with the display node (Exynos)? If not, would adding kmsro to the mix help? Architectural ideia: kmsro + kms_swrast on vGEM render node -> PRIME -> drm_hwcomposer and gbm_gralloc on display node (Exynos)Advantages: - no need to copy buffers between kms_swrast and Exynos (PRIME takes care of that); - can take advantage of HW planes. |
0 | 0 |
| ongoing | original plan | Document the design decisions. | Done at this wiki page plus GraphicsResearch and the presentation at ContributorsMeetingJuly2019. | 16 | 64 |
| ongoing | new | Try out the Android Go low RAM switches. | Check their impact on graphics rendering performance and overall system usability. | 0 | 1 |
| todo | new | Test gbm_gralloc with camera. | So far we've only been testing gbm_gralloc with Lima and Exynos. However, the Gralloc HAL will be used to allocate buffers that will be shared with other devices as well, such as the camera. | 0 | 0 |
| todo | new | Fix screen recorder. | Seems to fail with some EGL issue. | 0 | 1 |
| total sum: | 288 | 240 | |||
1 A big thanks to Joonas Kylmälä, Paul Kocialkowski, Denis Carikli, Andrés Domínguez, Mauro Rossi, Erico Nunes, Tomeu Vizoso, Daniel Stone, Emil Velikov, Andrzej Hajda, Marek Szyprowski and LiquidAcid.
| status | origin | short description | notes | estimated man-hours | actual man-hours |
|---|---|---|---|---|---|
| done | original plan | Find a way to use SwiftShader instead of Mesa. | Joonas got there with ranchu composer (from Android Emulator) and the default gralloc, plus a patch to support UDIV/SDIV emulation in the kernel. | 40 | 0 |
| done | new | Use LLVM as backend instead of SubZero. | Found a SwiftShader revision that uses LLVM and is still compatible with Android 9 frameworks/native. No noticeable performance difference. | 0 | 6 |
| done | new | Do UDIV/SDIV emulation on JIT compiled shader code instead of kernel patch. Avoids performance penalty of interrupt handling. | It seems that SwiftShader does not send the processor model (microarchitecture) to LLVM, leaving it without a way to decide whether the processor has hardware division. Fixed upon update to Replicant 10. SwiftShader now uses LLVM 7 instead of 3, which fixed this. |
0 | 30 |
| todo | new | Use drm_hwcomposer instead of ranchu. Advantages: uses hardware planes and DRM nodes instead of direct framebuffer. | Joonas was close. | 0 | 0 |
| todo | new | Use mainline SwiftShader. Brings in a Vulkan software renderer for Replicant. | Difficult to due incompatibilities with frameworks/native. Check if is fixed with Replicant 11. |
0 | 0 |
| total sum: | 40 | 36 | |||
| status | origin | short description | notes | estimated man-hours | actual man-hours |
|---|---|---|---|---|---|
| todo | original plan | Setup a testing and benchmarking environment. | Profiling: turn on profiling switch on Mesa + simpleperf? Benchmarks: android-fps-count, 0xBenchmark, GearsES2 Conformance: dEQP, Android CTS, piglit, freedreno/tests-*, glmark2 |
40 | 1 |
| todo | original plan | Disable expensive OpenGL operations. | 24 | 0 | |
| todo | original plan | Recap matrix operations and study ARM NEON. | 48 | 0 | |
| todo | original plan | Profile apps to find the most used GLES operations. | 32 | 0 | |
| todo | original plan | Use Ne10 library or Neon Intrinsics for the most used GLES operations. | Optimizations have to be done on LLVM and not on llvmpipe. llvmpipe only outputs LLVM IR. LLVM already has autovectorization for ARM NEON, try it. | 80 | 0 |
| todo | original plan | Fix bugs, re-write the code where needed, get it stable. | 80 | 0 | |
| total sum: | 304 | 1 | |||
| status | origin | short description | notes | estimated man-hours | actual man-hours |
|---|---|---|---|---|---|
| done | original plan | Rebase Lima's Linux kernel DRM driver on top of forkbomb's Midas on Mainline kernel. | Done by others. Lima DRM driver was accepted into mainline Linux, which also has forkbomb's patches and is now used on Replicant 11. | 80 | 0 |
| done | original plan | Replace mainline Mesa for Lima's Mesa (with their driver). | Done by others. Lima is now on mainline Mesa. Lima wiki | 16 | 0 |
| done | new | Lima DRM driver bringup on Exynos. | Lima development is done on AllWinner devices. We expected some issues to get it working on Exynos. Although there were encouraging reports by ChronoMonochrome, hexdump0815 and Viciouss (manifest, xda). Joonas added Lima to Replicant 10 and faced no major bringup issues. |
0 | 1 |
| done | new | Fully test proper architecture. | drm_hwcomposer and gbm_gralloc on card0 (Exynos) -> PRIME -> Mesa on renderD129 (Lima)Advantages: - no need to copy buffers between Lima and Exynos (PRIME takes care of that); - can take advantage of HW planes. |
0 | 1 |
| done | new | Fix graphics corruption with hardware planes. | Corruption happened when compositing GL planes with non-GL planes. E.g. on Shader Editor, run a shader and open a menu. Disabling devfreq didn't solve it (as it did with llvmpipe). Was due to having gbm_gralloc working on Lima's render node, which cannot do contiguous memory allocation. |
0 | 1 |
| todo | new | Fix video play. | Joonas reported that the Big Buck Bunny video fails at os_get_total_physical_memory call from Mesa, which is called from lima_screen.c |
0 | 0 |
| todo | new | Advertise GLES 2. Shader Editor can only detect GLES 1. | 0 | 0 | |
| todo | original plan | Build and test thoroughly with synthetic and real applications. | Use conformance tests to figure out the current GLES implementation status. | 40 | 0 |
| abandoned | original plan | Create a fallback mechanism that uses the software renderer for GLES functions not yet implemented in Lima. | There is no sane way to switch between different GLES drivers at the function level. Abandoned in favour of the tasks bellow. | 100 | 1 |
| done | new | Lima as SurfaceFlinger backend. | This is the default (SurfaceFlinger using the default GLES implementation). No problems found. | 0 | 0 |
| done | new | Lima as HWUI (SkiaGL) backend. | This is the default (SkiaGL using the default GLES implementation). No problems found. | 0 | 0 |
| todo | new | Lima on a per-app basis. | Lima will at most support GLES2. Therefore it may not work with certain apps depending on their GLES usage. We can re-work the per process libagl/llvmpipe patch into a patch that switches between Lima and a software renderer (llvmpipe or SwiftShader). | 0 | 0 |
| total sum: | 236 | 4 | |||
| status | origin | short description | notes | estimated man-hours | actual man-hours |
|---|---|---|---|---|---|
| todo | new | Investigate the possibility of using Pixman or Exynos G2D as RenderEngine for SurfaceFlinger. | There are interesting reports of people using G2D to hardware-accelerate X11 EXA | 0 | 1 |
| todo | new | Accelerate Skia with G2D. | Rework old patches (Hillenbrand 2013 and raymanfx 2016 ) to make them work on current Skia. | 0 | 1 |
| total sum: | 0 | 2 | |||
| app | Device | Replicant 6 | Replicant 11 | notes | |||
|---|---|---|---|---|---|---|---|
| libagl | LLVMpipe | Lima | LLVMpipe | SwiftShader | |||
| Fennec F-Droid1 | GT-I9300 | crashes | slow | fast | Needs GLES 2.0 | ||
| LibreOffice Viewer2 | GT-I9300 | crashes | slow | cannot test (missing storage) |
|||
| Red Reader3 | GT-I9300 | crashes4 | usable | cannot test (no network) |
|||
| Shader Editor5 | GT-I9300 | crashes | 7 fps | 30 fps (HW planes off) 40 fps (HW planes on) Freezes when changing resolution. |
FPS measured on default shader with 1/1 resolution. |
||
| Marine Compass6 | GT-I9300 | bad render | bad render | crashes | Only uses GLES 1.0 | ||
| Gears7 | GT-I9300 | crashes | no render | crashes | |||
| GL TRON8 | GT-I9300 | 4 fps | 2 fps | 23 fps | Has a nice FPS counter. | ||
| Tor-browser 10.0.59 | GT-I9250 | Untested | Crash10 [11] |
No support for GT-I9250 yet | |||
| Tor-browser 10.0.59 | GT-I9300 | Untested | Works10 [12] a bit slow |
No support for network yet | |||
| Replica Island | GT-I9300 | Untested | Untested | Fast enough | Retest with specific versions | ||
1 https://f-droid.org/en/packages/org.mozilla.fennec_fdroid
2 https://f-droid.org/en/packages/org.documentfoundation.libreoffice
3 https://f-droid.org/en/packages/org.quantumbadger.redreader
4 https://github.com/QuantumBadger/RedReader/issues/279
5 https://f-droid.org/en/packages/de.markusfisch.android.shadereditor
6 https://f-droid.org/en/packages/net.pierrox.mcompass
7 https://f-droid.org/en/packages/com.jeffboody.GearsES2eclair
8 https://f-droid.org/en/packages/com.glTron
9 https://dist.torproject.org/torbrowser/10.0.5/tor-browser-10.0.5-android-armv7-multi.apk
10 Tested on replicant-6.0 0004 RC3:
adb root ; adb shell # setprop ro.kernel.qemu 1 # setprop ro.kernel.qemu.gles 0 # killall surfaceflinger
11 It crashed when clicking on the URL bar with the following error:
12-04 00:35:36.364 4302 4322 I Gecko : Can't find symbol 'eglGetNativeClientBufferANDROID'. 12-04 00:35:36.364 4302 4322 I Gecko : Can't find symbol 'eglQuerySurfacePointerANGLE'. 12-04 00:35:36.364 4302 4322 I Gecko : Can't find symbol 'eglDupNativeFenceFDANDROID'. 12-04 00:35:36.364 4302 4322 I Gecko : Can't find symbol 'eglQueryDisplayAttribEXT'. 12-04 00:35:36.364 4302 4322 I Gecko : Can't find symbol 'eglQueryDeviceAttribEXT'. 12-04 00:35:36.364 4302 4322 I Gecko : Can't find symbol 'eglStreamConsumerGLTextureExternalAttribsNV'. 12-04 00:35:36.364 4302 4322 I Gecko : Can't find symbol 'eglCreateStreamProducerD3DTextureANGLE'. 12-04 00:35:36.365 4302 4322 I Gecko : Can't find symbol 'eglStreamPostD3DTextureANGLE'. 12-04 00:35:36.365 4302 4322 I Gecko : Can't find symbol 'eglSwapBuffersWithDamageEXT'.
12 To compare with the GT-I9250, # getprop | grep qemu returns nothing.
On this page, information is collected that could help solving graphics issues in Replicant (see #1539). Besides evaluating free implementations that are relevant for currently supported devices, other implementations should also be listed if they are useful for potential future target devices.
External resources:
Free and open-source graphics device drivers - Wikipedia
Mobile drivers - Debian Wiki
Replicant 6.0 0004 RC1 includes a mechanism that allows choosing between different OpenGL ES implementations for each app or process. This came into place as means to achieve a balance between fully-compliant but slower implementations (e.g. llvmpipe) and non-compliant but fast implementations (e.g. libagl).
A similar mechanism may be used in future Replicant versions, to take advantage of GPU backed implementations, even if they do not achieve full OpenGL ES compliance.
Software rendering uses the CPU and not a dedicated graphics processor for graphics rendering. It is slower than per-GPU implementations and is mostly used as a fallback, when GPU acceleration is not available. An advantage is that the same software renderer can work across many different types of hardware. Therefore, improving a software renderer benefits many different devices, regardless of the SoC and graphics unit that they have. Furthermore, a software renderer doesn't require a kernel driver. This makes it easier to work on mainline Linux kernel support for a device, until the graphics driver is in mainline.
libagl is the fastest software renderer available for Replicant devices. It is used by default on all Replicant-supported devices up until Replicant 6.0 0003 (0004 switched to llvmpipe).
libagl was developed specifically for Android and it is part of the AOSP source code. The renderer includes optimizations for ARM via libpixelflinger and codeflinger that do JIT compilation into platform optimized code. Development ceased in 2013 and no work was done to support newer OpenGL ES (GLES) versions (which causes #705).
Until ca. 2011 (Android 4.0), another library with the name libagl2 existed and surfaceflinger2 was developed based on Mesa. The source code was later removed and no further development is known. At the time, the work was done to support a newer GLES version for the software renderer. It was abandoned later, probably when Google made it mandatory for Android 4.0 and later devices to pack their own hardware GPU with OpenGL ES 2.0 support. It is questionable if it is worth it to port the old libagl2 library to a recent Replicant version, also given that we would be the only ones using and maintaining the code.
Mesa's llvmpipe is the default software renderer for Replicant since version 6.0 0004. It has a GLES implementation that is more complete than libagl, although slower when used by some system components (e.g. SurfaceFlinger).
Besides llvmpipe, Mesa has two other software rasterizers: swrast/swr and softpipe, but both are of no interest. swrast's GLES implementation is incomplete and this driver is mostly deprecated in favor of those built upon Gallium (softpipe and llvmpipe). softpipe on the other hand, is as complete as llvmpipe but is slower than it.
The Android-x86 project is using llvmpipe. A few of their Android-specific framework patches are applied in Replicant 6.0. Their Mesa source code fork is also used in Replicant 6.0. A lot of porting work of llvmpipe to Android was done by Jide while Intel is contributing as well. So there is an interest from different parties to have llvmpipe working on Android. Android patches are upstreamed to mainline Mesa.
llvmpipe is still not ported to ARM which makes it slow. Also for Android, it is mostly used on the x86 platform in other projects. See #705 for more information. Optimizing llvmpipe for ARM seems currently the most promising approach to fix graphics-related issues with Replicant.
The following environment variables might speed up llvmpipe somewhat:
LP_PERF=no_mipmap,no_linear,no_mip_linear,no_tex,no_blend,no_depth,no_alphatest MESA_NO_DITHER=1
LP_PERF seems to be undocumented; MESA_NO_DITHER is documented in the Mesa performance tips. According to adjtm, MESA_NO_DITHER=1 improved glxgears performance by 3% on a GNU/Linux PC without breaking any apps that they tested. LP_PERF=no_mipmap,no_linear,no_mip_linear also didn't break any apps on GNU/Linux in tests but there was no noticeable increase in performance. no_tex,no_blend,no_depth,no_alphatest broke rendering of all tested apps in GNU/Linux.
To test with those environment variables on a per-app basis, you can disable SELinux, and then run the following, substituting the name of the app (here info.guardianproject.orfox) for the one you wish to test; then run the app from the launcher:
setprop wrap.info.guardianproject.orfox "LP_PERF=no_mipmap,no_linear,no_mip_linear,no_tex,no_blend,no_depth,no_alphatest MESA_NO_DITHER=1"
Unfortunately, wrap seems to crash Replicant sometimes. There was allegedly a fix at https://android-review.googlesource.com/c/platform/frameworks/base/+/318859 .
Setting those environment variables globally might be possible by editing https://git.replicant.us/replicant/system_core/tree/rootdir/init.environ.rc.in .
Benchmarking performance in real-world apps might be feasible via this script: https://github.com/romannurik/env/blob/master/bin/android-fps-count
Google released SwiftShader as free software in mid 2016. It supports x86 and ARM architectures with SDIV/UDIV support. It is used in the Chromium project but also with Android, for example in the Android-x86 project. Swiftshader doesn't seem to depend on any external libraries besides what are provided in its Git repository, therefore it is very easy to compile it and use it as a software renderer for Replicant. All the Android build files are provided so you just need to the add the following packages to PRODUCT_PACKAGES in order to be able to use it:
SwiftShader features a broadly compliant GLES implementation like llvmpipe.
Apart from GLES, SwiftShader also supports Vulkan. Actually, Vulkan is SwiftShader's main focus now.
Lavapipe, previously known as Vallium, is a Vulkan software renderer based on Mesa's llvmpipe and Gallium. It is merged into mainline Mesa and being continuously improved by Dave Airlie, which is leading the effort single-handedly.
It is worth to follow Lavapipe's progress and later test it on Replicant 11.
Kazan is another work-in-progress Vulkan software renderer. It is an independent stack, not relying on any underlying graphics library. However, much like Vallium and SwiftShader, it uses LLVM for its shader compiler. Kazan is programmed in Rust.
kms_swrast is a Mesa driver, built upon Gallium, that uses DRM nodes for memory allocation and to present images on the display, but does the actual OpenGL rendering through a Mesa software renderer such as llvmpipe or softpipe.
It may allow noticeable performance improvements by avoiding expensive memory copy operations between the software renderer and DRM.
Exynos based devices have a working free-software DRM driver that can be used with kms_swrast. Devices that do not have DRM driver can still benefit from kms_swrast by usage of the VGEM (Virtual GEM) driver.
Pixman is a low-level software library for pixel manipulation, providing features such as image compositing and trapezoid rasterization.
It is highly optimized for ARM processors and has a fast path for ARM NEON. It may be worthwhile to write an OpenGL ES backend for Replicant that detects 2D operations and translates them to Pixman. This could provide a considerable performance improvement over llvmpipe or SwiftShader and, if complete enough, could even replace them.
On the other hand, writing such translation layer may prove to be an enormous task, as the OpenGL ES 2.0 API is quite extensive. In this scenario we can still benefit from Pixman by reproducing it's ARM NEON fast paths on llvmpipe.
In the following, free software implementations are listed that should make it possible to use the respective GPU with free software.
Supported devices that use Mali 400: Galaxy S 2, Galaxy S 3, Galaxy S 3 4G, Galaxy Note, Galaxy Note 2, Galaxy Note 8.0
Lima is now merged into Mesa and should be compatible with GLES 2.0. Supported extensions are listed at docs/features.txt and can be visualized with https://mesamatrix.net. GLES 3 is not planned because Utgard's "programmable pipeline" is not much more flexible than a fixed function pipeline, and cannot cope with the GLES 3 features which usually require a unified shader model.
Lima saw first light with the reverse-engineering efforts by Luc Verhaegen, that produced an experimental driver with it's original page at
https://limadriver.org . Luc's development stopped around 2014, but in 2017 Qiang Yu took on the task and started development on top of Mesa's Gallium3D driver as reported by Phoronix.
The code was then hosted at freedesktop.org's GitLab and later merged into mainline Mesa. It gets contributions by many developers besides Qiang Yu.
Apart from the driver in Mesa, Lima also has a corresponding driver in the Linux kernel.
Supported devices that use PowerVR SGX540: Nexus S, Galaxy S, Galaxy Nexus, Galaxy Tab 2 7.0, Galaxy Tab 2 10.1
Supported devices that use PowerVR SGX530: GTA04
No free software driver is available.
There is currently an effort by the OpenPVRSGX Linux Driver Group to build a device driver for the PVR/SGX5 architecture that is compatible with mainline Linux. They are building it out of old drivers released under GPL which are now incompatible with mainline.
Do note that this project is just about the kernel driver, which just initializes the hardware and feeds it the command stream. It still relies on the proprietary user-space driver to implement OpenGL, compile shaders, and generate the command stream.
Despite initial reverse-engineering progress until 2013, no further development took place and the project's website is now offline. Fortunately it can still be accessed through the Internet Archive's Wayback Machine: https://web.archive.org/web/20170923050320/http://powervr.gnu.org.ve/doku.php
In November 2014 the proprietary user-space driver source code for PowerVR SGX Series 5 and Series 5XT was leaked which created even more roadblocks for an already difficult reverse engineering effort.
As of February 2019 there was an attempt by Philipp Rossak to kickstart a clean room reverse engineering effort, but no further news were heard.
Not used by a supported device.
Used on several Samsung Galaxy S series phones that are now supported by LineageOs and may be potential targets for Replicant ports: S6 (Mali T760MP8), S7 (Mali-T880 MP12) and S9 (Mali-G72 MP18).
Panfrost is another reverse-engineered driver for ARM Mali GPUs based on Mesa's Gallium3D, but aimed at the latest architectures (Midgard and Bifrost). It is merged into Mesa and under active development with a strong community (as of February 2021). Supported extensions are listed at docs/features.txt and can be visualized with https://mesamatrix.net. It currently supports OpenGL ES 3.0 and desktop OpenGL 3.1 on both architectures (Midgard and Bifrost). According to the developers, Vulkan support should be achievable on both architectures.
Panfrost's main focus are the ARM SoCs present on some laptops and single-board computers (SBC), but it is intended to work on as many SoCs as possible to make everyone's lives easier.
Panfrost is developed by Alyssa Rosenzweig and Lyude Paul, and recently attracted other contributors such as Tomeu Vizoso and Rob Herring.
Development can be followed on Alyssas's blog.
Not used by any supported device.
freedreno is actively developed. Linux kernel component is available in mainline since version 3.12. It needs to be investigated how well freedreno could work on potential target devices. However, even when using freedreno, non-free firmware is very likely still needed.
Generally speaking, Qualcomm devices have a lot of blobs and no modem isolation which is the reason why no Qualcomm-based device is yet supported by Replicant. See TargetsEvaluation for some analysis. We have not yet identified a Qualcomm-based device that would be a promising target for Replicant and where freedreno could be used on.
Not used by any supported device.
Etnaviv is a driver for some Vivante GCxxxx GPU variants based on Mesa's Gallium3D. It would be interesting to investigate whether devices using such a GPUs are good Replicant targets. We also have check if non-free firmware need to be loaded to the GPU.
kmsro (kernel mode-setting render-only) is a Mesa's component that glues display-only (kms) with render-only drivers. It allows PRIME buffer sharing between these two counterparts.
It can also allocate scanout buffers using the display-only driver, catering for cases when only the display driver can allocate the appropriate memory (e.g. contiguous memory). These buffers are then shared through PRIME and imported at the render-only driver (e.g. lima_bo.c).
These two components then share image buffers through the main memory (RAM).
On the Linux kernel DRM subsystem, these appear as independent devices, handled by different drivers.
Along the years, Mesa got support for several render-only GPUs, through Gallium drivers like Lima, Panfrost, Freedreno and Etnaviv. The GPUs handled by these drivers are available on many different SoCs, with varying display controllers: exynos, imx, armada, etc.
The number of possible combinations, and thus code duplication, grew in Mesa. kmsro was then introduced as an abstraction layer to get rid of this code duplication.
The table bellow summarizes the capabilities of these 3 gralloc implementations (sourced from the slides of Mauro's Rossi talk at XDC 2018):
| project | API version | GEM/flink names | PRIME fd | binderization |
|---|---|---|---|---|
| drm_gralloc | 0 | Yes | incomplete | No |
| gbm_gralloc | 0 | N/A | Yes | Yes |
| minigbm | 0, 1 | N/A | Yes | Yes |
gbm_gralloc accepts a configuration property gralloc.gbm.device that should point to the DRI node to use for the memory operations.
However gbm_gralloc may not use the actual node set on that property. gbm_gralloc uses Mesa's GBM, which in turn may use kmsro (when active). As explained above, kmsro has the ability to allocate memory buffers on both render nodes and display nodes, according the the intended buffer usage. As such, when kmsro is active, gbm_gralloc will just care about the driver name of the node set on gralloc.gbm.device, and will operate on either the driver's display (kms) node or it's render node.
For instance, on a device with the exynos DRM driver, which exposes both a kms node (e.g. /dev/dri/card0) and a render-only node (e.g. /dev/dri/renderD128), if we set gralloc.gbm.device=/dev/dri/renderD128, gbm_gralloc will actually use /dev/dri/card0 when scanout buffers are requested.
| Implementation | Architecture | Advantages | Disadvantages | Sustainability |
| SPURV | Android<->Hwcomposer<->Wayland | Probably too low in the stack, maybe should replace surfaceflinger ideally? => Do some benchmarks |
According to ifixit the Galaxy Nexus's GPS is a GSD4t
It is also present in the Galaxy SII (GT-I9100).
corresponding feature request: #1479
The postmarket wiki page on the GPS of the Galaxy SII has pointers to projects that have documented that protocol.
termios.c_cflag = CRTSCTS | CS8 | CREAD | CLOCAL | B115200;
$ grep "c_cflags=" -r *
strace.903:1345240189.403289 ioctl(1, SNDCTL_TMR_TIMEBASE or TCGETS, {c_iflags=0x500, c_oflags=0x5, c_cflags=0xbf, c_lflags=0x8a3b, c_line=0, c_cc="\x03\x1c\x7f\x15\x04\x00\x01\x00\x11\x13\x1a\x00\x12\x0f\x17\x16\x00\x00\x00"}) = 0
strace.909:1345240195.711608 ioctl(13, SNDCTL_TMR_TIMEBASE or TCGETS, {c_iflags=0x4, c_oflags=0, c_cflags=0x800018b2, c_lflags=0, c_line=0, c_cc[VMIN]=1, c_cc[VTIME]=0, c_cc="\x03\x1c\x7f\x15\x04\x00\x01\x00\x11\x13\x1a\x00\x12\x0f\x17\x16\x00\x00\x00"}) = 0
strace.909:1345240195.712615 ioctl(13, SNDCTL_TMR_START or TCSETS, {c_iflags=0x4, c_oflags=0, c_cflags=0x18b2, c_lflags=0, c_line=0, c_cc[VMIN]=1, c_cc[VTIME]=0, c_cc="\x03\x1c\x7f\x15\x04\x00\x01\x00\x11\x13\x1a\x00\x12\x0f\x17\x16\x00\x00\x00"}) = 0
strace.909:1345240196.290496 ioctl(13, SNDCTL_TMR_TIMEBASE or TCGETS, {c_iflags=0x4, c_oflags=0, c_cflags=0x18b2, c_lflags=0, c_line=0, c_cc[VMIN]=1, c_cc[VTIME]=0, c_cc="\x03\x1c\x7f\x15\x04\x00\x01\x00\x11\x13\x1a\x00\x12\x0f\x17\x16\x00\x00\x00"}) = 0
strace.909:1345240196.291015 ioctl(13, SNDCTL_TMR_START or TCSETS, {c_iflags=0x4, c_oflags=0, c_cflags=0x18b2, c_lflags=0, c_line=0, c_cc[VMIN]=1, c_cc[VTIME]=0, c_cc="\x03\x1c\x7f\x15\x04\x00\x01\x00\x11\x13\x1a\x00\x12\x0f\x17\x16\x00\x00\x00"}) = 0
strace.909:1345240196.291870 ioctl(13, SNDCTL_TMR_TIMEBASE or TCGETS, {c_iflags=0x4, c_oflags=0, c_cflags=0x18b2, c_lflags=0, c_line=0, c_cc[VMIN]=1, c_cc[VTIME]=0, c_cc="\x03\x1c\x7f\x15\x04\x00\x01\x00\x11\x13\x1a\x00\x12\x0f\x17\x16\x00\x00\x00"}) = 0
strace.909:1345240196.292358 ioctl(13, SNDCTL_TMR_START or TCSETS, {c_iflags=0x4, c_oflags=0, c_cflags=0x18b2, c_lflags=0, c_line=0, c_cc[VMIN]=1, c_cc[VTIME]=0, c_cc="\x03\x1c\x7f\x15\x04\x00\x01\x00\x11\x13\x1a\x00\x12\x0f\x17\x16\x00\x00\x00"}) = 0
strace.909:1345240196.370361 ioctl(13, SNDCTL_TMR_TIMEBASE or TCGETS, {c_iflags=0x4, c_oflags=0, c_cflags=0x18b2, c_lflags=0, c_line=0, c_cc[VMIN]=1, c_cc[VTIME]=0, c_cc="\x03\x1c\x7f\x15\x04\x00\x01\x00\x11\x13\x1a\x00\x12\x0f\x17\x16\x00\x00\x00"}) = 0
strace.909:1345240196.370880 ioctl(13, SNDCTL_TMR_START or TCSETS, {c_iflags=0x4, c_oflags=0, c_cflags=0x18b4, c_lflags=0, c_line=0, c_cc[VMIN]=1, c_cc[VTIME]=0, c_cc="\x03\x1c\x7f\x15\x04\x00\x01\x00\x11\x13\x1a\x00\x12\x0f\x17\x16\x00\x00\x00"}) = 0
strace.909:1345240201.072235 ioctl(13, SNDCTL_TMR_TIMEBASE or TCGETS, {c_iflags=0x4, c_oflags=0, c_cflags=0x18b4, c_lflags=0, c_line=0, c_cc[VMIN]=1, c_cc[VTIME]=0, c_cc="\x03\x1c\x7f\x15\x04\x00\x01\x00\x11\x13\x1a\x00\x12\x0f\x17\x16\x00\x00\x00"}) = 0
strace.909:1345240201.073638 ioctl(13, SNDCTL_TMR_START or TCSETS, {c_iflags=0x4, c_oflags=0, c_cflags=0x18b2, c_lflags=0, c_line=0, c_cc[VMIN]=1, c_cc[VTIME]=0, c_cc="\x03\x1c\x7f\x15\x04\x00\x01\x00\x11\x13\x1a\x00\x12\x0f\x17\x16\x00\x00\x00"}) = 0
strace.910:1345240201.398132 ioctl(13, SNDCTL_TMR_TIMEBASE or TCGETS, {c_iflags=0x4, c_oflags=0, c_cflags=0x18b2, c_lflags=0, c_line=0, c_cc[VMIN]=1, c_cc[VTIME]=0, c_cc="\x03\x1c\x7f\x15\x04\x00\x01\x00\x11\x13\x1a\x00\x12\x0f\x17\x16\x00\x00\x00"}) = 0
strace.910:1345240201.404327 ioctl(13, SNDCTL_TMR_START or TCSETS, {c_iflags=0x4, c_oflags=0, c_cflags=0x800018b2, c_lflags=0, c_line=0, c_cc[VMIN]=1, c_cc[VTIME]=0, c_cc="\x03\x1c\x7f\x15\x04\x00\x01\x00\x11\x13\x1a\x00\x12\x0f\x17\x16\x00\x00\x00"}) = 0
strace.910:1345240201.406768 ioctl(13, SNDCTL_TMR_TIMEBASE or TCGETS, {c_iflags=0x4, c_oflags=0, c_cflags=0x800018b2, c_lflags=0, c_line=0, c_cc[VMIN]=1, c_cc[VTIME]=0, c_cc="\x03\x1c\x7f\x15\x04\x00\x01\x00\x11\x13\x1a\x00\x12\x0f\x17\x16\x00\x00\x00"}) = 0
strace.910:1345240201.408294 ioctl(13, SNDCTL_TMR_START or TCSETS, {c_iflags=0x4, c_oflags=0, c_cflags=0x800018b2, c_lflags=0, c_line=0, c_cc[VMIN]=1, c_cc[VTIME]=0, c_cc="\x03\x1c\x7f\x15\x04\x00\x01\x00\x11\x13\x1a\x00\x12\x0f\x17\x16\x00\x00\x00"}) = 0
strace.917:1345240203.624877 ioctl(24, SNDCTL_TMR_TIMEBASE or TCGETS, {c_iflags=0x4, c_oflags=0, c_cflags=0x800018b2, c_lflags=0, c_line=0, c_cc[VMIN]=1, c_cc[VTIME]=0, c_cc="\x03\x1c\x7f\x15\x04\x00\x01\x00\x11\x13\x1a\x00\x12\x0f\x17\x16\x00\x00\x00"}) = 0
strace.917:1345240203.626007 ioctl(24, SNDCTL_TMR_START or TCSETS, {c_iflags=0x4, c_oflags=0, c_cflags=0x800018b2, c_lflags=0, c_line=0, c_cc[VMIN]=1, c_cc[VTIME]=0, c_cc="\x03\x1c\x7f\x15\x04\x00\x01\x00\x11\x13\x1a\x00\x12\x0f\x17\x16\x00\x00\x00"}) = 0
strace.918:1345240204.809295 ioctl(24, SNDCTL_TMR_TIMEBASE or TCGETS, {c_iflags=0x4, c_oflags=0, c_cflags=0x800018b2, c_lflags=0, c_line=0, c_cc[VMIN]=1, c_cc[VTIME]=0, c_cc="\x03\x1c\x7f\x15\x04\x00\x01\x00\x11\x13\x1a\x00\x12\x0f\x17\x16\x00\x00\x00"}) = 0
strace.918:1345240204.809814 ioctl(24, SNDCTL_TMR_START or TCSETS, {c_iflags=0x4, c_oflags=0, c_cflags=0x800018b2, c_lflags=0, c_line=0, c_cc[VMIN]=1, c_cc[VTIME]=0, c_cc="\x03\x1c\x7f\x15\x04\x00\x01\x00\x11\x13\x1a\x00\x12\x0f\x17\x16\x00\x00\x00"}) = 0
strace.918:1345240204.810638 ioctl(24, SNDCTL_TMR_TIMEBASE or TCGETS, {c_iflags=0x4, c_oflags=0, c_cflags=0x800018b2, c_lflags=0, c_line=0, c_cc[VMIN]=1, c_cc[VTIME]=0, c_cc="\x03\x1c\x7f\x15\x04\x00\x01\x00\x11\x13\x1a\x00\x12\x0f\x17\x16\x00\x00\x00"}) = 0
strace.918:1345240204.811157 ioctl(24, SNDCTL_TMR_START or TCSETS, {c_iflags=0x4, c_oflags=0, c_cflags=0x800018b2, c_lflags=0, c_line=0, c_cc[VMIN]=1, c_cc[VTIME]=0, c_cc="\x03\x1c\x7f\x15\x04\x00\x01\x00\x11\x13\x1a\x00\x12\x0f\x17\x16\x00\x00\x00"}) = 0
gpsd:UNK: 00000000: character '.' [a0], new state: SIRF_LEADER_1 gpsd:UNK: 00000001: character '.' [a2], new state: SIRF_LEADER_2 gpsd:UNK: 00000002: character '.' [00], new state: SIRF_LENGTH_1 gpsd:UNK: 00000003: character '.' [0a], new state: SIRF_PAYLOAD gpsd:UNK: 00000004: character '.' [f9], new state: SIRF_PAYLOAD gpsd:UNK: 00000005: character '.' [00], new state: SIRF_PAYLOAD gpsd:UNK: 00000006: character '.' [04], new state: SIRF_PAYLOAD gpsd:UNK: 00000007: character '.' [00], new state: SIRF_PAYLOAD gpsd:UNK: 00000008: character 'k' [6b], new state: SIRF_PAYLOAD gpsd:UNK: 00000009: character '.' [90], new state: SIRF_PAYLOAD gpsd:UNK: 00000010: character '.' [87], new state: SIRF_PAYLOAD gpsd:UNK: 00000011: character '.' [e1], new state: SIRF_PAYLOAD gpsd:UNK: 00000012: character '.' [0a], new state: SIRF_PAYLOAD gpsd:UNK: 00000013: character '.' [14], new state: SIRF_PAYLOAD gpsd:UNK: 00000014: character '#' [23], new state: SIRF_PAYLOAD gpsd:UNK: 00000015: character '.' [09], new state: SIRF_DELIVERED gpsd:UNK: 00000016: character '`' [60], new state: GROUND_STATE gpsd:UNK: ISGPS word tag not correct, skipping byte gpsd:UNK: 00000017: character '.' [a2], new state: GROUND_STATE gpsd:UNK: ISGPS word tag not correct, skipping byte gpsd:UNK: 00000018: character '.' [00], new state: GROUND_STATE gpsd:UNK: ISGPS word tag not correct, skipping byte gpsd:UNK: 00000019: character '.' [0a], new state: GROUND_STATE gpsd:UNK: ISGPS word tag not correct, skipping byte gpsd:UNK: 00000020: character '.' [f9], new state: GROUND_STATE gpsd:UNK: ISGPS word tag not correct, skipping byte gpsd:UNK: 00000021: character '.' [00], new state: GROUND_STATE gpsd:UNK: ISGPS word tag not correct, skipping byte gpsd:UNK: 00000022: character '.' [04], new state: GROUND_STATE gpsd:UNK: ISGPS word tag not correct, skipping byte gpsd:UNK: 00000023: character '.' [00], new state: GROUND_STATE gpsd:UNK: ISGPS syncing at byte 24: 0x00000001 gpsd:UNK: ISGPS syncing at byte 24: 0x00000003 gpsd:UNK: ISGPS syncing at byte 24: 0x00000006 gpsd:UNK: ISGPS syncing at byte 24: 0x0000000d gpsd:UNK: ISGPS syncing at byte 24: 0x0000001a gpsd:UNK: ISGPS syncing at byte 24: 0x00000035 gpsd:UNK: ISGPS lock never achieved gpsd:UNK: 00000024: character 'k' [6b], new state: GROUND_STATE gpsd:UNK: ISGPS word tag not correct, skipping byte gpsd:UNK: 00000025: character '.' [90], new state: GROUND_STATE gpsd:UNK: ISGPS word tag not correct, skipping byte gpsd:UNK: 00000026: character '.' [87], new state: GROUND_STATE gpsd:UNK: ISGPS word tag not correct, skipping byte gpsd:UNK: 00000027: character '.' [e1], new state: GROUND_STATE gpsd:UNK: ISGPS word tag not correct, skipping byte gpsd:UNK: 00000028: character '.' [0a], new state: GROUND_STATE gpsd:UNK: ISGPS word tag not correct, skipping byte gpsd:UNK: 00000029: character '.' [14], new state: GROUND_STATE gpsd:UNK: 00000030: character '#' [23], new state: COMMENT_BODY gpsd:UNK: 00000030: character pushed back gpsd:UNK: 00000030: character '.' [09], new state: GROUND_STATE gpsd:UNK: ISGPS word tag not correct, skipping byte gpsd:UNK: 00000031: character '.' [09], new state: GROUND_STATE gpsd:UNK: ISGPS syncing at byte 32: 0x0000006a gpsd:UNK: ISGPS syncing at byte 32: 0x000000d4 gpsd:UNK: ISGPS syncing at byte 32: 0x000001a8 gpsd:UNK: ISGPS syncing at byte 32: 0x00000350 gpsd:UNK: ISGPS syncing at byte 32: 0x000006a0 gpsd:UNK: ISGPS syncing at byte 32: 0x00000d41 gpsd:UNK: ISGPS lock never achieved gpsd:UNK: 00000032: character '`' [60], new state: GROUND_STATE gpsd:UNK: ISGPS word tag not correct, skipping byte gpsd:UNK: 00000033: character '.' [05], new state: GROUND_STATE gpsd:UNK: ISGPS word tag not correct, skipping byte gpsd:UNK: 00000034: character '.' [bc], new state: GROUND_STATE gpsd:UNK: ISGPS syncing at byte 35: 0x00001a82 gpsd:UNK: ISGPS syncing at byte 35: 0x00003504 gpsd:UNK: ISGPS syncing at byte 35: 0x00006a09 gpsd:UNK: ISGPS syncing at byte 35: 0x0000d413 gpsd:UNK: ISGPS syncing at byte 35: 0x0001a827 gpsd:UNK: ISGPS syncing at byte 35: 0x0003504e gpsd:UNK: ISGPS lock never achieved gpsd:UNK: 00000035: character '\' [5c], new state: GROUND_STATE gpsd:UNK: ISGPS word tag not correct, skipping byte gpsd:UNK: 00000036: character ' ' [20], new state: GROUND_STATE gpsd:UNK: ISGPS word tag not correct, skipping byte gpsd:UNK: 00000037: character ' ' [20], new state: GROUND_STATE gpsd:UNK: ISGPS word tag not correct, skipping byte gpsd:UNK: 00000038: character '.' [14], new state: GROUND_STATE gpsd:SPIN: packet_get() fd 5 -> 128 (0) gpsd:UNK: ISGPS word tag not correct, skipping byte gpsd:UNK: 00000039: character '%' [25], new state: GROUND_STATE gpsd:UNK: ISGPS word tag not correct, skipping byte gpsd:UNK: 00000040: character '.' [06], new state: GROUND_STATE gpsd:UNK: ISGPS word tag not correct, skipping byte gpsd:UNK: 00000041: character '.' [19], new state: GROUND_STATE gpsd:UNK: ISGPS word tag not correct, skipping byte gpsd:UNK: 00000042: character '.' [06], new state: GROUND_STATE gpsd:UNK: ISGPS word tag not correct, skipping byte gpsd:UNK: 00000043: character '.' [07], new state: GROUND_STATE gpsd:UNK: ISGPS word tag not correct, skipping byte gpsd:UNK: 00000044: character '.' [14], new state: GROUND_STATE gpsd:UNK: ISGPS word tag not correct, skipping byte gpsd:UNK: 00000045: character '%' [25], new state: GROUND_STATE gpsd:UNK: ISGPS word tag not correct, skipping byte gpsd:UNK: 00000046: character '.' [06], new state: GROUND_STATE gpsd:UNK: ISGPS word tag not correct, skipping byte gpsd:UNK: 00000047: character '.' [09], new state: GROUND_STATE gpsd:UNK: ISGPS word tag not correct, skipping byte gpsd:UNK: 00000048: character '.' [04], new state: GROUND_STATE gpsd:UNK: 00000049: character '.' [01], new state: SUPERSTAR2_LEADER gpsd:UNK: 00000050: character '.' [14], new state: SUPERSTAR2_ID1 gpsd:UNK: 00000051: character '%' [25], new state: GROUND_STATE gpsd:UNK: ISGPS word tag not correct, skipping byte gpsd:UNK: 00000052: character '.' [14], new state: GROUND_STATE gpsd:UNK: ISGPS word tag not correct, skipping byte gpsd:UNK: 00000053: character '%' [25], new state: GROUND_STATE gpsd:UNK: ISGPS word tag not correct, skipping byte gpsd:UNK: 00000054: character '.' [06], new state: GROUND_STATE gpsd:UNK: ISGPS word tag not correct, skipping byte gpsd:UNK: 00000055: character '.' [1b], new state: GROUND_STATE gpsd:UNK: 00000056: character '.' [02], new state: NAVCOM_LEADER_1 gpsd:UNK: 00000057: character '.' [01], new state: GROUND_STATE gpsd:UNK: 00000058: character '.' [01], new state: SUPERSTAR2_LEADER gpsd:UNK: 00000059: character '.' [14], new state: SUPERSTAR2_ID1 gpsd:UNK: 00000060: character '%' [25], new state: GROUND_STATE gpsd:UNK: ISGPS word tag not correct, skipping byte gpsd:UNK: 00000061: character '.' [14], new state: GROUND_STATE gpsd:UNK: ISGPS word tag not correct, skipping byte gpsd:UNK: 00000062: character '%' [25], new state: GROUND_STATE gpsd:UNK: ISGPS word tag not correct, skipping byte gpsd:UNK: 00000063: character '.' [06], new state: GROUND_STATE gpsd:UNK: ISGPS word tag not correct, skipping byte gpsd:UNK: 00000064: character '.' [08], new state: GROUND_STATE gpsd:UNK: 00000065: character '.' [02], new state: NAVCOM_LEADER_1 gpsd:UNK: 00000066: character '.' [01], new state: GROUND_STATE gpsd:UNK: 00000067: character '.' [01], new state: SUPERSTAR2_LEADER gpsd:UNK: 00000068: character '.' [14], new state: SUPERSTAR2_ID1 gpsd:UNK: 00000069: character '%' [25], new state: GROUND_STATE gpsd:UNK: ISGPS word tag not correct, skipping byte gpsd:UNK: 00000070: character '.' [14], new state: GROUND_STATE gpsd:UNK: ISGPS word tag not correct, skipping byte gpsd:UNK: 00000071: character '%' [25], new state: GROUND_STATE gpsd:UNK: ISGPS word tag not correct, skipping byte gpsd:UNK: 00000072: character '.' [06], new state: GROUND_STATE gpsd:UNK: ISGPS word tag not correct, skipping byte gpsd:UNK: 00000073: character '.' [13], new state: GROUND_STATE gpsd:UNK: 00000074: character '.' [02], new state: NAVCOM_LEADER_1 gpsd:UNK: 00000075: character '.' [01], new state: GROUND_STATE gpsd:UNK: 00000076: character '.' [01], new state: SUPERSTAR2_LEADER gpsd:UNK: 00000077: character '.' [14], new state: SUPERSTAR2_ID1 gpsd:UNK: 00000078: character '%' [25], new state: GROUND_STATE gpsd:UNK: ISGPS word tag not correct, skipping byte gpsd:UNK: 00000079: character '.' [14], new state: GROUND_STATE gpsd:UNK: ISGPS word tag not correct, skipping byte gpsd:UNK: 00000080: character '%' [25], new state: GROUND_STATE gpsd:UNK: ISGPS word tag not correct, skipping byte gpsd:UNK: 00000081: character '.' [06], new state: GROUND_STATE gpsd:UNK: ISGPS word tag not correct, skipping byte gpsd:UNK: 00000082: character '.' [1d], new state: GROUND_STATE gpsd:UNK: 00000083: character '.' [02], new state: NAVCOM_LEADER_1 gpsd:UNK: 00000084: character '.' [01], new state: GROUND_STATE gpsd:UNK: 00000085: character '.' [01], new state: SUPERSTAR2_LEADER gpsd:UNK: 00000086: character '.' [14], new state: SUPERSTAR2_ID1 gpsd:UNK: 00000087: character '%' [25], new state: GROUND_STATE gpsd:UNK: ISGPS word tag not correct, skipping byte gpsd:UNK: 00000088: character '.' [14], new state: GROUND_STATE gpsd:UNK: ISGPS word tag not correct, skipping byte gpsd:UNK: 00000089: character '%' [25], new state: GROUND_STATE gpsd:UNK: ISGPS word tag not correct, skipping byte gpsd:UNK: 00000090: character '.' [06], new state: GROUND_STATE gpsd:UNK: ISGPS word tag not correct, skipping byte gpsd:UNK: 00000091: character '.' [06], new state: GROUND_STATE gpsd:UNK: 00000092: character '.' [01], new state: SUPERSTAR2_LEADER gpsd:UNK: 00000093: character '.' [01], new state: SUPERSTAR2_ID1 gpsd:UNK: 00000094: character '.' [14], new state: GROUND_STATE gpsd:UNK: 00000095: character '.' [01], new state: SUPERSTAR2_LEADER gpsd:UNK: 00000096: character '.' [14], new state: SUPERSTAR2_ID1 gpsd:UNK: 00000097: character '%' [25], new state: GROUND_STATE gpsd:UNK: ISGPS word tag not correct, skipping byte gpsd:UNK: 00000098: character '.' [14], new state: GROUND_STATE gpsd:UNK: ISGPS word tag not correct, skipping byte gpsd:UNK: 00000099: character '%' [25], new state: GROUND_STATE gpsd:UNK: ISGPS word tag not correct, skipping byte gpsd:UNK: 00000100: character '.' [06], new state: GROUND_STATE gpsd:UNK: ISGPS word tag not correct, skipping byte gpsd:UNK: 00000101: character '.' [11], new state: GROUND_STATE gpsd:UNK: 00000102: character '.' [01], new state: SUPERSTAR2_LEADER gpsd:UNK: 00000103: character '.' [01], new state: SUPERSTAR2_ID1 gpsd:UNK: 00000104: character '.' [14], new state: GROUND_STATE gpsd:UNK: 00000105: character '.' [01], new state: SUPERSTAR2_LEADER gpsd:UNK: 00000106: character '.' [14], new state: SUPERSTAR2_ID1 gpsd:UNK: 00000107: character '%' [25], new state: GROUND_STATE gpsd:UNK: ISGPS word tag not correct, skipping byte gpsd:UNK: 00000108: character '.' [14], new state: GROUND_STATE gpsd:UNK: ISGPS word tag not correct, skipping byte gpsd:UNK: 00000109: character '%' [25], new state: GROUND_STATE gpsd:UNK: ISGPS word tag not correct, skipping byte gpsd:UNK: 00000110: character '.' [06], new state: GROUND_STATE gpsd:UNK: ISGPS word tag not correct, skipping byte gpsd:UNK: 00000111: character '.' [04], new state: GROUND_STATE gpsd:UNK: 00000112: character '.' [01], new state: SUPERSTAR2_LEADER gpsd:UNK: 00000113: character '.' [01], new state: SUPERSTAR2_ID1 gpsd:UNK: 00000114: character '.' [14], new state: GROUND_STATE gpsd:UNK: 00000115: character '.' [01], new state: SUPERSTAR2_LEADER gpsd:UNK: 00000116: character '.' [14], new state: SUPERSTAR2_ID1 gpsd:UNK: 00000117: character '%' [25], new state: GROUND_STATE gpsd:UNK: ISGPS word tag not correct, skipping byte gpsd:UNK: 00000118: character '.' [14], new state: GROUND_STATE gpsd:UNK: ISGPS word tag not correct, skipping byte gpsd:UNK: 00000119: character '%' [25], new state: GROUND_STATE gpsd:UNK: ISGPS word tag not correct, skipping byte gpsd:UNK: 00000120: character '.' [06], new state: GROUND_STATE gpsd:UNK: ISGPS word tag not correct, skipping byte gpsd:UNK: 00000121: character '.' [0b], new state: GROUND_STATE gpsd:UNK: 00000122: character '.' [01], new state: SUPERSTAR2_LEADER gpsd:UNK: 00000123: character '.' [01], new state: SUPERSTAR2_ID1 gpsd:UNK: 00000124: character '.' [14], new state: GROUND_STATE gpsd:UNK: 00000125: character '.' [01], new state: SUPERSTAR2_LEADER gpsd:UNK: 00000126: character '.' [14], new state: SUPERSTAR2_ID1 gpsd:UNK: 00000127: character '%' [25], new state: GROUND_STATE gpsd:UNK: ISGPS word tag not correct, skipping byte gpsd:UNK: 00000128: character '.' [14], new state: GROUND_STATE gpsd:UNK: ISGPS word tag not correct, skipping byte gpsd:UNK: 00000129: character '%' [25], new state: GROUND_STATE gpsd:UNK: ISGPS word tag not correct, skipping byte gpsd:UNK: 00000130: character '.' [06], new state: GROUND_STATE gpsd:UNK: 00000131: character '.' [02], new state: NAVCOM_LEADER_1 gpsd:UNK: 00000132: character '.' [01], new state: GROUND_STATE gpsd:UNK: 00000133: character '.' [01], new state: SUPERSTAR2_LEADER gpsd:UNK: 00000134: character '.' [01], new state: SUPERSTAR2_ID1 gpsd:UNK: 00000135: character '.' [14], new state: GROUND_STATE gpsd:UNK: 00000136: character '.' [01], new state: SUPERSTAR2_LEADER gpsd:UNK: 00000137: character '.' [14], new state: SUPERSTAR2_ID1 gpsd:UNK: 00000138: character '%' [25], new state: GROUND_STATE gpsd:UNK: ISGPS word tag not correct, skipping byte gpsd:UNK: 00000139: character '.' [14], new state: GROUND_STATE gpsd:UNK: ISGPS word tag not correct, skipping byte gpsd:UNK: 00000140: character '%' [25], new state: GROUND_STATE gpsd:UNK: ISGPS word tag not correct, skipping byte gpsd:UNK: 00000141: character '.' [06], new state: GROUND_STATE gpsd:UNK: 00000142: character '.' [01], new state: SUPERSTAR2_LEADER gpsd:UNK: 00000143: character '.' [01], new state: SUPERSTAR2_ID1 gpsd:UNK: 00000144: character '.' [01], new state: GROUND_STATE gpsd:UNK: 00000145: character '.' [01], new state: SUPERSTAR2_LEADER gpsd:UNK: 00000146: character '.' [01], new state: SUPERSTAR2_ID1 gpsd:UNK: 00000147: character '.' [14], new state: GROUND_STATE gpsd:UNK: 00000148: character '.' [01], new state: SUPERSTAR2_LEADER gpsd:UNK: 00000149: character '.' [14], new state: SUPERSTAR2_ID1 gpsd:UNK: 00000150: character '%' [25], new state: GROUND_STATE gpsd:UNK: ISGPS word tag not correct, skipping byte gpsd:UNK: 00000151: character '.' [14], new state: GROUND_STATE gpsd:UNK: ISGPS word tag not correct, skipping byte gpsd:UNK: 00000152: character '%' [25], new state: GROUND_STATE gpsd:UNK: ISGPS word tag not correct, skipping byte gpsd:UNK: 00000153: character '.' [06], new state: GROUND_STATE gpsd:UNK: ISGPS word tag not correct, skipping byte gpsd:UNK: 00000154: character '.' [03], new state: GROUND_STATE gpsd:UNK: 00000155: character '.' [01], new state: SUPERSTAR2_LEADER gpsd:UNK: 00000156: character '.' [01], new state: SUPERSTAR2_ID1 gpsd:UNK: 00000157: character '.' [14], new state: GROUND_STATE gpsd:UNK: 00000158: character '.' [01], new state: SUPERSTAR2_LEADER gpsd:UNK: 00000159: character '.' [14], new state: SUPERSTAR2_ID1 gpsd:UNK: 00000160: character '%' [25], new state: GROUND_STATE gpsd:UNK: ISGPS word tag not correct, skipping byte gpsd:UNK: 00000161: character '.' [14], new state: GROUND_STATE gpsd:UNK: ISGPS word tag not correct, skipping byte gpsd:UNK: 00000162: character '%' [25], new state: GROUND_STATE gpsd:UNK: ISGPS word tag not correct, skipping byte gpsd:UNK: 00000163: character '.' [06], new state: GROUND_STATE gpsd:UNK: ISGPS word tag not correct, skipping byte gpsd:UNK: 00000164: character '.' [05], new state: GROUND_STATE gpsd:UNK: 00000165: character '.' [01], new state: SUPERSTAR2_LEADER gpsd:UNK: 00000166: character '.' [01], new state: SUPERSTAR2_ID1 gpsd:UNK: 00000167: character '.' [14], new state: GROUND_STATE gpsd:UNK: 00000168: character '.' [01], new state: SUPERSTAR2_LEADER gpsd:UNK: 00000169: character '.' [14], new state: SUPERSTAR2_ID1 gpsd:UNK: 00000170: character '%' [25], new state: GROUND_STATE gpsd:UNK: ISGPS word tag not correct, skipping byte gpsd:UNK: 00000171: character '.' [14], new state: GROUND_STATE gpsd:UNK: ISGPS word tag not correct, skipping byte gpsd:UNK: 00000172: character '%' [25], new state: GROUND_STATE gpsd:UNK: ISGPS word tag not correct, skipping byte gpsd:UNK: 00000173: character '.' [06], new state: GROUND_STATE gpsd:UNK: ISGPS word tag not correct, skipping byte gpsd:UNK: 00000174: character '.' [07], new state: GROUND_STATE gpsd:UNK: 00000175: character '.' [01], new state: SUPERSTAR2_LEADER gpsd:UNK: 00000176: character '.' [01], new state: SUPERSTAR2_ID1 gpsd:UNK: 00000177: character '.' [14], new state: GROUND_STATE gpsd:UNK: 00000178: character '.' [01], new state: SUPERSTAR2_LEADER gpsd:UNK: 00000179: character '.' [14], new state: SUPERSTAR2_ID1 gpsd:UNK: 00000180: character '%' [25], new state: GROUND_STATE gpsd:UNK: ISGPS word tag not correct, skipping byte gpsd:UNK: 00000181: character '.' [14], new state: GROUND_STATE gpsd:UNK: ISGPS word tag not correct, skipping byte gpsd:UNK: 00000182: character '%' [25], new state: GROUND_STATE gpsd:UNK: ISGPS word tag not correct, skipping byte gpsd:UNK: 00000183: character '.' [06], new state: GROUND_STATE gpsd:UNK: ISGPS word tag not correct, skipping byte gpsd:UNK: 00000184: character '.' [0c], new state: GROUND_STATE gpsd:UNK: 00000185: character '.' [01], new state: SUPERSTAR2_LEADER gpsd:UNK: 00000186: character '.' [01], new state: SUPERSTAR2_ID1 gpsd:UNK: 00000187: character 'M' [4d], new state: GROUND_STATE gpsd:UNK: 00000188: character '.' [01], new state: SUPERSTAR2_LEADER gpsd:UNK: 00000189: character 'M' [4d], new state: SUPERSTAR2_ID1 gpsd:UNK: 00000190: character '.' [91], new state: GROUND_STATE gpsd:UNK: ISGPS syncing at byte 191: 0x0006a09d gpsd:UNK: ISGPS syncing at byte 191: 0x000d413a gpsd:UNK: ISGPS syncing at byte 191: 0x001a8275 gpsd:UNK: ISGPS syncing at byte 191: 0x003504eb gpsd:UNK: ISGPS syncing at byte 191: 0x006a09d6 gpsd:UNK: ISGPS syncing at byte 191: 0x00d413ac gpsd:UNK: ISGPS lock never achieved gpsd:UNK: 00000191: character 'M' [4d], new state: GROUND_STATE gpsd:UNK: ISGPS word tag not correct, skipping byte gpsd:UNK: 00000192: character '.' [91], new state: GROUND_STATE gpsd:UNK: ISGPS word tag not correct, skipping byte gpsd:UNK: 00000193: character '.' [b0], new state: GROUND_STATE gpsd:UNK: ISGPS word tag not correct, skipping byte gpsd:UNK: 00000194: character '.' [b3], new state: GROUND_STATE
root@GT-I9100:/ # ls -laR /efs/ /efs/: total 8360 drwxrwx--x 8 radio system 4096 2000-01-01 00:19 . drwxr-xr-x 18 root root 0 2000-01-01 00:28 .. drwxrwxr-x 5 root root 4096 2000-01-01 00:03 .files -rwx------ 1 radio radio 1048576 2014-09-04 15:32 .nv_core.bak -rwx------ 1 radio radio 32 2014-09-04 15:32 .nv_core.bak.md5 -rwx------ 1 radio radio 2097152 2014-09-04 15:32 .nv_data.bak -rwx------ 1 radio radio 32 2014-09-04 15:32 .nv_data.bak.md5 -rw-rw-rw- 1 radio radio 1 2011-01-01 00:00 .nv_state drwxrwxr-x 2 radio system 4096 2012-08-29 18:12 bluetooth -rw-rw-rw- 1 system system 6 2000-01-01 00:01 calibration_data -rw-r--r-- 1 system system 9 2011-01-01 00:01 cryptprop_applied_result -rw-r--r-- 1 root root 5 2012-08-29 07:47 cryptprop_onetimeboot -rw-r--r-- 1 system system 13 2000-01-01 00:02 cryptprop_persist.sys.timezone -rw-r--r-- 1 root root 1 2011-01-01 00:00 cryptprop_rebootMode -rw-r--r-- 1 root root 3 2012-08-29 07:47 cryptprop_securewipedata drwx------ 3 system system 4096 2011-01-01 00:01 dmp drwxrwxr-x 2 radio radio 4096 2000-01-01 00:18 imei drwx------ 2 root root 4096 2000-01-01 03:38 lost+found -rw-rw-rw- 1 radio radio 1398 2014-09-04 15:32 nv.log -rw------- 1 radio radio 2097152 2000-01-01 00:19 nv_data.bin -rw------- 1 radio radio 32 2000-01-01 00:19 nv_data.bin.md5 -rwxrwxr-- 1 radio radio 880 2011-01-01 00:02 redata.bin -rw-rw-rw- 1 radio radio 1 2012-08-29 18:12 upgaddr drwxrwxr-x 2 radio system 4096 2012-08-29 18:12 wifi /efs/.files: total 48 drwxrwxr-x 5 root root 4096 2000-01-01 00:03 . drwxrwx--x 8 radio system 4096 2000-01-01 00:19 .. drwxrwxr-x 2 media system 4096 2000-01-01 00:03 .dm33 drwxrwxr-x 2 media system 4096 2000-01-01 00:03 .dx1 drwxrwxr-x 2 media system 4096 2000-01-01 00:03 .mp301 /efs/.files/.dm33: total 16 drwxrwxr-x 2 media system 4096 2000-01-01 00:03 . drwxrwxr-x 5 root root 4096 2000-01-01 00:03 .. /efs/.files/.dx1: total 16 drwxrwxr-x 2 media system 4096 2000-01-01 00:03 . drwxrwxr-x 5 root root 4096 2000-01-01 00:03 .. /efs/.files/.mp301: total 16 drwxrwxr-x 2 media system 4096 2000-01-01 00:03 . drwxrwxr-x 5 root root 4096 2000-01-01 00:03 .. /efs/bluetooth: total 32 drwxrwxr-x 2 radio system 4096 2012-08-29 18:12 . drwxrwx--x 8 radio system 4096 2000-01-01 00:19 .. -rwxrwxr-x 1 radio radio 17 2012-08-29 18:12 bt_addr /efs/dmp: total 32 drwx------ 3 system system 4096 2011-01-01 00:01 . drwxrwx--x 8 radio system 4096 2000-01-01 00:19 .. drwx------ 4 system system 4096 2011-01-01 00:01 sett /efs/dmp/sett: total 32 drwx------ 4 system system 4096 2011-01-01 00:01 . drwx------ 3 system system 4096 2011-01-01 00:01 .. drwx------ 2 system system 4096 2011-01-01 00:01 secure drwx------ 2 system system 4096 2012-08-28 21:44 system /efs/dmp/sett/secure: total 16 drwx------ 2 system system 4096 2011-01-01 00:01 . drwx------ 4 system system 4096 2011-01-01 00:01 .. /efs/dmp/sett/system: total 104 drwx------ 2 system system 4096 2012-08-28 21:44 . drwx------ 4 system system 4096 2011-01-01 00:01 .. -rw------- 1 system system 1 2012-08-29 07:47 airplane_mode_on -rw------- 1 system system 1 2012-08-29 17:05 mode_ringer -rw------- 1 system system 1 2012-08-28 07:04 screen_brightness_mode -rw------- 1 system system 2 2011-01-01 00:01 time_12_24 -rw------- 1 system system 1 2011-01-01 00:01 vibrate_on -rw------- 1 system system 1 2012-08-29 17:05 volume_notification -rw------- 1 system system 1 2012-08-28 07:32 volume_notification_last_audible -rw------- 1 system system 1 2012-08-29 17:05 volume_ring -rw------- 1 system system 1 2012-08-29 17:05 volume_ring_last_audible -rw------- 1 system system 1 2012-08-29 17:05 volume_system -rw------- 1 system system 1 2012-08-28 07:32 volume_system_last_audible /efs/imei: total 48 drwxrwxr-x 2 radio radio 4096 2000-01-01 00:18 . drwxrwx--x 8 radio system 4096 2000-01-01 00:19 .. -rw-rw-rw- 1 radio radio 23 2000-01-01 00:18 bt.txt -rw-rw-r-- 1 radio radio 2 2000-01-01 00:18 keystr -rw-rw-rw- 1 radio radio 3 2018-08-14 05:01 mps_code.dat /efs/lost+found: total 24 drwx------ 2 root root 4096 2000-01-01 03:38 . drwxrwx--x 8 radio system 4096 2000-01-01 00:19 .. /efs/wifi: total 24 drwxrwxr-x 2 radio system 4096 2012-08-29 18:12 . drwxrwx--x 8 radio system 4096 2000-01-01 00:19 .. root@GT-I9100:/ #
root@maguro:/ # ls -laR /factory/ /factory/: total 8296 drwxrwxr-x 6 radio radio 4096 2000-01-01 01:00 . drwxr-xr-x 18 root root 0 2000-01-01 01:00 .. -rwx------ 1 radio radio 1048576 2000-01-01 01:37 .nv_core.bak -rwx------ 1 radio radio 32 2000-01-01 01:37 .nv_core.bak.md5 -rwx------ 1 radio radio 2097152 2000-01-01 01:37 .nv_data.bak -rwx------ 1 radio radio 32 2000-01-01 01:37 .nv_data.bak.md5 -rw------- 1 radio radio 1 2011-01-01 01:00 .nv_state drwxr-xr-x 2 radio radio 4096 2011-12-07 06:29 bluetooth -rw------- 1 radio radio 640 2011-12-07 06:29 hdcp.keys drwxrwxr-x 2 radio radio 4096 2000-01-01 01:01 imei drwx------ 2 root root 4096 1970-01-01 01:00 lost+found -rw------- 1 radio radio 2354 2000-01-01 01:37 nv.log -rw------- 1 radio radio 2097152 2000-01-01 01:00 nv_data.bin -rw------- 1 radio radio 32 2000-01-01 01:00 nv_data.bin.md5 drwxrwx--- 2 system radio 4096 2000-01-01 01:00 wifi -rw-r--r-- 1 radio radio 144 2011-12-07 06:29 wv.keys /factory/bluetooth: total 32 drwxr-xr-x 2 radio radio 4096 2011-12-07 06:29 . drwxrwxr-x 6 radio radio 4096 2000-01-01 01:00 .. -rw-r--r-- 1 radio radio 17 2011-12-07 06:29 bt_addr /factory/imei: total 32 drwxrwxr-x 2 radio radio 4096 2000-01-01 01:01 . drwxrwxr-x 6 radio radio 4096 2000-01-01 01:00 .. -rw------- 1 radio radio 3 2011-01-01 01:02 mps_code.dat /factory/lost+found: total 24 drwx------ 2 root root 4096 1970-01-01 01:00 . drwxrwxr-x 6 radio radio 4096 2000-01-01 01:00 .. /factory/wifi: total 32 drwxrwx--- 2 system radio 4096 2000-01-01 01:00 . drwxrwxr-x 6 radio radio 4096 2000-01-01 01:00 .. -rw-rw---- 1 system radio 17 2000-01-01 01:00 .mac.info root@maguro:/ #
root@i9300:/ # ls -laR /efs/ /efs/: total 5184 drwxrwx--x 7 radio system 4096 May 18 00:07 . drwxr-xr-x 19 root root 0 May 17 22:24 .. -rw-rw-rw- 1 root root 1048576 Jan 28 2014 .nv_core.bak -rw-rw-rw- 1 root root 32 Jan 28 2014 .nv_core.bak.md5 -rw-rw-rw- 1 root root 2097152 Jan 28 2014 .nv_data.bak -rw-rw-rw- 1 root root 32 Jan 28 2014 .nv_data.bak.md5 -rw-rw-rw- 1 root root 1 Jan 28 2014 .nv_state -rw-rw-rw- 1 root root 152 Jan 28 2014 00000000.authtokcont drwxr-xr-x 2 system system 4096 Jan 1 2012 FactoryApp drwxr-xr-x 2 system system 4096 Jan 1 2012 bluetooth drwxr-xr-x 3 system system 4096 Jan 28 2014 drm -rw-rw-rw- 1 root root 6 Jan 28 2014 gyro_cal_data -rw-r--r-- 1 root root 1100 Jan 28 2014 h2k.dat drwxrwxr-x 2 radio system 4096 Jan 1 2012 imei -rw-rw-rw- 1 root root 2601 Jan 28 2014 nv.log -rw------- 1 radio radio 2097152 May 18 00:07 nv_data.bin -rw------- 1 radio radio 32 May 18 00:07 nv_data.bin.md5 drwxr-xr-x 2 system system 4096 Jan 1 2012 wifi -rw-rw-rw- 1 root root 220 Jan 28 2014 wv.keys /efs/FactoryApp: total 32 drwxr-xr-x 2 system system 4096 Jan 1 2012 . drwxrwx--x 7 radio system 4096 May 18 00:07 .. -rw-rw-rw- 1 root root 5 Jan 28 2014 baro_delta -rw-rw-rw- 1 root root 2 Jan 28 2014 factorymode -rw-rw-rw- 1 root root 10 Jan 28 2014 hw_ver -rw-rw-rw- 1 root root 2 Jan 28 2014 keystr -rw-rw-rw- 1 root root 11 Jan 28 2014 serial_no /efs/bluetooth: total 16 drwxr-xr-x 2 system system 4096 Jan 1 2012 . drwxrwx--x 7 radio system 4096 May 18 00:07 .. -rw-rw-rw- 1 root root 17 Jan 28 2014 bt_addr /efs/drm: total 16 drwxr-xr-x 3 system system 4096 Jan 28 2014 . drwxrwx--x 7 radio system 4096 May 18 00:07 .. drwxr-xr-x 2 system system 4096 Jan 1 2012 playready /efs/drm/playready: total 176 drwxr-xr-x 2 system system 4096 Jan 1 2012 . drwxr-xr-x 3 system system 4096 Jan 28 2014 .. -rw-rw-rw- 1 root root 3 Jan 28 2014 00002.PRV -rw-rw-rw- 1 root root 16 Jan 28 2014 DxDeviceKey -rw-rw-rw- 1 root root 24568 Jan 28 2014 DxSecureDB -rw-rw-rw- 1 root root 132048 Jan 28 2014 DxSecureDB_secondary -rw-rw-rw- 1 root root 80 Jan 28 2014 NVS -rw-rw-rw- 1 root root 0 Jan 28 2014 provisioning_done /efs/imei: total 16 drwxrwxr-x 2 radio system 4096 Jan 1 2012 . drwxrwx--x 7 radio system 4096 May 18 00:07 .. -rw-rw-rw- 1 root root 3 Jan 28 2014 mps_code.dat /efs/wifi: total 16 drwxr-xr-x 2 system system 4096 Jan 1 2012 . drwxrwx--x 7 radio system 4096 May 18 00:07 .. -rw-rw-rw- 1 root root 20 Jan 28 2014 .mac.info
This article has pictures of gnome-disks benchmarks that was run on a GT-I9300 under Parabola with the Replicant 11 kernel and u-boot with the nonfree BL1.
Xorg had instabilities so I had to take pictures before the display went black and/or were corrupted.
This information might be interesting if you want to know if it's better to run an OS on the eMMC or MicroSD (for instance if you want to do tests and need to reboot often or want to compile on the device).
Here we can see that the read speeds are between 70 and 80 MiB/s in average
I tried various microSD cards that are supposed to go faster than 25MiB/s but they seem to be limited to 25MiB/s on the Galaxy SIII (GT-I9300).
It's unclear if the Exynos 4412 used could support faster cards:
In one hand, one of the reference manuals of the Exynos 4412 says:Another Exynos 4412 reference manual says in the Mobile Storage Host chapter:
The Mobile Storage Host is an interface between system and SD/MMC card. The performance of this host is very powerful, as clock rate is 50MHz and access 8-bit data pins simultaneously. This host supports 8-bit DDR (Double Data Rate) transfers. The specifications that Mobile Storage Host supports are: * Secure Digial Memory Card (SD Memory Card, Version 2.0) * Secure Digital I/O (SDIO - Version 2.0) [...] * Multimedia Cards (MMC - Version 4.41)
So if we have 50Mhz x 4bit (according to the devicetree we have only 4 bits here) x 2 (DDR) / 8.0 we could have up to 50MB/s but in practice we have up to 25MiB/s (DDR cards compatible with SD 2.0 probably don't exist or are not common).
Various MicroSD (which should in theory be faster than 25MiB/s):S-BOOT # printenv : REBOOT_MODE: 0 : SWITCH_SEL: 3 : DEBUG_LEVEL: 20300 : SUD_MODE: 0 : DN_ERROR: 0 : CHECKSUM: 3 : INT_RSVD6: 1 : INT_RSVD7: 0 : INT_RSVD8: 0 : INT_RSVD9: 0 : CMDLINE: console=ttySAC2,115200 loglevel=4 : STR_RSVD1: (null) : STR_RSVD2: (null)
root@n7000:/ # ls -laR /efs/ /efs/: total 10432 drwxrwx--x 8 radio system 4096 2000-01-01 02:59 . drwxr-xr-x 17 root root 0 2000-01-01 01:00 .. drwxrwxr-x 5 root root 4096 2000-01-01 01:07 .files -rwx------ 1 radio radio 1048576 2011-01-01 01:00 .nv_core.bak -rwx------ 1 radio radio 32 2011-01-01 01:00 .nv_core.bak.md5 -rw-r--r-- 1 root root 2097152 2000-01-28 09:00 .nv_data.bak -rw-r--r-- 1 root root 32 2000-01-28 09:00 .nv_data.bak.md5 -rw-rw-rw- 1 radio radio 1 2011-01-01 01:00 .nv_state drwxrwxr-x 2 radio system 4096 2012-07-04 23:23 bluetooth -rw------- 1 system system 6 2014-06-25 18:42 calibration_data -rw-r--r-- 1 system system 9 2011-01-01 01:01 cryptprop_applied_result -rw-r--r-- 1 root root 5 2012-07-04 21:14 cryptprop_onetimeboot -rw-r--r-- 1 system system 3 2000-01-01 01:00 cryptprop_persist.sys.language -rw-r--r-- 1 system system 14 2012-04-09 13:38 cryptprop_persist.sys.timezone -rw-r--r-- 1 root root 1 2011-01-01 01:00 cryptprop_rebootMode -rw-r--r-- 1 root root 3 2012-07-04 21:14 cryptprop_securewipedata drwx------ 3 system system 4096 2011-01-01 01:01 dmp -rw------- 1 root root 1 2000-01-01 01:07 essiv drwxrwxr-x 2 radio radio 4096 2012-02-03 13:26 imei drwx------ 2 root root 4096 2000-01-01 02:17 lost+found -rw------- 1 root root 16384 2014-07-13 19:43 metadata -rw-rw-rw- 1 radio radio 1254 2011-01-01 01:00 nv.log -rwx------ 1 radio radio 2097152 2000-01-01 02:59 nv_data.bin -rw------- 1 radio radio 32 2000-01-01 02:59 nv_data.bin.md5 -rwxrw-r-- 1 radio radio 880 2011-01-01 01:02 redata.bin -rw-rw-rw- 1 radio radio 1 2000-01-01 02:06 upgaddr drwxrwxr-x 2 radio system 4096 2012-07-04 23:21 wifi /efs/.files: total 48 drwxrwxr-x 5 root root 4096 2000-01-01 01:07 . drwxrwx--x 8 radio system 4096 2000-01-01 02:59 .. drwxrwxr-x 2 media system 4096 2000-01-01 01:07 .dm33 drwxrwxr-x 2 media system 4096 2000-01-01 01:07 .dx1 drwxrwxr-x 2 media system 4096 2000-01-01 01:07 .mp301 /efs/.files/.dm33: total 16 drwxrwxr-x 2 media system 4096 2000-01-01 01:07 . drwxrwxr-x 5 root root 4096 2000-01-01 01:07 .. /efs/.files/.dx1: total 16 drwxrwxr-x 2 media system 4096 2000-01-01 01:07 . drwxrwxr-x 5 root root 4096 2000-01-01 01:07 .. /efs/.files/.mp301: total 16 drwxrwxr-x 2 media system 4096 2000-01-01 01:07 . drwxrwxr-x 5 root root 4096 2000-01-01 01:07 .. /efs/bluetooth: total 32 drwxrwxr-x 2 radio system 4096 2012-07-04 23:23 . drwxrwx--x 8 radio system 4096 2000-01-01 02:59 .. -rw-r--r-- 1 radio radio 17 2012-07-04 23:23 bt_addr /efs/dmp: total 32 drwx------ 3 system system 4096 2011-01-01 01:01 . drwxrwx--x 8 radio system 4096 2000-01-01 02:59 .. drwx------ 4 system system 4096 2011-01-01 01:01 sett /efs/dmp/sett: total 32 drwx------ 4 system system 4096 2011-01-01 01:01 . drwx------ 3 system system 4096 2011-01-01 01:01 .. drwx------ 2 system system 4096 2012-06-16 00:13 secure drwx------ 2 system system 4096 2012-04-10 17:23 system /efs/dmp/sett/secure: total 24 drwx------ 2 system system 4096 2012-06-16 00:13 . drwx------ 4 system system 4096 2011-01-01 01:01 .. -rw------- 1 system system 1 2012-06-16 13:30 mobile_data /efs/dmp/sett/system: total 144 drwx------ 2 system system 4096 2012-04-10 17:23 . drwx------ 4 system system 4096 2011-01-01 01:01 .. -rw------- 1 system system 4 2012-06-05 23:20 VIB_FEEDBACK_MAGNITUDE -rw------- 1 system system 1 2012-04-10 17:24 dtmf_tone -rw------- 1 system system 1 2012-07-01 10:06 mode_ringer -rw------- 1 system system 2 2012-07-04 20:18 screen_brightness -rw------- 1 system system 1 2012-04-08 13:21 screen_brightness_mode -rw------- 1 system system 5 2012-04-06 20:19 screen_off_timeout -rw------- 1 system system 1 2012-04-10 17:23 sound_effects_enabled -rw------- 1 system system 2 2011-01-01 01:02 time_12_24 -rw------- 1 system system 1 2012-04-10 17:22 vibrate_in_silent -rw------- 1 system system 1 2012-04-10 17:22 vibrate_on -rw------- 1 system system 1 2012-04-10 22:37 volume_notification -rw------- 1 system system 1 2012-04-10 22:37 volume_notification_last_audible -rw------- 1 system system 1 2012-07-01 10:06 volume_ring -rw------- 1 system system 1 2012-06-09 23:31 volume_ring_last_audible -rw------- 1 system system 1 2012-04-10 17:22 volume_system -rw------- 1 system system 1 2012-04-10 17:22 volume_system_last_audible /efs/imei: total 48 drwxrwxr-x 2 radio radio 4096 2012-02-03 13:26 . drwxrwx--x 8 radio system 4096 2000-01-01 02:59 .. -rw-rw-rw- 1 radio radio 23 2012-02-03 13:26 bt.txt -rw-rw-r-- 1 radio radio 2 2012-02-03 13:26 keystr -rwxrwxr-x 1 radio radio 3 2013-08-09 16:47 mps_code.dat /efs/lost+found: total 24 drwx------ 2 root root 4096 2000-01-01 02:17 . drwxrwx--x 8 radio system 4096 2000-01-01 02:59 .. /efs/wifi: total 32 drwxrwxr-x 2 radio system 4096 2012-07-04 23:21 . drwxrwx--x 8 radio system 4096 2000-01-01 02:59 .. -rw-rw-rw- 1 root root 18 2000-01-01 01:01 .mac.info
root@n7100:/ # ls -laR /efs/ /efs/: total 10400 drwxrwx--x 10 radio system 4096 2012-01-01 01:00 . drwxr-xr-x 19 root root 0 2012-01-01 01:00 .. drwxrwxr-x 5 root root 4096 2012-01-01 01:01 .files -rw------- 1 radio radio 1048576 2016-10-22 21:40 .nv_core.bak -rw------- 1 radio radio 32 2016-10-22 21:40 .nv_core.bak.md5 -rw------- 1 radio radio 2097152 2016-10-22 21:40 .nv_data.bak -rw------- 1 radio radio 32 2016-10-22 21:40 .nv_data.bak.md5 -rw------- 1 radio radio 1 2012-01-01 01:03 .nv_state -rw-rw-r-- 1 radio radio 152 2012-01-01 01:34 00000000.authtokcont drwxrwxr-x 2 system system 4096 2014-10-01 13:43 FactoryApp drwxrwxr-x 2 radio system 4096 2012-01-01 01:33 bluetooth drwxr-xr-x 2 system system 4096 2014-01-01 01:02 carrier drwxrwxr-x 4 drm system 4096 2015-03-10 12:41 drm -rw------- 1 system system 12 2012-01-01 01:06 gyro_cal_data -rw-r--r-- 1 radio radio 1100 2012-01-01 01:02 h2k.dat drwxrwxr-x 2 radio system 4096 2012-01-01 01:03 imei drwx------ 2 root root 4096 2017-03-04 01:29 lost+found -rw------- 1 radio radio 1526 2018-05-06 22:37 nv.log -rwx------ 1 radio radio 2097152 2012-01-01 01:00 nv_data.bin -rw------- 1 radio radio 32 2012-01-01 01:00 nv_data.bin.md5 -rw-rw---- 1 system system 108 2015-02-26 13:39 ss_data drwxrwxr-x 2 radio system 4096 2012-01-01 01:02 wifi -rw-r--r-- 1 radio radio 220 2012-01-01 01:34 wv.keys /efs/.files: total 48 drwxrwxr-x 5 root root 4096 2012-01-01 01:01 . drwxrwx--x 10 radio system 4096 2012-01-01 01:00 .. drwxrwxr-x 2 media system 4096 2012-01-01 01:01 .dm33 drwxrwxr-x 2 media system 4096 2012-01-01 01:01 .dx1 drwxrwxr-x 2 media system 4096 2012-01-01 01:01 .mp301 /efs/.files/.dm33: total 16 drwxrwxr-x 2 media system 4096 2012-01-01 01:01 . drwxrwxr-x 5 root root 4096 2012-01-01 01:01 .. /efs/.files/.dx1: total 16 drwxrwxr-x 2 media system 4096 2012-01-01 01:01 . drwxrwxr-x 5 root root 4096 2012-01-01 01:01 .. /efs/.files/.mp301: total 16 drwxrwxr-x 2 media system 4096 2012-01-01 01:01 . drwxrwxr-x 5 root root 4096 2012-01-01 01:01 .. /efs/FactoryApp: total 104 drwxrwxr-x 2 system system 4096 2014-10-01 13:43 . drwxrwx--x 10 radio system 4096 2012-01-01 01:00 .. -rwxr--r-- 1 system system 3 2013-02-21 03:45 baro_delta -rw-r--r-- 1 root root 5 2019-08-31 02:43 batt_cable_count -rwxrwxr-x 1 media system 0 2018-05-31 12:59 earjack_count -rw------- 1 system system 3 2019-10-18 01:26 epen_count -rwxr--r-- 1 system system 2 2012-01-01 01:34 factorymode -rwxrwxr-x 1 system radio 4 2012-01-01 01:02 fdata -rwxrwxr-x 1 system radio 0 2012-01-01 01:02 hist_nv -rwxr--r-- 1 system system 8 2013-02-21 03:46 hw_ver -rwxr--r-- 1 system system 2 2012-01-01 01:34 keystr -rwxr--r-- 1 system system 5 2012-01-01 01:03 prepay -rwxr--r-- 1 system system 11 2012-01-01 01:33 serial_no -rwxrwxr-x 1 system radio 270 2012-01-01 01:02 test_nv /efs/bluetooth: total 32 drwxrwxr-x 2 radio system 4096 2012-01-01 01:33 . drwxrwx--x 10 radio system 4096 2012-01-01 01:00 .. -rw-r--r-- 1 radio radio 17 2012-01-01 01:33 bt_addr /efs/carrier: total 32 drwxr-xr-x 2 system system 4096 2014-01-01 01:02 . drwxrwx--x 10 radio system 4096 2012-01-01 01:00 .. -rwxr--r-- 1 system system 3 2014-01-01 01:02 HiddenMenu /efs/drm: total 40 drwxrwxr-x 4 drm system 4096 2015-03-10 12:41 . drwxrwx--x 10 radio system 4096 2012-01-01 01:00 .. drwxrwxr-x 2 drm system 4096 2019-08-31 00:06 playready drwxrwxr-- 3 drm system 4096 2015-03-10 12:41 sdrm /efs/drm/playready: total 832 drwxrwxr-x 2 drm system 4096 2019-08-31 00:06 . drwxrwxr-x 4 drm system 4096 2015-03-10 12:41 .. -r-------- 1 system system 3 2015-02-26 13:39 00003.PRV -rw------- 1 drm system 16 2015-02-26 13:44 DxDeviceKey -rw------- 1 drm system 1052672 2000-01-01 02:17 DxPlayReadyDB.hds -rw------- 1 drm system 26104 2000-01-01 02:17 DxSecureDB -rw------- 1 drm system 158096 2000-01-01 02:17 DxSecureDB_secondary -rw------- 1 drm system 80 2000-01-01 02:17 NVS -rw------- 1 drm system 140 2015-02-26 13:44 tlobject.bin /efs/drm/sdrm: total 24 drwxrwxr-- 3 drm system 4096 2015-03-10 12:41 . drwxrwxr-x 4 drm system 4096 2015-03-10 12:41 .. drwxrwxr-- 2 drm system 4096 2015-03-10 12:41 data_agent /efs/drm/sdrm/data_agent: total 16 drwxrwxr-- 2 drm system 4096 2015-03-10 12:41 . drwxrwxr-- 3 drm system 4096 2015-03-10 12:41 .. /efs/imei: total 32 drwxrwxr-x 2 radio system 4096 2012-01-01 01:03 . drwxrwx--x 10 radio system 4096 2012-01-01 01:00 .. -rw-rw-r-- 1 radio system 3 2019-10-18 01:26 mps_code.dat /efs/lost+found: total 24 drwx------ 2 root root 4096 2017-03-04 01:29 . drwxrwx--x 10 radio system 4096 2012-01-01 01:00 .. /efs/wifi: total 32 drwxrwxr-x 2 radio system 4096 2012-01-01 01:02 . drwxrwx--x 10 radio system 4096 2012-01-01 01:00 .. -rw-rw-r-- 1 system system 20 2012-01-01 01:02 .mac.info root@n7100:/ #
root@espresso3g:/ # ls -laR /efs/ /efs/: total 8304 drwxrwxr-x 7 radio system 4096 2000-04-01 02:34 . drwxr-xr-x 17 root root 0 2000-04-01 02:34 .. drwxrwxr-x 5 root root 4096 2000-01-01 01:00 .files -rwx------ 1 radio radio 1048576 2000-01-01 01:02 .nv_core.bak -rwx------ 1 radio radio 32 2000-01-01 01:02 .nv_core.bak.md5 -rwx------ 1 radio radio 2097152 2000-01-01 01:02 .nv_data.bak -rwx------ 1 radio radio 32 2000-01-01 01:02 .nv_data.bak.md5 -rw------- 1 radio radio 1 2013-03-06 19:33 .nv_state drwxr-xr-x 2 system system 4096 2000-01-01 01:02 FactoryApp drwxr-xr-x 2 radio radio 4096 2000-01-01 01:02 bluetooth drwxrwxr-x 2 radio radio 4096 2000-01-01 01:03 imei -rw------- 1 radio radio 3317 2000-01-01 01:02 nv.log -rwx------ 1 radio radio 2097152 2000-04-01 02:34 nv_data.bin -rw------- 1 radio radio 32 2000-04-01 02:34 nv_data.bin.md5 -rwx------ 1 radio radio 880 2012-01-01 01:02 redata.bin drwxrwxr-x 2 system radio 4096 2000-01-01 01:00 wifi -rw-r--r-- 1 radio radio 144 2000-01-01 01:02 wv.keys /efs/.files: total 48 drwxrwxr-x 5 root root 4096 2000-01-01 01:00 . drwxrwxr-x 7 radio system 4096 2000-04-01 02:34 .. drwxrwxr-x 2 media system 4096 2000-01-01 01:00 .dm33 drwxrwxr-x 2 media system 4096 2000-01-01 01:00 .dx1 drwxrwxr-x 2 media system 4096 2000-01-01 01:00 .mp301 /efs/.files/.dm33: total 16 drwxrwxr-x 2 media system 4096 2000-01-01 01:00 . drwxrwxr-x 5 root root 4096 2000-01-01 01:00 .. /efs/.files/.dx1: total 16 drwxrwxr-x 2 media system 4096 2000-01-01 01:00 . drwxrwxr-x 5 root root 4096 2000-01-01 01:00 .. /efs/.files/.mp301: total 16 drwxrwxr-x 2 media system 4096 2000-01-01 01:00 . drwxrwxr-x 5 root root 4096 2000-01-01 01:00 .. /efs/FactoryApp: total 56 drwxr-xr-x 2 system system 4096 2000-01-01 01:02 . drwxrwxr-x 7 radio system 4096 2000-04-01 02:34 .. -rwxr--r-- 1 system system 2 2000-01-01 01:02 factorymode -rwxr--r-- 1 system system 10 2000-01-01 01:02 hw_ver -rwxr--r-- 1 system system 2 2000-01-01 01:02 keystr -rwxr--r-- 1 system system 11 2000-01-01 01:02 serial_no /efs/bluetooth: total 32 drwxr-xr-x 2 radio radio 4096 2000-01-01 01:02 . drwxrwxr-x 7 radio system 4096 2000-04-01 02:34 .. -rw-r--r-- 1 radio radio 17 2000-01-01 01:02 bt_addr /efs/imei: total 32 drwxrwxr-x 2 radio radio 4096 2000-01-01 01:03 . drwxrwxr-x 7 radio system 4096 2000-04-01 02:34 .. -rwxrwxr-x 1 radio radio 3 2013-01-24 19:07 mps_code.dat /efs/wifi: total 32 drwxrwxr-x 2 system radio 4096 2000-01-01 01:00 . drwxrwxr-x 7 radio system 4096 2000-04-01 02:34 .. -rw-rw-r-- 1 system radio 17 2000-01-01 01:02 .mac.info root@espresso3g:/ #
| Versions | type | Unit produced | Replicant compatible versions | SoC | Bootloader | Modem link | Modem audio links | Modem protocol | RAM |
|---|---|---|---|---|---|---|---|---|---|
| GTA04 A1 | Modified single board computer | Not supported | ? | Unsigned | ? | ? | ? | ? | |
| GTA04 A2 | first engineering boards | never sold | Not supported | ? | Unsigned | ? | ? | ? | ? |
| GTA04 A3 | second engineering boards | very few (20?) | Replicant 2.3, 4.2, modem audio not supported | DM3730 | Unsigned, free software, downstream | USB | * Software routing | AT, QMI | 512M |
| GTA04 A4 | release | Replicant 2.3, 4.2 | DM3730 | Unsigned, free software, downstream | USB | * Hardware routing * Software routing |
AT, QMI | 512M | |
| GTA04 A5 | release | ? | DM3730 | Unsigned, free software, downstream | USB | * Hardware routing * Software routing |
AT, QMI | ? |
 |
Device | GTA04 AX |
| Manufacturer | Goldelico | |
| Release date | January 2012 | |
| Codename | gta04 |
|
| Status | Uncompleted | |
| Supported models | GTA04 A4, partial support for the GTA04 A3 | |
| Latest images | Replicant 4.2 0004 |
Replicant status for the GTA04 A4: ReplicantStatus Replicant 4.2
Detailed status: GTA04Status
Replicant installation for the GTA04 AX: GTA04Installation
Replicant build for the GTA04 AX: GTA04Build
Privacy/security issues on the GTA04 A4: GTA04PrivacySecurityIssues
| Component | Name | Protocol/implementation | Documentation |
|---|---|---|---|
| SoC | TI OMAP DM3730 | Linux kernel | dm3730: * current product page * Reference manual: ? * References exits to: sprugn4b , sprugn4c , sprugn4d, sprugn4e, sprugn4f, sprugn4g, sprugn4h TI removing documentation |
| GPU | PowerVR (SGX530) | Linux kernel and secret userspace | No |
| Audio Codec | TWL4030 (TPS65950) | Linux kernel | tps65950 |
| Modem | GTM601 | AT | No |
| Wi-Fi | Marvell 8686 (W2CBW003) | Linux kernel | w2cbw003_datasheet_rev1.pdf |
| Bluetooth | CSR BC04-ROM (W2CBW003) | HCI | bccmd-commands.pdf w2cbw003_datasheet_rev1.pdf |
| GPS | SiRF GSD3 (W2SG0004) | NMEA, SiRF | GSC3 HW Implementation GPS_Firmware_GSC3_3.5.0_V4.2.pdf W2SG0004_Datasheet_Rev1.81.pdf |
| Accelerometer | BMA180 | Linux kernel | BST-BMA180-DS000-03.pdf |
| Compass | HMC5883 | Linux kernel | HMC5883L |
| Gyroscope | ITG-3200 | Linux kernel | PS-ITG-3200-00-01.4.pdf |
| Barometer | BMP085 | Linux kernel | BMP085_DataSheet_Rev.1.0_01July2008.pdf |
| Camera | OV9655 | Linux kernel | OV9655- datasheet.pdf |
| FM Radio | Si4705/4721 | Linux kernel | Si4704-05-C40.pdf |
| IrDA | TFDU6301 | Linux kernel | 0900766b80ed1faa.pdf |
| Component | Name | Protocol/implementation | Documentation |
|---|---|---|---|
| SoC | TI OMAP DM3730 | Linux kernel | dm3730 |
| GPU | PowerVR SGX530 | Linux kernel and secret userspace | No |
| Audio Codec | TWL4030 (TPS65950) | Linux kernel | tps65950 |
| Modem | GTM601 | AT | No |
| Wi-Fi | Marvell 8686 (W2CBW003) | Linux kernel | w2cbw003_datasheet_rev1.pdf |
| Bluetooth | CSR BC04-ROM (W2CBW003) | HCI | bccmd-commands.pdf w2cbw003_datasheet_rev1.pdf |
| GPS | SiRF GSD3 (W2SG0004) | NMEA, SiRF | GSC3 HW Implementation GPS_Firmware_GSC3_3.5.0_V4.2.pdf W2SG0004_Datasheet_Rev1.81.pdf |
| Accelerometer | BMA180 | Linux kernel | BST-BMA180-DS000-03.pdf |
| Accelerometer | LIS302 | Linux kernel | 12726.pdf |
| Compass | HMC5883 | Linux kernel | HMC5883L |
| Gyroscope | ITG-3200 | Linux kernel | PS-ITG-3200-00-01.4.pdf |
| Barometer | BMP085 | Linux kernel | BMP085_DataSheet_Rev.1.0_01July2008.pdf |
| Camera | OV9655 | Linux kernel | OV9655- datasheet.pdf |
| FM Radio | Si4705/4721 | Linux kernel | Si4704-05-C40.pdf |
| IrDA | TFDU6301 | Linux kernel | 0900766b80ed1faa.pdf |
Components shown in italics are optional and are not present on every board.
This explains how to build Replicant for the GTA04.
Do not build as root, always build as user.
Setup the build environment:
source build/envsetup.sh lunch replicant_gta04-userdebug export ANDROID_JAVA_HOME=$JAVA_HOME
Start the build:
parallel_tasks=$(echo "$(grep 'processor' /proc/cpuinfo | wc -l ) + 1" | bc) make -j$parallel_tasks bootable bacon
The -jn argument is to indicate the number of parallel tasks during the build.
You can remove it from the command line to have only one task at a time. With fast hardware, best results will come with -j9, -j16 and -j32.
out/target/product/gta04/out/host/linux-x86/bin/In order to install Replicant on your device, it is assumed that you have a computer running a GNU/Linux operating system, a spare microSD card (at least 1GB) and everything necessary to connect the card to the computer. Moreover, it is assumed that anyone performing the installation knows how to use command lines in a terminal and has basic knowledge about it.
The first step in the installation process is to download and set up the files that will be used to install Replicant to the device. The files must be downloaded on your computer first.
1. Find out what the latest image is: check out the Last image part of the general table on GTA04
2. Download all the files listed for the device (including the checksum and the signatures) on ReplicantImages for the latest image
2. Make sure you have added the Replicant release key to your GPG keyring
3. Check the signature of the files:
gpg --armor --verify path/to/replicant-4.2-gta04.zip.img.asc path/to/replicant-4.2-gta04.zip gpg --armor --verify path/to/bootable.zip.asc path/to/bootable.zip gpg --armor --verify path/to/replicant_gta04_install.sh.asc path/to/replicant_gta04_install.sh
md5sum -c gta04.md5
In order to install Replicant from the device using sideload, the ADB tool has to be installed on the host computer.
If it's not installed, you can follow the instructions on the ToolsInstallation page to install it:
In order to install Replicant on the microSD card, it has to be set up with the base bootable files first:
1. Connect the microSD card to the computer (e.g. using an USB card reader)
2. Make sure that the bootable.zip file is placed within the same directory as the replicant_gta04_install.sh script
(or change the FILES_BASE variable in the script to the correct path)
3. Make sure that the /media directory exists and can be used for creating boot, system, cache and data sub-folders
(or change the MOUNT_BASE variable in the script to the correct path)
4. Setup the card using the installation script (you can provide the block device node as a second argument):
./replicant_gta04_install.sh setup
Once the microSD card is prepared, it is possible to insert it in the phone though no system is installed yet. It is possible to install Replicant either from the host computer or from the device.
1. Connect the microSD card back to the computer (e.g. using an USB card reader)
2. Make sure that the replicant-4.2-gta04.zip file is placed within the same directory as the replicant_gta04_install.sh script
(or change the FILES_BASE variable in the script to the correct path)
3. Make sure that the /media directory exists and can be used for creating boot, system, cache and data sub-folders
(or change the MOUNT_BASE variable in the script to the correct path)
4. Install the system to the card using the installation script (you can provide the block device node as a second argument):
./replicant_gta04_install.sh install
Your device should now be running Replicant!
1. Insert the microSD card in the device and power the device on: the device should boot normally (the aux light should stay orange for a short time and then switch green)
2. Make sure the device boots to recovery
3. Connect the USB cable to both the computer and the device
4. Select install zip (using the AUX key to navigate and the power key to select)
5. Select install zip from sideload
5. Back to the host computer, load the system zip with sideload:
adb sideload path/to/replicant-4.2-gta04.zip
Your device should now be running Replicant!
Some hardware functionalities require firmwares to be functional.
If you are interested in writing free software replacements for these firmware files, please contact us.
Firmwares are programs that do not run on the main CPU: instead, they run on separate chips. Some firmwares come pre-installed on the chip and some others need to be loaded by the CPU.
Since these firmwares are non-free software, we do not recommend using them nor do we distribute them.
| Firmware location | Related chip | Function |
| /system/vendor/firmware/sd8686.bin | Marvell 8686 (W2CBW003) | Wi-Fi |
| /system/vendor/firmware/sd8686_helper.bin | Marvell 8686 (W2CBW003) | Wi-Fi |
So far, only the GTA04A4 board is supported (GTA04A3 should work as well). Other variants such as the Letux 7004 or Letux 3704 are not supported.
In the long run, all the different variants should be supported equally under the same device codename: gta04. Specific bootloaders and kernels might be shipped, along with a common userspace.
A tablet build could be made for devices with a large screen (e.g. 7"), unless it is possible to make Android behave in tablet mode at run-time.
reading nps status file is successfully!. nps status=0x504d4f43 PMIC_IRQ1 = 0xc0 PMIC_IRQ2 = 0x0 PMIC_IRQ3 = 0x0 PMIC_IRQ4 = 0x0 PMIC_STATUS1 = 0x80 PMIC_STATUS2 = 0x0 get_debug_level current debug level is 0x574f4c44. aries_process_platform: Debug Level Low keypad_scan: key value ----------------->= 0x40 CONFIG_ARIES_REV:48 , CONFIG_ARIES_REV03:48 aries_process_platform: final s1 booting mode = 0 DISPLAY_PATH_SEL[MDNIE 0x1]is on MDNIE setting Init start!! vsync interrupt is off video interrupt is off [fb0] turn on MDNIE setting Init end!! Autoboot (0 seconds) in progress, press any key to stop get_debug_level current debug level is 0x574f4c44. get_debug_level current debug level is 0x574f4c44. boot_kernel: Debug Level Low FOTA Check Bit Read BML page=, NumPgs= FOTA Check Bit (0xffffffff) Load Partion idx = (6) ..............................done Kernel read success from kernel partition no.6, idx.6. setting param.serialnr=0xxxxxxxxx 0xxxxxxxxx setting param.board_rev=0x30 setting param.cmdline=console=ttySAC2,115200 loglevel=4 Starting kernel at 0x32000000...
Here are the available commands:
SBL> help Following commands are supported: * setenv * saveenv * printenv * help * reset * boot * kernel * format * open * close * erasepart * eraseall * loadkernel * showpart * addpart * delpart * savepart * nkernel * nramdisk * nandread * nandwrite * usb * mmctest * keyread * usb_read * usb_write * fuelgauge * pmic_read * pmic_write To get commands help, Type "help <command>"
Environment related commands:
SBL> help setenv
* Help : setenv
* Usage : setenv [name] [value] . .
Modify current environment info on ram
SBL> help saveenv
* Help : saveenv
* Usage : saveenv
Save cuurent environment info to flash
SBL> help printenv
* Help : printenv
* Usage : printenv
Print current environment info on ram
Partition related commands:
SBL> help erasepart
* Help : erasepart
* Usage : erasepart partition_id
erase part of units
- ex) erase 0x9(temp partition)
SBL> help eraseall
* Help : eraseall
* Usage : eraseall
erase all units
SBL> help showpart
* Help : showpart
* Usage : showpart
show partition information
SBL> help addpart
* Help : addpart
* Usage : addpart <id> <attr> <unit>
add partition information
- ex) addpart 0x(id) 0x1(attr) 0x10(units)
SBL> help delpart
* Help : delpart
* Usage : delpart
delete last partition information
SBL> help savepart
* Help : savepart
* Usage : savepart
save partition information
Boot related commands:
SBL> help boot
* Help : boot
* Usage : boot [kernel options]
Boot Linux with optional kernel options
SBL> help kernel
* Help : kernel
* Usage : kernel hex_adr
Change the Linux kernel base
SBL> help loadkernel
* Help : loadkernel
* Usage : loadkernel
load kernel image
- loadkernel 0x80A00000 from kernel partition
SBL> help nkernel
* Help : nkernel
* Usage : nkernel command
* Usage : nkernel
read kernel from flash to DDR
SBL> help nramdisk
* Help : nramdisk
* Usage : nramdisk command
* Usage : nramdisk
read ramdisk from flash to DDR
SBL> help nandread
* Help : nandread
* Usage : * Usage : nandread <PARTID> <SIZE>
read partition from flash to SDRAM(0x80000000)
SBL> help nandwrite
* Help : nandwrite
* Usage : * Usage: nandwrite <PARTID> <SIZE>
write partition from SDRAM(0x80000000) to flash
Other commands:
SBL> help help
* Help : help
* Usage : help [command]
SBL> help reset
* Help : reset
* Usage : reboot
Reboot system
SBL> help format
* Help : format
* Usage : format
format device
SBL> help open
* Help : open
* Usage : open
open device
SBL> help close
* Help : close
* Usage : close
close device
SBL> help usb
* Help : usb
* Usage : usb download command
SBL> help mmctest
* Help : mmctest
* Usage : *Usage : mmctest
SBL> help keyread
* Help : keyread
* Usage : *Usage : keyread
SBL> help usb_read
* Help : usb_read
* Usage : usb_read reg
Read the usb ic register
SBL> help usb_write
* Help : usb_write
* Usage : usb_write reg, val
Read the usb ic register
SBL> help fuelgauge
* Help : fuelgauge
* Usage : *usage : fuelgauge
SBL> help pmic_read
* Help : pmic_read
* Usage : pmic_read reg
Read the pmic register
SBL> help pmic_write
* Help : pmic_write
* Usage : pmic_write reg, val
Read the pmic register
SBL>
SBL> printenv PARAM Rev 1.3 SERIAL_SPEED : 7 LOAD_RAMDISK : 0 BOOT_DELAY : 0 LCD_LEVEL : 97 SWITCH_SEL : 1 PHONE_DEBUG_ON : 0 LCD_DIM_LEVEL : 0 LCD_DIM_TIME : 6 MELODY_MODE : 1 REBOOT_MODE : 3 NATION_SEL : 0 LANGUAGE_SEL : 0 SET_DEFAULT_PARAM : 0 PARAM_INT_13 : 0 PARAM_INT_14 : 0 VERSION : I9000XXIL CMDLINE : console=ttySAC2,115200 loglevel=4 DELTA_LOCATION : /mnt/rsv PARAM_STR_3 : PARAM_STR_4 :
Thanks for using picocom [gnutoo@primarylaptop ~]$ picocom -b 115200 /dev/ttyUSB0 picocom v3.1 port is : /dev/ttyUSB0 flowcontrol : none baudrate is : 115200 parity is : none databits are : 8 stopbits are : 1 escape is : C-a local echo is : no noinit is : no noreset is : no hangup is : no nolock is : no send_cmd is : sz -vv receive_cmd is : rz -vv -E imap is : omap is : emap is : crcrlf,delbs, logfile is : none initstring : none exit_after is : not set exit is : no Type [C-a] [C-h] to see available commands Terminal ready Welcome to Samsung Primitive Bootloader. build time: May 8 2012 19:31:07 current time: fe/1f/7 3f:77:31 [set_mmc_ocr] Sector Mode [hsmmc_init] MMC card is detected Product Name : VYL00M <display_card_info:1009> ext_csd <display_card_info:1011>card_size: 15028 Total Card Size: 15029 MByte mmc_init: card initialization completed! pbl found bootable sbl in #53248. jump to sbl 0x4d400000. Secondary Bootloader v3.1 version. Copyright (C) 2011 System S/W Group. Samsung Electronics Co., Ltd. Board: C1 REV 02 / May 8 2012 19:31:13 current time: fe/1f/7 3f:77:31 booting code=0xc0c0c0c0 [set_mmc_ocr] Sector Mode [hsmmc_init] MMC card is detected Product Name : VYL00M CID:150100 56594c30 304d19da b33abb8e <display_card_info:1046> ext_csd <display_card_info:1048>card_size: 15028 Total Card Size: 15029 MByte Total Sector Count: 30777344 MoviNand Initialization Complete! ===== PARTITION INFORMATION ===== ID : GANG (0x0) DEVICE : MMC FIRST UNIT : 0 NO. UNITS : 0 ================================= ID : BOOT (0x1) DEVICE : MMC FIRST UNIT : 0 NO. UNITS : 0 ================================= ID : EFS (0x4) DEVICE : MMC FIRST UNIT : 8192 NO. UNITS : 40960 ================================= ID : SBL1 (0x2) DEVICE : MMC FIRST UNIT : 49152 NO. UNITS : 2560 ================================= ID : SBL2 (0x3) DEVICE : MMC FIRST UNIT : 53248 NO. UNITS : 2560 ================================= ID : PARAM (0x5) DEVICE : MMC FIRST UNIT : 57344 NO. UNITS : 16384 ================================= ID : KERNEL (0x6) DEVICE : MMC FIRST UNIT : 73728 NO. UNITS : 16384 ================================= ID : RECOVERY (0x7) DEVICE : MMC FIRST UNIT : 90112 NO. UNITS : 16384 ================================= ID : CACHE (0x8) DEVICE : MMC FIRST UNIT : 106496 NO. UNITS : 204800 ================================= ID : MODEM (0x9) DEVICE : MMC FIRST UNIT : 311296 NO. UNITS : 32768 ================================= ID : FACTORYFS (0xa) DEVICE : MMC FIRST UNIT : 344064 NO. UNITS : 1048576 ================================= ID : DATAFS (0xb) DEVICE : MMC FIRST UNIT : 1392640 NO. UNITS : 4194304 ================================= ID : UMS (0xc) DEVICE : MMC FIRST UNIT : 5586944 NO. UNITS : 24133632 ================================= ID : HIDDEN (0xd) DEVICE : MMC FIRST UNIT : 29720576 NO. UNITS : 1048576 ================================= loke_init: j4fs_open..success <start_checksum:1033>CHECKSUM_HEADER_SECTOR :42 <start_checksum:1035>offset:42, size:1024 Not Need Movinand Checksum load_lfs_parameters valid magic code and version. switch_sel_str='1' load_debug_level: read debug level successfully(0x574f4c44)...LOW init_ddi_data: usable ddi data. init_fuel_gauge : not por status fuel_gauge_get_version: [1]=0, [0]=92 init_fuel_gauge: vcell = 3846 mV, vfocv = 3877 mV, soc = 62 microusb_get_attached_device: STATUS1:0x3c, 2:0x0 microusb_get_attached_device: STATUS1:0x3c, 2:0x0 6280 = (382600 - 337808)*14022/100000 [3] 388175 = (6280 * 100000) / 11164 + 331923 init_microusb_ic: MUIC: CONTROL1:0x1b init_microusb_ic: MUIC: CONTROL1:0x1b init_microusb_ic: MUIC: CONTROL2:0x1a init_microusb_ic: MUIC: CONTROL2:0x3a reading nps status file is successfully!. nps status=0x504d4f43 PMIC_IRQSRC = 0x0 PMIC_IRQ1 = 0xb PMIC_IRQ2 = 0x1a PMIC_IRQ3 = 0x0 PMIC_IRQ4 = 0x11 PMIC_STATUS1 = 0x1 PMIC_STATUS2 = 0x10 PMIC_STATUS3 = 0x0 PMIC_STATUS4 = 0x0 bootloader base address=0x4d400000 LPDDR0 1st. cached=0x40000000, size=0xe400000 LPDDR0 non-cached=0x4e400000, size=0xa00000 LPDDR0 2nd. cached=0x4ee00000, size=0x1200000 RST_STAT = 0x10000 get_hwrev() = 14 board_process_platform: MAGIC c0c0c0c0 at 40000000! microusb_get_attached_device: STATUS1:0x3c, 2:0x0 microusb_get_attached_device: STATUS1:0x3c, 2:0x0 microusb_get_attached_device: STATUS1:0x3c, 2:0x0 microusb_get_attached_device: STATUS1:0x3c, 2:0x0 hw_pm_status: jig_status = 1, chg_status = 0 s5p_set_high_clk: ARM Clock = 800MHz. ......kernel is non signed binary. DISPLAY_PATH_SEL[MDNIE 0x1]is on div:2, FB_SOURCE_CLOCK:667000000, FB_PIXEL_CLOCK:25067520 MDNIE setting Init start!! vsync interrupt is off video interrupt is off [fb0] turn on MDNIE setting Init end!! Autoboot (0 seconds) in progress, press any key to stop boot_kernel: debug level low! checkbit: find RECOVERY checkbit (0) ......kernel is non signed binary. ATAG_CORE: 5 54410001 0 0 0 MEMCONFIG: 20e01323 20e01323 ATAG_MEM: 4 54410002 10000000 40000000 ATAG_MEM: 4 54410002 10000000 50000000 ATAG_MEM: 4 54410002 10000000 60000000 ATAG_MEM: 4 54410002 10000000 70000000 ATAG_SERIAL: 4 54410006 b33abb8e 304d19da ATAG_REVISION: 3 54410007 e hardware_ID : 0019dab33abb8e ATAG_CMDLINE: 40 54410009 'loglevel=4 console=ram androidboot.serialno=[...] sec_debug.enable=0 sec_debug.enable_user=0 c1_watchdog.sec_pet=5 sec_log=0x100000@0x4d900000 s3cfb.bootloaderfb=0x5ec00000 ld9040.get_lcdtype=0x2 consoleblank=0 lpj=3981312 vmalloc=144m' ATAG_NONE: 0 0 Starting kernel at 0x40008000... AST_POWERON
SBL> help Following commands are supported: * movichk * setenv * saveenv * printenv * help * reset * boot * kernel * loadpart * loadkernel * erasepart * format * open * close * eraseall * showpart * addpart * delpart * savepart * nkernel * nandread * nandwrite * usb * crc * log * sud * upload * emmc * keyread * mmctest * usb_read * usb_write * fuelgauge To get commands help, Type "help <command>"
And their respective help:
SBL> help movichk
* Help : movichk
* Usage :
SBL> help setenv
* Help : setenv
* Usage : setenv [name] [value] . .
Modify current environment info on ram
SBL> help saveenv
* Help : saveenv
* Usage : saveenv
Save cuurent environment info to flash
SBL> help printenv
* Help : printenv
* Usage : printenv
Print current environment info on ram
SBL> help help
* Help : help
* Usage : help [command]
SBL> help reset
* Help : reset
* Usage : reboot
Reboot system
SBL> help boot
* Help : boot
* Usage : boot [kernel options]
Boot Linux with optional kernel options
SBL> help kernel
* Help : kernel
* Usage : kernel hex_adr
Change the Linux kernel base
SBL> help loadpart
* Help : loadpart
* Usage : load partition from storage device.
SBL> help loadkernel
* Help : loadkernel
* Usage : load kernel from storage device.
SBL> help erasepart
* Help : erasepart
* Usage : erase partition.
SBL> help format
* Help : format
* Usage : format
format device
SBL> help open
* Help : open
* Usage : open
open device
SBL> help close
* Help : close
* Usage : close
close device
SBL> help eraseall
* Help : eraseall
* Usage : eraseall
erase all units
SBL> help showpart
* Help : showpart
* Usage : showpart
show partition information
SBL> help addpart
* Help : addpart
* Usage : addpart <id> <attr> <unit>
add partition information
- ex) addpart 0x(id) 0x1(attr) 0x10(units)
SBL> help delpart
* Help : delpart
* Usage : delpart
delete last partition information
SBL> help savepart
* Help : savepart
* Usage : savepart
save partition information
SBL> help nkernel
* Help : nkernel
* Usage : nkernel command
* Usage : nkernel
read kernel from flash to DDR
SBL> help nandread
* Help : nandread
* Usage : * Usage : nandread <PARTID> <SIZE>
read partition from flash to SDRAM(0x80000000)
SBL> help nandwrite
* Help : nandwrite
* Usage : * Usage: nandwrite <PARTID> <SIZE>
write partition from SDRAM(0x80000000) to flash
SBL> help usb
* Help : usb
* Usage : usb download command
SBL> help crc
* Help : crc
* Usage : crc <crc> <addr> <len>
SBL> help log
* Help : log
* Usage : print log
SBL> help sud
* Help : sud
* Usage : sud command
SBL> help upload
* Help : upload
* Usage : upload
SBL> help emmc
* Help : emmc
* Usage : emmc <addr>
SBL> help keyread
* Help : keyread
* Usage : *Usage : keyread
SBL> help mmctest
* Help : mmctest
* Usage : mmctest <addr> <start block> <number of blocks>
SBL> help usb_read
* Help : usb_read
* Usage : usb_read reg
Read the usb ic register
SBL> help usb_write
* Help : usb_write
* Usage : usb_write reg, val
Read the usb ic register
SBL> help fuelgauge
* Help : fuelgauge
* Usage : *usage : fuelgauge
SBL> printenv PARAM Rev 1.3 SERIAL_SPEED : 7 LOAD_RAMDISK : 0 BOOT_DELAY : 0 LCD_LEVEL : 97 SWITCH_SEL : 1 PHONE_DEBUG_ON : 0 LCD_DIM_LEVEL : 0 LCD_DIM_TIME : 6 MELODY_MODE : 1 REBOOT_MODE : 0 NATION_SEL : 0 LANGUAGE_SEL : 0 SET_DEFAULT_PARAM : 0 FLASH_LOCK_STATUS : 1 PARAM_INT_14 : 0 VERSION : I9000XXIL CMDLINE : loglevel=4 console=ram DELTA_LOCATION : /mnt/rsv PARAM_STR_3 : PARAM_STR_4 :
To get the UART enabled at boot with the Replicant 6.0 kernel and the stock bootloader, see the DHylands_SGS2_Console page on the mozilla wiki.
See OMAPBootrom for more information on the OMAP restricted boot.
hpagseddy and GNUtoo also found that when using odin to flash the MLO partition, odin interface makes the user think that the MLO partition was flashed correctly, while odin didn't flash anything. That may be due to the partition being set Read-Only and/or to the "File Offset" and "File Size" being 0.
-- Entry #0 --- Binary Type: 0 (AP) Device Type: 2 (MMC) Identifier: 1 Attributes: 0 (Read-Only) Update Attributes: 0 Partition Block Size/Offset: 0 Partition Block Count: 0 File Offset (Obsolete): 0 File Size (Obsolete): 0 Partition Name: X-loader Flash Filename: MLO FOTA Filename:
We know that nothing was successfuly flashed as we dumped MLO, and verified that the binary was signed by looking if it contained the strings that indicate that (PRIMAPP, KEYS, CertPK_)
As MLO is under the GPLv2+, its binaries are also under that license.
This means that if the binaries are not signed, they are legally speaking and practically speaking free software. So if we find the full and corresponding source code (which is or was probably distributed by Samsung on opensource.samsung.com) we can use them and redistribute them very easily.
As for the signed versions, while we can legally distribute them as well, as they are legally under a free software license, they are signed with keys that users don't have. If users don't have the ability to run modified version then they are practically speaking not free software.
Weather or not the binaries also work on unsigned devices and if they can be modified on such devices remains to be tested.
| Device | Android version | String | Signed | Reference | Updates history |
|---|---|---|---|---|---|
| ? | ? | Texas Instruments X-Loader 1.41 (Jan 11 2012 - 23:25:41) | ? | leviathan's blog | |
| I9100G_CHN_CHN | Android 2.3.6 | Texas Instruments X-Loader 1.41 (Mar 20 2012 - 11:20:26) | Yes | GNUtoo's device | * It came with the signed unmodified stock OS * A custom recovery for 2.3.6 found on XDA was installed * The bootloader wasn't touched * Beside KERNEL, and RECOVERY, the rest of the partitions were left untouched |
| I9100G_CHN_CHN | Android 4.1.2 | Texas Instruments X-Loader 1.41 (Jun 27 2013 - 18:34:17) | Yes | hpagseddy's device | * It came with Android 4.0.4 * It was upgraded to 4.1.2 and many community custom distributions were installed |
To do that you need to get into the ODIN MODE that is typically used to install the Replicant recovery:
When this is done, it should show some text:
ODIN MODE PRODUCT NAME: GT-I9100G_CHN_CHN
Here CHN_CHN probably refers to the Chinese version. And it looks like that version has a signed bootloader: According to a thread on the XDA developers forum "Means that you own a chinese bootloader locked I9100G. You can't flash any other bootloader than the chinese one."
See FindOMAPDevicesWithUnsignedBootloderFromUSB for how to do that.
hpagseddy/i9100g_xloader is based on ths-backup/i9100g_xloader which has an ics (Icecream Sandwitch, an Android version) branch only. According to hpagseddy, that branch is also used for Android Jelly brean.
It's still unclear if there is some correlation between Android version and signed bootloaders.
The device that was given to GNUtoo that has a signed bootloader also has the following characteristics:
Software state: Running the stock OS, unmodified
Android version: Android 2.3.6
Baseband version: IG9100GZCLC2
Build number: GINGERBREAD.ZCLC2
Kernel version: 2.6.35.7 se.infra@SEI-30#2
According to a thread on XDA there is a corelation between the Baseband version and the geographic zone that is targeted. And as we can see above, the Build number seem to be related to the Baseband version as well. While the list of baseband versions is incomplete, we can still use it to avoid the Chinese version (CHN_CHN) which has a signed bootloader.
At this point it's also still unclear if any of the other characteristics above correlate to signed or unsigned bootloaders.
As the binaries are under the GPLv2 or later, It would also be a good idea to collect all of them, match them with the device characteristics like the Build number and Baseband version, and verify if they are signed or not with some free software tool.
We could even publish the unsigned versions. As for the signed versions, if they cannot run on devices that don't enforce bootloader signatures, it would probably not be a good idea to publish them as the binaries wouldn't respect the 4 freedoms, but we can still check with the FSF if they have good ideas on that point.
On the devices we looked at, the first stage is a signed xloader, and there is some source code for it, so we might manage to find full and corresponding source code for some versions of the xloader having been shipped on the devices.
It most probably go fetch the second stages from the SBL1 partition.
Here's the output of the bootloader on UART at boot:
Texas Instruments X-Loader 1.41 (Mar 20 2012 - 11:20:26) Uboot-loading from Emmc Starting OS Bootloader from EMMC ...
Note that all the strings here are from xloader, and that we didn't find any traces of u-boot anywhere yet.
As xloader is typically used to boot u-boot, Samsung probably didn't bother to change the "Uboot-loading from Emmc" string when using it with another second stage.
We didn't manage to find how to get a shell in this bootloader yet.
On some laptops or desktops, heimdall works fine, while on some other it doesn't. The issue is that if heimdall doesn't work, your device could be stuck in "pc screen" mode, and you might not be able to recover from it.
On the following laptop it worked fine:List of known AT commands:
# picocom /dev/ttyACM0 picocom v3.1 port is : /dev/ttyACM0 flowcontrol : none baudrate is : 9600 parity is : none databits are : 8 stopbits are : 1 escape is : C-a local echo is : no noinit is : no noreset is : no hangup is : no nolock is : no send_cmd is : sz -vv receive_cmd is : rz -vv -E imap is : omap is : emap is : crcrlf,delbs, logfile is : none initstring : none exit_after is : not set exit is : no Type [C-a] [C-h] to see available commands Terminal ready AT+CLAC ATS ATD ATA ATO ATE ATH ATV ATZ ATl ATm ATQ ATX AT&F AT&D AT&C AT\Q AT+CGSMS AT+CMGD AT+CMGF AT+CMGL AT+CMGR AT+CMGS AT+CMGW AT+CMMS AT+CMSS AT+CNMA AT+CNMI AT+CPMS AT+CSCA AT+CSCB AT+CSMS AT+XCSSMS AT+XSMS AT+XTESM AT+CSDH AT+CSAS AT+CRES AT+CMGC AT+CSMP AT+CGREG AT+COPN AT+COPS AT+CREG AT+CSQ AT+XBANDSEL AT+XCOPS AT+XCSPAGING AT+XEONS AT+XREG AT+XAACOPS AT+XUBANDSEL AT+XRAT AT+CPLS AT+CPOL AT+XHOMEZR AT+CHUP AT+CMOD AT+CTFR AT+VTS AT+XCALLSTAT AT+XDTMF AT+XVTS AT+CSTA AT+CVHU AT+VTD AT+CCWE AT+CR AT+CRC AT+XPROGRESS AT+XREDIAL AT+CAOC AT+XLIN AT+CCFC AT+CCWA AT+CHLD AT+CLCC AT+CLCK AT+CLIP AT+CLIR AT+CNAP AT+COLP AT+COLR AT+CPWD AT+CSSN AT+CUSD AT+CCUG AT+CBST AT+CEER AT+CGACT AT+CGATT AT+CGAUTO AT+CGCLASS AT+CGCMOD AT+CGDATA AT+CGDCONT AT+CGDSCONT AT+CGEQMIN AT+CGEQNEG AT+CGEQREQ AT+CGEREP AT+CGPADDR AT+CGQMIN AT+CGQREQ AT+CGTFT AT+XCGCLASS AT+XDNS AT+XGAUTH AT+FCLASS AT+CRLP AT+XNVMPLMN AT+XNVMMCC AT+CBC AT+CCID AT+CCLK AT+CFUN AT+CGMI AT+CGMM AT+CGMR AT+CGSN AT+CIMI AT+CMEE AT+CMUX AT+CNUM AT+CPIN AT+CPWROFF AT+CRSM AT+CSCS AT+CSIM AT+CSVM AT+CTZR AT+CTZU AT+IPR AT+XCTMS AT+XGENDATA AT+XPINCNT AT+XLOG AT+XMER AT+XSIMSTATE AT+TRACE AT+XL1SET AT+XSIO AT+XDLCTEST AT+XPOW AT+XCEER AT+XEER AT+XTRACECONFIG AT+XMUX AT+XFDOR AT+XFDORT AT+XCONFIG AT+XAPP AT+XHSDUPA AT+CPIN2 AT+XDATACHANNEL AT+CONNECTPORT AT+CAMM AT+CACM AT+CCHO AT+CCHC AT+XCSP AT+NEER AT+CUAD AT+XUICC AT+XLEMA AT+XSYSTRACE AT+CLAC AT+CPUC AT+CLAN AT+CGLA AT+CRLA AT+CPAS AT+XSVM AT+XNOTIFYDUNSTATUS AT+XRXDIV AT+XSETCAUSE OK
AT+TRACE can enable protocol traces (to be used with xgoldmon):
AT+TRACE=1 OK
root@i9100:/ # find /preload/ | sed 's#/preload/.ngmoco/................................#/preload/.ngmoco/xxxxxxxxxxxxxxxxxxxxxxxxxxxxxxxx#' /preload/ /preload/.ngmoco /preload/.ngmoco/xxxxxxxxxxxxxxxxxxxxxxxxxxxxxxxx /preload/.ngmoco/xxxxxxxxxxxxxxxxxxxxxxxxxxxxxxxx/Content /preload/.ngmoco/xxxxxxxxxxxxxxxxxxxxxxxxxxxxxxxx/Content/audio /preload/.ngmoco/xxxxxxxxxxxxxxxxxxxxxxxxxxxxxxxx/Content/audio/tick.wav /preload/.ngmoco/xxxxxxxxxxxxxxxxxxxxxxxxxxxxxxxx/Content/brands /preload/.ngmoco/xxxxxxxxxxxxxxxxxxxxxxxxxxxxxxxx/Content/brands/gamehub_premium_eagames.png /preload/.ngmoco/xxxxxxxxxxxxxxxxxxxxxxxxxxxxxxxx/Content/brands/gamehub_premium_gameloft.png /preload/.ngmoco/xxxxxxxxxxxxxxxxxxxxxxxxxxxxxxxx/Content/brands/gamehub_premium_ggee.png /preload/.ngmoco/xxxxxxxxxxxxxxxxxxxxxxxxxxxxxxxx/Content/brands/gamehub_premium_glu.png /preload/.ngmoco/xxxxxxxxxxxxxxxxxxxxxxxxxxxxxxxx/Content/conf /preload/.ngmoco/xxxxxxxxxxxxxxxxxxxxxxxxxxxxxxxx/Content/conf/MobageGames.json /preload/.ngmoco/xxxxxxxxxxxxxxxxxxxxxxxxxxxxxxxx/Content/conf/NewGames.json /preload/.ngmoco/xxxxxxxxxxxxxxxxxxxxxxxxxxxxxxxx/Content/conf/ProdGames.json /preload/.ngmoco/xxxxxxxxxxxxxxxxxxxxxxxxxxxxxxxx/Content/conf/samsungapps.html /preload/.ngmoco/xxxxxxxxxxxxxxxxxxxxxxxxxxxxxxxx/Content/css /preload/.ngmoco/xxxxxxxxxxxxxxxxxxxxxxxxxxxxxxxx/Content/css/samsung2.css /preload/.ngmoco/xxxxxxxxxxxxxxxxxxxxxxxxxxxxxxxx/Content/games /preload/.ngmoco/xxxxxxxxxxxxxxxxxxxxxxxxxxxxxxxx/Content/games/frenzyball /preload/.ngmoco/xxxxxxxxxxxxxxxxxxxxxxxxxxxxxxxx/Content/games/frenzyball/110.png /preload/.ngmoco/xxxxxxxxxxxxxxxxxxxxxxxxxxxxxxxx/Content/games/frenzyball/80.png /preload/.ngmoco/xxxxxxxxxxxxxxxxxxxxxxxxxxxxxxxx/Content/games/frenzyball/de /preload/.ngmoco/xxxxxxxxxxxxxxxxxxxxxxxxxxxxxxxx/Content/games/frenzyball/de/detail.html /preload/.ngmoco/xxxxxxxxxxxxxxxxxxxxxxxxxxxxxxxx/Content/games/frenzyball/de/header.html /preload/.ngmoco/xxxxxxxxxxxxxxxxxxxxxxxxxxxxxxxx/Content/games/frenzyball/en /preload/.ngmoco/xxxxxxxxxxxxxxxxxxxxxxxxxxxxxxxx/Content/games/frenzyball/en/detail.html /preload/.ngmoco/xxxxxxxxxxxxxxxxxxxxxxxxxxxxxxxx/Content/games/frenzyball/en/header.html /preload/.ngmoco/xxxxxxxxxxxxxxxxxxxxxxxxxxxxxxxx/Content/games/frenzyball/es /preload/.ngmoco/xxxxxxxxxxxxxxxxxxxxxxxxxxxxxxxx/Content/games/frenzyball/es/detail.html /preload/.ngmoco/xxxxxxxxxxxxxxxxxxxxxxxxxxxxxxxx/Content/games/frenzyball/es/header.html /preload/.ngmoco/xxxxxxxxxxxxxxxxxxxxxxxxxxxxxxxx/Content/games/frenzyball/fr /preload/.ngmoco/xxxxxxxxxxxxxxxxxxxxxxxxxxxxxxxx/Content/games/frenzyball/fr/detail.html /preload/.ngmoco/xxxxxxxxxxxxxxxxxxxxxxxxxxxxxxxx/Content/games/frenzyball/fr/header.html /preload/.ngmoco/xxxxxxxxxxxxxxxxxxxxxxxxxxxxxxxx/Content/games/frenzyball/it /preload/.ngmoco/xxxxxxxxxxxxxxxxxxxxxxxxxxxxxxxx/Content/games/frenzyball/it/detail.html /preload/.ngmoco/xxxxxxxxxxxxxxxxxxxxxxxxxxxxxxxx/Content/games/frenzyball/it/header.html /preload/.ngmoco/xxxxxxxxxxxxxxxxxxxxxxxxxxxxxxxx/Content/games/frenzyball/ko /preload/.ngmoco/xxxxxxxxxxxxxxxxxxxxxxxxxxxxxxxx/Content/games/frenzyball/ko/detail.html /preload/.ngmoco/xxxxxxxxxxxxxxxxxxxxxxxxxxxxxxxx/Content/games/frenzyball/ko/header.html /preload/.ngmoco/xxxxxxxxxxxxxxxxxxxxxxxxxxxxxxxx/Content/games/frenzyball/screen1.png /preload/.ngmoco/xxxxxxxxxxxxxxxxxxxxxxxxxxxxxxxx/Content/games/frenzyball/screen2.png /preload/.ngmoco/xxxxxxxxxxxxxxxxxxxxxxxxxxxxxxxx/Content/games/frenzyball/screen3.png /preload/.ngmoco/xxxxxxxxxxxxxxxxxxxxxxxxxxxxxxxx/Content/games/hockey /preload/.ngmoco/xxxxxxxxxxxxxxxxxxxxxxxxxxxxxxxx/Content/games/hockey/128.png /preload/.ngmoco/xxxxxxxxxxxxxxxxxxxxxxxxxxxxxxxx/Content/games/hockey/de /preload/.ngmoco/xxxxxxxxxxxxxxxxxxxxxxxxxxxxxxxx/Content/games/hockey/de/detail.html /preload/.ngmoco/xxxxxxxxxxxxxxxxxxxxxxxxxxxxxxxx/Content/games/hockey/de/header.html /preload/.ngmoco/xxxxxxxxxxxxxxxxxxxxxxxxxxxxxxxx/Content/games/hockey/en /preload/.ngmoco/xxxxxxxxxxxxxxxxxxxxxxxxxxxxxxxx/Content/games/hockey/en/detail.html /preload/.ngmoco/xxxxxxxxxxxxxxxxxxxxxxxxxxxxxxxx/Content/games/hockey/en/header.html /preload/.ngmoco/xxxxxxxxxxxxxxxxxxxxxxxxxxxxxxxx/Content/games/hockey/es /preload/.ngmoco/xxxxxxxxxxxxxxxxxxxxxxxxxxxxxxxx/Content/games/hockey/es/detail.html /preload/.ngmoco/xxxxxxxxxxxxxxxxxxxxxxxxxxxxxxxx/Content/games/hockey/es/header.html /preload/.ngmoco/xxxxxxxxxxxxxxxxxxxxxxxxxxxxxxxx/Content/games/hockey/fr /preload/.ngmoco/xxxxxxxxxxxxxxxxxxxxxxxxxxxxxxxx/Content/games/hockey/fr/detail.html /preload/.ngmoco/xxxxxxxxxxxxxxxxxxxxxxxxxxxxxxxx/Content/games/hockey/fr/header.html /preload/.ngmoco/xxxxxxxxxxxxxxxxxxxxxxxxxxxxxxxx/Content/games/hockey/it /preload/.ngmoco/xxxxxxxxxxxxxxxxxxxxxxxxxxxxxxxx/Content/games/hockey/it/detail.html /preload/.ngmoco/xxxxxxxxxxxxxxxxxxxxxxxxxxxxxxxx/Content/games/hockey/it/header.html /preload/.ngmoco/xxxxxxxxxxxxxxxxxxxxxxxxxxxxxxxx/Content/games/hockey/ko /preload/.ngmoco/xxxxxxxxxxxxxxxxxxxxxxxxxxxxxxxx/Content/games/hockey/ko/detail.html /preload/.ngmoco/xxxxxxxxxxxxxxxxxxxxxxxxxxxxxxxx/Content/games/hockey/ko/header.html /preload/.ngmoco/xxxxxxxxxxxxxxxxxxxxxxxxxxxxxxxx/Content/games/hockey/screen1.png /preload/.ngmoco/xxxxxxxxxxxxxxxxxxxxxxxxxxxxxxxx/Content/games/hockey/screen2.png /preload/.ngmoco/xxxxxxxxxxxxxxxxxxxxxxxxxxxxxxxx/Content/games/legends /preload/.ngmoco/xxxxxxxxxxxxxxxxxxxxxxxxxxxxxxxx/Content/games/legends/128.png /preload/.ngmoco/xxxxxxxxxxxxxxxxxxxxxxxxxxxxxxxx/Content/games/legends/de /preload/.ngmoco/xxxxxxxxxxxxxxxxxxxxxxxxxxxxxxxx/Content/games/legends/de/detail.html /preload/.ngmoco/xxxxxxxxxxxxxxxxxxxxxxxxxxxxxxxx/Content/games/legends/de/header.html /preload/.ngmoco/xxxxxxxxxxxxxxxxxxxxxxxxxxxxxxxx/Content/games/legends/en /preload/.ngmoco/xxxxxxxxxxxxxxxxxxxxxxxxxxxxxxxx/Content/games/legends/en/detail.html /preload/.ngmoco/xxxxxxxxxxxxxxxxxxxxxxxxxxxxxxxx/Content/games/legends/en/header.html /preload/.ngmoco/xxxxxxxxxxxxxxxxxxxxxxxxxxxxxxxx/Content/games/legends/es /preload/.ngmoco/xxxxxxxxxxxxxxxxxxxxxxxxxxxxxxxx/Content/games/legends/es/detail.html /preload/.ngmoco/xxxxxxxxxxxxxxxxxxxxxxxxxxxxxxxx/Content/games/legends/es/header.html /preload/.ngmoco/xxxxxxxxxxxxxxxxxxxxxxxxxxxxxxxx/Content/games/legends/fr /preload/.ngmoco/xxxxxxxxxxxxxxxxxxxxxxxxxxxxxxxx/Content/games/legends/fr/detail.html /preload/.ngmoco/xxxxxxxxxxxxxxxxxxxxxxxxxxxxxxxx/Content/games/legends/fr/header.html /preload/.ngmoco/xxxxxxxxxxxxxxxxxxxxxxxxxxxxxxxx/Content/games/legends/it /preload/.ngmoco/xxxxxxxxxxxxxxxxxxxxxxxxxxxxxxxx/Content/games/legends/it/detail.html /preload/.ngmoco/xxxxxxxxxxxxxxxxxxxxxxxxxxxxxxxx/Content/games/legends/it/header.html /preload/.ngmoco/xxxxxxxxxxxxxxxxxxxxxxxxxxxxxxxx/Content/games/legends/ko /preload/.ngmoco/xxxxxxxxxxxxxxxxxxxxxxxxxxxxxxxx/Content/games/legends/ko/detail.html /preload/.ngmoco/xxxxxxxxxxxxxxxxxxxxxxxxxxxxxxxx/Content/games/legends/ko/header.html /preload/.ngmoco/xxxxxxxxxxxxxxxxxxxxxxxxxxxxxxxx/Content/games/legends/screen1.png /preload/.ngmoco/xxxxxxxxxxxxxxxxxxxxxxxxxxxxxxxx/Content/games/legends/screen2.png /preload/.ngmoco/xxxxxxxxxxxxxxxxxxxxxxxxxxxxxxxx/Content/games/mobage /preload/.ngmoco/xxxxxxxxxxxxxxxxxxxxxxxxxxxxxxxx/Content/games/mobage/blackjack.png /preload/.ngmoco/xxxxxxxxxxxxxxxxxxxxxxxxxxxxxxxx/Content/games/mobage/cityland.png /preload/.ngmoco/xxxxxxxxxxxxxxxxxxxxxxxxxxxxxxxx/Content/games/mobage/critterfarm.png /preload/.ngmoco/xxxxxxxxxxxxxxxxxxxxxxxxxxxxxxxx/Content/games/mobage/cupcakemaker.png /preload/.ngmoco/xxxxxxxxxxxxxxxxxxxxxxxxxxxxxxxx/Content/games/mobage/haypikingdom.png /preload/.ngmoco/xxxxxxxxxxxxxxxxxxxxxxxxxxxxxxxx/Content/games/mobage/holywars.png /preload/.ngmoco/xxxxxxxxxxxxxxxxxxxxxxxxxxxxxxxx/Content/games/mobage/mancala.png /preload/.ngmoco/xxxxxxxxxxxxxxxxxxxxxxxxxxxxxxxx/Content/games/mobage/mymonsterrancher.png /preload/.ngmoco/xxxxxxxxxxxxxxxxxxxxxxxxxxxxxxxx/Content/games/mobage/ninjaroyale.png /preload/.ngmoco/xxxxxxxxxxxxxxxxxxxxxxxxxxxxxxxx/Content/games/mobage/papertoss.png /preload/.ngmoco/xxxxxxxxxxxxxxxxxxxxxxxxxxxxxxxx/Content/games/mobage/paradiseisland.png /preload/.ngmoco/xxxxxxxxxxxxxxxxxxxxxxxxxxxxxxxx/Content/games/mobage/pocketfrogs.png /preload/.ngmoco/xxxxxxxxxxxxxxxxxxxxxxxxxxxxxxxx/Content/games/mobage/puttputt.png /preload/.ngmoco/xxxxxxxxxxxxxxxxxxxxxxxxxxxxxxxx/Content/games/mobage/ragdoll.png /preload/.ngmoco/xxxxxxxxxxxxxxxxxxxxxxxxxxxxxxxx/Content/games/mobage/sundaemaker.png /preload/.ngmoco/xxxxxxxxxxxxxxxxxxxxxxxxxxxxxxxx/Content/games/mobage/tapfish.png /preload/.ngmoco/xxxxxxxxxxxxxxxxxxxxxxxxxxxxxxxx/Content/games/mobage/tapjurassic.png /preload/.ngmoco/xxxxxxxxxxxxxxxxxxxxxxxxxxxxxxxx/Content/games/mobage/tapmall.png /preload/.ngmoco/xxxxxxxxxxxxxxxxxxxxxxxxxxxxxxxx/Content/games/mobage/taptown.png /preload/.ngmoco/xxxxxxxxxxxxxxxxxxxxxxxxxxxxxxxx/Content/games/mobage/tictactouch.png /preload/.ngmoco/xxxxxxxxxxxxxxxxxxxxxxxxxxxxxxxx/Content/games/mobage/tinychef.png /preload/.ngmoco/xxxxxxxxxxxxxxxxxxxxxxxxxxxxxxxx/Content/games/mobage/tinytower.png /preload/.ngmoco/xxxxxxxxxxxxxxxxxxxxxxxxxxxxxxxx/Content/games/mobage/viplife.png /preload/.ngmoco/xxxxxxxxxxxxxxxxxxxxxxxxxxxxxxxx/Content/games/mobage/wondercove.png /preload/.ngmoco/xxxxxxxxxxxxxxxxxxxxxxxxxxxxxxxx/Content/games/mobage/zombiefarm.png /preload/.ngmoco/xxxxxxxxxxxxxxxxxxxxxxxxxxxxxxxx/Content/games/mobage/zooland.png /preload/.ngmoco/xxxxxxxxxxxxxxxxxxxxxxxxxxxxxxxx/Content/games/pachinko /preload/.ngmoco/xxxxxxxxxxxxxxxxxxxxxxxxxxxxxxxx/Content/games/pachinko/128.png /preload/.ngmoco/xxxxxxxxxxxxxxxxxxxxxxxxxxxxxxxx/Content/games/pachinko/de /preload/.ngmoco/xxxxxxxxxxxxxxxxxxxxxxxxxxxxxxxx/Content/games/pachinko/de/detail.html /preload/.ngmoco/xxxxxxxxxxxxxxxxxxxxxxxxxxxxxxxx/Content/games/pachinko/de/header.html /preload/.ngmoco/xxxxxxxxxxxxxxxxxxxxxxxxxxxxxxxx/Content/games/pachinko/en /preload/.ngmoco/xxxxxxxxxxxxxxxxxxxxxxxxxxxxxxxx/Content/games/pachinko/en/detail.html /preload/.ngmoco/xxxxxxxxxxxxxxxxxxxxxxxxxxxxxxxx/Content/games/pachinko/en/header.html /preload/.ngmoco/xxxxxxxxxxxxxxxxxxxxxxxxxxxxxxxx/Content/games/pachinko/es /preload/.ngmoco/xxxxxxxxxxxxxxxxxxxxxxxxxxxxxxxx/Content/games/pachinko/es/detail.html /preload/.ngmoco/xxxxxxxxxxxxxxxxxxxxxxxxxxxxxxxx/Content/games/pachinko/es/header.html /preload/.ngmoco/xxxxxxxxxxxxxxxxxxxxxxxxxxxxxxxx/Content/games/pachinko/fr /preload/.ngmoco/xxxxxxxxxxxxxxxxxxxxxxxxxxxxxxxx/Content/games/pachinko/fr/detail.html /preload/.ngmoco/xxxxxxxxxxxxxxxxxxxxxxxxxxxxxxxx/Content/games/pachinko/fr/header.html /preload/.ngmoco/xxxxxxxxxxxxxxxxxxxxxxxxxxxxxxxx/Content/games/pachinko/it /preload/.ngmoco/xxxxxxxxxxxxxxxxxxxxxxxxxxxxxxxx/Content/games/pachinko/it/detail.html /preload/.ngmoco/xxxxxxxxxxxxxxxxxxxxxxxxxxxxxxxx/Content/games/pachinko/it/header.html /preload/.ngmoco/xxxxxxxxxxxxxxxxxxxxxxxxxxxxxxxx/Content/games/pachinko/ko /preload/.ngmoco/xxxxxxxxxxxxxxxxxxxxxxxxxxxxxxxx/Content/games/pachinko/ko/detail.html /preload/.ngmoco/xxxxxxxxxxxxxxxxxxxxxxxxxxxxxxxx/Content/games/pachinko/ko/header.html /preload/.ngmoco/xxxxxxxxxxxxxxxxxxxxxxxxxxxxxxxx/Content/games/pachinko/screen1.png /preload/.ngmoco/xxxxxxxxxxxxxxxxxxxxxxxxxxxxxxxx/Content/games/pachinko/screen2.png /preload/.ngmoco/xxxxxxxxxxxxxxxxxxxxxxxxxxxxxxxx/Content/games/pachinko/screen3.png /preload/.ngmoco/xxxxxxxxxxxxxxxxxxxxxxxxxxxxxxxx/Content/games/qrank /preload/.ngmoco/xxxxxxxxxxxxxxxxxxxxxxxxxxxxxxxx/Content/games/qrank/128.png /preload/.ngmoco/xxxxxxxxxxxxxxxxxxxxxxxxxxxxxxxx/Content/games/qrank/de /preload/.ngmoco/xxxxxxxxxxxxxxxxxxxxxxxxxxxxxxxx/Content/games/qrank/de/detail.html /preload/.ngmoco/xxxxxxxxxxxxxxxxxxxxxxxxxxxxxxxx/Content/games/qrank/de/header.html /preload/.ngmoco/xxxxxxxxxxxxxxxxxxxxxxxxxxxxxxxx/Content/games/qrank/en /preload/.ngmoco/xxxxxxxxxxxxxxxxxxxxxxxxxxxxxxxx/Content/games/qrank/en/detail.html /preload/.ngmoco/xxxxxxxxxxxxxxxxxxxxxxxxxxxxxxxx/Content/games/qrank/en/header.html /preload/.ngmoco/xxxxxxxxxxxxxxxxxxxxxxxxxxxxxxxx/Content/games/qrank/es /preload/.ngmoco/xxxxxxxxxxxxxxxxxxxxxxxxxxxxxxxx/Content/games/qrank/es/detail.html /preload/.ngmoco/xxxxxxxxxxxxxxxxxxxxxxxxxxxxxxxx/Content/games/qrank/es/header.html /preload/.ngmoco/xxxxxxxxxxxxxxxxxxxxxxxxxxxxxxxx/Content/games/qrank/fr /preload/.ngmoco/xxxxxxxxxxxxxxxxxxxxxxxxxxxxxxxx/Content/games/qrank/fr/detail.html /preload/.ngmoco/xxxxxxxxxxxxxxxxxxxxxxxxxxxxxxxx/Content/games/qrank/fr/header.html /preload/.ngmoco/xxxxxxxxxxxxxxxxxxxxxxxxxxxxxxxx/Content/games/qrank/it /preload/.ngmoco/xxxxxxxxxxxxxxxxxxxxxxxxxxxxxxxx/Content/games/qrank/it/detail.html /preload/.ngmoco/xxxxxxxxxxxxxxxxxxxxxxxxxxxxxxxx/Content/games/qrank/it/header.html /preload/.ngmoco/xxxxxxxxxxxxxxxxxxxxxxxxxxxxxxxx/Content/games/qrank/ko /preload/.ngmoco/xxxxxxxxxxxxxxxxxxxxxxxxxxxxxxxx/Content/games/qrank/ko/detail.html /preload/.ngmoco/xxxxxxxxxxxxxxxxxxxxxxxxxxxxxxxx/Content/games/qrank/ko/header.html /preload/.ngmoco/xxxxxxxxxxxxxxxxxxxxxxxxxxxxxxxx/Content/games/qrank/screen1.png /preload/.ngmoco/xxxxxxxxxxxxxxxxxxxxxxxxxxxxxxxx/Content/games/qrank/screen2.png /preload/.ngmoco/xxxxxxxxxxxxxxxxxxxxxxxxxxxxxxxx/Content/games/qrank/screen3.png /preload/.ngmoco/xxxxxxxxxxxxxxxxxxxxxxxxxxxxxxxx/Content/games/vegas /preload/.ngmoco/xxxxxxxxxxxxxxxxxxxxxxxxxxxxxxxx/Content/games/vegas/128.png /preload/.ngmoco/xxxxxxxxxxxxxxxxxxxxxxxxxxxxxxxx/Content/games/vegas/de /preload/.ngmoco/xxxxxxxxxxxxxxxxxxxxxxxxxxxxxxxx/Content/games/vegas/de/detail.html /preload/.ngmoco/xxxxxxxxxxxxxxxxxxxxxxxxxxxxxxxx/Content/games/vegas/de/header.html /preload/.ngmoco/xxxxxxxxxxxxxxxxxxxxxxxxxxxxxxxx/Content/games/vegas/en /preload/.ngmoco/xxxxxxxxxxxxxxxxxxxxxxxxxxxxxxxx/Content/games/vegas/en/detail.html /preload/.ngmoco/xxxxxxxxxxxxxxxxxxxxxxxxxxxxxxxx/Content/games/vegas/en/header.html /preload/.ngmoco/xxxxxxxxxxxxxxxxxxxxxxxxxxxxxxxx/Content/games/vegas/es /preload/.ngmoco/xxxxxxxxxxxxxxxxxxxxxxxxxxxxxxxx/Content/games/vegas/es/detail.html /preload/.ngmoco/xxxxxxxxxxxxxxxxxxxxxxxxxxxxxxxx/Content/games/vegas/es/header.html /preload/.ngmoco/xxxxxxxxxxxxxxxxxxxxxxxxxxxxxxxx/Content/games/vegas/fr /preload/.ngmoco/xxxxxxxxxxxxxxxxxxxxxxxxxxxxxxxx/Content/games/vegas/fr/detail.html /preload/.ngmoco/xxxxxxxxxxxxxxxxxxxxxxxxxxxxxxxx/Content/games/vegas/fr/header.html /preload/.ngmoco/xxxxxxxxxxxxxxxxxxxxxxxxxxxxxxxx/Content/games/vegas/it /preload/.ngmoco/xxxxxxxxxxxxxxxxxxxxxxxxxxxxxxxx/Content/games/vegas/it/detail.html /preload/.ngmoco/xxxxxxxxxxxxxxxxxxxxxxxxxxxxxxxx/Content/games/vegas/it/header.html /preload/.ngmoco/xxxxxxxxxxxxxxxxxxxxxxxxxxxxxxxx/Content/games/vegas/ko /preload/.ngmoco/xxxxxxxxxxxxxxxxxxxxxxxxxxxxxxxx/Content/games/vegas/ko/detail.html /preload/.ngmoco/xxxxxxxxxxxxxxxxxxxxxxxxxxxxxxxx/Content/games/vegas/ko/header.html /preload/.ngmoco/xxxxxxxxxxxxxxxxxxxxxxxxxxxxxxxx/Content/games/vegas/screen1.png /preload/.ngmoco/xxxxxxxxxxxxxxxxxxxxxxxxxxxxxxxx/Content/games/vegas/screen2.png /preload/.ngmoco/xxxxxxxxxxxxxxxxxxxxxxxxxxxxxxxx/Content/games/villains /preload/.ngmoco/xxxxxxxxxxxxxxxxxxxxxxxxxxxxxxxx/Content/games/villains/128.png /preload/.ngmoco/xxxxxxxxxxxxxxxxxxxxxxxxxxxxxxxx/Content/games/villains/de /preload/.ngmoco/xxxxxxxxxxxxxxxxxxxxxxxxxxxxxxxx/Content/games/villains/de/detail.html /preload/.ngmoco/xxxxxxxxxxxxxxxxxxxxxxxxxxxxxxxx/Content/games/villains/de/header.html /preload/.ngmoco/xxxxxxxxxxxxxxxxxxxxxxxxxxxxxxxx/Content/games/villains/en /preload/.ngmoco/xxxxxxxxxxxxxxxxxxxxxxxxxxxxxxxx/Content/games/villains/en/detail.html /preload/.ngmoco/xxxxxxxxxxxxxxxxxxxxxxxxxxxxxxxx/Content/games/villains/en/header.html /preload/.ngmoco/xxxxxxxxxxxxxxxxxxxxxxxxxxxxxxxx/Content/games/villains/es /preload/.ngmoco/xxxxxxxxxxxxxxxxxxxxxxxxxxxxxxxx/Content/games/villains/es/detail.html /preload/.ngmoco/xxxxxxxxxxxxxxxxxxxxxxxxxxxxxxxx/Content/games/villains/es/header.html /preload/.ngmoco/xxxxxxxxxxxxxxxxxxxxxxxxxxxxxxxx/Content/games/villains/fr /preload/.ngmoco/xxxxxxxxxxxxxxxxxxxxxxxxxxxxxxxx/Content/games/villains/fr/detail.html /preload/.ngmoco/xxxxxxxxxxxxxxxxxxxxxxxxxxxxxxxx/Content/games/villains/fr/header.html /preload/.ngmoco/xxxxxxxxxxxxxxxxxxxxxxxxxxxxxxxx/Content/games/villains/it /preload/.ngmoco/xxxxxxxxxxxxxxxxxxxxxxxxxxxxxxxx/Content/games/villains/it/detail.html /preload/.ngmoco/xxxxxxxxxxxxxxxxxxxxxxxxxxxxxxxx/Content/games/villains/it/header.html /preload/.ngmoco/xxxxxxxxxxxxxxxxxxxxxxxxxxxxxxxx/Content/games/villains/ko /preload/.ngmoco/xxxxxxxxxxxxxxxxxxxxxxxxxxxxxxxx/Content/games/villains/ko/detail.html /preload/.ngmoco/xxxxxxxxxxxxxxxxxxxxxxxxxxxxxxxx/Content/games/villains/ko/header.html /preload/.ngmoco/xxxxxxxxxxxxxxxxxxxxxxxxxxxxxxxx/Content/games/villains/screen1.png /preload/.ngmoco/xxxxxxxxxxxxxxxxxxxxxxxxxxxxxxxx/Content/games/villains/screen2.png /preload/.ngmoco/xxxxxxxxxxxxxxxxxxxxxxxxxxxxxxxx/Content/games/wars /preload/.ngmoco/xxxxxxxxxxxxxxxxxxxxxxxxxxxxxxxx/Content/games/wars/128.png /preload/.ngmoco/xxxxxxxxxxxxxxxxxxxxxxxxxxxxxxxx/Content/games/wars/de /preload/.ngmoco/xxxxxxxxxxxxxxxxxxxxxxxxxxxxxxxx/Content/games/wars/de/detail.html /preload/.ngmoco/xxxxxxxxxxxxxxxxxxxxxxxxxxxxxxxx/Content/games/wars/de/header.html /preload/.ngmoco/xxxxxxxxxxxxxxxxxxxxxxxxxxxxxxxx/Content/games/wars/en /preload/.ngmoco/xxxxxxxxxxxxxxxxxxxxxxxxxxxxxxxx/Content/games/wars/en/detail.html /preload/.ngmoco/xxxxxxxxxxxxxxxxxxxxxxxxxxxxxxxx/Content/games/wars/en/header.html /preload/.ngmoco/xxxxxxxxxxxxxxxxxxxxxxxxxxxxxxxx/Content/games/wars/es /preload/.ngmoco/xxxxxxxxxxxxxxxxxxxxxxxxxxxxxxxx/Content/games/wars/es/detail.html /preload/.ngmoco/xxxxxxxxxxxxxxxxxxxxxxxxxxxxxxxx/Content/games/wars/es/header.html /preload/.ngmoco/xxxxxxxxxxxxxxxxxxxxxxxxxxxxxxxx/Content/games/wars/fr /preload/.ngmoco/xxxxxxxxxxxxxxxxxxxxxxxxxxxxxxxx/Content/games/wars/fr/detail.html /preload/.ngmoco/xxxxxxxxxxxxxxxxxxxxxxxxxxxxxxxx/Content/games/wars/fr/header.html /preload/.ngmoco/xxxxxxxxxxxxxxxxxxxxxxxxxxxxxxxx/Content/games/wars/it /preload/.ngmoco/xxxxxxxxxxxxxxxxxxxxxxxxxxxxxxxx/Content/games/wars/it/detail.html /preload/.ngmoco/xxxxxxxxxxxxxxxxxxxxxxxxxxxxxxxx/Content/games/wars/it/header.html /preload/.ngmoco/xxxxxxxxxxxxxxxxxxxxxxxxxxxxxxxx/Content/games/wars/ko /preload/.ngmoco/xxxxxxxxxxxxxxxxxxxxxxxxxxxxxxxx/Content/games/wars/ko/detail.html /preload/.ngmoco/xxxxxxxxxxxxxxxxxxxxxxxxxxxxxxxx/Content/games/wars/ko/header.html /preload/.ngmoco/xxxxxxxxxxxxxxxxxxxxxxxxxxxxxxxx/Content/games/wars/screen1.png /preload/.ngmoco/xxxxxxxxxxxxxxxxxxxxxxxxxxxxxxxx/Content/games/wars/screen2.png /preload/.ngmoco/xxxxxxxxxxxxxxxxxxxxxxxxxxxxxxxx/Content/games/wecity /preload/.ngmoco/xxxxxxxxxxxxxxxxxxxxxxxxxxxxxxxx/Content/games/wecity/110.png /preload/.ngmoco/xxxxxxxxxxxxxxxxxxxxxxxxxxxxxxxx/Content/games/wecity/de /preload/.ngmoco/xxxxxxxxxxxxxxxxxxxxxxxxxxxxxxxx/Content/games/wecity/de/detail.html /preload/.ngmoco/xxxxxxxxxxxxxxxxxxxxxxxxxxxxxxxx/Content/games/wecity/de/header.html /preload/.ngmoco/xxxxxxxxxxxxxxxxxxxxxxxxxxxxxxxx/Content/games/wecity/en /preload/.ngmoco/xxxxxxxxxxxxxxxxxxxxxxxxxxxxxxxx/Content/games/wecity/en/detail.html /preload/.ngmoco/xxxxxxxxxxxxxxxxxxxxxxxxxxxxxxxx/Content/games/wecity/en/header.html /preload/.ngmoco/xxxxxxxxxxxxxxxxxxxxxxxxxxxxxxxx/Content/games/wecity/es /preload/.ngmoco/xxxxxxxxxxxxxxxxxxxxxxxxxxxxxxxx/Content/games/wecity/es/detail.html /preload/.ngmoco/xxxxxxxxxxxxxxxxxxxxxxxxxxxxxxxx/Content/games/wecity/es/header.html /preload/.ngmoco/xxxxxxxxxxxxxxxxxxxxxxxxxxxxxxxx/Content/games/wecity/fr /preload/.ngmoco/xxxxxxxxxxxxxxxxxxxxxxxxxxxxxxxx/Content/games/wecity/fr/detail.html /preload/.ngmoco/xxxxxxxxxxxxxxxxxxxxxxxxxxxxxxxx/Content/games/wecity/fr/header.html /preload/.ngmoco/xxxxxxxxxxxxxxxxxxxxxxxxxxxxxxxx/Content/games/wecity/it /preload/.ngmoco/xxxxxxxxxxxxxxxxxxxxxxxxxxxxxxxx/Content/games/wecity/it/detail.html /preload/.ngmoco/xxxxxxxxxxxxxxxxxxxxxxxxxxxxxxxx/Content/games/wecity/it/header.html /preload/.ngmoco/xxxxxxxxxxxxxxxxxxxxxxxxxxxxxxxx/Content/games/wecity/ko /preload/.ngmoco/xxxxxxxxxxxxxxxxxxxxxxxxxxxxxxxx/Content/games/wecity/ko/detail.html /preload/.ngmoco/xxxxxxxxxxxxxxxxxxxxxxxxxxxxxxxx/Content/games/wecity/ko/header.html /preload/.ngmoco/xxxxxxxxxxxxxxxxxxxxxxxxxxxxxxxx/Content/games/wecity/screen1.png /preload/.ngmoco/xxxxxxxxxxxxxxxxxxxxxxxxxxxxxxxx/Content/games/wecity/screen2.png /preload/.ngmoco/xxxxxxxxxxxxxxxxxxxxxxxxxxxxxxxx/Content/games/wefarm /preload/.ngmoco/xxxxxxxxxxxxxxxxxxxxxxxxxxxxxxxx/Content/games/wefarm/110.png /preload/.ngmoco/xxxxxxxxxxxxxxxxxxxxxxxxxxxxxxxx/Content/games/wefarm/de /preload/.ngmoco/xxxxxxxxxxxxxxxxxxxxxxxxxxxxxxxx/Content/games/wefarm/de/detail.html /preload/.ngmoco/xxxxxxxxxxxxxxxxxxxxxxxxxxxxxxxx/Content/games/wefarm/de/header.html /preload/.ngmoco/xxxxxxxxxxxxxxxxxxxxxxxxxxxxxxxx/Content/games/wefarm/en /preload/.ngmoco/xxxxxxxxxxxxxxxxxxxxxxxxxxxxxxxx/Content/games/wefarm/en/detail.html /preload/.ngmoco/xxxxxxxxxxxxxxxxxxxxxxxxxxxxxxxx/Content/games/wefarm/en/header.html /preload/.ngmoco/xxxxxxxxxxxxxxxxxxxxxxxxxxxxxxxx/Content/games/wefarm/es /preload/.ngmoco/xxxxxxxxxxxxxxxxxxxxxxxxxxxxxxxx/Content/games/wefarm/es/detail.html /preload/.ngmoco/xxxxxxxxxxxxxxxxxxxxxxxxxxxxxxxx/Content/games/wefarm/es/header.html /preload/.ngmoco/xxxxxxxxxxxxxxxxxxxxxxxxxxxxxxxx/Content/games/wefarm/fr /preload/.ngmoco/xxxxxxxxxxxxxxxxxxxxxxxxxxxxxxxx/Content/games/wefarm/fr/detail.html /preload/.ngmoco/xxxxxxxxxxxxxxxxxxxxxxxxxxxxxxxx/Content/games/wefarm/fr/header.html /preload/.ngmoco/xxxxxxxxxxxxxxxxxxxxxxxxxxxxxxxx/Content/games/wefarm/it /preload/.ngmoco/xxxxxxxxxxxxxxxxxxxxxxxxxxxxxxxx/Content/games/wefarm/it/detail.html /preload/.ngmoco/xxxxxxxxxxxxxxxxxxxxxxxxxxxxxxxx/Content/games/wefarm/it/header.html /preload/.ngmoco/xxxxxxxxxxxxxxxxxxxxxxxxxxxxxxxx/Content/games/wefarm/ko /preload/.ngmoco/xxxxxxxxxxxxxxxxxxxxxxxxxxxxxxxx/Content/games/wefarm/ko/detail.html /preload/.ngmoco/xxxxxxxxxxxxxxxxxxxxxxxxxxxxxxxx/Content/games/wefarm/ko/header.html /preload/.ngmoco/xxxxxxxxxxxxxxxxxxxxxxxxxxxxxxxx/Content/games/wefarm/screen1.png /preload/.ngmoco/xxxxxxxxxxxxxxxxxxxxxxxxxxxxxxxx/Content/games/wefarm/screen2.png /preload/.ngmoco/xxxxxxxxxxxxxxxxxxxxxxxxxxxxxxxx/Content/games/werule /preload/.ngmoco/xxxxxxxxxxxxxxxxxxxxxxxxxxxxxxxx/Content/games/werule/128.png /preload/.ngmoco/xxxxxxxxxxxxxxxxxxxxxxxxxxxxxxxx/Content/games/werule/de /preload/.ngmoco/xxxxxxxxxxxxxxxxxxxxxxxxxxxxxxxx/Content/games/werule/de/detail.html /preload/.ngmoco/xxxxxxxxxxxxxxxxxxxxxxxxxxxxxxxx/Content/games/werule/de/header.html /preload/.ngmoco/xxxxxxxxxxxxxxxxxxxxxxxxxxxxxxxx/Content/games/werule/en /preload/.ngmoco/xxxxxxxxxxxxxxxxxxxxxxxxxxxxxxxx/Content/games/werule/en/detail.html /preload/.ngmoco/xxxxxxxxxxxxxxxxxxxxxxxxxxxxxxxx/Content/games/werule/en/header.html /preload/.ngmoco/xxxxxxxxxxxxxxxxxxxxxxxxxxxxxxxx/Content/games/werule/es /preload/.ngmoco/xxxxxxxxxxxxxxxxxxxxxxxxxxxxxxxx/Content/games/werule/es/detail.html /preload/.ngmoco/xxxxxxxxxxxxxxxxxxxxxxxxxxxxxxxx/Content/games/werule/es/header.html /preload/.ngmoco/xxxxxxxxxxxxxxxxxxxxxxxxxxxxxxxx/Content/games/werule/fr /preload/.ngmoco/xxxxxxxxxxxxxxxxxxxxxxxxxxxxxxxx/Content/games/werule/fr/detail.html /preload/.ngmoco/xxxxxxxxxxxxxxxxxxxxxxxxxxxxxxxx/Content/games/werule/fr/header.html /preload/.ngmoco/xxxxxxxxxxxxxxxxxxxxxxxxxxxxxxxx/Content/games/werule/it /preload/.ngmoco/xxxxxxxxxxxxxxxxxxxxxxxxxxxxxxxx/Content/games/werule/it/detail.html /preload/.ngmoco/xxxxxxxxxxxxxxxxxxxxxxxxxxxxxxxx/Content/games/werule/it/header.html /preload/.ngmoco/xxxxxxxxxxxxxxxxxxxxxxxxxxxxxxxx/Content/games/werule/ko /preload/.ngmoco/xxxxxxxxxxxxxxxxxxxxxxxxxxxxxxxx/Content/games/werule/ko/detail.html /preload/.ngmoco/xxxxxxxxxxxxxxxxxxxxxxxxxxxxxxxx/Content/games/werule/ko/header.html /preload/.ngmoco/xxxxxxxxxxxxxxxxxxxxxxxxxxxxxxxx/Content/games/werule/screen1.png /preload/.ngmoco/xxxxxxxxxxxxxxxxxxxxxxxxxxxxxxxx/Content/games/werule/screen2.png /preload/.ngmoco/xxxxxxxxxxxxxxxxxxxxxxxxxxxxxxxx/Content/img /preload/.ngmoco/xxxxxxxxxxxxxxxxxxxxxxxxxxxxxxxx/Content/img/btn_check_off.png /preload/.ngmoco/xxxxxxxxxxxxxxxxxxxxxxxxxxxxxxxx/Content/img/btn_check_on.png /preload/.ngmoco/xxxxxxxxxxxxxxxxxxxxxxxxxxxxxxxx/Content/img/btn_tos.png /preload/.ngmoco/xxxxxxxxxxxxxxxxxxxxxxxxxxxxxxxx/Content/img/button_green.png /preload/.ngmoco/xxxxxxxxxxxxxxxxxxxxxxxxxxxxxxxx/Content/img/footer.png /preload/.ngmoco/xxxxxxxxxxxxxxxxxxxxxxxxxxxxxxxx/Content/img/gamehub_btn_green.png /preload/.ngmoco/xxxxxxxxxxxxxxxxxxxxxxxxxxxxxxxx/Content/img/gamehub_btn_green_p.png /preload/.ngmoco/xxxxxxxxxxxxxxxxxxxxxxxxxxxxxxxx/Content/img/gamehub_btn_new.png /preload/.ngmoco/xxxxxxxxxxxxxxxxxxxxxxxxxxxxxxxx/Content/img/gamehub_btn_new_02.png /preload/.ngmoco/xxxxxxxxxxxxxxxxxxxxxxxxxxxxxxxx/Content/img/gamehub_premium_bg.png /preload/.ngmoco/xxxxxxxxxxxxxxxxxxxxxxxxxxxxxxxx/Content/img/gamehub_premium_panel_bg.png /preload/.ngmoco/xxxxxxxxxxxxxxxxxxxxxxxxxxxxxxxx/Content/img/gamehub_premium_panel_bg_p.png /preload/.ngmoco/xxxxxxxxxxxxxxxxxxxxxxxxxxxxxxxx/Content/img/line.png /preload/.ngmoco/xxxxxxxxxxxxxxxxxxxxxxxxxxxxxxxx/Content/img/logo_button.png /preload/.ngmoco/xxxxxxxxxxxxxxxxxxxxxxxxxxxxxxxx/Content/img/menu_bg.png /preload/.ngmoco/xxxxxxxxxxxxxxxxxxxxxxxxxxxxxxxx/Content/img/morepannel_gamehub_icon_disclaimer.png /preload/.ngmoco/xxxxxxxxxxxxxxxxxxxxxxxxxxxxxxxx/Content/img/morepannel_gamehub_icon_legalinfor.png /preload/.ngmoco/xxxxxxxxxxxxxxxxxxxxxxxxxxxxxxxx/Content/img/morepannel_gamehub_icon_uninstall.png /preload/.ngmoco/xxxxxxxxxxxxxxxxxxxxxxxxxxxxxxxx/Content/img/morepannel_gamehub_icon_uninstall_disabled.png /preload/.ngmoco/xxxxxxxxxxxxxxxxxxxxxxxxxxxxxxxx/Content/img/news_button.png /preload/.ngmoco/xxxxxxxxxxxxxxxxxxxxxxxxxxxxxxxx/Content/img/news_button_on_clicked.png /preload/.ngmoco/xxxxxxxxxxxxxxxxxxxxxxxxxxxxxxxx/Content/img/no_response.png /preload/.ngmoco/xxxxxxxxxxxxxxxxxxxxxxxxxxxxxxxx/Content/img/panel.png /preload/.ngmoco/xxxxxxxxxxxxxxxxxxxxxxxxxxxxxxxx/Content/img/rating_button.png /preload/.ngmoco/xxxxxxxxxxxxxxxxxxxxxxxxxxxxxxxx/Content/img/rating_button_back.png /preload/.ngmoco/xxxxxxxxxxxxxxxxxxxxxxxxxxxxxxxx/Content/img/rating_button_on_clicked.png /preload/.ngmoco/xxxxxxxxxxxxxxxxxxxxxxxxxxxxxxxx/Content/img/rating_dialog_bg.png /preload/.ngmoco/xxxxxxxxxxxxxxxxxxxxxxxxxxxxxxxx/Content/img/rating_genre_1.png /preload/.ngmoco/xxxxxxxxxxxxxxxxxxxxxxxxxxxxxxxx/Content/img/rating_genre_2.png /preload/.ngmoco/xxxxxxxxxxxxxxxxxxxxxxxxxxxxxxxx/Content/img/rating_genre_3.png /preload/.ngmoco/xxxxxxxxxxxxxxxxxxxxxxxxxxxxxxxx/Content/img/rating_genre_4.png /preload/.ngmoco/xxxxxxxxxxxxxxxxxxxxxxxxxxxxxxxx/Content/img/rating_genre_5.png /preload/.ngmoco/xxxxxxxxxxxxxxxxxxxxxxxxxxxxxxxx/Content/img/rating_genre_6.png /preload/.ngmoco/xxxxxxxxxxxxxxxxxxxxxxxxxxxxxxxx/Content/img/rating_genre_7.png /preload/.ngmoco/xxxxxxxxxxxxxxxxxxxxxxxxxxxxxxxx/Content/img/rating_icon_12.png /preload/.ngmoco/xxxxxxxxxxxxxxxxxxxxxxxxxxxxxxxx/Content/img/rating_icon_15.png /preload/.ngmoco/xxxxxxxxxxxxxxxxxxxxxxxxxxxxxxxx/Content/img/rating_icon_18.png /preload/.ngmoco/xxxxxxxxxxxxxxxxxxxxxxxxxxxxxxxx/Content/img/rating_icon_all.png /preload/.ngmoco/xxxxxxxxxxxxxxxxxxxxxxxxxxxxxxxx/Content/img/rating_table_12.png /preload/.ngmoco/xxxxxxxxxxxxxxxxxxxxxxxxxxxxxxxx/Content/img/rating_table_15.png /preload/.ngmoco/xxxxxxxxxxxxxxxxxxxxxxxxxxxxxxxx/Content/img/rating_table_18.png /preload/.ngmoco/xxxxxxxxxxxxxxxxxxxxxxxxxxxxxxxx/Content/img/rating_table_all.png /preload/.ngmoco/xxxxxxxxxxxxxxxxxxxxxxxxxxxxxxxx/Content/img/tab_icon_premiumgames.png /preload/.ngmoco/xxxxxxxxxxxxxxxxxxxxxxxxxxxxxxxx/Content/img/tab_icon_premiumgames_selected.png /preload/.ngmoco/xxxxxxxxxxxxxxxxxxxxxxxxxxxxxxxx/Content/img/tab_icon_socialgames.png /preload/.ngmoco/xxxxxxxxxxxxxxxxxxxxxxxxxxxxxxxx/Content/img/tab_icon_socialgames_selected.png /preload/.ngmoco/xxxxxxxxxxxxxxxxxxxxxxxxxxxxxxxx/Content/js /preload/.ngmoco/xxxxxxxxxxxxxxxxxxxxxxxxxxxxxxxx/Content/js/scaling.js /preload/.ngmoco/xxxxxxxxxxxxxxxxxxxxxxxxxxxxxxxx/Content/languages /preload/.ngmoco/xxxxxxxxxxxxxxxxxxxxxxxxxxxxxxxx/Content/languages/en.json /preload/.ngmoco/xxxxxxxxxxxxxxxxxxxxxxxxxxxxxxxx/Content/languages/es.json /preload/.ngmoco/xxxxxxxxxxxxxxxxxxxxxxxxxxxxxxxx/Content/license /preload/.ngmoco/xxxxxxxxxxxxxxxxxxxxxxxxxxxxxxxx/Content/license/BSD_license.html /preload/.ngmoco/xxxxxxxxxxxxxxxxxxxxxxxxxxxxxxxx/Content/news /preload/.ngmoco/xxxxxxxxxxxxxxxxxxxxxxxxxxxxxxxx/Content/news/2games /preload/.ngmoco/xxxxxxxxxxxxxxxxxxxxxxxxxxxxxxxx/Content/news/2games/110.png /preload/.ngmoco/xxxxxxxxxxxxxxxxxxxxxxxxxxxxxxxx/Content/news/2games/80.png /preload/.ngmoco/xxxxxxxxxxxxxxxxxxxxxxxxxxxxxxxx/Content/news/2games/de /preload/.ngmoco/xxxxxxxxxxxxxxxxxxxxxxxxxxxxxxxx/Content/news/2games/de/detail.html /preload/.ngmoco/xxxxxxxxxxxxxxxxxxxxxxxxxxxxxxxx/Content/news/2games/en /preload/.ngmoco/xxxxxxxxxxxxxxxxxxxxxxxxxxxxxxxx/Content/news/2games/en/detail.html /preload/.ngmoco/xxxxxxxxxxxxxxxxxxxxxxxxxxxxxxxx/Content/news/2games/es /preload/.ngmoco/xxxxxxxxxxxxxxxxxxxxxxxxxxxxxxxx/Content/news/2games/es/detail.html /preload/.ngmoco/xxxxxxxxxxxxxxxxxxxxxxxxxxxxxxxx/Content/news/2games/fr /preload/.ngmoco/xxxxxxxxxxxxxxxxxxxxxxxxxxxxxxxx/Content/news/2games/fr/detail.html /preload/.ngmoco/xxxxxxxxxxxxxxxxxxxxxxxxxxxxxxxx/Content/news/2games/it /preload/.ngmoco/xxxxxxxxxxxxxxxxxxxxxxxxxxxxxxxx/Content/news/2games/it/detail.html /preload/.ngmoco/xxxxxxxxxxxxxxxxxxxxxxxxxxxxxxxx/Content/news/2games/ko /preload/.ngmoco/xxxxxxxxxxxxxxxxxxxxxxxxxxxxxxxx/Content/news/2games/ko/detail.html /preload/.ngmoco/xxxxxxxxxxxxxxxxxxxxxxxxxxxxxxxx/Content/news/pocketgod /preload/.ngmoco/xxxxxxxxxxxxxxxxxxxxxxxxxxxxxxxx/Content/news/pocketgod/110.png /preload/.ngmoco/xxxxxxxxxxxxxxxxxxxxxxxxxxxxxxxx/Content/news/pocketgod/80.png /preload/.ngmoco/xxxxxxxxxxxxxxxxxxxxxxxxxxxxxxxx/Content/news/pocketgod/de /preload/.ngmoco/xxxxxxxxxxxxxxxxxxxxxxxxxxxxxxxx/Content/news/pocketgod/de/detail.html /preload/.ngmoco/xxxxxxxxxxxxxxxxxxxxxxxxxxxxxxxx/Content/news/pocketgod/en /preload/.ngmoco/xxxxxxxxxxxxxxxxxxxxxxxxxxxxxxxx/Content/news/pocketgod/en/detail.html /preload/.ngmoco/xxxxxxxxxxxxxxxxxxxxxxxxxxxxxxxx/Content/news/pocketgod/es /preload/.ngmoco/xxxxxxxxxxxxxxxxxxxxxxxxxxxxxxxx/Content/news/pocketgod/es/detail.html /preload/.ngmoco/xxxxxxxxxxxxxxxxxxxxxxxxxxxxxxxx/Content/news/pocketgod/fr /preload/.ngmoco/xxxxxxxxxxxxxxxxxxxxxxxxxxxxxxxx/Content/news/pocketgod/fr/detail.html /preload/.ngmoco/xxxxxxxxxxxxxxxxxxxxxxxxxxxxxxxx/Content/news/pocketgod/it /preload/.ngmoco/xxxxxxxxxxxxxxxxxxxxxxxxxxxxxxxx/Content/news/pocketgod/it/detail.html /preload/.ngmoco/xxxxxxxxxxxxxxxxxxxxxxxxxxxxxxxx/Content/news/pocketgod/ko /preload/.ngmoco/xxxxxxxxxxxxxxxxxxxxxxxxxxxxxxxx/Content/news/pocketgod/ko/detail.html /preload/.ngmoco/xxxxxxxxxxxxxxxxxxxxxxxxxxxxxxxx/Content/spinner /preload/.ngmoco/xxxxxxxxxxxxxxxxxxxxxxxxxxxxxxxx/Content/spinner/spinner1.png /preload/.ngmoco/xxxxxxxxxxxxxxxxxxxxxxxxxxxxxxxx/Content/spinner/spinner2.png /preload/.ngmoco/xxxxxxxxxxxxxxxxxxxxxxxxxxxxxxxx/Content/spinner/spinner3.png /preload/.ngmoco/xxxxxxxxxxxxxxxxxxxxxxxxxxxxxxxx/Content/spinner/spinner4.png /preload/.ngmoco/xxxxxxxxxxxxxxxxxxxxxxxxxxxxxxxx/Content/spinner/spinner5.png /preload/.ngmoco/xxxxxxxxxxxxxxxxxxxxxxxxxxxxxxxx/Content/spinner/spinner6.png /preload/.ngmoco/xxxxxxxxxxxxxxxxxxxxxxxxxxxxxxxx/Content/spinner/spinner7.png /preload/.ngmoco/xxxxxxxxxxxxxxxxxxxxxxxxxxxxxxxx/Content/spinner/spinner8.png /preload/.ngmoco/xxxxxxxxxxxxxxxxxxxxxxxxxxxxxxxx/Content/terms /preload/.ngmoco/xxxxxxxxxxxxxxxxxxxxxxxxxxxxxxxx/Content/terms/ar_DZ /preload/.ngmoco/xxxxxxxxxxxxxxxxxxxxxxxxxxxxxxxx/Content/terms/ar_DZ/terms.html /preload/.ngmoco/xxxxxxxxxxxxxxxxxxxxxxxxxxxxxxxx/Content/terms/bg_BG /preload/.ngmoco/xxxxxxxxxxxxxxxxxxxxxxxxxxxxxxxx/Content/terms/bg_BG/terms.html /preload/.ngmoco/xxxxxxxxxxxxxxxxxxxxxxxxxxxxxxxx/Content/terms/cs_CZ /preload/.ngmoco/xxxxxxxxxxxxxxxxxxxxxxxxxxxxxxxx/Content/terms/cs_CZ/terms.html /preload/.ngmoco/xxxxxxxxxxxxxxxxxxxxxxxxxxxxxxxx/Content/terms/de_AT /preload/.ngmoco/xxxxxxxxxxxxxxxxxxxxxxxxxxxxxxxx/Content/terms/de_AT/terms.html /preload/.ngmoco/xxxxxxxxxxxxxxxxxxxxxxxxxxxxxxxx/Content/terms/de_CH /preload/.ngmoco/xxxxxxxxxxxxxxxxxxxxxxxxxxxxxxxx/Content/terms/de_CH/terms.html /preload/.ngmoco/xxxxxxxxxxxxxxxxxxxxxxxxxxxxxxxx/Content/terms/de_DE /preload/.ngmoco/xxxxxxxxxxxxxxxxxxxxxxxxxxxxxxxx/Content/terms/de_DE/terms.html /preload/.ngmoco/xxxxxxxxxxxxxxxxxxxxxxxxxxxxxxxx/Content/terms/eg_EG /preload/.ngmoco/xxxxxxxxxxxxxxxxxxxxxxxxxxxxxxxx/Content/terms/eg_EG/terms.html /preload/.ngmoco/xxxxxxxxxxxxxxxxxxxxxxxxxxxxxxxx/Content/terms/el_GR /preload/.ngmoco/xxxxxxxxxxxxxxxxxxxxxxxxxxxxxxxx/Content/terms/el_GR/terms.html /preload/.ngmoco/xxxxxxxxxxxxxxxxxxxxxxxxxxxxxxxx/Content/terms/en /preload/.ngmoco/xxxxxxxxxxxxxxxxxxxxxxxxxxxxxxxx/Content/terms/en/terms.html /preload/.ngmoco/xxxxxxxxxxxxxxxxxxxxxxxxxxxxxxxx/Content/terms/en_AU /preload/.ngmoco/xxxxxxxxxxxxxxxxxxxxxxxxxxxxxxxx/Content/terms/en_AU/terms.html /preload/.ngmoco/xxxxxxxxxxxxxxxxxxxxxxxxxxxxxxxx/Content/terms/en_CA /preload/.ngmoco/xxxxxxxxxxxxxxxxxxxxxxxxxxxxxxxx/Content/terms/en_CA/terms.html /preload/.ngmoco/xxxxxxxxxxxxxxxxxxxxxxxxxxxxxxxx/Content/terms/en_CL /preload/.ngmoco/xxxxxxxxxxxxxxxxxxxxxxxxxxxxxxxx/Content/terms/en_CL/terms.html /preload/.ngmoco/xxxxxxxxxxxxxxxxxxxxxxxxxxxxxxxx/Content/terms/en_EG /preload/.ngmoco/xxxxxxxxxxxxxxxxxxxxxxxxxxxxxxxx/Content/terms/en_EG/terms.html /preload/.ngmoco/xxxxxxxxxxxxxxxxxxxxxxxxxxxxxxxx/Content/terms/en_HK /preload/.ngmoco/xxxxxxxxxxxxxxxxxxxxxxxxxxxxxxxx/Content/terms/en_HK/terms.html /preload/.ngmoco/xxxxxxxxxxxxxxxxxxxxxxxxxxxxxxxx/Content/terms/en_IN /preload/.ngmoco/xxxxxxxxxxxxxxxxxxxxxxxxxxxxxxxx/Content/terms/en_IN/terms.html /preload/.ngmoco/xxxxxxxxxxxxxxxxxxxxxxxxxxxxxxxx/Content/terms/en_KZ /preload/.ngmoco/xxxxxxxxxxxxxxxxxxxxxxxxxxxxxxxx/Content/terms/en_KZ/terms.html /preload/.ngmoco/xxxxxxxxxxxxxxxxxxxxxxxxxxxxxxxx/Content/terms/en_PH /preload/.ngmoco/xxxxxxxxxxxxxxxxxxxxxxxxxxxxxxxx/Content/terms/en_PH/terms.html /preload/.ngmoco/xxxxxxxxxxxxxxxxxxxxxxxxxxxxxxxx/Content/terms/en_TW /preload/.ngmoco/xxxxxxxxxxxxxxxxxxxxxxxxxxxxxxxx/Content/terms/en_TW/terms.html /preload/.ngmoco/xxxxxxxxxxxxxxxxxxxxxxxxxxxxxxxx/Content/terms/es_AR /preload/.ngmoco/xxxxxxxxxxxxxxxxxxxxxxxxxxxxxxxx/Content/terms/es_AR/terms.html /preload/.ngmoco/xxxxxxxxxxxxxxxxxxxxxxxxxxxxxxxx/Content/terms/es_BO /preload/.ngmoco/xxxxxxxxxxxxxxxxxxxxxxxxxxxxxxxx/Content/terms/es_BO/terms.html /preload/.ngmoco/xxxxxxxxxxxxxxxxxxxxxxxxxxxxxxxx/Content/terms/es_CL /preload/.ngmoco/xxxxxxxxxxxxxxxxxxxxxxxxxxxxxxxx/Content/terms/es_CL/terms.html /preload/.ngmoco/xxxxxxxxxxxxxxxxxxxxxxxxxxxxxxxx/Content/terms/es_CO /preload/.ngmoco/xxxxxxxxxxxxxxxxxxxxxxxxxxxxxxxx/Content/terms/es_CO/terms.html /preload/.ngmoco/xxxxxxxxxxxxxxxxxxxxxxxxxxxxxxxx/Content/terms/es_CR /preload/.ngmoco/xxxxxxxxxxxxxxxxxxxxxxxxxxxxxxxx/Content/terms/es_CR/terms.html /preload/.ngmoco/xxxxxxxxxxxxxxxxxxxxxxxxxxxxxxxx/Content/terms/es_CU /preload/.ngmoco/xxxxxxxxxxxxxxxxxxxxxxxxxxxxxxxx/Content/terms/es_CU/terms.html /preload/.ngmoco/xxxxxxxxxxxxxxxxxxxxxxxxxxxxxxxx/Content/terms/es_DO /preload/.ngmoco/xxxxxxxxxxxxxxxxxxxxxxxxxxxxxxxx/Content/terms/es_DO/terms.html /preload/.ngmoco/xxxxxxxxxxxxxxxxxxxxxxxxxxxxxxxx/Content/terms/es_EC /preload/.ngmoco/xxxxxxxxxxxxxxxxxxxxxxxxxxxxxxxx/Content/terms/es_EC/terms.html /preload/.ngmoco/xxxxxxxxxxxxxxxxxxxxxxxxxxxxxxxx/Content/terms/es_ES /preload/.ngmoco/xxxxxxxxxxxxxxxxxxxxxxxxxxxxxxxx/Content/terms/es_ES/terms.html /preload/.ngmoco/xxxxxxxxxxxxxxxxxxxxxxxxxxxxxxxx/Content/terms/es_GT /preload/.ngmoco/xxxxxxxxxxxxxxxxxxxxxxxxxxxxxxxx/Content/terms/es_GT/terms.html /preload/.ngmoco/xxxxxxxxxxxxxxxxxxxxxxxxxxxxxxxx/Content/terms/es_HN /preload/.ngmoco/xxxxxxxxxxxxxxxxxxxxxxxxxxxxxxxx/Content/terms/es_HN/terms.html /preload/.ngmoco/xxxxxxxxxxxxxxxxxxxxxxxxxxxxxxxx/Content/terms/es_MX /preload/.ngmoco/xxxxxxxxxxxxxxxxxxxxxxxxxxxxxxxx/Content/terms/es_MX/terms.html /preload/.ngmoco/xxxxxxxxxxxxxxxxxxxxxxxxxxxxxxxx/Content/terms/es_PA /preload/.ngmoco/xxxxxxxxxxxxxxxxxxxxxxxxxxxxxxxx/Content/terms/es_PA/terms.html /preload/.ngmoco/xxxxxxxxxxxxxxxxxxxxxxxxxxxxxxxx/Content/terms/es_PE /preload/.ngmoco/xxxxxxxxxxxxxxxxxxxxxxxxxxxxxxxx/Content/terms/es_PE/terms.html /preload/.ngmoco/xxxxxxxxxxxxxxxxxxxxxxxxxxxxxxxx/Content/terms/es_PR /preload/.ngmoco/xxxxxxxxxxxxxxxxxxxxxxxxxxxxxxxx/Content/terms/es_PR/terms.html /preload/.ngmoco/xxxxxxxxxxxxxxxxxxxxxxxxxxxxxxxx/Content/terms/es_PY /preload/.ngmoco/xxxxxxxxxxxxxxxxxxxxxxxxxxxxxxxx/Content/terms/es_PY/terms.html /preload/.ngmoco/xxxxxxxxxxxxxxxxxxxxxxxxxxxxxxxx/Content/terms/es_SV /preload/.ngmoco/xxxxxxxxxxxxxxxxxxxxxxxxxxxxxxxx/Content/terms/es_SV/terms.html /preload/.ngmoco/xxxxxxxxxxxxxxxxxxxxxxxxxxxxxxxx/Content/terms/es_UY /preload/.ngmoco/xxxxxxxxxxxxxxxxxxxxxxxxxxxxxxxx/Content/terms/es_UY/terms.html /preload/.ngmoco/xxxxxxxxxxxxxxxxxxxxxxxxxxxxxxxx/Content/terms/es_VE /preload/.ngmoco/xxxxxxxxxxxxxxxxxxxxxxxxxxxxxxxx/Content/terms/es_VE/terms.html /preload/.ngmoco/xxxxxxxxxxxxxxxxxxxxxxxxxxxxxxxx/Content/terms/et_EE /preload/.ngmoco/xxxxxxxxxxxxxxxxxxxxxxxxxxxxxxxx/Content/terms/et_EE/terms.html /preload/.ngmoco/xxxxxxxxxxxxxxxxxxxxxxxxxxxxxxxx/Content/terms/fr_CA /preload/.ngmoco/xxxxxxxxxxxxxxxxxxxxxxxxxxxxxxxx/Content/terms/fr_CA/terms.html /preload/.ngmoco/xxxxxxxxxxxxxxxxxxxxxxxxxxxxxxxx/Content/terms/fr_CH /preload/.ngmoco/xxxxxxxxxxxxxxxxxxxxxxxxxxxxxxxx/Content/terms/fr_CH/terms.html /preload/.ngmoco/xxxxxxxxxxxxxxxxxxxxxxxxxxxxxxxx/Content/terms/fr_DZ /preload/.ngmoco/xxxxxxxxxxxxxxxxxxxxxxxxxxxxxxxx/Content/terms/fr_DZ/terms.html /preload/.ngmoco/xxxxxxxxxxxxxxxxxxxxxxxxxxxxxxxx/Content/terms/fr_FR /preload/.ngmoco/xxxxxxxxxxxxxxxxxxxxxxxxxxxxxxxx/Content/terms/fr_FR/terms.html /preload/.ngmoco/xxxxxxxxxxxxxxxxxxxxxxxxxxxxxxxx/Content/terms/fr_MA /preload/.ngmoco/xxxxxxxxxxxxxxxxxxxxxxxxxxxxxxxx/Content/terms/fr_MA/terms.html /preload/.ngmoco/xxxxxxxxxxxxxxxxxxxxxxxxxxxxxxxx/Content/terms/hr_HR /preload/.ngmoco/xxxxxxxxxxxxxxxxxxxxxxxxxxxxxxxx/Content/terms/hr_HR/terms.html /preload/.ngmoco/xxxxxxxxxxxxxxxxxxxxxxxxxxxxxxxx/Content/terms/hu_HU /preload/.ngmoco/xxxxxxxxxxxxxxxxxxxxxxxxxxxxxxxx/Content/terms/hu_HU/terms.html /preload/.ngmoco/xxxxxxxxxxxxxxxxxxxxxxxxxxxxxxxx/Content/terms/id_ID /preload/.ngmoco/xxxxxxxxxxxxxxxxxxxxxxxxxxxxxxxx/Content/terms/id_ID/terms.html /preload/.ngmoco/xxxxxxxxxxxxxxxxxxxxxxxxxxxxxxxx/Content/terms/it_CH /preload/.ngmoco/xxxxxxxxxxxxxxxxxxxxxxxxxxxxxxxx/Content/terms/it_CH/terms.html /preload/.ngmoco/xxxxxxxxxxxxxxxxxxxxxxxxxxxxxxxx/Content/terms/it_IT /preload/.ngmoco/xxxxxxxxxxxxxxxxxxxxxxxxxxxxxxxx/Content/terms/it_IT/terms.html /preload/.ngmoco/xxxxxxxxxxxxxxxxxxxxxxxxxxxxxxxx/Content/terms/ko_KR /preload/.ngmoco/xxxxxxxxxxxxxxxxxxxxxxxxxxxxxxxx/Content/terms/ko_KR/terms.html /preload/.ngmoco/xxxxxxxxxxxxxxxxxxxxxxxxxxxxxxxx/Content/terms/lt_LT /preload/.ngmoco/xxxxxxxxxxxxxxxxxxxxxxxxxxxxxxxx/Content/terms/lt_LT/terms.html /preload/.ngmoco/xxxxxxxxxxxxxxxxxxxxxxxxxxxxxxxx/Content/terms/lv_LV /preload/.ngmoco/xxxxxxxxxxxxxxxxxxxxxxxxxxxxxxxx/Content/terms/lv_LV/terms.html /preload/.ngmoco/xxxxxxxxxxxxxxxxxxxxxxxxxxxxxxxx/Content/terms/mk_MK /preload/.ngmoco/xxxxxxxxxxxxxxxxxxxxxxxxxxxxxxxx/Content/terms/mk_MK/terms.html /preload/.ngmoco/xxxxxxxxxxxxxxxxxxxxxxxxxxxxxxxx/Content/terms/nl_NL /preload/.ngmoco/xxxxxxxxxxxxxxxxxxxxxxxxxxxxxxxx/Content/terms/nl_NL/terms.html /preload/.ngmoco/xxxxxxxxxxxxxxxxxxxxxxxxxxxxxxxx/Content/terms/pl_PL /preload/.ngmoco/xxxxxxxxxxxxxxxxxxxxxxxxxxxxxxxx/Content/terms/pl_PL/terms.html /preload/.ngmoco/xxxxxxxxxxxxxxxxxxxxxxxxxxxxxxxx/Content/terms/pt_BR /preload/.ngmoco/xxxxxxxxxxxxxxxxxxxxxxxxxxxxxxxx/Content/terms/pt_BR/terms.html /preload/.ngmoco/xxxxxxxxxxxxxxxxxxxxxxxxxxxxxxxx/Content/terms/pt_PT /preload/.ngmoco/xxxxxxxxxxxxxxxxxxxxxxxxxxxxxxxx/Content/terms/pt_PT/terms.html /preload/.ngmoco/xxxxxxxxxxxxxxxxxxxxxxxxxxxxxxxx/Content/terms/ro_RO /preload/.ngmoco/xxxxxxxxxxxxxxxxxxxxxxxxxxxxxxxx/Content/terms/ro_RO/terms.html /preload/.ngmoco/xxxxxxxxxxxxxxxxxxxxxxxxxxxxxxxx/Content/terms/ru_RU /preload/.ngmoco/xxxxxxxxxxxxxxxxxxxxxxxxxxxxxxxx/Content/terms/ru_RU/terms.html /preload/.ngmoco/xxxxxxxxxxxxxxxxxxxxxxxxxxxxxxxx/Content/terms/sk_SK /preload/.ngmoco/xxxxxxxxxxxxxxxxxxxxxxxxxxxxxxxx/Content/terms/sk_SK/terms.html /preload/.ngmoco/xxxxxxxxxxxxxxxxxxxxxxxxxxxxxxxx/Content/terms/sl_SI /preload/.ngmoco/xxxxxxxxxxxxxxxxxxxxxxxxxxxxxxxx/Content/terms/sl_SI/terms.html /preload/.ngmoco/xxxxxxxxxxxxxxxxxxxxxxxxxxxxxxxx/Content/terms/sr_RS /preload/.ngmoco/xxxxxxxxxxxxxxxxxxxxxxxxxxxxxxxx/Content/terms/sr_RS/terms.html /preload/.ngmoco/xxxxxxxxxxxxxxxxxxxxxxxxxxxxxxxx/Content/terms/th_TH /preload/.ngmoco/xxxxxxxxxxxxxxxxxxxxxxxxxxxxxxxx/Content/terms/th_TH/terms.html /preload/.ngmoco/xxxxxxxxxxxxxxxxxxxxxxxxxxxxxxxx/Content/terms/tr_TR /preload/.ngmoco/xxxxxxxxxxxxxxxxxxxxxxxxxxxxxxxx/Content/terms/tr_TR/terms.html /preload/.ngmoco/xxxxxxxxxxxxxxxxxxxxxxxxxxxxxxxx/Content/terms/uk_UA /preload/.ngmoco/xxxxxxxxxxxxxxxxxxxxxxxxxxxxxxxx/Content/terms/uk_UA/terms.html /preload/.ngmoco/xxxxxxxxxxxxxxxxxxxxxxxxxxxxxxxx/Content/terms/zh_CN /preload/.ngmoco/xxxxxxxxxxxxxxxxxxxxxxxxxxxxxxxx/Content/terms/zh_CN/terms.html /preload/.ngmoco/xxxxxxxxxxxxxxxxxxxxxxxxxxxxxxxx/Content/terms/zh_TW /preload/.ngmoco/xxxxxxxxxxxxxxxxxxxxxxxxxxxxxxxx/Content/terms/zh_TW/terms.html /preload/.ngmoco/xxxxxxxxxxxxxxxxxxxxxxxxxxxxxxxx/application.js /preload/.ngmoco/xxxxxxxxxxxxxxxxxxxxxxxxxxxxxxxx/configuration.json /preload/.ngmoco/xxxxxxxxxxxxxxxxxxxxxxxxxxxxxxxx/webgame.ngmanifest /preload/data /preload/data/app /preload/data/app/KiesAir.apk /preload/data/app/OceanWeather.apk /preload/data/app/PhotoRetouching.apk /preload/data/app/PolarisOffice.apk /preload/data/app/SamsungIM.apk /preload/data/app/Swype.apk /preload/data/app/WindyWeather.apk /preload/data/app/vlingo.apk
List of known AT commands:
# picocom /dev/ttyACM0 picocom v3.1 port is : /dev/ttyACM0 flowcontrol : none baudrate is : 9600 parity is : none databits are : 8 stopbits are : 1 escape is : C-a local echo is : no noinit is : no noreset is : no hangup is : no nolock is : no send_cmd is : sz -vv receive_cmd is : rz -vv -E imap is : omap is : emap is : crcrlf,delbs, logfile is : none initstring : none exit_after is : not set exit is : no Type [C-a] [C-h] to see available commands Terminal ready AT+TRACE=1 OK AT OK AT+CLAC ATS ATD ATA ATO ATE ATH ATV ATZ ATl ATm ATQ ATX AT&F AT&D AT&C AT\Q AT+CGSMS AT+CMGD AT+CMGF AT+CMGL AT+CMGR AT+CMGS AT+CMGW AT+CMMS AT+CMSS AT+CNMA AT+CNMI AT+CPMS AT+CSCA AT+CSCB AT+CSMS AT+XCSSMS AT+XSMS AT+XTESM AT+CSDH AT+CSAS AT+CRES AT+CMGC AT+CSMP AT+CGREG AT+COPN AT+COPS AT+CREG AT+CSQ AT+XBANDSEL AT+XCOPS AT+XCSPAGING AT+XEONS AT+XREG AT+XAACOPS AT+XUBANDSEL AT+XRAT AT+CPLS AT+CPOL AT+XHOMEZR AT+XCSQ AT+CHUP AT+CMOD AT+CMUT AT+CTFR AT+VTS AT+XCALLSTAT AT+XDTMF AT+XVTS AT+CSTA AT+CVHU AT+VTD AT+CCWE AT+CR AT+CRC AT+XPROGRESS AT+XREDIAL AT+CAOC AT+XLIN AT+CCFC AT+CCWA AT+CHLD AT+CLCC AT+CLCK AT+CLIP AT+CLIR AT+CNAP AT+COLP AT+COLR AT+CPWD AT+CSSN AT+CUSD AT+CCUG AT+CBST AT+CEER AT+CGACT AT+CGANS AT+CGATT AT+CGAUTO AT+CGCLASS AT+CGCMOD AT+CGDATA AT+CGDCONT AT+CGDSCONT AT+CGEQMIN AT+CGEQNEG AT+CGEQREQ AT+CGEREP AT+CGPADDR AT+CGQMIN AT+CGQREQ AT+CGTFT AT+XCGCLASS AT+XDNS AT+XGAUTH AT+FCLASS AT+CRLP AT+XNVMPLMN AT+XNVMMCC AT+CBC AT+CCID AT+CCLK AT+CFUN AT+CGMI AT+CGMM AT+CGMR AT+CGSN AT+GSN AT+CIMI AT+CMEE AT+CMUX AT+CNUM AT+CPIN AT+CPWROFF AT+CRSM AT+CSCS AT+CSIM AT+CSVM AT+CTZR AT+CTZU AT+IPR AT+XCTMS AT+XGENDATA AT+XPINCNT AT+XLOG AT+XMER AT+XSIMSTATE AT+TRACE AT+XL1SET AT+XSIO AT+XDLCTEST AT+XPOW AT+XCEER AT+XEER AT+XTRACECONFIG AT+XMUX AT+XFDOR AT+XFDORT AT+XCONFIG AT+XAPP AT+XHSDUPA AT+XCAP AT+CPIN2 AT+XDATACHANNEL AT+CONNECTPORT AT+CAMM AT+CACM AT+CCHO AT+CCHC AT+XCSP AT+NEER AT+CUAD AT+XUICC AT+XLEMA AT+XSYSTRACE AT+CLAC AT+CPUC AT+CLAN AT+CGLA AT+CRLA AT+CPAS AT+XSVM AT+XNOTIFYDUNSTATUS AT+XRXDIV AT+XRXDIV3GRAB AT+XMAGETKEY AT+XMAGETBLOCK AT+CPOS AT+CPOSR AT+CMOLR AT+CMTLR AT+CMTLRA AT+XCPOSR AT+XSETCAUSE AT+XSPEECHINFO OK
AT+TRACE=1 also seems to do something but after running that command, xgoldmon waits for messages that never arrives.
| Start (included) | End (included) | size | Content |
| 0x000000 | 0x0de800 - 1 | 890 KiB | Tarball |
| around 0x000228 | ? | Kernel command line | |
| 0x700204 | 0x700204 | 1 byte | USB switch0x00: MODEM USB routed to the USB connector0x01: SOC USB routed to the USB connector |
| 0x700208 | 0x700208 | 1 byte | Modem debug levelLO: Modem debug level set to LOWMI: Modem debug level set to MEDIUMHI: Modem debug level set to HIGH |
| 0x7FFC00 | 0x7FFC0F | 16 bytes | checksum |
| 0x7ffc10 | 0x7fffff | 1008 bytes | MDM settings ? |
Size of the partition: 0x800000 (8MiB)
You can dump the PARAM partition for the Galaxy SIII (GT-I9300) like that:
adb pull /dev/block/platform/dw_mmc/by-name/PARAM PARAM.img
That file at first looks like a tar archive.
$ file PARAM.img PARAM.img: POSIX tar archive (GNU)
And it indeed does contain a tarball:
$ tar tvf PARAM.img -rw-r--r-- se.infra/se.infra 3624 2013-11-28 13:33 adv-env.img -rw-r--r-- se.infra/se.infra 42023 2013-11-28 13:33 ani_upload_1_kernel_panic.jpg -rw-r--r-- se.infra/se.infra 39255 2013-11-28 13:33 ani_upload_2_cp_crash.jpg -rw-r--r-- se.infra/se.infra 47443 2013-11-28 13:33 ani_upload_3_forced_upload.jpg -rw-r--r-- se.infra/se.infra 10810 2013-11-28 13:33 ani_upload_4_hardware_reset.jpg -rw-r--r-- se.infra/se.infra 11586 2013-11-28 13:33 ani_upload_4_smpl.jpg -rw-r--r-- se.infra/se.infra 54151 2013-11-28 13:33 ani_upload_4_unknown_reset.jpg -rw-r--r-- se.infra/se.infra 11495 2013-11-28 13:33 ani_upload_4_watchdog_reset.jpg -rw-r--r-- se.infra/se.infra 12276 2013-11-28 13:33 ani_upload_4_wtsr.jpg -rw-r--r-- se.infra/se.infra 9703 2013-11-28 13:33 ani_upload_4_wtsr_smpl.jpg -rw-r--r-- se.infra/se.infra 12711 2013-11-28 13:33 ani_upload_5_user_fault.jpg -rw-r--r-- se.infra/se.infra 19098 2013-11-28 13:33 ani_upload_6_hsic_disconnected.jpg -rw-r--r-- se.infra/se.infra 84123 2013-11-28 13:33 download_error.jpg -rw-r--r-- se.infra/se.infra 73061 2013-11-28 13:33 download.jpg -rw-r--r-- se.infra/se.infra 64410 2013-11-28 13:33 logo.jpg -rw-r--r-- se.infra/se.infra 37205 2013-11-28 13:33 lpm.jpg -rw-r--r-- se.infra/se.infra 36572 2013-11-28 13:33 lpm_wireless.jpg -rw-r--r-- se.infra/se.infra 91511 2013-11-28 13:33 secure_error.jpg -rwxr-xr-x se.infra/se.infra 5851 2013-11-28 13:33 sud_0.jpg -rwxr-xr-x se.infra/se.infra 2713 2013-11-28 13:33 sud_1.jpg -rwxr-xr-x se.infra/se.infra 5634 2013-11-28 13:33 sud_2.jpg -rwxr-xr-x se.infra/se.infra 6292 2013-11-28 13:33 sud_3.jpg -rwxr-xr-x se.infra/se.infra 4604 2013-11-28 13:33 sud_4.jpg -rwxr-xr-x se.infra/se.infra 5706 2013-11-28 13:33 sud_5.jpg -rwxr-xr-x se.infra/se.infra 6792 2013-11-28 13:33 sud_6.jpg -rwxr-xr-x se.infra/se.infra 3885 2013-11-28 13:33 sud_7.jpg -rwxr-xr-x se.infra/se.infra 6826 2013-11-28 13:33 sud_8.jpg -rwxr-xr-x se.infra/se.infra 6528 2013-11-28 13:33 sud_9.jpg -rw-r--r-- se.infra/se.infra 168616 2013-11-28 13:33 warning.jpg
The size of the PARAM.img file is exactly 8MiB:
$ ls -lah PARAM.img [...] 8.0M [...] PARAM.img $ ls -la PARAM.img [...] 8388608 [...] PARAM.img
And we can get the size of the tarball with --totals:
$ man tar
[...]
--totals[=SIGNAL]
Print total bytes after processing the archive. [...]
For example:
$ tar --totals -tf PARAM.img adv-env.img [many files] warning.jpg Total bytes read: 911360 (890KiB, 286MiB/s)
So here the tarball terminates way before the end of the PARAM.img file.
911360 is 0xde800:
$ python [...] >>> hex(911360) '0xde800'
But we still have things after the tarball:
$ hexdump -C PARAM.img 000dd4a0 05 00 14 00 50 07 ff d9 00 00 00 00 00 00 00 00 |....P...........| 000dd4b0 00 00 00 00 00 00 00 00 00 00 00 00 00 00 00 00 |................| * 00700000 03 00 fe ca 00 01 00 00 00 00 00 00 00 00 00 00 |................| 00700010 00 00 00 00 00 00 00 00 00 00 00 00 00 00 00 00 |................| * 00700200 00 00 00 00 03 00 00 00 4c 4f 00 00 00 00 00 00 |........LO......| 00700210 00 00 00 00 03 00 00 00 01 00 00 00 00 00 00 00 |................| 00700220 00 00 00 00 00 00 00 00 63 6f 6e 73 6f 6c 65 3d |........console=| 00700230 72 61 6d 20 6c 6f 67 6c 65 76 65 6c 3d 34 00 00 |ram loglevel=4..| 00700240 00 00 00 00 00 00 00 00 00 00 00 00 00 00 00 00 |................| * 00700e20 00 00 00 00 00 00 00 00 ff ff ff ff ff ef 7f ff |................| 00700e30 ff ff f7 ff ff ff f7 ff ff fe ff ff ff ff 7f ff |................| 00700e40 fb ef ff ff ff fb ff df ff ff ff ff ff ff ff ff |................| 00700e50 df bf ff ff 7f ef f7 ff f7 ff ff ff ff fe ff ff |................| 00700e60 ff ff ff ff ef fb ff ef ff fb ff ff fd ff f7 ef |................| 00700e70 ff ff ff ff f5 ff ff ff ff ff ff ff ff ff ff ff |................| 00700e80 ff ff ff fe ff ef ff ff ff bf fd ff ff ff ff ff |................| 00700e90 ff ff ff ff ff ff f7 fb ff ff ff eb ff ff ff eb |................| 00700ea0 ff ff ff ff ff ff ff ff ff ff ff ff ff ff ff fb |................| 00700eb0 ff ff ff ff ff ff ff ff ff ff ff df ff ff ff ff |................| 00700ec0 ff ff ff ff ff ff f7 ff ff ff ff ff ff ff ff ff |................| 00700ed0 ff ff ff ff ff ff ff ff ff ff ff ff ff ff ff fb |................| 00700ee0 df ff ff ff ff ff ff ff ff ff ff ff ff ff d7 ff |................| 00700ef0 ff ff ff af ff ff ff fe ff ff ff ff ff ff ff ff |................| 00700f00 ff ef ff ff ff 7f ff ff ff df ff ff f7 ff ff ff |................| 00700f10 ff ff ff ff ff ff ff ff ff ff ff ef ff ff f7 ff |................| 00700f20 ff ff ff ff ff ff ff ff ff fe ef ff ff ef fb df |................| 00700f30 ff ff ff ff ff fb ff ff ff ff ff ff ff ff ff ff |................| 00700f40 ff ff f5 ff ff ff ff fb ff ff ff ff ff ff ff ff |................| 00700f50 fb ff ff fb fd ff ff ff ff ff ff ff ff ff ff ff |................| 00700f60 f7 ff ff ef f7 ff ff ef ff ff ff ff ff 9e ff fd |................| 00700f70 ff ff ff ff fb ff ff de f3 fb ff ff ff ef df ff |................| 00700f80 ff ff ff ff ff fb ff bf ff ff ff ff ff ff ff fd |................| 00700f90 ff fe f7 fe ff eb ff ff ff fb ff ff df ff ff ff |................| 00700fa0 df ff ff ff ff ff ff ff ff ff fb ff ff ff ff fb |................| 00700fb0 ff ff ff df ff ff ff ff fe fe fe ff ff f7 ff ff |................| 00700fc0 ff ff ff ff ff ff ff ff ff ff ff ff ff ff ff fb |................| 00700fd0 fd ff ff ff ff fd ff ff ff ff ff ff fe ff ff ff |................| 00700fe0 ff ff df ff ff ff ff fb ff ff ff ff ff ff ff ff |................| 00700ff0 ff f7 df ff ff ff ff ff ff ff ff ff ff ff ff ff |................| 00701000 00 00 00 00 00 00 00 00 00 00 00 00 00 00 00 00 |................| * 007ffc00 d4 ad 55 ff 52 e9 ed 4c f8 d1 9c 08 79 b6 e9 6c |..U.R..L....y..l| 007ffc10 00 00 00 00 00 00 00 00 00 00 00 00 00 00 00 00 |................| * 00800000Questions:
Here's the content of the adv-env.img file:
$ hexdump -C adv-env.img 00000000 03 00 fe ca 00 01 00 00 00 00 00 00 00 00 00 00 |................| 00000010 00 00 00 00 00 00 00 00 00 00 00 00 00 00 00 00 |................| * 00000200 04 00 00 00 01 00 00 00 4c 4f 00 00 00 00 00 00 |........LO......| 00000210 00 00 00 00 00 00 00 00 00 00 00 00 00 00 00 00 |................| 00000220 00 00 00 00 00 00 00 00 63 6f 6e 73 6f 6c 65 3d |........console=| 00000230 72 61 6d 20 6c 6f 67 6c 65 76 65 6c 3d 34 00 00 |ram loglevel=4..| 00000240 00 00 00 00 00 00 00 00 00 00 00 00 00 00 00 00 |................| * 00000e20 00 00 00 00 00 00 00 00 |........| 00000e28Questions:
Default kernel command line: console=ram loglevel=4
console=ram loglevel=8 through the bootloader setenv commandSee MidasBootloader for more details on how to change the command line parameters.
After changing the environment variable, we still have loglevel=4 in the adv-env.img file that is in the tarball:
adv-env.img
$ hexdump -C adv-env.img 00000000 03 00 fe ca 00 01 00 00 00 00 00 00 00 00 00 00 |................| 00000010 00 00 00 00 00 00 00 00 00 00 00 00 00 00 00 00 |................| * 00000200 04 00 00 00 01 00 00 00 4c 4f 00 00 00 00 00 00 |........LO......| 00000210 00 00 00 00 00 00 00 00 00 00 00 00 00 00 00 00 |................| 00000220 00 00 00 00 00 00 00 00 63 6f 6e 73 6f 6c 65 3d |........console=| 00000230 72 61 6d 20 6c 6f 67 6c 65 76 65 6c 3d 34 00 00 |ram loglevel=4..| 00000240 00 00 00 00 00 00 00 00 00 00 00 00 00 00 00 00 |................| * 00000e20 00 00 00 00 00 00 00 00 |........| 00000e28
And the actual kernel parameters were instead saved after the tarball:
$ hexdump PARAM.img * 00700200 00 00 00 00 03 00 00 00 4c 4f 00 00 00 00 00 00 |........LO......| 00700210 00 00 00 00 03 00 00 00 01 00 00 00 00 00 00 00 |................| 00700220 00 00 00 00 00 00 00 00 63 6f 6e 73 6f 6c 65 3d |........console=| 00700230 72 61 6d 20 6c 6f 67 6c 65 76 65 6c 3d 38 00 00 |ram loglevel=8..| 00700240 00 00 00 00 00 00 00 00 00 00 00 00 00 00 00 00 |................| *Results:
On a GT-I9300, if I set the address 0x00700204 to 00, it switch to the USB to the modem's USB, and Bus 002 Device 095: ID 1519:0020 Comneon HSIC Device appears when connecting the GT-I9300 to a computer.
When I set it back to 01, I can have ADB again.
Here's the diff:
$ vbindiff PARAM.img PARAM.img.new PARAM.img 0070 0204: 00 00 00 00 4C 4F 00 00 00 00 00 00 00 00 00 00 ....LO.. ........ 0070 0214: 03 00 00 00 01 00 00 00 00 00 00 00 00 00 00 00 ........ ........ 0070 0224: 00 00 00 00 63 6F 6E 73 6F 6C 65 3D 72 61 6D 20 ....cons ole=ram 0070 0234: 6C 6F 67 6C 65 76 65 6C 3D 38 00 00 00 00 00 00 loglevel =8...... 0070 0244: 00 00 00 00 00 00 00 00 00 00 00 00 00 00 00 00 ........ ........ 0070 0254: 00 00 00 00 00 00 00 00 00 00 00 00 00 00 00 00 ........ ........ 0070 0264: 00 00 00 00 00 00 00 00 00 00 00 00 00 00 00 00 ........ ........ 0070 0274: 00 00 00 00 00 00 00 00 00 00 00 00 00 00 00 00 ........ ........ 0070 0284: 00 00 00 00 00 00 00 00 00 00 00 00 00 00 00 00 ........ ........ 0070 0294: 00 00 00 00 00 00 00 00 00 00 00 00 00 00 00 00 ........ ........ 0070 02A4: 00 00 00 00 00 00 00 00 00 00 00 00 00 00 00 00 ........ ........ 0070 02B4: 00 00 00 00 00 00 00 00 00 00 00 00 00 00 00 00 ........ ........ 0070 02C4: 00 00 00 00 00 00 00 00 00 00 00 00 00 00 00 00 ........ ........ 0070 02D4: 00 00 00 00 00 00 00 00 00 00 00 00 00 00 00 00 ........ ........ 0070 02E4: 00 00 00 00 00 00 00 00 00 00 00 00 00 00 00 00 ........ ........ 0070 02F4: 00 00 00 00 00 00 00 00 00 00 00 00 00 00 00 00 ........ ........ PARAM.img.new 0070 0204: 01 00 00 00 4C 4F 00 00 00 00 00 00 00 00 00 00 ....LO.. ........ 0070 0214: 03 00 00 00 01 00 00 00 00 00 00 00 00 00 00 00 ........ ........ 0070 0224: 00 00 00 00 63 6F 6E 73 6F 6C 65 3D 72 61 6D 20 ....cons ole=ram 0070 0234: 6C 6F 67 6C 65 76 65 6C 3D 38 00 00 00 00 00 00 loglevel =8...... 0070 0244: 00 00 00 00 00 00 00 00 00 00 00 00 00 00 00 00 ........ ........ 0070 0254: 00 00 00 00 00 00 00 00 00 00 00 00 00 00 00 00 ........ ........ 0070 0264: 00 00 00 00 00 00 00 00 00 00 00 00 00 00 00 00 ........ ........ 0070 0274: 00 00 00 00 00 00 00 00 00 00 00 00 00 00 00 00 ........ ........ 0070 0284: 00 00 00 00 00 00 00 00 00 00 00 00 00 00 00 00 ........ ........ 0070 0294: 00 00 00 00 00 00 00 00 00 00 00 00 00 00 00 00 ........ ........ 0070 02A4: 00 00 00 00 00 00 00 00 00 00 00 00 00 00 00 00 ........ ........ 0070 02B4: 00 00 00 00 00 00 00 00 00 00 00 00 00 00 00 00 ........ ........ 0070 02C4: 00 00 00 00 00 00 00 00 00 00 00 00 00 00 00 00 ........ ........ 0070 02D4: 00 00 00 00 00 00 00 00 00 00 00 00 00 00 00 00 ........ ........ 0070 02E4: 00 00 00 00 00 00 00 00 00 00 00 00 00 00 00 00 ........ ........ 0070 02F4: 00 00 00 00 00 00 00 00 00 00 00 00 00 00 00 00 ........ ........ ┌──────────────────────────────────────────────────────────────────────────────┐ │Arrow keys move F find RET next difference ESC quit T move top │ │C ASCII/EBCDIC E edit file G goto position Q quit B move bottom │ └──────────────────────────────────────────────────────────────────────────────┘
At the next boot the s-boot bootloader will then configure the USB switch to connect to the modem USB.
You can also get that behavior with the stock OS if you go to the phone application and enter *#7284# and set USB toMODEM and then click on the SAVE and RESET button. It will then reboot the phone automatically.
If you run the stock OS, you can't count on recoveries as it tend to replace them the recoveries with its own recovery, but you can still use *#7284# to change USB back to PDA instead of MODEM.
With Replicant, you can enable the terminal, adb and root for adb and applications in the developers settings, and once that is done, through the terminal application you can get root with su and then type the following command to enable adb again:
echo PDA > /sys/devices/virtual/sec/switch/usb_sel
PARAM partition and copy the modified PARAM image to the PARAM partition with dd.
In the stock OS, if we go to the phone application and dial *#9900# and change the Debug Level Enabled (LOW MEDIUM and HIGH are available), the PARAM partition will be modified (and then the phone will be rebooted):
Here we switched the setting from LOW to MEDIUM, and it produces a difference at 0x700208:
$ vbindiff low-2/PARAM.img medium-2/PARAM.img low-2/PARAM.img 0070 0208: 4C 4F 00 00 00 00 00 00 00 00 00 00 03 00 00 00 LO...... ........ 0070 0218: 01 00 00 00 00 00 00 00 00 00 00 00 00 00 00 00 ........ ........ 0070 0228: 63 6F 6E 73 6F 6C 65 3D 72 61 6D 20 6C 6F 67 6C console= ram logl 0070 0238: 65 76 65 6C 3D 38 00 00 00 00 00 00 00 00 00 00 evel=8.. ........ 0070 0248: 00 00 00 00 00 00 00 00 00 00 00 00 00 00 00 00 ........ ........ 0070 0258: 00 00 00 00 00 00 00 00 00 00 00 00 00 00 00 00 ........ ........ 0070 0268: 00 00 00 00 00 00 00 00 00 00 00 00 00 00 00 00 ........ ........ 0070 0278: 00 00 00 00 00 00 00 00 00 00 00 00 00 00 00 00 ........ ........ 0070 0288: 00 00 00 00 00 00 00 00 00 00 00 00 00 00 00 00 ........ ........ 0070 0298: 00 00 00 00 00 00 00 00 00 00 00 00 00 00 00 00 ........ ........ 0070 02A8: 00 00 00 00 00 00 00 00 00 00 00 00 00 00 00 00 ........ ........ 0070 02B8: 00 00 00 00 00 00 00 00 00 00 00 00 00 00 00 00 ........ ........ 0070 02C8: 00 00 00 00 00 00 00 00 00 00 00 00 00 00 00 00 ........ ........ 0070 02D8: 00 00 00 00 00 00 00 00 00 00 00 00 00 00 00 00 ........ ........ 0070 02E8: 00 00 00 00 00 00 00 00 00 00 00 00 00 00 00 00 ........ ........ 0070 02F8: 00 00 00 00 00 00 00 00 00 00 00 00 00 00 00 00 ........ ........ medium-2/PARAM.img 0070 0208: 4D 49 00 00 00 00 00 00 00 00 00 00 03 00 00 00 MI...... ........ 0070 0218: 01 00 00 00 00 00 00 00 00 00 00 00 00 00 00 00 ........ ........ 0070 0228: 63 6F 6E 73 6F 6C 65 3D 72 61 6D 20 6C 6F 67 6C console= ram logl 0070 0238: 65 76 65 6C 3D 38 00 00 00 00 00 00 00 00 00 00 evel=8.. ........ 0070 0248: 00 00 00 00 00 00 00 00 00 00 00 00 00 00 00 00 ........ ........ 0070 0258: 00 00 00 00 00 00 00 00 00 00 00 00 00 00 00 00 ........ ........ 0070 0268: 00 00 00 00 00 00 00 00 00 00 00 00 00 00 00 00 ........ ........ 0070 0278: 00 00 00 00 00 00 00 00 00 00 00 00 00 00 00 00 ........ ........ 0070 0288: 00 00 00 00 00 00 00 00 00 00 00 00 00 00 00 00 ........ ........ 0070 0298: 00 00 00 00 00 00 00 00 00 00 00 00 00 00 00 00 ........ ........ 0070 02A8: 00 00 00 00 00 00 00 00 00 00 00 00 00 00 00 00 ........ ........ 0070 02B8: 00 00 00 00 00 00 00 00 00 00 00 00 00 00 00 00 ........ ........ 0070 02C8: 00 00 00 00 00 00 00 00 00 00 00 00 00 00 00 00 ........ ........ 0070 02D8: 00 00 00 00 00 00 00 00 00 00 00 00 00 00 00 00 ........ ........ 0070 02E8: 00 00 00 00 00 00 00 00 00 00 00 00 00 00 00 00 ........ ........ 0070 02F8: 00 00 00 00 00 00 00 00 00 00 00 00 00 00 00 00 ........ ........ ┌──────────────────────────────────────────────────────────────────────────────┐ │Arrow keys move F find RET next difference ESC quit T move top │ │C ASCII/EBCDIC E edit file G goto position Q quit B move bottom │ └──────────────────────────────────────────────────────────────────────────────┘
And here's what happens when switching from MEDIUM to HIGH:
$ vbindiff medium-2/PARAM.img high-1/PARAM.img medium-2/PARAM.img 0070 0200: 00 00 00 00 01 00 00 00 4D 49 00 00 00 00 00 00 ........ MI...... 0070 0210: 00 00 00 00 03 00 00 00 01 00 00 00 00 00 00 00 ........ ........ 0070 0220: 00 00 00 00 00 00 00 00 63 6F 6E 73 6F 6C 65 3D ........ console= 0070 0230: 72 61 6D 20 6C 6F 67 6C 65 76 65 6C 3D 38 00 00 ram logl evel=8.. 0070 0240: 00 00 00 00 00 00 00 00 00 00 00 00 00 00 00 00 ........ ........ 0070 0250: 00 00 00 00 00 00 00 00 00 00 00 00 00 00 00 00 ........ ........ 0070 0260: 00 00 00 00 00 00 00 00 00 00 00 00 00 00 00 00 ........ ........ 0070 0270: 00 00 00 00 00 00 00 00 00 00 00 00 00 00 00 00 ........ ........ 0070 0280: 00 00 00 00 00 00 00 00 00 00 00 00 00 00 00 00 ........ ........ 0070 0290: 00 00 00 00 00 00 00 00 00 00 00 00 00 00 00 00 ........ ........ 0070 02A0: 00 00 00 00 00 00 00 00 00 00 00 00 00 00 00 00 ........ ........ 0070 02B0: 00 00 00 00 00 00 00 00 00 00 00 00 00 00 00 00 ........ ........ 0070 02C0: 00 00 00 00 00 00 00 00 00 00 00 00 00 00 00 00 ........ ........ 0070 02D0: 00 00 00 00 00 00 00 00 00 00 00 00 00 00 00 00 ........ ........ 0070 02E0: 00 00 00 00 00 00 00 00 00 00 00 00 00 00 00 00 ........ ........ 0070 02F0: 00 00 00 00 00 00 00 00 00 00 00 00 00 00 00 00 ........ ........ high-1/PARAM.img 0070 0200: 00 00 00 00 01 00 00 00 48 49 00 00 00 00 00 00 ........ HI...... 0070 0210: 00 00 00 00 03 00 00 00 01 00 00 00 00 00 00 00 ........ ........ 0070 0220: 00 00 00 00 00 00 00 00 63 6F 6E 73 6F 6C 65 3D ........ console= 0070 0230: 72 61 6D 20 6C 6F 67 6C 65 76 65 6C 3D 38 00 00 ram logl evel=8.. 0070 0240: 00 00 00 00 00 00 00 00 00 00 00 00 00 00 00 00 ........ ........ 0070 0250: 00 00 00 00 00 00 00 00 00 00 00 00 00 00 00 00 ........ ........ 0070 0260: 00 00 00 00 00 00 00 00 00 00 00 00 00 00 00 00 ........ ........ 0070 0270: 00 00 00 00 00 00 00 00 00 00 00 00 00 00 00 00 ........ ........ 0070 0280: 00 00 00 00 00 00 00 00 00 00 00 00 00 00 00 00 ........ ........ 0070 0290: 00 00 00 00 00 00 00 00 00 00 00 00 00 00 00 00 ........ ........ 0070 02A0: 00 00 00 00 00 00 00 00 00 00 00 00 00 00 00 00 ........ ........ 0070 02B0: 00 00 00 00 00 00 00 00 00 00 00 00 00 00 00 00 ........ ........ 0070 02C0: 00 00 00 00 00 00 00 00 00 00 00 00 00 00 00 00 ........ ........ 0070 02D0: 00 00 00 00 00 00 00 00 00 00 00 00 00 00 00 00 ........ ........ 0070 02E0: 00 00 00 00 00 00 00 00 00 00 00 00 00 00 00 00 ........ ........ 0070 02F0: 00 00 00 00 00 00 00 00 00 00 00 00 00 00 00 00 ........ ........ ┌──────────────────────────────────────────────────────────────────────────────┐ │Arrow keys move F find RET next difference ESC quit T move top │ │C ASCII/EBCDIC E edit file G goto position Q quit B move bottom │ └──────────────────────────────────────────────────────────────────────────────┘
Unfortunately in both cases, it also changes what appears to be a checksum:
$ vbindiff medium-2/PARAM.img high-1/PARAM.img medium-2/PARAM.img 007F FC00: 0D 4D 03 C0 FD 5C A8 D1 2B 14 25 76 03 51 C5 27 .M...\.. +.%v.Q.' 007F FC10: 00 00 00 00 00 00 00 00 00 00 00 00 00 00 00 00 ........ ........ 007F FC20: 00 00 00 00 00 00 00 00 00 00 00 00 00 00 00 00 ........ ........ 007F FC30: 00 00 00 00 00 00 00 00 00 00 00 00 00 00 00 00 ........ ........ 007F FC40: 00 00 00 00 00 00 00 00 00 00 00 00 00 00 00 00 ........ ........ 007F FC50: 00 00 00 00 00 00 00 00 00 00 00 00 00 00 00 00 ........ ........ 007F FC60: 00 00 00 00 00 00 00 00 00 00 00 00 00 00 00 00 ........ ........ 007F FC70: 00 00 00 00 00 00 00 00 00 00 00 00 00 00 00 00 ........ ........ 007F FC80: 00 00 00 00 00 00 00 00 00 00 00 00 00 00 00 00 ........ ........ 007F FC90: 00 00 00 00 00 00 00 00 00 00 00 00 00 00 00 00 ........ ........ 007F FCA0: 00 00 00 00 00 00 00 00 00 00 00 00 00 00 00 00 ........ ........ 007F FCB0: 00 00 00 00 00 00 00 00 00 00 00 00 00 00 00 00 ........ ........ 007F FCC0: 00 00 00 00 00 00 00 00 00 00 00 00 00 00 00 00 ........ ........ 007F FCD0: 00 00 00 00 00 00 00 00 00 00 00 00 00 00 00 00 ........ ........ 007F FCE0: 00 00 00 00 00 00 00 00 00 00 00 00 00 00 00 00 ........ ........ 007F FCF0: 00 00 00 00 00 00 00 00 00 00 00 00 00 00 00 00 ........ ........ high-1/PARAM.img 007F FC00: 67 39 08 85 9C 4A FE B8 65 47 9C C8 BB 95 DF B7 g9...J.. eG...... 007F FC10: 00 00 00 00 00 00 00 00 00 00 00 00 00 00 00 00 ........ ........ 007F FC20: 00 00 00 00 00 00 00 00 00 00 00 00 00 00 00 00 ........ ........ 007F FC30: 00 00 00 00 00 00 00 00 00 00 00 00 00 00 00 00 ........ ........ 007F FC40: 00 00 00 00 00 00 00 00 00 00 00 00 00 00 00 00 ........ ........ 007F FC50: 00 00 00 00 00 00 00 00 00 00 00 00 00 00 00 00 ........ ........ 007F FC60: 00 00 00 00 00 00 00 00 00 00 00 00 00 00 00 00 ........ ........ 007F FC70: 00 00 00 00 00 00 00 00 00 00 00 00 00 00 00 00 ........ ........ 007F FC80: 00 00 00 00 00 00 00 00 00 00 00 00 00 00 00 00 ........ ........ 007F FC90: 00 00 00 00 00 00 00 00 00 00 00 00 00 00 00 00 ........ ........ 007F FCA0: 00 00 00 00 00 00 00 00 00 00 00 00 00 00 00 00 ........ ........ 007F FCB0: 00 00 00 00 00 00 00 00 00 00 00 00 00 00 00 00 ........ ........ 007F FCC0: 00 00 00 00 00 00 00 00 00 00 00 00 00 00 00 00 ........ ........ 007F FCD0: 00 00 00 00 00 00 00 00 00 00 00 00 00 00 00 00 ........ ........ 007F FCE0: 00 00 00 00 00 00 00 00 00 00 00 00 00 00 00 00 ........ ........ 007F FCF0: 00 00 00 00 00 00 00 00 00 00 00 00 00 00 00 00 ........ ........ ┌──────────────────────────────────────────────────────────────────────────────┐ │Arrow keys move F find RET next difference ESC quit T move top │ │C ASCII/EBCDIC E edit file G goto position Q quit B move bottom │ └──────────────────────────────────────────────────────────────────────────────┘To capture that I had to :
$*#9900# and let it rebootBOOT (do not flash it to RECOVERY)If for some reason I rebooted to the RECOVERY partition, the setting would be changed back to LOW (this was verified by dialing *#9900# and then looking at the setting value without changing it).
I then tried to workaround the checksum issue by just reusing as-is the PARAM with LOW/MEDIUM/HIGH and potentially modifying them on top to switch the modem routing to the SOC or the modem USB (as that doesn't affect the checksum).
That worked fine with the stock OS, we can see the settings being changed (from LOW to HIGH for instance) after dialing *#9900#, and by reflashing a Replicant recovery with root to the BOOT partition (and reflashing the stock BOOT after that), I could verify that PARAM wasn't modified again after that and that the changes were really taken into account.
But after installing Replicant (still by using the recovery in the BOOT partition and by verifying that the PARAM partition hasn't been modified) once we boot in Replicant we don't have any messages anymore through xgoldmon, even with the USB routing to the modem USB and the debug to HIGH. With LineageOS (so with the nonfree samsung RIL library instead of the free software implementation), debug messages didn't appear either on /dev/ttyACM1 with xgoldmon.
1 https://roberto.greyhats.it/2016/05/samsung-access-rild.html
� Welcome to Samsung Primitive Bootloader. build time: Nov 11 2011 15:10:05 current time: ff/1f/3 3f:7f:70 [set_mmc_ocr] Sector Mode [hsmmc_init] MMC card is detected Product Name : VYL00M <display_card_info:1009> ext_csd <display_card_info:1011>card_size: 15028 Total Card Size: 15029 MByte mmc_init: card initialization completed! pbl found bootable sbl in #53248. jump to sbl 0x4d400000. Secondary Bootloader v3.1 version. Copyright (C) 2011 System S/W Group. Samsung Electronics Co., Ltd. Board: C1 REV 02 / Apr 25 2012 00:55:25 current time: ff/1f/3 3f:7f:71 booting code=0xc0c0c0c0 [set_mmc_ocr] Sector Mode [hsmmc_init] MMC card is detected Product Name : VYL00M CID:150100 56594c30 304d1999 c829381f <display_card_info:1046> ext_csd <display_card_info:1048>card_size: 15028 Total Card Size: 15029 MByte Total Sector Count: 30777344 MoviNand Initialization Complete! ===== PARTITION INFORMATION ===== ID DEVICE FIRST UNIT NO. UNITS GANG (0x0) MMC 0 0 BOOT (0x1) MMC 0 0 EFS (0x4) MMC 8192 40960 SBL1 (0x2) MMC 49152 2560 SBL2 (0x3) MMC 53248 2560 PARAM (0x5) MMC 57344 16384 KERNEL (0x6) MMC 73728 16384 RECOVERY (0x7) MMC 90112 16384 CACHE (0x8) MMC 106496 409600 MODEM (0x9) MMC 516096 32768 FACTORYFS (0xa) MMC 548864 1744896 DATAFS (0xb) MMC 2293760 4194304 UMS (0xc) MMC 6488064 23232512 HIDDEN (0xd) MMC 29720576 1048576 loke_init: j4fs_open..success <start_checksum:1031>CHECKSUM_HEADER_SECTOR :42 <start_checksum:1033>offset:42, size:1024 Not Need Movinand Checksum load_lfs_parameters valid magic code and version. switch_sel_str='1' load_debug_level: read debug level successfully(0x574f4c44)...LOW init_ddi_data: usable ddi data. init_fuel_gauge : not por status fuel_gauge_get_version: [1]=19, [0]=d3 init_fuel_gauge: vcell = 4058 mV, vfocv = 4131 mV, soc = 96 microusb_get_attached_device: STATUS1:0x3c, 2:0x0 microusb_get_attached_device: STATUS1:0x3c, 2:0x0 9172 = (403800 - 329011)*12264/100000 [1] 409450 = (9172 * 100000) / 10936 + 325581 0x0|0h,0xff|0h,0x7f|80h,0xff|1h,0x0|0h,0x7|91h,0x60|abh,0x64|0h,0x1c|0h,0xcb|16h,0xff|70h,0xff|73h,0x0|2h,0x60|b1h,0x60|d6h,0x7|91h,0x7|d0h,0x6d|c9h,0xa0|5ah,0x0|0h,0x2|90h,0x1|48h,0x16|e5h,0x0|1h,0x7|d0h,0xc9|6ah,0x1c|16h,0xcf|c2h,0x0|feh,0x23|14h,0x2|80h,0x7|8fh,0x4d|78h,0x0|92h,0x1|0h,0x7|d0h,0x14|0h,0x23|5h,0x16|0h,0x7f|ceh,0x0|7h,0x8e|84h,0x10|3bh,0x8|10h,0xe3|e1h,0x29|eh,0x40|0h,0x0|0h,0x4|0h,0x6|40h,0x8|0h,0x0|0h,0x5|52h,0x7|d4h,0x1|0h,0x5|e0h,0x0|78h,0x10|25h,0x50|30h,0x6|0h,0x16|80h,0x14|0h,0x5|deh,0xe0|0h,0x10|0h,0x4|10h,0x7f|ffh,0x0|0h,0xcf|0h,0x1|f4h,0x32|0h,0x0|0h,0x60|abh,0xe2|cfh,0x7|91h,0xf3|0h,0xff|fch,0xff|fch,0xba|cfh,0x23|c5h, 0xc|47h,0xb|c2h,0x0|1h,0x16|7dh,0x0|3h,0x0|6h,0xff|90h,0xff|ffh,0x4c|10h,0x0|0h,0x4c|30h,0xff|c0h,0x40|0h,0x0|0h,0xce|a0h,0x9|10h,0x0|0h,0x0|0h,0x0|0h,0x0|0h,0x0|0h,0x0|0h,0x60|b1h,0xff|47h,0x3f|e7h,0x55|71h,0xff|f3h,0xce|9bh,0x0|76h,0x39|10h,0xcb|16h,0x60|abh, init_microusb_ic: MUIC: CONTROL1:0x1b init_microusb_ic: MUIC: CONTROL1:0x1b init_microusb_ic: MUIC: CONTROL2:0x1a init_microusb_ic: MUIC: CONTROL2:0x3a reading nps status file is successfully!. nps status=0x504d4f43 PMIC_IRQSRC = 0x0 PMIC_IRQ1 = 0xb PMIC_IRQ2 = 0x1b PMIC_IRQ3 = 0x0 PMIC_IRQ4 = 0x11 PMIC_STATUS1 = 0x1 PMIC_STATUS2 = 0x10 PMIC_STATUS3 = 0x0 PMIC_STATUS4 = 0x0 bootloader base address=0x4d400000 LPDDR0 1st. cached=0x40000000, size=0xe400000 LPDDR0 non-cached=0x4e400000, size=0xa00000 LPDDR0 2nd. cached=0x4ee00000, size=0x1200000 RST_STAT = 0x10000 get_hwrev() = 8 board_process_platform: MAGIC c0c0c0c0 at 40000000! board_process_platform: debug level is 574f4c44! microusb_get_attached_device: STATUS1:0x3c, 2:0x0 microusb_get_attached_device: STATUS1:0x3c, 2:0x0 microusb_get_attached_device: STATUS1:0x3c, 2:0x0 microusb_get_attached_device: STATUS1:0x3c, 2:0x0 hw_pm_status: jig_status = 1, chg_status = 0 s5p_set_high_clk: ARM Clock = 800MHz. ......kernel is non signed binary. a2, 83, 1f, lcdtype = 0 Autoboot (0 seconds) in progress, press any key to stop boot_kernel: debug level low! checkbit: find RECOVERY checkbit (0) ......kernel is non signed binary. ATAG_CORE: 5 54410001 0 0 0 MEMCONFIG: 20e01323 20e01323 ATAG_MEM: 4 54410002 10000000 40000000 ATAG_MEM: 4 54410002 10000000 50000000 ATAG_MEM: 4 54410002 10000000 60000000 ATAG_MEM: 4 54410002 10000000 70000000 ATAG_SERIAL: 4 XXXXXXXX XXXXXXXX XXXXXXXX ATAG_REVISION: 3 54410007 8 ATAG_CMDLINE: 33 54410009 'loglevel=4 console=ram sec_debug.enable=0 sec_debug.enable_user=0 c1_watchdog.sec_pet=5 sec_log=0x100000@0x5ea00000 s3cfb.bootloaderfb=0x5ec00000 lcdtype=3 consoleblank=0 lpj=3981312 vmalloc=144m' ATAG_NONE: 0 0 Starting kernel at 0x40008000...
SBL> help Following commands are supported: * movichk * setenv * saveenv * printenv * help * reset * boot * kernel * loadpart * loadkernel * erasepart * format * open * close * eraseall * showpart * addpart * delpart * savepart * nkernel * nandread * nandwrite * usb * crc * log * sud * upload * emmc * smartreport * keyread * readadc * mmctest * usb_read * usb_write * fuelgauge * wdt To get commands help, Type "help <command>"
And their respective help
SBL> help movichk
* Help : movichk
* Usage :
SBL> help setenv
* Help : setenv
* Usage : setenv [name] [value] . .
Modify current environment info on ram
SBL> help saveenv
* Help : saveenv
* Usage : saveenv
Save cuurent environment info to flash
SBL> help printenv
* Help : printenv
* Usage : printenv
Print current environment info on ram
SBL> help help
* Help : help
* Usage : help [command]
SBL> help reset
* Help : reset
* Usage : reboot
Reboot system
SBL> help boot
* Help : boot
* Usage : boot [kernel options]
Boot Linux with optional kernel options
SBL> help kernel
* Help : kernel
* Usage : kernel hex_adr
Change the Linux kernel base
SBL> help loadpart
* Help : loadpart
* Usage : load partition from storage device.
SBL> help loadkernel
* Help : loadkernel
* Usage : load kernel from storage device.
SBL> help erasepart
* Help : erasepart
* Usage : erase partition.
SBL> help format
* Help : format
* Usage : format
format device
SBL> help open
* Help : open
* Usage : open
open device
SBL> help close
* Help : close
* Usage : close
close device
SBL> help eraseall
* Help : eraseall
* Usage : eraseall
erase all units
SBL> help showpart
* Help : showpart
* Usage : showpart
show partition information
SBL> help addpart
* Help : addpart
* Usage : addpart <id> <attr> <unit>
add partition information
- ex) addpart 0x(id) 0x1(attr) 0x10(units)
SBL> help delpart
* Help : delpart
* Usage : delpart
delete last partition information
SBL> help savepart
* Help : savepart
* Usage : savepart
save partition information
SBL> help nkernel
* Help : nkernel
* Usage : nkernel command
* Usage : nkernel
read kernel from flash to DDR
SBL> help nandread
* Help : nandread
* Usage : * Usage : nandread <PARTID> <SIZE>
read partition from flash to SDRAM(0x80000000)
SBL> help nandwrite
* Help : nandwrite
* Usage : * Usage: nandwrite <PARTID> <SIZE>
write partition from SDRAM(0x80000000) to flash
SBL> help usb
* Help : usb
* Usage : usb download command
SBL> help crc
* Help : crc
* Usage : crc <crc> <addr> <len>
SBL> help log
* Help : log
* Usage : print log
SBL> help sud
* Help : sud
* Usage : sud command
SBL> help upload
* Help : upload
* Usage : upload
SBL> help emmc
* Help : emmc
* Usage : emmc <addr>
SBL> help smartreport
* Help : smartreport
* Usage : smartreport [mode]
SBL> help keyread
* Help : keyread
* Usage : *Usage : keyread
SBL> help readadc
* Help : readadc
* Usage : *Usage : readadc <channel>
SBL> help mmctest
* Help : mmctest
* Usage : mmctest <addr> <start block> <number of blocks>
SBL> help usb_read
* Help : usb_read
* Usage : usb_read reg
Read the usb ic register
SBL> help usb_write
* Help : usb_write
* Usage : usb_write reg, val
Read the usb ic register
SBL> help fuelgauge
* Help : fuelgauge
* Usage : *usage : fuelgauge
SBL> help wdt
* Help : wdt
* Usage : wdt
root@n7100:/ # find /preload/ /preload/ /preload/lost+found /preload/INTERNAL_SDCARD /preload/INTERNAL_SDCARD/S Note /preload/INTERNAL_SDCARD/S Note/Business /preload/INTERNAL_SDCARD/S Note/Business/Business Notes.snb /preload/INTERNAL_SDCARD/S Note/Business/Financial Information.snb /preload/INTERNAL_SDCARD/S Note/Business/Meeting Notes 2.snb /preload/INTERNAL_SDCARD/S Note/Business/Meeting Notes.snb /preload/INTERNAL_SDCARD/S Note/Business/Mind Map.snb /preload/INTERNAL_SDCARD/S Note/Education /preload/INTERNAL_SDCARD/S Note/Education/Economics.snb /preload/INTERNAL_SDCARD/S Note/Education/Geology Notes.snb /preload/INTERNAL_SDCARD/S Note/Education/Physics.snb /preload/INTERNAL_SDCARD/S Note/IdeaSketch /preload/INTERNAL_SDCARD/S Note/IdeaSketch/Business Story.snb /preload/INTERNAL_SDCARD/S Note/IdeaSketch/Garden Plan.snb /preload/INTERNAL_SDCARD/S Note/IdeaSketch/Infographic.snb /preload/INTERNAL_SDCARD/S Note/IdeaSketch/Interior Sketch.snb /preload/INTERNAL_SDCARD/S Note/IdeaSketch/Personalized Map.snb /preload/INTERNAL_SDCARD/S Note/IdeaSketch/Subject Summary.snb /preload/INTERNAL_SDCARD/S Note/IdeaSketch/Visual Organization.snb /preload/INTERNAL_SDCARD/S Note/Lifestyle /preload/INTERNAL_SDCARD/S Note/Lifestyle/Diary.snb /preload/INTERNAL_SDCARD/S Note/Lifestyle/Magazine.snb /preload/INTERNAL_SDCARD/S Note/Lifestyle/Recipe.snb /preload/INTERNAL_SDCARD/S Note/Lifestyle/Travel.snb /preload/INTERNAL_SDCARD/Samsung /preload/INTERNAL_SDCARD/Samsung/Image /preload/INTERNAL_SDCARD/Samsung/Image/001.JPG /preload/INTERNAL_SDCARD/Samsung/Image/002.JPG /preload/INTERNAL_SDCARD/Samsung/Image/003.JPG /preload/INTERNAL_SDCARD/Samsung/Image/004.JPG /preload/INTERNAL_SDCARD/Samsung/Image/005.jpg /preload/INTERNAL_SDCARD/Samsung/Image/006.jpg /preload/INTERNAL_SDCARD/Samsung/Image/007.jpg /preload/INTERNAL_SDCARD/Samsung/Image/008.jpg /preload/INTERNAL_SDCARD/Samsung/Image/009.jpg /preload/INTERNAL_SDCARD/Samsung/Image/010.jpg /preload/INTERNAL_SDCARD/Samsung/Music /preload/INTERNAL_SDCARD/Samsung/Music/Over the horizon.mp3 /preload/INTERNAL_SDCARD/Samsung/Video /preload/INTERNAL_SDCARD/Samsung/Video/Wonders_of_Nature.mp4
They have a listing of products as productlist.pdf . This can help knowing if two chips are the same or having proof that some chips that aren't documented publically in their website do exist. It would also be a good idea to import the content in wikidata.
| Android version | 4.2 | 6.0 | 9.0 | Notes |
|---|---|---|---|---|
| RAM | 340M1 | 424M2 | 512M3 | It also depends on the display resolution and size: On android 9, it can go up to 1824MB on 64bit ARM with very high dpi and resolutions |
| /data partition | 4 GB | It might also be possible to use external storage for that |
3 android-9-cdd.pdf and html version
| Device | RAM | Display |
|---|---|---|
| Samsung Galaxy SII (i9100) | OK: * Has 1GB and an HDPI display9 * 512M required for 280dpi or lower on small/normal screens* |
HDPI1: 480x800 233 ppi9 |
| Samsung Galaxy SIII (i9300) | OK: * Has 1GB * 608MB required for XDPI |
XDPI1: 720×1280 306ppi2 |
| Samsung Galaxy SIII 4G (i9305) | OK: * Has 2GB * 608MB required for XDPI |
|
| Goldelico GTA04 A3 | May be or may not be OK: * The A34 and A45 have 512MB of RAM * 608MB required for xdpi but the resolution is very small |
XDPI1: 480×640 282ppi2 |
| Goldelico GTA04 A4 | ||
| Goldelico GTA04 A5 | OK?: * The A56 may have 1G of RAM * 608MB required for xdpi |
|
| LG Optimus black (p970) | OK: * 512M * small screens with 280dpi or less |
HDPI1: 480×800 233ppi3 |
| Amazon Kindle Fire first generation | OK: * 512M7 * mdpi or lower on large screens |
mdpi: 1024×600 at 169 ppi8 |
1 https://en.wikipedia.org/wiki/Pixel_density#Named_pixel_densities
2 https://en.wikipedia.org/wiki/Galaxy_SIII
3 https://en.wikipedia.org/wiki/LG_Optimus_Black
4 http://projects.goldelico.com/p/gta04-main/downloads/get/GTA04A3-1-complete.pdf
5 http://projects.goldelico.com/p/gta04-main/downloads/get/GTA04A4-3_System_Manual_Complete.pdf
8 https://en.wikipedia.org/wiki/Kindle_Fire
9 https://en.wikipedia.org/wiki/Galaxy_S
Android can be configured to use less hardware resources. Here are some links on the topic:
This explains how to build Replicant for the HTC Dream.
Do not build as root, always build as user.
Setup the build environment:
source build/envsetup.sh lunch replicant_dream_sapphire-eng export ANDROID_JAVA_HOME=$JAVA_HOME
Start the build:
parallel_tasks=$(echo "$(grep 'processor' /proc/cpuinfo | wc -l ) + 1" | bc) make -j$parallel_tasks distimages
The -jn argument is to indicate the number of parallel tasks during the build.
You can remove it from the command line to have only one task at a time. With fast hardware, best results will come with -j9, -j16 and -j32.
out/target/product/dream_sapphire/out/host/linux-x86/bin/This is the list of the proprietary libraries, binaries and firmwares shipped with Cyanogenmod or the factory images on HTC Dream/HTC Magic and the status of their replacement.
Note that we don't ship any proprietary binary, library or firmware.
First because our goal is to reach a 100% free Android distribution and also because sometimes, these are not even distributable.
| Library location | Function | Can be replaced or avoided? |
|---|---|---|
| /system/bin/akmd | compas+accelerometers | sliding the keyboard can rotate so we can avoid them for now(revere engineering has started but it's not usable yet) |
| /system/lib/egl/libGLES_qcom.so | 3d acceleration library | can be avoided |
| /system/lib/libaudioeq.so | the name seem related to audio | audio libraries are replaced and works fine |
| /system/lib/libcamera.so | camera library | we don't use the camera for now(would need to be replaced if we want to use it) |
| /system/lib/liboemcamera.so | camera library | we don't use the camera for now(would need to be replaced if we want to use it) |
| /system/lib/libgps.so | gps parsing and activator library | a free android lib is used and it works (but sometimes crashes the device) |
| /system/lib/libhtc_acoustic.so | dlopened audio library | totally replaced, the replacement works fine |
| /system/lib/libhtc_ril.so | Radio Interface library | Work in progress,calls,sms works, USSD,PIN,data(3g) need to be checked in. It should work as well in the US but needs to be checked |
| /system/lib/libmm-adspsvc.so | ? | |
| /system/lib/libOmxH264Dec.so | ? | |
| /system/lib/libOmxMpeg4Dec.so | ? | |
| /system/lib/libOmxVidEnc.so | ? | |
| /system/lib/libomx_wmadec_sharedlibrary.so | ? | |
| /system/lib/libomx_wmvdec_sharedlibrary.so | ? | |
| /system/lib/libpvasfcommon.so | ? | |
| /system/lib/libpvasflocalpbreg.so | ? | |
| /system/lib/libpvasflocalpb.so | ? |
| File location | Function | What depends on it? |
|---|---|---|
| /system/etc/AudioFilter.csv | ? | ?, proprietary version not used |
| /system/etc/AudioPara4.csv | contains audio values that are written to MSM shared memory | used by libhtc_acoustic (and its free replacement), enables in-call volume adjustment and fixes audio lacks. |
| /system/etc/AudioPreProcess.csv | ? | ?, proprietary version not used |
| /system/etc/pvasflocal.cfg | ? | ?, proprietary version not used |
| Firmware location | Function | What depends on it? |
|---|---|---|
| /system/etc/firmware/brf6300.bin | bluetooth firmware | bluetooth |
| /system/etc/wifi/Fw1251r1c.bin | wifi firmware | wifi |
This explains how to build Replicant for the HTC Magic.
Do not build as root, always build as user.
Setup the build environment:
source build/envsetup.sh lunch replicant_dream_sapphire-eng export ANDROID_JAVA_HOME=$JAVA_HOME
Start the build:
parallel_tasks=$(echo "$(grep 'processor' /proc/cpuinfo | wc -l ) + 1" | bc) make -j$parallel_tasks distimages
The -jn argument is to indicate the number of parallel tasks during the build.
You can remove it from the command line to have only one task at a time. With fast hardware, best results will come with -j9, -j16 and -j32.
Setup the build environment:
source build/envsetup.sh lunch replicant_dream_sapphire_ebi1-eng export ANDROID_JAVA_HOME=$JAVA_HOME
Start the build:
parallel_tasks=$(echo "$(grep 'processor' /proc/cpuinfo | wc -l ) + 1" | bc) make -j$parallel_tasks distimages
The -jn argument is to indicate the number of parallel tasks during the build.
You can remove it from the command line to have only one task at a time. With fast hardware, best results will come with -j9, -j16 and -j32.
out/target/product/dream_sapphire/out/host/linux-x86/bin/For 32A/EBI1 devices, the images to use have the -ebi1 prefix.
When connected on the serial port, during boot, if you press the volume down button and press enter on the serial console, you can get a shell:
====== VCELL : 409625, SOC : 100, nType : 4 ====== [Charger] nScaledVCELL : 409625000, nDesriedSOC, : 98, nMaxSOC : 118, nMinSOC : 78 * FB base addr = 0xbea70000! * PANEL_S6E8AA0_ID_READ : 0x12, 0x8e, 0x9b. [ omap_power_get_reset_source :47] PRM_RSTST : 0x2 Autoboot (1 seconds) in progress, press any key to stop . Autoboot aborted.. SBL> SBL> SBL> SBL> help Following commands are supported: * setenv * saveenv * printenv * help * reset * boot * kernel * loadpart * loadkernel * erasepart * omap_upload_rdx * omap_test_button * omap_test_hwinfo * omap_set_gpio_level * omap_get_gpio_level * omap_test_twl6030 * omap_test_power * omap_reboot * omap_halt * omap_cmdline_power * omap_test_kbd * omap_test_usbacc * usb * omap_test_max17043 * omap_test_fsa9480 * omap_dump_sec_log_buf * omap_test_sud To get commands help, Type "help <command>" SBL>
Here's the known list of commands:
SBL> help Following commands are supported: * setenv * saveenv * printenv * help * reset * boot * kernel * loadpart * loadkernel * erasepart * omap_upload_rdx * omap_test_button * omap_test_hwinfo * omap_set_gpio_level * omap_get_gpio_level * omap_test_twl6030 * omap_test_power * omap_reboot * omap_halt * omap_cmdline_power * omap_test_kbd * omap_test_usbacc * usb * omap_test_max17043 * omap_test_fsa9480 * omap_dump_sec_log_buf * omap_test_sud To get commands help, Type "help <command>" SBL>
And their respective help:
SBL> help setenv
* Help : setenv
* Usage : setenv [name] [value] . .
Modify current environment info on ram
SBL> help saveenv
* Help : saveenv
* Usage : saveenv
Save cuurent environment info to flash
SBL> help printenv
* Help : printenv
* Usage : printenv
Print current environment info on ram
SBL> help help
* Help : help
* Usage : help [command]
SBL> help reset
* Help : reset
* Usage : reboot
Reboot system
SBL> help boot
* Help : boot
* Usage : boot [kernel options]
Boot Linux with optional kernel options
SBL> help kernel
* Help : kernel
* Usage : kernel hex_adr
Change the Linux kernel base
SBL> help loadpart
* Help : loadpart
* Usage : load partition from storage device.
SBL> help loadkernel
* Help : loadkernel
* Usage : load kernel from storage device.
SBL> help erasepart
* Help : erasepart
* Usage : erase partition.
SBL> help omap_upload_rdx
* Help : omap_upload_rdx
* Usage : [OMAP] upload RDX
omap_upload_rdx
SBL> help omap_test_button
* Help : omap_test_button
* Usage : [OMAP] test OMAP buttons
omap_test_button
SBL> help omap_test_hwinfo
* Help : omap_test_hwinfo
* Usage : [OMAP] test OMAP HW Information
omap_test_hwinfo
SBL> help omap_set_gpio_level
* Help : omap_set_gpio_level
* Usage : [OMAP] set GPIO level
omap_set_gpio_level {GPIO} {VALUE}
SBL> help omap_get_gpio_level
* Help : omap_get_gpio_level
* Usage : [OMAP] get GPIO level
omap_get_gpio_level {GPIO}
SBL> help omap_test_twl6030
* Help : omap_test_twl6030
* Usage : [OMAP] test twl6030 device
omap_test_twl6030
SBL> help omap_test_power
* Help : omap_test_power
* Usage : [OMAP] test power function
omap_test_power
SBL> help omap_reboot
* Help : omap_reboot
* Usage : [OMAP] system reboot command
omap_reboot
SBL> help omap_halt
* Help : omap_halt
* Usage : [OMAP] system halt command
omap_halt
SBL> help omap_cmdline_power
* Help : omap_cmdline_power
* Usage : [OMAP] check kernel-cmdline by power
omap_cmdline_power
SBL> help omap_test_kbd
* Help : omap_test_kbd
* Usage : [OMAP] test power function
omap_test_kbd
SBL> help omap_test_usbacc
* Help : omap_test_usbacc
* Usage : [OMAP] test OMAP usb-accessary
omap_test_usbacc
SBL> help usb
* Help : usb
* Usage : usb download command
SBL> help omap_test_max17043
* Help : omap_test_max17043
* Usage : [OMAP] test max17043 device
omap_test_max17043
SBL> help omap_test_fsa9480
* Help : omap_test_fsa9480
* Usage : [OMAP] test fsa9480 device
omap_test_fsa9480
SBL> help omap_dump_sec_log_buf
* Help : omap_dump_sec_log_buf
* Usage : [OMAP] dump sec-log-buf
omap_dump_sec_log_buf
SBL> help omap_test_sud
* Help : omap_test_sud
* Usage : [OMAP] test SUD image
omap_test_sud {NUMBER}
SBL>
I've tried to modify the CMDLINE:
SBL> setenv CMDLINE loglevel=8 console=ttyFIQ0 androidboot.console=ttyFIQ0 argv[0] : setenv argv[1] : CMDLINE argv[2] : loglevel=8 console=ttyFIQ0 androidboot.console=ttyFIQ0 value : 656175548 SBL> saveenv save_param start block=49152, no.blocks=16384
SBL> omap_test_hwinfo ----------------------------------------------------------- OMAP-Samsung HW Information Board Name : tuna REV 9 Board Rev : HSPA - 9 Boot Type : USB MMC1 Device Type : HS Build Date : Jan 24 2012 18:27:20 -----------------------------------------------------------
SBL> printenv PARAM Rev 1.6 SERIAL_SPEED : 7 LOAD_RAMDISK : 0 BOOT_DELAY : 1 LCD_LEVEL : 6 SWITCH_SEL : 3 PHONE_DEBUG_ON : 0 LCD_DIM_LEVEL : 0 LCD_DIM_TIME : 6 MELODY_MODE : 1 REBOOT_MODE : 0 NATION_SEL : 0 LANGUAGE_SEL : 0 SET_DEFAULT_PARAM : 0 OFF_MODE_CHARGE : 1 FLASH_LOCK_STATUS : 0 VERSION : CMDLINE : DELTA_LOCATION : /mnt/rsv WIFI_MAC_LINE : PARAM_STR_4 : DCM
The installation instructions use Heimdall to install the Replicant recovery on the Galaxy Nexus (GT-I9250) in order to have unified installation instructions, so it would be great to be able to reboot to the bootloader mode that is compatible with heimdall with a command (like reboot download or adb reboot download), especially to be able to run automatic installation tests, but that doesn't look possible. The following explains why.
In arch/arm/mach-omap2/board-tuna.c in the Replicant 6.0 kernel_samsung_tuna, there is the following code:
#define REBOOT_FLAG_RECOVERY 0x52564352
#define REBOOT_FLAG_FASTBOOT 0x54534146
#define REBOOT_FLAG_NORMAL 0x4D524F4E
#define REBOOT_FLAG_POWER_OFF 0x46464F50
[...]
static int tuna_notifier_call(struct notifier_block *this,
unsigned long code, void *_cmd)
{
void __iomem *sar_base;
unsigned int flag = REBOOT_FLAG_NORMAL;
sar_base = omap4_get_sar_ram_base();
if (!sar_base)
return notifier_from_errno(-ENOMEM);
if (code == SYS_RESTART) {
if (_cmd) {
if (!strcmp(_cmd, "recovery"))
flag = REBOOT_FLAG_RECOVERY;
else if (!strcmp(_cmd, "bootloader"))
flag = REBOOT_FLAG_FASTBOOT;
}
} else if (code == SYS_POWER_OFF) {
flag = REBOOT_FLAG_POWER_OFF;
}
/* The Samsung LOKE bootloader will look for the boot flag at a fixed
* offset from the end of the 1st SAR bank.
*/
writel(flag, sar_base + SAR_BANK2_OFFSET - 0xC);
return NOTIFY_DONE;
}
If we look at the defines, we can see a pattern:
| #define | value | ASCII | ASCII with opposite endianess |
| REBOOT_FLAG_RECOVERY | 0x52564352 | RVCR | RCVR |
| REBOOT_FLAG_FASTBOOT | 0x54534146 | TSAF | FAST |
| REBOOT_FLAG_NORMAL | 0x4D524F4E | MRON | NORM |
| REBOOT_FLAG_POWER_OFF | 0x46464F50 | FFOP | POFF |
So if we patch the kernel with the following patch, we are able to test various flags values:
diff --git a/arch/arm/mach-omap2/board-tuna.c b/arch/arm/mach-omap2/board-tuna.c
index 43aaf6f38e76..7da64734df84 100755
--- a/arch/arm/mach-omap2/board-tuna.c
+++ b/arch/arm/mach-omap2/board-tuna.c
@@ -1128,6 +1128,15 @@ static int tuna_notifier_call(struct notifier_block *this,
flag = REBOOT_FLAG_RECOVERY;
else if (!strcmp(_cmd, "bootloader"))
flag = REBOOT_FLAG_FASTBOOT;
+ else if (strlen(_cmd) == 4) {
+ int i;
+ char* cmd = _cmd;
+ flag = (cmd[0] << 24) | (cmd[1] << 16) | (cmd[2] << 8) | (cmd[3]);
+
+ for (i=1000; i>0; i--) {
+ printk(KERN_INFO "%s: #%d reboot [%s] => 0x%x", __func__, i, cmd, flag);
+ }
+ }
}
} else if (code == SYS_POWER_OFF) {
flag = REBOOT_FLAG_POWER_OFF;
With the patch above, adb reboot TSAF will make the device reboot to the fastboot mode and adb reboot FFOP will power off the device.
Since FAST and POFF are strings inside the bootloader that is in the SBL partition, I coded a python script to test all the 4 letter uppercase strings found inside that partition:
#!/usr/bin/env python3
#
# Copyright (C) 2022 Denis 'GNUtoo' Carikli <GNUtoo@cyberdimension.org>
#
# This program is free software: you can redistribute it and/or modify
# it under the terms of the GNU General Public License as published by
# the Free Software Foundation, either version 3 of the License, or
# (at your option) any later version.
#
# This program is distributed in the hope that it will be useful,
# but WITHOUT ANY WARRANTY; without even the implied warranty of
# MERCHANTABILITY or FITNESS FOR A PARTICULAR PURPOSE. See the
# GNU General Public License for more details.
#
# You should have received a copy of the GNU General Public License
# along with this program. If not, see <http://www.gnu.org/licenses/>.
import os
import re
from sh import adb
import string
import sys
# From sysexits.h
EX_USAGE = 64 # command line usage error
class Log(object):
def __init__(self):
self.log_path = re.sub("\.py$", "", sys.argv[0]) + ".log"
self.file = open(self.log_path, 'a')
def print(self, string):
print(string)
self.file.write(string + os.linesep)
def close(self):
self.file.close()
def usage(progname):
print("Usage: {} bruteforce [start]".format(progname))
print("Example: {} bruteforce BAAA".format(progname))
sys.exit(EX_USAGE)
def is_uppercase(s):
for c in s:
if c not in string.ascii_uppercase[:26]:
return False
return True
def bruteforce(start='AAAA'):
start0 = string.ascii_uppercase[:26].index(start[0])
start1 = string.ascii_uppercase[:26].index(start[1])
start2 = string.ascii_uppercase[:26].index(start[2])
start3 = string.ascii_uppercase[:26].index(start[3])
log = Log()
for l1 in string.ascii_uppercase[start0:26]:
for l2 in string.ascii_uppercase[start1:26]:
for l3 in string.ascii_uppercase[start2:26]:
for l4 in string.ascii_uppercase[start3:26]:
reboot_cmd = "{}{}{}{}".format(l1, l2, l3, l4)
adb("wait-for-recovery")
log.print("reboot {}".format(reboot_cmd))
adb("reboot", reboot_cmd)
log.close()
def dictionary():
strings = [
'BOOT',
'DUDD',
'EDUQ',
'FAST',
'FGIQ',
'GTHP',
'GTPY',
'HALT',
'HFHO',
'HSPA',
'IWFR',
'JFIF',
'KKXA',
'LAST',
'LOKE',
'MDED',
'MYIB',
'NAND',
'NDED',
'NORM',
'NQST',
'NRZM',
'ODIN',
'OKAY',
'POFF',
'PXQE',
'QAAE',
'QUMC',
'RCVR',
'RMFO',
'RSET',
'SNBL',
'STAR',
'XMWQ',
]
log = Log()
for entry in strings:
reboot_cmd = entry[3] + entry[2] + entry[1] + entry[0]
adb("wait-for-recovery")
log.print("reboot {}".format(reboot_cmd))
adb("reboot", reboot_cmd)
log.close()
if len(sys.argv) == 2 and sys.argv[1] == "bruteforce":
bruteforce()
elif len(sys.argv) == 3 and sys.argv[1] == "bruteforce":
if len(sys.argv[2]) == 4 and is_uppercase(sys.argv[2]):
start = sys.argv[1]
bruteforce(start)
else:
usage(sys.argv[0])
if len(sys.argv) == 2 and sys.argv[1] == "dictionary":
dictionary()
elif len(sys.argv) != 1:
usage(sys.argv[0])
But it didn't find a way to boot to the heimdall compatible mode, so we now either need to implement fastboot in the tests or to test the Galaxy Nexus manually (which is more time consuming and way more error prone). Because of that limitation, we would not be able to have the installation instructions tested automatically.
The fact that the bootloader is signed and that the second stage (SBL) is not free software prevents us from fixing that issue.
It might still be possible to replace the second stage with u-boot though, but it would require to redistribute a signed bootloader that is under free a software license but practically nonfree as users can't run modified versions.
GPG signing key: FB31DBA3AB8DB76A4157329F7651568F80374459.asc
Key: Denis 'GNUtoo' Carikli's personal key
Usage: That GPG key was used to sign the recovery and the zip images.
| Shared certificate | Release certificate | Platform certificate | Media certificate | Checksum |
|---|---|---|---|---|
| shared.x509.pem | releasekey.x509.pem | platform.x509.pem | media.x509.pem | security.sha256 |
| ADB | Fastboot | Heimdall | mkbootimg | unpackbootimg | Checksum |
|---|---|---|---|---|---|
| adb adb.asc | fastboot fastboot.asc | heimdall heimdall.asc | mkbootimg mkbootimg.asc | unpackbootimg unpackbootimg.asc | tools.sha256 |
GPG signing key: 5816A24C10757FC4.asc
Key: Wolfgang Wiedmeyer's personal key
Usage: That GPG key was used to sign the recovery and the zip images.
| Shared certificate | Release certificate | Platform certificate | Media certificate | Checksum |
|---|---|---|---|---|
| shared.x509.pem | releasekey.x509.pem | platform.x509.pem | media.x509.pem | security.sha256 |
| ADB | Fastboot | Heimdall | mkbootimg | unpackbootimg | Checksum |
|---|---|---|---|---|---|
| adb adb.asc | fastboot fastboot.asc | heimdall heimdall.asc | mkbootimg mkbootimg.asc | unpackbootimg unpackbootimg.asc | tools.sha256 |
GPG signing key: 4A80EB23.asc
Key: Replicant project release key, Paul Kocialkowski has it.
Usage: That GPG key was used to sign the recovery and the zip images.
| System certificate | Shared certificate | Platform certificate | Media certificate | Checksum |
|---|---|---|---|---|
| system.x509.pem | shared.x509.pem | platform.x509.pem | media.x509.pem | security.md5 |
| ADB | Fastboot | Heimdall | Mkbootimg | Checksum |
|---|---|---|---|---|
| adb adb.asc | fastboot fastboot.asc | heimdall heimdall.asc | mkbootimg mkbootimg.asc | tools.md5 |
GPG signing key: 4A80EB23.asc
Key: Replicant project release key, Paul Kocialkowski has it.
Usage: That GPG key was used to sign the recovery and the zip images.
| System certificate | Shared certificate | Platform certificate | Media certificate | Checksum |
|---|---|---|---|---|
| system.x509.pem | shared.x509.pem | platform.x509.pem | media.x509.pem | security.md5 |
| ADB | Fastboot | Heimdall | Mkbootimg | Checksum |
|---|---|---|---|---|
| adb adb.sig | fastboot fastboot.sig | heimdall heimdall.sig | mkbootimg mkbootimg.sig | tools.md5 |
| Build ID | Build date | Supported devices | Base URL |
|---|---|---|---|
| 0005 | 2013-09-29 | Nexus S (crespo), Galaxy S2 (galaxys2), Galaxy S (galaxysmtd), Galaxy Nexus (maguro), Galaxy S2 (galaxys2), Galaxy Tab 2 10.1 (p5100), Galaxy Tab 2 10.1 WiFi (p5110), Galaxy Tab 2 7.0 (p3100), Galaxy Tab 2 7.0 WiFi (p3110), Galaxy S3 (i9300), Galaxy Note (n7000) |
https://download.replicant.us/images/replicant-4.0/0005/ |
| Device | Checksum | Boot image | Recovery image | System image | Userdata image | Bootloader image | Miscellaneous |
|---|---|---|---|---|---|---|---|
| Nexus S | crespo.md5 | boot.img | recovery.img | system.img | userdata.img | N/A | N/A |
| Galaxy S2 | galaxys2.md5 | boot.img | recovery.img | system.ext4.img | N/A | N/A | N/A |
| Galaxy S | galaxysmtd.md5 | boot.img | recovery.img | system.yaffs2.img | N/A | N/A | N/A |
| Galaxy Nexus | maguro.md5 | boot.img | recovery.img | system.img | userdata.img | N/A | N/A |
| Galaxy Tab 2 10.1 | p5100.md5 | boot.img | recovery.img | system.ext4.img | N/A | N/A | N/A |
| Galaxy Tab 2 7.0 | p3100.md5 | boot.img | recovery.img | system.ext4.img | N/A | N/A | N/A |
| Galaxy Tab 2 10.1 WiFi | p5110.md5 | boot.img | recovery.img | system.ext4.img | N/A | N/A | N/A |
| Galaxy Tab 2 7.0 WiFi | p3110.md5 | boot.img | recovery.img | system.ext4.img | N/A | N/A | N/A |
| Galaxy S3 | i9300.md5 | boot.img | recovery.img | system.ext4.img | N/A | N/A | N/A |
| Galaxy Note | n7000.md5 | boot.img | recovery.img | system.ext4.img | N/A | N/A | N/A |
| Build ID | Build date | Supported devices | Base URL |
|---|---|---|---|
| 0004 | 2013-07-22 | Nexus S (crespo), Galaxy S2 (galaxys2), Galaxy S (galaxysmtd), Galaxy Nexus (maguro), Galaxy S2 (galaxys2), Galaxy Tab 2 10.1 (p5100), Galaxy Tab 2 10.1 WiFi (p5110), Galaxy Tab 2 7.0 (p3100), Galaxy Tab 2 7.0 WiFi (p3110), Galaxy S3 (i9300) |
https://download.replicant.us/images/replicant-4.0/0004/ |
| Device | Checksum | Boot image | Recovery image | System image | Userdata image | Bootloader image | Miscellaneous |
|---|---|---|---|---|---|---|---|
| Nexus S | crespo.md5 | boot.img | recovery.img | system.img | userdata.img | N/A | N/A |
| Galaxy S2 | galaxys2.md5 | boot.img | recovery.img | system.ext4.img | N/A | N/A | N/A |
| Galaxy S | galaxysmtd.md5 | boot.img | recovery.img | system.yaffs2.img | N/A | N/A | N/A |
| Galaxy Nexus | maguro.md5 | boot.img | recovery.img | system.img | userdata.img | N/A | N/A |
| Galaxy Tab 2 10.1 | p5100.md5 | boot.img | recovery.img | system.ext4.img | N/A | N/A | N/A |
| Galaxy Tab 2 7.0 | p3100.md5 | boot.img | recovery.img | system.ext4.img | N/A | N/A | N/A |
| Galaxy Tab 2 10.1 WiFi | p5110.md5 | boot.img | recovery.img | system.ext4.img | N/A | N/A | N/A |
| Galaxy Tab 2 7.0 WiFi | p3110.md5 | boot.img | recovery.img | system.ext4.img | N/A | N/A | N/A |
| Galaxy S3 | i9300.md5 | boot.img | recovery.img | system.ext4.img | N/A | N/A | N/A |
| Build ID | Build date | Supported devices | Base URL |
|---|---|---|---|
| 0003 | 2013-04-06 | Nexus S (crespo), Galaxy S2 (galaxys2), Galaxy S (galaxysmtd), Galaxy Nexus (maguro), Galaxy S2 (galaxys2), Galaxy Tab 2 10.1 (p5100), Galaxy Tab 2 7.0 (p3100) |
https://download.replicant.us/images/replicant-4.0/0003/ |
| Device | Checksum | Boot image | Recovery image | System image | Userdata image | Bootloader image | Miscellaneous |
|---|---|---|---|---|---|---|---|
| Nexus S | crespo.md5 | boot.img | recovery.img | system.img | userdata.img | N/A | N/A |
| Galaxy S2 | galaxys2.md5 | boot.img | recovery.img | system.ext4.img | N/A | N/A | N/A |
| Galaxy S | galaxysmtd.md5 | boot.img | recovery.img | system.yaffs2.img | N/A | N/A | N/A |
| Galaxy Nexus | maguro.md5 | boot.img | recovery.img | system.img | userdata.img | N/A | N/A |
| Galaxy Tab 2 10.1 | p5100.md5 | boot.img | recovery.img | system.ext4.img | N/A | N/A | N/A |
| Galaxy Tab 2 7.0 | p3100.md5 | boot.img | recovery.img | system.ext4.img | N/A | N/A | N/A |
| Build ID | Build date | Supported devices | Base URL |
|---|---|---|---|
| 0002 | 2013-01-10 | Nexus S (crespo), Galaxy S2 (galaxys2), Galaxy S (galaxysmtd), Galaxy Nexus (maguro), Galaxy S2 (galaxys2) |
https://download.replicant.us/images/replicant-4.0/0002/ |
| Device | Checksum | Boot image | Recovery image | System image | Userdata image | Bootloader image | Miscellaneous |
|---|---|---|---|---|---|---|---|
| Nexus S | crespo.md5 | boot.img | recovery.img | system.img | userdata.img | N/A | N/A |
| Galaxy S2 | galaxys2.md5 | boot.img | recovery.img | system.ext4.img | N/A | N/A | N/A |
| Galaxy S | galaxysmtd.md5 | boot.img | recovery.img | system.yaffs2.img | N/A | N/A | N/A |
| Galaxy Nexus | maguro.md5 | boot.img | recovery.img | system.img | userdata.img | N/A | N/A |
| Build ID | Build date | Supported devices | Base URL |
|---|---|---|---|
| 0001 | 2012-11-15 | Nexus S (crespo), Galaxy S2 (galaxys2), Galaxy S (galaxysmtd), Galaxy Nexus (maguro), Galaxy S2 (galaxys2) |
https://download.replicant.us/images/replicant-4.0/0001/ |
| Device | Checksum | Boot image | Recovery image | System image | Userdata image | Bootloader image | Miscellaneous |
|---|---|---|---|---|---|---|---|
| Nexus S | crespo.md5 | boot.img | recovery.img | system.img | userdata.img | N/A | N/A |
| Galaxy S2 | galaxys2.md5 | boot.img | N/A | system.ext4.img | N/A | N/A | N/A |
| Galaxy S | galaxysmtd.md5 | boot.img | N/A | system.yaffs2.img | N/A | N/A | N/A |
| Galaxy Nexus | maguro.md5 | boot.img | recovery.img | system.img | userdata.img | N/A | N/A |
| Build ID | Build date | Supported devices | Base URL |
|---|---|---|---|
| 0005 | 2012-09-29 | Nexus S (crespo), Galaxy S (galaxysmtd), Nexus One (passion), GTA04 (gta04) |
https://download.replicant.us/images/replicant-2.3/0005/ |
| Device | Checksum | Boot image | Recovery image | System image | System tarball | Userdata image | Bootloader image | Miscellaneous |
|---|---|---|---|---|---|---|---|---|
| Nexus S | crespo.md5 | boot.img | recovery.img | system.img | userdata.img | |||
| Galaxy S | galaxysmtd.md5 | boot.img | recovery.img | system.yaffs2.img | data.ext4.img | |||
| Nexus One | passion.md5 | boot.img | recovery.img | system.img | userdata.img | |||
| GTA04 | gta04.md5 | boot.img | system.tar.bz2 | bootloader.img | boot.scr replicant_gta04_install.sh |
| Build ID | Build date | Supported devices | Base URL |
|---|---|---|---|
| 0004 | 2012-09-10 | Nexus S (crespo), Galaxy S (galaxysmtd), Nexus One (passion), GTA04 (gta04) |
https://download.replicant.us/images/replicant-2.3/0004/ |
| Device | Checksum | Boot image | Recovery image | System image | System tarball | Userdata image | Bootloader image | Miscellaneous |
|---|---|---|---|---|---|---|---|---|
| Nexus S | crespo.md5 | boot.img | recovery.img | system.img | userdata.img | |||
| Galaxy S | galaxysmtd.md5 | boot.img | recovery.img | system.yaffs2.img | data.ext4.img | |||
| Nexus One | passion.md5 | boot.img | recovery.img | system.img | userdata.img | |||
| GTA04 | gta04.md5 | boot.img | system.tar.bz2 | bootloader.img | boot.scr replicant_gta04_install.sh |
| Build ID | Build date | Supported devices | Base URL |
|---|---|---|---|
| 0003 | 2012-04-09 | Nexus S (crespo), Galaxy S (galaxysmtd), Nexus One (passion) |
https://download.replicant.us/images/replicant-2.3/0003/ |
| Device | Checksum | Bootimage | Recoveryimage | Systemimage | Userdataimage |
|---|---|---|---|---|---|
| Nexus S | crespo.md5 | boot.img | recovery.img | system.img | userdata.img |
| Galaxy S | galaxysmtd.md5 | boot.img | recovery.img | system.yaffs2.img | data.ext4.img |
| Nexus One | passion.md5 | boot.img | recovery.img | system.img | userdata.img |
| Build ID | Build date | Supported devices | Base URL |
|---|---|---|---|
| 0002 | 2012-01-07 | Nexus S (crespo), Nexus One (passion) |
https://download.replicant.us/images/replicant-2.3/0002/ |
| Device | Checksum | Bootimage | Recoveryimage | Systemimage | Userdataimage |
|---|---|---|---|---|---|
| Nexus S | crespo.md5sum | boot.img | recovery.img | system.img | userdata.img |
| Nexus One | passion.md5sum | boot.img | recovery.img | system.img | userdata.img |
| Build ID | Build date | Supported devices | Base URL |
|---|---|---|---|
| 0001 | 2011-11-08 | Nexus S (crespo), Nexus One (passion) |
https://download.replicant.us/images/replicant-2.3/0001/ |
| Device | Checksum | Bootimage | Recoveryimage | Systemimage | Userdataimage |
|---|---|---|---|---|---|
| Nexus S | crespo.md5sum | boot.img | recovery.img | system.img | userdata.img |
| Nexus One | passion.md5sum | boot.img | recovery.img | system.img | userdata.img |
| Build ID | Build date | Supported devices | Base URL |
|---|---|---|---|
| 0009 | 2011-10-20 | HTC Dream/HTC Magic (dream_sapphire), Nexus One (passion) |
https://download.replicant.us/images/replicant-2.2/preview/0009/ |
| Device | Checksum | Bootimage | Recoveryimage | Systemimage | Userdataimage |
|---|---|---|---|---|---|
| HTC Dream/HTC Magic | dream_sapphire.md5sum | boot.img | recovery.img | system.img | userdata.img |
| Nexus One | passion.md5sum | boot.img | recovery.img | system.img | userdata.img |
In this page, we consider you configured your device language in "english".
If you have installed Replicant a long time ago, you might not remember which exact Replicant version was on the phone.
Some information on the images can be found in Settings->About phone.
Some Replicant images don't clearly indicate which release they correspond to in "Settings->About phone".
However it is still possible find out by matching information like the build date and build number to the release with the data that is in the table below.
So if you check the signatures in some way, you still need to make sure that you are installing the right Replicant version. This helps checking that.
Feel free to add directly add the information below if you have a wiki account, or to paste it on IRC, or send it to the mailing list. You can pick whichever way suits you best.
The Replicant 6.0 0003 images are the most important ones to complete.
The last Replicant 4.2 images are also interesting, as some people are still using it because they don't exhibit the "sim not recognized bug" that is now fixed since Replicant 6.0 0004 RC1.
Beside that it could be nice to have older images as well, but it's not that important as not many people are using them. It could be a good idea to add them along the way when people test them for one reason or another.
Note that at the time of writing, the images are not out yet.
| Device | Image type | Identification |
|---|---|---|
| All devices | System | Replicant version: replicant-6.0-0004 |
| RC | Device | Image type | Identification |
|---|---|---|---|
| RC 5 | All devices | System | Replicant version: replicant-6.0-0004-rc5 |
| System (for key migration) | Replicant version: replicant-6.0-0004-rc5-transition | ||
| RC 4 | All devices | System | Replicant version: replicant-6.0-0004-rc4 |
| RC 3 | All devices | System | Replicant version: replicant-6.0-0004-rc3 |
| RC 2 | All devices | System | Replicant version: replicant-6.0-0004-rc2 |
| RC 1 | All devices | System | Replicant version: replicant-6.0-0004-rc1 |
| Device | Image type | Identification |
|---|---|---|
| Galaxy S 2 (I9100) | System | * Kernel version: 3.0.101-replicant wolfi@machinist #3 Sun Dec 10 21:37:52 UTC 2017 * Build date: So 10. Dez 07:02:04 UTC 2017 * Build number: replicant_i9100-userdebug 6.0.1 MOI10E eng.wolfi.20171210.065337 |
| Galaxy S 3 (I9300) | System | * Kernel version: 3.0.101-replicant wolfi@machinist #1 Sun Dec 10 15:47:55 UTC 2017 * Build date: So 10. Dez 14:44:33 UTC 2017 * Build number: replicant_i9300-userdebug 6.0.1 MOI10E eng.wolfi.20171210.143631 |
| Galaxy S 3 4G (I9305) | System | * Kernel version: 3.0.101-replicant wolfi@machinist #1 Sun Dec 10 18:35:42 UTC 2017 * Build date: So 10. Dez 17:31:16 UTC 2017 * Build number: replicant_i9305-userdebug 6.0.1 MOI10E eng.wolfi.20171210.172231 |
| Galaxy Note (N7000) | System | * Kernel version: 3.0.101-replicant wolfi@machinist #3 Sun Dec 10 21:44:54 UTC 2017 * Build date: So 10. Dez 09:03:56 UTC 2017 * Build number: replicant_n7000-userdebug 6.0.1 MOI10E eng.wolfi.20171210.085637 |
| Galaxy Note 2 (N7100) | System | * Kernel version: 3.0.101-replicant wolfi@machinist #1 Sun Dec 10 17:11:15 UTC 2017 * Build date: So 10. Dez 16:07:40 UTC 2017 * Build number: replicant_n7100-userdebug 6.0.1 MOI10E eng.wolfi.20171210.155927 |
| Galaxy Nexus (I9250) | System | * Kernel version: 3.0.101-replicant wolfi@machinist #1 Sun Dec 10 11:40:22 UTC 2017 * Build date: So 10. Dez 10:28:04 UTC 2017 * Build number: replicant_maguro-userdebug 6.0.1 MOI10E eng.wolfi.20171210.102026 |
| Galaxy Tab 2 7.0 (P31xx) | System | * Kernel version: 3.0.101-replicant wolfi@machinist #1 Sun Dec 10 14:23:54 UTC 2017 * Build date: So 10. Dez 13:21:16 UTC 2017 * Build number: replicant_espresso3g-userdebug 6.0.1 MOI10E eng.wolfi.20171210.131314 |
| Galaxy Tab 2 10.1 (P51xx) | ||
| Galaxy Tab 2 7.0 Wi-Fi (P3110) | System | * Kernel version: 3.0.101-replicant wolfi@machinist #1 Sun Dec 10 13:01:42 UTC 2017 * Build date: So 10. Dez 11:59:09 UTC 2017 * Build number: replicant_espressowifi-userdebug 6.0.1 MOI10E eng.wolfi.20171210.115131 |
| Galaxy Tab 2 10.1 Wi-Fi (P5110) | ||
| Galaxy Note 8.0 (N5100) | System | * Kernel version: 3.0.101-replicant wolfi@machinist #1 Sun Dec 10 20:00:03 UTC 2017 * Build date: So 10. Dez 18:55:56 UTC 2017 * Build number: replicant_n5100-userdebug 6.0.1 MOI10E eng.wolfi.20171210.184648 |
| Galaxy Note 8.0 Wi-Fi (N5110) | System | * Kernel version: 3.0.101-replicant wolfi@machinist #1 Sun Dec 10 21:24:46 UTC 2017 * Build date: So 10. Dez 20:20:54 UTC 2017 * Build number: replicant_n5110-userdebug 6.0.1 MOI10E eng.wolfi.20171210.201121 |
| Device | Image type | Identification |
|---|---|---|
| Galaxy S 2 (I9100) | System | |
| Galaxy S 3 (I9300) | System | * Kernel version: 3.0.101-replicant wolfi@machinist #2 Sat Sep 9 15:45:16 UTC 2017 * Build date: Sa 9. Sep 06:20:55 UTC 2017 * Build number: replicant_i9300-userdebug 6.0.1 MOB31T eng.wolfi.20170909.061207 |
| Galaxy S 3 4G (I9305) | System | |
| Galaxy Note (N7000) | System | * Kernel version: 3.0.101-replicant wolfi@machinist #3 Sat Sep 9 17:21:54 UTC 2017 * Build date: Sa 9. Sep 00:57:11 UTC 2017 * Build number: replicant_n7000-userdebug 6.0.1 MOB31T eng.wolfi.20170909.005028 |
| Galaxy Note 2 (N7100) | System | |
| Galaxy Nexus (I9250) | System | |
| Galaxy Tab 2 7.0 (P31xx) | System | |
| Galaxy Tab 2 10.1 (P51xx) | ||
| Galaxy Tab 2 7.0 Wi-Fi (P3110) | System | |
| Galaxy Tab 2 10.1 Wi-Fi (P5110) | ||
| Galaxy Note 8.0 (N5100) | System | |
| Galaxy Note 8.0 Wi-Fi (N5110) | System |
| Device | Image type | Identification |
|---|---|---|
| Galaxy S 2 (I9100) | System | |
| Galaxy S 3 (I9300) | System | * Kernel version: 3.0.101-replicant wolfi@machinist #1 Sun May 7 01:58:34 UTC 2017 * Build date: So 7. Mai 01:01:10 UTC 2017 * Build number: replicant_i9300-userdebug 6.0.1 MOB31T eng.wolfi.20170507.005454 |
| Galaxy S 3 4G (I9305) | System | |
| Galaxy Note (N7000) | System | |
| Galaxy Note 2 (N7100) | System | |
| Galaxy Nexus (I9250) | System | |
| Galaxy Tab 2 7.0 (P31xx) | System | |
| Galaxy Tab 2 10.1 (P51xx) | ||
| Galaxy Tab 2 7.0 Wi-Fi (P3110) | System | |
| Galaxy Tab 2 10.1 Wi-Fi (P5110) | ||
| Galaxy Note 8.0 (N5100) | System | |
| Galaxy Note 8.0 Wi-Fi (N5110) | System |
| Device | Image type | Identification |
|---|---|---|
| Galaxy S 2 (I9100) | System | |
| Galaxy S 3 (I9300) | System | * Kernel version: 3.0.64-replicant paulkocialkowsk@jolicoeur #1 Tue Sep 1 00:44:36 CEST 2015 * Build date: mardi 1 septembre 2015, 00:40:12 (UTC+0200) * Build number: replicant_i9300-userdebug 4.2.2 JDQ39E eng.paulkocialkowsk.20150901.003915 dev-keys |
| Galaxy S 3 4G (I9305) | System | |
| Galaxy Note (N7000) | System | |
| Galaxy Note 2 (N7100) | System | |
| Galaxy Nexus (I9250) | System | |
| Galaxy Tab 2 7.0 (P31xx) | System | |
| Galaxy Tab 2 10.1 (P51xx) | ||
| Galaxy Tab 2 7.0 Wi-Fi (P3110) | System | |
| Galaxy Tab 2 10.1 Wi-Fi (P5110) | ||
| Galaxy Note 8.0 (N5100) | System | |
| Galaxy Note 8.0 Wi-Fi (N5110) | System |
| Device | Image type | Identification |
|---|---|---|
| Galaxy S 2 (I9100) | System | |
| Galaxy S 3 (I9300) | System | * Kernel version: 3.0.64-replicant paulkocialkowsk@jolicoeur #1 Fri Dec 5 16:30:23 CET 2014 * Build date: vendredi 5 décembre 2014, 16:26:02 (UTC+0100) * Build number: replicant_i9300-userdebug 4.2.2 JDQ39E eng.paulkocialkowsk.20141205.162513 dev-keys |
| Galaxy S 3 4G (I9305) | System | |
| Galaxy Note (N7000) | System | |
| Galaxy Note 2 (N7100) | System | |
| Galaxy Nexus (I9250) | System | |
| Galaxy Tab 2 7.0 (P31xx) | System | |
| Galaxy Tab 2 10.1 (P51xx) | ||
| Galaxy Tab 2 7.0 Wi-Fi (P3110) | System | |
| Galaxy Tab 2 10.1 Wi-Fi (P5110) | ||
| Galaxy Note 8.0 (N5100) | System | |
| Galaxy Note 8.0 Wi-Fi (N5110) | System |
| Device | Image type | Identification |
|---|---|---|
| Galaxy S 2 (I9100) | System | |
| Galaxy S 3 (I9300) | System | * Kernel version: 3.0.64-replicant paulkocialkowsk@jolicoeur #1 Sat Jul 5 22:33:04 CEST 2014 * Build date: samedi 5 juillet 2014, 22:28:35 (UTC+0200) * Build number: replicant_i9300-userdebug 4.2.2 JDQ39E eng.paulkocialkowsk.20140705.222747 dev-keys |
| Galaxy S 3 4G (I9305) | System | |
| Galaxy Note (N7000) | System | |
| Galaxy Note 2 (N7100) | System | |
| Galaxy Nexus (I9250) | System | |
| Galaxy Tab 2 7.0 (P31xx) | System | |
| Galaxy Tab 2 10.1 (P51xx) | ||
| Galaxy Tab 2 7.0 Wi-Fi (P3110) | System | |
| Galaxy Tab 2 10.1 Wi-Fi (P5110) | ||
| Galaxy Note 8.0 (N5100) | System | |
| Galaxy Note 8.0 Wi-Fi (N5110) | System |
| Device | Image type | Identification |
|---|---|---|
| Galaxy S 2 (I9100) | System | |
| Galaxy S 3 (I9300) | System | * Kernel version: 3.0.64-replicant paulkocialkowsk@jolicoeur #1 Sun Jan 19 20:45:25 CEST 2014 * Build date: dimanche 19 janvier, 20:41:06 (UTC+0100) * Build number: replicant_i9300-userdebug 4.2.2 JDQ39E eng.paulkocialkowsk.20140119.204017 dev-keys |
| Galaxy S 3 4G (I9305) | System | |
| Galaxy Note (N7000) | System | |
| Galaxy Note 2 (N7100) | System | |
| Galaxy Nexus (I9250) | System | |
| Galaxy Tab 2 7.0 (P31xx) | System | |
| Galaxy Tab 2 10.1 (P51xx) | ||
| Galaxy Tab 2 7.0 Wi-Fi (P3110) | System | |
| Galaxy Tab 2 10.1 Wi-Fi (P5110) | ||
| Galaxy Note 8.0 (N5100) | System | |
| Galaxy Note 8.0 Wi-Fi (N5110) | System |
The IMEI is an identifier that identify the mobile phone and it's on the network.
With it, it's also possible to get the brand and model of the mobile phone being used, and some operator did go as far as showing the brand and model of the phone on the customer web interface.
We would need to do some more legal research on that to know in which conditions it's legal or not.
Though using random MAC address for privacy is now done by many OS and distributions.
In the European Union, the net neutrality regulation makes sure that user "can use the equipment of their choices" (Tim Wu (2003). "Network Neutrality, Broadband Discrimination" (PDF). Journal on Telecom and High Tech Law. page 169: "rule barring the Bells from preventing attachment of equipment unless harm to the network could be shown") to access the network.
So while there is some IMEI blocking in practice, as for instance the IMEI 00000000[...][1] is blocked in many networks, it's not legal to block devices based on their IMEI if that IMEI is valid and that the device is not stolen, etc.
For instance Operators aren't supposed to block older devices, devices from less known brands, devices from a specific brand, devices not tested or approved by the operator, etc.
We don't have any report of less common mobile phones like the Openmoko, or the GTA04 being blocked.
References:
1 This has been observed with OsmocomBB, by forgetting to add the IMEI inside the configuration file and trying to register, which didn't work. Once the proper IMEI (which is written on the back of the phone below the battery) was added to the configuration file, registering to the network worked.
There are some IMEI blocking going on too, but the articles tend to point out that valid IMEI aren't blocked.
This started recently (2018 and 2019)[1], and we don't have any report of less common mobile phones like the Openmoko or the GTA04 being blocked.
Nevertheless, there is a website that can use to check if a given IMEI is blocked or not, but it only works from Brazilian IP addresses (so it's less practical if you intend to travel there): https://consultaaparelhoimpedido.com.br/public-web/welcome
There are some articles on the topic:If I understood correctly, the articles says that if the IMEI is in the GSMA database it should be ok, but I don't speak Portugese.
References:
For the status of individual devices and most problematic known issues, see DeviceStatus.
Some applications are known not to work due to the lack of 3D acceleration but there aren't many.
We have some applications tests in GraphicsReplicant11 that reference some of them.
There is a tool named scrcpy that is packaged in various GNU/Linux distributions (including Parabola) that is meant to enable people to control their Android devices from their laptop.
That tool depends on video encoding/decoding acceleration1 so it cannot work with Replicant 6.0 as None of the devices currently have that working.
Possible replacements:
| Replacement | Description | TODO |
| RemoteKeyboard2 | Control the keyboard | we need to review it3 |
| screencap4 | Capture the the screen in a png |
For RemoteKeyboard if you try it (for instance after reviewing the code), don't forget to add a password since its listen on 0.0.0.0.
1 https://github.com/Genymobile/scrcpy/blob/master/DEVELOP.md#screen-video-encoding
2 https://f-droid.org/en/packages/de.onxybits.remotekeyboard
4 https://git.replicant.us/replicant/vendor_replicant-scripts/tree/screencap is an example
Xgoldmon is a tool to get modem logs and from that have what is being sent/received through the cellular interface in wireshark
For some devices (Galaxy Nexus), Xgoldmon works. For other devices we have extremely limited messages or no messages at all.
We didn't manage yet to find out what made the stock distribution work when Replicant or LineageOS don't work.
See XMMProtocolInterfaces for more details.

Welcome to the Replicant wiki, which provides information about Replicant, supported devices and research about other mobile devices and platforms.
For more information about Replicant, head over to the Replicant website.
You can help improving the wiki! Wiki editor privileges can be requested by contacting the developers. A short description of the changes and additions you want to make is needed as part of the request. The wiki guidelines should be followed.
Unless specified otherwise, the information displayed in this wiki is only relevant to the latest Replicant version. Do not assume backwards compatibility of the instructions with old versions of Replicant.
See the device pages for device-specific usage information.
Some device pages also have development sections.
This section contains link to pages that organize the wiki in topics.
For instance the Debugging page has links to wiki pages topics related to debugging, like how to obtain logs, etc.
Research on how to support specific hardware components (chips, various system on a chip, etc) in Replicant.
Device specific evaluation and research
The CommunityAndContact page has more information on the Mailing list, Forums, IRC and private / confidential contact address.
All the wikis in this Redmine instance are available under the Creative Commons 3.0 BY-SA license.
To obtain a properly-functioning Replicant installation, each of the following steps must be performed in sequence.
Replicant can only be installed on one of the supported devices. Please make sure that you have the correct device model before proceeding.
The model number on your device must exactly match the model number specified on the Replicant wiki page for that device. For example, if you want to use the Galaxy S II, you must obtain the GT-I9100 model (not SGH-I777, etc.).
Also check the status of your device in the Replicant 6.0 status page as it has a list of what is supposed to be working or not.
If your device storage contains any data that is important to you, back it up now. All existing data will be erased during the installation.
To install the Replicant recovery image, follow the instructions on the Recovery installation with Heimdall wiki page.
After installing the recovery image to your device, it should have rebooted into the recovery.
To ensure that the new partitions are formatted correctly, you must wipe the existing partitions.
To wipe the system partition, from the recovery main menu:
To wipe the cache and data partitions, from the recovery main menu:
Choose one of the following installation methods:
To perform a factory reset, from the recovery main menu:
From the recovery main menu, select Reboot system now.
Congratulations, you have successfully installed Replicant!
Some of the devices supported by Replicant have a partition that contains the modem data (called EFS).
Now that Replicant is installed, it's a good idea to do a backup of it if your device has one.
This way it would be way easier to restore it if it becomes corrupted (it can sometimes happen with Replicant).
For a list of devices that have a modem data partition, and for instructions on how to do a backup of it, see the BackupTheEFS wiki page.
Warning: installing an operating system, such as Replicant, may void your device's warranty and will erase the data stored on the device.
You can either complete this step by using the device's internal storage or by using an external microSD card.
1. Make sure the device is started up and has an Android system running
2. Connect the USB cable to both the computer and the device
3. Enable USB mass storage on the device
4. Mount the mass storage on the computer
5. Copy the replicant-6.0-i9300.zip file at the origin of the mass storage
6. Safely unmount the mass storage on the computer
7. Disable USB mass storage on the device
1. Connect the microSD card to the computer (e.g. using an USB card reader)
2. Mount the microSD card on the computer
3. Copy the replicant-6.0-i9300.zip file at the origin of the microSD card
4. Safely unmount the microSD card on the computer
5. Disconnect the microSD card from the computer
6. Insert the microSD card in the device (make sure it is turned off before inserting the card)
If you don't already have adb, see the ToolsInstallation page for how to install all required tools.
A data wipe is necessary if you switch from the factory image or a different Android distribution to Replicant. You also need to do a data wipe when upgrading to a new major release (e.g. from Replicant 4.2 to Replicant 6.0). Only when updating to a new minor release (e.g. from Replicant 6.0 0001 to Replicant 6.0 0002), a data wipe is usually not required.
3. Select Factory reset
4. Select Wipe data (keep media)
5. Confirm the data wipe by selecting Yes
6. Press the back key (if necessary) to get back to the general menu
7. Select Apply update
8. Select Choose from emulated
9. Select the system zip: replicant-6.0-i9300.zip
Note: if your device was running Android 4.2 and later, it may be located in the 0 directory
8. Select Choose from sdcard1
9. Select the system zip: replicant-6.0-i9300.zip
Note: if your device was running Android 4.2 and later, it may be located in the 0 directory
8. Select Apply from ADB
9. Back to the host computer, load the system zip with sideload:
adb sideload path/to/replicant-6.0-i9300.zip
11. Press the back key (if necessary) to get back to the general menu
16. Select Reboot system now to reboot the device
Your device should now be running Replicant!
1. First find the latest update file for your device in ReplicantImages, it will look like that:
replicant-6.0-<yourdevice>.zip
1. Press the power button
2. Select Reboot
3. Select Recovery
4. Press OK
1. Select Apply update
2. Select Choose from emulated
3. Select the update file, which looks like that: replicant-6.0-<yourdevice>.zip
Note: With Android 4.2 and later, it may be located in the 0 directory
4. It may ask you to confirm the installation. If it is the case, confirm it.
5. Press the back key (if necessary) to get back to the general menu
1. First find the latest update file for your device in ReplicantImages, it will look like that:
replicant-6.0-<yourdevice>.zip
In the recovery:
1. Select Apply update
2. Select Choose from sdcard1
3. Select the update file, which looks like that: replicant-6.0-<yourdevice>.zip
Note: With Android 4.2 and later, it may be located in the 0 directory
4. It may ask you to confirm the installation. If it is the case, confirm it.
5. Press the back key (if necessary) to get back to the general menu
First make sure you have adb installed. If you don't the ToolsInstallation page has instructions for doing that.
1. First find the latest update file for your device in ReplicantImages, it will look like that:
replicant-6.0-<yourdevice>.zip
For instance for the Samsung Galaxy S2, the update file will be named replicant-6.0-i9100.zip
2. Download the update file on your computer
In the recovery.
1. Select Apply update
2. Select Apply from ADB
3. Back to the host computer, load the system zip with sideload:
adb sideload path/to/replicant-6.0-i9300.zip
1. Make sure the device is connected to the Internet
2. Navigate to https://redmine.replicant.us/projects/replicant/wiki/ReplicantImages with a web browser
3. In that page, find the lastest update file for your device, it will look like that:
replicant-6.0-<yourdevice>.zip
1. Press the power button
2. Select Reboot
3. Select Recovery
4. Press OK
1. Select Apply update
2. Select Choose from emulated
3. Select the update file, which looks like that: replicant-6.0-<yourdevice>.zip
The file will usually be located in 0/Download, so select 0, then Download, then the file.
4. It may ask you to confirm the installation. If it is the case, confirm it.
5. Press the back key (if necessary) to get back to the general menu
On several Samsung Android smartphones, included devices supported by Replicant 6.0, the RECOVERY partition is not used by the stock bootloader.
This affects at least the following devices:What happens with the stock OS and old versions of Android distributions is that both the boot kernel and the recovery are in the KERNEL partition.
In practice in Replicant 6.0:However as distributions like LineageOS tend to use recoveries like TWRP, it was a problem for such distributions.
So people from XDA came with a scheme called isorec which made it into LineageOS 13.
And Replicant 6.0 is based on LineageOS 13, that is probably in Replicant too, even if it's not used for the Replicant installation and recoveries.
So if the RECOVERY partition contains valid lzop-compressed data, which contains a valid cpio archive, then the image flashed in KERNEL will use that as an initramfs for the recovery.
Building a kernel aside Replicant is faster to set up and faster to build since you do not need to fetch and use the huge Android build system.
Users wanting to add a driver to their kernel, or developers that want to work on kernel related areas can do that to speed up the development process. If the changes are integrated back into Replicant, they will automatically be built by the Android build system when building images.
Since you are not compiling any user space applications, you don't need the Android build system. The Linux kernel and bootloaders such as U-Boot can be built without the Android build system.
The Trisquel ARM version of gcc seem to work well. To install it run:
$ apt-get install gcc-arm-none-eabi
If you use distributions such as Parabola, this will probably not work because the arm-none-eabi-gcc is too recent for many device kernels. But there are efforts to make the kernel sources compatible with more recent compiler versions.
You can install Trisquel in a container to work around this.
This way, it will have very few CPU and memory overhead compared to a virtual machine.
It will also save disk space since you can just store the Trisquel rootfs in any directory.
As usual, verify the signature after importing the release key:
$ gpg --armor --verify path/to/replicant-4.2-crespo.zip.asc path/to/replicant-4.2-crespo.zip
Make sure the check succeeds!
Then unpack the zip file:
$ mkdir replicant-4.2-crespo && cd replicant-4.2-crespo && unzip ../replicant-4.2-crespo.zipThat should have extracted a boot.img. We then should not forget to look at what format the boot.img is in:
$ file boot.img boot.img: Android bootimg, kernel (0x30008000), ramdisk (0x31000000), page size: 4096, cmdline (console=ttyFIQ0 no_console_suspend)
mkbootimg to pack an imageunpackbootimg to unpack an imageFirst, install mkbootimg and unpackbootimg. The ToolsInstallation page has some installation instructions for them.
Then extract the ramdisk, kernel image and parameters from the original boot.img:
$ unpackbootimg -i boot.img -o boot Android magic found at: 0 BOARD_KERNEL_CMDLINE console=ttyFIQ0 no_console_suspend BOARD_KERNEL_BASE 30000000 BOARD_RAMDISK_OFFSET 01000000 BOARD_SECOND_OFFSET 00f00000 BOARD_TAGS_OFFSET 00000100 BOARD_PAGE_SIZE 4096 BOARD_SECOND_SIZE 0 BOARD_DT_SIZE 0
This will unpack the boot.img in the directory boot.
We also check the kernel image format, since we will build that:
$ file boot/boot.img-zImage boot/boot.img-zImage: Linux kernel ARM boot executable zImage (little-endian)
If you want to be able to run "make menuconfig", install libncurses5-dev:
# apt-get install libncurses5-dev
Download the sources:
$ git clone https://git.replicant.us/replicant/kernel_samsung_crespo.git
Then in each console you build from, run:
$ export ARCH=arm $ export CROSS_COMPILE=arm-none-eabi-
Configure it for crespo:
$ make crespo_defconfig
If you want to configure it further:
$ make menuconfig
Then build a zImage:
$ make -j4 zImage
If the compilation succeeded, the image is at:
arch/arm/boot/zImage
Many device-specific kernels often contains not very clean code. This is very common with high volume devices due to time to market constraints. Upstream Linux has a lot higher code quality standards, but having your patches merged there requires more time.
As a result, variations in the default kernel configuration for your device can result in build errors.
Compilation failures can also happen when you use another gcc version, like we do in this guide.
This happens frequently if you use a gcc that is more recent than your kernel.
The "not very clean" code also increases the probability of it.
If you manage to fix build failures for a kernel, feel free to submit patches.
We now create a new boot.img from the parameters and ramdisk we extracted from the default boot.img
$ mkbootimg --kernel path/to/arch/arm/boot/zImage --ramdisk boot/boot.img-ramdisk.gz --cmdline "console=ttyFIQ0 no_console_suspend" --base 0x30000000 --pagesize 4096 -o new-boot.img
Then we verify that it matches the default boot.img parameters:
$ unpackbootimg -i new-boot.img Android magic found at: 0 BOARD_KERNEL_CMDLINE console=ttyFIQ0 no_console_suspend BOARD_KERNEL_BASE 30000000 BOARD_RAMDISK_OFFSET 01000000 BOARD_SECOND_OFFSET 00f00000 BOARD_TAGS_OFFSET 00000100 BOARD_PAGE_SIZE 4096 BOARD_SECOND_SIZE 0 BOARD_DT_SIZE 0Here we check if the following parameters match:
BOARD_KERNEL_BASE)BOARD_RAMDISK_OFFSET) BOARD_TAGS_OFFSET) BOARD_PAGE_SIZE)BOARD_KERNEL_CMDLINE)Reboot the device to the bootloader, and run:
$ fastboot boot new-boot.img < waiting for device > downloading 'boot.img'... OKAY [ 0.435s] booting... OKAY [ 0.288s] finished. total time: 0.723s
Nowadays there are many documents that are legally and legitimately published, but still contain confidential markings.
This may be because someone forgot to remove them, or to publish the exact same document, or to save time and money, or for other reasons.
The Vault 7 and Snowden documents are in the public domain in the United States because it is a work prepared by an officer or employee of the United States Government as part of that person’s official duties under the terms of Title 17, Chapter 1, Section 105 of the US Code .
| Versions | type | Status | Unit produced | Replicant compatible versions | SoC | Bootloader | Modem link | Modem protocol | RAM |
|---|---|---|---|---|---|---|---|---|---|
| Librem 5 Devkit | Public development kit | released | ? | Not supported yet | consumer I.MX8M | Unsigned | USB | AT, QMI | 3G |
| Librem 5 Aspen | Smartphone, public prototype | released | ? | Not supported yet | consumer I.MX8M | Unsigned | USB | AT, QMI | 3G |
| Librem 5 Birch | Smartphone, public prototype | released | ? | ||||||
| Librem 5 Chestnut | Smartphone, public prototype | released | ? | ||||||
| Librem 5 Dogwood | Smartphone, public prototype | ? | |||||||
| Librem 5 Evergreen | Smartphone, release | ? | |||||||
| Librem 5 Fir | Smartphone, release | ? | Not supported yet | Unknown | Unknown | Unknown | Unknown | Unknown |
Two early batches (Birch and Chestnut) of Librem 5 are already in the hands of backers and developers. Another batch, Dogwood, is expected in March 2020 and then a mass produced one, Evergreen, in Q2 2020.
| Component | Hardware | Comments |
|---|---|---|
| SoC | iMX8M Quad CPU | * The non-free DDR4 controller firmware is handled by a M4 core present in the SoC and will be on a separate flash chip (so Replicant won't have to redistribute it). * The bootloader (u-boot + ATF) is going to be fully free and redistributable by Replicant. |
| GPU | Vivante GC7000Lite | * Supported in mainline Mesa by etnaviv driver. |
| Display | 5.7″ 720x1440 display | |
| Memory | 3GB RAM LPDDR4-3200 | |
| Storage | 32GB eMMC microSD slot |
|
| Wireless | Redpine RS9116 802.11abgn 2.4 Ghz / 5Ghz + Bluetooth 5 & BLE | * Firmware loaded from an on-board flash memory. * Removable1 |
| Audio | Wolfson Media WM8962 | |
| Baseband | Gemalto PLS8 or Broadmobi BM818 on replaceable M.2 card | * Single SIM. * Both modems use QMI and AT. * Connected via USB and I2S. * On-modem GNSS receiver has disabled antenna. * Removable1 |
| GPS | TESEO LIV3F multiconstellation GNSS receiver | * NMEA over UART |
| Motion sensor | STmicroelectronicts LSM9DS1 | |
| ALS/proximity | Vishay VCNL4040 | |
| Smartcard | 3FF format smart cards | * Early batches use 2FF format card. TODO: * How is it connected? * What Android frameworks exist for smartcards? |
| Back Camera w/LED flash | 1/3" 13Mpx CMOS sensor, S5K3L6XX; 4224×3136 active pixels; 30fps @4K, 60fps @FHD, 120fps @HD; focusing range: 10cm - ∞ @AF; FOV: 81.5° |
* No drivers yet. |
| Front Camera | 1/4" 8Mpx CMOS sensor, YACG4D0C9SHC; 3264×2448 active pixels; 30fps @QUXGA, 60fps @FHD (Crop), 90fps @HD; focusing range: 28.9-65.0cm; FOV: 83.3° |
* No drivers yet. |
| USB | USB-C functions handled by TPS65982 Charging handled by TI BQ25895 Battery monitored by MAX17055 |
* USB-C connector for: PD charging, USB 3.0 client and host function, DisplayPort * Doesn't require non-free firmware to use the video out (via USB-C DisplayPort alt-mode). |
1 from #purism: 23:16 < MrChromebox> GNUtoo: yes, they are removable/replaceable, that's a design feature not likely to change
fn2. See the Librem-5-6-980x735.jpg picture in the Arstechnica article from January 2020
Hardware reference documentation: https://developer.puri.sm/Librem5/Hardware_Reference.html
Schematics: https://source.puri.sm/Librem5/l5-schematic/
Batches information: https://puri.sm/posts/librem-5-shipping-announcement/
Final specifications: https://puri.sm/posts/librem-5-smartphone-final-specs-announced
Shop product page: https://shop.puri.sm/shop/librem-5/
libsamsung-ipc is a free software implementation of the Samsung IPC modem protocol, found in many Samsung devices.
libsamsung-ipc contains the device-specific code for transport between the kernel interface and the upper layer (usually, the Radio Interface Layer) and the definition of the data structures and values used in the protocol.
The libsamsung-ipc source code is hosted by the Replicant project. The latest version is available on the master branch.
It has support for both the Android build system and autotools.
The library itself is mostly complete: the actual protocol work takes place in the upper layer implementations, so only new devices support is left to be added.
libsamsung-ipc ships with some tools to ease development.
ipc-modem is a deprecated tool that was used at the beginning of the work for talking to the Nexus S modem. It implements basic functionalities (mostly SIM unlocking and network registration), using libsamsung-ipc.
usage: ipc-modem <command>
commands:
start boot modem and start read loop
boot boot modem only
power-on power on the modem
power-off power off the modem
arguments:
--debug enable debug messages
--pin=[PIN] provide SIM card PIN
ipc-test is a very minimalistic tool that simply boots up the modem and receives messages as they arrive. It is intended to ease boot code development by providing a standalone binary.
Samsung-RIL is the free software Radio Interface Layer that implements the Samsung IPC protocol and interfaces libsamsung-ipc and the Android framework:
Modem <=> Linux kernel <=> libsamsung-ipc <=> Samsung-RIL <=> Android framework <=> Android applications
Samsung-RIL is device-independent: it means that all the device-specific code takes place in libsamsung-ipc, not in Samsung-RIL directly.
The Samsung-RIL source code is hosted by the Replicant project. The latest version is available on the master branch.
It is aimed that Samsung-RIL can work on any Android version from gingerbread to jellybean in the master branch.
For now, CDMA messages are not supported at all.
Global status:
| RIL request/response | Functionality | Status |
|---|---|---|
| RIL_REQUEST_GET_SIM_STATUS | SIM status report | Working |
| RIL_REQUEST_ENTER_SIM_PIN | SIM pin unlock | Working |
| RIL_REQUEST_ENTER_SIM_PUK | SIM puk unlock | Should work, untested |
| RIL_REQUEST_ENTER_SIM_PIN2 | SIM pin2 unlock | Should work, untested |
| RIL_REQUEST_ENTER_SIM_PUK2 | SIM puk unlock | Should work, untested |
| RIL_REQUEST_CHANGE_SIM_PIN | SIM pin change | Working |
| RIL_REQUEST_CHANGE_SIM_PIN2 | SIM pin2 change | Should work, untested |
| RIL_REQUEST_ENTER_NETWORK_DEPERSONALIZATION | Network restriction unlock | Missing |
| RIL_REQUEST_GET_CURRENT_CALLS | Current calls report | Working |
| RIL_REQUEST_DIAL | Outgoing call | Working |
| RIL_REQUEST_GET_IMSI | IMSI report | Working |
| RIL_REQUEST_HANGUP | End call | Working |
| RIL_REQUEST_HANGUP_WAITING_OR_BACKGROUND | End waiting/bg call | Missing |
| RIL_REQUEST_HANGUP_FOREGROUND_RESUME_BACKGROUND | End current call and resume waiting call | Missing |
| RIL_REQUEST_SWITCH_WAITING_OR_HOLDING_AND_ACTIVE | Switch current/waiting-holding calls | Missing |
| RIL_REQUEST_SWITCH_HOLDING_AND_ACTIVE | Switch current/holding calls | Missing |
| RIL_REQUEST_CONFERENCE | Start a conference call | Missing |
| RIL_REQUEST_UDUB | Send user determined used busy | Missing |
| RIL_REQUEST_LAST_CALL_FAIL_CAUSE | Last call termination cause | Working |
| RIL_REQUEST_SIGNAL_STRENGTH | Signal strength | Working |
| RIL_REQUEST_VOICE_REGISTRATION_STATE | GSM registration state report | Working |
| RIL_REQUEST_DATA_REGISTRATION_STATE | GPRS registration state report | Working |
| RIL_REQUEST_OPERATOR | Operator report | Working |
| RIL_REQUEST_RADIO_POWER | Modem power control | Working |
| RIL_REQUEST_DTMF | DTMF tones | Working |
| RIL_REQUEST_SEND_SMS | Send SMS | Working |
| RIL_REQUEST_SEND_SMS_EXPECT_MORE | Send multiple SMS | Working |
| RIL_REQUEST_SETUP_DATA_CALL | Start GPRS call | Working |
| RIL_REQUEST_SIM_IO | SIM I/O | Working |
| RIL_REQUEST_SEND_USSD | Send USSD message | Working |
| RIL_REQUEST_CANCEL_USSD | Cancel USSD | Should work, untested |
| RIL_REQUEST_GET_CLIR | Get caller identity restriction | Missing |
| RIL_REQUEST_SET_CLIR | Set caller identity restriction | Missing |
| RIL_REQUEST_QUERY_CALL_FORWARD_STATUS | Call forwarding status | Missing |
| RIL_REQUEST_SET_CALL_FORWARD | Set call forwarding | Missing |
| RIL_REQUEST_QUERY_CALL_WAITING | Get waiting call's status | Missing |
| RIL_REQUEST_SET_CALL_WAITING | Enable/disable waiting state on current call | Missing |
| RIL_REQUEST_SMS_ACKNOWLEDGE | Ask for acknowledgment of the latest sent SMS | Working |
| RIL_REQUEST_GET_IMEI | Retrieve IMEI | Working |
| RIL_REQUEST_GET_IMEISV | Retrieve IMEISV | Working |
| RIL_REQUEST_ANSWER | Answer incoming call | Working |
| RIL_REQUEST_DEACTIVATE_DATA_CALL | Stop GPRS call | Working |
| RIL_REQUEST_QUERY_FACILITY_LOCK | Get a facility lock status | Working |
| RIL_REQUEST_SET_FACILITY_LOCK | Set a facility lock status | Working |
| RIL_REQUEST_CHANGE_BARRING_PASSWORD | Change call barring password | Missing |
| RIL_REQUEST_QUERY_NETWORK_SELECTION_MODE | Get network selection mode | Working |
| RIL_REQUEST_SET_NETWORK_SELECTION_AUTOMATIC | Set automatic network selection mode | Working |
| RIL_REQUEST_SET_NETWORK_SELECTION_MANUAL | Set manual network selection mode | Working |
| RIL_REQUEST_QUERY_AVAILABLE_NETWORKS | Query available networks | Working |
| RIL_REQUEST_DTMF_START | Start DTMF tone | Working |
| RIL_REQUEST_DTMF_STOP | Stop DTMF tone | Working |
| RIL_REQUEST_BASEBAND_VERSION | Get modem firmware version | Working |
| RIL_REQUEST_SEPARATE_CONNECTION | Separate a call from a multi-party call and make it the active call | Missing |
| RIL_REQUEST_SET_MUTE | Set audio mute status | Working |
| RIL_REQUEST_GET_MUTE | Get audio mute status | Missing |
| RIL_REQUEST_QUERY_CLIP | Get CLIP status | Missing |
| RIL_REQUEST_LAST_DATA_CALL_FAIL_CAUSE | Retrieve last GPRS call fail cause | Working |
| RIL_REQUEST_DATA_CALL_LIST | Retrieve GPRS call list | Working |
| RIL_REQUEST_RESET_RADIO | Deprecated | Deprecated |
| RIL_REQUEST_OEM_HOOK_RAW | OEM-specific uses, Samsung Service Mode | Working |
| RIL_REQUEST_OEM_HOOK_STRINGS | OEM-specific uses, no use | N/A |
| RIL_REQUEST_SCREEN_STATE | Indicate screen state | Working |
| RIL_REQUEST_SET_SUPP_SVC_NOTIFICATION | Enable/disable supplementary network notifications | Missing |
| RIL_REQUEST_WRITE_SMS_TO_SIM | Write SMS to SIM | Working |
| RIL_REQUEST_DELETE_SMS_ON_SIM | Delete SMS on SIM | Working |
| RIL_REQUEST_SET_BAND_MODE | Set RF band mode | Missing |
| RIL_REQUEST_QUERY_AVAILABLE_BAND_MODE | Query available RF band modes | Missing |
| RIL_REQUEST_STK_GET_PROFILE | Get STK profile | Missing |
| RIL_REQUEST_STK_SET_PROFILE | Set STK profile | Missing |
| RIL_REQUEST_STK_SEND_ENVELOPE_COMMAND | Send SAT command to the SIM | Missing |
| RIL_REQUEST_STK_SEND_TERMINAL_RESPONSE | Send response to the SIM | Missing |
| RIL_REQUEST_STK_HANDLE_CALL_SETUP_REQUESTED_FROM_SIM | Allow or deny SIM call setup | Missing |
| RIL_REQUEST_EXPLICIT_CALL_TRANSFER | Connect two calls and disconnect from both | Missing |
| RIL_REQUEST_SET_PREFERRED_NETWORK_TYPE | Set preferred network type | Working |
| RIL_REQUEST_GET_PREFERRED_NETWORK_TYPE | Get preferred network type | Working |
| RIL_REQUEST_GET_NEIGHBORING_CELL_IDS | Request neighboring cell ids | Missing |
| RIL_REQUEST_SET_LOCATION_UPDATES | Enable or disable cell id change notification | Missing |
| RIL_REQUEST_CDMA_SET_SUBSCRIPTION_SOURCE | ||
| RIL_REQUEST_CDMA_SET_ROAMING_PREFERENCE | ||
| RIL_REQUEST_CDMA_QUERY_ROAMING_PREFERENCE | ||
| RIL_REQUEST_SET_TTY_MODE | Set TTY mode | Missing |
| RIL_REQUEST_QUERY_TTY_MODE | Get TTY mode | Missing |
| RIL_REQUEST_CDMA_SET_PREFERRED_VOICE_PRIVACY_MODE | ||
| RIL_REQUEST_CDMA_QUERY_PREFERRED_VOICE_PRIVACY_MODE | ||
| RIL_REQUEST_CDMA_FLASH | ||
| RIL_REQUEST_CDMA_BURST_DTMF | ||
| RIL_REQUEST_CDMA_VALIDATE_AND_WRITE_AKEY | ||
| RIL_REQUEST_CDMA_SEND_SMS | ||
| RIL_REQUEST_CDMA_SMS_ACKNOWLEDGE | ||
| RIL_REQUEST_GSM_GET_BROADCAST_SMS_CONFIG | Get broadcast SMS config | Missing |
| RIL_REQUEST_GSM_SET_BROADCAST_SMS_CONFIG | Set broadcast SMS config | Missing |
| RIL_REQUEST_GSM_SMS_BROADCAST_ACTIVATION | Enable or disable broadcast SMS reception | Missing |
| RIL_REQUEST_CDMA_GET_BROADCAST_SMS_CONFIG | ||
| RIL_REQUEST_CDMA_SET_BROADCAST_SMS_CONFIG | ||
| RIL_REQUEST_CDMA_SMS_BROADCAST_ACTIVATION | ||
| RIL_REQUEST_CDMA_SUBSCRIPTION | ||
| RIL_REQUEST_CDMA_WRITE_SMS_TO_RUIM | ||
| RIL_REQUEST_CDMA_DELETE_SMS_ON_RUIM | ||
| RIL_REQUEST_DEVICE_IDENTITY | Request device identity | Missing |
| RIL_REQUEST_EXIT_EMERGENCY_CALLBACK_MODE | Leave emergency call mode | Missing |
| RIL_REQUEST_GET_SMSC_ADDRESS | Get SMSC address | Missing |
| RIL_REQUEST_SET_SMSC_ADDRESS | Set SMSC address | Missing |
| RIL_REQUEST_REPORT_SMS_MEMORY_STATUS | Report SIM SMS memory status | Missing |
| RIL_REQUEST_REPORT_STK_SERVICE_IS_RUNNING | Report whether STK is running | Missing |
| RIL_REQUEST_CDMA_GET_SUBSCRIPTION_SOURCE | ||
| RIL_REQUEST_ISIM_AUTHENTICATION | Perform AKA challenge/response | Missing |
| RIL_REQUEST_ACKNOWLEDGE_INCOMING_GSM_SMS_WITH_PDU | Acknowledge incoming SMS with PDU | Missing |
| RIL_REQUEST_STK_SEND_ENVELOPE_WITH_STATUS | Send SAT envelope status | Missing |
| RIL_UNSOL_RESPONSE_RADIO_STATE_CHANGED | Radio state changed | Working |
| RIL_UNSOL_RESPONSE_CALL_STATE_CHANGED | Call state changed | Working |
| RIL_UNSOL_RESPONSE_VOICE_NETWORK_STATE_CHANGED | Network state changed | Working |
| RIL_UNSOL_RESPONSE_NEW_SMS | Incoming SMS | Working |
| RIL_UNSOL_RESPONSE_NEW_SMS_STATUS_REPORT | Incoming SMS status report | Working |
| RIL_UNSOL_RESPONSE_NEW_SMS_ON_SIM | New SMS on SIM | Missing |
| RIL_UNSOL_ON_USSD | USSD message | Working |
| RIL_UNSOL_ON_USSD_REQUEST | Deprecated | Deprecated |
| RIL_UNSOL_NITZ_TIME_RECEIVED | NITZ time received | Working |
| RIL_UNSOL_SIGNAL_STRENGTH | Signal strength update | Working |
| RIL_UNSOL_DATA_CALL_LIST_CHANGED | GPRS call list changed | Working |
| RIL_UNSOL_SUPP_SVC_NOTIFICATION | Supplementary network notification | Missing |
| RIL_UNSOL_STK_SESSION_END | STK session ended | Missing |
| RIL_UNSOL_STK_PROACTIVE_COMMAND | Proactive STK command | Missing |
| RIL_UNSOL_STK_EVENT_NOTIFY | STK event happened | Missing |
| RIL_UNSOL_STK_CALL_SETUP | SIM is request call setup | Missing |
| RIL_UNSOL_SIM_SMS_STORAGE_FULL | SMS storage is full on SIM | Missing |
| RIL_UNSOL_SIM_REFRESH | SIM has to be reinitialized | Missing |
| RIL_UNSOL_CALL_RING | Incoming call | Working |
| RIL_UNSOL_RESPONSE_SIM_STATUS_CHANGED | SIM status changed | Working |
| RIL_UNSOL_RESPONSE_CDMA_NEW_SMS | ||
| RIL_UNSOL_RESPONSE_NEW_BROADCAST_SMS | Incoming broadcast SMS | Missing |
| RIL_UNSOL_CDMA_RUIM_SMS_STORAGE_FULL | ||
| RIL_UNSOL_RESTRICTED_STATE_CHANGED | Restricted state changed | Missing |
| RIL_UNSOL_ENTER_EMERGENCY_CALLBACK_MODE | Enter emergency callback mode | Missing |
| RIL_UNSOL_CDMA_CALL_WAITING | ||
| RIL_UNSOL_CDMA_OTA_PROVISION_STATUS | ||
| RIL_UNSOL_CDMA_INFO_REC | ||
| RIL_UNSOL_OEM_HOOK_RAW | OEM-specific use | N/A |
| RIL_UNSOL_RINGBACK_TONE | Start or stop playing ringback tone | Missing |
| RIL_UNSOL_RESEND_INCALL_MUTE | Resend mute state | N/A |
| RIL_UNSOL_CDMA_SUBSCRIPTION_SOURCE_CHANGED | ||
| RIL_UNSOL_CDMA_PRL_CHANGED | ||
| RIL_UNSOL_EXIT_EMERGENCY_CALLBACK_MODE | Exit emergency callback mode | Missing |
| RIL_UNSOL_RIL_CONNECTED |
Mobile phones are often used to connect to the GSM network.
Since no phones that could potentially support Replicant have free software firmware for the modem, currently, the only possible way to avoid location tracking by the phone network is to have the modem powered off. Thus, it is desirable to add support for a way to easily turn off the modem (see #1779).
Implementing some tricks to make location tracking harder or not reliable with free software modem firmware has not been done to our knowledge, and we don't know in which extend it is possible. This page should document research into alternative protocols that could be used to get location privacy. Possible ways to prevent location tracking by the GSM network should also be listed.
Some background information on how silent SMS or ping SMS are used and how they make location tracking possible:
https://en.wikipedia.org/wiki/SMS#Silent_SMS (German wiki article is a lot more detailed: https://de.wikipedia.org/wiki/Stille_SMS)
https://edri.org/edrigramnumber10-2silent-sms-tracking-suspects/
https://github.com/CellularPrivacy/Android-IMSI-Catcher-Detector/wiki/glossary-of-terms#user-content-silent-sms
F-Droid has an app that allows to send silent SMS: https://f-droid.org/repository/browse/?fdfilter=silent+sms&fdid=com.itds.sms.ping
The app can be used to send a silent SMS to a Replicant device and the radio log shows how the SMS is processed by the radio interface.
It looks like it is possible to detect silent SMS in Samsung-RIL. We could implement a detection mechanism and if a silent SMS is detected, the SMS is not acknowledged. This would violate the standard, but it could completely prevent tracking by silent SMS and make it a lot harder to track Replicant users that are connected to the phone network. We need to investigate if doing this is illegal in some jurisdictions. Silent SMS might be used to locate the phone's owner in an emergency which would be a feature that users like to have. So silent SMS shouldn't be dropped by default, rather should it be possible to optionally enable this detection mechanism.
This would be comparable to not responding to ping requests as host on an Internet Protocol network. This also violates the standard, but is often considered for security. However, silent SMS can reveal a lot more information about the user than ping requests.
Here I (belgin) will document the process of mainlining the samsung gt-n51xx tablets.
| event | date | location | details |
|---|
| event | date | location | details |
|---|---|---|---|
| 37C3 | 27-30 December 2023 | Hamburg, Germany | 37C3 |
| FOSDEM 2020 | 1-2 February 2020 | Brussels, Belgium | Fosdem2020 |
| 36C3 | 27-30 December 2019 | Leipzig, Germany | 36c3 |
| Replicant Contributors Meeting 2019 | 27-28 July 2019 | Paris, France | ReplicantContributorsMeetingJuly2019 |
| FOSDEM 2019 | 2-3 February 2019 | Brussels, Belgium | Fosdem2019 |
When connected on the serial port, during boot, if you press the volume down button and press enter at least 4 times on the serial console, you can get a shell:
PMIC rev = PASS2(4) BUCK1OUT(vdd_mif) = 0x05 BUCK3DVS1(vdd_int) = 0x20 [MMC] there are pending interrupts 0x00010000 cardtype: 0x00000007 SB_MMC_HS_52MHZ_1_8V_3V_IO mmc->card_caps: 0x00000311 mmc->host_caps: 0x00000311 mmc_initialize: mmc->capacity = 30777344 Samsung S-Boot 4.0-2836504 for GT-I9300 (Jun 15 2015 - 22:47:58) EXYNOS4412(EVT 1.1) / 1022MB / 15028MB / Rev 12 / I9300XXUGOF1 /(PKG_ID 0x7050008) - read_bl1 pit_check_signature (PIT) valid. initialize_ddi_data: usable! (3:0xf) PARAM ENV VERSION: v1.0.. set_charger_current: chg curr(3f), in curr(17) set_charger_state: buck(1), chg(1), reg(0x05) microusb_get_attached_device: STATUS1:0x3d, 2:0x00 set_auto_current: ta_state(0), curr(1000) init_fuelgauge: fuelgauge power ok init_fuelgauge: POR status fuelgauge_por: POR start: vcell(4081), vfocv(4188), soc(100) fuelgauge_por: update SDI M0 parameter fuelgauge_por: RCOMP(0x0065), TEMPCO(0x0930) fuelgauge_por: POR finish: vcell(4079), vfocv(4310), soc(88) get_table_soc: vcell(4077) is caculated to t-soc(84.590) init_fuelgauge: start: vcell(4077), vfocv(4301), soc(88), table soc(84) init_fuelgauge: finish: vcell(4077), vfocv(4301), soc(88), table soc(84) init_microusb_ic: MUIC: CONTROL1:0x1b init_microusb_ic: MUIC: CONTROL1:0x1b init_microusb_ic: MUIC: CONTROL2:0x3b init_microusb_ic: MUIC: CONTROL2:0x3b PMIC_ID = 0x02 PMIC_IRQSRC = 0x00 PMIC_IRQ1 = 0x06 PMIC_IRQ2 = 0x00 PMIC_IRQ1M = 0xc0 PMIC_IRQ2M = 0x03 PMIC_STATUS1 = 0x11 PMIC_STATUS2 = 0x00 PMIC_PWRON = 0x03 PMIC_RTCINT = 0x00 PMIC_RTCINTM = 0x3f s5p_check_keypad: 0x1100000 s5p_check_reboot_mode: INFORM3 = 0 ... skip s5p_check_upload: MAGIC(0x277b3bbf), RST_STAT(0x10000) microusb_get_attached_device: STATUS1:0x3d, 2:0x00 s5p_check_download: 0 microusb_get_attached_device: STATUS1:0x3d, 2:0x00 check_pm_status: non chargable jig, bypass check power cmu_div:1, div:7, src_clk:800000000, pixel_clk:57153600 s5p_dsim_display_config : VIDEO MODE a2, 60, 90, autoboot aborted.. S-BOOT # S-BOOT # S-BOOT # S-BOOT # S-BOOT # S-BOOT # S-BOOT # S-BOOT # S-BOOT # S-BOOT # help Following commands are supported: * chipinfo * help * log * load_kernel * boot * reset * findenv * saveenv * setenv * printenv * checksum_need * usb * upload * keyread * readadc * printcsd * rpmbwritedata * rpmbreadcount * rpmbsetkey * rpmbclose * rpmbopen * sdcard_read * sdcard * fuelgauge * usb_write * usb_read To get commands help, Type "help <command>" S-BOOT #
Here's the known list of commands:
S-BOOT # help Following commands are supported: * chipinfo * help * log * load_kernel * boot * reset * findenv * saveenv * setenv * printenv * checksum_need * usb * upload * keyread * readadc * printcsd * rpmbwritedata * rpmbreadcount * rpmbsetkey * rpmbclose * rpmbopen * sdcard_read * sdcard * fuelgauge * usb_write * usb_read To get commands help, Type "help <command>" S-BOOT #
And the respective help:
S-BOOT # help chipinfo * Help : chipinfo * Usage : display exynos chip info. S-BOOT # help help * Help : help * Usage : help [command] S-BOOT # help log * Help : log * Usage : *usage : log S-BOOT # help load_kernel * Help : load_kernel * Usage : load kernel image.. S-BOOT # help boot * Help : boot * Usage : boot [kernel options] Boot Linux with optional kernel options S-BOOT # help reset * Help : reset * Usage : reboot Reboot system S-BOOT # help findenv * Help : findenv * Usage : findenv [filename] S-BOOT # help saveenv * Help : saveenv * Usage : saveenv S-BOOT # help setenv * Help : setenv * Usage : setenv [name] [value] S-BOOT # help printenv * Help : printenv * Usage : printenv S-BOOT # help checksum_need * Help : checksum_need * Usage : Setting checksum need. 0 or 1 S-BOOT # help usb * Help : usb * Usage : usb download command. S-BOOT # help upload * Help : upload * Usage : usb upload command. S-BOOT # help keyread * Help : keyread * Usage : *Usage : keyread S-BOOT # help readadc * Help : readadc * Usage : *usage : readadc <channel> S-BOOT # help printcsd * Help : printcsd * Usage : printcsd S-BOOT # help rpmbwritedata * Help : rpmbwritedata * Usage : rpmbwritedata [data] S-BOOT # help rpmbreadcount * Help : rpmbreadcount * Usage : rpmbreadcount S-BOOT # help rpmbsetkey * Help : rpmbsetkey * Usage : rpmbsetkey [key] S-BOOT # help rpmbclose * Help : rpmbclose * Usage : rpmbclose S-BOOT # help rpmbopen * Help : rpmbopen * Usage : rpmbopen S-BOOT # help sdcard_read * Help : sdcard_read * Usage : sdcard_read test command S-BOOT # help sdcard * Help : sdcard * Usage : sdcard test command S-BOOT # help fuelgauge * Help : fuelgauge * Usage : *usage : fuelgauge S-BOOT # help usb_write * Help : usb_write * Usage : usb_write reg, val Read the usb ic register S-BOOT # help usb_read * Help : usb_read * Usage : usb_read reg Read the usb ic register S-BOOT #
By default we have console=ram and loglevel=4:
S-BOOT # printenv : REBOOT_MODE: 0 : SWITCH_SEL: 1 : DEBUG_LEVEL: 20300 : SUD_MODE: 0 : DN_ERROR: 0 : CHECKSUM: 3 : INT_RSVD6: 1 : INT_RSVD7: 0 : INT_RSVD8: 0 : INT_RSVD9: 0 : CMDLINE: console=ram loglevel=4 : STR_RSVD1: (null) : STR_RSVD2: (null)
However if we change that:
S-BOOT # setenv CMDLINE console=ram loglevel=8
argv[0]: setenv
argv[1]: CMDLINE
argv[2]: console=ram loglevel=8
S-BOOT # printenv
: REBOOT_MODE: 0
: SWITCH_SEL: 1
: DEBUG_LEVEL: 20300
: SUD_MODE: 0
: DN_ERROR: 0
: CHECKSUM: 3
: INT_RSVD6: 1
: INT_RSVD7: 0
: INT_RSVD8: 0
: INT_RSVD9: 0
: CMDLINE: console=ram loglevel=8
: STR_RSVD1: (null)
: STR_RSVD2: (null)
S-BOOT # saveenv
S-BOOT # reset
s5p_restart_handler ('N':null)
PMIC rev = PASS2(4)
[...]
Then after boot we can observe that the cmdline has changed:
$ adb root $ adb shell root@i9300:/ # cat /proc/cmdline console=ttySAC2,115200 consoleblank=0 androidboot.hardware=smdk4x12 console=ram loglevel=8 [...]
After complete power off (with battery removal) and power on, we can see that the modified cmdline has sticked:
S-BOOT # printenv : REBOOT_MODE: 0 : SWITCH_SEL: 1 : DEBUG_LEVEL: 20300 : SUD_MODE: 0 : DN_ERROR: 0 : CHECKSUM: 3 : INT_RSVD6: 1 : INT_RSVD7: 0 : INT_RSVD8: 0 : INT_RSVD9: 0 : CMDLINE: console=ram loglevel=8 : STR_RSVD1: (null) : STR_RSVD2: (null)
S-BOOT # chipinfo 5VF4_0023_0190_0178
This seem to give the bootloader log including what the input and output of the commands the user typed:
S-BOOT # log PMIC rev = PASS2(4) BUCK1OUT(vdd_mif) = 0x05 BUCK3DVS1(vdd_int) = 0x20 [MMC] there are pending interrupts 0x00010000 cardtype: 0x00000007 SB_MMC_HS_52MHZ_1_8V_3V_IO mmc->card_caps: 0x00000311 mmc->host_caps: 0x00000311 mmc_initialize: mmc->capacity = 30777344 Samsung S-Boot 4.0-2836504 for GT-I9300 (Jun 15 2015 - 22:47:58) EXYNOS4412(EVT 1.1) / 1022MB / 15028MB / Rev 12 / I9300XXUGOF1 /(PKG_ID 0x7050008) - read_bl1 pit_check_signature (PIT) valid. initialize_ddi_data: usable! (3:0xf) PARAM ENV VERSION: v1.0.. set_charger_current: chg curr(3f), in curr(17) set_charger_state: buck(1), chg(1), reg(0x05) microusb_get_attached_device: STATUS1:0x3d, 2:0x00 set_auto_current: ta_state(0), curr(1000) init_fuelgauge: fuelgauge power ok init_fuelgauge: POR status fuelgauge_por: POR start: vcell(4146), vfocv(4256), soc(108) fuelgauge_por: update SDI M0 parameter fuelgauge_por: RCOMP(0x0065), TEMPCO(0x0930) fuelgauge_por: POR finish: vcell(4140), vfocv(4405), soc(94) get_table_soc: vcell(4138) is caculated to t-soc(89.939) init_fuelgauge: start: vcell(4138), vfocv(4396), soc(94), table soc(89) init_fuelgauge: finish: vcell(4138), vfocv(4396), soc(94), table soc(89) init_microusb_ic: MUIC: CONTROL1:0x1b init_microusb_ic: MUIC: CONTROL1:0x1b init_microusb_ic: MUIC: CONTROL2:0x3b init_microusb_ic: MUIC: CONTROL2:0x3b PMIC_ID = 0x02 PMIC_IRQSRC = 0x00 PMIC_IRQ1 = 0x04 PMIC_IRQ2 = 0x00 PMIC_IRQ1M = 0xc0 PMIC_IRQ2M = 0x03 PMIC_STATUS1 = 0x10 PMIC_STATUS2 = 0x00 PMIC_PWRON = 0x02 PMIC_RTCINT = 0x10 PMIC_RTCINTM = 0x3f s5p_check_keypad: 0x1000000 s5p_check_reboot_mode: INFORM3 = 0 ... skip s5p_check_upload: MAGIC(0x275b3bbb), RST_STAT(0x10000) microusb_get_attached_device: STATUS1:0x3d, 2:0x00 s5p_check_download: 0 microusb_get_attached_device: STATUS1:0x3d, 2:0x00 check_pm_status: non chargable jig, bypass check power cmu_div:1, div:7, src_clk:800000000, pixel_clk:57153600 s5p_dsim_display_config : VIDEO MODE a2, 60, 90, autoboot aborted.. S-BOOT # S-BOOT # S-BOOT # S-BOOT # S-BOOT # S-BOOT # S-BOOT # S-BOOT # S-BOOT # Following commands are supported: * chipinfo * help * log * load_kernel * boot * reset * findenv * saveenv * setenv * printenv
The battery fuel gauge. Note that soc probably means state of charge, not system on a chip:
S-BOOT # fuelgauge fuelgauge_cmd: vcell(4007), vfocv(4157), soc(86)
sec-reboot.c has the following code:
if (!strcmp(cmd, "fota"))
writel(REBOOT_MODE_PREFIX | REBOOT_MODE_FOTA,
S5P_INFORM3);
else if (!strcmp(cmd, "fota_bl"))
writel(REBOOT_MODE_PREFIX | REBOOT_MODE_FOTA_BL,
S5P_INFORM3);
else if (!strcmp(cmd, "recovery"))
writel(REBOOT_MODE_PREFIX | REBOOT_MODE_RECOVERY,
S5P_INFORM3);
else if (!strcmp(cmd, "bootloader"))
writel(REBOOT_MODE_PREFIX | REBOOT_MODE_DOWNLOAD,
S5P_INFORM3);
else if (!strcmp(cmd, "download"))
writel(REBOOT_MODE_PREFIX | REBOOT_MODE_DOWNLOAD,
S5P_INFORM3);
else if (!strcmp(cmd, "upload"))
writel(REBOOT_MODE_PREFIX | REBOOT_MODE_UPLOAD,
S5P_INFORM3);
else if (!strncmp(cmd, "debug", 5)
&& !kstrtoul(cmd + 5, 0, &value))
writel(REBOOT_SET_PREFIX | REBOOT_SET_DEBUG | value,
S5P_INFORM3);
else if (!strncmp(cmd, "swsel", 5)
&& !kstrtoul(cmd + 5, 0, &value))
writel(REBOOT_SET_PREFIX | REBOOT_SET_SWSEL | value,
S5P_INFORM3);
else if (!strncmp(cmd, "sud", 3)
&& !kstrtoul(cmd + 3, 0, &value))
writel(REBOOT_SET_PREFIX | REBOOT_SET_SUD | value,
S5P_INFORM3);
else if (!strncmp(cmd, "emergency", 9))
writel(0, S5P_INFORM3);
else
writel(REBOOT_MODE_PREFIX | REBOOT_MODE_NONE,
S5P_INFORM3);
We can test them with reboot <rebootcommand>. Here are the results:
| Device | Command | Comments |
| Galaxy SIII (GT-I9300) | fota | * Reboots * Adds bootmode=3 to the kernel command line (/proc/cmdline) |
| fota_bl | * Reboots * No kernel command line change * 'bl' might mean bootloader |
|
| recovery | * Reboots to the recovery | |
| bootloader | * Reboot in Thor mode | |
| download | ||
| upload | * Reboots * No kernel command line change |
|
| debug | * Reboots * No kernel command line change |
|
| swsel | * Reboots * No kernel command line change * might be related to the bootloader SWITCH_SEL variable |
|
| sud | * Reboots * No kernel command line change |
|
| emergency | * Reboots * No kernel command line change |
Starting with Replicant 6.0 0004 RC5, the internal contact database format has changed due to the removal of some nonfree code (the Ambient SDK).
So when upgrading from a Replicant 6.0 image before Replicant 6.0 0004 RC5, you will need to follow the migration procedure that is in this wiki page.
If you follow it, you will have to backup your contact database to a file, then you will erase the internal contact database from within the Replicant recovery.
When this is done you will be able to install the new Replicant image.
After that you will be able to restore your contacts database by restoring it from the file you backuped it to.
First, you'll need to make sure Replicant is booted on the device and open the stock contact application. Here's how it looks like after the first start of Replicant 6.0 0003:
Then if it shows a screen with "No contacts." in it, you won't need to backup the contacts to a file since you have no contacts, so you can skip this section (Backuping your contacts in a file), but you will still need to follow the rest of the tutorial in order to erase the internal contact database, otherwise your device may continuously crash after installing a new Replicant version with a different contact database format.
If instead it shows some contacts, like in the following image you will then need to backup them to a file:
To do that you will first need to go in the contact application settings. For that click on the menu button (it's on the top right and it consists of 3 vertical dots):
That will display a menu. You will then have to select "Import/export":
And then "Export to .vcf file":
It will then display a new screen with many contacts. You will need to click a menu button again (it's on the top right and it consists of 3 vertical dots):
Then a new menu with only one option ("All [ ]") will appear:
You will need to select this option to select all contacts. This will bring to a new screen with all the contacts being checked. You will then need to press the right tick (it looks like a V) that is between the search button and the menu button on the top-right of the screen.
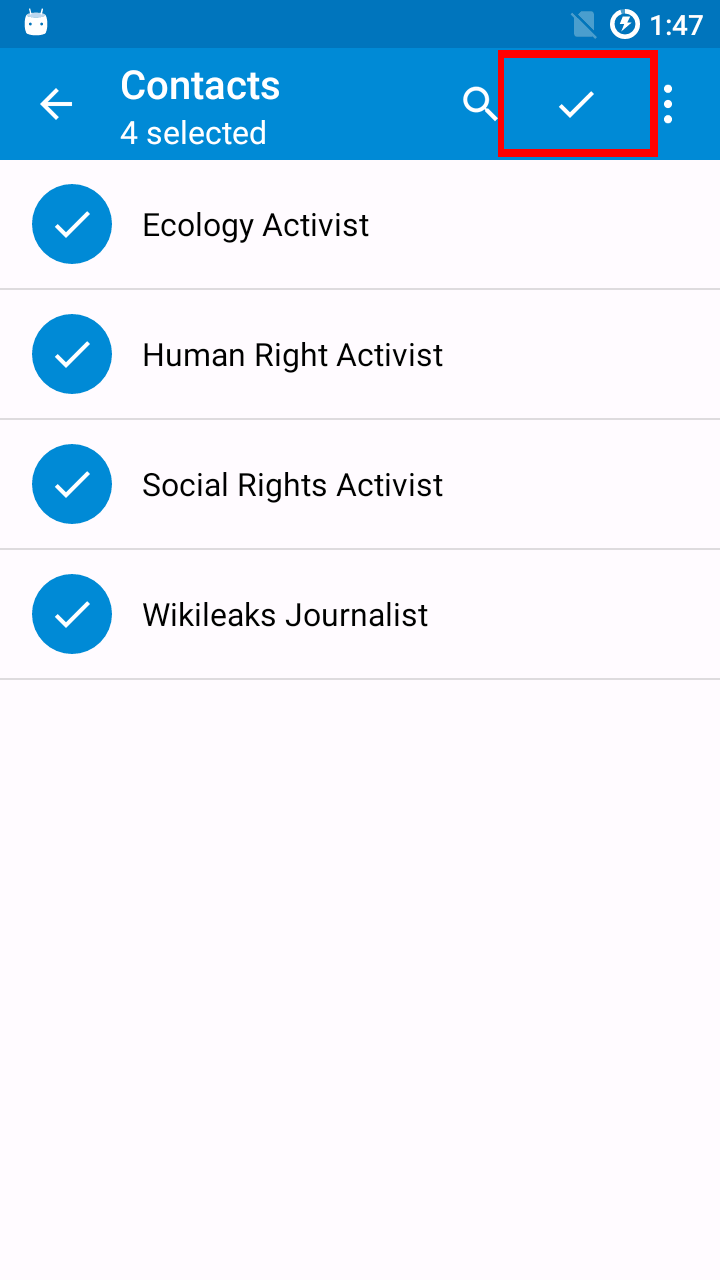
Once this is done, it typically brings you to the download application that let you save your contact to a file in the device. As there are no other options you need to select "Download" on the left to save it to the download folder: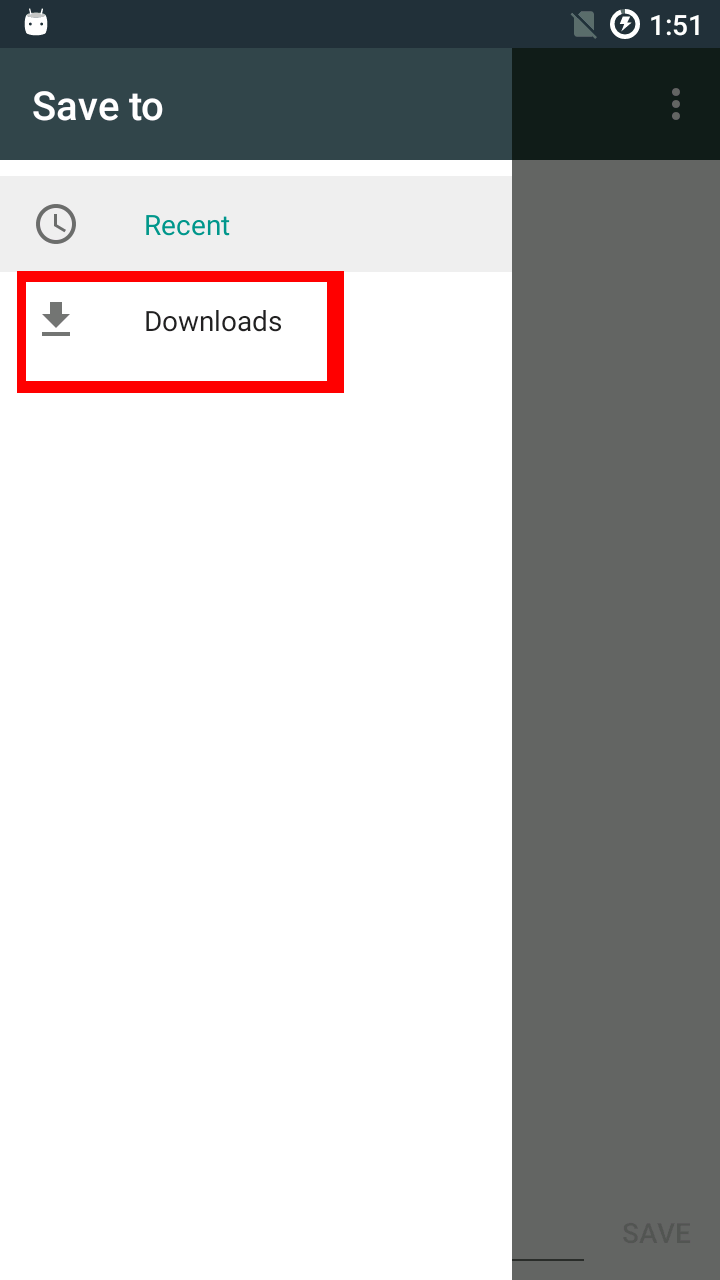
For the next parts, you'll need to have adb setup.
For doing that (or for verifying that your adb setup) you can use the instructions for setting up ADB on your computer in order to make sure that you can get a root shell on your device.
NOTE: when prompted on your Replicant device, make sure that you check the box that says Always allow from this computer when you grant your computer USB debugging permissions. Otherwise, you will be unable to obtain root shell access on your Replicant device when you reboot it into the recovery OS to actually perform the backup.
NOTE: for security reasons, you may want to revoke these non-expiring permissions once the backup is complete.
To reboot in the recovery, you can follow the instructions in the RebootIntoTheRecovery wiki page.
You then need to mount the data partition.
For the Galaxy S III (GT-I9300), Galaxy S III 4G (GT-I9305), the Galaxy Note II (GT-N7100) and the Galaxy Note 8.0 (GT-N51xx), you can use the following command:
mount /dev/block/platform/*/by-name/USERDATA /data/
And for the Galaxy Nexus (GT-I9250), you can use the following command:
mount /dev/block/platform/*/*/by-name/userdata /data/
For the Galaxy S II (GT-I9100) and the Galaxy Note (GT-N7000), you can use the following command instead:
mount /dev/block/platform/*/by-name/DATAFS /data/
And for the Galaxy Tab 2 (GT-P31xx, GT-P51xx):
mount /dev/block/platform/*/*/by-name/DATAFS /data/
Once in the recovery, you will then be able to erase your contact database.
For that you need to type this command to erase the contact database:
rm -rf /data/data/com.android.providers.contacts/databases/
And this one to make the dialer not crash after startup:
rm -rf /data/data/com.android.dialer/
Once this is done you will need to umount the userdata partition. This can be done with the following command:
umount /data/
Once the backup is done, you can proceed to install the Replicant images that use the new contact database.
First you need to launch the contact application again:
Then you end need to click on the "Import contacts" button on the bottom of the middle of the screen:
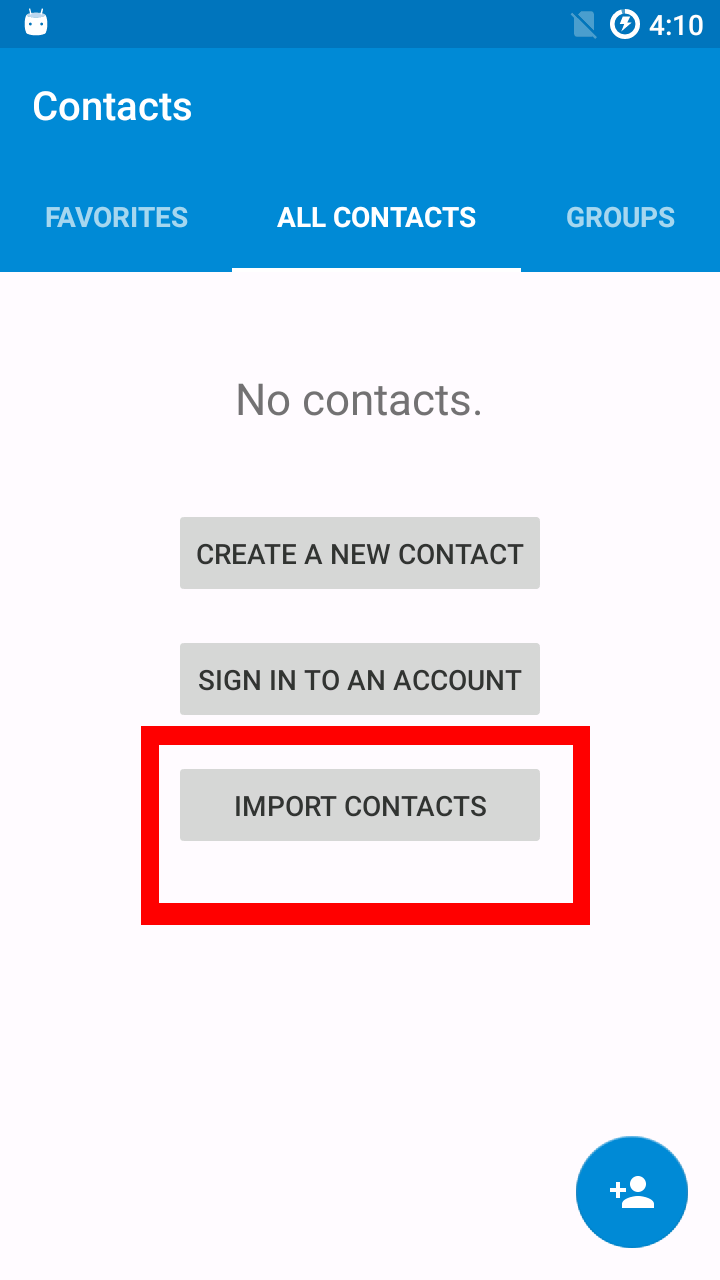
You then need to click on the "Import from .vcf file" in the popup in middle of the screen: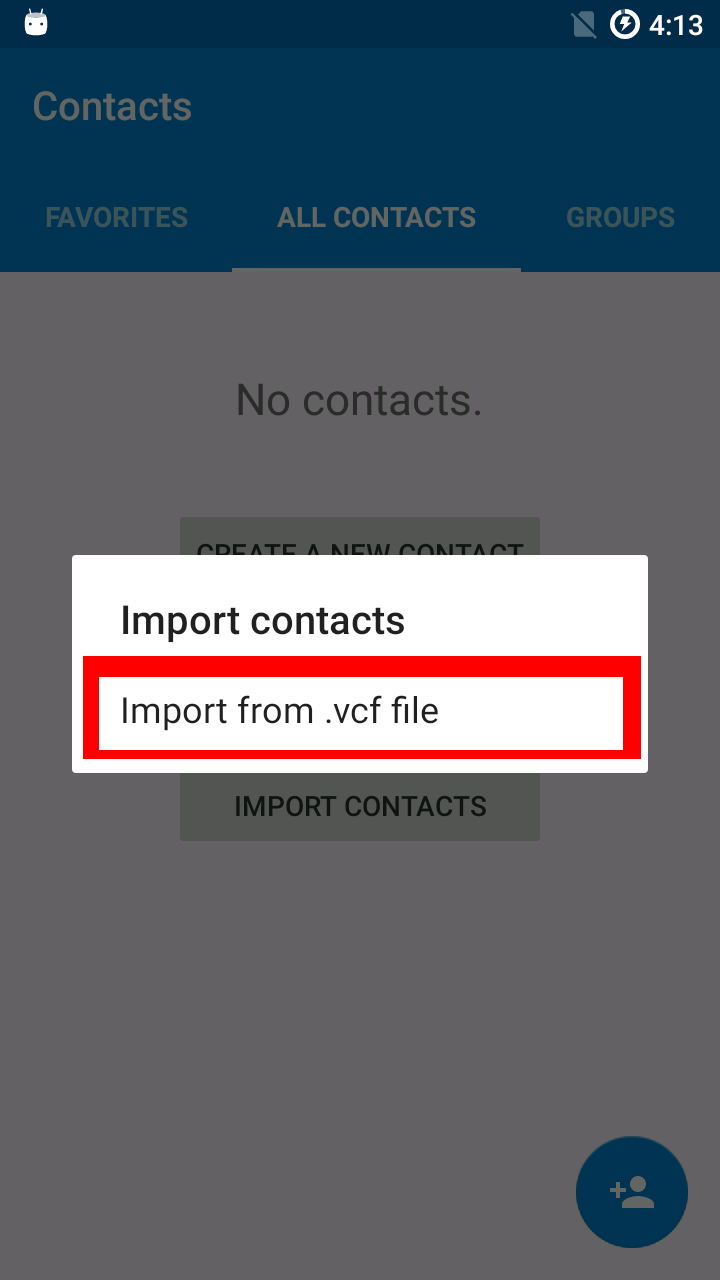
You then need to click on the "Local phone account" in the popup in middle of the screen:

You then need to click on the menu button on the top-left of the screen: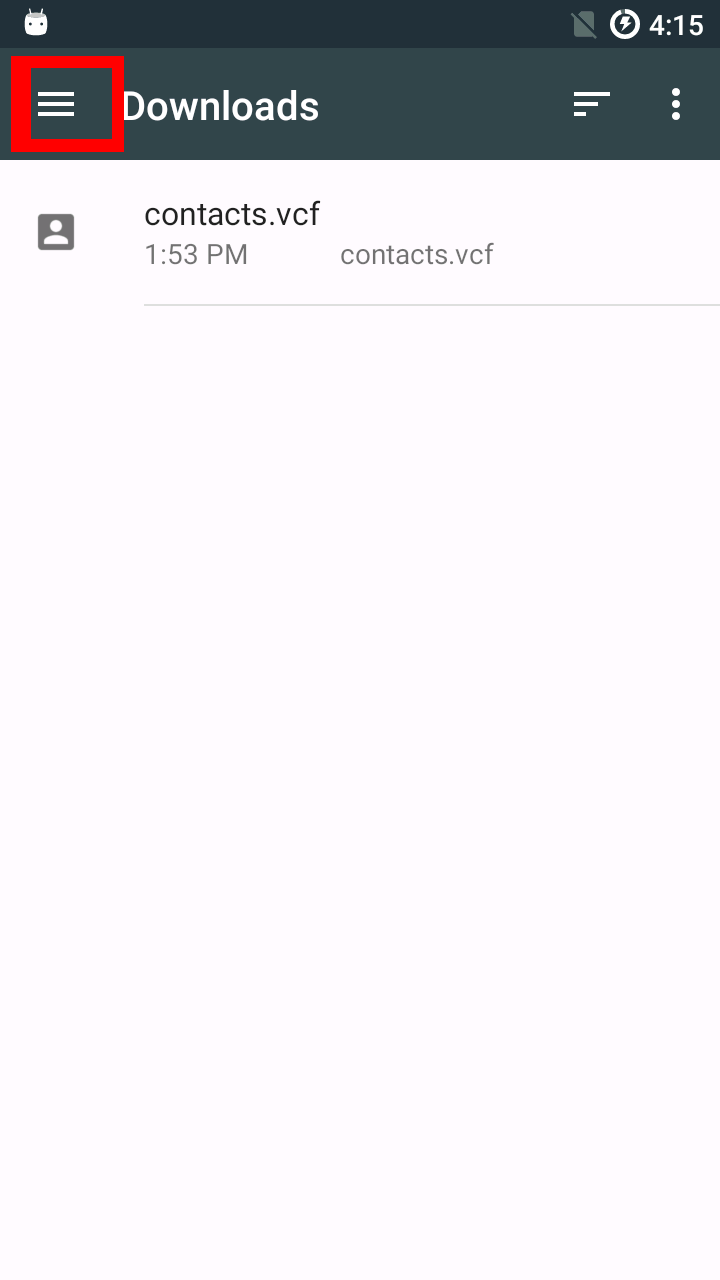
It will bring another menu, you can click on "Downloads":
This is to make sure you end up in Downloads as the Downloads application could have remembered other settings, for instance you could be in Recent instead.
You can then click on the contact.vcf file that you created earlier while backuping the contacts:
It will then start importing the contacts and show a popup notification:
If you go to the notification area, it will then show that the importing has finished: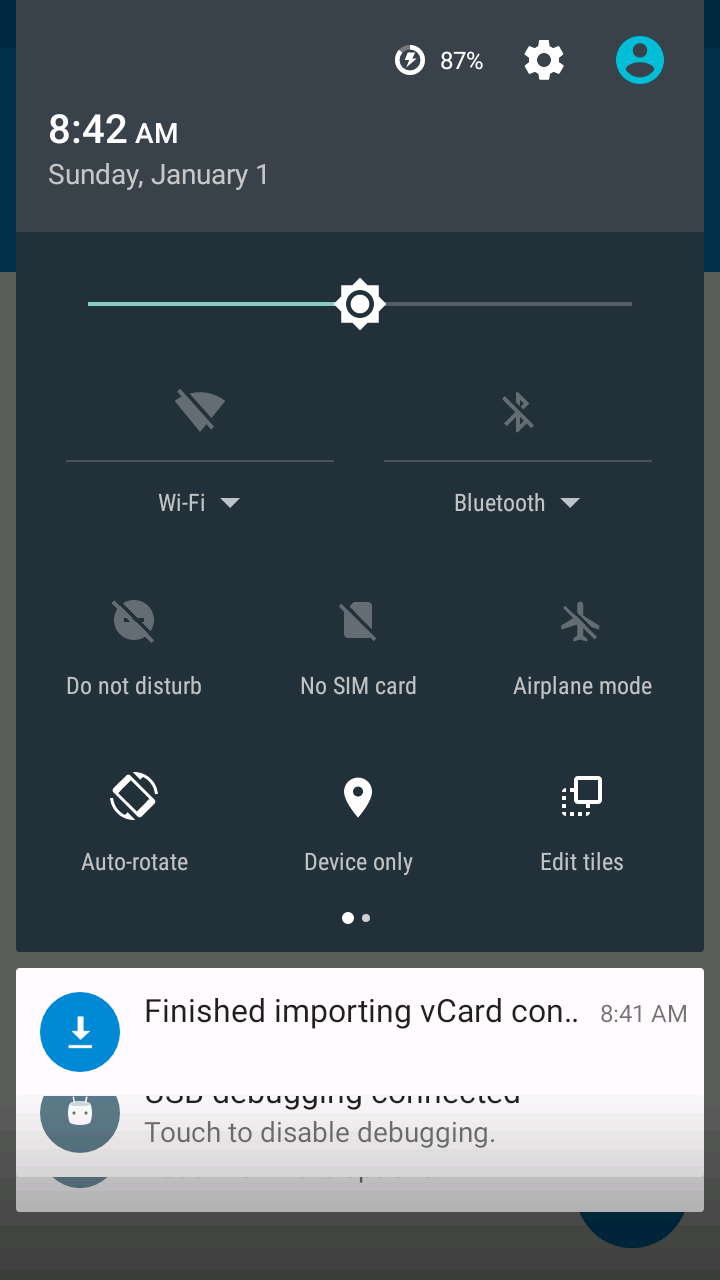
And you will then see all your contacts again:
If you don't need USB debugging permissions anymore, it might be a good idea to remove them. The Revoking all computer's USB debugging permissions section in the ADB wiki page explains how to do that.
That's it! Your contacts database is now migrated to the new Replicant release. In addition you should now have a backup of it.
The file you backuped your contact in is in the VCard format. That format is a standard, and many other software are compatible with it.
When updating to a new minor release (e.g. from Replicant 6.0 0001 to Replicant 6.0 0002), a data wipe is usually not required, so it is strongly advised not to wipe the data as all the applications settings and data would be gone. The guides below already take that into account.
There are several ways to update your device to a new minor release (e.g. from Replicant 6.0 0001 to Replicant 6.0 0002).
This can be done by:Once the upgrade is done, you can then reboot the device.
In the recovery:
1. Press the back key (if necessary) to get back to the general menu
2. Select Reboot system now to reboot the device
3. Your device should now be updated!
On Replicant, samsung-RIL currently asks the modem to actually turn off its transmitters by going into a low power mode.
This means that the modem firmware is most probably not off and that its firmware is still running. The modem might even still be able to receive information, as it would enable it to connect back to the network way faster than if it was really off.
The ModemDisableResearch has more technical details on the issue.
Since the modem's firmware is loaded by the CPU on boot, the modem will be nonfunctional if the CPU chooses not to load the modem firmware. This can be used to achieve a more trustworthy off-like state. It should be noted that while this does reduce attack surface, there may still be ways for the modem to be activated (e.g. if the non-free bootloader running on the CPU sends a firmware to the modem).
To disable the modem on Samsung-RIL devices, follow these steps:
The script should be shipped in Replicant 6.0 0004 RC2.
If you run a Replicant version that is before 6.0 0004 RC2, you will need to install the scripts.
To do that, from your PC, clone the user-scripts repository:
git clone https://git.replicant.us/replicant/vendor_replicant-scripts -b replicant-6.0
For the next steps, ADB needs to be set up and running as root. Connect the device to your PC. The scripts are in the networking/modem folder. Run the setup script the folder to push the scripts to the device:
cd vendor_replicant-scripts cd networking/modem ./setup.sh
Then disconnect the device. Make sure root access for apps is enabled.
Open a terminal emulator. If the terminal is not running as root, you can gain root by running:
su
To disable the modem, run the following command:
modem.sh off
To enable back the modem, run the following command:
modem.sh on
As of April 2020, Replicant 6.0 only supports devices with libsamsung-ril or without modems.
So on all supported devices with a modem, the script is supposed to work.
Starting from Replicant 6.0 0004 RC1, the scripts are now shipped on the devices that have a modem.
Earlier Replicant versions supported devices with other modems protocol as well. This script didn't work on such devices.
The script may or may not work on older Replicant versions. Check if there is a branch for the older version you are interested in if you want to try.
This article has details on possible ways to power off the modem and how to integrate them in Replicant.
The RIL_REQUEST_RADIO_POWER command is used by the airplane mode.
In libsamsung-ril, RIL_REQUEST_RADIO_POWER is implemneted in the ril_request_radio_power function which doesn't turn off the modem but asks it not to transmit by asking it to go in low power mode. This looks very similar to the AT command AT+CFUN.
The airplane mode could be implemented in another way where the modem is powered off. The advantage of using the airplane mode for that is that it's already implemented in the Android GUI.
We would also need to explain users that we implemented it this way, but that other Android distributions might have different implementations as their goal might differ. Doing again a full modem bootstrap will take longer than just asking the modem to go out of low power mode.
To do that we would need to understand what exactly the kernel modem power off interface do in hardware, and look at the kernel APIs that could be used to do that.
On Replicant 9, at the time of writing a GPIO interface (/sys/devices/platform/xmm6262/modem_power) is available for that, but we would need to look deeper into it to understand what it does exactly at the hardware level. That interface may change when the modem drivers are modified, for instance during the work to mainline them.
On Samsung kernel, the interface is different but probably expose the same hardware controls but in a different way.
At this point, libsamsung-ipc will need to be modified to use such interfaces instead.
Libsamsung-ipc and libsamsung-ril might also need to be modified to take into account the fact that the modem needs to be re-bootstraped again.
| Name | Content | GT-I9100 | GT-N7000 | GT-I9250 | GT-I9300 | GT-N7100 | GT-P3100 | GT-N5100 | GT-P5100 |
|---|---|---|---|---|---|---|---|---|---|
| TOC | Partition table | None | [ 0x0 -> 0xfff ] | TODO | |||||
| PSIRAM | First stage bootloader | [ 0x0 -> 0xefff ] | [ 0x1000 -> 0xefff ] | ||||||
| EBL | Second stage bootloader ? | [ 0xF000 -> 0x27fff ] | |||||||
| MAIN | ? | [ 0x28000 -> 0x9fffff ] | [ 0x28000 -> 0x9ff7ff ] | ||||||
| SECPACK | ? | [ 0x9ff800 -> 0x9fffff ] | |||||||
| NV | nvdata default values | [ 0xa00000 -> 0xbfffff ] | |||||||
| Name | Content | aries |
|---|---|---|
| TOC | Partition table | None |
| PSIRAM | First stage bootloader | [ 0x0-> 0x4fff ] |
| MAIN? | Modem firmware? Is it splitable? | [ 0x5000 -> 0x9fffff ] |
| NV | ? (/efs/nv_data.bin loaded instead) | |
| Filled with only 0xffff | [ 0xa00000 -> 0xbfffff ] | |
| Modem firmware size | 12 MiB | |
| Name | Content | crespo |
|---|---|---|
| TOC | Partition table | \ None |
| PSIRAM | First stage bootloader | [ 0x0-> 0x4fff ] |
| MAIN? | Modem firmware? Is it splitable? | [ 0x5000 -> 0x9fffff ] |
| NV | ? (/efs/nv_data.bin loaded instead) | |
| Beside very few data (144 bytes starting at 0xc00000 ), it's filled with 0xFFs | [ 0xa00000 -> 0xd7ffff ] | |
| Modem firmware size | 13.5 MiB | |
And the respective libsamsung-ipc functions:
| Partition | Content | aries | crespo | GT-I9100 | GT-N7000 | GT-I9250 | GT-I9300 | GT-N7100 | GT-P3100 | GT-P5100 | GT-N5100 |
|---|---|---|---|---|---|---|---|---|---|---|---|
| PSIRAM | First stage bootloader | xmm616_psi_send | xmm626_hsic_psi_send | xmm626_mipi_psi_send | xmm626_hsic_psi_send | xmm626_mipi_psi_send | xmm626_hsic_psi_send | ||||
| EBL | Second stage bootloader ? | ? | xmm626_hsic_ebl_send | xmm626_mipi_ebl_send | xmm626_hsic_ebl_send | xmm626_mipi_ebl_send | xmm626_hsic_ebl_send | ||||
| MAIN | ? | xmm616_firmware_send | xmm626_hsic_firmware_send | xmm626_mipi_firmware_send | xmm626_hsic_firmware_send | xmm626_mipi_firmware_send | xmm626_hsic_firmware_send | ||||
| SECPACK | ? | ? | xmm626_hsic_sec_start_send | xmm626_mipi_sec_start_send | xmm626_hsic_sec_start_send | xmm626_mipi_sec_start_send | xmm626_hsic_sec_start_send | ||||
| NV | nvdata default values | xmm616_nv_data_send | xmm626_hsic_nv_data_send | xmm626_mipi_nv_data_send | xmm626_hsic_nv_data_send | xmm626_mipi_nv_data_send | xmm626_hsic_nv_data_send | ||||
TODO: find the place in libsamsung-ipc source mentioning that
References for the table:$ hexdump -C RADIO.img 00000000 50 53 49 52 41 4d 00 00 00 00 00 00 00 10 00 00 |PSIRAM..........| 00000010 00 00 00 00 00 e0 00 00 00 00 00 00 00 00 00 00 |................| 00000020 45 42 4c 00 00 00 00 00 00 00 00 00 00 f0 00 00 |EBL.............| 00000030 00 00 00 60 00 90 01 00 00 00 00 00 00 00 00 00 |...`............| 00000040 4d 41 49 4e 00 00 00 00 00 00 00 00 00 80 02 00 |MAIN............| 00000050 00 00 30 60 00 78 9d 00 00 00 00 00 00 00 00 00 |..0`.x..........| 00000060 53 45 43 50 41 43 4b 00 00 00 00 00 00 f8 9f 00 |SECPACK.........| 00000070 00 00 00 00 00 08 00 00 00 00 00 00 00 00 00 00 |................| 00000080 4e 56 00 00 00 00 00 00 00 00 00 00 00 00 a0 00 |NV..............| 00000090 00 00 e8 60 00 00 20 00 00 00 00 00 00 00 00 00 |...`.. .........| 000000a0 00 00 00 00 00 00 00 00 00 00 00 00 00 00 00 00 |................| * [...]
Since the modem runs (only) proprietary software, devices that doesn't have any mechanism that prevent the modem from taking control of the processor running Android are a grave concern for users freedom ans security.
Because of that the Replicant project decided not to support anymore devices that don't have enough assurance that the modem is isolated. If you really want to add support for a device with a modem that is not isolated, several options are possible:When Replicant was started, the HTC Dream was the only available Android phone, and it had a Qualcomm System On a Chip (SOC) with an integrated modem. We then also added support for other very similar devices.
The System On a Chip family used by these devices was the MSM7K. While working on Replicant, very serious flaws were discovered with that System On a Chip family:Despite the huge amount of work required, when alternatives became available, we switched away from devices with this System On a Chip family because the gravity of the issues was a nightmare.
While some of the above issues have been fixed in more recent Qualcomm System On a Chip families, the increasing amount of proprietary libraries for theses new families, and the lack of strong guarantees that would prevent the modem from being able to take control of the processor running Replicant made the project ignore and discourage the use of the newer Qualcomm System On a Chip families.
Despite that, it may be possible to make sure that the modem cannot physically access and modify the Application Processor's RAM content, for instance by using the SOC IOMMU, if there is one, but that would require significant work. It would at least require:Despite that we may still accept contributions for devices with such System On a Chip, but it's best to contact the Replicant project (for instance on the mailing list or on IRC) before starting to work on that, to collectively decide how to handle that.
For instance some tablets use Qualcomm SOCs have no modems. So if the most important privacy sensitive hardware is under the control of the Application Processor, it might be possible to add support for such tablets if work is done to make sure that they can be useful without any proprietary libraries.
Having the modem and the processor running Android in separate chip, connected through a bus (like USB) that doesn't allow the modem to access the Android processor's memory offers pretty good guarantee that the modem cannot take the control of the processor running Android at a hardware level.
When the modem and the Android processor are in the same chip or when they use shared memory to communicate, and that memory is also used by the processor operating system, such guarantees are gone.
| Vendor | System on a chip | Isolation | Market share | References |
|---|---|---|---|---|
| Qualcomm | Mobile Station Modem (MSM) Snapdragon 7x30 | Bad: * The modem is in charge of loading the bootloader of the processor running Android. Because of that it can temper with that bootloader and take control of the processor running Android. * The modem can access the memory of the processor running Android, and can take control of it through that way. * The modem has access to the storage of the processor running Android, so it can take control of it through that. |
boot process | |
| Qualcomm | Snapdragon S4 | Unknown: * The modem is booted by the processor running Android (which in turn is booted by a separate boot processor called RPM) * There is not enough public documentation to understand if there is enough isolation between the modem and the processor running android. |
Boot process The Security of chip fabric page of rpw-pacsec2013-hexagon.pdf |
|
| Qualcomm | APQ* | No modem | ||
| Samsung | Exynos 4210 | No modem | ||
| Samsung | Exynos 4412 | No modem | ||
| Texas Instruments (TI) | OMAP 4460 | * No modem * Has some DSP cores (no known use as modem, typically used for audio and video decoding offload) |
This lists devices that have the modem and the processor running Android in separate chips and use shared memory between them, along with the way the processor running Android is isolated from the modem, or not.
| Vendor | Device | Isolation | References |
|---|---|---|---|
| Samsung | Nexus S | Bad | Exynos3110ModemIsolation |
| Samsung | Galaxy S | Bad | Exynos3110ModemIsolation |
| Vendor | Device | Link | Isolation | References |
|---|---|---|---|---|
| Samsung | Galaxy Nexus (I9250) | MIPI | * With MIPI it's most probably not possible for the peripheral to access the host RAM | * board-tuna.c:
#ifdef CONFIG_OMAP_HSI_DEVICE
if (TUNA_TYPE_MAGURO == omap4_tuna_get_type())
omap_hsi_init();
#endif
* modem_link_device_mipi.c |
| Galaxy Tab 2 7.0 (P31xx) | * espresso_defconfig: CONFIG_LINK_DEVICE_MIPI=y | |||
| Galaxy Tab 2 10.1 (P51xx) | ||||
| Galaxy S 3 (I9300) | HSIC | * HSIC is a subset of the USB protocol => the peripheral has no access to the host RAM * The device cannot change USB IDs without the host powering up and down the bus |
* lineageos_i9300_defconfig: CONFIG_MODEM_M0 * lineageos_i7000_defconfig: CONFIG_LINK_DEVICE_HSIC=y * lineageos_i7100_defconfig: CONFIG_MODEM_M0 * lineageos_i5100_defconfig: CONFIG_MODEM_M0 * lineageos_i9100_defconfig: CONFIG_LINK_DEVICE_HSIC=y * board-m0-modems.c |
|
| Galaxy Note (N7000) | ||||
| Galaxy Note 2 (N7100) | ||||
| Galaxy Note 8.0 (N51xx) | ||||
| Galaxy S 2 (I9100) |
See the ModemDisableResearch page for more details.
Exploiting qualcomm wlan and modem over the air (mp4 srt pdf ) is a presentation about gaining code execution in the Linux kernel by using bugs in code that runs in the modem. It shows that bypassing the IOMMU from the modem can work work in certain conditions.See feature #837 for the discussion about a NDK for Replicant and this page.
The Android 4.2 source code ships a ndk directory with NDK build scripts.
These tools download various upstream imports from https://git.androidproject.xxx/toolchain/XXX/ with optional commit date (no branches or tags), apply patches, and build them.
Note: as of 2015-07, the upcoming Android version moved to a different build system, and will populate $topdir/toolchain/ through repo instead of invoking git in a temporary directory (i.e. ditched download-toolchain-sources.sh).
Replicant 4.2 is based on CyanogenMod 10.1 which is based on AOSP 4.2.2, released 2013-02.
The build environment used by NDK release managers should be Ubuntu LTS 12.04 (or maybe Ubuntu LTS 10.04).
Note: compiling from Debian 8 will yield errors from texinfo (doc in binutils) and Perl (POD in LLVM) due to more recent, stricter versions of these.
# Base Android build dependencies (from https://source.android.com/source/initializing.html, section "Installing required packages (Ubuntu 12.04)") # Dropping mingw to skip windows builds for now. # Installing g++-multilib first otherwise apt-get complains. apt-get install build-essential g++-multilib apt-get install wget git gnupg flex bison gperf \ zip curl libc6-dev libncurses5-dev:i386 x11proto-core-dev \ libx11-dev:i386 libreadline6-dev:i386 libgl1-mesa-glx:i386 \ libgl1-mesa-dev \ python-markdown libxml2-utils xsltproc zlib1g-dev:i386 # Additional NDK build dependencies (completed from https://android.googlesource.com/platform/ndk/+/master/README.md) apt-get install curl texinfo bison flex libtool pbzip2 groff # Make 'bash' the default shell otherwise 'build-gabi++.sh' will fail dpkg-reconfigure dash
Login as user replicant and prepare the Replicant 4.2 source code as described in ReplicantSourceCode.
Optionally configure ccache:
cat <<EOF >> ~/.bashrc export USE_CCACHE=1 EOF exec bash prebuilts/misc/linux-x86/ccache/ccache -M 10G # unused in Trisquel 4.1?
Since there's no NDK release tag for the toolchain/ Git checkouts, we need to find the right date.
cd ndk/ && git log says the last commit is 2012-10-05, so it's around NDK r8b (2012-07) and NDK r8c (2012-11).
Checking build/tools/toolchain-patches/ in the NDKs shows r8c has matching patches.
Also NDKs from google contain several SOURCES files listing Git repos and commit IDs.
With r8c's release date (ls --full-time RELEASE.TXT => 2012-10-22 05:59), build/tools/download-toolchain-sources.sh checkouts the same Git commit IDs, and the patches apply.
Only, r8c references a LLVM Git repo, while our scripts download a tarball.
So our scripts match a NDK version between r8b and r8c, and can almost exactly reproduce r8c. Let's call it r8b2.
Based on ndk/docs/DEVELOPMENT.html, with much improvement :)
export NDK=~/replicant-4.2/ndk cd $NDK # Allow checking build errors export NDK_LOGFILE=$HOME/ndk.log # Follow Python download redirection sed -i -e 's/curl -S/curl -L -S/' build/tools/download-toolchain-sources.sh # Get the sources from toolchain/ repos, with r8c release date: bash $NDK/build/tools/download-toolchain-sources.sh --git-date='2012-10-22T05:59:40Z' ~/ndk-dl # ~5mn with good network, ndk-dl: 2.5GB # Define NDK_TMPDIR and and use --incremental so the build can be resumed on error export NDK_TMPDIR=~/ndk-tmp mkdir -p $NDK_TMPDIR/release-r8b2/ # Build the release bash $NDK/build/tools/make-release.sh --toolchain-src-dir=$HOME/ndk-dl --release=r8b2 --incremental # 30mn with 4 cores, 28GB (inc. 17GB .repo), 2.5GB ndk-dl, ?GB ndk-tmp, 1GB /tmp
The GNU/Linux NDK release is in /tmp/ndk-replicant/release/android-ndk-r8b2-linux-x86.tar.bz2 :)
toolchain/ repos¶download-toolchain-sources.sh's default is --git-base=https://android.googlesource.com/toolchain.
Should we use a git.replicant.us repo? (note: there's no 'toolchain' there yet)
Build deps:
# windows build is triggered by the presence of mingw32 apt-get install mingw32 tofrodos # and requires running maketab.exe apt-get install wine # I had troubles in LXC registering direct .exe execution: # $ /tmp/ndk-replicant/tmp/build-3038/maketab.exe # run-detectors: unable to find an interpreter for /tmp/ndk-replicant/tmp/build-3038/maketab.exe # Work-around: update-binfmts --disable dpkg-reconfigure wine1.4 --pri=high # or wine1.2 for Trisquel 4.1
Code fixes:
# build-ndk-stack/elff/ produces a warning with mingw32, and uses -Werror # cf. https://android.googlesource.com/platform/ndk/+/32e74f3f1b969ff65f037e1ee89e21a5cbc0ecf0 sed -i -e 's/-Werror//' sources/host-tools/ndk-stack/GNUMakefile # TODO: maybe 'export EXTRA_CFLAGS=-Wall' would be enough?
...
bash $NDK/build/tools/make-release.sh --toolchain-src-dir=$HOME/ndk-dl --release=r8b2 --incremental # /home/replicant/ndk-dl/build/../binutils/binutils-2.21/gold/arm.cc:2171: internal compiler error: in make_rtl_for_nonlocal_decl, at cp/decl.c:4971
Exact same errors with Trisquel 4.1 (Ubuntu 10.04). For reference, the build dependencies:
# Based on https://web.archive.org/web/20121201011547/http://source.android.com/source/initializing.html apt-get install gnupg flex bison gperf build-essential \ zip curl zlib1g-dev libc6-dev lib32ncurses5-dev ia32-libs \ x11proto-core-dev libx11-dev lib32readline5-dev lib32z-dev \ libgl1-mesa-dev g++-multilib python-markdown \ libxml2-utils xsltproc
No idea how google made the windows build for r8c. Maybe a later ndk.git has fixes?
Check how much of $topdir/prebuilts/ is used to compile the NDK. We shouldn't rely on untrusted binaries.
Attempt to rebuild r8e with the same build environment, but checkout-ing precise .git revisions from ndk.git and development.git:
less patches + local LLVM repo + precise control over the ndk scripts revision
According to ndk/docs/DEVELOPMENT.html one only needs:
git clone https://git.androidproject.xxx/platform/ndk.git ndk
git clone https://git.androidproject.xxx/platform/development.git development
We wouldn't rely on exactly the build scripts shipped in Replicant 4.2, but official NDK releases are not sync'd with an Android release either.
This would allow us to reproduce an existing NDK release precisely.
ndk/docs/DEVELOPMENT.html references using an existing (trusted) NDK to build the next one.
Maybe this is how the NDK release team worked around the windows build errors (by not recompiling everything)?
| Component | Comments |
|---|---|
| ARM® Cortex®-A9 NXP i.MX6 Locked bootloader: NO Binary blobs: NO |
* Will have an unsigned and free software bootloader |
| GPU: Vivante (Etnaviv with hardware acceleration) | TODO: * We'll need to look into how to integrate 3D acceleration into Replicant |
| Display: 5.0" Memory: 1GB |
TODO: * check if it meets Android 9 requirements |
| WLAN: WiFi (via SDIO) WL1801 (2.4 GHz) | TODO: * What chip will be used |
| Charging: Micro-USB, Data transfer disabled Ethernet: High speed 100Mb/s |
TODO: * Find how to install Replicant |
| Serial: Internal | This will probably require to disassemble the device to do the very early port |
| Versions | type | Status | Unit produced | Replicant compatible versions | SoC | Bootloader | WiFi | Ethernet | RAM |
|---|---|---|---|---|---|---|---|---|---|
| Necunos NC_1 | ? | Not supported yet | I.MX6Q | Unsigned | ? | Yes | 1G | ||
| Necunos NE_1 | ? | Not supported yet | I.MX6Q | Unsigned | Realtek, nonfree firmware | Yes | 1G |
 |
Device | Nexus One |
| Manufacturer | Google/HTC | |
| Release date | January 2010 | |
| Codename | passion |
|
| Status | Unmaintained | |
| Supported models | PB99100, PB99110 | |
| Latest images | Replicant 2.3 0005 |
Replicant status for the Nexus One: ReplicantStatus Replicant 2.3
Status of efforts to replace proprietary libraries, binaries and firmwares: NexusOneProprietary
Replicant installation for the Nexus One: NexusOneInstallation
Replicant build for the Nexus One: NexusOneBuild
Privacy/security issues on the Nexus One: NexusOnePrivacySecurityIssues
I/AudioHardwareQSD( 120): audience_a1026 init OK I/AudioHardwareQSD( 120): set_tpa2018d1_parameters() not present I/HTC Acoustic( 120): libhtc_acoustic.so version 2.0.1.2. I/HTC Acoustic( 120): open /system/etc/AdieHWCodecSetting.csv success. I/HTC Acoustic( 120): ADIE table version: PASSION_HTC_20091019 E/HTC Acoustic( 120): Update ADIE table ID 0 E/HTC Acoustic( 120): Update ADIE table ID 2 E/HTC Acoustic( 120): Update ADIE table ID 5 E/HTC Acoustic( 120): Update ADIE table ID 7 E/HTC Acoustic( 120): Update ADIE table ID 8 E/HTC Acoustic( 120): Update ADIE table ID 10 E/HTC Acoustic( 120): Update ADIE table ID 51 E/HTC Acoustic( 120): Update ADIE table ID 53 I/HTC Acoustic( 120): read_adie_para_from_file success. D/HTC Acoustic( 120): ioctl ACOUSTIC_UPDATE_ADIE success I/HTC Acoustic( 120): open /system/etc/AudioBTID.csv success. I/HTC Acoustic( 120): BT ID table version: PASSION_HTC_20091105 D/AudioHardwareQSD( 120): mNumBTEndpoints = 25 E/AudioHardwareQSD( 120): BT name Default (tx,rx)=(9,10) E/AudioHardwareQSD( 120): BT name Default Car-kit (tx,rx)=(9,10) E/AudioHardwareQSD( 120): BT name JKDAP3265 (tx,rx)=(1003,1103) E/AudioHardwareQSD( 120): BT name JKDAP3264 (tx,rx)=(1004,1104) E/AudioHardwareQSD( 120): BT name HTC BH M200 (tx,rx)=(1005,1105) E/AudioHardwareQSD( 120): BT name BH M300 (tx,rx)=(1006,1106) E/AudioHardwareQSD( 120): BT name Jabra BT530 (tx,rx)=(1007,1107) E/AudioHardwareQSD( 120): BT name Jabra BT5010 (tx,rx)=(1008,1108) E/AudioHardwareQSD( 120): BT name Jabra BT3030 (tx,rx)=(1009,1109) E/AudioHardwareQSD( 120): BT name Nokia BH-208 (tx,rx)=(1010,1110) E/AudioHardwareQSD( 120): BT name Nokia BH-703 (tx,rx)=(1011,1111) E/AudioHardwareQSD( 120): BT name Nokia BH-103 (tx,rx)=(1012,1112) E/AudioHardwareQSD( 120): BT name Samsung WEP410 (tx,rx)=(1013,1113) E/AudioHardwareQSD( 120): BT name 3xxPlantronics (tx,rx)=(1014,1114) E/AudioHardwareQSD( 120): BT name 6XXPlantronics (tx,rx)=(1015,1115) E/AudioHardwareQSD( 120): BT name 8XXPlantronics (tx,rx)=(1016,1116) E/AudioHardwareQSD( 120): BT name Motorola H710 (tx,rx)=(1017,1117) E/AudioHardwareQSD( 120): BT name Motorola H12 (tx,rx)=(1018,1118) E/AudioHardwareQSD( 120): BT name Motorola S9 (tx,rx)=(1019,1119) E/AudioHardwareQSD( 120): BT name HBH-IV840 (tx,rx)=(1020,1120) E/AudioHardwareQSD( 120): BT name HBH-PV710 (tx,rx)=(1021,1121) E/AudioHardwareQSD( 120): BT name HBH-DS220 (tx,rx)=(1022,1122) E/AudioHardwareQSD( 120): BT name HBH-DS980 (tx,rx)=(1023,1123) E/AudioHardwareQSD( 120): BT name Nexus One Car Dock (tx,rx)=(1024,1124) E/AudioHardwareQSD( 120): BT name END (tx,rx)=(1162429505,1146045279) D/AudioHardwareInterface( 120): setMode(NORMAL) I/AudioHardwareQSD( 120): Set master volume to 1.000000.
<6>[ 24.675720] htc-acoustic: -- vma dump start -- <6>[ 24.675933] htc-acoustic: vm_start=40107000 (1074819072) <6>[ 24.676055] htc-acoustic: vm_end=40127000 (1074950144) <6>[ 24.676269] htc-acoustic: vm_page_prot=38f (911) <6>[ 24.676361] htc-acoustic: vm_flags=ff (255) <6>[ 24.676483] htc-acoustic: vm_pgoff=0 (0) <6>[ 24.676696] htc-acoustic: -- vma dump end -- <6>[ 24.676818] htc-acoustic: mmap <6>[ 24.677825] htc-acoustic: ioctl <6>[ 24.678039] htc-acoustic: ioctl: ACOUSTIC_UPDATE_ADIE called 120. <6>[ 24.680389] htc-acoustic: ioctl: ONCRPC_UPDATE_ADIE_PROC success. <6>[ 24.681488] htc-acoustic: release
>>> hex(0x40127000 - 0x40107000) '0x20000'
This explains how to build Replicant for the Nexus One.
Do not build as root, always build as user.
Setup the build environment:
source build/envsetup.sh lunch replicant_passion-eng export ANDROID_JAVA_HOME=$JAVA_HOME
Start the build:
parallel_tasks=$(echo "$(grep 'processor' /proc/cpuinfo | wc -l ) + 1" | bc) make -j$parallel_tasks distimages
The -jn argument is to indicate the number of parallel tasks during the build.
You can remove it from the command line to have only one task at a time. With fast hardware, best results will come with -j9, -j16 and -j32.
out/target/product/passion/out/host/linux-x86/bin/This is the list of the proprietary libraries, binaries and firmwares shipped with Cyanogenmod or the factory images on the Nexus One and the status of their replacement.
Note that we don't ship any proprietary binary, library or firmware.
First because our goal is to reach a 100% free Android distribution and also because sometimes, these are not even distributable.
| Library location | Function | Can be replaced or avoided? | works or can work? |
|---|---|---|---|
| /system/lib/libhtc_ril.so | Radio Interface library | reference ril is usable(tested renaming the reference ril after installation) | replaced |
| /system/lib/egl/* | 3d userspace libraries and drivers | ? | not necessary |
| /system/lib/libgps.so | gps library | could possibly be replaced,untested | fully replaced |
| /system/lib/libcamera.so | camera library | we can avoid it, using camera stubs | no(camera is not highly necessary) |
| Firmware location | Function | What depends on it? |
|---|---|---|
| /system/etc/firmware/*.acdb | Audio "card" firmware | sound,calls(because calls need sound) |
| /system/vendor/firmware/fb_bcm4329*.bin | wifi firmware | wifi (and bluetooth?) |
| /system/etc/vpimg | ? | Microphone |
| Variant | Replicant compatible versions | SoC | Bootloader | Modem link | Modem protocol | RAM |
|---|---|---|---|---|---|---|
| Nexus S (GT-I9020) Nexus S (GT-I9020A) Nexus S (GT-I9023) |
Replicant 2.3, 4.0, 4.2 | Exynos 31101 | Signed | Not isolated (RAM) | samsung-ipc | 512M |
1 This system on a chip was was previously known as Hummingbird or S5PC110
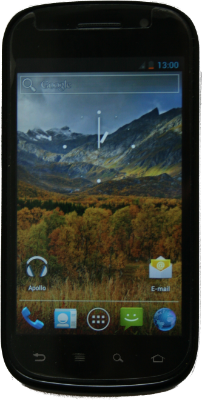 |
Device | Nexus S (GT-I902x) |
| Manufacturer | Google/Samsung | |
| Release date | December 2010 | |
| Codename | crespo |
|
| Status | Replicant: Not supported anymore Last Replicant version: Replicant 4.2 libsamsung-ipc: still supported libsamsung-ril: still supported |
|
| Variants | GSM: GT-I9020, GT-I9020A, GT-I9023 | |
| Latest images | Replicant 4.2 0004 |
The device has a modem that is not isolated. Because of that, the Replicant project isn't interested in officially supporting that device anymore until that issue is fixed.
More details on the issue and how to potentially fix it are available in the Exynos3110ModemIsolation wiki page.
However even if that issue isn't fixed or can't be fixed, the Replicant project still wants to collaborate with other projects or people wanting to add support for it in various other projects.
To make it easier for other projects to support that device, Replicant can still try to make sure that libsamsung-ipc and libsamsung-ril work for that device.
It's also still possible to build Replicant 4.2, which support this device with a recent libsamsung-ipc and libsamsung-ril.
To do that you need to install Trisquel 7, which is not supported anymore by Trisquel.
It's possible to do that from within Parabola with debootstrap and run the resulting rootfs in lxc through libvirt.
Nexus S (GT-I902x) installation
See NexusSI902xPrivacySecurityEvaluation for more details.
Details about the S5PC110 hardware design used in the Nexus S (GT-I902x): S5PC110HardwareDesign
| Component | Name | Status | Documentation |
|---|---|---|---|
| SoC | Samsung S5PC110/S5PV210 | Linux kernel support | |
| GPU | Imagination Technologies PowerVR SGX540 | Linux kernel support, proprietary userspace | |
| Audio Codec | Wolfson WM8994 | Linux kernel support (ALSA), free userspace | WM8994_Rev3.0.pdf |
| Modem | Intel XMM6160 | Free userspace implementation: Samsung-RIL/libsamsung-ipc | mobile-xmm-6160-brief.pdf |
| Wi-Fi | Broadcom BCM4329 | Linux kernel support, proprietary loaded firmware | |
| Bluetooth | Broadcom BCM4329 | Linux kernel support, proprietary loaded firmware | |
| NFC | NXP PN544 | Linux kernel support, free userspace, proprietary loaded firmware | 75016890.pdf |
| GPS | Broadcom BCM4751 | Proprietary userspace, proprietary loaded firmware, no free implementation: BCM4751 | BCM4751 |
| Accelerometer | STMicroelectronics KR3DM | Linux kernel support, free userspace | |
| Compass | Asahi Kasei AKM8973 | Linux kernel support, free userspace | AK8973.pdf |
| Gyroscope | STMicroelectronics K3G | Linux kernel support, free userspace | |
| Light | Sharp GP2A | Linux kernel support, free userspace | |
| Proximity | Sharp GP2A | Linux kernel support, free userspace | |
| Camera (back) | Samsung S5K4ECGX | Linux kernel support, free userspace | |
| Camera (front) | Samsung S5KA3DFX | Linux kernel support, free userspace | |
| Touchscreen | Atmel MXT224 | Linux kernel support | |
| Display | NT35580/TL2796 | Linux kernel support |
These documents are the propriety of Samsung Electronics and are not hosted by the Replicant project.
The Nexus S (I902x) comes with a bootrom and a set of two proprietary bootloaders. The bootrom: internal ROM (iROM) is stored read-only on the S5PC110 SoC chip. It loads the first bootloader: Samsung Primitive Bootloader (PBL), which loads the second bootloader: Samsung Secondary Bootloader (SBL). These bootloaders are proprietary software.
More information on the booting sequence is available on the S5PC110 User Manual, section 2 (System), part 6 (Booting sequence).
The S5PC110 bootrom (iROM) allows booting from various devices such as NAND, MMC, eMMC, UART and USB. The boot device priority is selected using the Operating Mode (OM) pins. Boolean values for each pin depend on the voltage applied to the pin: a positive voltage represents a logical 1 while ground represents a logical 0.
The OM_STAT register holds the value of the OM pins. It is available at address: 0xe010e100.
The register value can be read using:
# devmem 0xe010e100 8 0x09
OM pins are set to boolean values using pull-up (logical 1) and pull-down (logical 0) resistors. The Nexus S (I902x) schematics show all the possible resistors connected to the pins.
According to the Nexus S (I902x) Schematics:
Only a few are actually populated on the board: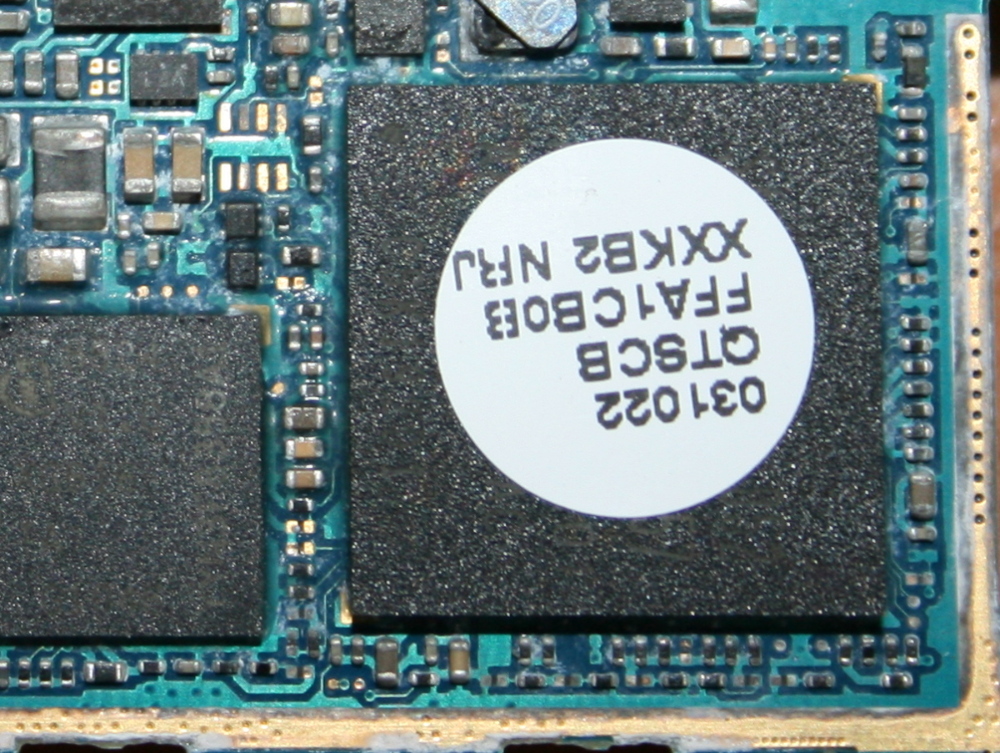
According to the Nexus S (I902x) Service Manual:
Resistors highlighted in green are not populated on the board. Hence, the actual layout is the following:
| XOM5 | XOM4 | XOM3 | XOM2 | XOM1 | XOM0 | |
|---|---|---|---|---|---|---|
| Pull-up resistor | N/A | N/A | R429 | N/A | N/A | R435 |
| Pull-down resistor | R448 | R447 | N/A | R445 | R444 | N/A |
| Boolean value | 0 | 0 | 1 | 0 | 0 | 1 |
According to the S5PC110 User Manual, section 2 (System), part 6.2.4 (OM pin configuration), table 6-3, such a value (0x04) indicates OnenandMux as first boot device.
According to the S5PC110 User Manual, section 2 (System), part 6 (Booting sequence), the bootrom (iROM) found on the S5PC110 SoC implements secure boot, which is enabled depending on the value of an e-fuse:
If you select secure booting, iROM code and first boot loader provide integrity checking function (that is it uses public key algorithm) to verify loaded image. There are 160 e-fuse bits of secure boot key, and they are used to authenticate loaded public key before the iROM’s integrity check.
This implies that in secure boot mode, the bootrom (iROM) will check the signature of the first bootloader and refuse to boot if the signature doesn't match the secure boot key. More information on this topic is available on the S5PC110 User Manual, section 2 (System), part 6.2.2 (Booting sequence example), figure 6-2.
On the Nexus S (I902x), secure boot mode appears to be enabled: changing a single byte on the first bootloader ended up in the system refusing to boot. In addition, a few messages from the bootloaders output suggest that such signature checks are enforced: IROM e-fused - Secure Boot Version.
The SECKEY register holds the public key that is used to check the bootloaders signatures. It is available at address 0xe0e00000, as mentioned on the S5PC110 User Manual, section 1 (Overview), part 2.1.2 (Special function register map). The register is e-fused and cannot be overwritten on the Nexus S (I902x).
Access to the register requires the CLK_SECKEY clock to be enabled, as mentioned on the S5PC110 User Manual, section 2 (System), part 3.7.5.6 (Clock gating control register).
The seckey clock can be enabled at boot-time using the following kernel patch:
diff --git a/arch/arm/mach-s5pv210/clock.c b/arch/arm/mach-s5pv210/clock.c
index 6d3e609..38ebb76 100644
--- a/arch/arm/mach-s5pv210/clock.c
+++ b/arch/arm/mach-s5pv210/clock.c
@@ -1479,6 +1479,7 @@ void __init_or_cpufreq s5pv210_setup_clocks(void)
unsigned int ptr;
u32 clkdiv0, clkdiv1;
struct clksrc_clk *pclkSrc;
+ int i;
/* Set functions for clk_fout_epll */
clk_fout_epll.enable = s5p_epll_enable;
@@ -1564,6 +1565,16 @@ void __init_or_cpufreq s5pv210_setup_clocks(void)
/* Display the clock source */
s3c_set_clksrc(pclkSrc, true);
}
+
+ for (i = 0; i < ARRAY_SIZE(init_clocks_off); i++) {
+ if (init_clocks_off[i].name == NULL)
+ break;
+
+ if (strcmp("seckey", init_clocks_off[i].name) == 0) {
+ printk(KERN_INFO "%s: Enabling seckey clock\n", __func__);
+ clk_enable(&init_clocks_off[i]);
+ }
+ }
}
static struct clk *clks[] __initdata = {
The register value can then be read using:
# devmem 0xE0E00018 32 0x07F0600F
A non-zero value on the register indicates that secure boot is enabled, while a zero value indicates that secure boot is disabled. Hence, secure boot is enabled on the Nexus S (I902x).
The first bootloader (PBL) appears to be implementing and enforcing a similar secure boot mechanism. However, there is no signature check enforced regarding the Linux kernel.
Since signature checks are enforced by the bootrom and provided that there is apparently no easy way of replacing the public key the signatures are checked against, running free software bootloaders on the Nexus S (I902x) seems impossible.
It is however possible to run a free software bootloader (U-Boot) as second bootloader using a version of the first bootloader (PBL) that does not enforce the signature check.
----------------------------------------------------------- Samsung Primitive Bootloader (PBL) v3.0 Copyright (C) Samsung Electronics Co., Ltd. 2006-2010 ----------------------------------------------------------- Muxed [[OneNAND]] 512MB (0x50) Sync Scanning Bad Block ....... Bad Block 77 (5) Bad Block 295 (5) Bad Block 1232 (5) Bad Block 1646 (5) Bad Block 1831 (5) Bad Block 2047 (0) SBL loadding success Set cpu clk. from 400MHz to 800MHz. OM=0x9, device=OnenandMux(Audi) IROM e-fused - Secure Boot Version. ----------------------------------------------------------- Samsung Secondary Bootloader (SBL) v3.0 Copyright (C) Samsung Electronics Co., Ltd. 2006-2010 Board Name: HERRING REV 52 Build On: Jan 20 2011 17:19:41 ----------------------------------------------------------- MMC SEM16G 15188 MB Re_partition: magic code(0x0) Muxed [[OneNAND]] 512MB (0x50) Sync Scanning Bad Block ....... Bad Block 77 (5) Bad Block 295 (5) Bad Block 1232 (5) Bad Block 1646 (5) Bad Block 1831 (5) Bad Block 2047 (0) Partitions loading success Read image(PARAM) from flash ....... Done init_fuel_gauge: vcell = 4083mV, soc = 94 PMIC_IRQ1 = 0xc0 PMIC_IRQ2 = 0x0 PMIC_IRQ3 = 0x0 PMIC_IRQ4 = 0x0 PMIC_STATUS1 = 0x0 PMIC_STATUS2 = 0x0 PMIC_STATUS3 = 0x0 PMIC_STATUS4 = 0x0 PMIC_STATUS5 = 0x0 PMIC_SMPL = 0x0 Key scan = 0x0 message.command = message.status = message.recovery = BOOT_MODE_NORMAL (SW_RST(0x00000004), INFORM(0x000000ee)) LCD ID = 0x0060a953 Done Kernel(boot.img) read success from partition no.5 Setting param.serialnr = 0x3733bab6 0x6de200ec Setting param.board_rev = 0x34 Setting param.cmdline = console=ttyFIQ0 no_console_suspend androidboot.serialno=3733BAB66DE200EC androidboot.bootloader=I9020XXKA3 androidboot.baseband=I9020XXKB3 androidboot.info=0x4,0xee,1 androidboot.carrier=EUR gain_code=3 s3cfb.bootloaderfb=0x34a00000 mach-herring.lcd_type=0x00000000 oem_state=unlocked Setting param.initrd_start = 0x31000000, param.initrd_size = 0x23265 Starting kernel at 0x30008000... Uncompressing Linux... done, booting the kernel.
These documents are the propriety of Samsung Electronics and are not hosted by the Replicant project.
However, some excerpts from these documents are provided, for the purpose of providing technical evidence of the facts that are mentioned in this page. We believe that this particular use of the copyrighted work is fair use.
There is no need to build as root, building as a regular user should be preferred.
In the source tree root folder, run:
source build/envsetup.sh lunch replicant_crespo-userdebug
Then, start the build:
parallel_tasks=$(echo "$(grep 'processor' /proc/cpuinfo | wc -l ) + 1" | bc) make -j$parallel_tasks bacon
-jn argument indicates the number of parallel tasks during the build (you can remove it from the command line to have only one task at a time).$parallel_tasks holds an optimized number of parallel tasks for your hardware. You may want to reduce this number if e.g. the computer runs out of RAM during the build.
out/target/product/crespo/ for the targetout/host/linux-x86/bin/ for the hostThe compass sensor is calculated from both the accelerometer and magnetic field sensors, which needs calibration to be accurate.
If the values reported by the compass sensor are not right, you can recalibrate the magnetic field sensor with the following steps:
Connect to the device via ADB with sufficient permissions and run:
adb shell stop zygote adb shell rm /data/misc/akmd_set.txt adb shell start zygote
Then start an application using the compass sensor and move the device in every direction, with a rotation around each axis: the device should now be calibrated.
Warning: installing an operating system, such as Replicant, may void your device's warranty and will erase the data stored on the device.
In order to install Replicant on your device, it is assumed that you have a computer running a GNU/Linux operating system and everything necessary to connect your device to the computer through USB available. Moreover, it is assumed that anyone performing the installation knows how to use command lines in a terminal and has basic knowledge about it.
The first step in the installation process is to download and set up the files that will be used to install Replicant to the device. The files must be downloaded on your computer first.
1. Find out what the latest image is: check out the Last image part of the general table on NexusSI902x
2. Download all the files listed for the device (including the checksum and the signatures) on ReplicantImages for the latest image
2. Make sure you have added the Replicant release key to your GPG keyring
3. Check the signature of the files:
gpg --armor --verify path/to/replicant-4.2-crespo.zip.asc path/to/replicant-4.2-crespo.zip gpg --armor --verify path/to/recovery.img.asc path/to/recovery.img
md5sum -c crespo.md5
The fastboot tool is required to flash the recovery image to the device.
Instructions to install fastboot: ToolsInstallation
1. Make sure the device is started up and has an Android system running
2. Connect the USB cable to both the computer and the device
3. Enable USB mass storage on the device
4. Mount the mass storage on the computer
5. Copy the replicant-4.2-crespo.zip file at the origin of the mass storage
6. Safely unmount the mass storage on the computer
7. Disable USB mass storage on the device
Instructions to install ADB: ToolsInstallation
The next step in the installation process is to prepare the device for fastboot mode.
1. Make sure the device is completely turned off and the USB cable is disconnected from the device
2. Start the device by holding the following key combination: Volume up, Power
3. Hold the key combination until the device shows Fastboot mode
4. Connect the USB cable to both the computer and the device
If this is the first time you are flashing an operating system to your device, you'll have to unlock it first. If this is not the case, you can skip that part.
Beware: all data stored on the internal storage will be lost during that operation.
1. Unlock the bootloader:
fastboot oem unlock
Now that both the computer and the device are set up, it is time to actually install the images to the device.
1. Install the recovery image to the device:
fastboot flash recovery path/to/recovery.img
5. Select install zip from sdcard
6. Select the system zip: replicant-4.2-crespo.zip
Note: if your device was running Android 4.2 and later, it may be located in the 0 directory
7. Confirm the installation
5. Select install zip from sideload
6. Back to the host computer, load the system zip with sideload:
adb sideload path/to/replicant-4.2-crespo.zip
8. Select Go Back (if necessary) to get back to the general menu
8. Select wipe data/factory reset
9. Confirm the data wipe by selecting Yes -- delete all user data
10. Select Reboot system now to reboot the device
Your device should now be running Replicant!
The various integrated circuits found on a mobile device run small pieces of dedicated software that are called firmwares, when powerful enough.
Thus, these programs do not run on the main processor: instead, they are executed on other integrated circuits.
Some firmwares come pre-installed on the integrated circuit while some others have to be loaded to the circuit by the main processor and are usually distributed along with the system.
When those firmwares are proprietary, they are not distributed along with Replicant, nor do we recommend using them.
| Firmware name | Related chip | Related functionality |
| fw_bcmdhd.bin | Broadcom BCM4329 | Wi-Fi |
| fw_bcmdhd_apsta.bin | Broadcom BCM4329 | Wi-Fi host |
| nvram_net.txt | Broadcom BCM4329 | Wi-Fi configuration |
| bcm4329.hcd | Broadcom BCM4329 | Bluetooth |
| libpn544_fw.so/pn544.bin | NXP PN544 | NFC |
| samsung_mfc_fw.bin | Samsung S5PC110/S5PV210 MFC | Hardware media encoding/decoding |
Note that the libpn544_fw.so file is actually a library containing the firmware that will be executed on the main processor!
Note that this information may or may not be exhaustive.
It also may or may not contain all known issues or good point about this device.
The Nexus S (I902x) allows accessing an UART serial port through the USB connector. A FSA9480 switch is in charge of switching the USB connector between UART and USB (among other choices).
The UART signal can itself be switched between the S5PC110 SoC UART and the XMM6160 modem UART by the MAX8998 PMIC. It is switched to the S5PC110 SoC UART by default.
According to the Nexus S (I902x) Schematics: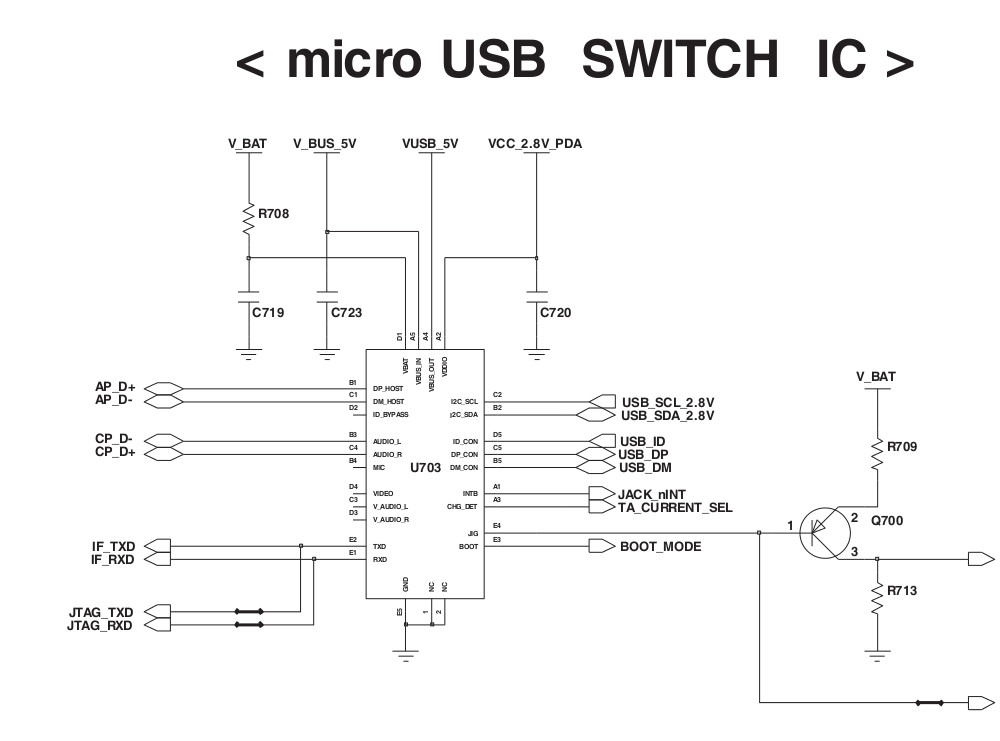
Depending on the resistor value between the USB connector ID and GND pins, the FSA9480 will automatically switch the USB connector to the selected device, as mentioned on the FSA9480 datasheet. A resistor value of 150k Ohm will switch the USB connector to UART.
In order to switch the USB connector to UART, a 150 kOhm resistor has to be placed between the ID and GND pins of the USB connector.
According to the FSA9480 datasheet, table 3 (Accessory auto configuration table), UART Rx is routed to USB DP (D+) and UART Tx is routed to USB DM (D-).
Hence, the USB DP (D+) has to be connected to the UART adapter's Tx pin and the USB DM (D-) has to be connected to the UART adapter's Rx pin.
GND has to be made common between the USB connector and the UART adapter. There is no need to connect the USB connector's VBUS to a positive voltage.
The USB connector can then be connected to the device at any time (the FSA9480 will automatically switch the USB connector to UART, even when the device is already on).
Alternatively, it is possible to switch the USB connector to UART at run-time, without using any resistor between the ID and GND pins (the ID pin can be left open).
Any USB cable has to be disconnected from the device before manually switching the USB connector to UART:
# echo UART > /sys/devices/platform/i2c-gpio.7/i2c-7/7-0025/switch
According to the FSA9480 datasheet, table 26 (Manual S/W 1), the USB connector's VBUS must be present (connected to a 5V voltage source) for manual configuration to be taken in account.
The USB connector can then be connected to the device.
By default, the Linux console is set to the FIQ debugger.
Kernel messages can be displayed over UART by setting the cmdline console argument to ttySAC2. The cmdline console argument is set on the crespo device files:
diff --git a/BoardConfigCommon.mk b/BoardConfigCommon.mk index 2892480..c3134b7 100755 --- a/BoardConfigCommon.mk +++ b/BoardConfigCommon.mk @@ -62,7 +62,7 @@ BOARD_NAND_SPARE_SIZE := 128 BOARD_KERNEL_BASE := 0x30000000 BOARD_KERNEL_PAGESIZE := 4096 -BOARD_KERNEL_CMDLINE := console=ttyFIQ0 no_console_suspend +BOARD_KERNEL_CMDLINE := console=ttySAC2,115200 no_console_suspend TARGET_RECOVERY_PIXEL_FORMAT := "BGRA_8888" TARGET_RECOVERY_UI_LIB := librecovery_ui_crespo
The FIQ debugger has to be disabled in the kernel configuration:
diff --git a/arch/arm/configs/crespo_defconfig b/arch/arm/configs/crespo_defconfig index 4f3997b..c60ea92 100644 --- a/arch/arm/configs/crespo_defconfig +++ b/arch/arm/configs/crespo_defconfig @@ -406,10 +406,10 @@ CONFIG_ARM_VIC=y CONFIG_ARM_VIC_NR=4 CONFIG_PL330=y CONFIG_FIQ_GLUE=y -CONFIG_FIQ_DEBUGGER=y +# CONFIG_FIQ_DEBUGGER is not set # CONFIG_FIQ_DEBUGGER_NO_SLEEP is not set # CONFIG_FIQ_DEBUGGER_WAKEUP_IRQ_ALWAYS_ON is not set -CONFIG_FIQ_DEBUGGER_CONSOLE=y +# CONFIG_FIQ_DEBUGGER_CONSOLE is not set # CONFIG_FIQ_DEBUGGER_CONSOLE_DEFAULT_ENABLE is not set #
These documents are the propriety of Samsung Electronics and are not hosted by the Replicant project.
However, some excerpts from these documents are provided, for the purpose of providing technical evidence of the facts that are mentioned in this page. We believe that this particular use of the copyrighted work is fair use.
| Variant | Replicant compatible versions | SoC | Bootloader | Modem link | Modem protocol | RAM |
|---|---|---|---|---|---|---|
| Nexus 7 (2012) WiFi (Grouper) | Not supported yet | Nvidia Tegra 3 T30L | Signed? | No modem | 1G | |
| Nexus 7 (2012) GSM (Tilapia) | Not supported yet | Nvidia Tegra 3 T30L | Signed? | Isolated (HSIC) | AT1 | 1G |
1 It uses a nonfree libril (libxgold-ril.so) which doesn't have strings of samsung-ipc commands and instead it has strings like "+CRING:" which are typically used to parse unsolicited AT commands. So it should use AT commands.
| TODO: IMAGE | Device | ODROID-U3 |
| Manufacturer | HardKernel | |
| Release date | ? | |
| Codename | ? | |
| Status | N/A | |
| Maintainer(s) | N/A | |
| Supported models | N/A | |
| Latest images | N/A |
At this time there is no interest in adding support for it in Replicant as it's a Single Board Computer.
However if we get a fully free bootloader for the Exynos 4412, and that we manage to build generic Replicant images supporting a wide variety of devices supported by Upstream Linux it could be added as well along the way.
The main purpose of getting such board was to use it to help with various research and upstreaming.
| Component | Name | Source | Status |
|---|---|---|---|
| SoC | Samsung Exynos 4412 Quad |
TODO: complete this hardware table
| Component | Name | data | Status |
|---|---|---|---|
| Bootloader interface | ? | ? | ? |
TODO
In the Replicant contributors meetings of July 2019, there is a presentation on the oFono RIL: Replicant and oFono based Java RIL
You can watch the talk and read the slides here: https://redmine.replicant.us/projects/replicant/wiki/ContributorsMeetingJuly2019#Presentations
The OFono RIl works1, but it's not integrated yet into Replicant and it also has several bugs that need to be fixed. You can follow along on the issue tracker here: #1958
References:
1 From #replicant, the 22 February 2020:
< scintill[m]> Hey all. I've been working again on the RIL for Note 2 LTE, and eventually other Qualcomm modems. I've got data working a few times, but it's not reliable. I'm looking into issues with audio calls too. It seems, for some reason, ofono doesn't get an acknowledgement that a dialed call has started.
Corresponding feature request: #351
The Galaxy Nexus and Galaxy Tab 2 chips have a camera that is accessible through the Ducati microcontroller. Some documentation can be found at omappedia.
Omap4 camera source code (used by Galaxy Tab 2, but currently disabled)
The Galaxy Nexus uses its own version, which is currently disabled as well.
In its current form, the camera source code cannot be used in Replicant. The code heavily depends on the PowerVR module which requires proprietary blobs. Below, attempts to remove this dependency are documented. Furthermore, the software renderer used with Replicant only works well with RGB565 as preview format, but the Ducati camera does not support this preview format. It uses YV12.
We don't support YV12 in the gralloc and in the software libgl yet.
There are several approaches to solve the issue:
Long and complicated
The Camera supports the following formats:
compile,push, and run the omap4 camera_test program with the "F" argument:
Here for the back camera:
Choice: E
E
E
Supported Cameras: (null)
Supported Picture Sizes: 2592x1944,2592x1728,2592x1458,2048x1536,1600x1200,1280x1024,1152x864,1280x960,640x480,320x240
Supported Picture Formats: yuv420sp,yuv420p,yuv422i-yuyv,rgb565,raw,jpeg
Supported Preview Sizes: 1920x1080,1280x720,960x720,800x480,720x576,720x480,768x576,640x480,320x240,352x288,240x160,176x144,128x96
Supported Preview Formats: yuv420sp,yuv420p,yuv422i-yuyv,yuv420p
Supported Preview Frame Rates: 30,15
Supported Thumbnail Sizes: 640x480,160x120,200x120,320x240,512x384,352x144,176x144,96x96,0x0
Supported Whitebalance Modes: auto,daylight,cloudy-daylight,fluorescent,incandescent,
Supported Effects: none,negative,solarize,sepia,mono,whiteboard,blackboard,aqua,posterize
Supported Scene Modes: auto,action,night,party,sunset
Supported Focus Modes: continuous-video,auto,macro,infinity,infinity,continuous-picture
Supported Antibanding Options: auto,50hz,60hz,off
Supported Flash Modes: off,on,auto,torch
Supported Focus Areas: 10
Focus Distances: Infinity,Infinity,Infinity
diff --git a/libs/ui/GraphicBufferAllocator.cpp b/libs/ui/GraphicBufferAllocator.cpp
index f7c4f4e..766a98f 100644
--- a/libs/ui/GraphicBufferAllocator.cpp
+++ b/libs/ui/GraphicBufferAllocator.cpp
@@ -99,8 +99,8 @@ status_t GraphicBufferAllocator::alloc(uint32_t w, uint32_t h, PixelFormat forma
// we have a h/w allocator and h/w buffer is requested
status_t err;
-#ifdef MISSING_EGL_PIXEL_FORMAT_YV12
- if (format == HAL_PIXEL_FORMAT_YV12) {
+#if 1
+ if (format == HAL_PIXEL_FORMAT_YV12 || format == 0x100 ) {
format = HAL_PIXEL_FORMAT_RGBX_8888;
}
if (usage & GRALLOC_USAGE_EXTERNAL_DISP) {
diff --git a/media/libstagefright/colorconversion/SoftwareRenderer.cpp b/media/libstagefright/colorconversion/SoftwareRenderer.cpp
index 2ce8fa7..abe68dd 100644
--- a/media/libstagefright/colorconversion/SoftwareRenderer.cpp
+++ b/media/libstagefright/colorconversion/SoftwareRenderer.cpp
@@ -62,7 +62,7 @@ SoftwareRenderer::SoftwareRenderer(
size_t bufWidth, bufHeight;
switch (mColorFormat) {
-#ifndef MISSING_EGL_PIXEL_FORMAT_YV12
+#if 0
case OMX_COLOR_FormatYUV420Planar:
case OMX_TI_COLOR_FormatYUV420PackedSemiPlanar:
{
Using the camera application produces the following traces:
[...] V/camera ( 7834): Preview size is 960x720 V/MediaProfilesJNI( 7834): native_get_num_image_encoding_quality_levels V/MediaProfilesJNI( 7834): native_get_image_encoding_quality_level V/MediaProfilesJNI( 7834): native_get_image_encoding_quality_level V/MediaProfilesJNI( 7834): native_get_image_encoding_quality_level D/CameraSettings( 7834): Parameters: [antibanding-values=auto,50hz,60hz,off, antibanding=auto, auto-convergence-mode=, auto-convergence=, auto-exposure-lock-supported=true, auto-exposure-lock=false, auto-whitebalance-lock-supported=true, auto-whitebalance-lock=false, brightness=50, camera-mode=0, camera-name=S5K4E1GA, contrast=100, current-iso=100, effect-values=none,negative,solarize,sepia,mono,whiteboard,blackboard,aqua,posterize, effect=none, exif-make=Samsung, exif-model=Galaxy Nexus, exposure-compensation-step=0.1, exposure-compensation=0, exposure-mode-values=auto,night,backlighting,spotlight,sports,snow,beach,aperture,small-aperture,, exposure=auto, flash-mode-values=off,on,auto,torch, flash-mode=auto, focal-length=3.43, focus-distances=Infinity,Infinity,Infinity, focus-mode-values=continuous-video,auto,macro,infinity,infinity,continuous-picture, focus-mode=continuous-picture, gbce=disable, horizontal-view-angle=54.8, ipp-values=off,ldc,nsf,ldc-nsf, ipp=ldc-nsf, iso-mode-values=auto,100,200,400,800, iso=auto, jpeg-quality=95, jpeg-thumbnail-height=120, jpeg-thumbnail-quality=60, jpeg-thumbnail-size-values=640x480,160x120,200x120,320x240,512x384,352x144,176x144,96x96,0x0, jpeg-thumbnail-width=160, manual-convergence-values=, max-exposure-compensation=30, max-framerate=30, max-num-detected-faces-hw=35, max-num-detected-faces-sw=0, max-num-focus-areas=10, max-num-metering-areas=10, max-zoom=60, min-exposure-compensation=-30, min-framerate=15, picture-format-values=yuv420sp,yuv420p,yuv422i-yuyv,rgb565,raw,jpeg, picture-format=jpeg, picture-size-values=2592x1944,2592x1728,2592x1458,2048x1536,1600x1200,1280x1024,1152x864,1280x960,640x480,320x240, picture-size=2592x1944, preview-format-values=yuv420sp,yuv420p,yuv422i-yuyv,yuv420p, preview-format=yuv420sp, preview-fps-range-values=(15000,15000),(15000,30000),(24000,30000), preview-fps-range=15000,30000, preview-frame-rate-values=30,15, preview-frame-rate=30, preview-size-values=1920x1080,1280x720,960x720,800x480,720x576,720x480,768x576,640x480,320x240,352x288,240x160,176x144,128x96, preview-size=960x720, recording-hint=false, s3d-supported=, s3d2d-preview-values=, s3d2d-preview=, saturation=100, scene-mode-values=auto,action,night,party,sunset, scene-mode=auto, sensor-orientation-values=, sensor-orientation=, sharpness=100, smooth-zoom-supported=true, vertical-view-angle=42.5, video-frame-format=OMX_TI_COLOR_FormatYUV420PackedSemiPlanar, video-snapshot-supported=true, video-stabilization-supported=true, video-stabilization=false, whitebalance-values=auto,daylight,cloudy-daylight,fluorescent,incandescent,, whitebalance=auto, zoom-ratios=100,104,107,111,115,119,123,127,132,137,141,146,152,157,162,168,174,180,187,193,200,207,214,222,230,238,246,255,264,273,283,293,303,314,325,336,348,361,373,386,400,414,429,444,459,476,492,510,528,546,566,586,606,628,650,673,696,721,746,773,800, zoom-supported=true, zoom=0] V/camera ( 7834): startPreview I/CameraHAL( 7751): NULL ANativeWindow passed to setPreviewWindow D/DOMX ( 7751): ENTER: hComponent = 0x154e570, pCompPrv = 0x1556240, nParamIndex = 2130706507, pParamStruct = 0x41b5ebd4 D/DOMX ( 7751): ERROR: [DBG] RPC_sendPacket_sync RPC_SetParameter:348 D/DOMX ( 7751): TRACE: Recd. omx message D/DOMX ( 7751): TRACE: Waiting for messages from remote core D/DOMX ( 7751): EXIT: D/DOMX ( 7751): TRACE: Corresponding RPC function executed successfully D/DOMX ( 7751): EXIT: eError: 0 D/DOMX ( 7751): ENTER: hComponent = 0x154e570, pCompPrv = 0x1556240, nParamIndex = 2130706506, pParamStruct = 0x41b5ebd0 D/DOMX ( 7751): ERROR: [DBG] RPC_sendPacket_sync RPC_SetParameter:348 D/DOMX ( 7751): TRACE: Recd. omx message D/DOMX ( 7751): TRACE: Waiting for messages from remote core D/DOMX ( 7751): EXIT: D/DOMX ( 7751): TRACE: Corresponding RPC function executed successfully D/DOMX ( 7751): EXIT: eError: 0 D/DOMX ( 7751): ENTER: hComponent = 0x154e570, pCompPrv = 0x1556240, nParamIndex = 2130706548, pParamStruct = 0x41b5ebc8 D/DOMX ( 7751): ERROR: [DBG] RPC_sendPacket_sync RPC_SetParameter:348 D/DOMX ( 7751): TRACE: Recd. omx message D/DOMX ( 7751): TRACE: Waiting for messages from remote core D/DOMX ( 7751): EXIT: D/DOMX ( 7751): TRACE: Corresponding RPC function executed successfully D/DOMX ( 7751): EXIT: eError: 0 D/DOMX ( 7751): ENTER: hComponent = 0x154e570, pCompPrv = 0x1556240, nParamIndex = 2130706469, pParamStruct = 0x41b5ebd4 D/DOMX ( 7751): ERROR: [DBG] RPC_sendPacket_sync RPC_SetParameter:348 D/DOMX ( 7751): TRACE: Recd. omx message D/DOMX ( 7751): TRACE: Waiting for messages from remote core D/DOMX ( 7751): EXIT: D/DOMX ( 7751): TRACE: Corresponding RPC function executed successfully D/DOMX ( 7751): EXIT: eError: 0 D/DOMX ( 7751): ENTER: hComponent = 0x154e570, pCompPrv = 0x1556240, nConfigIndex = 2130706509, pConfigStruct = 0x41b5ebbc D/DOMX ( 7751): ENTER: D/DOMX ( 7751): ERROR: [DBG] RPC_sendPacket_sync RPC_SetConfig:496 D/DOMX ( 7751): TRACE: Recd. omx message D/DOMX ( 7751): TRACE: Waiting for messages from remote core D/DOMX ( 7751): EXIT: D/DOMX ( 7751): TRACE: Corresponding RPC function executed successfully D/DOMX ( 7751): EXIT: eError: 0 D/DOMX ( 7751): ENTER: hComponent = 0x154e570, pCompPrv = 0x1556240, nParamIndex = 2130706515, pParamStruct = 0x41b5ebd0 D/DOMX ( 7751): ERROR: [DBG] RPC_sendPacket_sync RPC_SetParameter:348 D/DOMX ( 7751): TRACE: Recd. omx message D/DOMX ( 7751): TRACE: Waiting for messages from remote core D/DOMX ( 7751): EXIT: D/DOMX ( 7751): TRACE: Corresponding RPC function executed successfully D/DOMX ( 7751): EXIT: eError: 0 D/DOMX ( 7751): ENTER: hComponent = 0x154e570, pCompPrv = 0x1556240, nParamIndex = 2130706514, pParamStruct = 0x41b5ebcc D/DOMX ( 7751): ERROR: [DBG] RPC_sendPacket_sync RPC_SetParameter:348 D/DOMX ( 7751): TRACE: Recd. omx message D/DOMX ( 7751): TRACE: Waiting for messages from remote core D/DOMX ( 7751): EXIT: D/DOMX ( 7751): TRACE: Corresponding RPC function executed successfully D/DOMX ( 7751): EXIT: eError: 0 D/DOMX ( 7751): ENTER: hComponent = 0x154e570, pCompPrv = 0x1556240, nConfigIndex = 117440522, pConfigStruct = 0x41b5ebbc D/DOMX ( 7751): ENTER: D/DOMX ( 7751): ERROR: [DBG] RPC_sendPacket_sync RPC_GetConfig:564 D/DOMX ( 7751): TRACE: Recd. omx message D/DOMX ( 7751): TRACE: Waiting for messages from remote core D/DOMX ( 7751): EXIT: D/DOMX ( 7751): TRACE: Corresponding RPC function executed successfully D/DOMX ( 7751): EXIT: eError: 0 D/DOMX ( 7751): ENTER: hComponent = 0x154e570, pCompPrv = 0x1556240, nConfigIndex = 117440522, pConfigStruct = 0x41b5ebbc D/DOMX ( 7751): ENTER: D/DOMX ( 7751): ERROR: [DBG] RPC_sendPacket_sync RPC_SetConfig:496 D/DOMX ( 7751): TRACE: Recd. omx message D/DOMX ( 7751): TRACE: Waiting for messages from remote core D/DOMX ( 7751): EXIT: D/DOMX ( 7751): TRACE: Corresponding RPC function executed successfully D/DOMX ( 7751): EXIT: eError: 0 D/DOMX ( 7751): ENTER: hComponent = 0x154e570, pCompPrv = 0x1556240, nParamIndex = 33554433, pParamStruct = 0x41b5eb48 D/DOMX ( 7751): ENTER: D/DOMX ( 7751): ERROR: [DBG] RPC_sendPacket_sync RPC_GetParameter:419 D/DOMX ( 7751): TRACE: Recd. omx message D/DOMX ( 7751): TRACE: Waiting for messages from remote core D/DOMX ( 7751): EXIT: D/DOMX ( 7751): TRACE: Corresponding RPC function executed successfully D/DOMX ( 7751): EXIT: eError: 0 index: 0x2000001 D/DOMX ( 7751): ENTER: hComponent = 0x154e570, pCompPrv = 0x1556240, nParamIndex = 2130706522, pParamStruct = 0x41b5eb14 I/Process ( 189): Sending signal. PID: 7834 SIG: 3 D/DOMX ( 7751): ERROR: [DBG] RPC_sendPacket_sync RPC_SetParameter:348 I/dalvikvm( 7834): threadid=3: reacting to signal 3 D/DOMX ( 7751): TRACE: Recd. omx message D/DOMX ( 7751): TRACE: Waiting for messages from remote core D/DOMX ( 7751): EXIT: D/DOMX ( 7751): TRACE: Corresponding RPC function executed successfully D/DOMX ( 7751): EXIT: eError: 0 D/DOMX ( 7751): ENTER: hComponent = 0x154e570, pCompPrv = 0x1556240, nParamIndex = 33554433, pParamStruct = 0x41b5eb48 D/DOMX ( 7751): ERROR: [DBG] RPC_sendPacket_sync RPC_SetParameter:348 D/DOMX ( 7751): TRACE: Recd. omx message D/DOMX ( 7751): TRACE: Waiting for messages from remote core D/DOMX ( 7751): EXIT: D/DOMX ( 7751): TRACE: Corresponding RPC function executed successfully D/DOMX ( 7751): EXIT: eError: 0 D/DOMX ( 7751): ENTER: hComponent = 0x154e570, pCompPrv = 0x1556240, nParamIndex = 33554433, pParamStruct = 0x41b5eb48 D/DOMX ( 7751): ENTER: D/DOMX ( 7751): ERROR: [DBG] RPC_sendPacket_sync RPC_GetParameter:419 D/DOMX ( 7751): TRACE: Recd. omx message D/DOMX ( 7751): TRACE: Waiting for messages from remote core D/DOMX ( 7751): EXIT: D/DOMX ( 7751): TRACE: Corresponding RPC function executed successfully D/DOMX ( 7751): EXIT: eError: 0 index: 0x2000001 D/DOMX ( 7751): ENTER: hComponent = 0x154e570, pCompPrv = 0x1556240, nConfigIndex = 117440523, pConfigStruct = 0x41b5ebc0 D/DOMX ( 7751): ENTER: D/DOMX ( 7751): ERROR: [DBG] RPC_sendPacket_sync RPC_GetConfig:564 D/DOMX ( 7751): TRACE: Recd. omx message D/DOMX ( 7751): TRACE: Waiting for messages from remote core D/DOMX ( 7751): EXIT: D/DOMX ( 7751): TRACE: Corresponding RPC function executed successfully D/DOMX ( 7751): EXIT: eError: 0 D/DOMX ( 7751): ENTER: hComponent = 0x154e570, pCompPrv = 0x1556240, nConfigIndex = 117440523, pConfigStruct = 0x41b5ebc0 D/DOMX ( 7751): ENTER: D/DOMX ( 7751): ERROR: [DBG] RPC_sendPacket_sync RPC_SetConfig:496 D/DOMX ( 7751): TRACE: Recd. omx message D/DOMX ( 7751): TRACE: Waiting for messages from remote core D/DOMX ( 7751): EXIT: D/DOMX ( 7751): TRACE: Corresponding RPC function executed successfully D/DOMX ( 7751): EXIT: eError: 0 D/DOMX ( 7751): ENTER: hComponent = 0x154e570, pCompPrv = 0x1556240, nConfigIndex = 117440523, pConfigStruct = 0x41b5ebc0 D/DOMX ( 7751): ENTER: D/DOMX ( 7751): ERROR: [DBG] RPC_sendPacket_sync RPC_GetConfig:564 D/DOMX ( 7751): TRACE: Recd. omx message D/DOMX ( 7751): TRACE: Waiting for messages from remote core D/DOMX ( 7751): EXIT: D/DOMX ( 7751): TRACE: Corresponding RPC function executed successfully D/DOMX ( 7751): EXIT: eError: 0 D/DOMX ( 7751): ENTER: hComponent = 0x154e570, pCompPrv = 0x1556240, nParamIndex = 33554433, pParamStruct = 0x41b5eb48 D/DOMX ( 7751): ENTER: D/DOMX ( 7751): ERROR: [DBG] RPC_sendPacket_sync RPC_GetParameter:419 D/DOMX ( 7751): TRACE: Recd. omx message D/DOMX ( 7751): TRACE: Waiting for messages from remote core D/DOMX ( 7751): EXIT: D/DOMX ( 7751): TRACE: Corresponding RPC function executed successfully D/DOMX ( 7751): EXIT: eError: 0 index: 0x2000001 D/DOMX ( 7751): ENTER: hComponent = 0x154e570, pCompPrv = 0x1556240, nParamIndex = 2130706522, pParamStruct = 0x41b5eb14 D/DOMX ( 7751): ERROR: [DBG] RPC_sendPacket_sync RPC_SetParameter:348 D/DOMX ( 7751): TRACE: Recd. omx message D/DOMX ( 7751): TRACE: Waiting for messages from remote core D/DOMX ( 7751): EXIT: D/DOMX ( 7751): TRACE: Corresponding RPC function executed successfully D/DOMX ( 7751): EXIT: eError: 0 D/DOMX ( 7751): ENTER: hComponent = 0x154e570, pCompPrv = 0x1556240, nParamIndex = 33554433, pParamStruct = 0x41b5eb48 D/DOMX ( 7751): ERROR: [DBG] RPC_sendPacket_sync RPC_SetParameter:348 D/DOMX ( 7751): TRACE: Recd. omx message D/DOMX ( 7751): TRACE: Waiting for messages from remote core D/DOMX ( 7751): EXIT: D/DOMX ( 7751): TRACE: Corresponding RPC function executed successfully D/DOMX ( 7751): EXIT: eError: 0 D/DOMX ( 7751): ENTER: hComponent = 0x154e570, pCompPrv = 0x1556240, nParamIndex = 33554433, pParamStruct = 0x41b5eb48 D/DOMX ( 7751): ENTER: D/DOMX ( 7751): ERROR: [DBG] RPC_sendPacket_sync RPC_GetParameter:419 D/DOMX ( 7751): TRACE: Recd. omx message D/DOMX ( 7751): TRACE: Waiting for messages from remote core D/DOMX ( 7751): EXIT: D/DOMX ( 7751): TRACE: Corresponding RPC function executed successfully D/DOMX ( 7751): EXIT: eError: 0 index: 0x2000001 D/DOMX ( 7751): ENTER: hComponent = 0x154e570, pCompPrv = 0x1556240, nParamIndex = 2130706519, pParamStruct = 0x41b5ebfc D/DOMX ( 7751): ENTER: D/DOMX ( 7751): ERROR: [DBG] RPC_sendPacket_sync RPC_GetParameter:419 D/DOMX ( 7751): TRACE: Recd. omx message D/DOMX ( 7751): TRACE: Waiting for messages from remote core D/DOMX ( 7751): EXIT: D/DOMX ( 7751): TRACE: Corresponding RPC function executed successfully D/DOMX ( 7751): EXIT: eError: 0 index: 0x7f000057 I/CameraHAL( 7751): Preview not started. Preview in progress flag set D/DOMX ( 7751): ENTER: hComponent = 0x154e570, pCompPrv = 0x1556240, eCmd = 2, nParam = 2, pCmdData = 0x0 D/DOMX ( 7751): ENTER: D/DOMX ( 7751): ERROR: [DBG] RPC_sendPacket_sync RPC_SendCommand:644 D/DOMX ( 7751): TRACE: Recd. omx message D/DOMX ( 7751): TRACE: Waiting for messages from remote core D/DOMX ( 7751): EXIT: D/DOMX ( 7751): TRACE: Corresponding RPC function executed successfully D/DOMX ( 7751): EXIT: eError: 0 D/DOMX ( 7751): TRACE: Recd. omx message D/DOMX ( 7751): ENTER: D/DOMX ( 7751): TRACE: D/DOMX ( 7751): **__**Got eventhandler from Remote Core succesffuly - values are : **__** D/DOMX ( 7751): TRACE: hComp :0x154e570,eEvent: 0x0,nData1: 0x2,nData2: 0x2,pEventData: 0x0 D/DOMX ( 7751): TRACE: Just Before Entering Proxy Event handler call D/DOMX ( 7751): ENTER: hComponent=0x154e570, pCompPrv=0x1556240, eEvent=0x0, nData1=0x2, nData2=0x2, pEventData=0x0 D/DOMX ( 7751): EXIT: eError: 0 D/DOMX ( 7751): EXIT: D/DOMX ( 7751): TRACE: Waiting for messages from remote core D/DOMX ( 7751): ENTER: hComponent = 0x154e570, pCompPrv = 0x1556240, eCmd = 0, nParam = 2, pCmdData = 0x0 D/DOMX ( 7751): ENTER: D/DOMX ( 7751): ERROR: [DBG] RPC_sendPacket_sync RPC_SendCommand:644 D/DOMX ( 7751): TRACE: Recd. omx message D/DOMX ( 7751): TRACE: Waiting for messages from remote core D/DOMX ( 7751): EXIT: D/DOMX ( 7751): TRACE: Corresponding RPC function executed successfully D/DOMX ( 7751): EXIT: eError: 0 I/dalvikvm( 7834): Wrote stack traces to '/data/anr/traces.txt' D/DOMX ( 7751): TRACE: Recd. omx message D/DOMX ( 7751): ENTER: D/DOMX ( 7751): TRACE: D/DOMX ( 7751): **__**Got eventhandler from Remote Core succesffuly - values are : **__** D/DOMX ( 7751): TRACE: hComp :0x154e570,eEvent: 0x0,nData1: 0x0,nData2: 0x2,pEventData: 0x0 D/DOMX ( 7751): TRACE: Just Before Entering Proxy Event handler call D/DOMX ( 7751): ENTER: hComponent=0x154e570, pCompPrv=0x1556240, eEvent=0x0, nData1=0x0, nData2=0x2, pEventData=0x0 D/DOMX ( 7751): EXIT: eError: 0 D/DOMX ( 7751): EXIT: D/DOMX ( 7751): TRACE: Waiting for messages from remote core D/DOMX ( 7751): ENTER: hComponent = 0x154e570, pCompPrv = 0x1556240, eCmd = 0, nParam = 3, pCmdData = 0x0 D/DOMX ( 7751): ENTER: D/DOMX ( 7751): ERROR: [DBG] RPC_sendPacket_sync RPC_SendCommand:644 D/DOMX ( 7751): TRACE: Recd. omx message D/DOMX ( 7751): TRACE: Waiting for messages from remote core D/DOMX ( 7751): TRACE: Recd. omx message D/DOMX ( 7751): ENTER: D/DOMX ( 7751): EXIT: D/DOMX ( 7751): TRACE: D/DOMX ( 7751): **__**Got eventhandler from Remote Core succesffuly - values are : **__** D/DOMX ( 7751): TRACE: Corresponding RPC function executed successfully D/DOMX ( 7751): TRACE: hComp :0x154e570,eEvent: 0x0,nData1: 0x0,nData2: 0x3,pEventData: 0x0 D/DOMX ( 7751): EXIT: eError: 0 D/DOMX ( 7751): TRACE: Just Before Entering Proxy Event handler call D/DOMX ( 7751): ENTER: hComponent=0x154e570, pCompPrv=0x1556240, eEvent=0x0, nData1=0x0, nData2=0x3, pEventData=0x0 D/DOMX ( 7751): EXIT: eError: 0 D/DOMX ( 7751): EXIT: D/DOMX ( 7751): TRACE: Waiting for messages from remote core V/camera ( 7834): surfaceChanged. w=720. h=960 D/DOMX ( 7751): ENTER: hComponent = 0x154e570, pCompPrv = 0x1556240, nParamIndex = 33554433, pParamStruct = 0x413a1ad8 D/DOMX ( 7751): ENTER: D/DOMX ( 7751): ERROR: [DBG] RPC_sendPacket_sync RPC_GetParameter:419 D/DOMX ( 7751): TRACE: Recd. omx message D/DOMX ( 7751): TRACE: Waiting for messages from remote core D/DOMX ( 7751): EXIT: D/DOMX ( 7751): TRACE: Corresponding RPC function executed successfully D/DOMX ( 7751): EXIT: eError: 0 index: 0x2000001 D/DOMX ( 7751): ENTER: hComponent = 0x154e570, pCompPrv = 0x1556240, nParamIndex = 33554433, pParamStruct = 0x413a1ad8 D/DOMX ( 7751): ERROR: [DBG] RPC_sendPacket_sync RPC_SetParameter:348 D/DOMX ( 7751): TRACE: Recd. omx message D/DOMX ( 7751): TRACE: Waiting for messages from remote core D/DOMX ( 7751): EXIT: D/DOMX ( 7751): TRACE: Corresponding RPC function executed successfully D/DOMX ( 7751): EXIT: eError: 0 D/DOMX ( 7751): ENTER: hComponent = 0x154e570, pCompPrv = 0x1556240, nParamIndex = 33554433, pParamStruct = 0x413a1ad8 D/DOMX ( 7751): ENTER: D/DOMX ( 7751): ERROR: [DBG] RPC_sendPacket_sync RPC_GetParameter:419 D/DOMX ( 7751): TRACE: Recd. omx message D/DOMX ( 7751): TRACE: Waiting for messages from remote core D/DOMX ( 7751): EXIT: D/DOMX ( 7751): TRACE: Corresponding RPC function executed successfully D/DOMX ( 7751): EXIT: eError: 0 index: 0x2000001 D/DOMX ( 7751): ENTER: hComponent = 0x154e570, pCompPrv = 0x1556240, nConfigIndex = 117440523, pConfigStruct = 0x413a1b50 D/DOMX ( 7751): ENTER: D/DOMX ( 7751): ERROR: [DBG] RPC_sendPacket_sync RPC_GetConfig:564 D/DOMX ( 7751): TRACE: Recd. omx message D/DOMX ( 7751): TRACE: Waiting for messages from remote core D/DOMX ( 7751): EXIT: D/DOMX ( 7751): TRACE: Corresponding RPC function executed successfully D/DOMX ( 7751): EXIT: eError: 0 D/DOMX ( 7751): ENTER: hComponent = 0x154e570, pCompPrv = 0x1556240, nConfigIndex = 117440523, pConfigStruct = 0x413a1b50 D/DOMX ( 7751): ENTER: D/DOMX ( 7751): ERROR: [DBG] RPC_sendPacket_sync RPC_SetConfig:496 D/DOMX ( 7751): TRACE: Recd. omx message D/DOMX ( 7751): TRACE: Waiting for messages from remote core D/DOMX ( 7751): EXIT: D/DOMX ( 7751): TRACE: Corresponding RPC function executed successfully D/DOMX ( 7751): EXIT: eError: 0 D/DOMX ( 7751): ENTER: hComponent = 0x154e570, pCompPrv = 0x1556240, nConfigIndex = 117440523, pConfigStruct = 0x413a1b50 D/DOMX ( 7751): ENTER: D/DOMX ( 7751): ERROR: [DBG] RPC_sendPacket_sync RPC_GetConfig:564 D/DOMX ( 7751): TRACE: Recd. omx message D/DOMX ( 7751): TRACE: Waiting for messages from remote core D/DOMX ( 7751): EXIT: D/DOMX ( 7751): TRACE: Corresponding RPC function executed successfully D/DOMX ( 7751): EXIT: eError: 0 D/DOMX ( 7751): ENTER: hComponent = 0x154e570, pCompPrv = 0x1556240, nParamIndex = 33554433, pParamStruct = 0x413a1ad8 D/DOMX ( 7751): ENTER: D/DOMX ( 7751): ERROR: [DBG] RPC_sendPacket_sync RPC_GetParameter:419 D/DOMX ( 7751): TRACE: Recd. omx message D/DOMX ( 7751): EXIT: D/DOMX ( 7751): TRACE: Waiting for messages from remote core D/DOMX ( 7751): TRACE: Corresponding RPC function executed successfully D/DOMX ( 7751): EXIT: eError: 0 index: 0x2000001 D/DOMX ( 7751): ENTER: hComponent = 0x154e570, pCompPrv = 0x1556240, nParamIndex = 33554433, pParamStruct = 0x413a1ad8 D/DOMX ( 7751): ERROR: [DBG] RPC_sendPacket_sync RPC_SetParameter:348 D/DOMX ( 7751): TRACE: Recd. omx message D/DOMX ( 7751): TRACE: Waiting for messages from remote core D/DOMX ( 7751): EXIT: D/DOMX ( 7751): TRACE: Corresponding RPC function executed successfully D/DOMX ( 7751): EXIT: eError: 0 D/DOMX ( 7751): ENTER: hComponent = 0x154e570, pCompPrv = 0x1556240, nParamIndex = 33554433, pParamStruct = 0x413a1ad8 D/DOMX ( 7751): ENTER: D/DOMX ( 7751): ERROR: [DBG] RPC_sendPacket_sync RPC_GetParameter:419 D/DOMX ( 7751): TRACE: Recd. omx message D/DOMX ( 7751): TRACE: Waiting for messages from remote core D/DOMX ( 7751): EXIT: D/DOMX ( 7751): TRACE: Corresponding RPC function executed successfully D/DOMX ( 7751): EXIT: eError: 0 index: 0x2000001 D/DOMX ( 7751): ENTER: hComponent = 0x154e570, pCompPrv = 0x1556240, nConfigIndex = 2130706541, pConfigStruct = 0x413a1b58 D/DOMX ( 7751): ENTER: D/DOMX ( 7751): ERROR: [DBG] RPC_sendPacket_sync RPC_SetConfig:496 D/DOMX ( 7751): TRACE: Recd. omx message D/DOMX ( 7751): TRACE: Waiting for messages from remote core D/DOMX ( 7751): EXIT: D/DOMX ( 7751): TRACE: Corresponding RPC function executed successfully D/DOMX ( 7751): EXIT: eError: 0 D/DOMX ( 7751): ENTER: hComponent = 0x154e570, pCompPrv = 0x1556240, eCmd = 3, nParam = 2, pCmdData = 0x0 D/DOMX ( 7751): ENTER: D/DOMX ( 7751): ERROR: [DBG] RPC_sendPacket_sync RPC_SendCommand:644 D/DOMX ( 7751): TRACE: Recd. omx message D/DOMX ( 7751): TRACE: Waiting for messages from remote core D/DOMX ( 7751): EXIT: D/DOMX ( 7751): TRACE: Corresponding RPC function executed successfully D/DOMX ( 7751): EXIT: eError: 0 D/DOMX ( 7751): ENTER: hComponent = 0x154e570, pCompPrv = 0x1556240, nParamIndex = 2130706545, pParamStruct = 0x413a1ba0 D/DOMX ( 7751): TRACE: Corresponding RPC function executed successfully D/DOMX ( 7751): EXIT: eError: 0 D/DOMX ( 7751): ENTER: hComponent = 0x154e570, pCompPrv = 0x1556240, nPortIndex = 0x2, pAppPrivate = 0x0, nSizeBytes = 1142784, pBuffer = 0x154a580 D/DOMX ( 7751): TRACE: In UB, no. of buffers = 0 D/DOMX ( 7751): TRACE: Preparing buffer to Remote Core... D/DOMX ( 7751): ENTER: D/DOMX ( 7751): ERROR: [DBG] RPC_sendPacket_sync RPC_GetParameter:419 D/DOMX ( 7751): TRACE: Recd. omx message D/DOMX ( 7751): TRACE: Waiting for messages from remote core D/DOMX ( 7751): EXIT: D/DOMX ( 7751): TRACE: Corresponding RPC function executed successfully D/DOMX ( 7751): ERROR: [DBG] eError = 0, line 1037 D/DOMX ( 7751): ENTER: D/DOMX ( 7751): ENTER: D/DOMX ( 7751): ERROR: [DBG] RPC_sendPacket_sync RPC_GetParameter:419 D/DOMX ( 7751): TRACE: Recd. omx message D/DOMX ( 7751): TRACE: Waiting for messages from remote core D/DOMX ( 7751): EXIT: D/DOMX ( 7751): TRACE: PROXY_UTIL Get Parameter Successful D/DOMX ( 7751): ENTER: D/DOMX ( 7751): ERROR: [DBG] RPC_sendPacket_sync RPC_GetParameter:419 D/DOMX ( 7751): TRACE: Recd. omx message D/DOMX ( 7751): TRACE: Waiting for messages from remote core D/DOMX ( 7751): EXIT: D/DOMX ( 7751): TRACE: PROXY_UTIL Get Parameter Successful D/DOMX ( 7751): TRACE: Port Number: 2 :: NumOfLines 720 D/DOMX ( 7751): EXIT: eError: 0 D/DOMX ( 7751): ERROR: [DBG] eError = 0, line 1047 D/DOMX ( 7751): ENTER: hComponent = 0x154e570, pCompPrv = 0x1556240, nParamIndex = 2130706550, pParamStruct = 0x413a1b34 D/DOMX ( 7751): ENTER: D/DOMX ( 7751): ERROR: [DBG] RPC_sendPacket_sync RPC_GetParameter:419 D/DOMX ( 7751): TRACE: Recd. omx message D/DOMX ( 7751): TRACE: Waiting for messages from remote core D/DOMX ( 7751): EXIT: D/DOMX ( 7751): TRACE: Corresponding RPC function executed successfully D/DOMX ( 7751): EXIT: eError: 0 index: 0x7f000076 D/DOMX ( 7751): ERROR: [DBG] eError = 0, line 1116 D/DOMX ( 7751): TRACE: Metadata size = 12332 D/DOMX ( 7751): TRACE: ion_fd=70 D/DOMX ( 7751): TRACE: ION being USED for allocation!!!!! handle = c3e30380, ret =0 D/DOMX ( 7751): ERROR: [DBG] eError = 0, line 1130 D/DOMX ( 7751): TRACE: Metadata buffer ion handle = c3e30380 D/DOMX ( 7751): ENTER: D/DOMX ( 7751): TRACE: Marshaling data D/DOMX ( 7751): TRACE: eMapInfo = 3 D/DOMX ( 7751): TRACE: UV buffer fd= 3141592 D/DOMX ( 7751): TRACE: Metadata buffer = c3e30380 D/DOMX ( 7751): TRACE: About to send packet D/DOMX ( 7751): TRACE: RPC_sendPacket_sync hCtx->fd_omx=26|nPacketSize=240 D/DOMX ( 7751): ERROR: [DBG] RPC_sendPacket_sync RPC_UseBuffer:1080 D/DOMX ( 7751): ERROR: [DBG] RPC_sendPacket_sync write errno error 22 D/DOMX ( 7751): ERROR: DOMX Write failed 0xffffffff -1 D/DOMX ( 7751): ERROR: failed check:status >= 0 - returning error: 0x81001 - Write failed D/DOMX ( 7751): EXIT: D/DOMX ( 7751): ERROR: RPC function returned error 0x81001 D/DOMX ( 7751): TRACE: Use Buffer Successful D/DOMX ( 7751): TRACE: Value of pBufHeaderRemote: 0x0 LocalBufferHdr :0x15714e8, LocalBuffer :0x154a580 D/DOMX ( 7751): TRACE: Metadata buffer ion handle given to ion map = c3e30380 D/DOMX ( 7751): TRACE: Updating no. of buffer to 1 D/DOMX ( 7751): ERROR: [DBG] eError = -2147479551, line 1192 D/DOMX ( 7751): EXIT: eError: -2147479551 E/CameraHAL( 7751): OMX_UseBuffer-0x80001001 E/CameraHAL( 7751): Exiting function UseBuffersPreview because of ret 0 eError=80001001 D/DOMX ( 7751): ENTER: hComponent = 0x154e570 E/ion ( 7751): ioctl -1073460991 failed with code -1: Bad file number F/libc ( 7751): @@@ ABORTING: INVALID HEAP ADDRESS IN dlfree F/libc ( 7751): Fatal signal 11 (SIGSEGV) at 0xdeadbaad (code=1) I/Process ( 189): Sending signal. PID: 7834 SIG: 3 I/dalvikvm( 7834): threadid=3: reacting to signal 3 I/dalvikvm( 7834): Wrote stack traces to '/data/anr/traces.txt' I/DEBUG ( 127): *** *** *** *** *** *** *** *** *** *** *** *** *** *** *** *** I/DEBUG ( 127): Build fingerprint: 'google/yakju/maguro:4.0.4/IMM76I/330937:user/release-keys' I/DEBUG ( 127): pid: 7751, tid: 7758 >>> /system/bin/mediaserver <<< I/DEBUG ( 127): signal 11 (SIGSEGV), code 1 (SEGV_MAPERR), fault addr deadbaad I/DEBUG ( 127): r0 deadbaad r1 00000001 r2 a0000000 r3 00000000 I/DEBUG ( 127): r4 00000000 r5 00000027 r6 401342f4 r7 401424d4 I/DEBUG ( 127): r8 01571540 r9 40fe1000 10 0155f9a0 fp 01570e5c I/DEBUG ( 127): ip ffffffff sp 413a19c0 lr 40115441 pc 40111788 cpsr 600f0030 I/DEBUG ( 127): d0 656c696620646120 d1 373565343531786e I/DEBUG ( 127): d2 6c202c3135353975 d3 3239313120656e6d I/DEBUG ( 127): d4 7264487265666675 d5 3137353178303a20 I/DEBUG ( 127): d6 636f4c202c386534 d7 7265666675426c61 I/DEBUG ( 127): d8 0000000000000000 d9 0000000000000000 I/DEBUG ( 127): d10 0000000000000000 d11 0000000000000000 I/DEBUG ( 127): d12 0000000000000000 d13 0000000000000000 I/DEBUG ( 127): d14 0000000000000000 d15 0000000000000000 I/DEBUG ( 127): d16 3f7316d1d399f1e0 d17 3ffd42315763b9eb I/DEBUG ( 127): d18 4000000000000000 d19 3fc5ee7544e230aa I/DEBUG ( 127): d20 3f1152f62f5a4167 d21 bebbb7b7df4a3093 I/DEBUG ( 127): d22 3ff0000000000000 d23 3ff316d1d399f1e0 I/DEBUG ( 127): d24 3e66376972bea4d0 d25 3fee147ae0000000 I/DEBUG ( 127): d26 0000000000000000 d27 0000000000000000 I/DEBUG ( 127): d28 0000000000000000 d29 0000000000000000 I/DEBUG ( 127): d30 0000000000000000 d31 0000000000000000 I/DEBUG ( 127): scr 68000010 I/DEBUG ( 127): I/DEBUG ( 127): #00 pc 00017788 /system/lib/libc.so I/DEBUG ( 127): #01 pc 00013732 /system/lib/libc.so I/DEBUG ( 127): #02 pc 00015a70 /system/lib/libc.so (dlfree) I/DEBUG ( 127): #03 pc 00016100 /system/lib/libc.so (free) I/DEBUG ( 127): #04 pc 000019e6 /system/lib/libmm_osal.so (TIMM_OSAL_Free) I/DEBUG ( 127): #05 pc 00006446 /system/lib/libdomx.so (PROXY_ComponentDeInit) I/DEBUG ( 127): #06 pc 000018ec /system/lib/libOMX.TI.DUCATI1.VIDEO.CAMERA.so I/DEBUG ( 127): #07 pc 00001df6 /system/lib/libOMX_Core.so (OMX_FreeHandle) I/DEBUG ( 127): #08 pc 000284fc /system/lib/hw/camera.omap4.so (_ZN7android16OMXCameraAdapter24performCleanupAfterErrorEv) I/DEBUG ( 127): #09 pc 0002b04e /system/lib/hw/camera.omap4.so (_ZN7android16OMXCameraAdapter17UseBuffersPreviewEPvi) I/DEBUG ( 127): #10 pc 0002b182 /system/lib/hw/camera.omap4.so (_ZN7android16OMXCameraAdapter10useBuffersENS_13CameraAdapter10CameraModeEPvijj) I/DEBUG ( 127): #11 pc 00024c4c /system/lib/hw/camera.omap4.so (_ZN7android17BaseCameraAdapter11sendCommandENS_13CameraAdapter14CameraCommandsEiii) I/DEBUG ( 127): #12 pc 0001d3d0 /system/lib/hw/camera.omap4.so (_ZN7android9CameraHal12startPreviewEv) I/DEBUG ( 127): #13 pc 0001d6de /system/lib/hw/camera.omap4.so (_ZN7android9CameraHal16setPreviewWindowEP18preview_stream_ops) I/DEBUG ( 127): #14 pc 0001ae80 /system/lib/hw/camera.omap4.so (_Z25camera_set_preview_windowP13camera_deviceP18preview_stream_ops) I/DEBUG ( 127): #15 pc 000076cc /system/lib/libcameraservice.so I/DEBUG ( 127): #16 pc 000091b4 /system/lib/libcameraservice.so (_ZN7android13CameraService6Client16setPreviewWindowERKNS_2spINS_7IBinderEEERKNS2_I13ANativeWindowEE) I/DEBUG ( 127): #17 pc 000092ea /system/lib/libcameraservice.so (_ZN7android13CameraService6Client17setPreviewDisplayERKNS_2spINS_7SurfaceEEE) I/DEBUG ( 127): #18 pc 00013592 /system/lib/libcamera_client.so (_ZN7android8BnCamera10onTransactEjRKNS_6ParcelEPS1_j) I/DEBUG ( 127): #19 pc 00017f44 /system/lib/libbinder.so (_ZN7android7BBinder8transactEjRKNS_6ParcelEPS1_j) I/DEBUG ( 127): #20 pc 0001b26e /system/lib/libbinder.so (_ZN7android14IPCThreadState14executeCommandEi) I/DEBUG ( 127): #21 pc 0001b44a /system/lib/libbinder.so (_ZN7android14IPCThreadState14joinThreadPoolEb) I/DEBUG ( 127): #22 pc 00020744 /system/lib/libbinder.so I/DEBUG ( 127): #23 pc 00022a1e /system/lib/libutils.so (_ZN7android6Thread11_threadLoopEPv) I/DEBUG ( 127): #24 pc 00023064 /system/lib/libutils.so I/DEBUG ( 127): #25 pc 00012e2c /system/lib/libc.so (__thread_entry) I/DEBUG ( 127): #26 pc 0001295c /system/lib/libc.so (pthread_create) I/DEBUG ( 127): I/DEBUG ( 127): code around pc: I/DEBUG ( 127): 40111768 4623b15c 2c006824 e026d1fb b12368db \.#F$h.,..&..h#. I/DEBUG ( 127): 40111778 21014a17 6011447a 48124798 24002527 .J.!zD.`.G.H'%.$ I/DEBUG ( 127): 40111788 f7f47005 2106ef8c e838f7f6 460aa901 .p.....!..8....F I/DEBUG ( 127): 40111798 f04f2006 94015380 94029303 ebe4f7f5 . O..S.......... I/DEBUG ( 127): 401117a8 4622a905 f7f52002 f7f4ebee 2106ef78 .."F. ......x..! I/DEBUG ( 127): I/DEBUG ( 127): code around lr: I/DEBUG ( 127): 40115420 41f0e92d 46804c0c 447c2600 68a56824 -..A.L.F.&|D$h.h I/DEBUG ( 127): 40115430 e0076867 300cf9b5 dd022b00 47c04628 gh.....0.+..(F.G I/DEBUG ( 127): 40115440 35544306 37fff117 6824d5f4 d1ee2c00 .CT5...7..$h.,.. I/DEBUG ( 127): 40115450 e8bd4630 bf0081f0 000280be 41f0e92d 0F..........-..A I/DEBUG ( 127): 40115460 fb01b086 9004f602 461f4815 4615460c .........H.F.F.F I/DEBUG ( 127): I/DEBUG ( 127): memory map around addr deadbaad: I/DEBUG ( 127): bede2000-bee03000 [stack] I/DEBUG ( 127): (no map for address) I/DEBUG ( 127): ffff0000-ffff1000 [vectors] I/DEBUG ( 127): I/DEBUG ( 127): stack: I/DEBUG ( 127): 413a1980 00000001 I/DEBUG ( 127): 413a1984 413a19c0 I/DEBUG ( 127): 413a1988 4013d7e0 /system/lib/libc.so I/DEBUG ( 127): 413a198c 0000000c I/DEBUG ( 127): 413a1990 4013d780 /system/lib/libc.so I/DEBUG ( 127): 413a1994 4013d718 /system/lib/libc.so I/DEBUG ( 127): 413a1998 00000000 I/DEBUG ( 127): 413a199c 40115441 /system/lib/libc.so I/DEBUG ( 127): 413a19a0 00000000 I/DEBUG ( 127): 413a19a4 413a19d4 I/DEBUG ( 127): 413a19a8 401342f4 /system/lib/libc.so I/DEBUG ( 127): 413a19ac 401424d4 I/DEBUG ( 127): 413a19b0 01571540 [heap] I/DEBUG ( 127): 413a19b4 401145ad /system/lib/libc.so I/DEBUG ( 127): 413a19b8 df0027ad I/DEBUG ( 127): 413a19bc 00000000 I/DEBUG ( 127): #00 413a19c0 413a19bc I/DEBUG ( 127): 413a19c4 00000001 I/DEBUG ( 127): 413a19c8 401342d8 /system/lib/libc.so I/DEBUG ( 127): 413a19cc 00000005 I/DEBUG ( 127): 413a19d0 413a19ec I/DEBUG ( 127): 413a19d4 fffffbdf I/DEBUG ( 127): 413a19d8 413a19ec I/DEBUG ( 127): 413a19dc 413a19ec I/DEBUG ( 127): 413a19e0 401377f4 /system/lib/libc.so I/DEBUG ( 127): 413a19e4 4010d737 /system/lib/libc.so I/DEBUG ( 127): #01 413a19e8 01571560 [heap] I/DEBUG ( 127): 413a19ec 20404040 I/DEBUG ( 127): 413a19f0 524f4241 I/DEBUG ( 127): 413a19f4 474e4954 I/DEBUG ( 127): 413a19f8 4e49203a I/DEBUG ( 127): 413a19fc 494c4156 I/DEBUG ( 127): 413a1a00 45482044 I/DEBUG ( 127): 413a1a04 41205041 /dev/snd/pcmC0D0p I/DEBUG ( 127): 413a1a08 45524444 I/DEBUG ( 127): 413a1a0c 49205353 I/DEBUG ( 127): 413a1a10 6c64204e I/DEBUG ( 127): 413a1a14 65657266 I/DEBUG ( 127): 413a1a18 00000000 I/DEBUG ( 127): 413a1a1c 17f80cb3 I/DEBUG ( 127): 413a1a20 00000000 I/DEBUG ( 127): 413a1a24 00000060 I/DEBUG ( 127): 413a1a28 40fa4b13 /system/lib/libdomx.so I/DEBUG ( 127): 413a1a2c 40fa7c7d /system/lib/libdomx.so I/DEBUG ( 127): 413a1a30 00000020 I/DEBUG ( 127): 413a1a34 40f95340 /system/lib/libmm_osal.so I/DEBUG ( 127): 413a1a38 ffffffff I/DEBUG ( 127): 413a1a3c 02000001 I/DEBUG ( 127): 413a1a40 000000fb I/DEBUG ( 127): 413a1a44 401424d4 I/DEBUG ( 127): 413a1a48 01571568 [heap] I/DEBUG ( 127): 413a1a4c 00000000 I/DEBUG ( 127): 413a1a50 00000000 I/DEBUG ( 127): 413a1a54 401424d4 I/DEBUG ( 127): 413a1a58 7f000076 I/DEBUG ( 127): 413a1a5c 4010ec25 /system/lib/libc.so I/DEBUG ( 127): 413a1a60 01571560 [heap] I/DEBUG ( 127): 413a1a64 01571658 [heap] I/DEBUG ( 127): 413a1a68 000000fb I/DEBUG ( 127): 413a1a6c 401424d4 I/DEBUG ( 127): 413a1a70 01571568 [heap] I/DEBUG ( 127): 413a1a74 00000000 I/DEBUG ( 127): 413a1a78 8060f290 I/DEBUG ( 127): 413a1a7c 401424d4 I/DEBUG ( 127): 413a1a80 00000002 I/DEBUG ( 127): 413a1a84 4010ec25 /system/lib/libc.so I/DEBUG ( 127): 413a1a88 01571560 [heap] I/DEBUG ( 127): 413a1a8c 01571658 [heap] I/DEBUG ( 127): 413a1a90 00006288 I/DEBUG ( 127): 413a1a94 401424d4 I/DEBUG ( 127): 413a1a98 01571568 [heap] I/DEBUG ( 127): 413a1a9c 0157157c [heap] I/DEBUG ( 127): 413a1aa0 00000002 I/DEBUG ( 127): 413a1aa4 4010fa89 /system/lib/libc.so I/DEBUG ( 127): 413a1aa8 015714e8 [heap] I/DEBUG ( 127): 413a1aac 01571568 [heap] I/DEBUG ( 127): 413a1ab0 80001001 I/DEBUG ( 127): 413a1ab4 00000003 I/DEBUG ( 127): 413a1ab8 00000046 I/DEBUG ( 127): 413a1abc 413a1acc I/DEBUG ( 127): 413a1ac0 015714e0 [heap] I/DEBUG ( 127): 413a1ac4 01571538 [heap] I/DEBUG ( 127): 413a1ac8 00006308 I/DEBUG ( 127): 413a1acc 401424d4 I/DEBUG ( 127): 413a1ad0 015714e8 [heap] I/DEBUG ( 127): 413a1ad4 40fa8ae1 /system/lib/libdomx.so I/DEBUG ( 127): 413a1ad8 40143280 I/DEBUG ( 127): 413a1adc 4011c8ad /system/lib/libc.so I/DEBUG ( 127): 413a1ae0 01556240 [heap] I/DEBUG ( 127): 413a1ae4 01556240 [heap] I/DEBUG ( 127): 413a1ae8 00000000 I/DEBUG ( 127): 413a1aec 17f80cb3 I/DEBUG ( 127): 413a1af0 01571538 [heap] I/DEBUG ( 127): 413a1af4 01556240 [heap] I/DEBUG ( 127): 413a1af8 00000000 I/DEBUG ( 127): 413a1afc 4010fa75 /system/lib/libc.so I/Process ( 189): Sending signal. PID: 7834 SIG: 3 I/dalvikvm( 7834): threadid=3: reacting to signal 3 I/dalvikvm( 7834): Wrote stack traces to '/data/anr/traces.txt' W/AudioTrack( 7751): obtainBuffer timed out (is the CPU pegged?) 0x154a940 user=00150740, server=0014f800 I/Process ( 189): Sending signal. PID: 7834 SIG: 3 I/dalvikvm( 7834): threadid=3: reacting to signal 3 I/dalvikvm( 7834): Wrote stack traces to '/data/anr/traces.txt' I/Process ( 189): Sending signal. PID: 7834 SIG: 3 I/dalvikvm( 7834): threadid=3: reacting to signal 3 I/dalvikvm( 7834): Wrote stack traces to '/data/anr/traces.txt' W/AudioTrack( 7751): obtainBuffer timed out (is the CPU pegged?) 0x154a940 user=00150740, server=0014f800 I/Process ( 189): Sending signal. PID: 7834 SIG: 3 I/dalvikvm( 7834): threadid=3: reacting to signal 3 I/dalvikvm( 7834): Wrote stack traces to '/data/anr/traces.txt' I/Process ( 189): Sending signal. PID: 7834 SIG: 3 I/dalvikvm( 7834): threadid=3: reacting to signal 3 I/dalvikvm( 7834): Wrote stack traces to '/data/anr/traces.txt' W/AudioTrack( 7751): obtainBuffer timed out (is the CPU pegged?) 0x154a940 user=00150740, server=0014f800 I/Process ( 189): Sending signal. PID: 7834 SIG: 3 I/dalvikvm( 7834): threadid=3: reacting to signal 3 I/dalvikvm( 7834): Wrote stack traces to '/data/anr/traces.txt' W/AudioSystem( 189): AudioFlinger server died! W/AudioSystem( 189): AudioPolicyService server died! I/ServiceManager( 122): service 'media.audio_flinger' died I/ServiceManager( 122): service 'media.player' died I/ServiceManager( 122): service 'media.camera' died I/ServiceManager( 122): service 'media.audio_policy' died W/IMediaDeathNotifier( 723): media server died E/MediaPlayer( 723): error (100, 0) W/Camera ( 7834): Camera server died! W/Camera ( 7834): ICamera died E/MediaPlayer( 723): Error (100,0) E/VanillaMusic( 723): MediaPlayer error: 100 0 I/ActivityManager( 189): Displayed com.android.camera/.Camera: +4s446ms D/CameraStorage( 7834): External storage state=mounted I/Thumbnail( 7834): Fail to load bitmap. java.io.FileNotFoundException: /data/data/com.android.camera/files/last_thumb: open failed: ENOENT (No such file or directory) E/Camera ( 7834): Error 100 E/CameraErrorCallback( 7834): Got camera error callback. error=100 D/AndroidRuntime( 7834): Shutting down VM W/dalvikvm( 7834): threadid=1: thread exiting with uncaught exception (group=0x40a411f8) I/ ( 7873): ServiceManager: 0x959958 E/SRS-Client( 7873): OpenClient_RILD D/SRS-Client( 7873): Unsolicited handler isn't implemented yet! I/AudioFlinger( 7873): Loaded primary audio interface from Tuna audio HW HAL (audio) I/AudioFlinger( 7873): Using 'Tuna audio HW HAL' (audio.primary) as the primary audio interface I/AudioFlinger( 7873): Loaded a2dp audio interface from A2DP Audio HW HAL (audio) I/CameraService( 7873): CameraService started (pid=7873) I/AudioFlinger( 7873): AudioFlinger's thread 0x960400 ready to run I/AudioPolicyService( 7873): Loaded audio policy from LEGACY Audio Policy HAL (audio_policy) I/Process ( 189): Sending signal. PID: 7834 SIG: 3 I/dalvikvm( 7834): threadid=3: reacting to signal 3 I/dalvikvm( 7834): Wrote stack traces to '/data/anr/traces.txt' E/AudioService( 189): Media server died. E/AudioService( 189): Media server started. W/AudioPolicyManagerBase( 7873): setPhoneState() setting same state 0
The interesting part in all that noise is the following:
D/DOMX ( 7751): ERROR: [DBG] RPC_sendPacket_sync write errno error 22 D/DOMX ( 7751): ERROR: DOMX Write failed 0xffffffff -1
#define RPC_sendPacket_sync(hCtx, pPacket, nPacketSize, nFxnIdx, pRetPacket, nSize) do { \
DOMX_ERROR("[DBG] RPC_sendPacket_sync %s:%d",__func__,__LINE__); \
status = write(hCtx->fd_omx, pPacket, nPacketSize); \
if (status == -1){ \
int errsv = errno; \
DOMX_ERROR("[DBG] RPC_sendPacket_sync write errno error %d",errsv); \
} \
RPC_freePacket(pPacket); \
pPacket = NULL; \
if(status < 0 ) DOMX_ERROR("DOMX Write failed 0x%x %d",status,status); \
RPC_assert(status >= 0, RPC_OMX_ErrorUndefined, "Write failed"); \
eError = TIMM_OSAL_ReadFromPipe(hCtx->pMsgPipe[nFxnIdx], &pRetPacket, \
RPC_MSG_SIZE_FOR_PIPE, (TIMM_OSAL_U32 *)(&nSize), TIMM_OSAL_SUSPEND); \
RPC_assert(eError == TIMM_OSAL_ERR_NONE, eError, \
"Read failed"); \
} while(0)
root@android:/ # dmesg <6>[ 105.768157] max17040 4-0036: online = 1 vcell = 4200000 soc = 100 status = 4 health = 1 temp = 380 charger status = 1 <6>[ 108.557067] request_suspend_state: wakeup (3->0) at 108550701674 (2012-11-02 19:41:27.498122569 UTC) <6>[ 108.558135] DSSCOMP: dsscomp_late_resume <6>[ 109.513000] vibrator: value=20, pwmval=127 <6>[ 109.872772] vibrator: value=20, pwmval=127 <6>[ 110.213806] vibrator: value=20, pwmval=127 <6>[ 110.543334] omap-iommu omap-iommu.0: iommu_get: ducati qos_request <4>[ 110.557281] omap_hwmod: ipu: failed to hardreset <6>[ 110.560150] omap-iommu omap-iommu.0: ducati: version 2.1 <6>[ 110.733123] sr_class1p5_calib_work: core: Calibration complete: Voltage:Nominal=1250000,Calib=1038160,margin=13000 <6>[ 111.117462] PVR_K:(Error): GetHandleStructure: Handle index out of range (1835561824 >= 0) [454, /home/gnutoo/embedded/android/replicant-4.0/kernel/samsung/tuna/drivers/gpu/pvr/handle.c] <6>[ 111.117584] PVR_K:(Error): PVRSRVLookupHandle: Error looking up handle (149) [1407, /home/gnutoo/embedded/android/replicant-4.0/kernel/samsung/tuna/drivers/gpu/pvr/handle.c] <6>[ 111.117706] PVR_K:(Error): PVRSRVExportFDToIONHandle: Failed to look up MEM_INFO handle [78, /home/gnutoo/embedded/android/replicant-4.0/kernel/samsung/tuna/drivers/gpu/pvr/ion.c] <6>[ 114.291107] binder: release 138:532 transaction 8079 in, still active <6>[ 114.291168] binder: send failed reply for transaction 8079 to 814:814 <4>[ 116.686065] sr_class1p5_calib_work: iva Stop sampling: Voltage Nominal=950000 samples=18 <6>[ 116.686309] sr_class1p5_calib_work: iva: Calibration complete: Voltage:Nominal=950000,Calib=860920,margin=13000 <3>[ 119.851684] omap-rproc omap-rproc.1: rproc_watchdog_isr <6>[ 119.851959] omap_rproc_dump_registers: REGISTER DUMP FOR REMOTEPROC ipu <6>[ 119.852264] omap_rproc_dump_registers: PC is at 002a5006 <6>[ 119.852416] omap_rproc_dump_registers: LR is at 002a5007 <6>[ 119.852722] omap_rproc_dump_registers: pc : [<002a5006>] lr : [<002a5007>] psr: 61000000 <6>[ 119.852752] sp : 806041e8 ip : 806041a8 fp : 802b839c <6>[ 119.853210] omap_rproc_dump_registers: r10: 802a5f27 r9 : 0000804f r8 : 00000000 <6>[ 119.853515] omap_rproc_dump_registers: r7 : 00000137 r6 : 00000000 r5 : 80604214 r4 : 00254a3c <6>[ 119.853698] omap_rproc_dump_registers: r3 : 00000000 r2 : 9f070000 r1 : 00000010 r0 : 00000000 <6>[ 119.854003] omap_rproc_dump_registers: Flags: nZCv IRQs on FIQs on <6>[ 119.854675] _event_notify: remoteproc: ipu has crashed <3>[ 119.854827] rpmsg_rproc_error: Fatal error in ipu <3>[ 119.855133] rpmsg_rproc_error: Fatal error in ipu <3>[ 119.855316] rpmsg_reset_work: reseting virtio device 0 <6>[ 119.855682] rpmsg_resmgr rpmsg0: Enter rprm_remove <6>[ 119.862121] rpmsg_omx rpmsg-omx0: rpmsg omx driver is removed <3>[ 119.866668] rpmsg_reset_work: reseting virtio device 1 <6>[ 119.866912] rpmsg_resmgr rpmsg2: Enter rprm_remove <6>[ 119.868988] rpmsg_omx rpmsg-omx1: rpmsg omx driver is removed <4>[ 119.870544] rproc_reset_poolmem: invalid pool <6>[ 119.870819] omap-rproc omap-rproc.1: stopped remote processor ipu <6>[ 119.873626] omap-rproc omap-rproc.1: powering up ipu <6>[ 119.873962] virtio_rpmsg_bus virtio2: rpmsg backend virtproc probed successfully <6>[ 119.874877] virtio_rpmsg_bus virtio3: rpmsg backend virtproc probed successfully <6>[ 119.915710] omap-rproc omap-rproc.1: Loaded BIOS image ducati-m3.bin, size 4511300 <6>[ 119.915893] omap-rproc omap-rproc.1: BIOS image version is 2 <6>[ 119.927490] omap-iommu omap-iommu.0: iommu_get: ducati qos_request <4>[ 119.941894] omap_hwmod: ipu: failed to hardreset <6>[ 119.943176] omap-iommu omap-iommu.0: ducati: version 2.1 <6>[ 119.952117] omap-rproc omap-rproc.1: remote processor ipu is now up <6>[ 119.965270] omap_rpmsg_mbox_callback: received echo reply from ipu ! <6>[ 119.965393] omap_rpmsg_mbox_callback: received echo reply from ipu ! <6>[ 119.965545] omap_rpmsg_mbox_callback: received echo reply from ipu ! <6>[ 119.965637] omap_rpmsg_mbox_callback: received echo reply from ipu ! <6>[ 119.965820] virtio_rpmsg_bus virtio2: creating channel rpmsg-client-sample addr 0x32 <6>[ 119.966125] virtio_rpmsg_bus virtio2: creating channel rpmsg-client-sample addr 0x33 <6>[ 119.966400] virtio_rpmsg_bus virtio2: creating channel rpmsg-omx addr 0x3c <6>[ 119.966827] rpmsg_omx rpmsg-omx0: new OMX connection srv channel: 1024 -> 60! <6>[ 121.112823] virtio_rpmsg_bus virtio3: creating channel rpmsg-omx addr 0x3c <6>[ 121.116668] rpmsg_omx rpmsg-omx1: new OMX connection srv channel: 1024 -> 60!
Disabling the pvr driver with:
diff --git a/arch/arm/configs/cyanogenmod_tuna_defconfig b/arch/arm/configs/cyanogenmod_tuna_defconfig index 1a060a2..a9e3990 100644 --- a/arch/arm/configs/cyanogenmod_tuna_defconfig +++ b/arch/arm/configs/cyanogenmod_tuna_defconfig @@ -1,6 +1,6 @@ # # Automatically generated make config: don't edit -# Linux/arm 3.0.34 Kernel Configuration +# Linux/arm 3.0.36 Kernel Configuration # CONFIG_ARM=y CONFIG_HAVE_PWM=y @@ -70,6 +70,7 @@ CONFIG_GENERIC_IRQ_CHIP=y # RCU Subsystem # CONFIG_TREE_PREEMPT_RCU=y +# CONFIG_TINY_RCU is not set CONFIG_PREEMPT_RCU=y # CONFIG_RCU_TRACE is not set CONFIG_RCU_FANOUT=32 @@ -583,6 +584,8 @@ CONFIG_INET_DIAG=y CONFIG_INET_TCP_DIAG=y # CONFIG_TCP_CONG_ADVANCED is not set CONFIG_TCP_CONG_CUBIC=y +# CONFIG_DEFAULT_CUBIC is not set +# CONFIG_DEFAULT_RENO is not set CONFIG_DEFAULT_TCP_CONG="cubic" # CONFIG_TCP_MD5SIG is not set CONFIG_IPV6=y @@ -785,6 +788,9 @@ CONFIG_IP6_NF_RAW=y # CONFIG_BRIDGE_NF_EBTABLES is not set # CONFIG_IP_DCCP is not set # CONFIG_IP_SCTP is not set +# CONFIG_SCTP_HMAC_NONE is not set +# CONFIG_SCTP_HMAC_SHA1 is not set +# CONFIG_SCTP_HMAC_MD5 is not set # CONFIG_RDS is not set # CONFIG_TIPC is not set # CONFIG_ATM is not set @@ -917,6 +923,8 @@ CONFIG_CFG80211_DEFAULT_PS=y # CONFIG_LIB80211 is not set CONFIG_CFG80211_ALLOW_RECONNECT=y # CONFIG_MAC80211 is not set +# CONFIG_MAC80211_RC_DEFAULT_PID is not set +# CONFIG_MAC80211_RC_DEFAULT_MINSTREL is not set # CONFIG_WIMAX is not set CONFIG_RFKILL=y CONFIG_RFKILL_PM=y @@ -1204,6 +1212,9 @@ CONFIG_WLAN=y # CONFIG_USB_NET_RNDIS_WLAN is not set CONFIG_WIFI_CONTROL_FUNC=y # CONFIG_ATH_COMMON is not set +# CONFIG_B43LEGACY_DMA_AND_PIO_MODE is not set +# CONFIG_B43LEGACY_DMA_MODE is not set +# CONFIG_B43LEGACY_PIO_MODE is not set # CONFIG_BCM4329 is not set CONFIG_BCMDHD=y CONFIG_BCMDHD_FW_PATH="/system/vendor/firmware/fw_bcmdhd.bin" @@ -1688,24 +1699,13 @@ CONFIG_TILER_ENABLE_USERSPACE=y # Graphics support # # CONFIG_DRM is not set -CONFIG_PVR_SGX=y -CONFIG_PVR_SGXCORE_540=y -CONFIG_PVR_BUILD_RELEASE=y +# CONFIG_PVR_SGX is not set +# CONFIG_PVR_SGXCORE_540 is not set +# CONFIG_PVR_BUILD_RELEASE is not set # CONFIG_PVR_BUILD_DEBUG is not set -CONFIG_PVR_NEED_PVR_DPF=y -CONFIG_PVR_NEED_PVR_ASSERT=y -CONFIG_PVR_PERCONTEXT_PB=y -CONFIG_PVR_ACTIVE_POWER_MANAGEMENT=y -CONFIG_PVR_ACTIVE_POWER_LATENCY_MS=100 -CONFIG_PVR_SGX_LOW_LATENCY_SCHEDULING=y -CONFIG_PVR_USSE_EDM_STATUS_DEBUG=y -CONFIG_PVR_DUMP_MK_TRACE=y -# CONFIG_PVR_PDUMP is not set -CONFIG_PVR_OMAP_DSS2=y # CONFIG_SGX_DVFS_MODE_NONE is not set # CONFIG_SGX_DVFS_MODE_LINEAR is not set -CONFIG_SGX_DVFS_MODE_OPTIMIZED=y -CONFIG_SGX_DVFS_IDLE_TIMEOUT=1000 +# CONFIG_SGX_DVFS_MODE_OPTIMIZED is not set CONFIG_ION=y CONFIG_ION_OMAP=y # CONFIG_VGASTATE is not set @@ -1734,10 +1734,13 @@ CONFIG_FB_MODE_HELPERS=y # Frame buffer hardware drivers # # CONFIG_FB_S1D13XXX is not set +# CONFIG_FB_CARMINE_DRAM_EVAL is not set +# CONFIG_CARMINE_DRAM_CUSTOM is not set # CONFIG_FB_TMIO is not set # CONFIG_FB_UDL is not set # CONFIG_FB_VIRTUAL is not set # CONFIG_FB_METRONOME is not set +# CONFIG_FB_MB862XX_PCI_GDC is not set # CONFIG_FB_BROADSHEET is not set CONFIG_HDMI_TI_4XXX_IP=y CONFIG_SII9234=y @@ -1765,7 +1768,6 @@ CONFIG_FB_OMAP2_NUM_FBS=3 CONFIG_PANEL_S6E8AA0=y # CONFIG_PANEL_TAAL is not set CONFIG_COLOR_HACK=y -CONFIG_DSSCOMP=y CONFIG_DSSCOMP_DEBUG_LOG=y CONFIG_OMAP4_HDCP=y # CONFIG_OMAP4_HDCP_DEBUG is not set @@ -2094,6 +2096,12 @@ CONFIG_USB_GADGET_SELECTED=y # CONFIG_USB_GADGET_R8A66597 is not set # CONFIG_USB_GADGET_PXA_U2O is not set # CONFIG_USB_GADGET_M66592 is not set +# CONFIG_USB_GADGET_AMD5536UDC is not set +# CONFIG_USB_GADGET_CI13XXX_PCI is not set +# CONFIG_USB_GADGET_NET2280 is not set +# CONFIG_USB_GADGET_GOKU is not set +# CONFIG_USB_GADGET_LANGWELL is not set +# CONFIG_USB_GADGET_EG20T is not set # CONFIG_USB_GADGET_DUMMY_HCD is not set CONFIG_USB_GADGET_DUALSPEED=y # CONFIG_USB_ZERO is not set @@ -2113,6 +2121,9 @@ CONFIG_USB_G_ANDROID=y # CONFIG_USB_G_MULTI is not set # CONFIG_USB_G_HID is not set # CONFIG_USB_G_DBGP is not set +# CONFIG_USB_G_DBGP_PRINTK is not set +# CONFIG_USB_G_DBGP_SERIAL is not set +# CONFIG_USB_G_WEBCAM is not set # # OTG and related infrastructure @@ -2265,9 +2276,15 @@ CONFIG_ANDROID_LOW_MEMORY_KILLER=y # CONFIG_USB_SERIAL_QUATECH_USB2 is not set # CONFIG_VT6656 is not set # CONFIG_IIO is not set +# CONFIG_LIS3L02DQ_BUF_KFIFO is not set +# CONFIG_LIS3L02DQ_BUF_RING_SW is not set +# CONFIG_AD2S1210_GPIO_INPUT is not set +# CONFIG_AD2S1210_GPIO_OUTPUT is not set +# CONFIG_AD2S1210_GPIO_NONE is not set # CONFIG_XVMALLOC is not set # CONFIG_ZRAM is not set # CONFIG_FB_SM7XX is not set +# CONFIG_EASYCAP_SND is not set CONFIG_MACH_NO_WESTBRIDGE=y # CONFIG_ATH6K_LEGACY is not set # CONFIG_USB_ENESTORAGE is not set @@ -2381,6 +2398,10 @@ CONFIG_MISC_FILESYSTEMS=y # CONFIG_EFS_FS is not set # CONFIG_YAFFS_FS is not set # CONFIG_JFFS2_FS is not set +# CONFIG_JFFS2_CMODE_NONE is not set +# CONFIG_JFFS2_CMODE_PRIORITY is not set +# CONFIG_JFFS2_CMODE_SIZE is not set +# CONFIG_JFFS2_CMODE_FAVOURLZO is not set # CONFIG_LOGFS is not set # CONFIG_CRAMFS is not set # CONFIG_SQUASHFS is not set @@ -2390,6 +2411,9 @@ CONFIG_MISC_FILESYSTEMS=y # CONFIG_HPFS_FS is not set # CONFIG_QNX4FS_FS is not set # CONFIG_ROMFS_FS is not set +# CONFIG_ROMFS_BACKED_BY_BLOCK is not set +# CONFIG_ROMFS_BACKED_BY_MTD is not set +# CONFIG_ROMFS_BACKED_BY_BOTH is not set # CONFIG_PSTORE is not set # CONFIG_SYSV_FS is not set # CONFIG_UFS_FS is not set @@ -2595,6 +2619,10 @@ CONFIG_SECURITY_MIDDLEWARE_COMPONENT=y # CONFIG_SMC_KERNEL_CRYPTO is not set CONFIG_SECURE_TRACE=y # CONFIG_TF_DRIVER_DEBUG_SUPPORT is not set +# CONFIG_DEFAULT_SECURITY_SELINUX is not set +# CONFIG_DEFAULT_SECURITY_SMACK is not set +# CONFIG_DEFAULT_SECURITY_TOMOYO is not set +# CONFIG_DEFAULT_SECURITY_APPARMOR is not set CONFIG_DEFAULT_SECURITY_DAC=y CONFIG_DEFAULT_SECURITY="" CONFIG_CRYPTO=y
Didn't fix it.
replicant-4.0/kernel/samsung/tuna/drivers/rpmsg$ grep rpmsg-omx -r *
rpmsg_omx.c: "rpmsg-omx");
rpmsg_omx.c: "rpmsg-omx%d", minor);
rpmsg_omx.c: { .name = "rpmsg-omx" },
replicant-4.0/kernel/samsung/tuna/drivers/rpmsg$ grep pvr -r *
rpmsg_omx.c:#include "../gpu/pvr/ion.h"
rpmsg_omx.c: struct ion_client *pvr_ion_client;
rpmsg_omx.c: handle = PVRSRVExportFDToIONHandle(fd, &pvr_ion_client);
rpmsg_omx.c: !ion_phys(pvr_ion_client, handle, &paddr, &unused)) {
static u32 _rpmsg_omx_buffer_lookup(struct rpmsg_omx_instance *omx, long buffer)
{
phys_addr_t pa;
u32 va;
#ifdef CONFIG_ION_OMAP
struct ion_handle *handle;
ion_phys_addr_t paddr;
size_t unused;
int fd;
/* is it an ion handle? */
handle = (struct ion_handle *)buffer;
if (!ion_phys(omx->ion_client, handle, &paddr, &unused)) {
pa = (phys_addr_t) paddr;
goto to_va;
}
#ifdef CONFIG_PVR_SGX
/* how about an sgx buffer wrapping an ion handle? */
{
struct ion_client *pvr_ion_client;
fd = buffer;
handle = PVRSRVExportFDToIONHandle(fd, &pvr_ion_client);
if (handle &&
!ion_phys(pvr_ion_client, handle, &paddr, &unused)) {
pa = (phys_addr_t)paddr;
goto to_va;
}
}
#endif
#endif
pa = (phys_addr_t) tiler_virt2phys(buffer);
#ifdef CONFIG_ION_OMAP
to_va:
#endif
va = _rpmsg_pa_to_da(pa);
return va;
}
<6>[ 111.117462] PVR_K:(Error): GetHandleStructure: Handle index out of range (1835561824 >= 0) [454, /home/gnutoo/embedded/android/replicant-4.0/kernel/samsung/tuna/drivers/gpu/pvr/handle.c] <6>[ 111.117584] PVR_K:(Error): PVRSRVLookupHandle: Error looking up handle (149) [1407, /home/gnutoo/embedded/android/replicant-4.0/kernel/samsung/tuna/drivers/gpu/pvr/handle.c] <6>[ 111.117706] PVR_K:(Error): PVRSRVExportFDToIONHandle: Failed to look up MEM_INFO handle [78, /home/gnutoo/embedded/android/replicant-4.0/kernel/samsung/tuna/drivers/gpu/pvr/ion.c]
static ssize_t rpmsg_omx_write(struct file *filp, const char __user *ubuf,
size_t len, loff_t *offp)
{
struct rpmsg_omx_instance *omx = filp->private_data;
struct rpmsg_omx_service *omxserv = omx->omxserv;
char kbuf[512];
struct omx_msg_hdr *hdr = (struct omx_msg_hdr *) kbuf;
int use, ret;
if (omx->state != OMX_CONNECTED)
return -ENOTCONN;
/*
* for now, limit msg size to 512 bytes (incl. header).
* (note: rpmsg's limit is even tighter. this whole thing needs fixing)
*/
use = min(sizeof(kbuf) - sizeof(*hdr), len);
/*
* copy the data. Later, number of copies can be optimized if found to
* be significant in real use cases
*/
if (copy_from_user(hdr->data, ubuf, use))
return -EMSGSIZE;
ret = _rpmsg_omx_map_buf(omx, hdr->data);
if (ret < 0)
return ret;
hdr->type = OMX_RAW_MSG;
hdr->flags = 0;
hdr->len = use;
use += sizeof(*hdr);
ret = rpmsg_send_offchannel(omxserv->rpdev, omx->ept->addr,
omx->dst, kbuf, use);
if (ret) {
dev_err(omxserv->dev, "rpmsg_send failed: %d\n", ret);
return ret;
}
return use;
}
ret = _rpmsg_omx_map_buf(omx, hdr->data);
Then _rpmsg_omx_map_buf is like that:
static int _rpmsg_omx_map_buf(struct rpmsg_omx_instance *omx, char *packet)
{
int ret = -EINVAL, offset = 0;
long *buffer;
char *data;
enum rpc_omx_map_info_type maptype;
u32 da = 0;
data = (char *)((struct omx_packet *)packet)->data;
maptype = *((enum rpc_omx_map_info_type *)data);
/*Nothing to map*/
if (maptype == RPC_OMX_MAP_INFO_NONE)
return 0;
if ((maptype != RPC_OMX_MAP_INFO_THREE_BUF) &&
(maptype != RPC_OMX_MAP_INFO_TWO_BUF) &&
(maptype != RPC_OMX_MAP_INFO_ONE_BUF))
return ret;
offset = *(int *)((int)data + sizeof(maptype));
buffer = (long *)((int)data + offset);
da = _rpmsg_omx_buffer_lookup(omx, *buffer);
printk("[DBG] [%s] da = %x \n",__func__,da);
if (da) {
printk("[DBG] [%s] inside da\n",__func__);
*buffer = da;
ret = 0;
}else {
printk("[DBG] [%s] outside da\n",__func__);
}
if (!ret && (maptype >= RPC_OMX_MAP_INFO_TWO_BUF)) {
buffer = (long *)((int)data + offset + sizeof(*buffer));
if (*buffer != 0) {
ret = -EIO;
da = _rpmsg_omx_buffer_lookup(omx, *buffer);
if (da) {
*buffer = da;
ret = 0;
}
}
}
if (!ret && maptype >= RPC_OMX_MAP_INFO_THREE_BUF) {
buffer = (long *)((int)data + offset + 2*sizeof(*buffer));
if (*buffer != 0) {
ret = -EIO;
da = _rpmsg_omx_buffer_lookup(omx, *buffer);
if (da) {
*buffer = da;
ret = 0;
}
}
}
return ret;
}
It calls
da = _rpmsg_omx_buffer_lookup(omx, *buffer);which is like that:
static u32 _rpmsg_omx_buffer_lookup(struct rpmsg_omx_instance *omx, long buffer)
{
phys_addr_t pa;
u32 va;
#ifdef CONFIG_ION_OMAP
struct ion_handle *handle;
ion_phys_addr_t paddr;
size_t unused;
int fd;
/* is it an ion handle? */
handle = (struct ion_handle *)buffer;
printk("[DBG] handle:%x\n",handle);
if (!ion_phys(omx->ion_client, handle, &paddr, &unused)) {
printk("[DBG] is ion_phys\n");
pa = (phys_addr_t) paddr;
goto to_va;
}
#if 0
#ifdef CONFIG_PVR_SGX
printk("[DBG] INSIDE CONFIG_PVR_SGX\n");
/* how about an sgx buffer wrapping an ion handle? */
{
struct ion_client *pvr_ion_client;
fd = buffer;
handle = PVRSRVExportFDToIONHandle(fd, &pvr_ion_client);
printk("[DBG] [INSIDE CONFIG_PVR_SGX] handle:%x\n",handle);
if (handle &&
!ion_phys(pvr_ion_client, handle, &paddr, &unused)) {
printk("[DBG] [INSIDE CONFIG_PVR_SGX] goto to_va\n");
pa = (phys_addr_t)paddr;
goto to_va;
}
}
#endif
#endif
#endif
printk("[DBG] [after CONFIG_PVR_SGX]\n");
pa = (phys_addr_t) tiler_virt2phys(buffer);
printk("[DBG] [after CONFIG_PVR_SGX] pa = %x \n");
#ifdef CONFIG_ION_OMAP
to_va:
#endif
printk("[DBG] [to_va] \n");
va = _rpmsg_pa_to_da(pa);
printk("[DBG] [to_va] = %x \n",va);
return va;
}
which calls
/*
* TODO: Need to do this using lookup with rproc, but rproc is not
* visible to rpmsg_omx
*/
#define TILER_START 0x60000000
#define TILER_END 0x80000000
#define ION_1D_START 0xBA300000
#define ION_1D_END 0xBFD00000
#define ION_1D_VA 0x88000000
static u32 _rpmsg_pa_to_da(u32 pa)
{
if (pa >= TILER_START && pa < TILER_END){
printk("[DBG] TILER\n");
return pa;
}
else if (pa >= ION_1D_START && pa < ION_1D_END){
printk("[DBG] ION\n");
return (pa - ION_1D_START + ION_1D_VA);
}
else{
printk("[DBG] ELSE(not tiler and not ion)\n");
}
return 0;
}
which prints ION for the 2 good buffers and print ELSE for the bad buffer(the one which produces the EINVAL in write)...
then _rpmsg_omx_buffer_lookup returns 0 which results in:
static int _rpmsg_omx_map_buf(struct rpmsg_omx_instance *omx, char *packet)
{
int ret = -EINVAL, offset = 0;
[...]
da = _rpmsg_omx_buffer_lookup(omx, *buffer);
printk("[DBG] [%s] da = %x \n",__func__,da);
if (da) {
->not reached
printk("[DBG] [%s] inside da\n",__func__);
*buffer = da;
ret = 0;
}else {
->reached
printk("[DBG] [%s] outside da\n",__func__);
}
if (!ret && (maptype >= RPC_OMX_MAP_INFO_TWO_BUF)) {
[...] (not reached)
}
if (!ret && maptype >= RPC_OMX_MAP_INFO_THREE_BUF) {
[...] (not reached)
}
return ret;
}
Running replicant kernel with:
#if 0
#ifdef CONFIG_PVR_SGX
printk("[DBG] INSIDE CONFIG_PVR_SGX\n");
/* how about an sgx buffer wrapping an ion handle? */
{
struct ion_client *pvr_ion_client;
fd = buffer;
handle = PVRSRVExportFDToIONHandle(fd, &pvr_ion_client);
printk("[DBG] [INSIDE CONFIG_PVR_SGX] handle:%x\n",handle);
if (handle &&
!ion_phys(pvr_ion_client, handle, &paddr, &unused)) {
printk("[DBG] [INSIDE CONFIG_PVR_SGX] goto to_va\n");
pa = (phys_addr_t)paddr;
goto to_va;
}
}
#endif
#endif
with cyanogenmod userspace produces the same issue:
D/DOMX ( 135): ENTER: D/DOMX ( 135): TRACE: Recd. omx message D/DOMX ( 135): TRACE: Waiting for messages from remote core D/DOMX ( 135): EXIT: D/DOMX ( 135): TRACE: Corresponding RPC function executed successfully D/DOMX ( 135): EXIT: eError: 0 D/DOMX ( 135): ENTER: hComponent = 0x103f7e0, pCompPrv = 0x1035ee0, nConfigIndex = 117440523, pConfigStruct = 0x41365b50 D/DOMX ( 135): ENTER: D/DOMX ( 135): TRACE: Recd. omx message D/DOMX ( 135): TRACE: Waiting for messages from remote core D/DOMX ( 135): EXIT: D/DOMX ( 135): TRACE: Corresponding RPC function executed successfully D/DOMX ( 135): EXIT: eError: 0 D/DOMX ( 135): ENTER: hComponent = 0x103f7e0, pCompPrv = 0x1035ee0, nParamIndex = 33554433, pParamStruct = 0x41365ad8 D/DOMX ( 135): ENTER: D/DOMX ( 135): TRACE: Recd. omx message D/DOMX ( 135): TRACE: Waiting for messages from remote core D/DOMX ( 135): EXIT: D/DOMX ( 135): TRACE: Corresponding RPC function executed successfully D/DOMX ( 135): EXIT: eError: 0 index: 0x2000001 D/DOMX ( 135): ENTER: hComponent = 0x103f7e0, pCompPrv = 0x1035ee0, nParamIndex = 33554433, pParamStruct = 0x41365ad8 D/DOMX ( 135): TRACE: Recd. omx message D/DOMX ( 135): TRACE: Waiting for messages from remote core D/DOMX ( 135): EXIT: D/DOMX ( 135): TRACE: Corresponding RPC function executed successfully D/DOMX ( 135): EXIT: eError: 0 D/DOMX ( 135): ENTER: hComponent = 0x103f7e0, pCompPrv = 0x1035ee0, nParamIndex = 33554433, pParamStruct = 0x41365ad8 D/DOMX ( 135): ENTER: D/DOMX ( 135): TRACE: Recd. omx message D/DOMX ( 135): TRACE: Waiting for messages from remote core D/DOMX ( 135): EXIT: D/DOMX ( 135): TRACE: Corresponding RPC function executed successfully D/DOMX ( 135): EXIT: eError: 0 index: 0x2000001 D/DOMX ( 135): ENTER: hComponent = 0x103f7e0, pCompPrv = 0x1035ee0, nConfigIndex = 2130706541, pConfigStruct = 0x41365b58 D/DOMX ( 135): ENTER: D/DOMX ( 135): TRACE: Recd. omx message D/DOMX ( 135): TRACE: Waiting for messages from remote core D/DOMX ( 135): EXIT: D/DOMX ( 135): TRACE: Corresponding RPC function executed successfully D/DOMX ( 135): EXIT: eError: 0 D/DOMX ( 135): ENTER: hComponent = 0x103f7e0, pCompPrv = 0x1035ee0, eCmd = 3, nParam = 2, pCmdData = 0x0 D/DOMX ( 135): ENTER: D/DOMX ( 135): TRACE: Recd. omx message D/DOMX ( 135): TRACE: Waiting for messages from remote core D/DOMX ( 135): EXIT: D/DOMX ( 135): TRACE: Corresponding RPC function executed successfully D/DOMX ( 135): EXIT: eError: 0 D/DOMX ( 135): ENTER: hComponent = 0x103f7e0, pCompPrv = 0x1035ee0, nParamIndex = 2130706545, pParamStruct = 0x41365ba0 D/DOMX ( 135): TRACE: Corresponding RPC function executed successfully D/DOMX ( 135): EXIT: eError: 0 D/DOMX ( 135): ENTER: hComponent = 0x103f7e0, pCompPrv = 0x1035ee0, nPortIndex = 0x2, pAppPrivate = 0x0, nSizeBytes = 1142784, pBuffer = 0x1046f40 D/DOMX ( 135): TRACE: In UB, no. of buffers = 0 D/DOMX ( 135): TRACE: Preparing buffer to Remote Core... D/DOMX ( 135): ENTER: D/DOMX ( 135): TRACE: Recd. omx message D/DOMX ( 135): TRACE: Waiting for messages from remote core D/DOMX ( 135): EXIT: D/DOMX ( 135): TRACE: Corresponding RPC function executed successfully D/DOMX ( 135): ENTER: D/DOMX ( 135): ENTER: D/DOMX ( 135): TRACE: Recd. omx message D/DOMX ( 135): TRACE: Waiting for messages from remote core D/DOMX ( 135): EXIT: D/DOMX ( 135): TRACE: PROXY_UTIL Get Parameter Successful D/DOMX ( 135): ENTER: D/DOMX ( 135): TRACE: Recd. omx message D/DOMX ( 135): TRACE: Waiting for messages from remote core D/DOMX ( 135): EXIT: D/DOMX ( 135): TRACE: PROXY_UTIL Get Parameter Successful D/DOMX ( 135): TRACE: Port Number: 2 :: NumOfLines 720 D/DOMX ( 135): EXIT: eError: 0 D/DOMX ( 135): ENTER: hComponent = 0x103f7e0, pCompPrv = 0x1035ee0, nParamIndex = 2130706550, pParamStruct = 0x41365b34 D/DOMX ( 135): ENTER: D/DOMX ( 135): TRACE: Recd. omx message D/DOMX ( 135): TRACE: Waiting for messages from remote core D/DOMX ( 135): EXIT: D/DOMX ( 135): TRACE: Corresponding RPC function executed successfully D/DOMX ( 135): EXIT: eError: 0 index: 0x7f000076 D/DOMX ( 135): TRACE: Metadata size = 12332 D/DOMX ( 135): TRACE: ION being USED for allocation!!!!! handle = c63ccd80, ret =0 D/DOMX ( 135): TRACE: Metadata buffer ion handle = -969093760 D/DOMX ( 135): ENTER: D/DOMX ( 135): TRACE: Marshaling data D/DOMX ( 135): TRACE: eMapInfo = 3 D/DOMX ( 135): TRACE: UV buffer fd= 109 D/DOMX ( 135): TRACE: Metadata buffer = -969093760 D/DOMX ( 135): TRACE: About to send packet D/DOMX ( 135): ERROR: DOMX Write failed 0xffffffff -1 D/DOMX ( 135): ERROR: failed check:status >= 0 - returning error: 0x81001 - Write failed D/DOMX ( 135): EXIT: D/DOMX ( 135): ERROR: RPC function returned error 0x81001 D/DOMX ( 135): TRACE: Use Buffer Successful D/DOMX ( 135): TRACE: Value of pBufHeaderRemote: 0x0 LocalBufferHdr :0x104f118, LocalBuffer :0x1046f40 D/DOMX ( 135): TRACE: Metadata buffer ion handle given to ion map = -969093760 D/DOMX ( 135): TRACE: Updating no. of buffer to 1 D/DOMX ( 135): EXIT: eError: -2147479551 E/CameraHAL( 135): OMX_UseBuffer-0x80001001 E/CameraHAL( 135): Exiting function UseBuffersPreview because of ret 0 eError=80001001 D/DOMX ( 135): ENTER: hComponent = 0x103f7e0 E/ion ( 135): ioctl -1073460991 failed with code -1: Bad file number F/libc ( 135): @@@ ABORTING: INVALID HEAP ADDRESS IN dlfree F/libc ( 135): Fatal signal 11 (SIGSEGV) at 0xdeadbaad (code=1) I/Process ( 203): Sending signal. PID: 914 SIG: 3 I/dalvikvm( 914): threadid=3: reacting to signal 3 I/dalvikvm( 914): Wrote stack traces to '/data/anr/traces.txt' I/DEBUG ( 130): *** *** *** *** *** *** *** *** *** *** *** *** *** *** *** *** I/DEBUG ( 130): Build fingerprint: 'google/yakju/maguro:4.0.4/IMM76I/330937:user/release-keys' I/DEBUG ( 130): pid: 135, tid: 187 >>> /system/bin/mediaserver <<< I/DEBUG ( 130): signal 11 (SIGSEGV), code 1 (SEGV_MAPERR), fault addr deadbaad I/DEBUG ( 130): r0 deadbaad r1 00000001 r2 a0000000 r3 00000000 I/DEBUG ( 130): r4 00000000 r5 00000027 r6 401022f4 r7 401104d4 I/DEBUG ( 130): r8 0104f170 r9 40110600 10 01040eb0 fp 010387fc I/DEBUG ( 130): ip ffffffff sp 413659c0 lr 400e3441 pc 400df788 cpsr 60000030 I/DEBUG ( 130): d0 656c696620646120 d1 653766333031786e I/DEBUG ( 130): d2 68206e6f69207275 d3 696720656c646e6d I/DEBUG ( 130): d4 426c61636f4c2030 d5 7264487265666675 I/DEBUG ( 130): d6 6634303178303a20 d7 636f4c202c383131 I/DEBUG ( 130): d8 0000000000000000 d9 0000000000000000 I/DEBUG ( 130): d10 0000000000000000 d11 0000000000000000 I/DEBUG ( 130): d12 0000000000000000 d13 0000000000000000 I/DEBUG ( 130): d14 0000000000000000 d15 0000000000000000 I/DEBUG ( 130): d16 3ff0000000000000 d17 3ff0000000000000 I/DEBUG ( 130): d18 7e37e43c8800759c d19 bfba43196d2f888d I/DEBUG ( 130): d20 3f115549a0c32687 d21 bebbbb72a4af9d58 I/DEBUG ( 130): d22 3ff0000000000000 d23 3fecedd52e2a681e I/DEBUG ( 130): d24 3e66376972bea4d0 d25 3fee147ae0000000 I/DEBUG ( 130): d26 0000000000000000 d27 0000000000000000 I/DEBUG ( 130): d28 0000000000000000 d29 0000000000000000 I/DEBUG ( 130): d30 0000000000000000 d31 0000000000000000 I/DEBUG ( 130): scr 68000010 I/DEBUG ( 130): I/DEBUG ( 130): #00 pc 00017788 /system/lib/libc.so I/DEBUG ( 130): #01 pc 00013732 /system/lib/libc.so I/DEBUG ( 130): #02 pc 00015a70 /system/lib/libc.so (dlfree) I/DEBUG ( 130): #03 pc 00016100 /system/lib/libc.so (free) I/DEBUG ( 130): #04 pc 000019e6 /system/lib/libmm_osal.so (TIMM_OSAL_Free) I/DEBUG ( 130): #05 pc 00005dda /system/lib/libdomx.so (PROXY_ComponentDeInit) I/DEBUG ( 130): #06 pc 000018ec /system/lib/libOMX.TI.DUCATI1.VIDEO.CAMERA.so I/DEBUG ( 130): #07 pc 00001df6 /system/lib/libOMX_Core.so (OMX_FreeHandle) I/DEBUG ( 130): #08 pc 000284fc /system/lib/hw/camera.omap4.so (_ZN7android16OMXCameraAdapter24performCleanupAfterErrorEv) I/DEBUG ( 130): #09 pc 0002b04e /system/lib/hw/camera.omap4.so (_ZN7android16OMXCameraAdapter17UseBuffersPreviewEPvi) I/DEBUG ( 130): #10 pc 0002b182 /system/lib/hw/camera.omap4.so (_ZN7android16OMXCameraAdapter10useBuffersENS_13CameraAdapter10CameraModeEPvijj) I/DEBUG ( 130): #11 pc 00024c4c /system/lib/hw/camera.omap4.so (_ZN7android17BaseCameraAdapter11sendCommandENS_13CameraAdapter14CameraCommandsEiii) I/DEBUG ( 130): #12 pc 0001d3d0 /system/lib/hw/camera.omap4.so (_ZN7android9CameraHal12startPreviewEv) I/DEBUG ( 130): #13 pc 0001d6de /system/lib/hw/camera.omap4.so (_ZN7android9CameraHal16setPreviewWindowEP18preview_stream_ops) I/DEBUG ( 130): #14 pc 0001ae80 /system/lib/hw/camera.omap4.so (_Z25camera_set_preview_windowP13camera_deviceP18preview_stream_ops) I/DEBUG ( 130): #15 pc 000076cc /system/lib/libcameraservice.so I/DEBUG ( 130): #16 pc 000091b4 /system/lib/libcameraservice.so (_ZN7android13CameraService6Client16setPreviewWindowERKNS_2spINS_7IBinderEEERKNS2_I13ANativeWindowEE) I/DEBUG ( 130): #17 pc 000092ea /system/lib/libcameraservice.so (_ZN7android13CameraService6Client17setPreviewDisplayERKNS_2spINS_7SurfaceEEE) I/DEBUG ( 130): #18 pc 00013592 /system/lib/libcamera_client.so (_ZN7android8BnCamera10onTransactEjRKNS_6ParcelEPS1_j) I/DEBUG ( 130): #19 pc 00017f44 /system/lib/libbinder.so (_ZN7android7BBinder8transactEjRKNS_6ParcelEPS1_j) I/DEBUG ( 130): #20 pc 0001b26e /system/lib/libbinder.so (_ZN7android14IPCThreadState14executeCommandEi) I/DEBUG ( 130): #21 pc 0001b44a /system/lib/libbinder.so (_ZN7android14IPCThreadState14joinThreadPoolEb) I/DEBUG ( 130): #22 pc 00020744 /system/lib/libbinder.so I/DEBUG ( 130): #23 pc 00022a1e /system/lib/libutils.so (_ZN7android6Thread11_threadLoopEPv) I/DEBUG ( 130): #24 pc 00023064 /system/lib/libutils.so I/DEBUG ( 130): #25 pc 00012e2c /system/lib/libc.so (__thread_entry) I/DEBUG ( 130): #26 pc 0001295c /system/lib/libc.so (pthread_create) I/DEBUG ( 130): I/DEBUG ( 130): code around pc: I/DEBUG ( 130): 400df768 4623b15c 2c006824 e026d1fb b12368db \.#F$h.,..&..h#. I/DEBUG ( 130): 400df778 21014a17 6011447a 48124798 24002527 .J.!zD.`.G.H'%.$ I/DEBUG ( 130): 400df788 f7f47005 2106ef8c e838f7f6 460aa901 .p.....!..8....F I/DEBUG ( 130): 400df798 f04f2006 94015380 94029303 ebe4f7f5 . O..S.......... I/DEBUG ( 130): 400df7a8 4622a905 f7f52002 f7f4ebee 2106ef78 .."F. ......x..! I/DEBUG ( 130): I/DEBUG ( 130): code around lr: I/DEBUG ( 130): 400e3420 41f0e92d 46804c0c 447c2600 68a56824 -..A.L.F.&|D$h.h I/DEBUG ( 130): 400e3430 e0076867 300cf9b5 dd022b00 47c04628 gh.....0.+..(F.G I/DEBUG ( 130): 400e3440 35544306 37fff117 6824d5f4 d1ee2c00 .CT5...7..$h.,.. I/DEBUG ( 130): 400e3450 e8bd4630 bf0081f0 000280be 41f0e92d 0F..........-..A I/DEBUG ( 130): 400e3460 fb01b086 9004f602 461f4815 4615460c .........H.F.F.F I/DEBUG ( 130): I/DEBUG ( 130): memory map around addr deadbaad: I/DEBUG ( 130): bec5b000-bec7c000 [stack] I/DEBUG ( 130): (no map for address) I/DEBUG ( 130): ffff0000-ffff1000 [vectors] I/DEBUG ( 130): I/DEBUG ( 130): stack: I/DEBUG ( 130): 41365980 00000001 I/DEBUG ( 130): 41365984 413659c0 I/DEBUG ( 130): 41365988 4010b7e0 /system/lib/libc.so I/DEBUG ( 130): 4136598c 0000000c I/DEBUG ( 130): 41365990 4010b780 /system/lib/libc.so I/DEBUG ( 130): 41365994 4010b718 /system/lib/libc.so I/DEBUG ( 130): 41365998 00000000 I/DEBUG ( 130): 4136599c 400e3441 /system/lib/libc.so I/DEBUG ( 130): 413659a0 00000000 I/DEBUG ( 130): 413659a4 413659d4 I/DEBUG ( 130): 413659a8 401022f4 /system/lib/libc.so I/DEBUG ( 130): 413659ac 401104d4 I/DEBUG ( 130): 413659b0 0104f170 [heap] I/DEBUG ( 130): 413659b4 400e25ad /system/lib/libc.so I/DEBUG ( 130): 413659b8 df0027ad I/DEBUG ( 130): 413659bc 00000000 I/DEBUG ( 130): #00 413659c0 413659bc I/DEBUG ( 130): 413659c4 00000001 I/DEBUG ( 130): 413659c8 401022d8 /system/lib/libc.so I/DEBUG ( 130): 413659cc 00000005 I/DEBUG ( 130): 413659d0 413659ec I/DEBUG ( 130): 413659d4 fffffbdf I/DEBUG ( 130): 413659d8 413659ec I/DEBUG ( 130): 413659dc 413659ec I/DEBUG ( 130): 413659e0 401057f4 /system/lib/libc.so I/DEBUG ( 130): 413659e4 400db737 /system/lib/libc.so I/DEBUG ( 130): #01 413659e8 02000001 I/DEBUG ( 130): 413659ec 20404040 I/DEBUG ( 130): 413659f0 524f4241 I/DEBUG ( 130): 413659f4 474e4954 I/DEBUG ( 130): 413659f8 4e49203a I/DEBUG ( 130): 413659fc 494c4156 I/DEBUG ( 130): 41365a00 45482044 I/DEBUG ( 130): 41365a04 41205041 /dev/ashmem/OMXCodec (deleted) I/DEBUG ( 130): 41365a08 45524444 I/DEBUG ( 130): 41365a0c 49205353 I/DEBUG ( 130): 41365a10 6c64204e I/DEBUG ( 130): 41365a14 65657266 I/DEBUG ( 130): 41365a18 00000000 I/DEBUG ( 130): 41365a1c 00000000 I/DEBUG ( 130): 41365a20 8060f270 I/DEBUG ( 130): 41365a24 a5d1751e I/DEBUG ( 130): 41365a28 00000060 I/DEBUG ( 130): 41365a2c 41365a78 I/DEBUG ( 130): 41365a30 40fb75e9 /system/lib/libdomx.so I/DEBUG ( 130): 41365a34 40fba619 /system/lib/libdomx.so I/DEBUG ( 130): 41365a38 0000001c I/DEBUG ( 130): 41365a3c 40021340 /system/lib/libmm_osal.so I/DEBUG ( 130): 41365a40 ffffffff I/DEBUG ( 130): 41365a44 02000001 I/DEBUG ( 130): 41365a48 000000fb I/DEBUG ( 130): 41365a4c 401104d4 I/DEBUG ( 130): 41365a50 0104f198 [heap] I/DEBUG ( 130): 41365a54 00000000 I/DEBUG ( 130): 41365a58 8060f270 I/DEBUG ( 130): 41365a5c 401104d4 I/DEBUG ( 130): 41365a60 7f000076 I/DEBUG ( 130): 41365a64 400dcc25 /system/lib/libc.so I/DEBUG ( 130): 41365a68 0104f190 [heap] I/DEBUG ( 130): 41365a6c 0104f288 [heap] I/DEBUG ( 130): 41365a70 000000fb I/DEBUG ( 130): 41365a74 401104d4 I/DEBUG ( 130): 41365a78 0104f198 [heap] I/DEBUG ( 130): 41365a7c 00000000 I/DEBUG ( 130): 41365a80 00000000 I/DEBUG ( 130): 41365a84 401104d4 I/DEBUG ( 130): 41365a88 00000002 I/DEBUG ( 130): 41365a8c 400dcc25 /system/lib/libc.so I/DEBUG ( 130): 41365a90 0104f190 [heap] I/DEBUG ( 130): 41365a94 401105f0 I/DEBUG ( 130): 41365a98 000000f8 I/DEBUG ( 130): 41365a9c 401104d4 I/DEBUG ( 130): 41365aa0 0104f198 [heap] I/DEBUG ( 130): 41365aa4 0104f1ac [heap] I/DEBUG ( 130): 41365aa8 00000002 I/DEBUG ( 130): 41365aac 400dda89 /system/lib/libc.so I/DEBUG ( 130): 41365ab0 0104f118 [heap] I/DEBUG ( 130): 41365ab4 00000024 I/DEBUG ( 130): 41365ab8 01035ee0 [heap] I/DEBUG ( 130): 41365abc 00000003 I/DEBUG ( 130): 41365ac0 0000004d I/DEBUG ( 130): 41365ac4 41365ad4 I/DEBUG ( 130): 41365ac8 0104f110 [heap] I/DEBUG ( 130): 41365acc 00000001 I/DEBUG ( 130): 41365ad0 00000178 I/DEBUG ( 130): 41365ad4 00000001 I/DEBUG ( 130): 41365ad8 40111280 I/DEBUG ( 130): 41365adc 400ea8ad /system/lib/libc.so I/DEBUG ( 130): 41365ae0 01035ee0 [heap] I/DEBUG ( 130): 41365ae4 01035ee0 [heap] I/DEBUG ( 130): 41365ae8 00000000 I/DEBUG ( 130): 41365aec a5d1751e I/DEBUG ( 130): 41365af0 0104f168 [heap] I/DEBUG ( 130): 41365af4 01035ee0 [heap] I/DEBUG ( 130): 41365af8 00000000 I/DEBUG ( 130): 41365afc 400dda75 /system/lib/libc.so I/Process ( 203): Sending signal. PID: 914 SIG: 3 I/dalvikvm( 914): threadid=3: reacting to signal 3 I/dalvikvm( 914): Wrote stack traces to '/data/anr/traces.txt' I/Process ( 203): Sending signal. PID: 914 SIG: 3 I/dalvikvm( 914): threadid=3: reacting to signal 3 I/dalvikvm( 914): Wrote stack traces to '/data/anr/traces.txt' I/Process ( 203): Sending signal. PID: 914 SIG: 3 I/dalvikvm( 914): threadid=3: reacting to signal 3 I/dalvikvm( 914): Wrote stack traces to '/data/anr/traces.txt' I/Process ( 203): Sending signal. PID: 914 SIG: 3 I/dalvikvm( 914): threadid=3: reacting to signal 3 I/dalvikvm( 914): Wrote stack traces to '/data/anr/traces.txt' I/Process ( 203): Sending signal. PID: 914 SIG: 3 I/dalvikvm( 914): threadid=3: reacting to signal 3 I/dalvikvm( 914): Wrote stack traces to '/data/anr/traces.txt' D/dalvikvm( 203): GC_FOR_ALLOC freed 3709K, 60% free 4952K/12288K, paused 29ms W/AudioSystem( 203): AudioFlinger server died! W/IMediaDeathNotifier( 203): media server died W/AudioSystem( 203): AudioPolicyService server died! W/AudioSystem( 420): AudioFlinger server died! W/AudioSystem( 420): AudioPolicyService server died! I/ServiceManager( 124): service 'media.audio_flinger' died I/ServiceManager( 124): service 'media.player' died I/ServiceManager( 124): service 'media.camera' died I/ServiceManager( 124): service 'media.audio_policy' died W/IMediaDeathNotifier( 437): media server died W/Camera ( 914): Camera server died! W/Camera ( 914): ICamera died I/ActivityManager( 203): Displayed com.android.camera/.Camera: +4s438ms D/CameraStorage( 914): External storage state=mounted I/Thumbnail( 914): Fail to load bitmap. java.io.FileNotFoundException: /data/data/com.android.camera/files/last_thumb: open failed: ENOENT (No such file or directory) E/Camera ( 914): Error 100 E/CameraErrorCallback( 914): Got camera error callback. error=100 D/AndroidRuntime( 914): Shutting down VM W/dalvikvm( 914): threadid=1: thread exiting with uncaught exception (group=0x40a4e1f8) I/ ( 948): ServiceManager: 0x5cd958 I/AudioFlinger( 948): Loaded primary audio interface from Tuna audio HW HAL (audio) I/AudioFlinger( 948): Using 'Tuna audio HW HAL' (audio.primary) as the primary audio interface I/AudioFlinger( 948): Loaded a2dp audio interface from A2DP Audio HW HAL (audio) I/CameraService( 948): CameraService started (pid=948) I/AudioFlinger( 948): AudioFlinger's thread 0x5d44b8 ready to run D/dalvikvm( 203): GC_FOR_ALLOC freed 1181K, 59% free 5063K/12288K, paused 27ms I/AudioPolicyService( 948): Loaded audio policy from LEGACY Audio Policy HAL (audio_policy) I/Process ( 203): Sending signal. PID: 914 SIG: 3 I/dalvikvm( 914): threadid=3: reacting to signal 3 I/dalvikvm( 914): Wrote stack traces to '/data/anr/traces.txt' E/AudioService( 203): Media server died. E/AudioService( 203): Media server started. W/AudioPolicyManagerBase( 948): setPhoneState() setting same state 0 W/AudioFlinger( 948): session id 13 not found for pid 203 I/Process ( 914): Sending signal. PID: 914 SIG: 9 [ 104.225494] binder: release proc 914, transaction 18351, not freed [ 104.234130] binder: release proc 914, transaction 18352, not freed W/InputDispatcher( 203): channel '40f93a50 com.android.camera/com.android.camera.Camera (server)' ~ Consumer closed input channel or an error occurred. events=0x8 E/InputDispatcher( 203): channel '40f93a50 com.android.camera/com.android.camera.Camera (server)' ~ Channel is unrecoverably broken and will be disposed! W/InputDispatcher( 203): Attempted to unregister already unregistered input channel '40f93a50 com.android.camera/com.android.camera.Camera (server)'
if (!ion_phys(omx->ion_client, handle, &paddr, &unused)) {pa = (phys_addr_t) tiler_virt2phys(buffer);
if (!ion_phys(omx->ion_client, handle, &paddr, &unused)) {pa = (phys_addr_t) tiler_virt2phys(buffer);and goes to the end.
struct ion_handle *
PVRSRVExportFDToIONHandle(int fd, struct ion_client **client)
{
[...]
eError = PVRSRVLookupHandle(KERNEL_HANDLE_BASE,
(IMG_PVOID *)&psKernelMemInfo,
psPrivateData->hKernelMemInfo,
PVRSRV_HANDLE_TYPE_MEM_INFO);
[...]
Then it uses psKernelMemInfo and returns a derivative of it.
}
PVRSRV_ERROR PVRSRVLookupHandle(PVRSRV_HANDLE_BASE *psBase, IMG_PVOID *ppvData, IMG_HANDLE hHandle, PVRSRV_HANDLE_TYPE eType)
{
struct sHandle *psHandle;
PVRSRV_ERROR eError;
PVR_ASSERT(eType != PVRSRV_HANDLE_TYPE_NONE)
eError = GetHandleStructure(psBase, &psHandle, hHandle, eType);
if (eError != PVRSRV_OK)
{
PVR_DPF((PVR_DBG_ERROR, "PVRSRVLookupHandle: Error looking up handle (%d)", eError));
return eError;
}
*ppvData = psHandle->pvData;
return PVRSRV_OK;
}
PVRSRV_ERROR GetHandleStructure(PVRSRV_HANDLE_BASE *psBase, struct sHandle **ppsHandle, IMG_HANDLE hHandle, PVRSRV_HANDLE_TYPE eType)
#endif
{
IMG_UINT32 ui32Index = HANDLE_TO_INDEX(hHandle);
struct sHandle *psHandle;
if (!INDEX_IS_VALID(psBase, ui32Index))
{
PVR_DPF((PVR_DBG_ERROR, "GetHandleStructure: Handle index out of range (%u >= %u)", ui32Index, psBase->ui32TotalHandCount));
return PVRSRV_ERROR_HANDLE_INDEX_OUT_OF_RANGE;
}
psHandle = INDEX_TO_HANDLE_STRUCT_PTR(psBase, ui32Index);
if (psHandle->eType == PVRSRV_HANDLE_TYPE_NONE)
{
PVR_DPF((PVR_DBG_ERROR, "GetHandleStructure: Handle not allocated (index: %u)", ui32Index));
return PVRSRV_ERROR_HANDLE_NOT_ALLOCATED;
}
if (eType != PVRSRV_HANDLE_TYPE_NONE && eType != psHandle->eType)
{
PVR_DPF((PVR_DBG_ERROR, "GetHandleStructure: Handle type mismatch (%d != %d)", eType, psHandle->eType));
return PVRSRV_ERROR_HANDLE_TYPE_MISMATCH;
}
*ppsHandle = psHandle;
return PVRSRV_OK;
}
#define INDEX_IS_VALID(psBase, i) ((i) < (psBase)->ui32TotalHandCount)
<6>[ 313.967468] PVR_K:(Error): GetHandleStructure: Handle index out of range (1835561824 >= 256) [454, /home/gnutoo/embedded/android/replicant-4.0/kernel/samsung/tuna/drivers/gpu/pvr/handle.c] <6>[ 313.967681] PVR_K:(Error): PVRSRVLookupHandle: Error looking up handle (149) [1407, /home/gnutoo/embedded/android/replicant-4.0/kernel/samsung/tuna/drivers/gpu/pvr/handle.c] <6>[ 313.967803] PVR_K:(Error): PVRSRVExportFDToIONHandle: Failed to look up MEM_INFO handle [78, /home/gnutoo/embedded/android/replicant-4.0/kernel/samsung/tuna/drivers/gpu/pvr/ion.c]
#include <sys/types.h>
#include <sys/stat.h>
#include <fcntl.h>
int main(){
int fd = open("/dev/pvrsrvkm",O_RDWR);
printf("fd = %d\n");
while(1)
sleep(10000);
return 0; //not reached
}
https://groleo.wordpress.com/2012/07/24/ion-buffer-sharing-mechanism/
https://groleo.wordpress.com/2012/07/31/jelly-bean-codec-infrastructure/
=> we need to modify OMXCameraAdapter.cpp not to send its acquired buffer to OMX, and instead to reimplement that part, by looking at how the TI V4l2 camera does it.
=> we probably need to replace the UseBuffer functions and look at how OMX_UseBuffer works in order to replace them:
there is a use buffer function which calls different functions according to its state, for instance OMXCameraAdapter::UseBuffersPreview which uses OMX_UseBuffer...
OMX_UseBuffer calls PROXY_UseBuffer in hardware/ti/omap4xxx/domx/domx/omx_proxy_common/src/omx_proxy_common.c
The droiddevelopers website has some information on trying to use bugs run free software on several Motorola devices.
| Device | SOC |
| Motorola Milestone | OMAP 3430 |
| Motorola Milestone 2 | OMAP 3630 |
| Motorola Defy | OMAP3630? |
| Motorola Defy+ (MB526) | OMAP3 (which one?) |
sensiblemn: https://web.archive.org/web/20130613110712/http://gitorious.org/x-loader/x-loader/blobs/master/README sensiblemn: "X-Loader can be signed by Texas Instruments IFT and installed to Nand flash to achieve Nand booting." sensiblemn: [...] https://wiki.tizen.org/Tizen_IVI_Getting_Started_Guide_For_PandaBoard#x-loader_config_files There's also this curious part... "download the MShield signing tool and use the commands below. Contact your TI representative to get access to this tool."
On IRC there was some interest in replacing the SOC by simply unsoldering it and resoldering a GP OMAP.
For some SOCs like the Allwinner A20, it looks relatively easy to do . That is probably not the case for every SOCs as simply soldering a SOC can be really complicated sometimes (look for reballing for more details on how things can go wrong, and how it's typically repaired).
TODO:Devices:
| Device | Markings on the chip package that contains the SOC | Other relevant features |
|---|---|---|
| GT-I9100G_CHN_CHN | KMVYLOOOLM-B503 | * MicroSD slot * UART exposed through the USB connector and well documented * Configured to boot through USB first |
| GT-I9250?[1] | KMVYL000LM2 | * No microSD slot * UART exposed through the USB connector and well documented * Configured to boot through USB first |
1 We need to check which exact model variant it is. Ifixit usually use the generic model like Galaxy SII instead. And on some variant even the SOC can differ.
2 See the Step 12 of the Galaxy Nexus Teardown by Ifixit
If the chip is in a custom package like with the GT-I9100G_CHN_CHN and Galaxy Nexus:The issue with these custom packages is that they might not be as available in low and large quantities as regular OMAP SOCs, which are probably already old and so harder to find.
People:| Variant | Replicant compatible versions | SoC | Bootloader | Modem link | Modem protocol | RAM |
|---|---|---|---|---|---|---|
| Optimus Black (P970) | Not compatible yet | OMAP3630 | * Unsigned. * It was shipped with either a downstream u-boot or a nonfree bootloader * It is supported in upstream u-boot |
USB? | AT, other | 512M |
The Optimus Black comes with a bootrom and a set of two bootloaders. The bootrom is stored read-only on the OMAP3630 SoC chip. It loads the first bootloader, which loads the second bootloader.
More information on the booting sequence is available on the OMAP36xx Technical Reference Manual section 26 (Initialization).
According to the OMAP36xx Technical Reference Manual, section 26.4.4.3 (Booting Device List Setup), the OMAP3630 platform will first choose devices to boot from based on the software booting configuration. If no valid software booting configuration is found, it will read the status of the SYS_BOOT pins to determine the boot device priority order.
According to the OMAP36xx Technical Reference Manual, section 26.4.4.4 (Software Booting Configuration), the software booting configuration is a data structure stored in scratchpad memory, at address 0x48002910. It is not cleared at reset and can be written with a valid structure before reboot, to take effect.
According to the OMAP36xx Technical Reference Manual, table 13-109 (CONTROL_STATUS), the CONTROL_STATUS register provides the values of the SYS_BOOT pins as sampled at reset time. It is located at address: 0x480022f0.
The register value can be read using:
$ devmem 0x480022f0 8 0x25
According to the OMAP36xx Technical Reference Manual, section 26.2.3 (Boot Configuration), the SYS_BOOT[5:0] pins are used to select the boot device priority. SYS_BOOT5 indicates whether peripheral booting is preferred.
According to the Optimus Black (P970) Service Manual: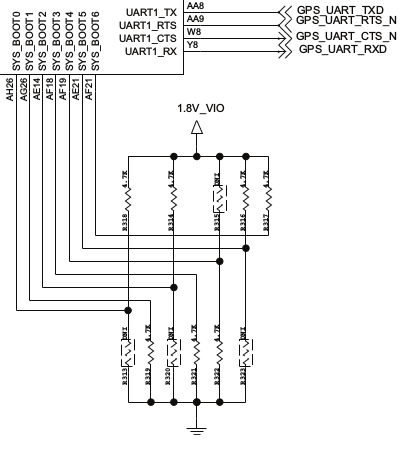
Some of the resistors framed on the schematics were found not to be populated on the board. The actual layout is the following:
| SYS_BOOT5 | SYS_BOOT4 | SYS_BOOT3 | SYS_BOOT2 | SYS_BOOT1 | SYS_BOOT0 | |
|---|---|---|---|---|---|---|
| Pull-up resistor | R316 | N/A | N/A | R314 | N/A | R318 |
| Pull-down resistor | R323 | R322 | R321 | N/A | R319 | N/A |
| Boolean value | 0 | 0 | 0 | 1 | 0 | 1 |
According to the OMAP36xx Technical Reference Manual, section 26.2.3 (Boot Configuration), such a value (0x05) indicates MMC2 as first boot device and USB as second boot device.
With MMC2 as first boot device, there is no immediate and easy way to recover from flashing a non-functional bootloader. With that setup, the bootloader can only be updated from the bootloader itself or the running system, both of which require a working bootloader. This makes it nearly impossible to work on developing a bootloader, which may end up not working for unexpected reasons or during the initial bringup phase.
The easiest solution for a fail-proof boot method is to switch the boot device priority order to USB boot first. According to the OMAP36xx Technical Reference Manual, section 26.4.5 (Peripheral Booting), the bootrom allows loading an image from USB to the internal SRAM, at address 0x40200000 and will execute it in place. Note that the image must not have any header, unlike memory booting.
This can be achieved either by a temporary software-only solution or by a permanent hardware-only solution.
Loading an image via serial (UART3) is also possible, but given the necessity to solder connectors directly and the difficulty associated with it, this method is not described here.
Note that blanking the contents of MMC2 does not make the bootrom switch automatically to USB boot.
The software booting configuration can be written to scratchpad memory to temporarily set the boot device priority to USB first, according to the OMAP36xx Technical Reference Manual, section 26.4.4.4 (Software Booting Configuration).
At this point, there is no readily available software that allows doing this from either the Android or GNU/Linux userspace.
The boot device priority can be permanently switched to USB as first boot device and MMC2 as second boot device. This allows continuing a regular boot when USB is not connected or no image is loaded. Thus, the device can still be used regularly.
Note that permanently having USB as first boot device makes the device even more vulnerable to physical attacks, as it allows any attacker to run unverified code on the device.
On P970 devices, removing resistor R323 switches the SYS_BOOT value to 0x25, which indicates USB as first boot device and MMC2 as second boot device. The resistor is located according to the Optimus Black (P970) Service Manual:
The resistor is located on the board as shown:
As the resistor is very tiny, it is often easier to try to burn it instead of carefully removing it.
Note that USB boot is only effective at power-on reset and won't be triggered by a cold or warm reset.
These documents are the propriety of LG Electronics and Texas Instruments and are not hosted by the Replicant project.
However, some excerpts from these documents are provided, for the purpose of providing technical evidence of the facts that are mentioned in this page. We believe that this particular use of the copyrighted work is fair use.
Optimus Black Privacy/security issues
| Component | Name | Status | Documentation |
|---|---|---|---|
| SoC | Texas Instruments OMAP3630 | Linux kernel support | OMAP36xx Technical Reference Manual |
| CPU | ARM Cortex-A8 | Linux kernel support | Cortex-A8 Technical Reference Manual |
| GPU | Imagination Technologies PowerVR SGX530 | Linux kernel support, proprietary userspace | |
| Modem | Intel XMM6160 | Free userspace implementation for the AT protocol | XMM 6160 Brief |
| Wi-Fi | Broadcom BCM4329 | Linux kernel support, proprietary loaded firmware | |
| Bluetooth | Broadcom BCM4329 | Linux kernel support, proprietary loaded firmware | |
| FM radio | Broadcom BCM4329 | Linux kernel support, proprietary loaded firmware | |
| GPS | Broadcom BCM4751 | Proprietary userspace, proprietary loaded firmware, no free implementation: BCM4751 | |
| Audio Codec | Wolfson WM9093 | Linux kernel support | WM9093 |
| Audio Codec | Texas Instruments TWL5030 (TPS65950) | Linux kernel support | TPS65950 Data Manual |
| Touchscreen | LG Innotek TSM-G402A | Linux kernel support | |
| Display | Hitachi TX10D10VM0EAA | Linux kernel support | |
| Accelerometer | Kionix KXTF9 | Linux kernel support | KXTF9-4100 Specifications |
| Compass | Asahi Kasei AK8975C | Linux kernel support, free userspace | AK8975 |
| Gyroscope | InvenSense MPU-3050 | Linux kernel support, free userspace | MPU-3000 Specifications |
| Light sensor | Rohm BH1621FVC | Linux kernel support | BH1621FVC Technical Note |
| Proximity sensor | Sharp GP2A | Linux kernel support, free userspace | |
| Camera (back) | Sony IMX072 | Linux kernel support | |
| Camera (front) | MM Solutions YACD5B1S | Linux kernel support | |
| PMIC | Texas Instruments TWL5030 (TPS65950) | Linux kernel support | TPS65950 Data Manual |
| PMIC | Texas Instruments LP8720 | Linux kernel support | LP8720 |
| Battery charger | Richtek RT9524 | Linux kernel support | RT9524 |
| Fuell gauge | Maxim MAX17043 | Linux kernel support | MAX17043 |
| Backlight driver | Skyworks AAT2870 | Linux kernel support | AAT2870 Data Sheet |
| Flash driver | Richtek RT8515 | Linux kernel support | |
| MUIC | Maxim MAX14526 | Linux kernel support | |
| UART switch | Fairchild FSUSB63 | Linux kernel support | FSUSB63 |
These documents are the propriety of LG Electronics and Texas Instruments and are not hosted by the Replicant project.
The Optimus Black allows accessing an UART serial port through the USB connector, the dummy interface debug connector (only on P970 devices) or the MAX14526 MUIC pins.
The MAX14526 MUIC is in charge of switching the USB connector between the USB and UART lines. The UART line can be muxed either to the main processor's debug UART (UART3), to the modem's UART or to the modem's USB lines via a FSUSB63 DP3T switch. The modem's UART line can also be switched directly to the main processor via an analog switch.
Thus, a working configuration to access the serial port through the USB connector is to route the USB connector to the UART line with the MAX14526 MUIC and to route the UART line to the main processor's debug UART (UART3) with the FSUSB63 DP3T switch.
Block diagram of the USB and UART connection, according to the Optimus Black (P970) service manual: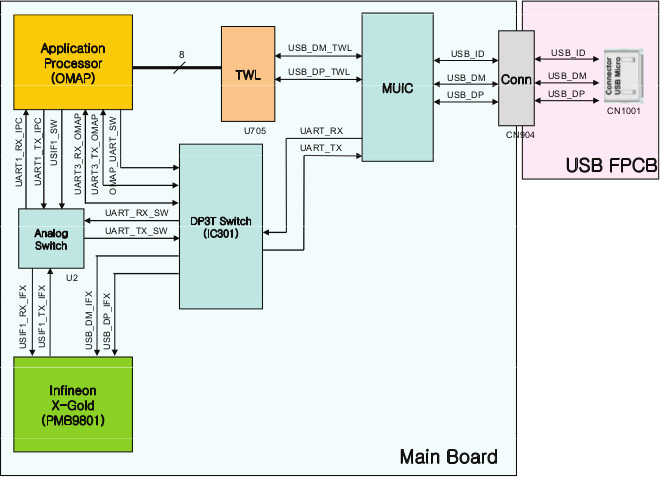
On the other hand, the main processor's debug UART (UART3) can be accessed directly on the board, via the pins of the debug connector or via the pins of the FSUSB63 DP3T switch.
According to the FSUSB63 DP3T switch datasheet and the Optimus Black (P970) service manual, UART Rx is routed to USB DM (D-) and UART Tx is routed to USB DP (D+).
Hence, the USB DM (D-) has to be connected to the UART adapter's Tx pin and the USB DP (D+) has to be connected to the UART adapter's Rx pin.
GND has to be made common between the USB connector and the UART adapter. There is no need to connect the USB connector's VBUS to a positive voltage.
Note that there is no automatic software switching (yet) with U-Boot, so make sure that the FSUSB63 DP3T switch is switched to the main processor's UART and that the MAX14526 MUIC is switched to UART before connecting the UART receiver to the USB connector.
The dummy interface connector (found only on P970 devices) is likely a debug connector that was used by LG for bringing up the device. On production devices, there is no connector there and only pins are exposed. It is highly unrecommended to solder wires to those pins as their size and location make it very inconvenient to come up with a reliable setup.
According to the Optimus Black (P970) service manual:
The pins are located on the board as shown: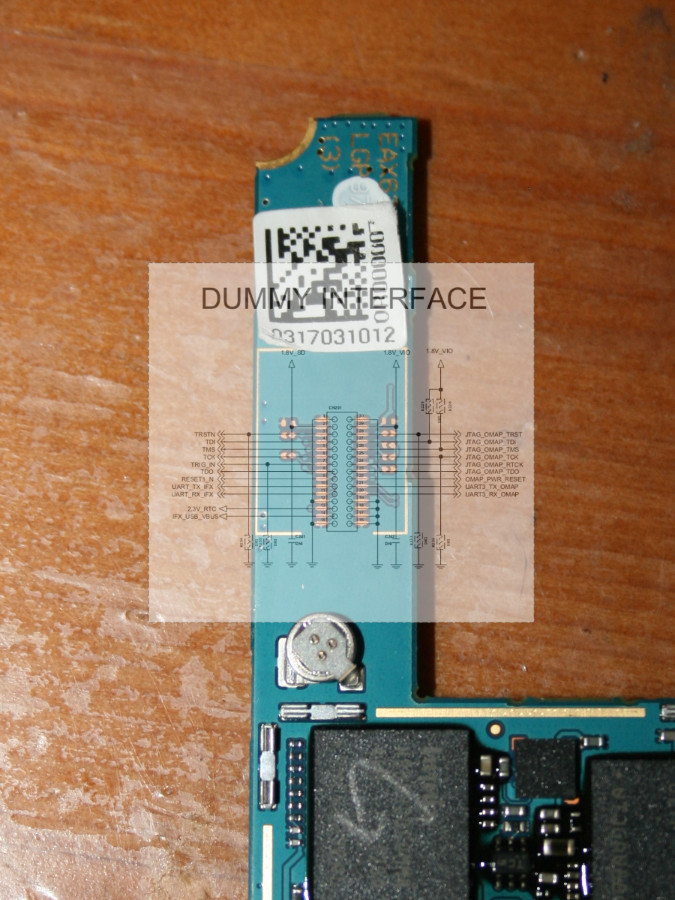
The FSUSB63 DP3T switch exposes the main processor's UART serial on its pins.
On P970 devices, the pins are placed as follows: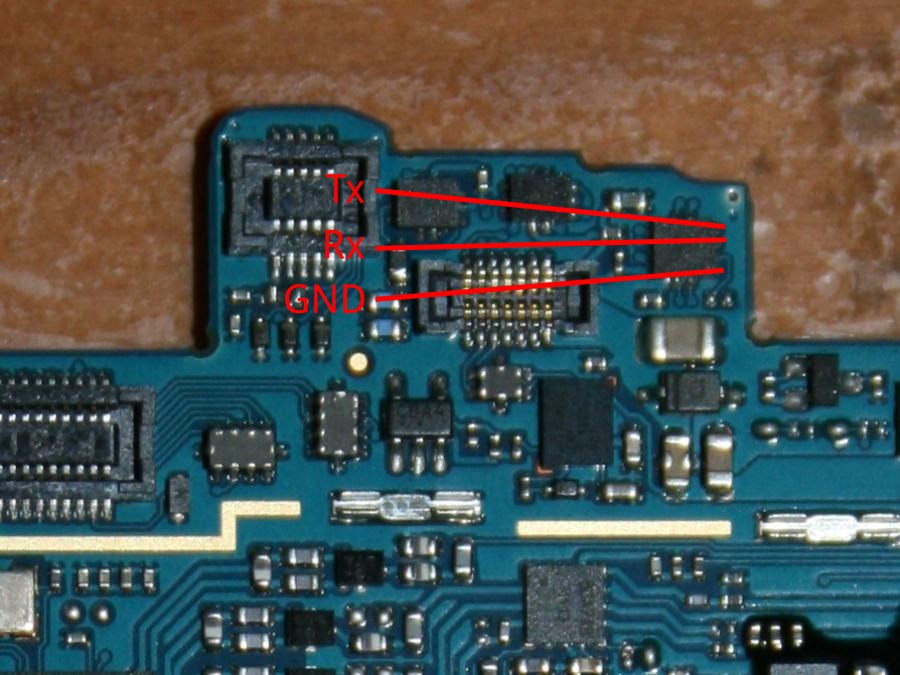
On KU5900 devices, the pins are placed as follows: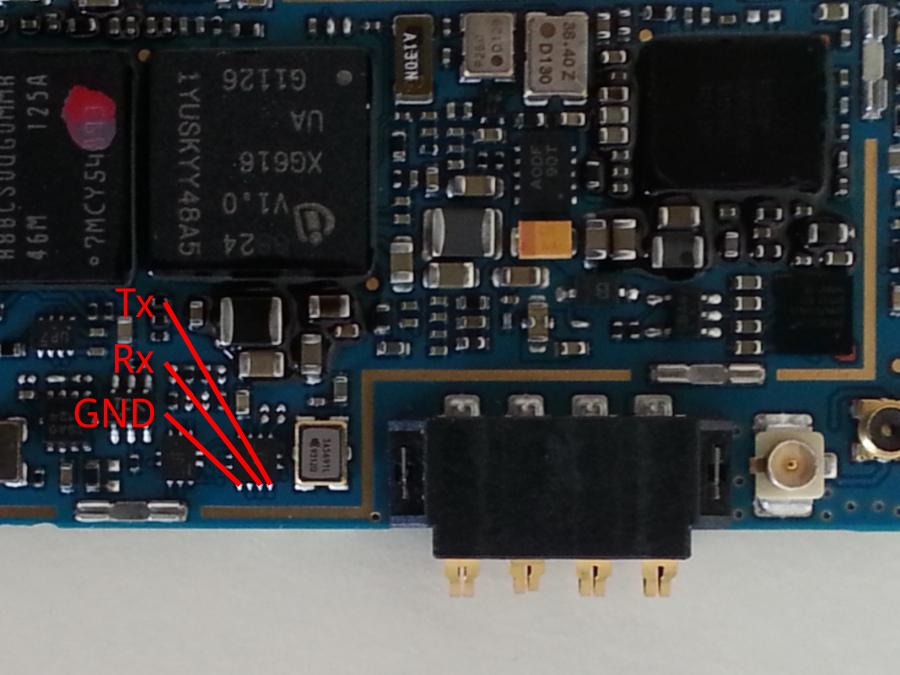
The main processor's debug UART is using a 1.8V logic level. Most UART adapters expect 3.3V, so a logic level shifter has to be used between the device and the adapter to convert between 1.8V and 3.3V.
To access the main processor's debug UART serial port, the FSUSB63 DP3T switch has to be switched to the main processor's UART and the MAX14526 MUIC has to be switched to UART.
The FSUSB63 DP3T switch can be switched to the main processor's UART by setting the OMAP_UART_SW GPIO (161) high and the IFX_UART_SW GPIO (162) low.
The MAX14526 MUIC can be switched to UART by writing 0x09 to register 0x03 on device address 0x44 on I2C bus 1 (I2C2). It can be switched back to USB by writing 0x00 at the same address.
Some development versions of U-Boot allow switching the USB connector to UART by pressing the G key (on the side) at boot.
LG's downstream version of U-Boot, that ships with Android version prior to 4.0, should allow switching the USB connector to UART by placing a 56 kOhm resistor between the ID and GND pins of the connector and pressing the volume down key at boot. LG's downstream version of LK, that ships with Android 4.0, may behave the same. This feature was not tested at this time.
LG's downstream version of Linux provides an interface for changing the USB connector muxing. It can be accessed through the /proc/driver/hmuic file.
ASCII values can be written to the file, using e.g. echo. Numerical values have the following meaning:
| Value (ASCII) | Muxing |
|---|---|
| 3 | Modem USB (download mode) |
| 6 | Main processor's debug UART |
| 7 | Modem UART |
| 8 | Main processor's USB |
| 9 | Modem USB |
These documents are the propriety of LG Electronics and Texas Instruments and are not hosted by the Replicant project.
However, some excerpts from these documents are provided, for the purpose of providing technical evidence of the facts that are mentioned in this page. We believe that this particular use of the copyrighted work is fair use.
Software stacks: freesmartphone.org's cornucopia
Status: Reverse engineered and upstreamed in freesmartphone.org's cornucopia, kernel part not upstream.
The msmcomm modem protocol was used on various Palm Pre devices, which were smartphones running GNU/Linux.
While the modem ran AT commands, if my memory is good, it didn't report RING indication. So people wanting to add support for the palm pre in Freesmartphone.org to have a free software modem stack on GNU/Linux for the palm pre had to reverse engineer that protocol. While the source code has been lost, a recent version (is it the last version?) of the git repository was obtained by Asking Lukas Maerdian and it is now archived on the Replicant git
msmcomm is now back inside the freesmartphone.org project at github
The MBIM protocol seems to be a standard.
Software stacks:1 https://www.freedesktop.org/wiki/Software/libmbim/
Software stacks: freesmartphone.org's cornucopia , oFono through the isimodem driver and the ISI protocol implementation
Status: Modem supported by Linux, userspace stack probably complete and in upstream projects, though not necessarily packaged by all GNU/Linux distributions.
At first, that modem protocol had to be reverse engineered. At one point, this was made easier thanks to the publication of the protocol headers in a specific SDK version released by Nokia for the N900. Unfortunately they took down that SDK version. The headers were probably redistributable anyway. After some point Nokia and Intel decided to share effort in making a GNU/Linux distribution for smartphones called Meego. As part of that effort, Nokia published libraries and software implementing that modem protocol as free software.
As for the sound part, this is implemented by a pulseaudio library which has cmt_speech in its name.
URl: https://github.com/KB-JetDroid/bada-modemril/
How close is it close to libsamsung-ipc? Can both be merged?
Modem using the XMM7360 chip like the Fibocom L850-GL seem to use a different protocol than libsamsung-ipc.
There is some implementation (not sure if it has a license or not) on github1.
The kernel drivers seem to also use HDLC_START and HDLC_END though.
This page is a work in progress, so it might contains mistakes, inaccuracies, etc.
Sometimes we need to use host tools for building Replicant.
This has several consequences:Ideally we could make Replicant build most of the tools we need in a reproducible way to not use the host tools without having to trust prebuilt binaries, but this is not always practical as doing that could take a lot of time. In addition we do need tools to build replacement tools in the first place.
In any case when using tools from the host distribution, it's a really good idea to not hardcode the path of the tool (like /usr/bin/python) and instead make sure that the host distribution PATH is used instead.
PATH but don't use standard paths (repo could be in /gnu/store/4cw9j7c36cgv37g6bzs2dnygmfc5jxh1-git-repo-2.4.1/share/git-repo/repo or in ~/.guix-profile/bin/repo). And since Guix is reproducible and even bootstrapable we also want not to rule out this option, while also being compatible with other distributions (for simplicity and to not be stuck with Guix).This article shows how to use host tools in a way that makes use of the host PATH and also how Android implements (with PathInterposer) the isolation between the tools provided by the host distribution and Android.
With Trisquel 8, and Replicant 11, here's an example of how the path looks like for applications being launched through the path interposer1:
/home/replicant/replicant-11/prebuilts/jdk/jdk11/linux-x86/bin /home/replicant/replicant-11/prebuilts/jdk/jdk11/linux-x86/bin /home/replicant/replicant-11/out/soong/host/linux-x86/bin /home/replicant/replicant-11/out/host/linux-x86/bin /home/replicant/replicant-11/prebuilts/gcc/linux-x86/arm/arm-linux-androideabi-4.9/bin /home/replicant/replicant-11/development/scripts /home/replicant/replicant-11/prebuilts/devtools/tools /home/replicant/replicant-11/external/selinux/prebuilts/bin /home/replicant/replicant-11/prebuilts/misc/linux-x86/dtc /home/replicant/replicant-11/prebuilts/misc/linux-x86/libufdt /home/replicant/replicant-11/prebuilts/clang/host/linux-x86/llvm-binutils-stable /home/replicant/replicant-11/prebuilts/android-emulator/linux-x86_64 /home/replicant/replicant-11/prebuilts/asuite/acloud/linux-x86 /home/replicant/replicant-11/prebuilts/asuite/aidegen/linux-x86 /home/replicant/replicant-11/prebuilts/asuite/atest/linux-x86 /home/replicant/bin /home/replicant/.local/bin /usr/local/sbin /usr/local/bin /usr/sbin /usr/bin /sbin /bin /usr/games
Here we can deduce that the paths set by the Android build system take precedence over the host paths.
1 This has been deduced by prints with the following patch:
--- a/cmd/path_interposer/main.go
+++ b/cmd/path_interposer/main.go
@@ -116,6 +116,10 @@ func Main(stdout, stderr io.Writer, interposer string, args []string, opts mainO
return 1, fmt.Errorf("Failed to set PATH env: %v", err)
}
+ fmt.Fprintln(os.Stderr, "####################################")
+ fmt.Fprintln(os.Stderr, os.Getenv("PATH"))
+ fmt.Fprintln(os.Stderr, "####################################")
+
if config := opts.config(base); config.Log || config.Error {
var procs []paths.LogProcess
if opts.lookupParents != nil {
In Replicant 10, we could use out/.path/python3 as python3 interpreter assuming that we enabled it in build/soong/ui/build/paths/config.go
for instance in the Mesa (external/mesa3d) Android.mk we had:
MESA_PYTHON2 := out/.path/python2 MESA_PYTHON3 := out/.path/python3
This worked because 'python2' and 'python3' were only available in the host path:
$ for path in $(echo /home/replicant/replicant-10/prebuilts/jdk/jdk9/linux-x86/bin:/home/replicant/replicant-10/prebuilts/jdk/jdk9/linux-x86/bin:/home/replicant/replicant-10/out/soong/host/linux-x86/bin:/home/replicant/replicant-10/out/host/linux-x86/bin:/home/replicant/replicant-10/prebuilts/gcc/linux-x86/arm/arm-linux-androideabi-4.9/bin:/home/replicant/replicant-10/development/scripts:/home/replicant/replicant-10/prebuilts/devtools/tools:/home/replicant/replicant-10/external/selinux/prebuilts/bin:/home/replicant/replicant-10/prebuilts/misc/linux-x86/dtc:/home/replicant/replicant-10/prebuilts/misc/linux-x86/libufdt:/home/replicant/replicant-10/prebuilts/android-emulator/linux-x86_64:/home/replicant/replicant-10/prebuilts/asuite/acloud/linux-x86:/home/replicant/replicant-10/prebuilts/asuite/aidegen/linux-x86:/home/replicant/replicant-10/prebuilts/asuite/atest/linux-x86:/home/replicant/bin:/home/replicant/.local/bin:/usr/local/sbin:/usr/local/bin:/usr/sbin:/usr/bin:/sbin:/bin:/usr/games | sed 's#:#\n#g') ; do ls "${path}/python3" ; done
ls: cannot access '/home/replicant/replicant-10/prebuilts/jdk/jdk9/linux-x86/bin/python3': No such file or directory
ls: cannot access '/home/replicant/replicant-10/prebuilts/jdk/jdk9/linux-x86/bin/python3': No such file or directory
ls: cannot access '/home/replicant/replicant-10/out/soong/host/linux-x86/bin/python3': No such file or directory
ls: cannot access '/home/replicant/replicant-10/out/host/linux-x86/bin/python3': No such file or directory
ls: cannot access '/home/replicant/replicant-10/prebuilts/gcc/linux-x86/arm/arm-linux-androideabi-4.9/bin/python3': No such file or directory
ls: cannot access '/home/replicant/replicant-10/development/scripts/python3': No such file or directory
ls: cannot access '/home/replicant/replicant-10/prebuilts/devtools/tools/python3': No such file or directory
ls: cannot access '/home/replicant/replicant-10/external/selinux/prebuilts/bin/python3': No such file or directory
ls: cannot access '/home/replicant/replicant-10/prebuilts/misc/linux-x86/dtc/python3': No such file or directory
ls: cannot access '/home/replicant/replicant-10/prebuilts/misc/linux-x86/libufdt/python3': No such file or directory
ls: cannot access '/home/replicant/replicant-10/prebuilts/android-emulator/linux-x86_64/python3': No such file or directory
ls: cannot access '/home/replicant/replicant-10/prebuilts/asuite/acloud/linux-x86/python3': No such file or directory
ls: cannot access '/home/replicant/replicant-10/prebuilts/asuite/aidegen/linux-x86/python3': No such file or directory
ls: cannot access '/home/replicant/replicant-10/prebuilts/asuite/atest/linux-x86/python3': No such file or directory
ls: cannot access '/home/replicant/bin/python3': No such file or directory
ls: cannot access '/home/replicant/.local/bin/python3': No such file or directory
ls: cannot access '/usr/local/sbin/python3': No such file or directory
ls: cannot access '/usr/local/bin/python3': No such file or directory
ls: cannot access '/usr/sbin/python3': No such file or directory
/usr/bin/python3
ls: cannot access '/sbin/python3': No such file or directory
ls: cannot access '/bin/python3': No such file or directory
ls: cannot access '/usr/games/python3': No such file or directory
For instance prebuilts/python/linux-x86/2.7.5/bin/python wasn't in the path.
If the tool we want to use isn't allowed by the PathInterposer, we will also need to allow it by modifying its configuration in build/soong. Here's an example for xz:
commit b896549c85f0a87fb94c9e879a3fcf2062efad10
Author: Denis 'GNUtoo' Carikli <GNUtoo@cyberdimension.org>
Date: Mon Nov 23 15:54:08 2020 +0100
Enable host xz to build the kernel
Without that fix we have:
XZKERN arch/arm/boot/compressed/piggy_data
xz: Unsupported filter chain or filter options
make[3]: ***
[.../kernel/replicant/linux/arch/arm/boot/compressed/Makefile:184:
arch/arm/boot/compressed/piggy_data] Error 1
make[3]: *** Deleting file 'arch/arm/boot/compressed/piggy_data'
make[2]: ***
[.../kernel/replicant/linux/arch/arm/boot/Makefile:64:
arch/arm/boot/compressed/vmlinux] Error 2
make[1]: *** [arch/arm/Makefile:328: zImage] Error 2
make[1]: Leaving directory
'.../out/target/product/i9300/obj/KERNEL_OBJ'
make: *** [Makefile:185: __sub-make] Error 2
Signed-off-by: Denis 'GNUtoo' Carikli <GNUtoo@cyberdimension.org>
diff --git a/ui/build/paths/config.go b/ui/build/paths/config.go
index b84e6245..3a3e759b 100644
--- a/ui/build/paths/config.go
+++ b/ui/build/paths/config.go
@@ -97,6 +97,7 @@ var Configuration = map[string]PathConfig{
"sh": Allowed,
"tr": Allowed,
"unzip": Allowed,
+ "xz": Allowed,
"zip": Allowed,
// Host toolchain is removed. In-tree toolchain should be used instead.
So feel free to add yourself in this page if you work or want to work on Replicant.
Nickname: GNUtoo
Email address: GNUtoo@replicant.us
GPG key: FB31 DBA3 AB8D B76A 4157 329F 7651 568F 8037 4459
Role: Replicant developer, member of the Replicant steering committee.
Location: Paris
Events/Conferences he typically attends to: local events and conferences in Paris
Devices and testing hardware: list (As I also work on other free software projects like Parabola, I moved the list there).
Tools:Nickname: PaulK
Email address: paulk@replicant.us
Previous roles: Replicant developer, ex-member of the Steering committee.
Current occupations: Paul now works on free software hardware support in upstream projects (Linux, and GNU/Linux userspace) but still advises the Replicant project on upstream related topics.
GPG key: 01B7 0C5D 940C B63D 5FA6 12C2 84FD C1EA 8FEE 950C
Role: Replicant developer, member of the Steering committee.
Nickname: Putti
Current work: Work on Replicant 11.0
Nickname: wiewo
Email address: wreg@wiedmeyer.de
Website: fossencdi.org
Role: Replicant developer (major contributor to the Replicant 6 release).
GPG key: 0F30 D1A0 2F73 F70A 6FEE 048E 5816 A24C 1075 7FC4
| Versions | type | Status | Unit produced | Replicant compatible versions | SoC | Bootloader | Modem link | Modem protocol | RAM |
|---|---|---|---|---|---|---|---|---|---|
| Project Anakin | Modified single board computer | ? | ? | Not supported yet | Allwinner A64 | Unsigned | ? | ? | ? |
| "Project Don't Be Evil" devkit | Public development kit | released | ? | Not supported yet | Allwinner A64 | Unsigned | ? | ? | ? |
| PinePhone v1.0 | Public prototype | released | ? | Not supported yet | Allwinner A64 | Unsigned | USB | AT, QMI | 2G |
| PinePhone v1.1 | Public prototype | released | ? | Not supported yet | Allwinner A64 | Unsigned | USB | AT, QMI | 2G |
| PinePhone v1.2 | Public prototype | released March 2020 | ? | Not supported yet | Allwinner A64 | Unsigned | USB | AT, QMI | 2G |
| PinePhone v1.2a | Public prototype | released June 2020 | ? | Not supported yet | Allwinner A64 | Unsigned | USB | AT, QMI | 2G |
| PinePhone v1.2b | Public prototype | released October 2020 | ? | Not supported yet | Allwinner A64 | Unsigned | USB | AT, QMI | 3G |
When it was leant to me, the person lending it to me tried many distros. The last distro tried was PostMarketOS.
U-Boot SPL 2020.01 (Jan 09 2020 - 12:17:54 +0000)
DRAM: 2048 MiB
Trying to boot from MMC1
NOTICE: BL31: v2.1(release):v3.10.0_rc3-151-ga4b61dc7d9
NOTICE: BL31: Built : 16:21:59, Jun 12 2019
NOTICE: BL31: Detected Allwinner A64/H64/R18 SoC (1689)
NOTICE: BL31: Found U-Boot DTB at 0x408e1a8, model: Pine64 LTS
NOTICE: BL31: PMIC: Detected AXP803 on RSB.
U-Boot 2020.01 (Jan 09 2020 - 12:17:54 +0000) Allwinner Technology
CPU: Allwinner A64 (SUN50I)
Model: Pine64 LTS
DRAM: 2 GiB
MMC: mmc@1c0f000: 0, mmc@1c11000: 1
Loading Environment from FAT... Unable to use mmc 1:1... In: serial
Out: serial
Err: serial
Net: phy interface7
Could not get PHY for ethernet@1c30000: addr 1
No ethernet found.
starting USB...
Bus usb@1c1a000: USB EHCI 1.00
Bus usb@1c1a400: USB OHCI 1.0
Bus usb@1c1b000: USB EHCI 1.00
Bus usb@1c1b400: USB OHCI 1.0
scanning bus usb@1c1a000 for devices... 1 USB Device(s) found
scanning bus usb@1c1a400 for devices... 1 USB Device(s) found
scanning bus usb@1c1b000 for devices... 1 USB Device(s) found
scanning bus usb@1c1b400 for devices... 1 USB Device(s) found
scanning usb for storage devices... 0 Storage Device(s) found
Hit any key to stop autoboot: 0
switch to partitions #0, OK
mmc0 is current device
Scanning mmc 0:1...
Found U-Boot script /boot.scr
919 bytes read in 7 ms (127.9 KiB/s)
## Executing script at 4fc00000
gpio: pin 114 (gpio 114) value is 1
Booting from SD
arch=arm
baudrate=115200
board=sunxi
board_name=sunxi
boot_a_script=load ${devtype} ${devnum}:${distro_bootpart} ${scriptaddr} ${prefix}${script}; source ${scriptaddr}
boot_efi_binary=if fdt addr ${fdt_addr_r}; then bootefi bootmgr ${fdt_addr_r};else bootefi bootmgr ${fdtcontroladdr};fi;load ${devtype} ${devnum}:${distro_bootpart} ${kernel_addr_r} efi/boot/bootaa64.efi; if fdt addr ${fdt_addr_r}; then bootefi ${kernel_addr_r} ${fdt_addr_r};else bootefi ${kernel_addr_r} ${fdtcontroladdr};fi
boot_extlinux=sysboot ${devtype} ${devnum}:${distro_bootpart} any ${scriptaddr} ${prefix}${boot_syslinux_conf}
boot_net_usb_start=usb start
boot_prefixes=/ /boot/
boot_script_dhcp=boot.scr.uimg
boot_scripts=boot.scr.uimg boot.scr
boot_syslinux_conf=extlinux/extlinux.conf
boot_targets=fel mmc_auto usb0 pxe dhcp
bootargs=init=/init.sh rw console=tty0 console=ttyS0,115200 no_console_suspend earlycon=uart,mmio32,0x01c28000 panic=10 consoleblank=0 loglevel=1 cma=256M PMOS_NO_OUTPUT_REDIRECT pmos_boot=/dev/mmcblk0p1 pmos_root=/dev/mmcblk0p2
bootcmd=run distro_bootcmd
bootcmd_dhcp=run boot_net_usb_start; if dhcp ${scriptaddr} ${boot_script_dhcp}; then source ${scriptaddr}; fi;setenv efi_fdtfile ${fdtfile}; setenv efi_old_vci ${bootp_vci};setenv efi_old_arch ${bootp_arch};setenv bootp_vci PXEClient:Arch:00011:UNDI:003000;setenv bootp_arch 0xb;if dhcp ${kernel_addr_r}; then tftpboot ${fdt_addr_r} dtb/${efi_fdtfile};if fdt addr ${fdt_addr_r}; then bootefi ${kernel_addr_r} ${fdt_addr_r}; else bootefi ${kernel_addr_r} ${fdtcontroladdr};fi;fi;setenv bootp_vci ${efi_old_vci};setenv bootp_arch ${efi_old_arch};setenv efi_fdtfile;setenv efi_old_arch;setenv efi_old_vci;
bootcmd_fel=if test -n ${fel_booted} && test -n ${fel_scriptaddr}; then echo '(FEL boot)'; source ${fel_scriptaddr}; fi
bootcmd_mmc0=devnum=0; run mmc_boot
bootcmd_mmc1=devnum=1; run mmc_boot
bootcmd_mmc_auto=if test ${mmc_bootdev} -eq 1; then run bootcmd_mmc1; run bootcmd_mmc0; elif test ${mmc_bootdev} -eq 0; then run bootcmd_mmc0; run bootcmd_mmc1; fi
bootcmd_pxe=run boot_net_usb_start; dhcp; if pxe get; then pxe boot; fi
bootcmd_usb0=devnum=0; run usb_boot
bootdelay=2
bootdev=0
bootfstype=ext4
bootm_size=0xa000000
console=ttyS0,115200
cpu=armv8
devplist=1
dfu_alt_info_ram=kernel ram 0x40080000 0x1000000;fdt ram 0x4FA00000 0x100000;ramdisk ram 0x4FE00000 0x4000000
distro_bootcmd=for target in ${boot_targets}; do run bootcmd_${target}; done
efi_dtb_prefixes=/ /dtb/ /dtb/current/
ethaddr=02:ba:83:c7:f4:f3
fdt_addr_r=0x4FA00000
fdtcontroladdr=b9f31258
fdtfile=allwinner/sun50i-a64-pine64-lts.dtb
fileaddr=4fc00000
filesize=397
kernel_addr_r=0x40080000
load_efi_dtb=load ${devtype} ${devnum}:${distro_bootpart} ${fdt_addr_r} ${prefix}${efi_fdtfile}
mmc_boot=if mmc dev ${devnum}; then devtype=mmc; run scan_dev_for_boot_part; fi
mmc_bootdev=0
partitions=name=loader1,start=8k,size=32k,uuid=${uuid_gpt_loader1};name=loader2,size=984k,uuid=${uuid_gpt_loader2};name=esp,size=128M,bootable,uuid=${uuid_gpt_esp};name=system,size=-,uuid=${uuid_gpt_system};
preboot=usb start
pxefile_addr_r=0x4FD00000
ramdisk_addr_r=0x4FE00000
scan_dev_for_boot=echo Scanning ${devtype} ${devnum}:${distro_bootpart}...; for prefix in ${boot_prefixes}; do run scan_dev_for_extlinux; run scan_dev_for_scripts; done;run scan_dev_for_efi;
scan_dev_for_boot_part=part list ${devtype} ${devnum} -bootable devplist; env exists devplist || setenv devplist 1; for distro_bootpart in ${devplist}; do if fstype ${devtype} ${devnum}:${distro_bootpart} bootfstype; then run scan_dev_for_boot; fi; done; setenv devplist
scan_dev_for_efi=setenv efi_fdtfile ${fdtfile}; for prefix in ${efi_dtb_prefixes}; do if test -e ${devtype} ${devnum}:${distro_bootpart} ${prefix}${efi_fdtfile}; then run load_efi_dtb; fi;done;if test -e ${devtype} ${devnum}:${distro_bootpart} efi/boot/bootaa64.efi; then echo Found EFI removable media binary efi/boot/bootaa64.efi; run boot_efi_binary; echo EFI LOAD FAILED: continuing...; fi; setenv efi_fdtfile
scan_dev_for_extlinux=if test -e ${devtype} ${devnum}:${distro_bootpart} ${prefix}${boot_syslinux_conf}; then echo Found ${prefix}${boot_syslinux_conf}; run boot_extlinux; echo SCRIPT FAILED: continuing...; fi
scan_dev_for_scripts=for script in ${boot_scripts}; do if test -e ${devtype} ${devnum}:${distro_bootpart} ${prefix}${script}; then echo Found U-Boot script ${prefix}${script}; run boot_a_script; echo SCRIPT FAILED: continuing...; fi; done
scriptaddr=0x4FC00000
serial#=92c08dba83c7f4f3
soc=sunxi
stderr=serial,vidconsole
stdin=serial,usbkbd
stdout=serial,vidconsole
usb_boot=usb start; if usb dev ${devnum}; then devtype=usb; run scan_dev_for_boot_part; fi
uuid_gpt_esp=c12a7328-f81f-11d2-ba4b-00a0c93ec93b
uuid_gpt_system=b921b045-1df0-41c3-af44-4c6f280d3fae
Environment size: 4745/131068 bytes
Loading DTB
30085 bytes read in 14 ms (2 MiB/s)
Loading Initramfs
4584216 bytes read in 220 ms (19.9 MiB/s)
Loading Kernel
15091720 bytes read in 708 ms (20.3 MiB/s)
gpio: pin 115 (gpio 115) value is 1
Resizing FDT
Booting kernel
gpio: pin 116 (gpio 116) value is 1
## Loading init Ramdisk from Legacy Image at 4fe00000 ...
Image Name: uInitrd
Image Type: AArch64 Linux RAMDisk Image (uncompressed)
Data Size: 4584152 Bytes = 4.4 MiB
Load Address: 00000000
Entry Point: 00000000
Verifying Checksum ... OK
## Flattened Device Tree blob at 4fa00000
Booting using the fdt blob at 0x4fa00000
EHCI failed to shut down host controller.
Loading Ramdisk to 49ba0000, end 49fff2d8 ... OK
Loading Device Tree to 0000000049b95000, end 0000000049b9ffff ... OK
Starting kernel ...
[ 0.000000] Booting Linux on physical CPU 0x0000000000 [0x410fd034]
[ 0.000000] Linux version 5.4.0 (pmos@msi) (gcc version 9.2.0 (Alpine 9.2.0)) #3-postmarketos-allwinner SMP Sat Jan 18 16:55:25 UTC 2020
[ 0.000000] Machine model: PinePhone
[ 0.000000] earlycon: uart0 at MMIO32 0x0000000001c28000 (options '')
[ 0.000000] printk: bootconsole [uart0] enabled
### postmarketOS initramfs ###
Configuring kernel firmware image search path
modprobe: module sun6i_mipi_dsi not found in modules.dep
modprobe: module sun4i_drm not found in modules.dep
modprobe: module pwm_sun4i not found in modules.dep
modprobe: module sun8i_mixer not found in modules.dep
modprobe: module ext4 not found in modules.dep
modprobe: module usb_f_rndis not found in modules.dep
NOTE: Waiting 10 seconds for the framebuffer /dev/fb0.
If your device does not have a framebuffer, disable this with:
no_framebuffer=true in <https://postmarketos.org/deviceinfo>
Setting framebuffer mode to: U:720x1440p-0
Setup usb network
/sys/class/android_usb does not exist, skipping android_usb
Setting up an USB gadget through configfs
Starting udhcpd
Using interface usb0
Start the dhcpcd daemon (forks into background)
Mount boot partition (/dev/mmcblk0p1)
Extract /boot/initramfs-postmarketos-allwinner-extra
31639 blocks
Check/repair root filesystem (/dev/mmcblk0p2)
e2fsck 1.45.5 (07-Jan-2020)
pmOS_root: recovering journal
Clearing orphaned inode 81454 (uid=10000, gid=10000, mode=0100600, size=17344)
Clearing orphaned inode 81296 (uid=10000, gid=10000, mode=0100600, size=8896)
Clearing orphaned inode 81253 (uid=10000, gid=10000, mode=0100600, size=47218)
Clearing orphaned inode 81241 (uid=10000, gid=10000, mode=0100600, size=1024)
Setting free inodes count to 27171 (was 27176)
Setting free blocks count to 81716 (was 81737)
pmOS_root: clean, 72989/100160 files, 562892/644608 blocks
Resize root filesystem (/dev/mmcblk0p2)
resize2fs 1.45.5 (07-Jan-2020)
The filesystem is already 644608 (4k) blocks long. Nothing to do!
Mount root partition (/dev/mmcblk0p2)
umount: can't unmount /dev: Invalid argument
OpenRC 0.42.1.6a467d4a81 is starting up Linux 5.4.0 (aarch64)
/lib/rc/sh/init.sh: line 15: can't create /dev/null: Read-only file system
* md5sum is missing, which suggests /usr is not mounted
* If you have separate /usr, it must be mounted by initramfs
* If not, you should check coreutils is installed correctly
* Mounting /proc ... [ ok ]
* Mounting /run ... * /run/openrc: creating directory
* /run/lock: creating directory
* /run/lock: correcting owner
/lib/rc/sh/gendepends.sh: line 28: can't create /dev/null: Read-only file system
* Caching service dependencies ... [ ok ]
* Clock skew detected with `(null)'
* Adjusting mtime of `/run/openrc/deptree' to Sat Jan 18 19:20:37 2020
* WARNING: clock skew detected!
* Mounting devtmpfs on /dev ... [ ok ]
* Mounting /dev/mqueue ... [ ok ]
* Mounting /dev/pts ... [ ok ]
* Mounting /dev/shm ... [ ok ]
* Mount subpartitions of /dev/mmcblk0
device-mapper: reload ioctl on mmcblk0p1 failed: Resource busy
create/reload failed on mmcblk0p1
device-mapper: reload ioctl on mmcblk0p2 failed: Resource busy
create/reload failed on mmcblk0p2
* Mount subpartitions of /dev/mmcblk2
* Mounting /sys ... [ ok ]
* Mounting security filesystem ... [ ok ]
* Mounting debug filesystem ... [ ok ]
* Mounting config filesystem ... [ ok ]
* Mounting persistent storage (pstore) filesystem ... [ ok ]
* Starting udev ... [ ok ]
* Generating a rule to create a /dev/root symlink ... [ ok ]
* Populating /dev with existing devices through uevents ... [ ok ]
* WARNING: clock skew detected!
* Loading modules ... [ ok ]
* Setting system clock using the hardware clock [UTC] ... [ ok ]
* Setting the local clock based on last shutdown time ... [ ok ]
* Checking local filesystems .../dev/mmcblk2p2 is in use.
e2fsck: Cannot continue, aborting.
* Operational error
[ !! ]
* Remounting root filesystem read/write ... [ ok ]
* Remounting filesystems ... [ ok ]
* Mounting local filesystems ... [ ok ]
* Configuring kernel parameters ...sysctl: error: 'net.ipv4.tcp_syncookies' is an unknown key
[ ok ]
* Creating user login records ... [ ok ]
* Wiping /tmp directory ... [ ok ]
* Setting hostname ... [ ok ]
* Starting busybox syslog ... [ ok ]
* WARNING: clock skew detected!
* Starting System Message Bus ... [ ok ]
* Starting RNG Daemon ... [ ok ]
* Could not find a wireless interface
* Starting WPA Supplicant ... [ ok ]
* Starting networkmanager ... [ ok ]
* Starting chronyd ... [ ok ]
* Enabling EG25 WWAN module ... * /run/lightdm: creating directory
* /run/lightdm: correcting owner
* Starting Display Manager ... [ ok ]
* Starting oFono ... [ ok ]
* Starting sshd ... [ ok ]
* Activating swap file ...Configured swap file size is 0, skipping creation.
[ ok ]
* Starting urfkill ... [ ok ]
* Starting local ... [ ok ]
Welcome to postmarketOS
Kernel 5.4.0 on an aarch64 (/dev/ttyS0)
pine64-pinephone login:
=> help ? - alias for 'help' base - print or set address offset bdinfo - print Board Info structure blkcache - block cache diagnostics and control boot - boot default, i.e., run 'bootcmd' bootd - boot default, i.e., run 'bootcmd' bootefi - Boots an EFI payload from memory bootelf - Boot from an ELF image in memory booti - boot Linux kernel 'Image' format from memory bootm - boot application image from memory bootp - boot image via network using BOOTP/TFTP protocol bootvx - Boot vxWorks from an ELF image cmp - memory compare coninfo - print console devices and information cp - memory copy crc32 - checksum calculation dhcp - boot image via network using DHCP/TFTP protocol dm - Driver model low level access echo - echo args to console editenv - edit environment variable env - environment handling commands exit - exit script ext2load - load binary file from a Ext2 filesystem ext2ls - list files in a directory (default /) ext4load - load binary file from a Ext4 filesystem ext4ls - list files in a directory (default /) ext4size - determine a file's size false - do nothing, unsuccessfully fatinfo - print information about filesystem fatload - load binary file from a dos filesystem fatls - list files in a directory (default /) fatmkdir - create a directory fatrm - delete a file fatsize - determine a file's size fatwrite - write file into a dos filesystem fdt - flattened device tree utility commands fstype - Look up a filesystem type go - start application at address 'addr' gpio - query and control gpio pins gpt - GUID Partition Table gzwrite - unzip and write memory to block device help - print command description/usage iminfo - print header information for application image imxtract - extract a part of a multi-image itest - return true/false on integer compare lcdputs - print string on video framebuffer ln - Create a symbolic link load - load binary file from a filesystem loadb - load binary file over serial line (kermit mode) loads - load S-Record file over serial line loadx - load binary file over serial line (xmodem mode) loady - load binary file over serial line (ymodem mode) loop - infinite loop on address range ls - list files in a directory (default /) lzmadec - lzma uncompress a memory region md - memory display mdio - MDIO utility commands mii - MII utility commands mm - memory modify (auto-incrementing address) mmc - MMC sub system mmcinfo - display MMC info mw - memory write (fill) nfs - boot image via network using NFS protocol nm - memory modify (constant address) part - disk partition related commands ping - send ICMP ECHO_REQUEST to network host printenv - print environment variables pxe - commands to get and boot from pxe files random - fill memory with random pattern reset - Perform RESET of the CPU run - run commands in an environment variable save - save file to a filesystem saveenv - save environment variables to persistent storage setcurs - set cursor position within screen setenv - set environment variables setexpr - set environment variable as the result of eval expression sf - SPI flash sub-system showvar - print local hushshell variables size - determine a file's size sleep - delay execution for some time source - run script from memory sysboot - command to get and boot from syslinux files test - minimal test like /bin/sh tftpboot - boot image via network using TFTP protocol true - do nothing, successfully unzip - unzip a memory region usb - USB sub-system usbboot - boot from USB device version - print monitor, compiler and linker version
=> printenv
arch=arm
baudrate=115200
board=sunxi
board_name=sunxi
boot_a_script=load ${devtype} ${devnum}:${distro_bootpart} ${scriptaddr} ${prefix}${script}; source ${scriptaddr}
boot_efi_binary=if fdt addr ${fdt_addr_r}; then bootefi bootmgr ${fdt_addr_r};else bootefi bootmgr ${fdtcontroladdr};fi;load ${devtype} ${devnum}:${distro_bootpart} ${kernel_addr_r} efi/boot/bootaa64.efi; if fdt addr ${fdt_addr_r}; then bootefi ${kernel_addr_r} ${fdt_addr_r};else bootefi ${kernel_addr_r} ${fdtcontroladdr};fi
boot_extlinux=sysboot ${devtype} ${devnum}:${distro_bootpart} any ${scriptaddr} ${prefix}${boot_syslinux_conf}
boot_net_usb_start=usb start
boot_prefixes=/ /boot/
boot_script_dhcp=boot.scr.uimg
boot_scripts=boot.scr.uimg boot.scr
boot_syslinux_conf=extlinux/extlinux.conf
boot_targets=fel mmc_auto usb0 pxe dhcp
bootcmd=run distro_bootcmd
bootcmd_dhcp=run boot_net_usb_start; if dhcp ${scriptaddr} ${boot_script_dhcp}; then source ${scriptaddr}; fi;setenv efi_fdtfile ${fdtfile}; setenv efi_old_vci ${bootp_vci};setenv efi_old_arch ${bootp_arch};setenv bootp_vci PXEClient:Arch:00011:UNDI:003000;setenv bootp_arch 0xb;if dhcp ${kernel_addr_r}; then tftpboot ${fdt_addr_r} dtb/${efi_fdtfile};if fdt addr ${fdt_addr_r}; then bootefi ${kernel_addr_r} ${fdt_addr_r}; else bootefi ${kernel_addr_r} ${fdtcontroladdr};fi;fi;setenv bootp_vci ${efi_old_vci};setenv bootp_arch ${efi_old_arch};setenv efi_fdtfile;setenv efi_old_arch;setenv efi_old_vci;
bootcmd_fel=if test -n ${fel_booted} && test -n ${fel_scriptaddr}; then echo '(FEL boot)'; source ${fel_scriptaddr}; fi
bootcmd_mmc0=devnum=0; run mmc_boot
bootcmd_mmc1=devnum=1; run mmc_boot
bootcmd_mmc_auto=if test ${mmc_bootdev} -eq 1; then run bootcmd_mmc1; run bootcmd_mmc0; elif test ${mmc_bootdev} -eq 0; then run bootcmd_mmc0; run bootcmd_mmc1; fi
bootcmd_pxe=run boot_net_usb_start; dhcp; if pxe get; then pxe boot; fi
bootcmd_usb0=devnum=0; run usb_boot
bootdelay=2
bootm_size=0xa000000
console=ttyS0,115200
cpu=armv8
dfu_alt_info_ram=kernel ram 0x40080000 0x1000000;fdt ram 0x4FA00000 0x100000;ramdisk ram 0x4FE00000 0x4000000
distro_bootcmd=for target in ${boot_targets}; do run bootcmd_${target}; done
efi_dtb_prefixes=/ /dtb/ /dtb/current/
ethaddr=02:ba:83:c7:f4:f3
fdt_addr_r=0x4FA00000
fdtcontroladdr=b9f31258
fdtfile=allwinner/sun50i-a64-pine64-lts.dtb
kernel_addr_r=0x40080000
load_efi_dtb=load ${devtype} ${devnum}:${distro_bootpart} ${fdt_addr_r} ${prefix}${efi_fdtfile}
mmc_boot=if mmc dev ${devnum}; then devtype=mmc; run scan_dev_for_boot_part; fi
mmc_bootdev=0
partitions=name=loader1,start=8k,size=32k,uuid=${uuid_gpt_loader1};name=loader2,size=984k,uuid=${uuid_gpt_loader2};name=esp,size=128M,bootable,uuid=${uuid_gpt_esp};name=system,size=-,uuid=${uuid_gpt_system};
preboot=usb start
pxefile_addr_r=0x4FD00000
ramdisk_addr_r=0x4FE00000
scan_dev_for_boot=echo Scanning ${devtype} ${devnum}:${distro_bootpart}...; for prefix in ${boot_prefixes}; do run scan_dev_for_extlinux; run scan_dev_for_scripts; done;run scan_dev_for_efi;
scan_dev_for_boot_part=part list ${devtype} ${devnum} -bootable devplist; env exists devplist || setenv devplist 1; for distro_bootpart in ${devplist}; do if fstype ${devtype} ${devnum}:${distro_bootpart} bootfstype; then run scan_dev_for_boot; fi; done; setenv devplist
scan_dev_for_efi=setenv efi_fdtfile ${fdtfile}; for prefix in ${efi_dtb_prefixes}; do if test -e ${devtype} ${devnum}:${distro_bootpart} ${prefix}${efi_fdtfile}; then run load_efi_dtb; fi;done;if test -e ${devtype} ${devnum}:${distro_bootpart} efi/boot/bootaa64.efi; then echo Found EFI removable media binary efi/boot/bootaa64.efi; run boot_efi_binary; echo EFI LOAD FAILED: continuing...; fi; setenv efi_fdtfile
scan_dev_for_extlinux=if test -e ${devtype} ${devnum}:${distro_bootpart} ${prefix}${boot_syslinux_conf}; then echo Found ${prefix}${boot_syslinux_conf}; run boot_extlinux; echo SCRIPT FAILED: continuing...; fi
scan_dev_for_scripts=for script in ${boot_scripts}; do if test -e ${devtype} ${devnum}:${distro_bootpart} ${prefix}${script}; then echo Found U-Boot script ${prefix}${script}; run boot_a_script; echo SCRIPT FAILED: continuing...; fi; done
scriptaddr=0x4FC00000
serial#=92c08dba83c7f4f3
soc=sunxi
stderr=serial,vidconsole
stdin=serial,usbkbd
stdout=serial,vidconsole
usb_boot=usb start; if usb dev ${devnum}; then devtype=usb; run scan_dev_for_boot_part; fi
uuid_gpt_esp=c12a7328-f81f-11d2-ba4b-00a0c93ec93b
uuid_gpt_system=b921b045-1df0-41c3-af44-4c6f280d3fae
Environment size: 4448/131068 bytes
=>
The PinePhone is an AllWinner A64 based smartphone designed and produced by PINE64 that strives to be compatible with fully free software. It is documented in detail at PINE64's wiki
| Feature | Hardware | Comments | TODO |
|---|---|---|---|
| System on a chip | Allwinner A64 Quad Core9 | * The bootloader should be fully free software7 including ARM Trusted Firmware8. * The code should be upstream already7. |
TODO: * Look at the code. |
| GPU | Mali 400 MP2 GPU1 | * A "pipe" driver is in Linux since 5.2 * Has support in Mesa. |
|
| Modem | Quectel EG-25G1 with2 worldwide bands4 | * The EG-25G is an international version of the EC25. * Runs GNU/Linux18. * USB connection for data and I2S connection for audio18. * Audio connected to both PCM interfaces on the A6414. * PCM audio still experimental: sending to the modem works fine, receiving produces mangled samples14. * AT support commands look unusable20, so we need to use QMI which is way more robust anyway. |
TODO: * What's the similarity with the EC-25? |
| GNSS1: GPS, GPS-A, GLONASS4 | * Part of the modem (Qualcomm chip). * It's NMEA protocol variant is already supported by GNU/Linux's gpsd21. * Supports regular A-GNSS and Qualcomm's gpsOneXTRA22. * Reception is poor. |
||
| WiFi | RTL8723cs3 | * Requires a nonfree loadable firmware3. * Connected via SDIO18. |
TODO: * Check if firmware is provided under GPLv2 within the Linux driver as happened in similar chips. |
| Bluetooth: 4.0, A2DP1 | * Requires a nonfree firmware3. * Connected via UART18. |
||
| USB – C1 (Power, Data and Video Out) | * USB 2.09 * Serial console is only available in the headphone connector (activated by the 6th contact on the dipswitch10) |
||
| RAM | 2 or 3 GB of LPDDR3 RAM | * Initialized by u-boot SPL18. | |
| Main Camera | Single OmniVision OV6540, 5MP, 1/4″, LED Flash1 | * Mainline driver5 * No firmware required5 * There's an optional non-free firmware for the auto-focus18. |
|
| Selfie Camera | Single GC20351, 2MP, f/2.8, 1/5″ | ||
| Storage | Bootable microSD slot1 16GB eMMC1 |
* Boot order: microSD -> eMMC6 | |
| Sensors accelerator, gyro, proximity, compass, barometer, ambient light1 | TODO: * Which chips are used? |
||
| LCD panel and touchscreen | 5.95″ LCD 1440×720 18:9 aspect ratio (hardened glass) |
Probably works with free software11. | |
| Power Management IC (PMIC) | AXP80313 | ||
| Power Management coprocessor | AR10015 | * The proprietary firmware can be replaced with Crust16. * Allows deep power-saving modes and later wake-up. * Use case: receive signal from modem to wake-up device17. |
Downstream Linux: https://gitlab.com/pine64-org/linux https://xff.cz/git/linux pp-x.xx branches (mirror: https://codeberg.org/megi/linux)
Downstream u-boot: https://gitlab.com/pine64-org/u-boot (can now use upstream)
Downstream arm-trusted-firmware: https://gitlab.com/pine64-org/arm-trusted-firmware
Current upstreaming work is being led by Ondřej Jirman (aka "megi"): megi's PinePhone Development Log.
megi publishes kernels after each release with the not-yet-upstreamed patches rebased on top. The commit log thus serves as the best available "to upstream" list: example for Linux 6.10
A now (2024) outdated status can be seen at: megi's feature/driver support matrix.
Current upstreaming path looks like this: megi -> sunxi-next -> linux-next -> torvalds
Patches relevant to all A64 devices should be directly sent to sunxi-next.
Patches only relevant to PinePhone may be sent to megi
Previous upstreaming work was done at PINE64's GitLab.
PinePhone support was upstreamed on November 2020
Check megi's Audio on PinePhone.
The PinePhone has 6 hardware switches19 that allow turning on/off different hardware components: modem, WiFi/Bluetooth, microphone, rear camera, front camera and headphones. Unfortunately these are located under the back cover, which needs to be taken out to operate them.
There are many reports of poor GPS reception on the PinePhone. The official cause is the small antenna in the PinePhone and the suggested fix is to use Assisted GNSS (A-GNSS).
A-GNSS has already been added into Mobian's eg25-manager and there is also a proof of concept script available.
Unfortunately, A-GNSS alone, will not solve the full issue we are experiencing. A-GNSS can only improve the Time To First Fix (TTFF). On GNUtoo's tests with the PinePhone, after the first fix was acquired, just going under some trees in a town sufficed to loose the signal. This hints that, besides being small, the GNSS antenna may suffer some design fault.
On top of that, there exists no SUPL server server running free software (that we know of), as such we cannot implement A-GNSS on Replicant.
The Openmoko Freerunner had working A-GNSS but used it only to save and inject back the almanac data, e.g. for faster fixes after closing and opening a navigation app in a short time interval. Unfortunately the almanac and ephemeris data is only valid for a limited period.
In general to make GPS work fine with free software we need the best GPS chips available. What's inside the PinePhone does not seem to be up to par. More testing and tweaking is needed though.
All listed at PinePhone board information, schematics and certifications on PINE64 wiki.
1 Some specifications are available at the device page and wiki page.
2 PinePhone discussion in Replicant's mailing list: https://lists.osuosl.org/pipermail/replicant/2019-July/001997.html
3 From #replicant channel on Freenode:
<MoeIcenowy> The Wi-Fi changed to RTL8723CS (this chip also does BT), which needs non-free firmware to be feed
4 From #replicant channel on Freenode:
<MoeIcenowy> The GNSS should be also done by EG25-G
5 From #replicant channel on Freenode:
<MoeIcenowy> The OV5640 camera doesn't need firmware and its driver is mainlined
6 From #replicant channel on Freenode:
<MoeIcenowy> The boot order is strictly MicroSD->eMMC, which is set in the A64's boot ROM
7 From #replicant channel on Freenode:
<MoeIcenowy> The bootloader (U-Boot SPL + ATF + U-Boot) is free software, all mainlined now (and the downstream dirty U-Boot cannot boot upstream Linux kernel)
8 From #replicant channel on Freenode:
<MoeIcenowy> https://github.com/ARM-software/arm-trusted-firmware
9 Allwinner A64 Datasheet: http://files.pine64.org/doc/datasheet/pine64/A64_Datasheet_V1.1.pdf
10 PostmarketOS Pinephone page: https://wiki.postmarketos.org/wiki/PINE64_PinePhone_(pine64-pinephone)#Serial_console
11 From #replicant channel on Freenode:
01:48 <adjtm> GNUtoo, lukasz confirmed me that the lcd doesn't require proprietary firmware to be uploaded
01:49 <adjtm> the conversation between pine64 staff about the lcd that someone posted on irc was probably before deciding in
the last lcd
13 From Xalius on PINE64 IRC. Details at: https://linux-sunxi.org/AXP803
14 From Xalius.
15 https://linux-sunxi.org/AR100
16 https://github.com/crust-firmware/crust
17 From Xalius.
18 PinePhone Misconceptions: https://www.pine64.org/2020/01/24/setting-the-record-straight-pinephone-misconceptions/
19 PinePhone at PINE64 wiki: https://wiki.pine64.org/index.php/PinePhone#Killswitch_configuration
20 According to Pavel Machek, there is no RING indication on the AT side (archive) so we might be required to use QMI. QMI is probably a better long term solution anyway.
21 GNUtoo tested it with gpsd + some configuration on top of a Mobian image.
22 Quectel EG25-G GNSS Application Note: https://wiki.pine64.org/wiki/File:Quectel_EC2x%26EG9x%26EG2x-G%26EM05_Series_GNSS_Application_Note_V1.3.pdf
The us-21-Breaking-Secure-Bootloaders.pdf presentation has some information on the PN553 bootloader, firmware and architecture and the "PN553 bears similarities with the PN547, PN548, PN551 and PN5180".
So some of the information may apply to the PN544 as well.
It's relatively simple to add very basic support for devices (like a tablets or smartphones) in Linux.
This article will give some tips on how to do that, as there are some knowledge specific to Android smartphones and tablets that are worth mentioning.
If you already did that kind of things, this article might still be interesting because it mention how to work around smartphone specific issues we are aware of.
Some newer devices that already have a devicetree. In that case you probably need to find out which drivers are already supported by upstream Linux and which are not.
This can be found by looking for the values of the compatible property in the device tree.
In addition, things can change between vendor kernels and upstream Linux.
A strategy could be to trim the vendor devicetree down to a minimal version, and make sure that everything is right, and then import the rest step by step, testing it as you go.
Older devices that don't already have a device tree typically have the exact same information in the vendor kernel. Before the devicetree, ARM computers used C files to describe what hardware they had, like the gta02.c file for the OpenMoko GTA02 smartphone.
For the basic support, you probably don't need require much programming skills as you don't need to be able to write C code, but you still need to understand it a bit as the information you need in file like gta02.c.
First, you probably don't want to break your device while doing that kind of work, especially if you have only one.
To avoid any issues:Vendors kernels have patches for various eMMC corruption bugs.
See the EMMCFirmwareBugs article for more details.
Upstream Linux is incompatible with several bootloaders found on smartphones and tablets.
See BootloadersIncompatibleWithLinux and the table in BootloaderInterfaces for list of devices bootloaders that are known to be incompatible with Linux and for workarounds.
If you're unsure you could still do the workarounds to make sure your device is not stuck very early in the boot.
In addition, if you need to pass certain arguments to the kernel, you could hardcode them in the kenrel itself with configuration like CONFIG_CMDLINE and CONFIG_CMDLINE_FORCE to make sure that they are really passed to the kernel, as bootloaders often ignore this or that way to pass the kenrel command line to the kenrel. The BootloaderInterfaces also has some information on that.
In addition you might also be able to play with the kernel command line arguments and delays to understand what is going on. For instance if the device doesn't find the rootfs, assuming that you can make the device reboot, adding panic=1 rootdelay=60 in one boot and panic=1 rootdelay=120 in the next boot can help you detect why the device is rebooting: if the second boot takes 60 more seconds to reboot, then it probably didn't find its rootfs and rebooted. You could also play with panic values like panic=60 in the first boot and panic=120 in the second boot: if there it waits 60 seconds more in the second boot to reboot, then it's probably due to a kernel panic.
If you have access to the bootloader through UART, you could also try to use its interface (which is documented a bit in BootloaderInterfaces) to dump the memory and retrieve a kernel log (like with dmesg). More information on that method is also available in the Debugging by printing wiki page on elinux.org. It would be best to check if that works fine with a stock kernel first, and then proceed with the upstream kernel. Beware that the offsets can and did change over time.
If you're not familiar with smartphones hardware architecture, Replicant's Freedom Privacy and Security article is a good introduction.
There seems to be some good introduction on the device tree by Bootlin.
Slides: https://bootlin.com/pub/conferences/2014/elc/petazzoni-device-tree-dummies/
Video: https://www.youtube.com/watch?v=rPRqIS9q6CY
Active development has moved towards AOSP 11.
The basic features working on Replicant 9 and 10 have been confirmed to work on Replicant 11, but not everything has been tested yet on either version. The source code and build instruction for both these previous versions have been kept to do regression tracking:See RunningReplicant11 before installing Replicant 11 on your device to not break it.
$ repo init -u https://git.replicant.us/replicant-next/manifest.git -b replicant-11-dev $ repo sync
Alternatively a shallow copy of the source tree can be fetched in order to save on disk space:
$ repo init -u https://git.replicant.us/replicant-next/manifest.git -b replicant-11-dev --depth=1 $ repo sync -c
To unshallow a specific module:
$ cd path/to/module $ git fetch --unshallow <remote>
While there are no official releases yet, there will be a 11-nlnet-eu-grant-825310-replicant-update tag that freezes the replicant-11 source code in order to enable anyone to review the work done as part of an NLnet grant.
If you want to checkout the source code at this tag, you will need to replace the -b replicant-11-dev in the commands above by -b refs/tags/<tagname>. For example:
$ repo init \ --depth=1 \ -u https://git.replicant.us/replicant-next/manifest.git \ -b refs/tags/11-nlnet-eu-grant-825310-replicant-update
sudo apt-get install bc bison build-essential bsdmainutils ccache curl flex g++-multilib gcc-multilib gettext git gnupg gperf imagemagick lib32ncurses5-dev lib32readline-dev lib32z1-dev liblz4-tool libncurses5-dev libsdl1.2-dev libssl-dev libwxgtk3.0-dev libxml2 libxml2-utils lzop python-mako python3-mako pngcrush rsync schedtool squashfs-tools xsltproc zip zlib1g-dev sudo apt-get install gcc-5-arm-linux-gnueabi
You will also need to install repo as described in the bug #2199.
By default, the Android 11 build system can only use the prebuilt binaries it ships.
While having binary toolchains is better for reproducible builds, and that the binaries are free software, this creates a number of issues:As GNU/Linux distribution's tools can be rebuilt and are easier to trust, we are using that for now.
The Java heap size is automatically set according to the available system memory. On machines with 8 GB or less RAM, it is set to a value which is too low, and will result in the following error during the build:
Exception in thread "main" java.lang.OutOfMemoryError: Java heap space
The heap size can be increased with an envirnoment variable:
$ export _JAVA_OPTIONS="-Xmx3g"
Increasing the Java heap space is not enough to get a successful build on machines with 8 GB or less RAM. It is also necessary to reduce the number of parallel jobs, to avoid processes from being killed due to lack of memory. This typically happens during the build of frameworks/base components.
For greater speed, you may let your build run with the defaults, wait for it to fail due to killed processes, and then relunch the build with:
$ make -j1
By default, Ninja, the underlaying build system for Android, used when you run make bacon, computes the number of parallel jobs according to the number of CPUs on your machine (typically #CPUs + 2 parallel jobs).
You can either launch builds with our wrapper script like that:
$ ./vendor/replicant/build.sh i9305
It will try to use all the the CPU cores you have available by using one job per processor + one extra job.
You can also manually launch the build with the usual AOSP commands (so you could adjust the number of jobs with -j for instance):
$ source build/envsetup.sh $ lunch replicant_i9305-userdebug $ make -j2
heimdall flash --BOOT boot.img --RECOVERY recovery.img --SYSTEM system.imgWipe data/factory reset and then Factory data resetReboot the system nowadb remount adb sync
As the device IDs are the ones given by the Linux kernel, they are not in the adb udev rules, so for now it requires to run adb as root:
$ sudo adb shell * daemon not running; starting now at tcp:5037 * daemon started successfully i9305:/ # $ sudo adb kill-server $ adb shell * daemon not running; starting now at tcp:5037 * daemon started successfully error: no devices/emulators found
$ adb kill-server $ sudo adb shell * daemon not running; starting now at tcp:5037 * daemon started successfully i9305:/ #
You can also follow the boot progress with adb:
adb logcat adb logcat -b main
Note that the device can go into suspend at any time, so adb might be interrupted. That looks like that:
First you get a shell
$ sudo adb shell i9305:/ #
Then the connection is interrupted:
$ adb shell i9305:/ # [randomdev@fullyfreelaptop ]$
The effect with adb logcat is similar.
git push --force as we are trying things out, and don't want to make the commits history look too dirty, so be sure to backup your local changes.git push --force. In that case the following commands will loose all the work you did locally but will make the repository consistent with upstream repositories again:$ rm -rf .repo/manifests .repo/manifests.git .repo/manifest.xml $ repo init -u https://git.replicant.us/replicant-next/manifest.git -b replicant-11-dev $ repo sync --force-sync
$ repo sync --force-sync
| Distribution | Works | Comments |
|---|---|---|
| Trisquel 8 | Yes | Tested with an lxc chroot: * Worked fine before and it buildt images fine * Doesn't work anymore in LXC in Parabola in due to cgroup API upgrades, it probably still works in chroots or as standalone installation * Trisquel 8 is also not supported anymore by Trisquel |
| Trisquel 9 | Yes | Tested with an lxc chroot: * Builds images fine |
| Trisquel 10 | ? | Upgraded from a Trisquel 9 lxc chroot: * Seems to build image fine, build from scratch not tried yet. |
| Debian 10 | Yes |
If you use Parabola, you may be interested in running Trisquel 9 in LXC.
To do that first debootstrap a Trisquel 9 rootfs.
Parabola's debootstrap does support Trisquel 9 and its manual has an example on how to do that for Trisquel 8:
$ man debootstrap [...] # debootstrap flidas flidas-root http://archive.trisquel.info/trisquel
So you just need to change from flidas to etiona:
$ man debootstrap [...] # debootstrap etiona etiona-root http://archive.trisquel.info/trisquel
Then you can use virt-manager to setup the LXC instance.
The advantages of this solution are that:There is also some information in the Libreplanet wiki about the topic, like with the DistroExecutionEnvironments article.
It makes sense to move the information that are not Replicant specific there (or in another place) to make it easier to coordonate with with other distributions that may need specific FSDG distributions to be built, or software that needs to be deployed in specific distributions.
With Trisquel 8 and 9 we have an issue with the repo tool.
It tends to update itself automatically, so you might end in a situation like that:
$ repo --force-sync repo: error: Python 3 version is too old; Please use Python 3.6 or newer.
Both Trisquel 8 and Trisquel 9 don't have a recent enough python3 to run recent versions of repo.
There is a workaround described in the bug #2199.
Progress of the graphics related tasks is tracked at GraphicsReplicant11.
Right now the modem is started then stopped at boot, so to see it boot we need to start it with these commands:
$ sudo adb root $ adb shell $ adb start ril-daemon
Then we see the modem boot messages and also samsung-ipc messages arriving with the following command:
$ adb logcat -b radio
It's also possible to run ipc-modem under Android.
First month of full time equivalent work:
| Time estimation | Task | Comments |
|---|---|---|
| DONE | |
Only boots with graphics, not much more |
| |
|
Builds under Trisquel8 |
| |
* * * * * |
Status: * Boots with adb. * Has ultra slow graphics |
| 14h | find, remove and document proprietary software in LineageOS 16 | |
| 21h | find, remove and document privacy issues in LineageOS 16 | |
| 7h | |
applied |
| 7h | |
Now in 5.3 |
| 7h | rebrand LineageOS as Replicant | |
| 70h | |
See the modem status for more details |
| Total: 147h (~1 month) | ||
| * port libsamsung-ril and libsamsung-ipc to Android 9 * Make the modem driver and libsamsung-ipc work together |
157h | See the modem status for more details |
| Total | 157h | ~1 month |
|---|
| Task | Time estimation | Comments |
|---|---|---|
| Look which sensor libraries can be used |
70h | Already done by the unofficial LineageOS port of the Galaxy SIII (i9300), needs testing |
| add support for Audio with the upstream kernel driver | 70h | Might be way faster, depending on what Android 9 uses See also this bugreport |
| |
14h | * The source code on which the work was based changed from AOSP to an unofficial LineageOS port to a port of i9305 support for AOSP by Joonas to the official LineageOS so it's now supported by default * The work to factorize the code between the i9300 and i9305 still need to be done |
| Total | 154h | ~1 month |
| Task | Time estimation | Comments |
|---|---|---|
| create a recovery | 21h | |
| add internal WiFi support and validate the functionality | 6h | |
| add external WiFi dongles support | 20h | External dongles support might be tricky |
| |
|
Mostly done: * The installation instructions are now generic enough. * Some long standing TODO were also done along the way like adding backup instructions for the EFS. * The current instructions are still for Replicant 6.0 and will need to be updated for Replicant 9.0 |
| Task | Time estimation | Comments |
|---|---|---|
| Estimate the amount of work to Reduce the attack surface | ? | |
| Estimate the amount of work to add in-system upgrades | ? |
1 The generic instructions were tested at Install parties in Paris
| Galaxy Note II (N7100) | ||
|---|---|---|
| Task | Time estimation | Comments |
| port the EA8061 LCD Linux driver | 35h | |
| port the S6EVR02 LCD Linux driver | 35h | |
| port the MAX77693 flash led Linux driver | 7h | |
| android: add support for the Note II (N7100) and factorize the code with Galaxy SIII (i9300) and Galaxy SIII 4G (i9305) | 14h | Should be similar to the Galaxy SIII |
| port the sensors libraries and other device specific libraries | 70h | It's difficult to evaluate how much time it could take |
| add support for Audio with the upstream kernel driver | 14h | Should be similar to the Galaxy SIII |
| Galaxy Note 8.0 (N5100) and 8.0 WiFi (N5110) | ||
|---|---|---|
| Task | Time estimation | Comments |
| Evaluate the time required to do the port | 14h | TODO |
| Device | Time estimation | Comments |
|---|---|---|
| Galaxy S II (i9100) | Linux: devboard dts upstream? unknown status | |
| Galaxy Note (N7000) | unknown Linux upstream status | |
| Galaxy Nexus (I9250) | OMAP4, no dts upstream | |
| Galaxy Tab 2 7.0 (P3100), 7.0 WiFi (P3110), 10.1 (P5100), 10.1 WiFi (P5110) | ||
| GTA04 >= A4 | TODO: a RIL needs to be written, userspace GPS support is missing, audio scenarios, etc |
See Replican6Changes.
See the Samsung-ipc page.
| Device(s) | Repository | status | Comments |
|---|---|---|---|
| i9300 | CustomROMs | * February 8 2020 Pie release | |
| i9300 | Team InFusion | * August 20 2019 Pie release | Issues: * Uses a Samsung kernel * Uses too many nonfree libraries => Probably nothing we could reuse from its code |
| n7100 | ComicoTeam | * January 4 2020 Pie release | |
| i9100 | rINanDO | * March 20 2020 Pie release * July 19 2020 Android 10 release |
| Repository | Tree path | Dependencies | Function | Comments |
|---|---|---|---|---|
| https://github.com/CustomROMs/android_hardware_samsung lineage-16.0 branch |
hardware/samsung/macloader | Loads the MAC Address of the WiFi network interface | Might be useful | |
| hardware/samsung/wifiloader | Loads the wifi kernel module (like modprobe) and setup firmware filesystems permissions | May be useful | ||
| hardware/samsung/audio | seems to contains ril related stuff as well | Look if the ril stuff is required, go for standard audio | ||
| hardware/samsung/lineagehw/hidl/livedisplay | livedisplay is a feature similar to what redshift does on GNU/Linux | Not sure if it works with mainline | ||
| hardware/samsung/exynos/multimedia/utils/ | seem meant for audio/video decoding offload | assembly obtimized color conversion and resize code | check assembly code license, not sure if useful | |
| all other directories in hardware/samsung/exynos/ | nonfree firmwares, nonfree software?, smdk kernel? | audio/video decoding offload | Avoid using that | |
| hardware/samsung/exynos3 | nonfree firmwares?, nonfree software?, smdk kernel? | some light libraries, display stuff (gralloc, etc), 2D acceleration (FIMG), camera (FIMC), 3D acceleration, etc | Avoid using that for now | |
| hardware/samsung/exynos4 |
This consists in porting Replicant to Android 9 while using a kernel closely based on upstream Linux.
The graphics part is covered by another tasks also being funded.
Status: PortingToAndroid9
| Your name | Denis Carikli |
|---|---|
| Email address | PrivateContact + our contact at the FSF |
| Phone numbers | GNUtoo's phone number |
| Organisation | Replicant and the FSF |
| Country | France(Denis Carikli), USA (FSF) |
| Project name | Finish porting Replicant to a newer Android version |
|---|---|
| Website / wiki | https://redmine.replicant.us/projects/replicant/wiki/Porting_Replicant_to_Android_9 |
| Abstract: Can you explain the whole project and its expected outcome(s).in 1200 characters | Replicant is a fully free software Android distribution which is approved by the FSF (http://gnu.org/distros). The combination of Android Open Source Project source code with the Linux source code provided by the device vendor is not sufficient to produce a fully free Android distribution that works: a lot of the code that makes critical hardware components work (the modem, graphics, audio, GPS, etc) is in userspace. Because of that, most device manufacturers don't release them as free software. To make such hardware work, the Replicant project manages to replace or avoid such nonfree software. Replicant is currently based on LineageOS 13.0 which in turn is based on Android 6.0.1 which are both not supported anymore. Replicant is based on LineageOS because it supports way more smartphones and tablets than the Android Open Source Project. The project consists in porting Replicant changes on top of the Android 9 release of the Android Open Source project, and when LineageOS 16 will be ready, to backport our changes on top of LineageOS 16. |
| Have you been involved with projects or organizations relevant to this project before? And if so, can you tell us a bit about your contributions? |
Yes: I've been involved in Replicant since the beginning both as a developer and for managing the project: As a developer: * I did most/all the initial system work and made it work for the the HTC Dream, and the Google Nexus One. * I also worked on porting the Goldelico GTA04, Galaxy nexus, Galaxy Tab 2 7.1 along with other Replicant developers and did various bug fixes and improvements. * I am also doing code reviews for patches. And as for managing the project I'm involved in: * public relations (blog posts, etc) * fund usage decisions * infrastructure (system administration with other developers, etc) * documentation * project direction and strategic decisions |
| Requested Amount (Between 5000 and 50000 Euros) | 50000 Euros |
|---|---|
| Does the project have other funding sources, both past and present? | The Replicant project has about 200000 dollars at disposition: * The Replicant project has a donation page https://crm.fsf.org/civicrm/contribute/transact?reset=1&id=19. Part of the donations were used for buying devices and reimburse conference attendances. We have about 20000 dollars remaining from the donation. * The Replicant project recently received 200000 dollars from Handshake: https://www.fsf.org/news/free-software-foundation-receives-1-million-from-handshake As the FSF takes 10% that leaves us 180000 dollars |
Explain what the requested budget will be used for?
The budget will only be used to fund this task through contract work. We think it will take something between 3 and 6 months of work for one full time developer. However it is always difficult to evaluate precisely the amount of time that this kind of project would take as sometimes it can be slowed down a lot due to bugs needing to be fixed. For instance, when adding support for the Nexus One to Replicant, a lot of time was spent dealing with display issues that didn't affect the upstream projects, because they relied on the GPU which required nonfree software to work. If we take the cost of a Freelance developer in the USA (75$ to 150$ per hour) as a basis, to enable people living in Europe and the USA to apply, we can fund a developer to work on it for a period that is mostly equivalent to something between 2 to 4 months full time. So far we have at least one person interested in working on it as a contractor (me), and one volunteer who wants to work on it at the same time, but who cannot do it full time. We will make sure that everybody has a chance to apply for doing contract work. If the work is not done when the 50000E run out, and if we cannot make sure that it will be completed by volunteers in a reasonable timeframe, the Replicant project will most probably use its existing funds to pay for contract work to make sure that this task is completed. The Replicant project will also take care of ensuring that the people that will work on this task have the necessary hardware to do it, for instance by shipping or reimbursing the purchase of a compatible smartphone with the Replicant project money. Once we have the Samsung Galaxy SIII fully working with Replicant 9, we will add support for most smartphones and tablets we currently support in Replicant, and add support for more recent smartphones (the most recent one we currently support has been released in 2013). We also have a very basic documentation on the Android 9 port here: https://redmine.replicant.us/projects/replicant/wiki/Porting_Replicant_to_Android_9
Compare your own project with existing or historical efforts.
Upgrading Replicant to a new Android version usually took about 2 or 3 months of full-time equivalent work for one person. Here, we already have a device (The Galaxy SIII 4G) booting under Android 9 master before the release, with a kernel that is closely based on upstream Linux, but a lot still needs to be done (modem, audio, sensors, etc) and validated. The Android architecture also changed a lot more between Android 6.0.1 and Android 9 than it did when we ported Replicant to newer Android versions.
What are significant technical challenges you expect to solve during the project, if any?
We will also need to make sure that Replicant 9 can be built with a GNU/Linux distribution that is approved by the FSF. This could be challenging if they lack some of the packages required to build Android.
Describe the ecosystem of the project, and how you will engage with relevant actors and promote the outcomes?
This project will re-use code from several projects such as Android, drm-hwcomposer, Mesa and Lima driver. Whenever possible we will foster collaboration with these projects and submit our changes upstream. The Replicant project contributors and the FSF will supervise contractors to do the work. A blog post will announce that the Replicant project has got some funding for this specific task, and that it is looking for a contractor to work on it. This is to make sure that everyone has equal chances in the application process. Then the most suited contractor will be selected. Only contractors that already have worked on similar tasks as part of free and open source software projects will be chosen. This way we can look at their existing contributions and make sure that they are able to do the task before engaging with them. The Replicant project will also make sure that the contractor has or gets the hardware required to work on the task, before starting to work on it.
| Attachments | None |
|---|
| What should we do in the other case, e.g. when your project is not immediately selected? |
I allow NLnet Foundation to keep the information I submit on record, should future funding opportunities arise |
|---|---|
| Send me a copy of this application. | check-box checked |
| PGP pubkey | None (if we use Replicant contact address, we can't encrypt to it) |
Funding: We applied to https://nlnet.nl/PET
This is a list of talks that were handed on behalf of the Replicant project.
Some of the content presented during those conferences may be outdated: do not assume that all the facts are still accurate!
Replicant is a fully free Android distribution that is approved by the FSF. This short talk briefly explains: why Replicant came into being; the freedom, privacy and security issues it has found in devices aimed to run Android; and the approaches that it follows to liberate such Android devices.
Replicant is an Android distribution that is certified by the FSF that supports some smartphones and tablets. After explaining some extensive background about the project and its situation, the talk will focus on the project strategic decisions and will also try to involve the audience to get feedback on some of the project current and longer term issues that we didn't solve yet.
The talk will start with a description of what hardware is typically found in a smartphone and its freedom implications.
Once this is done we will look at several smartphones models (PinePhone, PinePhone PRO, Librem 5, regular LineageOS and/or Fairphone 1/2/3/4/5) and compare the implications of the hardware design and component choices both for freedom usability (for instance does suspend-to-ram currently work), and other factors affecting the ability to use the device.
We will then look at Android and GNU/Linux operating systems / distributions, and the application ecosystems around them (F-Droid, Android SDK, type of applications available, compatibility layers like Waydroid) for these smartphones, with a focus on fundamental differences that impact end users freedom and usability.
Guix is a 100% free software distribution that can be used in a wide variety of ways.
Unlike other GNU/Linux distributions, all its packages and configuration are defined in Scheme (with Guile). To do that it uses software abstractions. That abstraction enables to reuse the same packages or configurations in various contexts (for instance to build containers, to build packages for other distributions, etc).
This re-usability can enables other projects to use Guix in various ways (for testing, for project infrastructure, etc).
This talks looks at how and why Replicant uses or depends on Guix, where it didn't use Guix and why, and future directions with the usage of Guix by the Replicant project.
This talk is mostly about real life usage of Guix from the point of view of another software project (here an Android distribution). It will therefore show both advantages and limitations of Guix in that context.
It also has the necessary background information on Replicant and Guix.
This short talk will look at how and why Replicant uses or depends on Guix, and future directions with the usage of Guix by the Replicant project.
How Replicant wants more independence from the device manufacturers and from the Android distributions from which it is based.
After a very quick introduction on Replicant and the smartphones ecosystem, we look at what affects smartphones' and tablets' lifetime and how to increase it by making Replicant more sustainable.
There is a small, satirical play in the middle this presentation. Its goal is to show how the current market trends in smartphone design and construction severely impair those that look for privacy, software freedom and reduction of electronic waste.
Replicant is a fully free Android distribution that is approved by the FSF. This short talk briefly explains: why Replicant came into being; the freedom, privacy and security issues it has found in devices aimed to run Android; and the approaches that it follows to liberate such Android devices.
Android Open Source Project (AOSP)'s build system differs greatly from other GNU/Linux based distribution: software components are built and bundled together into a single image without using any package manager during the build process; external software components are also tasked with maintaining support for AOSP build system themselves. Theses differences creates some extremely serious issues that also affect Replicant, a fully free software Android distribution. To solve that, we aim to foster a discussion with other projects and the community on sustainable ways to achieve an AOSP build that properly incorporates GNU/Linux projects such as Linux and Mesa. This talk might also be interesting to people packaging Android utilities like adb in GNU/Linux distributions, as they also have to deal with some of the issues created by the Android build system.
After a very quick introduction on Replicant and the smartphones ecosystem, we look at what affects smartphones' and tablets' lifetime and how to increase it by making Replicant more sustainable.
WebView is one of the core components of the Android system, used and abused by apps to render web content (HTML, CSS, JS). WebView is nowadays built out of the Chromium source tree which has been plagued by privacy and freedom issues. As a fully free-software Android distribution, Replicant is exploring different paths to create a WebView build that respects user's privacy and freedom. Our tentative approaches go all the way from further cleaning the Chromium source after projects like ungoogled-chromium, to fully replacing WebView by a shim built around GeckoView. We will present our approaches on this lightning talk, on the hopes of getting feedback from the community and engaging other projects to collaborate with us.
See the table in the ContributorsMeetingJuly2019 page for a list of presentations held there and their corresponding medias (videos, slides, etc).
Beside the talk on Replicant history, the presentations held in that meeting goes in more technical details (including the source code of Replicant) as they are mainly targeted at present or future Replicant contributors.
Les appareils mobiles, tels que les téléphones portables ou tablettes sont de plus en plus présent dans notre usage de l'informatique et sont particulièrement sujets aux questions de liberté et de vie privée/sécurité. Étant de véritables ordinateurs, il est possible d'y exécuter du logiciel libre, même si la situation est loin d'être parfaite.
Cet exposé présentera Replicant dans le cadre de l'initiative visant à libérer les appareils mobiles. En premier lieu, les problèmes majeurs liés à la liberté sur ces appareils seront abordés. Il s'agira de détailler la situation pour chaque composant et à chaque niveau, en proposant ainsi un aperçu complet. Ainsi, de nombreuses considérations sur différents aspects seront présentées, allant de la liberté du matériel jusqu'au système d'exploitation, en passer par les micrologiciels. Après avoir dressé un bilan de la situation, les remédiations possibles à plus ou moins court terme seront présentées. C'est dans ce cadre que s'inscrit le projet Replicant, distribution entièrement libre d'Android pour plusieurs appareils, un système mobile libre mettant l'accent sur la liberté et la vie privée/sécurité. L'état du projet ainsi que les différents challenges et objectifs futurs seront ainsi présentés.
Liberating the software running at the lower levels of the hardware we use, either on the main processor or on controllers and peripherals can reveal to be quite challenging. There is a series of (more or less) usual limitations to overcome in the process, each of them being a challenge for free software developers, with the potential of fatally blocking a free software implementation.
This talk will highlight the process of liberating the software running at the lower levels of devices we use. In particular, it will focus on each recurrent limitation that is encountered when freeing a device, with an insight on the process to overcoming them, when possible at all.
Various examples will be shown, drawn from experience liberating mobile devices at the operating system level (with Replicant), at the bootloader level and other devices such as a Chromebook laptop and another laptop's embedded controller.
Finally, the question of the free software replacement's installation process for end users will be mentioned, with positive and negative examples and suggestions for making the process less painful in general.
Les appareils mobiles sont privilégiés pour nos communications et gardent grand nombre de données personnelles, en plus de ce qu'ils ont la capacité de collecter via les différents capteurs qu'ils embarquent. Il semble donc nécessaire de pouvoir réellement contrôler ces appareils. Replicant vise à libérer ces appareils. Présentation, enjeux, et limites.
Les appareils mobiles sont privilégiés pour nos communications et gardent grand nombre de données personnelles, en plus de ce qu'ils ont la capacité de collecter via les différents capteurs qu'ils embarquent. Il semble donc nécessaire de pouvoir réellement contrôler ces appareils. Replicant vise à libérer ces appareils. Présentation, enjeux, et limites.
Cette présentation mettra donc l'accent sur les enjeux du contrôle des appareils mobiles, l'état actuel de la situation ainsi que les remèdes possibles et leurs limitations, avec le projet Replicant. Une présentation du projet et de son état actuel sera ainsi abordée, accompagnée d'un aperçu du travail technique nécessaire à la libération des appareils mobiles. En particulier, il s'agira de mentionner les techniques d'ingénierie inverse qui peuvent-être utilisées pour écrire des remplacements libres pour les composants propriétaires et de mettre en évidence les aspects instructifs et valorisants du processus, tout en démystifiant leur difficulté.
Dans la lignée du mouvement du logiciel libre, Replicant est une facette de nos infrastructures de communication : à l’heure où l’informatique mobile (ordiphone, tablette,...) prend son envol, il est indispensable que les utilisateurs aient le contrôle de leur machine pour garder le contrôle de leurs informations personnelles (carnet d’adresse, agenda, SMS/appels reçus/émis,...), de leur liberté d’information et de leur liberté d’expression ainsi que du droit au secret de leur correspondance.
Après une introduction par Benjamin Bayart, Paul Kocialkowski présentera le projet Replicant, les différentes manières d’y contribuer, les enjeux d’un système d’exploitation mobile libre et les problématiques attenantes aux modems privateurs (hors de contrôle de l’utilisateur) incorporés dans nos ordiphones.
This lightning talk will (quickly) highlight various aspects of developing on Replicant, the fully free Android-based mobile operating system. It will provide some insight about why more developers should join-in and how to get started with it.
This will introduce an overview of how different parts of a mobile device interact, which parts can run free software and what problems arise when it comes to privacy and security.
Cet exposé présentera Replicant dans le cadre de l’initiative visant à libérer les appareils mobiles. En premier lieu, les problèmes majeurs liés à la liberté sur ces appareils seront abordés, ainsi que différentes considérations à propos de la sécurité de ces appareils et des communications qu’ils peuvent effectuer. Par la suite, Replicant sera introduit comme réponse à certaines de ces problématiques. Les différentes étapes du projet au fil des années ainsi que l’ensemble du travail accompli pour la prise en charge de différents appareils seront présentés, en particulier au travers de l’écriture de remplacements libres pour les composants propriétaires. Plusieurs exemples parmi les plus laborieux seront particulièrement mis en lumière. L’état actuel du projet ainsi que les récents développements seront présentés par la suite. Finalement, cette présentation abordera en quoi les appareils actuellement pris en charge sont fondamentalement imparfaits pour le logiciel libre et quelles sont les conséquences qui en découlent vis-à-vis de l’orientation et du développement actuel et futur de Replicant.
Most mainstream mobile devices are fatally flawed when it comes to software freedom since they are unable to function without proprietary software on their main processing unit. In particular, most of those devices ship with proprietary bootloaders: early software that is in charge of bringing up the hardware and loading the operating system. While free software bootloaders exist and provide support for a wide range of different platforms, mainstream mobile devices very often do not allow running free bootloaders because of enforced numeric signature checks.
However, once in a while, we come across a few devices or platforms that allow running free bootloaders and thus show true potential for taking freedom to the next step. Some of those will be presented, along with the communities built around them. In particular, the work conducted to liberate the LG Optimus Black (P970) will be presented with detail, as well as the efforts to free Allwinner platforms by the linux-sunxi community and the work on the GTA04 and Neo900 phones, built around the OpenPhoenux community.
Replicant was started as a pragmatic way to achieve software freedom on mobile devices, as a fully free version of Android. Over the years, support was added for a dozen of different mainstream devices. However, most of these are severely flawed when it comes to software freedom and privacy/security. Thus, it was decided to focus the development effort on a few specific devices that perform better than others from those perspectives, instead of trying to catch up with the latest mainstream devices.
This talk will first cover what was accomplished by the Replicant project over the last few years and what milestones have been reached. This includes an overview of the work that was completed to support various devices, especially when it comes to writing free software replacements for proprietary components. Some of the most challenging examples will be highlighted and put in perspective as milestones for the project. In addition, some of the work on making the system better regarding privacy and security will be mentioned. Once the improvement of the situation is acknowledged, this talk will show how most of these devices are still fundamentally flawed, hence opening up two possible ways for the future of the project: adding support for more and more new devices and recent Android versions or focusing on a handful of devices that show real potential for being liberated. Hence, the second part of this presentation will introduce the recent efforts that were started to support devices that can take freedom to the next step. Some of these exciting devices will be presented in details, with a description of the journey to freeing them from the ground up!
Les appareils mobiles, tels que les téléphones portables ou tablettes sont de plus en plus présent dans notre usage del'informatique et sont particulièrement sujets aux questions de liberté et de vie privée/sécurité. Étant de véritables ordinateurs, il est aisé d'y exécuter du logiciel libre, même si la situation est loin d'être parfaite.
Cet exposé présentera Replicant dans le cadre de l'initiative visant à libérer les appareils mobiles. En premier lieu, les problèmes majeurs liés à la liberté sur ces appareils seront abordés, ainsi que différentes considérations à propos de la sécurité de ces appareils et des communications qu'ils peuvent effectuer, d'un scénario idéal à la réalité d'aujourd'hui. Par la suite, la question des composants propriétaires requis pour de nombreuses versions communautaires d'Android sera abordée, ainsi que les réponses qu'apporte Replicant à ces problèmes. Plusieurs versions communautaires d'Android seront mentionnées, de même que d'autres systèmes tels que Firefox OS ou Ubuntu Touch. Un aperçu de ce-qui a été accompli au sein du projet Replicant au fil des années sera présenté, de même que les difficultés que nous avons pu rencontrer récemment et l'état actuel du projet.
Android is developed by Google mostly as open source, through the Android Open Source Project. However, AOSP cannot actually run on most devices without proprietary software for supporting various hardware features. Back in 2010, the Replicant project was founded by a couple of free software enthusiasts to try and bring a fully free version of Android to the first Android phone, the HTC Dream, by replacing or avoiding the proprietary parts. Four years later, more than 10 different devices are supported by the project, which still focuses primarily on software freedom. Hence, making Replicant the only mobile operating system that truly puts the emphasis on freedom.
This talk will present Replicant as part of the effort to reach software freedom on (telephony-enabled) mobile devices. First, it will introduce the major freedom issues that are encountered on these devices, as well as considerations regarding the security of these devices and the communications made with them, from an ideal scenario to what the reality actually is today. The talk will then focus on the proprietary parts needed by most open source mobile operating system and how Replicant comes into play. Various community Android versions will be mentionned, as well as other systems such as Firefox OS or Ubuntu Touch. An overview of what was accomplished by the Replicant project over the years will then be mentioned, as well as the challenges we are currently facing and the current state of the project. Finally, a demonstration of Replicant running on various devices will be shown!
The Replicant project was founded four years ago as a fully free version of Android. While Google releases most of Android as open source, with the Android Open Source Project, it still cannot run as-is on any actual device, since it needs proprietary programs for handling various parts of the hardware. Replicant however intends to run on actual devices while not compromising on software freedom. Hence, the proprietary parts are not part of Replicant and are instead either avoided or replaced. Over time, a good share free software replacements for the proprietary components was developed by the project, each time a new challenge for the developers involved!
This technical talk will describe how free replacements for the user-space proprietary components (in charge of the hardware) are developed by the Replicant project. Numerous examples of the general approach we use for figuring out what these proprietary parts actually do will be given. The intent of this talk is to highlight how reverse engineering such proprietary programs is often not as hard as it sounds and can in fact be accomplished without particular knowledge of very advanced techniques. The talk also intends to demonstrate that getting involved in the project only requires basic programming knowledge, time and a good share of curiosity and ingeniosity! Replicant is currently a one-man effort, hence particularly looking forward to seeing new developers getting involved.
Schedule
ARM devices have become an overwhelming part of our computing, present in most embedded and mobile devices. While free software seems prominent on ARM platforms, for instance with Android on phones and tablets, and various other GNU/Linux systems on single board computers and plug computers, not all systems and platforms are equal in terms of software freedom.
Over this talk, various aspects of the platforms built around the ARM architecture will be reviewed from the perspective of software freedom. First, it will introduce what ARM is and the concept of System on a Chip (SoC) as well as the different form factors and use cases for ARM devices. An overview of the various hardware platforms that use the ARM architecture will then be drawn, along with comparisons between these platforms regarding software freedom. The communities build around some of these platforms will also be introduced. The talk will put the emphasis on the free software and systems available for each platform.
The talk will go through the freedom issues in android, their possible solutions, and then in the second part of I will present the Replicant project in more detail.
This talk will deal with the freedom issues in android, their solutions and the Replicant project (https://replicant.us/) that is a 100% Free software distribution of android.
The Replicant project aims at developing a fully free derivative of Android, and focus mainly on phones. This talk will explain the freedom issues with Android and their solutions. It will also explain how Replicant is developed.
If your inquiry can't be made public, requires confidentiality or is press-related, you can contact the Replicant project directly.
Please do not use this address in any other case: use public means of contacting the Replicant community instead.
The Replicant project can be contacted directly by sending an email to contact@replicant.us.
Please do not use the Replicant release key (that matches this address) to encrypt emails to this address.
Instead, please encrypt the message using the active developers' keys. For convenience, you might want to use their addresses directly.
When using the private contact address for general-purpose questions or public matters, be aware that you might not get an answer to your email or get a standard response such as:
Unfortunately this is the contact email address.
This contact email address is intended for inquiries that cannot be made public.
General-purpose questions should be asked through public means of
communications such as our mailing list, forums or IRC channel.
This way, more people can help you and answer your inquiry while others
can benefit from the question and its answers as well.

So far one unit was printed on a 1200x600 mm PVC tarpaulin with reinforced edges and grommets. Meant to be used at 36C3, FOSDEM 2020 and other future conferences where Replicant will have a stand.
The full reasoning behind the simple design, as well as previous iterations, can be checked at the Assembly at 36C3 - Banner Idea thread on the Replcaint mailing list.
To spice up the banner, strips of paper are hanged from the grommets on the lower side of the banner. They act much like a MOTD or a roadside letter board, containing jokes or catchy sentences that can be changed every day of the conference. Examples are:
Want to know if your phone phones home?
Take the red pill!
Tired of phony privacy? Let's get into the rabbit hole.
Copyright © 2019 Adonay Felipe Nogueira (conctact information)
Licensed under the Creative Commons Attribution-ShareAlike 4.0 International License.
With contributions from: dl lud, GNUtoo, TJ and Fil Lupin.
Based upon the Replicant Artwork with League Gothic typeface.


These flyers are yet another reinterpretation of the The Good, the Bad and the Ugly. As the Wikipedia article puts it:
the respective phrases refer to upsides, downsides and the parts that could, or should have been done better, but were not.
The full reasoning behind the flyers content and design, as well as previous iterations, can be checked at the Assembly at 36C3 - Illustrate freedom, privacy and security issues thread on the Replcaint mailing list.
So far, 250 units of each flyer were printed and distributed at 36C3, with left-overs remaining for FOSDEM 2020.
Copyright © 2019 Adonay Felipe Nogueira (contact information)
Licensed under the Creative Commons Attribution-ShareAlike 4.0 International License.
With contributions from: dl lud, GNUtoo and Fil Lupin.
This page covers development efforts to create a Radio Interface Layer (RIL) for modems that use the Qualcomm MSM Interface (QMI) protocol. The work is currently carried out for the Galaxy S 3 4G (I9305) which has a Qualcomm MDM9615 modem. The Galaxy Note 2 4G (t0lte) uses the same modem and this device could be supported as well in Replicant when the QMI-RIL is ready. We will hopefully identify further candidates that have an isolated modem using the QMI protocol and for which Replicant support could be added. Among the non-Android devices, the iPhone 5 is one that uses the MDM9615 modem as well.
relevant thread on libqmi mailing list
When the MDM9615 modem is activated, it first boots into a Download mode. There, firmware, bootloaders and EFS files are uploaded to the modem via a serial interface. The used protocol is called SAHARA and it is a proprietary protocol developed by Qualcomm. The protocol covers various functionalities. We likely only need to implement a very small subset that is responsible for transferring firmware and other files to the modem and synchronising changes to EFS files with the filesystem. Being able to retrieve RAM dumps from the modem would also be helpful for debugging. In case of a fatal error, the Linux kernel already requests RAM dumps from the modem, so only the file transfer part needs to be implemented.
Qualcomm provides the proprietary tool kickstart for uploading the files to the modem. It is run by the daemon qcks. After the modem is booted, qcks spawns efsks which is responsible for EFS sync.
Logcat and dmesg output of the upload: ks_logcat, ks_dmesg
libopenpst, their sahara tool, and Linaro's QDL code can be used as a reference to implement the file upload and as documentation about the protocol. The kernel itself can be checked for the different boot modes.
An initial version of the modem boot part is completed and a tool called modem-boot is available as part of the qmi-ril repo: https://git.replicant.us/contrib/wiewo/qmi-ril/
It uploads the needed files in the Download mode and reboots the modem. The files are uploaded from a directory that qcks uses to prepare the files. This preparation step (reading data from partitions and preparing them in a certain way before the upload) needs to be implemented. Otherwise, updates to the EFS partitions aren't used at the next boot of the modem.
During regular operation of the modem, EFS data is received. The data is not yet written to the EFS partition. This step needs to be implemented as well.
See the commit messages for more details.
libqmi is a library that implements the QMI protocol and it will be used for implementing the RIL. The source code for the command-line tool qmicli, which is part of libqmi, and ModemManager's code is helpful for figuring out how to use libqmi.
libqmi needs the cdc-wdm and qmi_wwan kernel drivers for communicating with the modem. These are backported to the smdk4412 kernel on the qmi branch. The qmi_wwan driver replaces the RMNET usb driver that the blobs use for a network interface to the modem. Some missing code in the backported qmi_wwan driver was ported from the RMNET driver. The commit messages offer more details.
libqmi provides the command-line tool qmicli to communicate with the modem. It was already successfully tested on the S 3 4G. Using the modem boot tool described above and the qmi branch of the kernel, qmicli is usable with only free software.
The RIL header documents the Android side of the interface and the commands that need to be implemented. The Samsung-RIL page also offers some documentation in that regard.
An initial version of QMI-RIL is available in the qmi-ril repo See this commit message for the status details.
The device-specific repos for i9305 need to use these two branches to make the RIL work:
https://code.fossencdi.org/device_samsung_i9305.git/log/?h=qmi-wip
https://git.replicant.us/contrib/wiewo/device_samsung_smdk4412-qcom-common/log/?h=replicant-6.0
These instructions can be used to build libqmi and include it in an image for the Galaxy S 3 4G. See the build instructions for the Galaxy S 3 4G for building the image.
Android.mk files need to be written to integrate libqmi and its dependencies into a regular device build. Some of the source code is auto-generated and some dependencies like GLib have a lot of source files, so writing the Android Makefiles will be some work. For GLib, these commits could be used for creating the Android.mk files:
https://github.com/scintill/android_external_glib/commit/9bc8d813979140b8abdad77619aba20f08b19c6f
https://github.com/scintill/android_external_glib/commit/ae860f678520471da44823f500f302a1a27c1be9
They are for GLib 2.32, but libqmi requires at least GLib 2.36, so they need to be ported to that version. It looks like that with these Makefiles, only libiconv is required as an additional dependency for GLib. For libiconv, the Makefiles from this commit could be helpful:
https://github.com/tguillem/android-libiconv/commit/8be7e8a7670abf251d6198606098a1908ec1033c
Based on these instructions
apt-get install groff libltdl-dev pkg-config gtk-doc-tools
git clone https://code.fossencdi.org/external_libqmi.git external/libqmi git clone https://git.savannah.gnu.org/git/libiconv.git external/libiconv -b v1.15 git clone https://github.com/libffi/libffi external/libffi -b v3.2.1 git clone https://code.fossencdi.org/external_gettext.git external/gettext git clone https://github.com/GNOME/glib external/glib -b 2.52.3
The attached script qmi_build_envsetup.sh makes it more convenient to configure the environment. You need to set the Replicant source tree root folder as the REPLICANT_BASE variable at the top of the script. Then you can source it:
. path/to/qmi_build_envsetup.sh
It's recommended to not run this and the following commands in the same shell you use for building a Replicant image as the environment variables break the Replicant build. Run the commands after you built an image for the I9305.
./autogen.sh
./configure --build=${BUILD_SYSTEM} --host=arm-eabi --prefix=${PREFIX} --disable-rpath
make install -j8
If autoconf-2.69 and autoheader-2.69 are not found, remove the -2.69 suffix from the AUTOCONF and AUTOHEADER variables in Makefile.devel, libcharset/Makefile.devel and preload/Makefile.devel.
./autogen.sh
sed -e '/^includesdir/ s/$(libdir).*$/$(includedir)/' -i include/Makefile.in
sed -e '/^includedir/ s/=.*$/=@includedir@/' -e 's/^Cflags: -I${includedir}/Cflags:/' -i libffi.pc.in
./configure --build=${BUILD_SYSTEM} --host=arm-eabi --prefix=${PREFIX} --enable-static
make install -j8
./autogen.sh
./configure --build=${BUILD_SYSTEM} --host=arm-eabi --prefix=${PREFIX} --disable-rpath --disable-libasprintf --disable-java --disable-native-java --disable-openmp --disable-curses
make install -j8
First, the file android.cache with the following content needs to be created:
glib_cv_long_long_format=ll glib_cv_stack_grows=no glib_cv_sane_realloc=yes glib_cv_have_strlcpy=no glib_cv_va_val_copy=yes glib_cv_rtldglobal_broken=no glib_cv_uscore=no glib_cv_monotonic_clock=no ac_cv_func_nonposix_getpwuid_r=no ac_cv_func_posix_getpwuid_r=no ac_cv_func_posix_getgrgid_r=no glib_cv_use_pid_surrogate=yes ac_cv_func_printf_unix98=no ac_cv_func_vsnprintf_c99=yes ac_cv_func_realloc_0_nonnull=yes ac_cv_func_realloc_works=yes
Make it read-only:
chmod 444 android.cache
Then configure and build:
./autogen.sh --build=${BUILD_SYSTEM} --host=${TOOLCHAIN_PREFIX} --prefix=${PREFIX} --disable-dependency-tracking --cache-file=android.cache --enable-included-printf --enable-static --with-pcre=no --enable-libmount=no
make install -j8
./autogen.sh --build=${BUILD_SYSTEM} --host=${TOOLCHAIN_PREFIX} --prefix=${PREFIX} --enable-mbim-qmux=false --enable-firmware-update=false --enable-qmi-username=radio --without-udev --disable-mm-runtime-check --with-udev-base-dir=${PREFIX}/etc/udev
make install -j8
When Replicant was started, the HTC Dream was the only available Android phone, and it had a Qualcomm System On a Chip (SOC) with an integrated modem. We then also added support for other very similar devices.
The System On a Chip family used by these devices was the MSM7K. While working on Replicant, very serious flaws were discovered with that System On a Chip family:Despite the huge amount of work required, when alternatives became available, we switched away from devices with this System On a Chip family because the gravity of the issues was a nightmare.
While some of the above issues have been fixed in more recent Qualcomm System On a Chip families, the increasing amount of proprietary libraries for theses new families, and the lack of strong guarantees that would prevent the modem from being able to take control of the processor running Replicant made the project ignore and discourage the use of the newer Qualcomm System On a Chip families.
Despite that, it may be possible to make sure that the modem cannot physically access and modify the Application Processor's RAM content, for instance by using the SOC IOMMU, if there is one, but that would require significant work. It would at least require:Despite that we may still accept contributions for devices with such System On a Chip, but it's best to contact the Replicant project (for instance on the mailing list or on IRC) before starting to work on that, to collectively decide how to handle that.
For instance some tablets use Qualcomm SOCs have no modems. So if the most important privacy sensitive hardware is under the control of the Application Processor, it might be possible to add support for such tablets if work is done to make sure that they can be useful without any proprietary libraries.
You can reboot your device into the recovery by one of the following methods:
Run the following on your computer:
adb reboot recovery
Do the following:
The recovery image or recovery is a very minimalist operating system that is used to install and update Replicant.
To obtain the recovery image for your particular device, refer to the list of images.
These instructions explain how to install the Replicant recovery image to your device. This procedure is part of the larger procedure of installing Replicant.
If you use these instructions with a device not listed above, there is a significant risk of breaking your device up to a point where it's way too complicated to repair it. This is often refered as "bricking" your device in computer Jargon.
In order to install the recovery image on your device, it is assumed that you have a computer running a GNU/Linux operating system and everything necessary to connect your device to the computer through USB.
Moreover, it is assumed that anyone performing the installation knows how to use the command line in a terminal and has basic knowledge about it.
Heimdall is a free software program that is required to install the recovery image to your device.
If you don't already have heimdall you can use the instructions on the ToolsInstallation page to install all the required tools.
First find the section for the Replicant version you want to install.
For instance if you want to install Replicant 6.0 0003, go in the Replicant 6.0 0003 section.
Then find the Security subsection and download the GPG signing key for that release.
Depending on your browser and the format of the GPG key, the GPG signing key can appear as a web page with some text that begin with "-----BEGIN PGP PUBLIC KEY BLOCK-----".
This is because one of the popular key format actually stores the key as encoded text as this gives various advantages.
In that case, you simply need to save that web page with "File"->"Save Page As".
Once the GPG signing key has been downloaded, you need to find the Images subsection, and, inside it find the in the row that corresponds to your device.
Inside that row, there are links to the recovery image and the corresponding signature, which are in that row under the column Bootable/recovery.
You need to download both files to your PC.
For example, if you want to install Replicant to a Galaxy S III (GT-I9300), you will download recovery-i9300.img and recovery-i9300.img.asc.
First, add the Replicant release key to your GPG keyring.
Then, from the command line:
cd "${HOME}/Downloads/"
gpg --verify recovery-<yourdevice>.img.asc recovery-<yourdevice>.img
Unless GPG reports something to the effect of a "good signature" from the expected key, do not continue! Your downloaded files may be corrupted or compromised.
The next step in the installation process is to prepare the device for heimdall mode.
There are a few additional steps to follow, depending on which device you have.
If your device is the Galaxy Nexus (GT-I9250):
You can then connect the USB cable to both the computer and the device
For all other devices:
You can then connect the USB cable to both the computer and the device
For instructions on installing the recovery image on your device for the first time, proceed further with this section.
Otherwise, for instructions on updating the recovery image on your device, proceed to the section on upgrading the recovery.
When installing or upgrading Replicant, use the commands in the table below. This will make sure that the device is rebooted right into the recovery. It does that by also installing the recovery in the boot partition.
If instead you only want to upgrade an existing recovery, use the commands in the section on upgrading the recovery.
Once in the recovery you can then proceed to the installation or s.
| Devices | Command for installing the recovery image |
|---|---|
| Galaxy Nexus (I9250) | heimdall flash --boot path/to/recovery-<yourdevice>.img --recovery path/to/recovery-<yourdevice>.img |
| Galaxy S 3 (I9300) | heimdall flash --BOOT path/to/recovery-<yourdevice>.img --RECOVERY path/to/recovery-<yourdevice>.img |
| Galaxy S 3 4G (I9305) | |
| Galaxy Note 2 (N7100) | |
| Galaxy Note 8.0 (N5100) | |
| Galaxy Note 8.0 Wi-Fi (N5110) | |
| Galaxy S 2 (I9100) | heimdall flash --KERNEL path/to/recovery-<yourdevice>.img --RECOVERY path/to/recovery-<yourdevice>.img |
| Galaxy Note (N7000) | |
| Galaxy Tab 2 7.0 (P3100) | |
| Galaxy Tab 2 7.0 Wi-Fi (P3110) | |
| Galaxy Tab 2 10.1 (P5100) | |
| Galaxy Tab 2 10.1 Wi-Fi (P5110) |
If your device reboots into the recovery OS, you have successfully installed the Replicant recovery. Proceed with the remaining installation instructions, or with the minor version upgrade instructions if you are upgrading an existing Replicant installation.
Otherwise, see the section on troubleshooting.
If you only want to update the recovery, without updating or installing Replicant, use the commands in the this section. This will make sure that your Replicant installation is not modified.
If instead you are installing Replicant for the first time, use the commands in the section on installing the recovery.
The command to update the recovery depends on which device you have. See below.
If your device is the Galaxy Nexus (I9250):
heimdall flash --recovery path/to/recovery-<yourdevice>.img
For all other devices:
heimdall flash --RECOVERY path/to/recovery-<yourdevice>.img
You can run the following command to verify if the device is in download mode:
lsusb
If it is you will then have one line that will be somewhat similar to that one:
Bus 004 Device 002: ID 04e8:685d Samsung Electronics Co., Ltd GT-I9100 Phone [Galaxy S II] (Download mode)
It is pretty easy to end up with heimdall failing like that:
Heimdall v1.4.2 Copyright (c) 2010-2017 Benjamin Dobell, Glass Echidna http://www.glassechidna.com.au/ This software is provided free of charge. Copying and redistribution is encouraged. If you appreciate this software and you would like to support future development please consider donating: http://www.glassechidna.com.au/donate/ Initialising connection... Detecting device... Claiming interface... Setting up interface... Initialising protocol... ERROR: Protocol initialisation failed! Releasing device interface...
In that case disconnect and reconnect the USB cable from the computer and try again.
If it still fails, make sure that your computer isn't doing resource intensive tasks:The download mode for more recent devices, like the Galaxy S III GT-I9305, may show the following message in blue:
Secure Download : Enabled
This is usually not an issue, but in devices where users didn't install (yet) another recovery or distribution before, it may prevent the installation of the recovery. Heimdall will fail with errors like:
Initialising connection... Detecting device... libusb: error [_get_usbfs_fd] libusb couldn't open USB device /dev/bus/usb/001/028: Input/output error ERROR: Failed to access device. libusb error: -1
This can usually be solved with the following adb command:
adb reboot booloader
Android debugging in the Developer settings.
Unlike what's expected (a reboot to Download mode), this command will rather trigger a normal reboot, with the device going back to the installed Android system. After this you should power off your phone and use the key combination to enter Download mode. After that, installing images with Heimdall should work from then on.
Key ID: FB31DBA3AB8DB76A4157329F7651568F80374459
These images are signed with Denis 'GNUtoo' Carikli's key and has the following fingerprint:
FB31 DBA3 AB8D B76A 4157 329F 7651 568F 8037 4459
The FB31DBA3AB8DB76A4157329F7651568F80374459 can be downloaded form https://download.replicant.us/people/GNUtoo/FB31DBA3AB8DB76A4157329F7651568F80374459.key
It can then be imported with the following command (it needs to be run in the directory where FB31DBA3AB8DB76A4157329F7651568F80374459.key has been downloaded):
gpg --import FB31DBA3AB8DB76A4157329F7651568F80374459.key
Alternatively this key is also available in several key servers and it's also part of several Replicant releases, so the other methods mentioned below in Retrieving the Replicant release key can also work.
Besides the methods documented below in Establishing a chain of trust, you can also get the key ID from Parabola's hackers repository at https://git.parabola.nu/hackers.git/tree/users/1042.yml .
Key ID: 5816A24C10757FC4
These images are signed with Wolfgang Wiedmeyer's key and has the following fingerprint:
0F30 D1A0 2F73 F70A 6FEE 048E 5816 A24C 1075 7FC4
Key ID: 16D1FEEE4A80EB23
These images are signed with the Replicant release key which expires 2024-01-17 and has the following fingerprint:
E776 092B 052A DC91 FDD1 FD80 16D1 FEEE 4A80 EB23
In the following, KEY_ID needs to be replaced with the right key ID from above.
You can retrieve our signing key from a public key server and import it to your GPG keyring using:
gpg --recv-key KEY_ID
It sometimes is the case that certain keyservers have updated GPG keys while other keyservers have expired GPG keys or don't have them at all. In this situation, an alternate keyserver can be specified by adding a keyserver flag to the command:
gpg --keyserver KEYSERVER_ID --recv-key KEY_ID
For example, to get Denis 'GNUtoo' Carikli's up to date public GPG key, you can use a command such as this:
gpg --keyserver hkps://keyserver.ubuntu.com --recv-key FB31DBA3AB8DB76A4157329F7651568F80374459
Errors may occur if GPG is not properly configured. Following a guide like this should ensure that the key is retrieved securely.
A copy of our signing key is shipped with every Replicant release, distributed with Replicant images.
Once downloaded, the key can be imported to your GPG keyring using:
gpg --armor --import path/to/KEY.asc
In order to establish a chain of trust, you are encouraged to retrieve our release key physically when meeting a trusted Replicant developer and sign it with your own key.
You can see the signatures the release key is already signed with running:
gpg --list-sigs KEY_ID
If a key you already trust is among these signatures, a chain of trust is established between your key and the release key. However, this chain of trust is not as strong as the direct one you establish when you personally verify and sign the release key.
We need to make sure that users are able to easily check the signature with as few steps as possible, else they would simply skip the signature checking as it's too complicated.
It may be possible to limit some of the impact by using the gpg key as a PKI: It's possible to have some people have a separate primary key, while handing over subkeys to other people, but it doesn't completely solve any of the issues above, as they would all still apply to the people having access to the primary key, and only remove the subkeys of the equation.
This is what is in use at the time of writing.
Tradeoffs:At the time of writing, the Replicant images tend to be relevant for a very long time (years).
For instance The GTA04 A4 is supported by Replicant 4.2 but not by Replicant 6.0, and in order to maintain support for some devices in libsamsung-ipc we also need to build and test Replicant 4.2 images, many years after. While old images do have many security issues, some people don't care much as other distributions probably have other issues like backdoors and freedom issues.
Having the ability to easily run Replicant 4.2 years later was also very useful to solve the bug about SIM card not being recognized.
So it's still good to make sure that everyone can easily check the signature of old releases.
Considerations:Parabola uses a keyring to check the package.
Tradeoffs:OpenBSD uses signify.
Tradeoffs:minisign looks interesting as you can add text to be displayed (like the Replicant version) in the signature.
TODO:The tool could use other schemes, like something similar to signify or a keyring.
Tradeoffs:Such tool could for instance check signatures of an image, and even identify the Replicant version of the image.
Rockbox managed to ship an installer in many GNU/Linux distributions, so if we ever make a dedicated tool, it would be interesting to have the ability to easily install Replicant from that tool.
Schemes could also be combined.
So far we have the following install flow: Recovery signature -> Recovery -> zip
The users check the recovery signature, and the recovery then check the zip.
The recovery could be signed with a Replicant contributor key, while it could check the signatures of the zip through a keyring for instance.
| Repository path | rebase worked | Changes | pushed rebase in Replicant 6.0 | Tag for the old history | diff |
|---|---|---|---|---|---|
| build | No | ||||
| manifest | No | N/A | |||
| bootable/recovery | Yes | * UI changes to improve usability * Branding * Small fix(es) |
|||
| external/boringssl | Yes | * Small fix(es) | |||
| external/heimdall | Yes | Yes | replicant-6.0-0004-rc1 | ||
| frameworks/av | Yes | * Software rendering fix(es) | Yes | replicant-6.0-aug-2018 | |
| frameworks/base | Yes | * WiFi fixe(s) for external dongles * Software rendering fix(es) * Privacy fix(es) * Security improvements * Usability improvements |
Yes | replicant-6.0-sept-2018 | |
| frameworks/native | Yes | replicant-6.0-0003 | |||
| hardware/broadcom/wlan | Yes | * Remove nonfree software | |||
| hardware/libhardware | Yes | * Software rendering fix(es) | Yes | replicant-6.0-0003 | replicant-6.0-0003..replicant-6.0-0004-rc1: empty diff |
| hardware/libhardware_legacy | Yes | * Don't depend on nonfree software | |||
| hardware/ti/omap4 | Yes | * Remove nonfree software * Don't depend on nonfree software * Small fix(es) |
|||
| libcore | Yes | * Small fix(es) | |||
| packages/apps/Browser | Yes | * Privacy fix(es) * Branding * Small fix(es) |
|||
| packages/apps/LegacyCamera | Yes | * Software rendering fix(es) * Small fix(es) |
|||
| packages/apps/RepWifi | Not upstreamed, obsolete | N/A | |||
| packages/apps/ReplicantWallpapers | Not upstreamed | * Branding | |||
| packages/apps/Settings | No | ||||
| packages/apps/SetupWizard | Yes | * Privacy fix(es) * Don't depend on nonfree software * Branding |
|||
| packages/apps/ThemeChooser | Yes | * Privacy fix(es) ? * Don't depend on nonfree software ? |
|||
| packages/providers/ContactsProvider | Yes | * Small fix(es) | |||
| system/core | Yes | * Branding * various fixes |
|||
| vendor/replicant | No | ||||
| vendor/cmsdk | Yes | * Branding | |||
| external/chromium-webview | ? | ? | |||
| external/drm_gralloc | Yes | * Software rendering fix(es) | Yes | replicant-6.0-aug-2018 | |
| external/llvm | Yes | * Software rendering fix(es) | Already rebased | replicant-6.0-0003 | |
| external/mesa3d | Yes | * Software rendering fix(es) * Performance debugging for software rendering |
|||
| external/parameter-framework | Yes | * Small fix(es) | |||
| external/protobuf | N/A | No changes | |||
| prebuilts/ndk | ? | ? | |||
| prebuilts/sdk | ? | ? | |||
| sdk | Yes | * Small fix(es) | |||
| toolchain/src/binutils | Yes | * Small fix(es) | |||
| toolchain/src/gcc | No | ||||
| toolchain/src/jack | Yes | * Small fix(es) | |||
| toolchain/src/jill | Yes | * Small fix(es) | |||
| kernel/samsung/smdk4412 | Yes | * Security fixes * Privacy Fixes (TrustZone) * Don't depend on nonfree software * Remove nonfree software * Small fix(es) |
Yes | replicant-6.0-0003 | |
| kernel/samsung/tuna | Yes | replicant-6.0-0003 | |||
| kernel/samsung/espresso10 | |||||
| device/samsung/i9100 | No | * Replace nonfree software by free software * free software sensors implementation(s) * free software modem audio implementation(s) * Software rendering fix(es) * Privacy Fixes (TrustZone) * Don't depend on nonfree software * Remove nonfree software * Branding * Small fix(es) |
|||
| device/samsung/n7000 | Yes | ||||
| device/samsung/i9300 | No | ||||
| device/samsung/i9305 | No | ||||
| device/samsung/n7100 | Yes | Already rebased | replicant-6.0-0003 | ||
| device/samsung/n5100 | Yes | ||||
| device/samsung/n5110 | Yes | ||||
| device/samsung/maguro | Yes | ||||
| device/samsung/tuna | Yes | ||||
| device/samsung/espressowifi | Yes | ||||
| device/samsung/espresso3g | Yes | ||||
| device/samsung/galaxys2-common | Yes | ||||
| device/samsung/smdk4412-common | Yes | ||||
| device/samsung/kona-common | Yes | ||||
| hardware/ril/samsung-ril | Not upstreamed | ||||
| external/libsamsung-ipc | Not upstreamed | ||||
| hardware/tinyalsa-audio | Not upstreamed? | ||||
Replicant can only be built on 64 bit x86 architectures, building on 32 bit x86 systems is no longer supported.
However, some prebuilt tools are still 32 bit x86 executables and some host tools are generated as 32 bit x86 executables.
It is recommended to have at least 4GB of RAM available.
Trisquel 7.0
Packages installation:
dpkg --add-architecture i386 ; apt-get update apt-get install build-essential apt-get install g++-multilib apt-get install bc git gnupg flex bison gperf zip curl openjdk-7-jre openjdk-7-jdk libc6-dev libncurses5-dev:i386 x11proto-core-dev libx11-dev:i386 libreadline6-dev:i386 libgl1-mesa-glx:i386 libgl1-mesa-dev mingw32 tofrodos python-markdown libxml2-utils libxml2-dev xsltproc zlib1g-dev:i386 repo
Debian 8
Packages installation:
dpkg --add-architecture i386 ; apt-get update apt-get install bison flex git-core gperf libncurses-dev build-essential curl squashfs-tools openjdk-7-jre openjdk-7-jdk pngcrush wget zip zlib1g-dev lzma libxml2-utils libxml2-dev libc6-dev-i386 g++-multilib lib32z1-dev lib32readline-gplv2-dev lib32ncurses5-dev zlib1g-dev:i386 xsltproc
If you have the following error:
$ ./vendor/replicant/build-toolchain [...] -- Clang version: 3.7.0 -- Configuring done -- Generating done -- Build files have been written to: /home/replicant/replicant-6.0/toolchain/clang + nproc + echo 1 + make -j 1 [...] [ 98%] Built target libclang make[2]: *** No rule to make target '/usr/lib64/libxml2.so', needed by 'bin/c-index-test'. Stop. CMakeFiles/Makefile2:13807: recipe for target 'tools/clang/tools/c-index-test/CMakeFiles/c-index-test.dir/all' failed make[1]: *** [tools/clang/tools/c-index-test/CMakeFiles/c-index-test.dir/all] Error 2 Makefile:149: recipe for target 'all' failed make: *** [all] Error 2
If the packages manager complains about lib32readline5-dev being missing, it has to be replaced with lib32readline-gplv2-dev in the command line.
/usr/lib/zconf.h header is missing, a symlink has to be created:ln -s /usr/include/x86_64-linux-gnu/zconf.h /usr/lib/zconf.h
sudo ln -s /usr/lib32/libstdc++.so.6.0.14 /usr/lib32/libstdc++.so sudo ln -s /usr/lib32/libz.so.1.2.3.4 /usr/lib32/libz.so
To fix the following:
make: *** No rule to make target `.../out/target/product/maguro/obj/SHARED_LIBRARIES/libsamsung-ipc_intermediates/export_includes', needed by `.../out/target/product/maguro/obj/SHARED_LIBRARIES/libsamsung-ril_intermediates/import_includes'. Stop. make: *** Waiting for unfinished jobs....
Run the following command:
mkdir -p out/target/product/maguro/obj/SHARED_LIBRARIES/libsamsung-ipc_intermediates/export_includes
Parabola
Base packages (from the Parabola repositories) installation:
pacman -S --needed core/bison core/flex core/make core/ncurses core/xz core/zlib extra/bc extra/git extra/gperf extra/gperftools libre/jdk7-openjdk extra/openjdk7-src libre/jre7-openjdk extra/wget extra/zip community/squashfs-tools community/pngcrush libre/unzip community/repo
Some additional repositories are required to retrieve some of the build dependencies.
To enable those repositories, the following should be added to /etc/pacman.conf:
[libre-multilib] Include = /etc/pacman.d/mirrorlist [multilib] Include = /etc/pacman.d/mirrorlist
For these changes to take effect, the packages database should be updated:
pacman -Syu
Additional packages installation:
pacman -S --needed multilib/lib32-glibc multilib/gcc-multilib multilib/lib32-readline multilib/lib32-ncurses multilib/lib32-zlib
Tweaks
ln -s /usr/bin/python2 /usr/local/bin/python
dh1. Replicant 6.0 build dependencies installation
Replicant can only be built on 64 bit x86 architectures, building on 32 bit x86 systems is no longer supported.
However, some prebuilt tools are still 32 bit x86 executables and some host tools are generated as 32 bit x86 executables.
It is recommended to have at least 4GB of RAM available.
Packages installation:
dpkg --add-architecture i386 ; apt-get update apt-get install build-dep binutils gcc llvm-defaults apt-get install aapt android-sdk-build-tools android-sdk-platform-23 ant bash bc ca-cacert cmake curl dirmngr eclipse-jdt gawk gcc-arm-none-eabi git-core g++-multilib gperf gradle lib32ncurses5-dev lib32readline-dev lib32z1-dev libandroidsdk-ddmlib-java libandroidsdk-sdklib-java libasm4-java libc6-dev-i386 libemma-java libfreemarker-java libgmp3-dev libgradle-android-plugin-java libguava-java libmaven-javadoc-plugin-java libmaven-source-plugin-java libmpc-dev libmpfr-dev libnb-org-openide-util-java libnb-platform18-java libncurses-dev lzma lzop maven-debian-helper pngcrush proguard python-dev python-mako rsync schedtool squashfs-tools swig xsltproc zip zlib1g-dev zlib1g-dev:i386
As repo tend to update itself (by downloading a new version of repo and running it) and that newer versions of repos also require newer versions of python, it doesn't work anymore on Debian 9 (stretch).
To work around that, we also released a version of repo that is self-contained . Make sure to read the README for installation instructions. The README content is also signed with gpg (by Denis 'GNUtoo' Carikli, who at the time of writing did the last Replicant 6 Release Candidates).
In addition you also need to workaround some issues with Debian 9 (stretch) with the path of grep, sed, and mkdir that prevent building the toolchain. See the /usr/bin/grep, /usr/bin/sed, /usr/bin/mkdir: No such file or directory section for how to do that.
Note that Trisquel 9 is a work in progress as some patches for it have not been sent yet, and we have not yet confirmed that it can build Replicant 6.0.
Packages installation:
dpkg --add-architecture i386 ; apt-get update apt-get build-dep binutils gcc llvm-defaults apt-get install aapt android-sdk-build-tools android-sdk-platform-23 ant bash bc ca-cacert cmake curl dirmngr eclipse-jdt gawk gcc-arm-none-eabi git g++-multilib gperf gradle lib32ncurses5-dev lib32readline-dev lib32z1-dev libandroidsdk-ddmlib-java libandroidsdk-sdklib-java libasm4-java libc6-dev-i386 libfreemarker-java libgmp3-dev libgradle-android-plugin-java libguava-java libmaven-javadoc-plugin-java libmaven-source-plugin-java libmpc-dev libmpfr-dev libnb-org-openide-util-java libnb-platform18-java libncurses-dev lzma lzop maven-debian-helper pngcrush proguard python-dev python-mako rsync schedtool squashfs-tools swig xsltproc zip zlib1g-dev zlib1g-dev:i386 update-alternatives --set java /usr/lib/jvm/java-8-openjdk-amd64/jre/bin/java update-alternatives --set javac /usr/lib/jvm/java-8-openjdk-amd64/bin/javac
As repo tend to update itself (by downloading a new version of repo and running it) and that newer versions of repos may also require newer versions of python that aren't in Trisquel 9.
If that appears to be the case, we also released a version of repo that is self-contained . Make sure to read the README for installation instructions. The README content is also signed with gpg (by Denis 'GNUtoo' Carikli, who at the time of writing did the last Replicant 6 Release Candidates).
In addition you may also need to workaround some issues with Trisquel 9 (stretch) with the path of grep, sed, and mkdir that prevent building the toolchain. See the /usr/bin/grep, /usr/bin/sed, /usr/bin/mkdir: No such file or directory section for how to do that.
Associated bugreport: #1847
When budilding the toolchain, with debian stretch and potentially other distributions, it should fails with the following error:
.../toolchain/src/binutils/binutils-2.25/bfd/configure: line 16741: /usr/bin/sed: No such file or directory
To workaround this issue, first become root:
$ sudo su
Then go to the /usr/bin directory:
# /cd /usr/bin
And create some symlinks:
# ln -s /bin/grep ./ # ln -s /bin/mkdir ./ # ln -s /bin/sed ./
This workaround should make the issue disappear in the next build.
Affected distributions (not all might be able to build Replicant):On a less powerful build host, the following build error can happen:
target Java: org.cyanogenmod.platform.sdk (/home/replicantbuilder/replicant-6.0/out/target/common/obj/JAVA_LIBRARIES/org.cyanogenmod.platform.sdk_intermediates/classes) javac: file not found: /home/replicantbuilder/replicant-6.0/out/target/common/obj/APPS/org.cyanogenmod.platform-res_intermediates/src/cyanogenmod/platform/Manifest.java Usage: javac <options> <source files> use -help for a list of possible options build/core/java.mk:394: recipe for target '/home/replicantbuilder/replicant-6.0/out/target/common/obj/JAVA_LIBRARIES/org.cyanogenmod.platform.sdk_intermediates/classes-full-debug.jar' failed make: *** [/home/replicantbuilder/replicant-6.0/out/target/common/obj/JAVA_LIBRARIES/org.cyanogenmod.platform.sdk_intermediates/classes-full-debug.jar] Error 41
This can be fixed by building the specific target that fails:
mka org.cyanogenmod.platform-res
Sometimes, you may want to start over again from the point where either nothing is built yet or only parts are already built. A reason could be that you are facing errors that didn't happen before.
To remove everything, including the toolchain build, run
make clobber
If you want to keep the toolchain, but all binaries for the target device and all compiled host tools should be deleted, run
make clean
If only the built toolchain should go away, run
make tcclean
Keys for signing the images can be deleted with
rm -r vendor/replicant-security
This can be helpful when there are issues with the sign-build script. The keys will be regenerated the next time the sign-build script runs. Please note that a factory reset on the device is needed when the images are signed with new keys.
Result: Decided against moving it
Rationale:18 June 2024 at 19:00 CEST
Mumble on the mumble.replicant.us self hosted Mumble server.
Public announcement: https://blog.replicant.us/2024/06/first-online-replicant-meeting/
Attendees: dllud, GNUtoo, jack_kekzoz, Johannes_dolphinana, Putti, tct, thatch, wizzard
Duration: 1h30m
All scheduled topics were addressed.
The status of the steering committee was explained. GNUtoo recalled that Fil Bergamo was not very active and wanted to leave (that is now confirmed). The consensus was that dllud will replace Fil Bergamo, and that this will be taken care of before putting out the announce for the Replicant community manager / manager.
For the Replicant community manager / manager:18 August 2024 19:00 CEST
mumble.replicant.us
This tracks the main changes between the different RC releases of Replicant 6.0 0004.
| Image | Key set | Corrupts packages.xml | Boots fine on OMAP4 devices | Telephony |
| RC1 | Lost | N/A (no key migration) | No4 | Works |
| RC2 | GNUtoo | Has key migration? | Broken1 | |
| RC3 | Has key migration? | Yes2 | Works2 | |
| RC4 | Yes3 | Yes5 | Works5 | |
| RC5 | To test | To test | To test |
1 https://redmine.replicant.us/issues/2122
2 https://redmine.replicant.us/issues/2152
3 https://redmine.replicant.us/issues/2229
4 https://redmine.replicant.us/issues/1994
5 https://redmine.replicant.us/issues/2207
The Galaxy Note 2 released images are corrupted and incomplete. This is probably due to the lack of free space when building the release.
The solution to that is to use the Replicant 6.0 0004 RC5 releases instead. The Replicant 6.0 0004 installation and upgrade instructions (below) also work on the Replicant 6.0 0004 RC5 release.
Reference: https://lists.osuosl.org/pipermail/replicant/2022-June/003777.html
If you are installing Replicant 6.0 0004 from scratch you can simply follow the usual ReplicantInstallation instructions.
You can also follow the ReplicantInstallation instructions if erasing your data in the process is not an issue or if you are upgrading from Replicant 4.2 (as nobody wrote instructions to upgrade from Replicant 4.2 while keeping the data).
Upgrading from a previous Replicant 6.0 version like Replicant 6.0 0003 Replicant 6.0 0004 requires a special procedure to do a data migration.
This is because because:If for some reasons you don't care about keeping your data, or that for some reasons these procedure fails and that you don't care about your data, you can simply follow ReplicantInstallation.
To upgrade from Replicant 6.0 0003:Due to a bug with the integration of a new, more compatible graphic stack based on llvmpipe, once booted, the Galaxy Nexus and a Galaxy Tab 2 graphics are extremely slow.
So if you have a Galaxy Nexus (GT-I9250), a Galaxy Tab 2 (GT-P3100, GT-P3110, GT-P3113, GT-P5100, or GT-P5110 ) you might also want to restore the previous graphics stack.
To do that, you can follow the EnablingRootAccess article to get root access on the device, and run the following command on the device:
graphics.sh faster
It will reboot and restore the previous graphic stack.
The Graphics article also has more details on the topic.
| GPG signing key | Checksum |
|---|---|
| 4A80EB23.gpg | security.md5 |
| SDK | Checksum |
|---|---|
| replicant-sdk_linux-x86.zip replicant-sdk_linux-x86.zip.sig | sdk.md5 |
| Build ID | Build date | Base URL | API level | SDK zip |
|---|---|---|---|---|
| 0001 | 2013-01-03 | https://download.replicant.us/sdk/replicant-4.0/0001/ | 15 | replicant-sdk_linux-x86.zip |
| Build ID | Build date | Base URL | API level | SDK zip |
|---|---|---|---|---|
| 0002 | 2011-07-06 | https://download.replicant.us/sdk/replicant-2.2/0002/ | 8 | replicant-sdk_eng.gnu_linux-x86.zip |
After downloading the Replicant SDK from the ReplicantSDK page, it should work the same as the Android SDK as provided by Google except that the Replicant SDK already contains a built and ready to use emulator image.
Please refer to: http://developer.android.com/sdk/installing/index.html for further assistance.
In some unlikely cases, creating a "JAVA_HOME" environment variable and pointing it to your JDK's true install location (not the "bin" directory but one level upward) may prove necessary.
Note that the Replicant SDK is built for x86 platforms and you may need compatibility libraries such as ia32-libs.
Required packages:
apt-get install libsdl1.2debian openjdk-6-jdk ant
Additional requirements for amd64:
apt-get install ia32-libs
See SDKBuild.
You may want to install Eclipse to work on Android Java applications. Note that this is not strictly necessary as all the required tools are already present on the SDK package.
The following instructions work with Eclipse 3.7.2 (Indigo) as installed via Apt under Trisquel Toutatis GNU/Linux.
sudo aptitude install eclipse
Once you have Eclipse installed and running properly, you may want to install the Android Development Tools plugin.
http://dl.google.com/android/ADT-16.0.0.zip
http://dl.google.com/android/ADT-20.0.0.zip
- select "Window" > "Preferences" > "Install/Update" > "Available Software Sites"
- click the "Add" button
- name your software site something recognizable, e.g. "ADT"
- click "Archive" and select the ADT zip file
- select "Help" > "Install New Software"
- select the "ADT"/ software site from the dropdown menu
- select the "Developer Tools" software package
- verify that the "Android DDMS" and "Android Development Tools" sub-packages were selected
- click the "Next" to install Android Developer Tools
When you have installed ADT and restarted Eclipse, select the "Window" menu. You should see a menu entry named "Android SDK and AVD Manager". Then select "Preferences" from the "Window" menu. A menu item named "Android" should be available on the left panel.
Once the "Android" menu item is available in the "Window" > "Preferences" dialog, select it. In the main panel, click the "Browse" button for the "SDK Location" field, and point it to the directory where you unzipped your Replicant 4.2 SDK. Then click "Apply" or "OK".
Next time you enter this dialog, a line saying "Android 4.2.2 / Android Open Source Project / Platform: 4.2.2 / API level: 17" should be present in the list of SDK targets.
To run your app in an emulator, you need to create an Android Virtual Device. In Eclipse, choose "Window" > "Android SDK and AVD Manager" > "Virtual Devices" > "New" and fill in the properties of the virtual device as follows:
- Name: something descriptive like "AVD_for_Nexus_S"
- Screen resolution of your physical device, e.g. "WVGA800" for Nexus S
- Target: choose "Android 4.2.2 - API level 17" from the dropdown menu
- SD Card: specify the size of an emulated SD card, alternatively browse for an existing SD card image
- leave other values at defaults and click "Create AVD"
- if your disk is slow and you specified a large SD card image for creation, it may take a few seconds to complete
In Eclipse, choose "File" > "New" > "Project". In the tree of possible project types, a branch named "Android" should exist. Open it, select the project type "Android Application Project" and click "Next".
Enter a friendly name for your application, e.g. "Hello World", then a name for your project, e.g. "hello". Enter its package name, which can be either public (e.g. "com.example.hello") or private (e.g. "hello.test").
For "Configure", select "Create project in workspace" and use default location. The project will be created in your local Eclipse workspace directory, in a subdirectory corresponding to the project name. Leave the minimum SDK version as-is.
If you want the first piece of your application's user interface to be auto-created, leave the "Create Activity" checkbox checked and enter someting like "MainActivity" for the name of the "Activity" class to create.
Finally click "Finish" and your project should appear in Eclipse's left-hand projects tree.
To have your application's MainActivity class do something, consider adding some code. For example, you might want your application to have a button which closes it. In this sample, we specify the design of user interface elements in a separate XML resource file, so don't be surprised when you don't see anything related to their design here:
package hello.test;
import android.app.Activity;
import android.os.Bundle;
import android.view.View;
import android.widget.Button;
public class MainActivity extends Activity {
@Override
public void onCreate(Bundle savedInstanceState) {
super.onCreate(savedInstanceState);
setContentView(R.layout.main);
Button buttonFinish = (Button) findViewById(R.id.buttonFinish);
buttonFinish.setOnClickListener(new View.OnClickListener() {
@Override
public void onClick(View v) {
finish();
}
});
}
}
You may notice how the constructor of MainActivity calls setContentView(R.layout.main). In this statement, R is a special resource class, pointing to resources hosted in the res directory of your project. The layout class limits the choice to layout resources hosted under the res/layout while main is the name of a layout resource file main.xml located there.
We need to create this resource file now. I would recommend having it be like this:
<?xml version="1.0" encoding="utf-8"?>
<LinearLayout xmlns:android="http://schemas.android.com/apk/res/android"
android:orientation="vertical"
android:layout_width="fill_parent"
android:layout_height="fill_parent"
>
<TextView
android:id="@+id/textInfo"
android:layout_width="fill_parent"
android:layout_height="wrap_content"
android:text="Click button to close app."
/>
<Button android:id="@+id/buttonFinish"
android:layout_width="wrap_content"
android:layout_height="wrap_content"
android:text="Close" />
</LinearLayout>
Together, it makes sense. The "LinearLayout" element directs the application to fill the screen with its window ("fill_parent" for width and height). The "TextView" element displays a text field expanding to cover window width, but limits itself to content height ("wrap_content"). The "Button" element is a button named "buttonFinish", big enough to accommodate its content. Code obtains a handle to it by calling "Button buttonFinish = (Button) findViewById(R.id.buttonFinish);"), and creates an event listener for its OnClick event. This event listener calls "finish()" to close the app.
Once you've coded your app, choose "Run" > "Run" in Eclipse. A dialog named "Android Device Chooser" will open, asking you to choose a device for it. Select the "Launch a new Android Virtual Device" checkbox and the virtual device you previously made, should become available for selection (select it and click "OK"). The virtual device will start booting up and will eventually run your app. Beware, on slow computers (e.g. an old model of Asus EEE PC) this can take minutes.
1. Declare your app as debuggable. In the left-hand sidebar of Eclipse, your project's resource tree should contain a file resource named "AndroidManifest.xml". Right-click it and choose "Open With". Proceed by choosing either "Android Manifest Editor" or "Text Editor". If you preferred the manifest editor GUI, select the tab "Application" at its bottom. On the "Application" tab, set the field "Debuggable" to "true". If you preferred the text editor, append the property "android:debuggable="true" to the "<application>" element.
2. Enable USB debugging on your device, for example by choosing "Menu" > "Settings" > "Applications" > "Development" and checking the "USB Debugging" checkbox.
3. Set up ADB on your PC.
Do the verification by issuing "adb devices" on command line. Make your your ADB (Android Debug Bridge) is included in your $PATH variable. If it lists your device and its numeric ID, all should be fine. If it lists ????????? for the ID and says No permissions, you might need to restart the ADB server (issue adb kill-server; adb start-server).
4. Run the app. Without a customized run configuration, Eclipse should display the "Android Device Chooser" dialog, letting you choose.
5. Optionally, configure automatic deployment: if you want to automatically deploy to devices when they're attached, create a run configuration for your app, proceeding to select "Deployment Target Selection Mode: Automatic" in the "Target" tab.
| Replicant version | Base | Supported devices | Source mirrors | Releases | Comments |
|---|---|---|---|---|---|
| Replicant 1.5 | AOSP | * First Replicant version ? * Binary releases probably lost if there were any (it was mostly source code based at first, users were probably expected to build it) * It was hosted on gitorious at first |
|||
| Replicant 2.2 | CyanogenMod | ||||
| Replicant 2.3 | CyanogenMod | * 0004 release : 2012-09-10 | * Replicant 2.3 0001 is the first Replicant version with libsamsung-ipc * Replicant 2.3 0004 was the first version with partial support for the GTA04 |
||
| Replicant 4.0 | CyanogenMod | Not mirrored: * AOSP (uses fixed revisions) To check: * Uses gitorious remote (probably mirrored) |
* Dropped support for devices with Qualcom SOCs | ||
| Replicant 4.2 | CyanogenMod 10.1.3 | * Nexus S (I902x) * Galaxy S (I9000) * Galaxy S 2 (I9100) * Galaxy Note (N7000) * Galaxy Nexus (I9250) * Galaxy Tab 2 7.0 (P3100) * Galaxy Tab 2 7.0 Wi-Fi (P3110) * Galaxy Tab 2 10.1 (P5100) * Galaxy Tab 2 10.1 Wi-Fi (P5110) * Galaxy S 3 (I9300) * Galaxy Note 2 (N7100) * GTA04 |
Not mirrored: * AOSP (uses fixed revisions) * CyanogenMod (uses fixed revisions) |
* Last version with partial support for the GTA04 | |
| Replicant 6.0 | LineageOS 13.0 | * Galaxy Nexus (GT-I9250) * Galaxy Note (GT-N7000) * Galaxy Note II (GT-N7100) * Galaxy S II (GT-I9100) * Galaxy SIII (GT-I9300) * Galaxy Tab 2 7.0 GSM (GT-P3100) * Galaxy Tab 2 7.0 WiFi (GT-P3110) * Galaxy Tab 2 10.1 GSM (GT-P5100) * Galaxy Tab 2 10.1 WiFi (GT-P5110) * Galaxy Note 8.0 GSM (GT-N5100) * Galaxy Note 8.0 WiFi (GT-N5110) |
Fully mirrored | * All devices have a somewhat isolated modem * Work to remove prebuilts which ended up requiring Debian |
|
| "Replicant 9.0" | AOSP | * Galaxy SIII 4G (GT-I9305) * Galaxy SIII (GT-I9300) ? |
Not mirrored at all (git://git.putti.eu/aosp/manifest_i9305.git) | * No releases, superseeded by the LineageOS version of Replicant 9 | |
| Replicant 9.0 | LineageOS | * Galaxy SIII 4G (GT-I9305) * Galaxy SIII (GT-I9300) |
Not mirrored: * Freedesktop (1 floating revision * 5 github repositories (4 floating revisions) * AOSP (fixed revisions) |
* No releases, superseeded by Replicant 10 | |
| Replicant 10.0 | LineageOS 17.1 | * Galaxy SIII 4G (GT-I9305) * Galaxy SIII (GT-I9300) |
Not mirrored: * Freedesktop (1 fixed revisions) * Github (2 fixed revisions) * AOSP (1 floating revisions, many fixed revisions) |
* No releases, superseeded by Replicant 11 | |
| Replicant 11.0 | AOSP 11 + LineageOS backports | * Galaxy SIII 4G (GT-I9305) * Galaxy SIII (GT-I9300) |
Not mirrored: * Freedesktop (1 fixed revisions) * Github (1 fixed revisions) * AOSP (fixed revisions only, mirrored) |
* No releases yet |
In some case, it is useful to be able to restore internal applications data:
For instance you might need to move the data of an application from a device to another if you want to switch device.
Another use case is if /data/system/packages.xml and/or /data/system/appops.xml get corrupted, applications can loose access to their data. This can make the launcher and other applications crash.
So while it is possible to recover from that by wiping the data partition in the recovery, sometimes it's very impractical to do that because you might have important data like silence encryption keys and established sessions that you don't want to loose.
This howto will explain how to move silence data from a device to another.
For instance you could want to move from a Galaxy SIII (GT-I9300) to a Galaxy SII (GT-I9100) or vice versa, and you might not want to recreate keys, sessions, etc when moving device.
This could also be adapted to restore application data from a block device level backup of the internal eMMC or the internal data partition.
Silence stores its data in the internal application storage. As far as I know it's not supposed to store any data on the microSD or user storage beside potential backups.
It might be interesting to make additional tutorial for other cases. For instance for:This howto assumes that the data partition is unencrypted. If you know how to open encrypted data partition in the recovery, or in a GNU/Linux distribution, it would be great to either modify this tutorial to add information on how to do it, or contact us on the mailing list or through the bugreporting system about it.
Follow the instructions for setting up ADB on your computer so that you can access a root shell on your device.
NOTE: when prompted on your Replicant device, make sure that you check the box that says Always allow from this computer when you grant your computer USB debugging permissions. Otherwise, you will be unable to obtain root shell access on your Replicant device when you reboot it into the recovery OS to actually perform the backup.
NOTE: for security reasons, you may want to revoke these non-expiring permissions once the backup is complete.
To correctly backup the application data, you need to make sure that the application isn't writing to its data while you are doing the backup and that the data is consistent.
To make sure of that the easiest way to do that is to go in the recovery: this way the application will not be started automatically and the data is consistent. You will also need a root shell there, so make sure to setup that beforehand.
If everything is setup correctly, running adb shell from your computer should result in a shell that now looks like this:
root@m0:/ #
Once that you have a shell in the recovery, you need to mount the data partition in /data from within that shell.
For the Galaxy SII (GT-I9100) and the Galaxy Note (GT-N7000), this can be done from your computer with this command:
mount /dev/block/platform/*/by-name/DATAFS /data
For the Galaxy S III (GT-I9300), Galaxy S III 4G (GT-I9305), Galaxy Note II (GT-N7100), Galaxy Note 8.0 (GT-N51xx) this can be done from your computer with this command:
mount /dev/block/platform/*/by-name/USERDATA /data
For the Galaxy Nexus (GT-I9250), this can be done from your computer with this command:
mount /dev/block/platform/*/*/by-name/userdata /data
For the Galaxy Nexus (GT-I9250), this can be done from your computer with this command:
mount /dev/block/platform/*/*/by-name/userdata /data
For the Tab 2 (GT-P3100, GT-P3110, GT-P5100, GT-P3510), this can be done from your computer with this command:
mount /dev/block/platform/omap/omap_hsmmc.1/by-name/DATAFS /data
We will then create an archive of the silence data.
This makes things much easier because with an archive:The silence data is in /data/data/org.smssecure.smssecure/. To make sure that the archive is created correctly and that once decompressed it will create the org.smssecure.smssecure directory (with all the silence data in it) in the current directory, we need to go to /data/data first.
To do that, we can go in /data/data with the following command:
cd /data/data
We can then create the archive in the recovery with that command:
root@m0:/data/data # tar cvpf /org.smssecure.smssecure.tar org.smssecure.smssecure/
This will create the /org.smssecure.smssecure.tar file which is our archive.
We will then exit the recovery shell as we will then need to type commands on your computer.
You can exit the recovery shell with the following command:
root@m0:/ # exit
We're now back on your computer.
As for now, we've created the archive but it's still in the recovery, so we need to copy it to your computer.
This can be done with the following command:
$ adb pull /org.smssecure.smssecure.tar ./
It will create the org.smssecure.smssecure.tar file in the current directory.
We will then need to verify that the archive was created correctly.
More precisely we need to check that it will be extracted in the org.smssecure.smssecure/ directory, in the current directory, otherwise it could mess up the data partition when it's being uncompressed.
To do that we can list its content with the following command:
tar tvf org.smssecure.smssecure.tar
It should output something that will look more or less like that:
drwxr-x--x u0_a61/u0_a61 0 2020-10-28 18:58 org.smssecure.smssecure/ lrwxrwxrwx root/root 0 2020-10-28 18:58 org.smssecure.smssecure/lib -> /data/app/org.smssecure.smssecure-1/lib/arm [...]
org/smssecure.smssecure/ or ./org.smssecure.smssecure/. If not something went wrong during the creation of the backup (for instance you might have forgetten to go in the /data/data/ recovery, or this tutorial could contain mistakes or be out of date).
Now that the backup is done, we can finally unmount the data partition and reboot the device.
To do that, we need to go back in the device recovery with the following command:
adb shell
It should output something that looks more or less like that:
root@m0:/ #
To do that first we need to go outside of data, else the mount will fail. This can be done with this command:
cd /
Then we can simply unmount /data/ with this command:
umount /data/
Then it's a good practice to make sure that everything is written to the data partition before rebooting.
We can do that with this command:
sync
And we can finally reboot or shutdown the device.
Rebooting can be done by selecting Reboot system now in the recovery menu.
Shutting down the device can be done by selecting Power off in Advanced in the recovery menu.
In the previous section, we did a backup of silence data that is now contained in the org.smssecure.smssecure.tar archive that you have on your computer.
In this section, we will restore that archive to a new device.
First you need to install silence, and if possible, give it the same permissions it had before. If not, we can still fix that later as silence is not required to boot the device, so we can still access the Android settings and fix that afterward.
Silence is installed before restoring its data for several reasons:/data/data/org.smssecure.smssecure directory to be created to be able to easily find the new username in which silence is running, as right after restoring the backup will need to fix the permissions of the new data to use this new username.Once Silence is installed, you will also need to enable root shells in the recovery like you did when doing a backup of Silence data.
Here too, it's done this way to make sure that the application isn't writing to its data while you are restoring the data from the older device.
To make sure of that, here too, the easiest way to do that is to go in the recovery: this way the application will not be started automatically and the data will be restored while the application isn't started.
You will also need a root shell in the recovery of this new device, so make sure to setup that beforehand.
If everything is setup correctly, running adb shell from your computer should result in a shell that now looks like this:
root@m0:/ #
Once that you have a shell in the recovery, you need to mount the data partition in /data from within that shell.
For the Galaxy SII (GT-I9100) and the Galaxy Note (GT-N7000), this can be done from your computer with this command:
mount /dev/block/platform/*/by-name/DATAFS /data
For the Galaxy S III (GT-I9300), Galaxy S III 4G (GT-I9305), Galaxy Note II (GT-N7100), and Galaxy Note 8.0 (GT-N51xx), this can be done from your computer with this command:
mount /dev/block/platform/*/by-name/USERDATA /data
For the Galaxy Nexus (GT-I9250), this can be done from your computer with this command:
mount /dev/block/platform/*/*/by-name/userdata /data
For the Tab 2 (GT-P3100, GT-P3110, GT-P5100, GT-P3510), this can be done from your computer with this command:
mount /dev/block/platform/omap/omap_hsmmc.1/by-name/DATAFS /data
If we extract the archive we made eariler, it will create the org.smssecure.smssecure directory and extract everything in it.
Since the data of Silence is in /data/data/org.smssecure.smssecure/ we then need to go in /data/data before extracting the archive. This way when extracting it, everything will be at the place it's supposed to be.
To do that, we can go in /data/data with the following command:
cd /data/dataHowever we can't restore Silence data yet as:
As applications are sandboxed, and that as part of that sandboxing, they have their own usernames, we need to retrieve this username, as we'll reuse it to fix the restored silence data permissions.
To get that username we can just use ls -ld on the directory holding the internal data of the newly installed silence (which is in /data/data/org.smssecure.ssmsecure).
So with ls -ld we can find the application username in this way:
root@m0:/data/data # ls -ld org.smssecure.smssecure __bionic_open_tzdata: couldn't find any tzdata when looking for localtime! __bionic_open_tzdata: couldn't find any tzdata when looking for GMT! __bionic_open_tzdata: couldn't find any tzdata when looking for posixrules! drwxr-x--x 2 u0_a61 u0_a61 4096 2012-01-01 00:01 org.smssecure.smssecure
Here the users and groups are u0_a61.
We will then need use this information later on to restore the silence data from the other device: If we restore Silence's data as-is it will most likely have wrong permissions: when the the Silence application was installed on the older device, it was assigned an username. As this username depends on the number of applications that were installed before it, we cannot expect it to always be the same between the two devices.
We will also move the data of the silence we just installed. Moving it can be done with this command:
mv org.smssecure.smssecure org.smssecure.smssecure.delmeMoving it has several advantages over just deleting it:
To be sure that the data is restored in the right directory, we will need to verify that the archive will extract its files in the org.smssecure.smssecure directory and not directly in the current directory (which should be /data/data as we moved into it before):
The archive can be verified with the following command:
tar tf /org.smssecure.smssecure.tar
It will output something that looks a bit like that:
./org.smssecure.smssecure/ ./org.smssecure.smssecure/lib -> /data/app/org.smssecure.smssecure-1/lib/arm [...]
./org.smssecure.smssecure/ or org.smssecure.smssecure/. Here it is the case, so the archive is good.
If we had something like that instead:
root@m0:/data/data # tar tf /org.smssecure.smssecure.tar ./lib -> /data/app/org.smssecure.smssecure-1/lib/arm [...]
Then it's best to recreate the archive. In that case, if you want to abort to restart later on, you could also move back org.smssecure.smsecure.delme to org.smssecure.smssecure if needed.
If the archive was good, we can then proceed to extract the application data.
This can be done with the following command:
tar xpf /org.smssecure.smssecure.tar --numeric-owner
If we look at the data we just restored, we can see that the username differs from the one we need with the following command:
ls -ld org.smssecure.smssecure
It should then print something like that ( the lines starting with __bionic_open_tzdata: can be ignored):
__bionic_open_tzdata: couldn't find any tzdata when looking for localtime! __bionic_open_tzdata: couldn't find any tzdata when looking for GMT! __bionic_open_tzdata: couldn't find any tzdata when looking for posixrules! drwxr-x--x 9 u0_a63 u0_a63 4096 2012-01-01 00:21 org.smssecure.smssecure
Here we have u0_a63, while the new silence data used u0_a61, so we need to fix it.
This can be done with the chown command, like that:
root@m0:/data/data # chown u0_a61:u0_a61 -R org.smssecure.smssecure root@m0:/data/data #
u0_a61 by the username you found earlier.
When this is done, we don't need the org.smssecure.smssecure.delme directory anymore, and it's best to remove it not to create any issues later on.
This can be done with the following command:
rm -rf org.smssecure.smssecure.delme
If everything went fine, it shouldn't output anything.
We are not done yet at restoring the permissions as in addition to the standard unix permissions which we just fixed, Android also uses selinux, which also has its own permissions.
The restorecon command can be used to fixup selinux permissions.
Here's its help (it can be shown just by typing restorecon):
usage: restorecon [-D] [-F] [-R] [-n] [-v] FILE... Restores the default security contexts for the given files. -D apply to /data/data too -F force reset -R recurse into directories -n don't make any changes; useful with -v to see what would change -v verbose: show any changes restorecon: Needs 1 argument
So to use it to fixup the selinux permissions, we can use the following command:
restorecon -D -F -R -v /data/
The order of the arguments (-D, -F, etc) seem to be important here as the wrong order might result in nothing being done.
Without the -v argument and with the wrong order of argument, it might make you think that it did its job while it did nothing.
It will then print something that looks like that:
SELinux: Loaded file_contexts contexts from /file_contexts. [...] SELinux: Relabeling /data/data/org.smssecure.smssecure from u:object_r:system_data_file:s0 to u:object_r:app_data_file:s0:c512,c768. SELinux: Relabeling /data/data/org.smssecure.smssecure/lib from u:object_r:system_data_file:s0 to u:object_r:app_data_file:s0:c512,c768. [...]
Now the permissions fixing is finally done.
we can then umount the data partition and reboot.
To do that first we need to go outside of data, else the mount will fail. This can be done with this command:
cd /
Then we can simply unmount /data/ with this command:
umount /data/
Then it's a good practice to make sure that everything is written to the data partition before rebooting.
We can do that with this command:
sync
And we can finally reboot or shutdown the device.
Rebooting can be done by selecting Reboot system now in the recovery menu.
Shutting down the device can be done by selecting Power off in Advanced in the recovery menu.
After rebooting, silence may still refuse to start if it doesn't have the right permissions.
To identify if it doesn't start due to missing permissions, you can use the following command from your computer:
adb logcat -b main
Then you need to wait until no more new logs were printed, otherwise it'd be harder to find the crash we're looking for in this huge amount of logs.
To better identify where the part where Silence crash starts and stops, you could for instance create a separation in the logs being printed by adding
many new lines once no more logs are printed, right before launching silence. This can be done by pressing enter multiple times or by pressing many time a character like = to create a visible line.
You can then launch silence, and as soon as the crash is done, do the same to mark the end, not to have too much logs to read.
When Silence crashed, the following appeard in the logs:
01-01 01:27:48.260 4126 4126 D AndroidRuntime: Shutting down VM
01-01 01:27:48.265 4126 4126 E AndroidRuntime: FATAL EXCEPTION: main
01-01 01:27:48.265 4126 4126 E AndroidRuntime: Process: org.smssecure.smssecure, PID: 4126
01-01 01:27:48.265 4126 4126 E AndroidRuntime: Theme: themes:{}
01-01 01:27:48.265 4126 4126 E AndroidRuntime: java.lang.RuntimeException: Unable to create application org.smssecure.smssecure.ApplicationContext: java.lang.SecurityException: getActiveSubscriptionInfoList: Neither user 10061 nor current process has android.permission.READ_PHONE_STATE.
01-01 01:27:48.265 4126 4126 E AndroidRuntime: at android.app.ActivityThread.handleBindApplication(ActivityThread.java:4754)
[...]
Here we can clearly see that it's a permission issue as it says that Neither user 10061 nor current process has android.permission.READ_PHONE_STATE.
And we know it's from silence as it has Process: org.smssecure.smssecure.
To fix that issue, I went in Settings->Apps->Silence->Permissions and gave it all the permissions it needed.
I had this issue because I didn't even launch silence after installing it, so it couldn't ask me for the permissions it needed.
And the silence of the former device probably wrote in its data that it already asked the permissions not to re-ask for it each time.
The directories holding the data are in /data/data/ and have the internal name of the application.
Here are some well known name correspondances:
| Internal name | Application |
| org.smssecure.smssecure | Silence |
| com.android.dialer | Dialer (Android's stock dialer application) |
| fil.libre.repwifiapp | RepWiFi |
So silence RepWiFi will be /data/data/fil.libre.repwifiapp
For packages coming from f-droid, the f-droid website can find the correspondance.
For instance the Silence page has org.smssecure.smssecure in its URL and inside the page.
If you don't need USB debugging permissions anymore, it might be a good idea to remove them. The Revoking all computer's USB debugging permissions section in the ADB wiki page explains how to do that.
That's it! Your device's EFS partition is now backed up. Your device should be running Replicant normally again.
These instructions are experimental and have not been tested yet, so it's better to have a backup of the modem partition before continuing.
Also, they were made for the Galaxy SIII (GT-I9300) and we need to make sure that it's supposed to work too on other devices by making sure that the filenames inside the modem data partition are the sames.
In case of doubt, you can still just read the instructions until the end and try to understand if they are good enough, before starting to follow them blindly.
Many devices supported by Replicant have a partition with the modem data (IMEI, etc) which is called EFS.
That partition is used by Replicant to enable the modem to store data, by making files inside that partition available to the modem through a network protocol between Replicant and the modem.
As with every other computer system, files can get corrupted, especially if the power goes away suddenly, while data is being written in some of the files.
The advantage of an architecture like that is that Replicant has more control, and the modem (which runs nonfree software) has less control over the data it uses. That control can be used to fix some level of files corruption.
Files corruptions in that partition can easily happen with batteries that are in very bad conditions: very old batteries can still last several hours, but if the smartphones tries to consume too much power (mA / miliampers) at once, the battery can be unable to provide that much power at the same time, which results in the voltage dropping and the smartphone or the tablet being turned off suddenly, without having the time to properly save any data it may be writing.
In addition to the issue described above, the modem data partition contains data that is crucial (like the IMEI) and we don't know (yet) how to reconstruct the files that are in that partition. And without them, the modem will not work. This is why doing a backup of the data that is in this partition is crucial.
So if you didn't do that backup yet, you can follow the instructions in the BackupTheEFS wiki page.
The BackupTheEFS page has information on which devices have a modem data partition (some devices supported by Replicant don't have a modem for instance).
If you don't want your device to break, really make sure you have a backup of the modem data partition. The backup can be done with the instruction that are in the BackupTheEFS wiki page.
If all the files in the modem data partition are destroyed for a reason or another, you won't be able to use the modem anymore.
This means that you will not be able to receive SMS, make calls, get 3G data connections, etc. anymore, and we don't know how to repair that (yet).
If you have any information on the structure of the files inside that partition, it would be great to tell us about it (through a bugreport, on the mailing list, etc) so we could progress on that side.
We're mostly interested in finding where are various information needed to reconstruct the files like the IMEI location and format, or other information needed to get the modem working again.
If only the nv_data.bin file is corrupted , you can easily restore it, without having to restore a full backup.
Before starting, it's a good idea to make a new backup of the modem data partition, and name it in a way that is self-explanatory. For instance you could put it in a directory named 'backup-with-corrupted-nvdata-bin' not to confuse it with other backups that do not contain any corrupted files. As repeated before, you can use the BackupTheEFS instructions to do a backup.
Making a new backup has several advantages:Make sure not to erase the old backups while making a new one.
At the time of writing, the BackupTheEFS contain the following command:
REPLICANT_EFS_BACKUP_DIR=~/replicant_devices/0123456789abcdef/backup_efs mkdir -p $REPLICANT_EFS_BACKUP_DIR && cd $REPLICANT_EFS_BACKUP_DIR
This creates a directory named replicant_devices in your home, with inside a directory named 0123456789abcdef, with inside a directory named backup_efs.
Then it makes you go in that directory from the command line. This way the next commands will save the backups in that directory.
We can easily substitute that command with another one:
REPLICANT_EFS_BACKUP_DIR=~/replicant_devices/backup-with-corrupted-nvdata-bin-of-fourth-jully-2020/backup_efs mkdir -p $REPLICANT_EFS_BACKUP_DIR && cd $REPLICANT_EFS_BACKUP_DIR
Here instead of creating the 0123456789abcdef directory, it will create one named backup-with-corrupted-nvdata-bin-of-fourth-jully-2020. We can change that as we need to make sure that the directory has a name that is self explanatory, not to confuse the half-corrupted backups with ones that are not corrupted at all.
Alternatively if the replicant_devices, 0123456789abcdef or backup_efs directories don't exist, you can also follow the BackupTheEFS and rename the directories as you wish once the backup is done.
Or if you have an old backup, you could rename its directories to make sure you don't accidentally overwrite it.
The BackupTheEFS page has instructions to setup ADB. So if you just did a backup you should be good.
However if you already had an old backup somewhere and didn't do a new one, you will need to make sure that ADB is setup.
To do that, you can follow the setting up ADB on your computer instructions, so that you can access a root shell on your device.
NOTE: when prompted on your Replicant device, make sure that you check the box that says Always allow from this computer when you grant your computer USB debugging permissions. Otherwise, you will be unable to obtain root shell access on your Replicant device when you reboot it into the recovery OS to actually perform the EFS backup.
NOTE: for security reasons, you may want to revoke these non-expiring permissions once the EFS backup is complete.
You can reboot your device into the recovery by one of the following methods:
Run the following on your computer:
adb reboot recovery
Do the following:
In order to get a root shell in the recovery, your devices system partition must be mounted.
On certain devices, the system partition is already mounted, so you might already be able to get a root shell without mounting the system partition again.
In any case, it's still best to do the following to make sure that the system partition is mounted:
Also to make sure that they are really executed, you can press the 'enter' key after having pasted them.
Pressing 'enter' twice will not hurt as the command will still be executed only once.
The nv_data.bin file seem to be the file that is corrupted the most, probably because it is more often written to than the other files.
On most devices it can be found at several locations:The second one is a backup file. Note the '.' in front of the nv_data.bak. That dot ('.') is part of the file name. So that file name is '.nv_data.bak'.
When a file name starts with a dot, many tools (like file managers, command line utilities like 'ls', etc) will not list that file by default.
This convention enables to 'hide' some files. In GNU/Linux, this is typically used to 'hide' the configuration files used by graphical programs. Without that, it wound't be very convenient as you would see hundreds of extra files in your home. And in GNU/Linux the graphical programs still need to store their configuration somewhere.
For instance if you want to list all the files in your home in GNU/Linux, including the hidden ones you can use the following command:
ls -a ~
The '~' is a shortcut/alias for your home, and the '-a' switch tells ls to list all files (including the hidden ones). Note that it will also list '.' and '..' which you can ignore in this tutorial (they are special 'shortcuts' to the current directory and the parent directory).
So here we need to replace 'nv_data.bin' with '.nv_data.bak'. And as '.nv_data.bak' is a hidden file, we will use the concept of hidden files later on.
To do that we first need to mount the modem data partition (named efs) to a directory (here we will use /efs).
Your device should already be in the recovery, ready to accept commands through adb.
Not all the devices have their modem data partition at the same place. Because of that, the mount instructions are device specific.
You can use the following instructions to mount the modem data partition, but make sure that you use the ones that corresponds to your device.
adb shell "mkdir /efs" adb shell "mount /dev/block/platform/*/by-name/EFS /efs"
adb shell "mkdir /efs" adb shell "mount /dev/block/platform/*/*/by-name/efs /efs"
adb shell "mkdir /efs" adb shell "mount /dev/block/platform/*/*/by-name/EFS /efs"
Now that the modem data partition is mounted to /efs, we can proceed to replace nv_data.bin.
First we can list all the files in /efs to make sure everything is good so far:
adb shell "ls -a /efs/"
Here with a Galaxy SIII (GT-I9300), it gives the following output:
. .nv_data.bak FactoryApp h2k.dat nv_data.bin.md5 .. .nv_data.bak.md5 bluetooth imei wifi .nv_core.bak .nv_state drm nv.log wv.keys .nv_core.bak.md5 00000000.authtokcont gyro_cal_data nv_data.bin
So we can clearly see the nv_data.bin and .nv_data.bak
We will then proceed to replace /efs/nv_data.bin by /efs/.nv_data.bak. This can be done with the following command:
adb shell "cp /efs/.nv_data.bak /efs/nv_data.bin"
It's a good idea to verify that everything went fine. This can be done with the following command:
adb shell "cmp /efs/.nv_data.bak /efs/nv_data.bin"
If everything went fine, it shound't print anything.
If not, it will print an error similar to this one:
/efs/.nv_data.bak /efs/nv_data.bin differ: char 1, line 1
So now we finally replaced nv_data.bin, however we need to do the exact same operation to replace nv_data.bin.md5 with .nv_data.bak.
The nv_data.bin.md5 file contains something called a checksum : it's a short sequence of numbers and letters that can be used to matematically verify if nv_data.bin wasn't accidentally corrupted by verifying if all the data in nv_data.bin match the checksum in nv_data.bin.md5
As we replaced nv_data.bin by the content of .nv_data.bak, we need to also replace nv_data.bin.md5 by the content of .nv_data.bak.md5, otherwise the modem will think that nv_data.bin is corrupted.
To do that we can use the following command:
adb shell "cp /efs/.nv_data.bak.md5 /efs/nv_data.bin.md5"
Then we can also verify like before that evertyhign went fine:
adb shell "cmp /efs/.nv_data.bak.md5 /efs/nv_data.bin.md5"
If not, we might have an output that looks like that:
/efs/.nv_data.bak.md5 /efs/nv_data.bin.md5 differ: char 1, line 1
We're now mostly done. We still need to properly umount the modem filesystem partition to prevent corruptions.
We can do it with the following command:
adb shell "umount /efs" adb shell "rmdir /efs"
Once the the umount is done, you can finally reboot your device into Replicant by one of two ways.
You can reboot by running the following command on your computer:
adb reboot
Or alternatively you can use the Replicant recovery graphical user interface to reboot by selecting Reboot system now.
If you are concerned about security, you may want to revoke the non-expiring USB debugging permissions that you granted to your computer earlier (which you may of course grant again at any time, as desired). This control is located at Settings > Developer options > Revoke USB debugging authorizations.
That's it! Your device's EFS partition is now backed up. Your device should be running Replicant normally again.
Having root access on your computer empowers you to control your computer. Having users in control of their own computers is not a security vulnerability.
If you don't have root access, then you are locked out of your own computer, and this can be a very serious problem as you also have data in it, your data.
For instance if you can't copy your data outside and inside of the device, then you're stuck, and dependent on the software that is installed on that computer to use your data.
In general, root is also required for being able to use any network protocol you wish or want to design as the tun/tap interface or other mechanism to send RAW packets requires root: It really enables you to use net neutrality and Internet design principles in practice.
Some applications like USB mountr that makes use of the hardware features like the USB OTG to expose an USB iso over mass storage over the USB port require root. So it's a good idea to enable users to easily become root in Replicant.
However it's a good security practice not to give root access to programs that don't need it, or to people that you don't trust, as it could give them full control of the system.
And even if you trust programs enough, they could have vulnerabilities which enable an attacker to get root access.
So once the user is in control and has root, it's then a good idea not to have any vulnerabilities that could enable attackers to get root once they have code running in your computer.
Many Android distributions that are shipped on the devices took away the ability for users to become root.
Because of that it's sometime necessary to become root within such distributions.
For instance it can enable you to backup and migrate your data from the stock Android distribution to Replicant, or enable to backup the stock OS, etc.
While running the stock distribution is not interesting per se if it's not fully free software, it can still be useful to do reverse engineering for instance.
| Vulnerability names | CVE | Affected software and versions | Free software implementation | Status |
|---|---|---|---|---|
| Towelroot | CVE-2014-3153 | Linux 3.5 to 3.15 | GPLv3 version, improved from github | Not yet tested |
| * iovyroot * Pipe-iovec root |
CVE-2015-1805 | Linux 2.6x to 3.15 | * None of the 4 implementations on github were under a free software license | |
| Ping-Pong Root | CVE-2015-3636 | Linux ? to 4.1 | ||
| Dirty COW | CVE-2016-5195 | Linux 2.6.13 to 4.9 | * List of some free and nonfree implementations For the free implementations: * GPLv3 (?) implementation in Go * GPLv3 implementations in C++ and Go * MIT implementation in crystal |
|
| * MIT implementation in C | Uses assembly (x86_64 only at this time) | |||
| * LGPLv3(+?) implementation in C | Tried 'cowpy', but it didn't work on I9100G: * Tried replacing /system/bin/run-as from /system which is ro says "Done" but binary not changed * Tried replacing /system.prop from / which is probably rw, says "Done" but binary not changed |
| Device | Android version | Kernel version | Status |
|---|---|---|---|
| GT-I9100G_CHN_CHN | 2.3.5 | 2.6.35.7 se.infra@SEI-30#2 | Failed |
| Nexus 5 | 6.0.1 | 3.4.0-gcf10b7e | Failed. Tried cowpy with (tried replacing /default.prop wich is root:root 644). Compiled on top of Replicant 6.0 |
1 https://redmine.replicant.us/projects/replicant/wiki/Exynos4Bootrom#Loading-a-bootloader-from-SD
Replicant 9, 10 and 11 are currently a work in progress.
They support the following devices:
| Device | Status |
|---|---|
| Galaxy SIII (GT-I9300) | Boots, modem WIP |
| Galaxy SIII 4G (GT-I9305) | Boots, modem unsupported on Replicant 11, unfinished on Replicant 9 and 10 |
If your device is stuck in a boot loop (the device is crashing during boot, endlessly) after installing or updating applications, it is possible to recover from that by booting the device into Safe Mode which will disable all applications that are not part of the Replicant image.
However this will purge all accounts, including corresponding data. Therefore, any not-yet-synced data (e.g. contacts, calendar appointments, etc.) which are bound to an account will be lost.
Furthermore there is a bug #1986 in Replicant which causes the account configuration itself to be deleted as well.
To boot into Safe Mode, you need to press and hold down theVolume Down button during boot:
You will then see a small dark box at the bottom left screen reading Safe Mode if you have been successful.
Just reboot your device to disable Safe Mode again.
Many smartphones and tablets made by Samsung uses the samsung-ipc.
At least the following devices use that protocol:The free software implementation is very flexible.
The protocol and most of the logic is implemented in libsamsung-ipc, which enables to reuse it for other operating system (like GNU/Linux) or with different software stack.
In Android, hardware abstraction is not done by the Linux kernel. Instead applications are developed against the Android framework which uses hardware abstraction daemons to do the hardware abstraction.
This way kernel device manufacturers can completely break the kernel interfaces standards to improve time to market.
For the modem the daemon that does the modem protocol abstraction is rild. The rild daemon typically opens a library implementing the modem protocol.
In order to make the design modular, the library opened by the rild daemon is not libsamsung-ipc, but libsamsung-ril which is in charge of creating implementing the interface between Android's rild and libsamsung-ipc.
So we have: rild <-> libsamsung-ril <-> libsamsung-ipc <-> Linux kernel (currently based on Samsung's modified Linux kernels that are specific to a very small number of devices).
Having the modem protocol implemented in libsamsung-ipc enables to reuse it in very different software architectures. For instance there have been patches to use it with ofono.
See Modem-support in the Upstream wiki pages for different ways of reusing libsamsung-ipc.
In the Replicant contributors meetings of July 2019, several presentations were done on Replicant's Samsung-ipc implementation.
They can be found in the Presentations section of the Replicant contributors meetings of July 2019 page:The two presentations explain how the code architecture simply by following what happen in the actual code.
The first presentation starts with a protocol that is much more simple and well known, the the second ones dives into the Replicant Samsung-IPC implementation by following what happens for some of its messages.
So it's a good idea to look at them if you intend to contribute to libsamsung-ipc or libsamsung-ril and that you are not used to dive deep into huge piles of unknown code.
| Repository path | date | Tag for the old history | Changes | Rationale |
|---|---|---|---|---|
| hardware/ril/samsung-ril | 24 July 2019 | replicant-6.0-0003 | Pointed replicant-6.0 to master | * See the libsamsung-ril/libsamsung-ipc: delete or sync master branch? Was: [PATCH 6/6] Fix undefined references to MD5_{Init, Update, Final} thread * This also has been made to prevent similar mistakes from hapening again |
| hardware/ril/samsung-ril | 01 January 2021 | replicant-6.0-0004-rc3 | Fixed the 2250038 Convert to use separate SIM status commit message | * See the e593f41 Convert to use separate SIM status commit message for the rationale |
| external/libsamsung-ipc | 24 July 2019 | replicant-6.0-0003 | Pointed replicant-6.0 to master | * See the libsamsung-ril/libsamsung-ipc: delete or sync master branch? Was: [PATCH 6/6] Fix undefined references to MD5_{Init, Update, Final} thread * This also has been made to prevent similar mistakes from hapening again |
This page contains a technical description of the back-door found in Samsung Galaxy devices.
For a general description of the issue, please refer to the statement published on the Free Software Foundation's website.
This back-door is present in most proprietary Android systems running on the affected Samsung Galaxy devices, including the ones that are shipped with the devices. However, when Replicant is installed on the device, this back-door is not effective: Replicant does not cooperate with back-doors.
Samsung Galaxy devices running proprietary Android versions come with a back-door that provides remote access to the data stored on the device.
In particular, the proprietary software that is in charge of handling the communications with the modem, using the Samsung IPC protocol, implements a class of requests known as RFS commands, that allows the modem to perform remote I/O operations on the phone's storage. As the modem is running proprietary software, it is likely that it offers over-the-air remote control, that could then be used to issue the incriminated RFS messages and access the phone's file system.
The following table shows which devices are known to contain this back-door as part of the software they ship with.
Please contact us if you know about some other device that could be concerned by this back-door or have more information on one of the listed devices!
| Device | Incriminated program running as root | SELinux enabled | libsamsung-ipc support | Replicant support |
|---|---|---|---|---|
| Nexus S (I902x) | No | Possible with Android 4.2 and later | Yes | Yes |
| Galaxy S (I9000) | Yes | ? | Yes | Yes |
| Galaxy S 2 (I9100) | No | ? | Yes | Yes |
| Galaxy Note (N7000) | No | ? | Yes | Yes |
| Galaxy Nexus (I9250) | No | Possible with Android 4.2 and later | Yes | Yes |
| Galaxy Tab 2 7.0 (P31xx) | No | ? | Yes | Yes |
| Galaxy Tab 2 10.1 (P51xx) | No | ? | Yes | Yes |
| Galaxy S 3 (I9300) | No | ? | Yes | Yes |
| Galaxy Note 2 (N7100) | No | ? | Yes | Yes |
While we don't have any absolute certainty regarding other Samsung Galaxy devices, it is likely that any other such device in its 3G flavor is affected by the back-door as well, as it probably uses the Samsung IPC protocol with the same proprietary user-space implementation.
In order to investigate the back-door and check what it actually lets the modem do, some code was added to the modem kernel driver to make it craft and inject requests using the incriminated messages and check its results.
The following patch: 0001-modem_if-Inject-and-intercept-RFS-I-O-messages-to-pe.patch (to apply to the SMDK4412 Replicant 4.2 kernel) implements a sample use of the back-door that will:/data/radio/test fileThis demonstrates that the incriminated software will execute these operations upon modem request. Note that the software implementation appends /efs/root/ to the provided path, but it's fairly simple to escape that path and request any file on the file system (using ../../). Note that the files are opened with the incriminated software's user permissions, which may be root on some devices. On other cases, its runs as an unprivileged user that can still access the user's personal data (/sdcard). Finally, some devices may implement SELinux, which considerably restricts the scope of possible files that the modem can access, including the user's personal data (/sdcard/).
The following sample was obtained on a Galaxy Note 2 (N7100) running CyanogenMod 10.1.3.
The sample file used for this demonstration (/data/radio/test) is filled with "Hello World!":
root@android:/ # hexdump -C /data/radio/test 00000000 48 65 6c 6c 6f 20 57 6f 72 6c 64 21 0a |Hello World!.| 0000000d
<3>[ 62.712637] c0 mif: rx_iodev_skb: rx_iodev_skb: Dropping RFS frame <3>[ 62.712808] c0 mif: rfs_craft_start: rfs_craft_start: Crafting open <3>[ 62.712966] c0 mif: rfs_craft_start: rfs_craft_start: Adding SKB to queue <3>[ 62.713122] c0 mif: rx_iodev_skb: rx_iodev_skb: Dropping RFS frame <3>[ 62.744690] c0 mif: misc_write: misc_write: Intercepted RFS response <3>[ 62.744867] c0 mif: rfs_craft_write: rfs_craft_write: Open response: fd=21, errno=0 <3>[ 62.745116] c0 mif: rfs_craft_write: rfs_craft_write: Adding SKB to queue <3>[ 62.792888] c0 mif: misc_write: misc_write: Intercepted RFS response <3>[ 62.793026] c0 mif: rfs_craft_write: rfs_craft_write: Read response: 12 bytes read <3>[ 62.793154] c0 mif: mif_print_data: 0000: 48 65 6c 6c 6f 20 57 6f 72 6c 64 21 <3>[ 62.793284] c0 mif: rfs_craft_write: rfs_craft_write: Adding SKB to queue <3>[ 62.796168] c0 mif: misc_write: misc_write: Intercepted RFS response <3>[ 62.796269] c0 mif: rfs_craft_write: rfs_craft_write: Rx RFS message with command 0x6 and size 14 <3>[ 62.796422] c0 mif: mif_print_data: 0000: 00 00 00 00 00 00 00 00
The relevant part is the response to the read request:
<3>[ 62.793026] c0 mif: rfs_craft_write: rfs_craft_write: Read response: 12 bytes read <3>[ 62.793154] c0 mif: mif_print_data: 0000: 48 65 6c 6c 6f 20 57 6f 72 6c 64 21
/data/radio/test file, hence making it obvious that the incriminated software implements the back-door.
E/RIL ( 1927): processRFS: received standalone RFS frame. len 35 E/RIL ( 1927): ipc_recv_rfs() E/RIL ( 1927): get_wakelock: 1. on 1, ril_WakeLock_Mask 0 E/RIL ( 1927): get_wakelock: 2. on 1, ril_WakeLock_Mask 1 E/RIL ( 1927): RxRFS_OpenFile: E/RIL ( 1927): RxRFS_OpenFile: open file "/efs/root/../../data/radio/test" flag O_RDWR (0x00000002) E/RIL ( 1927): check dir '/efs/root/../../data/radio' E/RIL ( 1927): A directory already exists. E/RIL ( 1927): RxRFS_OpenFile: length 14 E/RIL ( 1927): TxRFS_CfrmOpenFile() E/RIL ( 1927): TxRFS_CfrmOpenFile(): length 14 E/RIL ( 1927): IPC_send_singleRfsIPC: fd 16 sendto 14 bytes rfs_hdr =6 E/RIL ( 1927): get_wakelock: 1. on 0, ril_WakeLock_Mask 1 E/RIL ( 1927): get_wakelock: 2. on 0, ril_WakeLock_Mask 0 E/RIL ( 1927): set_wakelock: secril_rfs-interface 0 E/RIL ( 1927): set_wakelock: secril_fmt-interface 1 E/RIL ( 1927): processIPC: Single IPC plen 23, pkt 23
E/RIL ( 1927): processRFS: received standalone RFS frame. len 14 E/RIL ( 1927): ipc_recv_rfs() E/RIL ( 1927): get_wakelock: 1. on 1, ril_WakeLock_Mask 0 E/RIL ( 1927): get_wakelock: 2. on 1, ril_WakeLock_Mask 1 E/RIL ( 1927): RxRFS_ReadFile: E/RIL ( 1927): RxRFS_ReadFile: length 4110 E/RIL ( 1927): TxRFS_CfrmReadFile() E/RIL ( 1927): TxRFS_CfrmReadFile(): length 4110 E/RIL ( 1927): IPC_send_singleRfsIPC: fd 16 sendto 4110 bytes rfs_hdr =6
E/RIL ( 1927): processRFS: received standalone RFS frame. len 10 E/RIL ( 1927): get_wakelock: 1. on 0, ril_WakeLock_Mask 1 E/RIL ( 1927): get_wakelock: 2. on 0, ril_WakeLock_Mask 0 E/RIL ( 1927): set_wakelock: secril_rfs-interface 0 E/RIL ( 1927): [EVT]:Req(0), RX(0) E/RIL ( 1927): ipc_recv_rfs() E/RIL ( 1927): get_wakelock: 1. on 1, ril_WakeLock_Mask 0 E/RIL ( 1927): get_wakelock: 2. on 1, ril_WakeLock_Mask 1 E/RIL ( 1927): RxRFS_CloseFile: E/RIL ( 1927): RxRFS_CloseFile: length 14 E/RIL ( 1927): TxRFS_CfrmCloseFile() E/RIL ( 1927): TxRFS_CfrmCloseFile(): length 14 E/RIL ( 1927): IPC_send_singleRfsIPC: fd 16 sendto 14 bytes rfs_hdr =6
The following analysis was conducted using the libsec-ril.so binary file (the incriminated proprietary software) as extracted from the CyanogenMod 10.1.3 system zip for the Galaxy S 3 (I9300), from location system/lib/libsec-ril.so.
The developers involved in the present analysis did not ever agree to any sort of End User License Agreement that explicitly prohibited the reverse engineering and decompiling operations of the incriminated binary. The reverse engineering operations that led to these findings originally took place during the development of Samsung-RIL, the free software replacement for the incriminated program. Hence, we believe these operations were conducted for the sole purpose of interoperability and not with the intent of creating a competing product. As the involved developers were based in Europe, we believe the legality of these operations is granted by article 6 of the 1991 EU Computer Programs Directive.
As a first approach, using the strings tool against the incriminated program reveals numerous suspicious command names that appear to be Samsung IPC protocol definitions:
IPC_RFS_READ_FILE IPC_RFS_WRITE_FILE IPC_RFS_LSEEK_FILE IPC_RFS_CLOSE_FILE IPC_RFS_PUT_FILE IPC_RFS_GET_FILE IPC_RFS_RENAME_FILE IPC_RFS_GET_FILE_INFO IPC_RFS_UNLINK_FILE IPC_RFS_MAKE_DIR IPC_RFS_REMOVE_DIR IPC_RFS_OPEN_DIR IPC_RFS_READ_DIR IPC_RFS_CLOSE_DIR IPC_RFS_OPEN_FILE IPC_RFS_FTRUNCATE_FILE IPC_RFS_GET_HANDLE_INFO IPC_RFS_CREATE_FILE
The names of these commands make it obvious that they let the modem perform I/O operations.
The strings utility also reveals matching function names that seem to implement the handling of these commands:
RxRFS_GetFile RxRFS_CreateFile RxRFS_ReadDirectory RxRFS_OpenDirectory RxRFS_RenameFile RxRFS_Default RxRFS_OpenFile RxRFS_ReadFile RxRFS_FtruncateFile RxRFS_WriteFile RxRFS_GetFileInfoByHandle RxRFS_GetFileInfo RxRFS_PutFile RxRFS_LseekFile RxRFS_CloseFile RxRFS_DeleteFile RxRFS_MakeDirectory RxRFS_CloseDirectory RxRFS_RemoveDirectory TxRFS_CfrmCreateFile TxRFS_CfrmPutFile TxRFS_CfrmOpenDirectory TxRFS_CfrmGetFileInfo TxRFS_CfrmReadDirectory TxRFS_CfrmRenameFile TxRFS_CfrmCloseFile TxRFS_CfrmFtruncateFile TxRFS_CfrmGetFileInfoByHandle TxRFS_CfrmDeleteFile TxRFS_CfrmCloseDirectory TxRFS_CfrmRemoveDirectory TxRFS_CfrmMakeDirectory TxRFS_CfrmGetFile TxRFS_CfrmReadFile TxRFS_CfrmWriteFile TxRFS_CfrmLseekFile TxRFS_CfrmOpenFile
Taking a closer look at these functions, using the objdump decompiler, reveals that they are actually called from the ipc_recv_rfs function, itself called from process_ipc_notify_message, which appears to handle the received messages from the modem. Hence we can deduct that the incriminated functions are actually called upon modem request.
Taking a closer look at one of these functions, e.g. RxRFS_ReadFile reveals multiple calls to the Procedure Linkage Table (PLT). Hence we believe these calls are linked functions from the libc library, especially I/O-related functions such as (in a general manner) open, close, read, write, etc.
The following table associates each Samsung IPC RFS message with its hexadecimal command value:
| Message | Hexadecimal command value |
|---|---|
| IPC_RFS_NV_READ_ITEM | 0x01 |
| IPC_RFS_NV_WRITE_ITEM | 0x02 |
| IPC_RFS_READ_FILE | 0x03 |
| IPC_RFS_WRITE_FILE | 0x04 |
| IPC_RFS_LSEEK_FILE | 0x05 |
| IPC_RFS_CLOSE_FILE | 0x06 |
| IPC_RFS_PUT_FILE | 0x07 |
| IPC_RFS_GET_FILE | 0x08 |
| IPC_RFS_RENAME_FILE | 0x09 |
| IPC_RFS_GET_FILE_INFO | 0x0a |
| IPC_RFS_UNLINK_FILE | 0x0b |
| IPC_RFS_MAKE_DIR | 0x0c |
| IPC_RFS_REMOVE_DIR | 0x0d |
| IPC_RFS_OPEN_DIR | 0x0e |
| IPC_RFS_READ_DIR | 0x0f |
| IPC_RFS_CLOSE_DIR | 0x10 |
| IPC_RFS_OPEN_FILE | 0x11 |
| IPC_RFS_FTRUNCATE_FILE | 0x12 |
| IPC_RFS_GET_HANDLE_INFO | 0x13 |
| IPC_RFS_CREATE_FILE | 0x14 |
| IPC_RFS_NV_WRITE_ALL_ITEM | 0x15 |
The incriminated RFS messages of the Samsung IPC protocol were not found to have any particular legitimacy nor relevant use-case. However, it is possible that these were added for legitimate purposes, without the intent of doing harm by providing a back-door. Nevertheless, the result is the same and it allows the modem to access the phone's storage.
However, some RFS messages of the Samsung IPC protocol are legitimate (IPC_RFS_NV_READ_ITEM and IPC_RFS_NV_WRITE_ITEM) as they target a very precise file, known as the modem's NV data. There should be no particular security concern about these as both the proprietary implementation and its free software replacement strictly limit actions to that particular file.
Our free software replacement for the incriminated binary is Samsung-RIL which relies on libsamsung-ipc: both are used in Replicant.
The affected devices have modems that use the Samsung IPC protocol, mostly Intel XMM6160 and Intel XMM6260 modems. Note that despite this back-door, the devices using these modems are most likely to have good modem isolation, compared to other devices using Qualcomm platforms. Bear in mind that this back-door is implemented in software and can easily be removed by installing a free replacement for the incriminated software, for instance by installing Replicant. Hence, we don't consider the incriminated devices to be inherently bad targets because of this back-door.
The packets were captured with tshark / wireshark-cli on the GT-I9300 with a Replicant 11 kernel and a specific revision of the work in progress libsamsung-ipc that works with it.
Since the GT-I9300 modem is connected through the HSIC bus (which is a subset of USB, without the PHY), we can simply capture it with tshark/Wireshark by capturing on the usbmon interface that sees the modem.
This packet was the first USB packet containing samsung-ipc packet(s) right after the modem finished booting:
0000 80 df 35 c3 00 00 00 00 43 03 81 02 01 00 2d 00 | USB packet
0010 e8 f1 03 62 00 00 00 00 7e 59 0d 00 00 00 00 00 | USB packet
0020 28 00 00 00 28 00 00 00 00 00 00 00 00 00 00 00 | USB packet
0030 00 00 00 00 00 00 00 00 00 02 00 00 00 00 00 00 | USB packet
+------------------------------------------------ HDLC_START
| +--------------------------------------------- ?
| | +------------------------------------------ ?
| | | +--------------------------------------- ?
| | | | +--+--------------------------------- ipc_fmt_header.length
| | | | | |
| | | | | | +------------------------------ ipc_fmt_header.mseq +--- IPC_PWR_PHONE_PWR_UP == 0x0101
| | | | | | | +--------------------------- ipc_fmt_header.aseq |
| | | | | | | | +------------------------ ipc_fmt_header.group ---+
| | | | | | | | | +--------------------- ipc_fmt_header.index ---+
| | | | | | | | | | +------------------ ipc_fmt_header.type ------- IPC_TYPE_NOTI == 0x03
| | | | | | | | | | | +--------------- HDLC_END
| | | | | | | | | | | |
0040 7f 0a 00 00 07 00 ff ff 01 01 03 7e
+--+--------------------------------------------- ipc_fmt_header.length
| | +------------------------------------------ ipc_fmt_header.mseq +--- IPC_MISC_ME_IMSI == 0x0a02
| | | +--------------------------------------- ipc_fmt_header.aseq |
| | | | +------------------------------------ ipc_fmt_header.group ---+
| | | | | +--------------------------------- ipc_fmt_header.index ---+
| | | | | | +------------------------------ ipc_fmt_header.type ------- IPC_TYPE_NOTI == 0x03
| | | | | | | +--------------------------- Payload length
| | | | | | | | +------------ HDLC_START
| | | | | | | | | +--------- ?
| | | | | | | | | | +------ ?
| | | | | | | | | | | +--- ?
| | | | | | | | | | | |
0040 | | | | | | | | 7f 1a 00 00
0050 17 00 ff 00 0a 02 03 0f 30 30 30 30 30 30 30 30
| | | | | | | |
| | | | | | | |
+--+--+--+--+--+--+-----+--+--+--+--+--+--+--+--- Payload (IMSI)
| | | | | | |
| | | | | | |
0060 30 30 30 30 30 30 30 7e
|
+-------------------------- HDLC_END
#2 output| UART to USB board output | Resistor | microUSB connector(s) name(s) | microUSB wire color |
|---|---|---|---|
| N/A | 150K Ohm | ID and GND | ID not wired (the 5th connector that is unused), GND is black |
| 3.3V | N/A | V+ | red |
| GND | N/A | GND | black |
| Rx | N/A | D- | white |
| Tx | N/A | D+ | green |
Warning: the voltage to use is 3.3V and not 5V! Using 5V can cause serious damages to the UART component.
To read/write on the serial, you can use screen (or picocomm, or any other software that deals with serial consoles):
115200 is the baud rate to use (certainly with most UART to USB board).
Then, do a regular boot. You should see the second bootloader #2 output. To get the 1st and 2nd bootloaders output, press <enter> to get in fiq debugger and write "reboot" then <enter>.
Photos: here's what it looks like when all setup: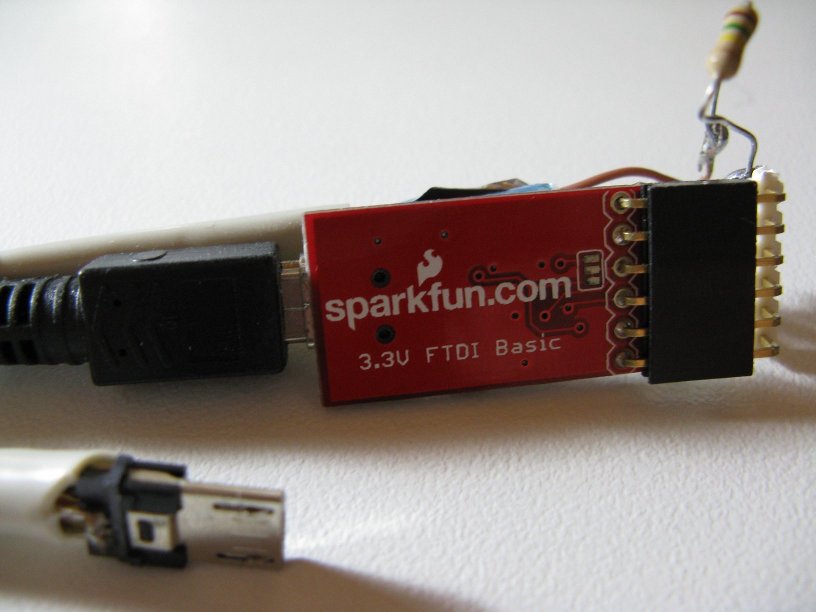
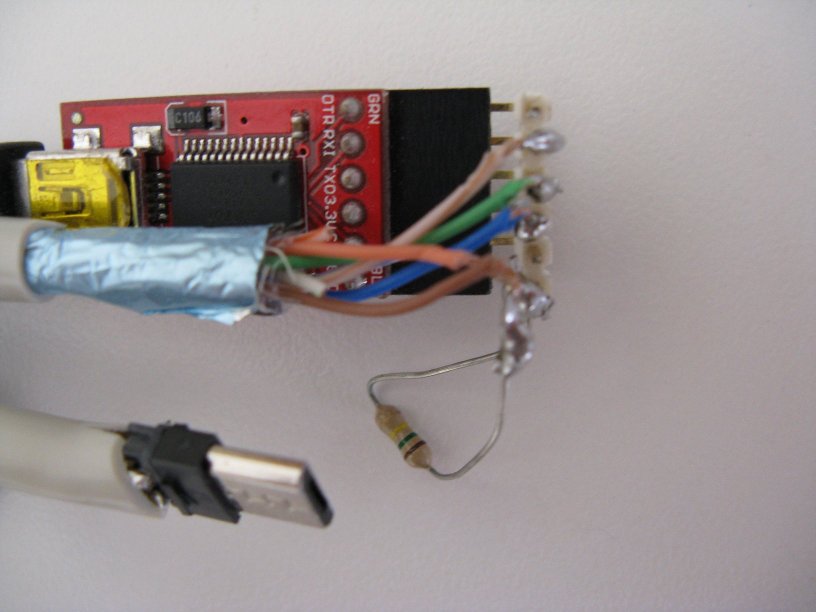
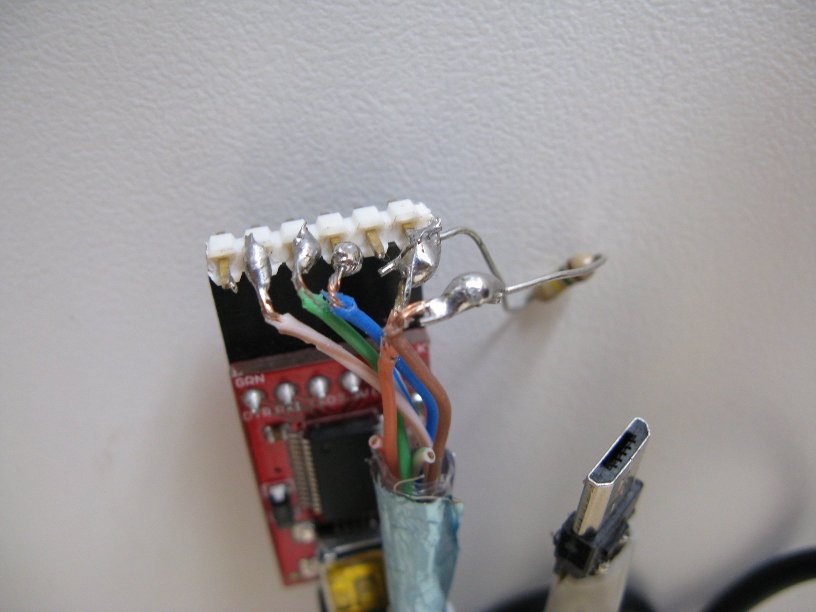
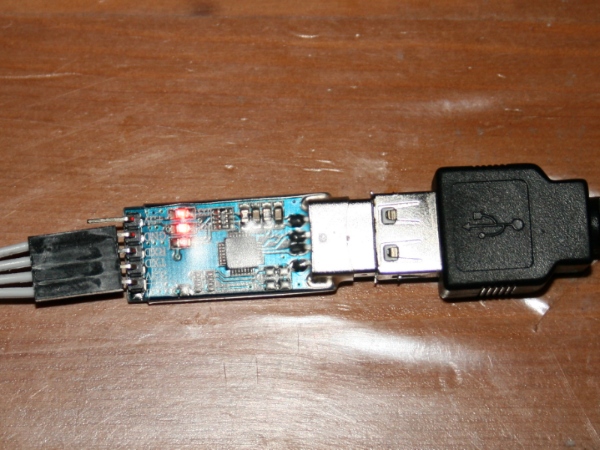
The UART to USB board. USB is connected to the host PC, UART pins to the microUSB connector.
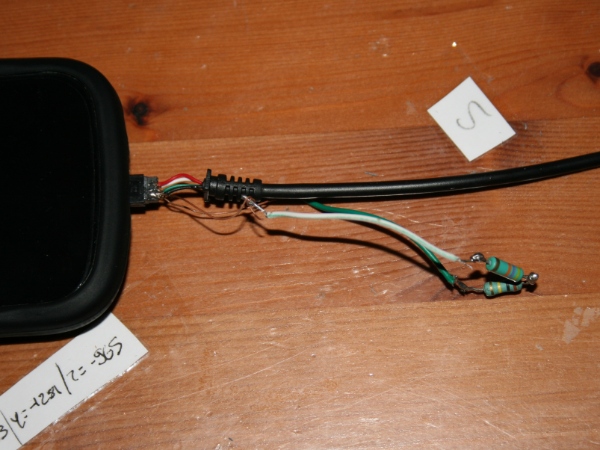
The 150K resistor (two resistors here that make 150K together) soldered to the microUSB connector, that is attached to the Nexus S.
Note: it was done the quick and dirty way here, it's better to use a protoboard (prototyping board).
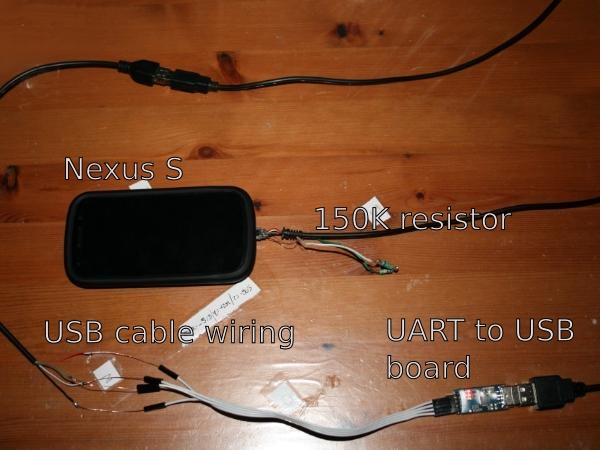
The USB cable that is connected to the Nexus S ends on the connectors attached to the UART to USB board.
Note: it was done the quick and dirty way here, it's better to use a protoboard (prototyping board).
first bootloader:
----------------------------------------------------------- Samsung Primitive Bootloader (PBL) v3.0 Copyright (C) Samsung Electronics Co., Ltd. 2006-2010 ----------------------------------------------------------- Muxed [[OneNAND]] 512MB (0x50) Sync Scanning Bad Block ....... Bad Block 77 (5) Bad Block 295 (5) Bad Block 1232 (5) Bad Block 1646 (5) Bad Block 1831 (5) Bad Block 2047 (0) SBL loadding success Set cpu clk. from 400MHz to 800MHz. OM=0x9, device=OnenandMux(Audi) IROM e-fused - Secure Boot Version.
second bootloader:51ea3aaa63e65b74b7386fe1365d7b52f4495c43
----------------------------------------------------------- Samsung Secondary Bootloader (SBL) v3.0 Copyright (C) Samsung Electronics Co., Ltd. 2006-2010 Board Name: HERRING REV 52 Build On: Jan 20 2011 17:19:41 ----------------------------------------------------------- MMC SEM16G 15188 MB Re_partition: magic code(0x0) Muxed [[OneNAND]] 512MB (0x50) Sync Scanning Bad Block ....... Bad Block 77 (5) Bad Block 295 (5) Bad Block 1232 (5) Bad Block 1646 (5) Bad Block 1831 (5) Bad Block 2047 (0) Partitions loading success Read image(PARAM) from flash ....... Done init_fuel_gauge: vcell = 4083mV, soc = 94 PMIC_IRQ1 = 0xc0 PMIC_IRQ2 = 0x0 PMIC_IRQ3 = 0x0 PMIC_IRQ4 = 0x0 PMIC_STATUS1 = 0x0 PMIC_STATUS2 = 0x0 PMIC_STATUS3 = 0x0 PMIC_STATUS4 = 0x0 PMIC_STATUS5 = 0x0 PMIC_SMPL = 0x0 Key scan = 0x0 message.command = message.status = message.recovery =
second bootloader #2:
BOOT_MODE_NORMAL (SW_RST(0x00000004), INFORM(0x000000ee)) LCD ID = 0x0060a953 Done Kernel(boot.img) read success from partition no.5 Setting param.serialnr = 0x3733bab6 0x6de200ec Setting param.board_rev = 0x34 Setting param.cmdline = console=ttyFIQ0 no_console_suspend androidboot.serialno=3733BAB66DE200EC androidboot.bootloader=I9020XXKA3 androidboot.baseband=I9020XXKB3 androidboot.info=0x4,0xee,1 androidboot.carrier=EUR gain_code=3 s3cfb.bootloaderfb=0x34a00000 mach-herring.lcd_type=0x00000000 oem_state=unlocked Setting param.initrd_start = 0x31000000, param.initrd_size = 0x23265 Starting kernel at 0x30008000... Uncompressing Linux... done, booting the kernel.
kernel
<hit enter to activate fiq debugger>
----------------------------------------------------------- Samsung Primitive Bootloader (PBL) v3.0 Copyright (C) Samsung Electronics Co., Ltd. 2006-2010 ----------------------------------------------------------- +n1stVPN 2688 +nPgsPerBlk 64 PBL found bootable SBL: Partition(3). Set cpu clk. from 400MHz to 800MHz. OM=0x9, device=OnenandMux(Audi) IROM e-fused - Non Secure Boot Version. ----------------------------------------------------------- Samsung Secondary Bootloader (SBL) v3.0 Copyright (C) Samsung Electronics Co., Ltd. 2006-2010 Board Name: ARIES REV 03 Build On: Dec 29 2011 16:57:09 ----------------------------------------------------------- Re_partition: magic code(0x0) [PAM: ] ++FSR_PAM_Init [PAM: ] OneNAND physical base address : 0xb0000000 [PAM: ] OneNAND virtual base address : 0xb0000000 [PAM: ] OneNAND nMID=0xec : nDID=0x50 [PAM: ] --FSR_PAM_Init fsr_bml_load_partition: pi->nNumOfPartEntry = 12 partitions loading success board partition information update.. source: 0x0 .Done. read 1 units. ==== PARTITION INFORMATION ==== ID : IBL+PBL (0x0) ATTR : RO SLC (0x1002) FIRST_UNIT : 0 NO_UNITS : 1 =============================== ID : PIT (0x1) ATTR : RO SLC (0x1002) FIRST_UNIT : 1 NO_UNITS : 1 =============================== ID : EFS (0x14) ATTR : RW STL SLC (0x1101) FIRST_UNIT : 2 NO_UNITS : 40 =============================== ID : SBL (0x3) ATTR : RO SLC (0x1002) FIRST_UNIT : 42 NO_UNITS : 5 =============================== ID : SBL2 (0x4) ATTR : RO SLC (0x1002) FIRST_UNIT : 47 NO_UNITS : 5 =============================== ID : PARAM (0x15) ATTR : RW STL SLC (0x1101) FIRST_UNIT : 52 NO_UNITS : 20 =============================== ID : KERNEL (0x6) ATTR : RO SLC (0x1002) FIRST_UNIT : 72 NO_UNITS : 30 =============================== ID : RECOVERY (0x7) ATTR : RO SLC (0x1002) FIRST_UNIT : 102 NO_UNITS : 30 =============================== ID : FACTORYFS (0x16) ATTR : RW STL SLC (0x1101) FIRST_UNIT : 132 NO_UNITS : 1146 =============================== ID : DBDATAFS (0x17) ATTR : RW STL SLC (0x1101) FIRST_UNIT : 1278 NO_UNITS : 536 =============================== ID : CACHE (0x18) ATTR : RW STL SLC (0x1101) FIRST_UNIT : 1814 NO_UNITS : 140 =============================== ID : MODEM (0xb) ATTR : RO SLC (0x1002) FIRST_UNIT : 1954 NO_UNITS : 50 =============================== loke_init: j4fs_open success.. load_lfs_parameters valid magic code and version. load_debug_level reading debug level from file successfully(0x574f4c44). init_fuel_gauge: vcell = 4062mV, soc = 95 reading nps status file is successfully!. nps status=0x504d4f43 PMIC_IRQ1 = 0x0 PMIC_IRQ2 = 0x0 PMIC_IRQ3 = 0x0 PMIC_IRQ4 = 0x0 PMIC_STATUS1 = 0x0 PMIC_STATUS2 = 0x0 get_debug_level current debug level is 0x574f4c44. aries_process_platform: Debug Level Low keypad_scan: key value ----------------->= 0x0 CONFIG_ARIES_REV:48 , CONFIG_ARIES_REV03:48 aries_process_platform: final s1 booting mode = 0 DISPLAY_PATH_SEL[MDNIE 0x1]is on MDNIE setting Init start!! vsync interrupt is off video interrupt is off [fb0] turn on MDNIE setting Init end!! Autoboot (0 seconds) in progress, press any key to stop get_debug_level current debug level is 0x574f4c44. get_debug_level current debug level is 0x574f4c44. boot_kernel: Debug Level Low FOTA Check Bit Read BML page=, NumPgs= FOTA Check Bit (0xffffffff) Load Partion idx = (6) ..............................done Kernel read success from kernel partition no.6, idx.6. setting param.serialnr=0x38301804 0xb3e900ec setting param.board_rev=0x30 setting param.cmdline=console=ttySAC2,115200 loglevel=4 Starting kernel at 0x32000000...
reading nps status file is successfully!. nps status=0x504d4f43 PMIC_IRQ1 = 0x80 PMIC_IRQ2 = 0x0 PMIC_IRQ3 = 0x1 PMIC_IRQ4 = 0x0 PMIC_STATUS1 = 0x80 PMIC_STATUS2 = 0x0 get_debug_level current debug level is 0x574f4c44. aries_process_platform: Debug Level Low keypad_scan: key value ----------------->= 0x40 CONFIG_ARIES_REV:48 , CONFIG_ARIES_REV03:48 aries_process_platform: final s1 booting mode = 0 DISPLAY_PATH_SEL[MDNIE 0x1]is on MDNIE setting Init start!! vsync interrupt is off video interrupt is off [fb0] turn on MDNIE setting Init end!! Autoboot (0 seconds) in progress, press any key to stop get_debug_level current debug level is 0x574f4c44. get_debug_level current debug level is 0x574f4c44. boot_kernel: Debug Level Low FOTA Check Bit Read BML page=, NumPgs= FOTA Check Bit (0xffffffff) Load Partion idx = (6) ..............................done Kernel read success from kernel partition no.6, idx.6. setting param.serialnr=0x38301804 0xb3e900ec setting param.board_rev=0x30 setting param.cmdline=console=ttySAC2,115200 loglevel=4 Starting kernel at 0x32000000...
Here is the location and the description of the JTAG pins on the Nexus S board:
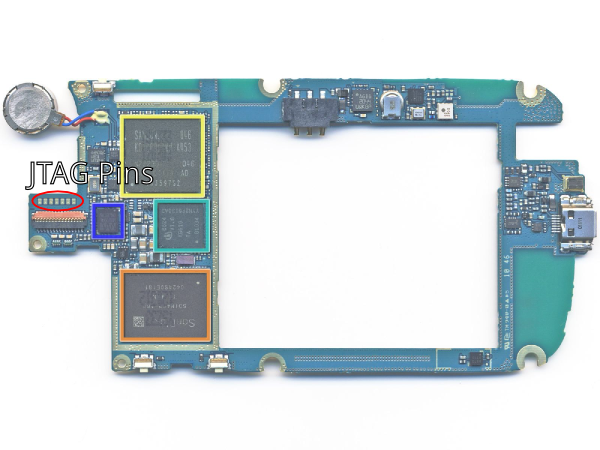
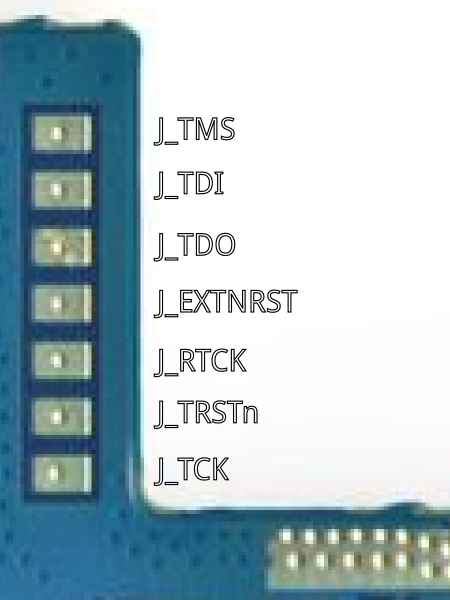
JTAG was untested on the device so far.
IROM e-fusedAs the IROM is apparently signed, porting a free bootloader will most likely fail as Primary Boot Loader (PBL).
On Android, it is usually possible to take a screenshot by pressing simultaneously the Volume Down and Power buttons. A shortcut can also be added to the menu that pops up when long-pressing the Power button. Unfortunately this doesn't work out-of-the-box in Replicant because libagl, the software renderer used for SurfaceFlinger (screen compositor), has an incomplete OpenGL ES implementation.
It is possible to take screenshots from within Replicant by forcing SurfaceFlinger to use llvmpipe. Be aware that this will make your system extremely slow and bring in rendering issues to apps such as Gallery and Orbot.
On Replicant 6.0 0003 it is only possible to change the software renderer system-wide. Please follow the instructions at Graphics - Choosing the default software renderer on Replicant 6.0 0003.
As of Replicant 6.0 0004, llvmpipe is used as the default renderer. However, due to performance reasons, an exception is in place that forces SurfaceFlinger to use libagl instead. Follow these steps to remove the exception:
adb shell rm /system/etc/libGLES_android/system/bin/surfaceflinger
adb shell touch /system/etc/libGLES_android/system/bin/surfaceflinger
Regardless of which graphics renderer is enabled, it is possible to take screenshots when the device is connected to a computer through an USB cable. The following steps explain the procedure.
FFMEG="ffmpeg"
FFMEG="avconv"
./screencap.sh -f OUTPUT.PNG
OUTPUT.PNG is the filename of the screenshot. The screenshot will be saved with this filename in the directory you are running the script in. The script only supports the PNG format for screenshots.The display size in pixels is auto-detected. If you want the script to be faster, you can add the screen size as another option, e.g.:
./screencap.sh -s 720x1280 -f OUTPUT.PNG
It is also possible to take screenshots in recovery mode with the script by running:
./screencap.sh -r -s SCREENSIZE -f OUTPUT.PNG
The Android SDK as released by Google is distributed under a non-free license and suggests installing non-free plug-ins such as the Google APIs.
Replicant 4.2 and earlier provided its own SDK, built from source. The ReplicantSDK page holds a list of the previously released Replicant SDK builds.
With Replicant 6.0, Replicant didn't invest time into releasing an SDK since several FSF certified distributions already shipped an Android 6.0 compatible SDK. The associated blog post has more details about this choice.
There is a new project to rebuild SDK in https://codeberg.org/Starfish/SDK-Rebuilds. It can build Imagepipe and TinyWeatherForecastGermany that are being review in F-DroidAndApplications and that have fully free source code and no external dependencies. The SDK build scripts are tested and kept up to date. So at the time of writing are currently trying to organize to build the Android SDK with these scripts and publish them. The author of these script also told us that he can respond to bug reports about freedom for instance in cases where nonfree code is found inside the SDK source code. He can also add support for FSDG compliant distributions if users test them. Since we're organizing to to setup builds for the SDK we'll most likely use Trisquel to build them to have Trisquel automatically supported.
The following FSF certified distributions have Android SDKs:
| Distribution | Gradle version | Android versions |
| PureOS 9 (amber) | 4.4.1 | 6.0 (API Level 23) |
| PureOS 10 (byzantium) | 4.4.1 | 6.0 (API Level 23) |
| Trisquel 9 (etiona) | 3.4.1 | 6.0 (API Level 23) |
| Trisquel 10 (nabia) | 4.4.1 | 6.0 (API Level 23) |
At the time of writing, Guix, Hyperbola, Parabola don't have an SDK, and the other FSF certified distributions weren't checked but are unlikely to have packages for an Android SDK.
The following distributions are also known to have an Android SDK:| Distribution | Gradle version | Android versions |
| Debian 9 (stretch) | 3.2.1 | 6.0 (API Level 23) |
| Debian 10 (buster) | ||
| Debian 11 (bullseye) | 4.4.1 | 6.0 (API Level 23) |
The F-DroidAndApplications wiki page also has information on attempts to build Android packages with these SDKs.
At some point there was an Android Rebuilds project that provided free SDKs at https://android-rebuilds.beuc.net/ but the author mentions that the project ended in 20211.
That project also lacked a license. That led another project by wchen342 to restart from scratch.
Wchen342's reimplementation is tested ungoogled-chromium-android and uses debian 12 (bookworm) through docker. It might be possible to use PureOS instead when the equivalent PureOS version is released.
F-Droid also has a forum post that asks for help with that as they currently rely on the nonfree SDKs and they want to fix that.
1 "Android Rebuilds, how to rebuild SDK/NDK, precisely, without non-free EULA (2015-2021)" on https://www.beuc.net/
Current Status:
We have successfully created a pkgbuild/APKBUILD for the android-sdk based on the Rebuild-SDK, which again was based on the android rebuilds, which builds without errors for Android 14. However, upon further investigation, we discovered that the Android repository includes over 187 binary dependencies, such as Go and Rust, in the prebuilt repository, that are downloaded using the repo tool. Patching these dependencies manually is a tedious task, as there are many build scripts that rely on these binaries.
New Approach:
We have found an unofficial CMake-based build system for Android command line utilities called android-tools, which is already used in many Linux distributions. Our next step is to evaluate the possibility of creating a merge request to build the Android SDK using CMake.
Call for Help:
We are seeking assistance in writing the necessary CMake files to support this new build system. Specifically, we are looking for help with:
pkgname=android-sdk
pkgver=14.0.0
_pkgrev=r74
pkgrel=0
pkgdesc="android sdk without google binaries"
url="https://git.replicant.us/contrib/wizzard/Android/SDK-Rebuild"
arch="all"
license="APACHE"
makedepends="
bison
flex
git
gnupg
gperf
libx11-static
libxml2
libxslt
mesa-dev
ncurses-static
python3
repo
rsync
unzip
openssh
bash
"
source=""
builddir="$srcdir/"
options="!check net"
prepare() {
git config --global user.email "you@example.com" r
git config --global user.name "Your Name"
sdkver="${pkgver}_${_pkgrev}"
echo $sdkver
# TODO maybe make init fast using this: https://android.googlesource.com/platform/sdk/+/refs/tags/android-14.0.0_r74/README.txt
repo init -u https://android.googlesource.com/platform/manifest -b android-$sdkver --depth=1 </dev/null
sed -i '/prebuilt/d' "$builddir"/.repo/manifests/default.xml
while ! repo sync --current-branch -j"$(nproc)"; do
echo "repo sync failed, retrying..."
done
}
build() {
export TARGET_RELEASE=trunk
BUILD_VARIANT='eng'
export BUILD_NUMBER=${BUILD_VARIANT}."${sdkver}"
# needed, because otherwise conscrypt build will fail. ART and some other
# dependencies need to be built from source.
export ART_MODULE_BUILD_FROM_SOURCE=true
export MODULE_BUILD_FROM_SOURCE=true
echo "$BUILD_NUMBER"
cd src
. build/envsetup.sh
lunch sdk-$TARGET_RELEASE-$BUILD_VARIANT
make -j"$(nproc)" sdk dist sdk_repo
}
package() {
install -Dm755 "$srcdir"/build/dist/android-sdk_linux-x86-"$BUILD_VARIANT".zip "$pkgdir"/opt/android-sdk
}
The port has been tested to work on trisquel using this script:
#!/bin/env bash
# Source the PKGBUILD file
. APKBUILD
# Set environment variables
if [ -z "$pkgver" ] || [ -z "$_pkgrev" ]; then
echo "Error: pkgver and/or _pkgrev not set in PKGBUILD"
exit 1
fi
# Check if required Ubuntu packages are available, install them if not
sudo apt-get update
for pkg in bison flex git gnupg gperf libx11-dev libxml2 libxslt1-dev libgl1-mesa-dev libncurses5-dev python3 repo rsync unzip openssh-client; do
if ! dpkg -s $pkg &>/dev/null; then
echo "Installing $pkg..."
sudo apt-get install -y $pkg
fi
done
# Run the prepare, build, and package functions
prepare
build
package
# Save the SHA256 of the zip
sha256sum=$(sha256sum "$pkgdir"/opt/android-sdk/android-sdk_linux-x86-"$BUILD_VARIANT".zip | cut -d' ' -f1)
echo "SHA256 of android-sdk: $sha256sum"
echo "$sha256sum" >android-sdk.sha256
Tooling:
We either write the cmake files by hand or to utilize Bear, a tool that generates a compilation database for clang tooling, to aid in the creation of the CMake files. Bear can generate a JSON compilation database during the build process when make is called, which will help us to port the build process to cmake, as the JSON complilation database will contain all the files, that where required for building the sdk
Next Steps:
Help Wanted:
If you have experience with CMake and Android build systems, we would appreciate your help in writing the CMake files and integrating the new build system. Your contributions will be invaluable in helping us create a FOSS version of the Android SDK.
See ReplicantSDKUsage for more details about SDKs up to Replicant 4.2.
There is no need to build as root, building as a regular user should be preferred.
In the source tree root folder, run:
source build/envsetup.sh lunch sdk-eng
Then, start the build:
parallel_tasks=$(echo "$(grep 'processor' /proc/cpuinfo | wc -l ) + 1" | bc) make -j$parallel_tasks sdk
-jn argument indicates the number of parallel tasks during the build (you can remove it from the command line to have only one task at a time).$parallel_tasks holds an optimized number of parallel tasks for your hardware. You may want to reduce this number if e.g. the computer runs out of RAM during the build.
out/host/linux-x86/sdk/Security is very subjective: Some security features are a serious threats to one's (computer) security, while other protect people. For instance nonfree boot software that you cannot change (and is nonfree) is often considered as a security feature by device vendors while free software users consider that as a threat instead. In contrast, many mostly invisible security features protect users like ALSR, stack protections, etc, with almost no cost for (practical) freedom.
The freedom-privacy-security-issues page has an introduction to various issues affecting smartphones and tablets in general.
About every 30 seconds (29 seconds in some devices) the modem asks about the SIM.
If we observe the traffic with wireshark we can measure the time precisely and we see that when there is no activity, the modem sends packets like that to the SIM card every 30 seconds: GSM SIM 65 ETSI TS 102.221 STATUS
In addition some devices also have a GPIO that can be used to detect the removal of the SIM card (see XMMBoot for more details)
On the Galaxy SIII (GT-I9300), after removing the SIM from SIMtrace (not to trigger the GPIO) after a small amount of time (few minutes?) the modem managed to understand that the SIM card was gone.
It might have been interesting to leave your phone at home during a protest for instance but get the SIM card out to be able to call from another phone in case of issues. However that doesn't work as the modem checks if the SIM card is still there.
With Simtrace 2, it might be possible to remove the SIM and still make simtrace2 send status messages, but at that point getting a second SIM card is probably much easier and cheaper for most people.
However since the modem sends regular status update commands to the SIM, we can use that to see if the modem firmware is not crashed. That information is interesting for the modem bringup work on top of a mainline kernel.
This page attempts to list SIM cards that are known to be compatible with Replicant, and the ones were known not to be compatible because of a bug.
The main bug is fixed now and has been part of Replicant 4.0 0004 RC1, however we still need to make sure that all the reported bugs are also fixed as the symptoms could be similar but have another cause.
In order to make it easier to reproduce, a list of compatible and incompatible cards has stated to be sumarized here, mostly using the information from the various bugreports.
| country | type | carrier | date | works | references | prices and conditions |
|---|---|---|---|---|---|---|
| France | contract | Free | ? (years ago, 2013?) | Yes | ||
| France | prepaid | SFR | bought the 2018-08-24 in Paris | Yes | ||
| France | ? | SFR | Very old card, expired | * Replicant 6.0: No * Replicant 4.2: Yes |
#1909 | N/A |
| France | prepaid | Orange | ? (probably bought last year) | Yes | #1868 | |
| France | conrtact? | Orange | No | #1868 | ||
| Italy | ? | Fastweb | No | #1824 | ||
| Italy | ? | Wind | older SIM cards | Yes | #1871 | |
| Italy | prepaid | Wind | No | #1871 | 25E, valid one month, 10E per recharge | |
| Spain | ? | Vodafone | micro-SIM bought before the 2018-02-23 | No | #1874 | |
| NZ | prepaid | Spark | 2013? | No |
At the time of writing, we know of two completely different bugs that broke the detection of SIM cards.
Bug report(s): #2122.
Fix: sent for review for libsamsung-ipc
How it was broken: libsamsung-ipc was converted to a consistent code style. That kind of work is very mentally tiring as you keep doing the same thing again and again during many many hours, it's also very prone to mistakes because of that. So the person that did the conversion (GNUtoo) did a typo and that slipped through the review as well as reviewers have the same issue: they need to keep looking for the same thing again and again.
How it was Fixed: It was fixed with a bisect. libsamsung-ipc and libsamsung-ril were first bisected manually which consisted of picking a libsamsung-ipc+libsamsung-ril revision set, building it, wiping the data, installing the image, and booting the result and testing. To test if the SIM appeared in the welcome application (by displaying the SIM carrier name) it was good, if not I still tested if the SIM was recognized in Settings->About phone->SIM status as sometimes you need to wait a bit before the SIM is ready. Once libsamsung-ril was removed of the equation, a simple bisect on libsamsung-ril was done. Then I bisected some functions inside the commit. this can be done by saving the older revision to a file with git ls-tree <previous-revision> -- path/to/file and git show <resulting_hash> > old_file. Then you can just use meld and keep track manually of the functions. And at then end reading the code was faster than testing so I did that.
Bug report(s): At least #1909. Maybe #1868, #1868, #1824, #1871, #1874 were related too but we'd need confirmation from the bug reporters.
Fix: In libsamsung-ril
How it was broken: Libsamsung-ril incorrectly implemented SIM message parsing, but for some reason it wasn't an issue in Replicant 4.2.
How it was Fixed: It was not possible to bisect as it was broken since the very first Replicant 6.0 version and it did work in Replicant 4.2 fine. So somehow "Replicant 6" broke it. GNUtoo also tried to understand what was happening by tracing the SIM but it wasn't enough to fix it. GNUtoo never found enough time to dig into the code and go look for what was really happening. So at the end Belgin did that and fixed it.
The Replicant source code is currently hosted by the FSF at: git.replicant.us
There is one branch per Replicant version, such as replicant-2.2.
Before downloading the Replicant source code, make sure there is a considerable amount of disk space left on the drive you intend to build Replicant on.
It is advised to have 60-70GiB available for the Replicant source code and the produced files for one device. If you intend to build for multiple devices, every additional device will need ca. 17GiB.
The path to the source tree root folder must not contain spaces.
Warning: to install the repo tool for Replicant 6 and before, please follow instructions here.
Following instructions are only to be followed for Replicant versions greater than 6.
To be able download the complete source code, the repo tool needs to be installed. The distribution you are using may already have the tool packaged and it may already been installed as part of the Build dependencies installation.
It is recommended to install the repo tool with the package manager. However, if the repo tool is not available on your system, you can download and install it locally:
mkdir tools
cd tools
wget https://commondatastorage.googleapis.com/git-repo-downloads/repo
chmod a+x repo
cd ../
In the following, it is assumed that repo is installed from your system's package manager. If you have installed repo locally in ../tools/repo, replace
repo
with
../tools/repo
at the beginning of the following commands.
The source manifest is the list of all the git repositories that are present in the Replicant tree.
Each Replicant version has a dedicated branch with the proper source manifest.
mkdir replicant-6.0 cd replicant-6.0 repo init -u https://git.replicant.us/replicant/manifest.git -b replicant-6.0
mkdir replicant-6.0 cd replicant-6.0 repo init -u https://git.replicant.us/replicant/manifest.git -b refs/tags/replicant-6.0-0004-rc2
mkdir replicant-6.0-dev cd replicant-6.0-dev repo init -u https://git.replicant.us/replicant/manifest.git -b replicant-6.0-dev
mkdir replicant-4.2 cd replicant-4.2 repo init -u https://git.replicant.us/replicant/manifest.git -b replicant-4.2
mkdir replicant-4.0 cd replicant-4.0 repo init -u https://git.replicant.us/replicant/manifest.git -b replicant-4.0
mkdir replicant-2.3 cd replicant-2.3 repo init -u https://git.replicant.us/replicant/manifest.git -b replicant-2.3
mkdir replicant-2.2 cd replicant-2.2 repo init -u https://git.replicant.us/replicant/manifest.git -b replicant-2.2
Now that you have configured repo, you can start downloading Replicant sources for the desired version.
This step is very long and can take hours to complete!
repo sync
For the Replicant 6.0 release branch, it is possible and recommended to verify the signatures of the Git tags in all repositories:ReplicantSourceCodeTagsVerification
Warning: following instructions are only for Replicant 6.0 0003 and before.
Once the source code is ready, you need to get the prebuilt applications (they are downloaded from F-Droid). Since Replicant 6.0, the prebuilt applications are checked if they were signed with the F-Droid signing key. The signing key can be retrieved and added to your GPG keyring using:
gpg --keyserver hkps://keyserver.ubuntu.com --recv-key 37D2C98789D8311948394E3E41E7044E1DBA2E89
Then you can download the prebuilts:
vendor/replicant/get-prebuilts
You must redo these steps each time you want to sync your tree, in order to keep it up to date. Future syncs are faster than the first one.
While the git.replicant.us git server supports http://, https://, git://, and ssh:// only http:// and https:// are supported for building Replicant.
This is because over time we need to move or rename repositories for various reasons. And in order to avoid breaking older Replicant versions (including specific releases that are tagged and that can't be modified anymore), we use http:// and https:// redirects, but we don't have any redirects with git:// or ssh://.
Using symlinks also doesn't scale as it has the side effect of making a repository appear multiple times in the cgit web interface that is used to display the repositories like the Replicant specific repositories for instance.
If you have SSH access, you can then clone the git repository directly on the server. This is way faster than having to push the code from a slow ADSL connection for instance.
# sudo -iu git $ cd repositories/LineageOS-mirror/ $ git clone --mirror git://github.com/LineageOS/<repo-name>.git $ cd <repo-name>.git $ touch git-daemon-export-ok
Replicant uses gitolite to handle git access.
If you don't already have the right to create repositories in the group you want to push to, this can be done with someone with SSH access to the git server:
sudo -iu git mkdir repositories/<groupname>/<repo-name>.git cd repositories/<groupname>/<repo-name>.git git --bare init touch git-daemon-export-ok<groupname> is to be replaced by the repository namespaces. For instance:
Once the repository has been created you then need to configure gitolite to give access to the repository.
gitolite is configured by configuration files stored in git.
The repository that handles that is at:
ssh://git@git.replicant.us/gitolite-admin
Examples of push URL can be found in the various repositories in cgit.
For instance for omap-usb-boot we can see the following URL:
ssh://git@git.replicant.us/PaulK/omap-usb-boot
Once the git repository is setup either by mirroring it with SSH or by setting it up in the normal way, you still need
to configure cgit to make the repository appear on the cgit web interface.
See the Cgit wiki page for where to adjust its configuration.
It's worth to check if all mirror repos have bundles in place.
TODO: Document how to create bundles.
So far the LineageOS mirror has bundles but not AOSP mirror.
If we ever add support for a device that uses CAF branches of Qualcomm repos, we need to figure out how the mirror can still be updated and how releases can be tagged.
CAF branches are in the same repos as the default branches. So two or more local repos are created for one remote repo when the default branch and the CAF branches are checked out. The current setup for tagging a new release and updating the mirror assumes that there is one local repo for one remote repo.
To ensure that nobody has tampered with the source code copy you received, it is recommended to verify the Git tags of all repositories. On the release branch, only signed tags are checked out in the Git repositories and the source code is "frozen" at a certain release version.
Tags are signed with different keys and you need to retrieve these GPG keys first.
Repos that come from the Replicant group and the LineageOS mirror are signed with the same release key that was used for creating the corresponding release images.
Tags in repos that are directly synced from AOSP are signed with the key from the Android Open Source Project:
Key ID: E8AD3F819AB10E78
Fingerprint: 4340 D135 70EF 945E 8381 0964 E8AD 3F81 9AB1 0E78
The tags in the repo for the F-Droid Privileged Extension is signed with the key of its maintainer Hans-Christoph Steiner:
Key ID: E9E28DEA00AA5556
Fingerprint: EE66 20C7 136B 0D2C 456C 0A4D E9E2 8DEA 00AA 5556
As with the Replicant release key, the other keys can be retrieved with:
gpg --recv-key KEY_ID
First, the tag in the manifest needs to be checked:
cd .repo/manifests git verify-tag $(git describe) cd ../..
Then all the other tags can be verified:
repo forall -ec ' { echo "Verifying $REPO_PROJECT" && git verify-tag $(git describe) 2>/dev/null; } || { echo "Error: verification failed!" && exit 1; } '
If the verification fails for a repo, Error: verification failed! is displayed. To investigate further in case an error happens, you can run git verify-tag $(git describe) in the repo where the error happens.
This tutorial was tested on Replicant 6.0, it might or might not work on older Replicant versions.
This tutorial assumes that:First, connect your smartphone or tablet to your computer trough USB, and make sure that ADB is already setup. If it is not, you can follow the explanations on how to setup ADB.
Then on your computer, make sure to give adb root permissions:
$ adb root $ adb shell
OpenSSH requires some host keys to work, generate them on your smartphone/tablet with:
root@i9300:/ # ssh-keygen -A
OpenSSH also needs a configuration file in /data/ssh/sshd_config, and by default the /data/ssh/sshd_config doesn't exist. Since we have an example configuration file in /etc/ssh/sshd_config, we can use it.
First copy the smartphone/tablet's /etc/ssh/sshd_config to your computer.
root@i9300:/ # cp /etc/ssh/sshd_config /data/ssh/sshd_config
Then, to permit accessing the smartphone/tablet with your SSH key, you need to copy your public key to the smartphone/tablet. This can be done with:
$ adb push ~/.ssh/id_rsa.pub /data/ssh/authorized_keys
First get a root shell again on the smartphone/tablet with:
$ adb root $ adb shell
root@i9300:/ # /system/bin/sshd
Note that OpenSSH won't be started automatically at boot, so after rebooting the smartphone/tablet, it will need to be started again manually.
You should then be able to ssh into the smartphone/tablet. For instance, if you connect to it trough WiFi and that it's IP address is 192.168.43.1, you can do it this way:
$ ssh root@192.168.43.1
The Free Software Foundation (FSF) and developers representing the Replicant project (Denis Carikli and Paul Kocialkowski), made an agreement on the 5th of June 2013 that enables the FSF to conduct fundraising in the name of Replicant and governs the fund usage.
In a nutshell:| date | Amendments | Signatures |
|---|---|---|
| ? (Before FOSDEM 2018) | Removal of the Unless authorized by a written amendment to this Agreement, signed by both parties, the Initiative Fund shall not be used to pay for software or software development services.limitation |
|
| 20 April 2019 | * Paul Kocialkowski was removed from the agreement. * Filippo Bergamo was added to the agreement. * Joonas Kylmälä was added to the agreement. |
The signatures were done through mail with GPG:From: Denis 'GNUtoo' Carikli To: John Sullivan Cc: Joonas Kylmälä, Fil Bergamo, Paul Kocialkowski Date: Tue, 12 Mar 2019 17:30:58 +0100 [...] I, Denis Carikli, agree to add the following people to the "Fundraising and Development Agreement" that exists between the FSF and the Replicant project: - Filippo Bergamo - Joonas Kylmälä and I also agree to remove Paul Kocialkowski from this agreement. Denis Carikli. From: Paul Kocialkowski To: Denis 'GNUtoo' Carikli, John Sullivan Cc: Joonas Kylmälä , Fil Bergamo Date: Sat, 20 Apr 2019 01:07:57 +0200 [...] I, Paul Kocialkowski, agree to add the following people to the "Fundraising and Development Agreement" that exists between the FSF and the Replicant project: - Filippo Bergamo - Joonas Kylmälä and also agree to remove myself from this agreement. [...] Paul |
| 12 September 2024 | * Filippo Bergamo was removed from the agreement. * David Ludovino was added to the agreement. |
addendum-A-update-signers.pdf was wet (handwritten) signed by the current Steering Community members (Denis, Joonas and Filippo) and Zoë Kooyman representing the FSF. Scanned copies were passed by email. |
| December 2024 | Removal of the Unless authorized by a written amendment to this Agreement, signed by both parties, the Initiative Fund shall not be used to pay for software or software development services.limitation was re-formalized. |
amendment-A.pdf was both wet signed and PGP signed by the current Steering Community members (Denis, Joonas and David). Scanned copies of the wet signatures were passed by email. PGP signatures: amendment-A.pdf.asc |
To track the upstream status of various devices, we also have the Upstream wiki page. Here we really need information on the upstream status of smartphones and tablets, even if the devices are worse than the ones currently supported as it helps plan the future of Replicant. For instance we could use the data to understand how to build virtuous circles with various upstream project that care less about freedom.
That page was previously used to evaluate potential target devices to which we may port Replicant, but the information on the devices Replicant would not want to support turned out to be useful as well.
Also note that adding support for a new device in Replicant takes some time and effort.
Because of that, adding new devices in that page doesn't guarantee at all that the device will be supported in Replicant, even if that device has significantly less freedom issues than the ones currently supported by Replicant, as some people still need to step up and do the work.
Other resources:The developer guide explains the terminology used on this page. See also the website for background information.
The porting guides provide information how the following requirements can be evaluated.
It might be a good idea to investigate how to use Wikidata to store the data and be able to automatically generate some tables from that.
This could also enable us to share the work with other communities. However the main issue with doing that would be to ensure that the data quality is good enough to our standards.
The inventaire project has exactly the same issues and did a presentation on how they deal with it.
It's also possible to build compatibility tables with sparql querries but much more research needs to be done on how to best interface with wikidata data.
Replicant even has a tool:"https://git.replicant.us/replicant/vendor_replicant-scripts/tree/research" to automatize that
| Manufacturer | Device | RAM size | Upstream | Flash method | SoC | Graphics | Sound | Modem | Camera | GPS | Sensors | Removable battery | nonfree | Freedom issues | Verdict |
|---|---|---|---|---|---|---|---|---|---|---|---|---|---|---|---|
| Asus | Nexus 7 | ? | CM 10 (Android 4.1) | Fastboot | Tegra 3 | ? | Free module | 3G version modem uses AT1 | Non-free tegra module, perhaps not even v4l2 | BCM4751: secret protocol | ? | ? | ? | ? | Port possible but unlikely to succeed |
| GeeksPhone | One | ? | CM 7.2 (Android 2.3) | Recovery | MSM7K | Should be fast | Should work | Non-standard protocol but AT seems possible, bad design for freedom | MSM undocumented mechanism | Probably NMEA from modem, bad design for freedom | ? | ? | ? | Qualcomm, hardware is BAD for freedom | |
| GeeksPhone | Zero | ? | CM 7.2 (Android 2.3) | Fastboot | MSM7227 | Should be fast | May need non-free firmwares | ? | MSM undocumented mechanism | Probably NMEA from modem, bad design for freedom | ? | ? | ? | Qualcomm, hardware is BAD for freedom | |
| LG | Nexus 4 | ? | CM 10.1 (Android 4.2) | Fastboot | Qualcomm Snapdragon S4 Pro APQ8064 | ? | ? | Unknown protocol | ? | ? | ? | ? | Really BAD: has too many proprietary things and the hardware is bad for freedom: modem controls the GPS (included in the modem chip), audio and perhaps NAND too | ||
| LG | Optimus L9 | ? | CM 10.1 (Android 4.2) | ? | OMAP 4430 | ? | ? | ? | ? | ? | ? | ? | ? | ? | |
| Motorola | Defy | ? | CM 7.2 (Android 2.3) | Recovery | OMAP 3630 | Should work | ? | ? | Non-free | ? | ? | ? | ? | Kernel is signed, making a Replicant port impossible | |
| Samsung | Galaxy S II, I9100G variant | 1G | ? | ? | OMAP 4430 | ? | ? | XMM6260 MIPI |
? | ? | ? | ? | ? | ? | Looks really good: * The modem looks isolated * The modem probably use the samsung-ipc protocol * Has a free software xloader * Unsigned bootloader |
| Samsung | Galaxy Note 2 (LTE) | ? | LineageOS 14.1 | heimdall | Exynos 4412 | 1280x720 | ? | Qualcomm MDM9X15 HSIC |
? | ? | ? | ? | ? | ? | ? |
| Samsung | Galaxy Note 3 (HSPA+ version) | ? | LineageOS 14.1 | heimdall | Exynos 5420 | 1080x1920 | ? | XMM6360 HSIC |
? | ? | ? | Yes | ? | ? | ? |
| Samsung | Galaxy Note 4 (LTE Cat.4 & South Korea LTE Cat.6 & LTE Cat.9 (S-LTE)) | ? | ? | ? | Exynos 5433 | ? | ? | ? | ? | ? | ? | Yes | ? | ? | ? |
| Samsung | Samsung Galaxy Note Edge (South Korea version) | ? | ? | ? | Exynos 5433 | ? | ? | ? | ? | ? | ? | Yes | ? | ? | ? |
| Samsung | Galaxy Note 5 | ? | ? | ? | Exynos 7420 | ? | ? | ? | ? | ? | ? | No | ? | ? | ? |
| Samsung | Galaxy S4 (GT-I9500) | ? | ? | ? | Exynos 5410 | ? | ? | ? | ? | ? | ? | Yes | ? | ? | ? |
| Samsung | Galaxy S5 (SM-G900H) | ? | LineageOS 14.1 | heimdall | Exynos 5422 | 1080x1920 screen | ? | XMM6360 HSIC |
? | ? | ? | Yes | proprietary-files.txt | ? | ? |
| Samsung | Galaxy S5 Neo (SM-G903F, SM-G903M, SM-G903W) | ? | LineageOS 16.0 | heimdall | Exynos 7580 | Mali-T720 MP2 | ? | Shared memory | ? | ? | ? | Yes | s5neolte/proprietary-files.txt universal7580-common/proprietary-files.txt ? universal7580-common/proprietary-files-bsp.txt ? |
Has at least a modem that is not isolated | not isolated modem => too bad for freedom to support in Replicant |
| Samsung | Galaxy S6 | ? | ? | ? | Exynos 7420 | ? | ? | ? | ? | ? | ? | No | ? | ? | ? |
| Samsung | Galaxy S7 | 4GB | LineageOS 14.1 | heimdall | Exynos 8890 | 2560x1440 | ? | ? | ? | ? | ? | No | ? | ? | ? |
| Samsung | Galaxy S7 Edge | ? | LineageOS 14.1 | heimdall | Exynos 8890 | 2560x1440 | ? | ? | ? | ? | ? | No | ? | ? | ? |
| Samsung | Galaxy S8 international | ? | ? | ? | Exynos 8895 | ? | ? | ? | ? | ? | ? | No | ? | ? | ? |
| Samsung | Galaxy Tab 8.9 | ? | CM 9.0 (Android 4.0) | Heimdall | Tegra 2 | ? | Free module | Samsung IPC XMM6260 |
Non-free tegra module, perhaps not even v4l2 | BCM4751: secret protocol | ? | ? | ? | ? | PaulK had one but failed to port to it because of Tegra slowness issues |
| Samsung | Galaxy Xcover 3 | ? | ? | ? | Marvell Armada PXA1908 | Vivante GPU | ? | ? | ? | ? | ? | Yes | ? | ? | ? |
| Samsung | Galaxy Xcover 4 | ? | ? | ? | Exynos 7570 | ? | ? | ? | ? | ? | ? | Yes | ? | ? | ? |
| Samsung | Nexus 10 - codenamed Manta | ? | Downstream LineageOS 16.0 ; Downstream AOSP 9.0 ; PostmarketOS wiki and repo ; Devices with same SoC that have some upstream support : Samsung SMDK5250 eval board: kernel u-boot ; Samsung Chromebook Series 3 XE303 - codenamed snow : kernel u-boot can use nv-U-Boot to boot unverified kernel tutorial to install upstream kernel at boot time ifixit teardown XDA thread about porting AOSP/CyanogenMod to this Chromebook Tutorial on running Android on this Chromebook Tutorial on bootloader unlock on this Chromebook ; Arndale board : wiki kernel u-boot supports non-secure JTAG debugging ; HP Chromebook 11 G1 - codenamed spring : kernel u-boot | Fastboot | Exynos 5250 , also called the Exynos 5 Dual. 1.7 GHz dual-core ARMv7 Cortex-A15 User manual | Free gralloc, hwcomposer, non-free 3d, beware: ultra high resolution (could be slow), display may need non-free firmware, Mali T604 GPU can run panfrost | May need non-free firmware | No modem | Free module | BCM4751: secret protocol | Free module | No, but ifixit battery replacement is ranked as moderate, taking only 10 to 15 minutes. | ? | ? | Port of Replicant 6.0 was planned but never pursued |
| SHIFTPHONE | SHIFT5me | ? | ? | ? | MT6797X Helio X27 | ? | ? | ? | ? | ? | ? | ? | ? | Modem in the same SOC | |
| SHIFTPHONE | SHIFT6m | ? | ? | ? | MT6797X Helio X27 | ? | ? | ? | ? | ? | ? | ? | ? | Modem in the same SOC | |
| SHIFTPHONE | SHIFT6mq | ? | ? | ? | Qualcomm snapdragon 845 | ? | ? | ? | ? | ? | ? | ? | ? | Modem in the same SOC | |
| SHIFTPHONE | SHIFTmu | ? | ? | ? | Qualcomm snapdragon 865 | ? | ? | ? | ? | ? | ? | ? | ? | Modem in the same SOC | |
| Wiko | Highway 4G | ? | ? | ? | Tegra | ? | ? | ? | ? | ? | ? | ? | ? | ? | TODO: Check if the bootloader is signed |
1 It uses a nonfree libril (libxgold-ril.so) which doesn't have strings of samsung-ipc commands and instead it has strings like "+CRING:" which are typically used to parse unsolicited AT commands. So it should use AT commands.
| Device | Manufacturer | Android port | Bootloader | SoC | Standardness | Blobs | Firmwares | Modem | Notes |
|---|---|---|---|---|---|---|---|---|---|
| Neo Freerunner | Openmoko | AoF | u-boot, flash with dfu-utils | Samsung S3C2442, CPU @400Mhz | Audio: ALSA, GPS: NMEA, Modem: AT | No | No | Total isolation | Hardware is too old to be supported by Replicant: * armv4t * Only 128M of RAM |
| N900 | Nokia | Nitdroid | partially signed, chainloaded u-boot, flash with 0xff | OMAP3430, CPU @600Mhz | Voice calls depend on cmt_speech pulseaudio plugin, modem protocol is non-standard but implemented in ofono | Nitdroid uses blobs | Nitdroid uses non-free firmwares (Wi-Fi, bluetooth, camera) | GPS is controlled by the modem, modem transport is over high-speed serial | * Has only 256M of RAM |
| iPhone | Apple | iDroid | iDroid bootloader seems free | iPhone 3G: Similar to Samsung S5PC110 | iPhone 3G: Audio: ALSA, Modem: AT, Wi-Fi: libertas | Probably needs some | Probably needs some | Known to never sleep | already supported by the Idroid project ,however it has a really bad status : it can't suspend to ram... |
| FLOW G1.55 | GizmoForYou | Stock | xloader + u-boot | OMAP3 | Audio: ALSA, Modem: AT | ? | Wi-Fi/Bluetooth | Needs to be check, could be OK | Instructions to build Android 2.2 for it are provided: http://www.gizmoforyou.net/wiki/index.php/Building_G155_Android Unfortunately that phone isn’t cheap. |
| PengPod1000/700 | PengPod | ? Android development forum | u-boot | Allwinner A10 | ? | both 8192cu and rtl8188eu Wi-Fi chips need non-free firmware | Some have rtl8192cu Wi-Fi, some have rtl8188eu | N/A | More focused on running GNU/Linux than Android. Wiki |
There are a small number of do-it-yourself phones where the user is expected to assemble the phone. Examples of this include the odroid phones which comes with android support. However, the issue is that not all users want or are able to assemble their own phones.
This page describes how to help Replicant if you have some time at hand.
While supporting many common (Samsung) phones and tablets is relatively easy and fast to do, we think that it's at lot more important to support devices that are better for freedom. Many Samsung devices we do support have an isolated modem, however we can't free their bootloader because it is signed.
Devices like the GTA04 or the LG Optimus Black don't have this bootloader issue, while still having an isolated modem.
We therefore strongly advise to pick tasks that would improve the support for these more freedom-friendly devices in Replicant.
We however still accept contributions for devices with isolated modems and non-free bootloaders.
Filtering the issue tracker for open issues, which have either one of the priorities immediate, urgent or high, lists the important current tasks.
Additionally, below is an overview over tasks where help is greatly appreciated.
The NLnet foundation managed to get some European Union grants to fund work on privacy and trust technologies.
It's then up to individuals to apply to it, and to define tasks that can improve privacy and trust on the Internet, which then the NLnet foundation can choose to fund.
This could for instance be used to fund the advancement of software (Tor, Replicant, etc) and hardware freedom (RISC-V, etc).
The only requirement (beside improving privacy and trust) seem to be that the project needs to have an European Union component (like the people applying for the grant living in the European union, etc).
They are then paid once tasks defined and/or the deliverables mentioned in the task have been completed.
The NLnet foundation also have some resources to help pushing changes upstream and try to push the applicants into making their work as useful as possible by engaging with upstream communities.
References:| Task | Status |
| Finish porting Replicant to a newer Android version | Ended |
| Graphics acceleration | Ended |
| Add support for the Pinephone | Draft |
There is a thread about funding on the mailing list about that
See TasksFunding for tasks that have been accepted by funding organizations. It also contains more background on such organizations.
In order to minimize the risk:
Alternatively we could also handle it in a way that is similar to the NLnet foundation, where we would only pay once some useful part of the work has been done.
See TasksFunding.
The most recent smartphones that Replicant support are quite old (they were made around 2013). The goal here is to add support for more recent smartphones in Replicant.
Even if we think that it's at lot more important to support devices that are better for freedom (samsung devices usually have a nonfree bootloaders), adding supporting common (Samsung) phones and tablets is relatively easy and fast to do and could be a good way to get started in contributing to Replicant.
It's advised to pick a device that:Make sure to evaluate the device before starting to work on it. Some devices have been evaluated in the TargetsEvaluation wiki page. There is also a forum section for devices evaluation.
Hardware requirements:Difficulty: Medium
Expected outcomes:It would be useful for a Replicant device to be able to update itself to a new version of Replicant without requiring being connected to a PC. LineageOS already supports this; we suspect that it should be possible to adapt this LineageOS functionality to Replicant.
Whenever possible, it would be useful to complete and submit some of the code written for Replicant to LineageOS.
Difficulty: Medium
Expected outcomes:Samsung-RIL is the RIL (Radio Interface Layer) that many Replicant devices use to communicate with the modem. It is a free, reverse-engineered replacement for the proprietary RIL that the Samsung phones ship with by default (which has been found to have backdoors).
Right now, Samsung-RIL mostly implements only the protocol features that are absolutely necessary for the phone to be operable. As a result, many more rarely used protocol features are unimplemented, which decreases functionality compared to the proprietary RIL. You can help by implementing the missing features of Samsung-RIL.
It would also be nice to fix most the reported bugs involving samsung-ril and libsamsung-ipc that are impacting users very seriously. This includes the bugs about the SIM card not being detected, and the issue about having metallic sound quality when doing voice calls over 3G (bug #1773). It would also be nice to be able to recover from EFS (the modem filesystem) corruptions (Bug #1869).
Hardware requirements : A computer that is able to build Replicant. A smartphone or tablet supported by Samsung-RIL.
Difficulty: Medium to Hard
Requirements/Prerequisites: Knowledge of C.
Expected outcomes: Implement the missing features listed at Samsung-RIL. When all the features have been implemented, also ask usptream (LineageOS) if they want to use libsamsung-ipc and samsung-ril.
Dependencies: This task should be fairly independent as:Funding: We could apply to https://nlnet.nl/PET
| Project name | Complete libsamsung-ipc and libsamsung-ril |
|---|---|
| Website / wiki | https://redmine.replicant.us/projects/replicant/wiki/Samsung-RIL |
Abstract: Can you explain the whole project and its expected outcome(s).in 1200 characters
Replicant is a fully free Android distribution that is approved by the FSF (http://gnu.org/distros). It supports several Samsung smartphones tablets that have a modem. The modem can be thought as a separate computer in a chip that is dedicated for interfacing with the cellular network. Many use custom protocols that are implemented by nonfree software to communicate with the smartphone OS (Android). This has issues: https://redmine.replicant.us/projects/replicant/wiki/SamsungGalaxyBackdoor The Samsung IPC protocol is used by the modems of the devices currently supported by Replicant, and in many other Samsung smartphones and Tablets. Replicant implemented it in: - libsamsung-ipc: the low level protocol implementation - libsamsung-ril: the interface between libsamsung-ipc and Android The project consists in implementing their missing features, which are known and documented in the RIL API. They are things like "start a conference call". When they are completed, we expect other Android and GNU/Linux distributions to start using and contributing to these libraries. This will also lower our maintenance burden and improve Replicant usability and compatibility with networks.
| Have you been involved with projects or organizations relevant to this project before? And if so, can you tell us a bit about your contributions? |
SEE TEMPLATE |
|---|
| Requested Amount (Between 5000 and 50000 Euros) | 50000 Euros |
|---|---|
| Does the project have other funding sources, both past and present? | SEE TEMPLATE |
Explain what the requested budget will be used for?
The budget will only be used to fund this task through contract work. We think it will take something between 3 and 4 month of work for one full time developer. If we take the cost of a Freelance developer in the USA (75$ to 150$ per hour) as a basis, to enable people living in Europe and the USA to apply, we can fund a developer to work on it for a period that is mostly equivalent to something between 2 to 4 months full time. The Replicant project will take care of ensuring that the people who will work on this task have the necessary hardware to do it, for instance by shipping or reimbursing the purchase of a compatible smartphone with the Replicant project money.
Compare your own project with existing or historical efforts.
Here, implementing the missing features will be done in the same way than before, which is running the proprietary implementation and understanding the data format of the data going from/to the modem that is gathered either with strace or by patching the kernel, and implementing the feature in libsamsung-ipc and libsamsung-ril.
What are significant technical challenges you expect to solve during the project, if any?
There is currently no CDMA support at all in Replicant and libsamsung-ril/libsamsung-ipc. A lot of areas in the world don't have any CMDA coverage, so testing the implementation could be challenging as it would either require the contractor to live in an area with CDMA coverage, or to be able to build a cheap CDMA infrastructure to be able to test the implementation. If we don't have good enough assurances that implementing CDMA is doable, that will not be attempted.
| Describe the ecosystem of the project, and how you will engage with relevant actors and promote the outcomes? | SEE TEMPLATE |
|---|---|
| Attachments | SEE TEMPLATE |
The LTE variants of the Samsung Galaxy S3 and Samsung Galaxy Note 2 use a different modem from the non-LTE variants that Replicant currently supports. You can help Replicant support those modems by implementing a QMI-RIL, which performs a similar role on the LTE variants as what Samsung-RIL performs on the currently-supported non-LTE variants. Wolfgang has done some preliminary work on this, so you'll probably be picking up where he left off.
Hardware requirements : A computer that is able to build Replicant. A smartphone or tablet supported by QMI-RIL like the Galaxy SIII 4G (i9305).
Difficulty: Hard
Requirements/Prerequisites: Knowledge of C.
Expected outcomes: A QMI-RIL that supports voice calls, SMS, and data, with as complete a protocol implementation as possible.
Dependencies: This task should be fairly independent as:Funding: We could apply to https://nlnet.nl/PET
The the Galaxy S 2 (I9100), Galaxy S 3 (I9300) and Galaxy Note 2 (N7100) currently use a kernel based on a vendor fork of Linux, which poses a maintainability and security issue. Forkbomb has done some initial work on porting these devices to use mainline Linux. You can help by continuing this work. This would also enable these devices to use generic hardware abstraction layers (HAL) when abstractions layers are ready, and to do some research on whether the TrustZone operating system can be removed from such devices.
Hardware requirements : A computer that is able to build Replicant. A Galaxy S 2 (I9100), Galaxy S 3 (I9300) or Galaxy Note 2 (N7100), and a serial port adapter to get the kernel boot logs.
Difficulty: Medium
Requirements/Prerequisites: C programming language, driver development
Expected outcomes: Audio working, modem working, and Replicant or LineageOS booting with mainline Linux.
| Project name | TODO |
|---|---|
| Website / wiki | https://redmine.replicant.us/projects/replicant/wiki/Upstream#Replicant-supported-Samsung-Exynos-devices |
Abstract: Can you explain the whole project and its expected outcome(s).in 1200 characters
Replicant is a fully free Android distribution that is approved by the FSF (http://gnu.org/distros). TODO
| Have you been involved with projects or organizations relevant to this project before? And if so, can you tell us a bit about your contributions? |
SEE TEMPLATE |
|---|
| Requested Amount (Between 5000 and 50000 Euros) | 50000 Euros |
|---|---|
| Does the project have other funding sources, both past and present? | SEE TEMPLATE |
Explain what the requested budget will be used for?
The budget will only be used to fund this task through contract work. We think it will take something between 3 and 4 month of work for one full time developer. If we take the cost of a Freelance developer in the USA (75$ to 150$ per hour) as a basis, to enable people living in Europe and the USA to apply, we can fund a developer to work on it for a period that is mostly equivalent to something between 2 to 4 months full time. The Replicant project will take care of making sure that the people that will work on this task have the necessary hardware to do it, for instance by shipping or reimbursing the purchase of a compatible smartphone with the Replicant project money.
Compare your own project with existing or historical efforts.
TODO
What are significant technical challenges you expect to solve during the project, if any?
TODO
| Describe the ecosystem of the project, and how you will engage with relevant actors and promote the outcomes? | SEE TEMPLATE |
|---|---|
| Attachments | SEE TEMPLATE |
Depends on the work on Replicant 9 being finished.
Having an automated build and test infrastructure would be very beneficial for Replicant.
Issues:A lot of time is spent on the wiki documentation, and a lot of information is redundant (for instance the installation guide)
TODO:We might want to consider Android 9 HardwareRequirements before working on that
The Optimus Black from LG is an interesting device from the perspective of freedom and privacy/security. It has the ability to run a free bootloader and uses an OMAP3 SoC that is well-documented and supported in upstream U-Boot (bootloader) and Linux (kernel). Its modem is well-isolated from the rest of the device, ensuring a sane base for privacy/security. Currently, the device-specific parts of the mainline U-Boot and Linux ports are still at an early stage, where they are functional with a very limited set of supported hardware.
Advancing the Optimus Black U-Boot and Linux mainline ports would allow using the device with free, up-to-date and maintainable software and would pave the way for support in GNU/Linux systems as well as Replicant. A list of priorities in hardware support will be defined, with the objective of tackling as many as possible.
Hardware requirements : A computer that is able to build Replicant. An Optimus Black with u-boot and modified boot pins, a serial port adapter to get the kernel boot logs.
Difficulty: Medium to Hard
Requirements/Prerequisites: C programming language, driver development
Expected outcomes: Improved hardware support for the Optimus Black in U-Boot and Linux
The Kindle Fire (first generation) from Amazon is an interesting device from the perspective of freedom and privacy/security. It has the ability to run a free bootloader and uses an OMAP4 SoC that is well-documented and supported in upstream U-Boot (bootloader) and Linux (kernel). It does not embed a modem, ensuring a sane base for privacy/security. Currently, the device-specific parts of the mainline U-Boot and Linux ports are still at an early stage, where they are functional with a very limited set of supported hardware.
Advancing the Kindle Fire (first generation) U-Boot and Linux mainline ports would allow using the device with free, up-to-date and maintainable software and would pave the way for support in GNU/Linux systems as well as Replicant. A list of priorities in hardware support will be defined, with the objective of tackling as many as possible.
Hardware requirements : A computer that is able to build Replicant. A Kindle Fire first generation, a serial port adapter to get the kernel boot logs.
Difficulty: Medium
Requirements/Prerequisites: C programming language, driver development
Expected outcomes: Improved hardware support for the Kindle Fire (first generation) in U-Boot and Linux
Tablets with Allwinner SOCs are an interesting targets because they do not use signed bootloaders and the SOCs and various devices using them have good Linux and u-boot mainline support. If not much work is required for that, once the code is merged, the candidate is also required to work on the generic abstraction layer project which is also documented in this page.
The chosen tablet should have:It would be better if the chosen tablet doesn't use an AllWinner SOC with a PowerVR GPU, as MALI GPU have more probability to be usable with free software in the future.
Hardware requirements : A computer that is able to build Replicant. An Allwinner tablet, a serial port adapter to get the kernel boot logs.
Difficulty: Medium
Requirements/Prerequisites: C programming language, driver development
Expected outcomes: Replicant support for a tablet using an Allwinner SOC, with free software bootloader and mainline based Linux kernel.
Replicant is plagued by various security issues, that are mostly due to using a downstream codebase. One of the most crucial issues is that Replicant uses an old version of the Android WebView (from circa 2015), which is also a functionality drawback.
An initial evaluation of the security issues in Replicant should be conducted, followed by the integration or update of the concerned components of the system.
It would also be nice to do the same for privacy issues. Since Replicant indirectly depends on the "Android Open Source Project" and directly depends on LineageOS, not all privacy issues might have been found fixed by Replicant. Once security issues have been fixed, it would be nice to try to identify as many privacy issues as possible, and in a second time to fix them.
Hardware requirements: A computer that is able to build Replicant. A smartphone or tablet that is supported by Replicant to be able to test the result.
Difficulty: Medium-Hard
Requirements/Prerequisites: Android build system, knowledge of system security, advanced git
Expected outcomes: Integration or update of components of Replicant to tackle security issues
The Android WebView is now built out of Chromium source tree. Chromium, specially when targeting Android, brings in several prebuilt files into the build process, some of which are proprietary. These are also suspicions that Chromium stills includes non-free source files. Fortunately there are several community forks of Chromium that clean some of this mess, however the work for an Android build was never completed.
Check out the comments on issue #1780 for more details and proposed approaches.
Hardware requirements: A computer that is able to build Chromium. A smartphone or tablet that is supported by Replicant to be able to test the result.
Difficulty: Medium-Hard
Requirements/Prerequisites: Chromium build system, Android build system, advanced git
Expected outcomes: WebView apk built without prebuilts and non-free source files. Bonus if it can be built on fdroid-server.
Replicant has some issues with FSDG compliance: F-droid repository is not FSDG compliant anymore (Bug #1629), and Replicant can't be built from an FSDG distribution (Bug #1861). This ought to be fixed. Replicant should also be fixed to build without issue.
It would also be nice to have the build system not depend on pre-built dependencies anymore, and to document which FSDG compliant F-droid applications crash because Replicant's incomplete EGL implementation (#705) and tag such applications as incompatible (so they are greyed out) until the EGL implemetation is fixed. Ideally Replicant builds should also be made reproducible if they are not already.
Hardware requirements: A computer that is able to build Replicant. A smartphone or tablet that is supported by Replicant to be able to test the result.
Difficulty: Easy
Requirements/Prerequisites: Knowledge of shell scripts and the ability to learn the Android build system
Expected outcomes: The ability to compile Replicant from an FSDG distribution, F-droid only showing FSDG compliant software.
All devices currently supported by Replicant have WiFi chips that requires a non-free firmware to work. So to have WiFi working with free software, users need to use external WiFi adapters. They typically use tiny ath9k_htc compatible USB WiFi adapter along with a tiny USB OTG Host adapter.
Such external USB WiFi adapters used with Replicant are originally intended for laptops, not phones. As a result, they tend to consume a lot of power. According to lsusb some ath9k_htc compatible devices can consume up to 500mA.
This poses several issues:Such USB WiFi adapters can also randomly stop working completely on some devices (e.g. needing to unplug and replug the adapter periodically to keep it operational).
You will need to investigate reliability issues such as the one mentioned above and look how power consumption can be improved in the adapter firmware and/or kernel driver.
You will also need to investigate how much miliampers USB devices can use, at the hardware level, on the smartphones and tablets Replicant supports.
Hardware requirements : An ath9k_htc compatible WiFi card, the ability to measure the current usage, the ability to build the ath9k_htc firmware and driver.
Difficulty: Medium/Hard
Requirements/Prerequisites: Knowledge of C
Expected outcomes: Reliable WiFi with external WiFi adapter
It's up to the device vendor to decide if the bootrom should enforce signature or not.
Some devices and several development boards (like the Jetson boards) do not enforce code signature by default.
When code signature is enforced, fusee_gelee can still enable to load unsigned code through USB, as it use a bug in the USB stack, it can only be used when booting through USB.
The downside is that, to boot an unsigned and free software bootloader, you need either:After loading a free software bootloader through USB, it might be possible to patch the bootrom, as part of it ends up being in the fuse memory region.
This is meant to fix bugs inside the bootrom, but we might also be able to use it to disable code signature completely.
Replicant 6.0 includes a minimal terminal app, but it is not accessible by default. To make the app visible in the launcher, open the Developer options in the settings. In the Debugging section, enable Local terminal. A more feature-complete terminal emulator is available from F-Droid: https://f-droid.org/repository/browse/?fdfilter=terminal&fdid=jackpal.androidterm.
Lava can be used to do functional tests on real hardware. It can be easily installed on PureOS, an FSDG compliant GNU/Linux distribution.
Labgrid has features similar to Lava but it is probably easier to learn because it's probably way easier to get started with it.
The OsmoGSMTester project is able to be interfaced with the Android RIL through ofono and can emulate a GSM network with the help of a compatible GSM base station or SDR.
This presentation from 2019 has many insights on what kind of issue we might expect in interfacing it with smartphones.
The Simtrace 2 project can be used, along with SIM card readers to programmatically feed a SIM card to a smartphone. This can be used to run test on real networks.
Serial port and USB:
Buttons:
Battery:
Antenna connector and GSM tower or SDR:See also the links inside the Serial_port article for more background on how to get serial port access on devices like the Galaxy SIII (GT-I9300) or the Galaxy SII (GT-I9100).
")
See https://git.replicant.us/contrib/GNUtoo/test-infrastructure.git for the source of the file.
| Device | Modem antenna connector | Compatible software | Comments |
| Motorolla C155 | MS-147 | * OsmocomBB * Old Nuttx revisions |
Could be used as reference phone as it's probably already supported by the Osmocom testing infrastructure |
| Galaxy SII (GT-I9100) | MS-162 | * Replicant 4.0, 4.2, 6.0 * Upstream Linux (partial) |
|
| Galaxy Nexus (GT-I9250) | ? | * Replicant 4.0, 4.2, 6.0 | We can get some GSM traces in wireshark with xgoldmon |
| Galaxy SIII (GT-I9300) | ? | * Replicant 4.0, 4.2, 6.0 * Upstream Linux (partial) |
When trying to enable protocol tracing in modems we can connect the device modem (somewhat directly) to a laptop
Questions:It might be possible to have a pure software test infrastructure with libsamsung-ipc.
It could be done more or less like that:
test script <-> ipc-modem or other programs <-> libsamsung-ipc <-> Linux kernel <-> VHCI <-> software sending USB packets
We have several choices for the Linux kernel:
| Kernels | Comments |
| User mode Linux (ARCH=um) | + Very lightweight, runs completely in userspace + Very simple setup. Probably works on armv7 too without dedicated hardware like Intel vt-x - Require dedicated RAM |
| Linux + libvirt + kvm | - Require some virtualization setup that requires dedicated RAM + Probably works unpatched |
| Project | Description | comments |
| gnuk | USB token software | can build for gnulinux |
| choptix | Library used by gnuk | More simple examples |
| osmo-ccid-firmware1[2][3] | CCID emulation | Probably uses vusb for testing too |
1 https://git.osmocom.org/osmo-ccid-firmware/tree/ccid_host
2 https://git.osmocom.org/osmo-ccid-firmware/tree/ccid_host/README.linux-dummy_hcd-ffs
So it might be possible to modify them to send some simple USB packets captured with wireshark / tshark / tcpdump.
| Settings | Status |
| kernel: kernel_replicant_linux commit: 843565d21f78 [WIP] ARM: dts: exynos: Add reboot modes to midas compilation settings: ARCH=um Host architecture: x86_64 kernel defconfig: x86_64_defconfig Target Distribution: Parabola x86_64 commandline arguments: ./linux mem=2047M ubd0=parabola.img root=/dev/ubda1 |
Boots fine |
| kernel: kernel_replicant_linux commit: 063228e445e2 net: sipc: core: fix code style compilation settings: ARCH=um Host architecture: i686 kernel defconfig: i386_defconfig |
Fails to compile1 |
| kernel: linux commit: f1baf68e1383 Merge tag 'net-5.17-rc4' of [...]kernel/git/netdev/net compilation settings: ARCH=um Host architecture: x86_64 kernel defconfig: i386_defconfig |
Boots fine |
| Target Distribution: Replicant 11 Build command: source build/envsetup.sh && lunch uml-userdebug && make dist kernel: ? kernel defconfig: ? |
Fails to compile2 |
1
CC arch/x86/um/user-offsets.s cc1: error: code model ‘large’ not supported in the 32 bit mode cc1: sorry, unimplemented: 64-bit mode not compiled in make[1]: *** [scripts/Makefile.build:117: arch/x86/um/user-offsets.s] Error 1 make: *** [arch/um/Makefile:118: archprepare] Error 2
2
[ 52% 179/339] including external/mesa3d/Android.mk ... FAILED: In file included from build/make/core/prebuilt.mk:53: In file included from external/mesa3d/Android.mk:124: In file included from external/mesa3d/src/mesa/Android.mk:23: external/mesa3d/src/mesa/Android.libmesa_glsl_utils.mk:74: error: BUILD_HOST_STATIC_LIBRARY is obsolete. Please convert to Soong. 12:25:14 ckati failed with: exit status 1 #### failed to build some targets (02:04 (mm:ss)) ####
To run Parabola first you need to create an image.
Then you need to chroot (with arch-chroot) insde the image and change the password.
Once you exited the chroot and unmounted the image and removed the loop mapping, you can boot it.
During boot you'll see a message like that at the end:
Virtual console 1 assigned device '/dev/pts/4'
You can then login in this way:
$ sudo picocom /dev/pts/4 picocom v3.1 port is : /dev/pts/4 flowcontrol : none baudrate is : 9600 parity is : none databits are : 8 stopbits are : 1 escape is : C-a local echo is : no noinit is : no noreset is : no hangup is : no nolock is : no send_cmd is : sz -vv receive_cmd is : rz -vv -E imap is : omap is : emap is : crcrlf,delbs, logfile is : none initstring : none exit_after is : not set exit is : no Type [C-a] [C-h] to see available commands Terminal ready parabola login: root Password: [root@parabola ~]# cat /etc/os-release NAME="Parabola" PRETTY_NAME="Parabola GNU/Linux-libre" ID=parabola ID_LIKE=arch BUILD_ID=rolling ANSI_COLOR="1;35" HOME_URL="https://www.parabola.nu/" DOCUMENTATION_URL="https://wiki.parabola.nu/" SUPPORT_URL="irc://chat.freenode.net#parabola" BUG_REPORT_URL="https://labs.parabola.nu/" LOGO=parabola [root@parabola ~]#
With vec0:transport=raw,ifname=p-veth0,depth=128,gro=1 in Linux command line, we can have a regular Ethernet interface that can be configured as usual, bridges also work.
See the kernel documentation (user_mode_linux_howto_v2.rst) for more details on how to setup UML networking.
With Linux 5.17-rc3 it's possible to have USB in user-mode-linux and I validated it by exporting an rtl_sdr with usbip and testing the receiving of FM with rtl_fm -f 88M | hexdump -C.
It seems to be there since Linux 5.14 since this commit:
68f5d3f3b654 um: add PCI over virtio emulation driver
Unfortunately we use Linux 5.10.70 in replicant 11 right now.
Development efforts to get rid of prebuilt binaries in the Replicant source code are tracked on this page. Prebuilts usually belong to the toolchain, but they can also be found in other parts of the source code. Most of them reside in the prebuilts directory.
These binaries are committed to AOSP git repos and in most cases, it is poorly documented, how they can be rebuilt, or the documentation is outdated. Compiler rebuild scripts rely on the prebuilt compilers to build the compilers. It is possible that non-free software was used to build the prebuilts (e.g. Google-internal Java compiler). To keep the build trustworthy, we need to make sure, that as little prebuilts as possible are used.
The focus should be on prebuilts that run on the build machine, so basically all prebuilts that belong to the toolchain. We first need to make sure that the toolchain can be trusted by developers and users that build Replicant from source. Then we can focus on binaries that only run on the target devices.
Only building an image for a device needs to work for now. Making e.g. the SDK build target work is a lot more challenging as it depends on a lot more prebuilts.
Building as much from source as possible is one strategy to achieve this. Using packaged versions of the prebuilts that are provided by GNU/Linux distributions is an alternative way to ensure that the binaries can be trusted. If the prebuilts are available as packages, then these should be preferred before a clean build from source is investigated. A clean build means that no prebuilts from the AOSP or LineageOS source code are required.
Working on getting build tools packaged by distributions should also be part of the strategy.
Debian currently provides by far the most packages that offer replacements for prebuilts. A lot of tools were only packaged for Debian Stretch, so they aren't yet available in most Debian-based distributions. The packages are DFSG-compliant and in accordance to the GNU FSDG. Debian only has free software in its main repository, so no non-free software is installed when setting up a Debian build environment for Replicant.
Debian has their own team that is dedicated to packaging Android tools, the Debian Android Tools team. We are cooperating with them.
For these reasons, it makes sense to primarily work with Debian Stretch as build system. Requiring certain packages, that are only available in Debian Stretch, breaks the build for other distributions for now. This is a setback we need to accept before packages become available in more distributions. #1787 tries to find a temporary solution to make Replicant buildable on other distributions without relying on untrustworthy prebuilts again.
Below is a (likely incomplete) overview of the work that has already been done.
The gcc-arm-none-eabi toolchain from Debian is used to build kernel images. The Android ARM cross-compiler and the host toolchains (Clang and GCC) are built from source. The host toolchains are built natively and don't rely on Google's modified Ubuntu sysroot.
The Jack and Jill Java compilers are built from source while prebuilts in the source tree are either built from source or they were replaced with binaries from Debian packages.
Sources for the compilers are in toolchain/src and the compilers are built in other subdirectories of toolchain. Only for Clang and LLVM, sources from the external dir are used.
The rudimentary script build-toolchain in vendor/replicant takes care of building the compilers and setting up the toolchain.
The build of the relocation packer was integrated in the Android build system.
Quite a few prebuilt tools and libraries, especially Java libraries, could be replaced with binaries from Debian packages. These include the Manifest Merger, Bison, Yasm, Flex, Proguard, Findbugs, SWIG and EMMA.
For tools, the path is usually changed from the path to the prebuilt binary to the path of the tool in /usr. JAR archives are mostly replaced with symlinks to the files from /usr/share (if they are not built from source). The symlinks are necessary as Android Makefiles expect local paths to prebuilts.
The prebuilt Python interpreter is also not in use anymore.
Repositories with prebuilts, that are not needed to build an image, are not fetched by default. Users need to specify the group the repo belongs to in order to fetch the repo. Groups can be specified by adding -g GROUP_NAME to the repo init command. Some repos were completely removed if they were deemed unnecessary.
No prebuilt binary should be in $PATH, so one can be sure that no prebuilt binary is run when executing commands in a shell that has environment variables set from envsetup.sh or lunch. Only prebuilts/devtools/tools is still part of $PATH, but the repo is not fetched by default. However, it is not fully clear if prebuilts get copied to out/host/linux-x86/bin.
See open issues in the build system category.
More tasks are listed below.
The Android ARM cross-compiler build uses the sysroot from prebuilts/ndk/current/platforms/android-21/arch-arm. The compiler needs to be bootstrapped with proper 1st and 2nd stage compilers so it doesn't rely on the sysroot from the NDK.
Some Makefiles in build reference binaries from prebuilts/ndk. It needs to be checked if they are used during an image build and if so whether they can be replaced.
There are still prebuilt libraries and target APIs in prebuilts/sdk. It needs to be investigated which of the libraries are needed to build an image and if the needed ones are already packaged by Debian. It is probably too much work to replace the different target API jar files, so we have to wait until they are packaged by Debian.
Same as above. It needs to be checked if they are used during an image build and if they can be replaced.
repo¶Get the repo tool back into the main repository of Debian. It is currently in the contrib repo due to bug #855846. A substantial patch is needed, which should remove the self-updating part of repo or make it optional.
This page explains how to install the various tools used with Replicant. It is assumed that you are running a GNU/Linux operating system.
Note: you may need to run the tools as root if your current user doesn't have USB access privileges.
Many distributions already have packages for the most common tools.
Using the tools from your distribution have many advantages:sudo pacman -S android-tools android-udev heimdall
sudo apt-get install android-tools-adb android-tools-fastboot heimdall-flash
guix install adb heimdall fastboot mkbootimg
Some of the tools are also built with the Replicant releases.
1. Download the adb, fastboot, heimdall, mkbootimg and unpackbootimg tools, with their corresponding .asc signatures files from ReplicantImages for the latest image.
2. Make sure you have added the Replicant release key of the latest version to your GPG keyring
3. Check the signature of the each tools:
gpg --armor --verify path/to/adb.asc path/to/adb gpg --armor --verify path/to/fastboot.asc path/to/fastboot gpg --armor --verify path/to/heimdall.asc path/to/heimdall gpg --armor --verify path/to/mkbootimg.asc path/to/mkbootimg gpg --armor --verify path/to/unpackbootimg.asc path/to/unpackbootimg
As the tools are built as a 32 bit binary, you will need to install compatibility libraries for 32 bits executables if your computer is running on a 64 bit architecture.
5. Make sure tools can be executed:
chmod a+x adb chmod a+x fastboot chmod a+x heimdall chmod a+x mkbootimg chmod a+x unpackbootimg
6. You can now use the tools. As they weren't installed in the system path, you need to go in the directory they were downloaded in and add a './' in front of the commands.
For instance if you want to obtain a list of commands accepted by adb you can use the following command:
./adb --help
There is an in-depth article covering several Samsung devices in the SamsungSerial page
| Device and documentation | I/O voltage | ID<->GND | SOC TX | SOC RX | switch | stock bootloader settings | Comments |
|---|---|---|---|---|---|---|---|
| GT-I9000 | 1.8V8 ? | 150k | D- | D+ | UART settings: ttySAC2 115200 8N1 To get a shell in the bootloader: * Power off the phone * Start sending some characters through the UART * Press the volume down button and the power button to power up the phone * Release the buttons when the phone has powered up * Once you get the shell, you can stop sending characters through the UART |
At some point the boot procedure switches to the modem UART, it's probably some linux driver doing that | |
| GT-I902x | 3.3V8 ? | 150k | UART settings: ttySAC2 115200 8N1 | ||||
| GT-I9100 | 1.8V8 ? | 510k9 | MAX8997 | UART settings: ttySAC2 115200 8N1 To get the UART enabled at boot with the stock bootloader: * Power the phone off and remove the battery * Put a battery in * Hold the select button * Plug the UART * Release the select button To get the UART enabled at boot with the Replicant 6.0 kernel and the stock bootloader, see the DHylands_SGS2_Console page on the mozilla wiki. |
At some point the boot procedure switches to the modem UART, it's probably some linux driver doing that | ||
| GT-N7000 | 1.8V8 ? | 510k9 | UART settings: 115200 8N1 | ||||
| GT-I9100G_CHN_CHN | 1.8V8 ? | 619k9 | ? | UART settings: 115200 8N1 | Very few prints from Xloader, the next bootloader used by Android 2.6.3 doesn't seem to print much | ||
| GT-I9300 | 1.8V1 | 619 kOhms3 | MAX776935 | UART settings: 115200 To increase verbosity during boot: * Power off the phone and remove the battery * Put a battery in * Hold the volume-down button * Plug the UART and wait for the first lines to be printed * Release the volume-down button |
It gives a shell once Replicant 6 has booted | ||
| GT-I9305 | |||||||
| GT-N7100 | ? | ||||||
| GT-N7105 | ? | ||||||
| GT-N5100 | ? | ? | UART settings: 115200 To increase verbosity during boot: * Power off the tablet * Hold down the volume-down button * Plug the UART and wait for the first lines to be printed * Release the volume-down button |
||||
| Galaxy Nexus (GT-I9250) | 619 kOhms4 | FSA94807 | UART settings: * By default: ttyFIQ0, 115200 8N1 * After patching Linux: ttyO2, 115200 8N1 See GalaxyNexusI9250SerialConsole for more details. |
||||
| Nexus S | 150 kOhm | FSA9480 | |||||
| Optimus Black (P970) | 1.8V6 | N/A2 | DP3T | ||||
| ODROID-U3, console UART | 1.8V | connector | UART settings: ttySAC1, 115200 8N1 | ||||
| ODROID-U3, IO pins UART | 1.8V | connector | UART settings: ttySAC0, 115200 8N1 | ||||
| Pinephone 1.x | 3.3v | connector | UART settings: ttyS0, 115200 8N1 | ||||
| Galaxy Tab 2 | 1.8V8 ? | UART pins exported on the connector | ? | ? | None? (UART pins exported on the connector) | UART settings: 115200 8N1 | |
1 Measured between USB GND and USB VCC
2 Code is required to use the switch as you need to configure both the MUIC and DP3T switch
3 See The related driver source code
4 See the postmarketOS wiki page on Serial debugging
5 See the driver and the ifixit teardown
6 Reference: OptimusBlackSerial
7 See board-tuna-connector.c fsa9480.c in kernel_samsung_tuna
8 Works, as it was tested on the device. TODO: measure the voltage, as lower UART voltages often works with higher voltage levels.
9 Works, as it was tested on the device. TODO: look the official reference in the driver for it.
As the Android build system also produces files like system.img and boot.img, theses can be installed through the bootloader (either with fastboot or heimdall) without any signatures check.
That can be useful if you just built Replicant and want to test it without having to generate a zip install file.
The resulting system.img might be a sparse ext4 image which needs to be converted to a normal image before flashing.
Also make sure to refer to the Replicant installation guide to make sure that you are using heimdall or fastboot correctly, to not break your device.
| Description | Fixed | Link with more information |
|---|
General-purpose usage notes and tips can be found on this page.
The website also provides recommendations and general advice.
See EnablingRootAccess for more details.
See DeviceEncryption for how to do it.
The default Browser has JavaScript enabled and runs the JavaScript that is loaded when you visit a website. Replicant has no mechanism to check if the complex JavaScript programs that are included in some websites are free software. See the JavaScript Trap article for more general freedom-related information about JavaScript.
Not only browser apps might run non-free JavaScript. Some apps include an embedded view that loads websites which is called webview. Although app developers can disable JavaScript for the webview, JavaScript is usually enabled in the webview. So you might run non-free software inside a webview.
For these reasons, it is recommended to disable JavaScript by default in the browser settings. As most browser exploits require JavaScript to work, you can also prevent that malicious websites can make use of security issues with your browser. Unfortunately, the currently used webview in Replicant has many security issues. See #1780 for more information. So disabling JavaScript helps a lot in securing your device.
Some apps have a setting that allows to use an external browser to view websites. This ensures that the embedded webview is not used and websites are loaded with a browser you can configure for security and privacy and that allows to disable JavaScript.
AdAway blocks a lot of known malicious websites that contain spyware and malware. However, using AdAway does not guarantee that all malicious websites or domains in general are blocked or that only free JavaScript is loaded.
The Lightning browser works well with Replicant, but it is prone to the same security issues as the default browser or the webview in general. However, this browser can be better configured for privacy and security. It is recommended to go through all the settings and to not only disable Javascript, but also to enable other settings that enhance privacy and security.
If you use Lightning as your default browser with the above described configuration, some websites might not work due to disabled JavaScript or other settings. But if you are sure that these websites do not contain non-free JavaScript, spyware or malware, you could load these websites with the default browser that has JavaScript enabled. This way, you do not need to enable JavaScript or disable other conflicting settings in Lightning for certain websites and revert the changes afterwards again. The default browser is then your browser for trusted websites with only free programs, while you visit all other websites with the configured Lightning browser.
**Note: The recommendation above to use the Lightning browser needs to be reviewed because it hasn't been updated in over two years
Gecko-based web browsers (such as IceCatMobile and Orfox) don't use WebView, and therefore don't have the security issues associated with WebView. However, Gecko-based web browsers require enabling llvmpipe.
Note that Firefox Klar uses WebView, not Gecko, and therefore does have the security issues associated with WebView.
See the "Backup and restore data" section in the UsingReplicant wiki page.
You should now be able to use the camera again.
The mostly used barcode scanner app ZXing has a slow preview. The privacy-friendly QR Scanner has a faster preview.
Viewing videos in the gallery or in the browser is not possible. See #1539 for background information.
Only the VLC app is known to be able to play videos on Replicant. Make sure to disable hardware acceleration in the settings to prevent crashes.
See TerminalEmulator for more details.
This page explains how to connect your Replicant device to the Internet via an USB connection to a computer connected to the Internet.
Replicant USB Networking requires a script: usb_networking_device.sh
Make sure to have ADB installed and to have the host daemon running as root.
Push the script on the device, make it executable and run the first part of the script:
adb push usb_networking_device.sh /data/
adb shell chmod a+x /data/usb_networking_device.sh
adb shell /data/usb_networking_device.sh start1
The network manager applet on your PC (usually accessible through the network icon on your taskbar) should now display the device as a new wired interface. Below the name of the device should be a list of available connections. Depending on your network configuration, the list might be empty or offers one or more entries.
If your PC is connected to the Internet via Ethernet, a connection with the name "Auto-Ethernet" or a similar name could be available. Selecting this option should be enough to configure the connection and you can skip most of the steps below and continue with step 5. If there are issues with your connection, you will have to start again and do the rest of the steps, too.
If your PC uses Wi-Fi and Ethernet-based connections are suggested for your device, selecting one of them will likely not work. You will have to set up a new Ethernet-based connection.
The following steps are required to set up a new network connection for the device:
1. In the network manager applet, create a new "Ethernet" or "Wired" connection.
2. In the tab for IPv4 settings, select the method "Shared to other computers".
3. Save the connection, preferably with a distinguishable name (The name can be changed at the top of the edit window).
4. Select this connection for your device.
5. Now run the second part of the script on the device:
adb shell /data/usb_networking_device.sh start2
The connection should now work.
The new connection is saved on your PC and you don't have to recreate it when connecting the device again. It is then only necessary to run the first part of the script, selecting the network connection for the device in case it is not auto-selected and to run the second part of the script.
To disconnect the device, run:
adb shell /data/usb_networking_device.sh stop
The reverse_tether.sh script is part of AOSP and can be downloaded from: reverse_tether.sh
In order to start basic NAT networking between the host and the device, make sure to have installed ADB and to have the host daemon running as root. Then, use reverse_tether.sh the following way:
./reverse_tether.sh rndis
./reverse_tether.sh nat
Replicant USB Networking requires two scripts: usb_networking_device.sh usb_networking_host.sh
However, you can avoid the host part if your network manager can manage a shared connection.
Make sure to have installed ADB and to have the host daemon running as root.
Push the device part on the device and make it executable:
adb push usb_networking_device.sh /data/
adb shell chmod a+x /data/usb_networking_device.sh
Using a network manager shared connection
1. On your Linux PC, in the network manager applet (where you normally set up wired or wireless network connections), create a new "Shared" "Wired" connection, with default settings (connection type = Shared). (This is independent of the device, and only needs to be created once.)
2. Disconnect any other network connections (Wifi, 3G data) on the device.
3. Run the first part of the device-side script:
adb shell /data/usb_networking_device.sh start1 dhcp
adb shell /data/usb_networking_device.sh start2 dhcp
The connection should now work. To disconnect the device, run:
adb shell /data/usb_networking_device.sh stop
Using the host script
1. Disconnect any other network connections (Wifi, 3G data) on the device.
2. Run the first part of the device-side script:
adb shell /data/usb_networking_device.sh start1 static
adb shell /data/usb_networking_device.sh start2 static
sudo ./usb_networking_host.sh start
The connection should now work. To disconnect the device, run:
adb shell /data/usb_networking_device.sh stop
sudo ./usb_networking_host.sh stop
In /data/data there is the application data.
The issue is that just copying the /data/data/<application> from a block device backup will not always work. In some cases, the application will crash like that:
01-02 06:49:06.105 5938 5951 E SQLiteLog: (14) os_unix.c:31282: (13) open(/data/user/0/org.smssecure.smssecure/databases/_jobqueue-SilenceJobs) -
01-02 06:49:06.110 5938 5951 E SQLiteDatabase: Failed to open database '/data/user/0/org.smssecure.smssecure/databases/_jobqueue-SilenceJobs'.
01-02 06:49:06.110 5938 5951 E SQLiteDatabase: android.database.sqlite.SQLiteCantOpenDatabaseException: unknown error (code 14): Could not open database
01-02 06:49:06.110 5938 5951 E SQLiteDatabase: at android.database.sqlite.SQLiteConnection.nativeOpen(Native Method)
01-02 06:49:06.110 5938 5951 E SQLiteDatabase: at android.database.sqlite.SQLiteConnection.open(SQLiteConnection.java:207)
01-02 06:49:06.110 5938 5951 E SQLiteDatabase: at android.database.sqlite.SQLiteConnection.open(SQLiteConnection.java:191)
01-02 06:49:06.110 5938 5951 E SQLiteDatabase: at android.database.sqlite.SQLiteConnectionPool.openConnectionLocked(SQLiteConnectionPool.java:463)
01-02 06:49:06.110 5938 5951 E SQLiteDatabase: at android.database.sqlite.SQLiteConnectionPool.open(SQLiteConnectionPool.java:185)
01-02 06:49:06.110 5938 5951 E SQLiteDatabase: at android.database.sqlite.SQLiteConnectionPool.open(SQLiteConnectionPool.java:177)
01-02 06:49:06.110 5938 5951 E SQLiteDatabase: at android.database.sqlite.SQLiteDatabase.openInner(SQLiteDatabase.java:806)
01-02 06:49:06.110 5938 5951 E SQLiteDatabase: at android.database.sqlite.SQLiteDatabase.open(SQLiteDatabase.java:791)
01-02 06:49:06.110 5938 5951 E SQLiteDatabase: at android.database.sqlite.SQLiteDatabase.openDatabase(SQLiteDatabase.java:694)
01-02 06:49:06.110 5938 5951 E SQLiteDatabase: at android.database.sqlite.SQLiteOpenHelper.getDatabaseLocked(SQLiteOpenHelper.java:234)
01-02 06:49:06.110 5938 5951 E SQLiteDatabase: at android.database.sqlite.SQLiteOpenHelper.getReadableDatabase(SQLiteOpenHelper.java:187)https://redmine.replicant.us/projects/replicant/issues/new
01-02 06:49:06.110 5938 5951 E SQLiteDatabase: at org.whispersystems.jobqueue.persistence.PersistentStorage.getJobs(PersistentStorage.java:80)
01-02 06:49:06.110 5938 5951 E SQLiteDatabase: at org.whispersystems.jobqueue.persistence.PersistentStorage.getAllUnencrypted(PersistentStorage.java:71)
01-02 06:49:06.110 5938 5951 E SQLiteDatabase: at org.whispersystems.jobqueue.JobManager$LoadTask.run(JobManager.java:153)
01-02 06:49:06.110 5938 5951 E SQLiteDatabase: at java.util.concurrent.ThreadPoolExecutor.runWorker(ThreadPoolExecutor.java:1113)
01-02 06:49:06.110 5938 5951 E SQLiteDatabase: at java.util.concurrent.ThreadPoolExecutor$Worker.run(ThreadPoolExecutor.java:588)
01-02 06:49:06.110 5938 5951 E SQLiteDatabase: at java.lang.Thread.run(Thread.java:818)
01-02 06:49:06.110 5938 5951 E AndroidRuntime: FATAL EXCEPTION: pool-1-thread-1
01-02 06:49:06.110 5938 5951 E AndroidRuntime: Process: org.smssecure.smssecure, PID: 5938
01-02 06:49:06.110 5938 5951 E AndroidRuntime: Theme: themes:{}
The above crash occured while switching between Replicant 6.0 minor revisions (6.0 0003 -> 6.0-dev -> 6.0 0003).
Several systems permission systems are in use:Adding support for a new device can range from almost no time (minutes or very few hours) to a lot of time (several years). So we typically try to choose wisely which devices to spend time on.
As Replicant is a community project, anyone can add support for a device if it meets the Minimal-requirements defined by the Replicant project.
If you don't plan to add support for the device yourself, it might still be a good idea to see if it meets the Minimal-requirements and to see if it's has less freedom issues for than the devices currently supported, as it could make people (more) interested in adding support for that device. Having existing free software support for many hardware features that are typically mising (Free WiFi firmware, free software GPS implementation, etc) could also make people more interested.
If it doesn't meet the criteria, the Replicant project is open to collaboration to helping you adding support for that device in other project, and/or to help you fork Replicant to do that.
See the What can I do if my device doesn't meet the Replicant project's criteria section below for more details on that.
The Replicant developers are typically available on the mailing list, and on IRC (depending on the days and hours of the day). We do accept patches on the mailing list.
We also have guides that can help getting started such as:However we're still open to collaboration with those wanting to add support for devices that don't meet Replicant criteria.
Replicant can help you fork Replicant to support such devices, as it would be sad not to have them supported by a fully free software distribution.
We can also accept patches for devices that don't many of the criteria: for instance merging patches to add support for a phone with a non-isolated modem will probably not hurt.
However as Replicant will not maintain this phone, so you might have to maintain that part of the code. And we won't even be able to test that code, as it's likely that we will not have the device you are adding support for.
The Replicant developers are typically available on the mailing list, and on IRC (depending on the days and hours of the day). We do accept patches on the mailing list.
We will still be open to collaboration as long as it's on the free software parts.
For instance the Replicant project already collaborates with other projects, some of which have serious freedom issues:And it would still be a good idea to collaborate on the free software parts, as sometimes as people work on free software, less and less nonfree software become required for some specific devices.
For instance, the Lime2, which is an ARM Single board computer, probably required a nonfree bootloader long time ago, and noadays we have free replacements for it. The video decoding offload also didn't work with free software, and now it does. Nowadays all hardware features probably work with free software.
While that is not the case for all hardware devices, enabling collaboration to have more and more free software, even for device that don't run only free software, looks like a good strategy.
All Replicant-supported devices need non-free firmware to be loaded to make the internal WiFi component work. See the WiFi research page for more information. Free replacements for these non-free firmwares do not yet exist.
However, free firmware does exist for WiFi adapters with the AR9271 and rt2500usb chipsets. Such adapters can be used with a device running Replicant 6.0. A USB OTG (On-The-Go) cable is needed to connect the WiFi adapter to the phone.
WiFi adapters work best with the Galaxy Note 2 or the supported tablets because of their large batteries, though connection issues or crashes of the RepWifi app can happen.
Otherwise, the Galaxy S 3 works well, while the Galaxy Nexus, Galaxy Note and especially the Galaxy S 2 are more unstable and have a smaller battery life. Extended See known issues for more details. Using an USB OTG Y-cable with an additional power source helps preventing battery-related issues.
More adapters exist that have the AR9271 chipset than are listed below. The listed adapters are the ones that are known to us.
In Replicant versions before 6.0 0004 rc1, using the WiFi adapter with the RepWifi app was the recommended and most convenient way.
As of Replicant 6.0 0004 rc1, RepWifi has been removed since it is now possible to configure WiFi connections through the adapter with the pull-down quicksettings or the regular WiFi menu in the settings. In 6.0 0003 and older, these methods only worked with the internal WiFi component of the device.
Replicant 6.0 version before 0004 rc1 shipped with the RepWifi app. Root access for apps needs to be enabled to make the app work.
The app has the following capabilities:Forum thread about the app and its development
While the RepWifi app should be preferred, use cases might exist where the WiFi scripts yield better results. The scripts were developed before work on the RepWifi app was started. Scripts both for Replicant 6.0 and Replicant 4.22 exist. It is unlikely that the WiFi scripts will be improved further as the development focus lies on the RepWifi app.
The scripts can be retrieved by cloning the user-scripts repository:
git clone https://git.replicant.us/replicant/user-scripts.git -b replicant-6.0
for Replicant 6.0 and
git clone https://git.replicant.us/replicant/user-scripts.git -b replicant-4.2
for Replicant 4.2.
For the next steps, ADB needs to be set up and running as root. Connect the device to your PC. The scripts are in the networking/wifi folder. Run the setup script the folder to push the scripts to the device:
./setup.sh
Then disconnect the device and attach the WiFi adapter. Make sure root access for apps is enabled. Open a terminal emulator. If the terminal is not running as root, you can gain root by running:
su
Navigate to the data/misc/wifi directory and run the script to scan and select the network access point:
bash select_network.sh
After selecting the preferred AP and entering the password (if required), a WiFi connection should be successfully established.
Forum thread about the WiFi scripts and their development (contains some more usage notes, especially for Replicant 4.2)
1 According to WikiDevi page on the version 1 and WikiDevi page on the version 2 only version 1 of TP-Link TL-WN722N works with free software, while version 2 doesn't
2 Replicant 4.2 does not include the required drivers to make these adapters work. Custom kernel images are necessary for Replicant 4.2. The scripts for Replicant 4.2 run services with greater privileges and do not restrict file access as good as the scripts for Replicant 6.0 do, so using them is less secure.
Currently, the internal WiFi chip cannot be used on any of the Replicant-supported devices without having to load non-free firmware. See Replicant status and the device pages for more information.
On desktops and laptops, several WiFi chips don't require non-free firmwares to be loaded.
Several cases exist:On phones, the only WiFi chip that doesn't require a non-free firmware that we know of is the OpenMoko FreeRunner WiFi chip. The firmware is in a flash chip.
The idea here is to find ways to still get WiFi on Replicant Supported devices, without needing to load any non-free firmware.
Either the firmware implements the WiFi operations (scanning, association, and so on), either the driver implements it.
This is also known as Hard-MAC.
An easy way to find out is to look into the WiFi driver Kconfig for "select CFG80211" or "depends CFG80211"
Example:
config LIBERTAS
tristate "Marvell 8xxx Libertas WLAN driver support"
depends on CFG80211
[...]
If it is implemented by the firmware, it often contains bugs which cannot be fixed by the community. That also severally limit the use case of such WiFi chip beyond its most common uses cases.
This can result in more help in getting a free software firmware to run on such chip. However the amount of work to re-implement such firmware may be bigger.
The best way to reimplement it would be to write a new driver taking care of such WiFi operations and to make the firmware do the smallest amount of work possible.
This is also known as Soft-MAC.
An easy way to find out is to look into the WiFi driver Kconfig for "select MAC80211" or "depends MAC80211"
Example:
config WL1251
tristate "TI wl1251 driver support"
depends on MAC80211
[...]
| Device | WiFi chip | driver(s) | Research |
|---|---|---|---|
| Galaxy S | Broadcom BCM4329 | BCMDHD (cfg80211) | |
| LG Optimus Black | |||
| Nexus S | |||
| Galaxy Nexus | Broadcom BCM4330 | * See the nexmon project * The BCM4330 has a rom. Can the driver use it? do functional free software firmware 'patches' exist for it ? * Some documentation exists at least for the BCM4334 * Also see the blog post about reverse engineering Broadcom wireless chipsets * A talk that was given about debugging code running on the chip * See also the RECON-BRX-2018-DIY-ARM-Debugger-for-Wi-Fi-Chips.pdf slides * A political solution might be worth pursuing |
|
| Galaxy Note | |||
| Galaxy S 2 | |||
| Galaxy Tab 2 7.0 | |||
| Galaxy Tab 2 10.1 | |||
| Galaxy S 3 | Broadcom BCM4334 | ||
| Galaxy S 3 4G | |||
| Galaxy Note 2 | |||
| GTA04 | Marvell 8686 (W2CBW003) | libertas_sdio(mainline, cfg80211) | |
| libertas_tf_sdio(patches, mac80211) |
| Driver / Chip | Busses | Firmware | Usable in smartphones or tablets? | Research |
|---|---|---|---|---|
| ath5k | PCI, PCIe, PCMCIA, AHB | None(Driver<->Hardware) | Busses? chip size? power consumption? | |
| ath9k | PCI, PCIe, PCMCIA, AHB | None(Driver<->Hardware) | Busses? chip size? power consumption? | |
| ath9k_htc | USB | Free firmware | Bus? chip size? power consumption? | |
| carl9170 | USB | Free firmware | Bus? chip size? power consumption? | |
| airo | PCI, PCMCIA | Non-free firmware on flash | ? | |
| at76c50x-usb | USB | Non-free firmware needed for some cards only | ? | |
| b43/b43-legacy | SSB, PCI, PCI-E, PCMCIA | OpenFWWF with 4306, 4311(rev1), 4318, 4320 | ? | |
| rt2400 | PCI | No non-free firmware needed | ? | |
| rt2500 | PCI | No non-free firmware needed | ? | |
| rt2500usb | PCI | No non-free firmware needed | ? | |
| rtl818x | PCI, USB | No non-free firmware needed | ? | |
| esp8266 (out of tree) | UART, SPI, SDIO | * Unsigned fimrware and free software SDK available for it * nonfree binaries required to make WiFi work * Out of tree Linux driver available which depend on nonfree firmware |
Used in a tablet? | |
| esp32 (out of tree) | * Unsigned fimrware and free software SDK available for it * nonfree binaries required to make WiFi work |
Used in a tablet? | ||
| rsi91x | SDIO, USB, other? | * nonfree firmware required * may be possible to add it on a dedicated flash chip |
Might be used in a smartphone in the future | |
| brcmfmac | SDIO, USB, pcie | * ARM CPU with ROM and ARM * Unsigned code * nonfree firmware are used with the Linux driver |
Used in smartphones and tablets | * TODO: Look if it works once firmware loading has been patched out of the upstream Linux driver * TODO: Look at the nextmon project if there are usable free firmwares * According to the BCM4334 documentation it's possible to have the firmware on dedicated flash chip. |
| rtlwifi (staging) | SDIO, USB, PCIe | nonfree firmware | Used at least in e-readers | * The nonfree firmware allow reverse engineering (GPL) * Reverse engineering the nonfree firmware looks easy |
Most/All Replicant supported devices support USB OTG. With the proper (standard) cable, the USB port of the device can do USB host.
However devices differ a lot in the number of Milli-ampers they can deliver through that USB port. Some phones also have USB host enabled by default in their kernel configuration, and some other require patching the kernel.
On Replicant kernels, USB WiFi drivers are probably not compiled in by default. So you will also need to recompile.
Information about currently supported WiFi adapters for Replicant 6.0 can be found here: https://redmine.replicant.us/projects/replicant/wiki/WiFiAdapter
| Device | Chips involved | Replicant 6 Kernel | Max mA |
|---|---|---|---|
| Galaxy Nexus | TWL6040 | 3.0.101 | 500mA (tuna_set_vbus_drive in board-tuna-connector.c ) |
| Galaxy S III (I9300) | MAX77693 with the ESAFEOUT1 regulator | 3.0.101 | * Datasheet not found * The upstream driver doesn't have the information * Downstream drivers might have some information about how much mA ESAFEOUT1 can deliver |
| Galaxy S III 4G (I9305) | |||
| Galaxy Note 2 | |||
| Galaxy Note | |||
| Galaxy S 2 | MAX8997 with the SAFEOUT1 regulator [1] [2] | * Datasheet not found * The upstream driver doesn't have the information * Downstream drivers might have some information about how much mA SAFEOUT1 can deliver |
|
| Galaxy Tab 2 7.0 | ? | ||
| Galaxy Tab 2 10.1 | ? | ||
| GTA04 | |||
| Galaxy S | |||
| Nexus S | |||
| Optimus Black |
See #1926 for pointers on how to find the missing information for the Maxim Power Management ICs (PMICs).
Replicant workshops have usually been organized to help contributors, typically by answering to question or helping them overcome some issues that are blocking them from continuing to contribute.
For both libsamsung-ipc and the Linux driver it's interesting to understand better the boot of the modem in order to come with good names for the abstraction.
| Hardware | Linux | libsamsung-ipc | ||||
|---|---|---|---|---|---|---|
| Variant | SOC | Modem | Link | GPIO usage | GPIO assignement | device driver name |
| Galaxy Tab: GT-P1000 |
Exynos 3310 | RAM | aries | |||
| Galaxy S: GT-I9000 |
Exynos 3110 | XMM6160 | RAM | aries | ||
| Nexus S: GT-I9020 GT-I9020A GT-I9023 |
Exynos 3110 | RAM | crespo | |||
| Galaxy SII: GT-I9100 |
Exynos 4210 | XMM6260 | HSIC | CONFIG_UMTS_MODEM_XMM6260=y | galaxys2 | |
| Galaxy Note: GT-N7000 |
Exynos 4210 | XMM6260 | HSIC | CONFIG_UMTS_MODEM_XMM6260=y | galaxys2 | |
| Galaxy Nexus: GT-I9250 |
OMAP 4460 | XMM6260 | MIPI | CONFIG_UMTS_MODEM_XMM6260=y Makefile modem_modemctl_device_xmm6260.c |
maguro | |
| Galaxy SIII: GT-I9300 |
Exynos 4412 | XMM6262 | HSIC | CONFIG_UMTS_MODEM_XMM6262=y Makefile modem_modemctl_device_xmm6262.c |
CONFIG_SEC_MODEM_M0=y Makefile board-m0-modems.c CONFIG_MACH_M0=y gpio-midas.h gpio-rev00-m0.h |
i9300 |
| Galaxy Note 8.0 GSM: GT-N5100 |
Exynos 4412 | XMM6262 | HSIC | CONFIG_UMTS_MODEM_XMM6262=y | n5100 | |
| Galaxy Note II: GT-N7100 |
Exynos 4412 | XMM6262 | HSIC | CONFIG_UMTS_MODEM_XMM6262=y | n7100 | |
| Galaxy Tab 2: GT-P3100 GT-P5100 |
OMAP 4430 | XMM6262 | MIPI | CONFIG_UMTS_MODEM_XMM6262=y | piranah | |
Note that we don't limit ourselves to the drivers that are in use on the devices supported by Replicant.
As Samsung wrote drivers for the modem interfaces, and that the interface is similar across many different modems, other unused drivers and their comments also gives many hints about what the GPIOs are supposed to be used for.
| gpio platform data name | present | absent | direction | comments |
|---|---|---|---|---|
| gpio_cp_on | GT-I9300 | powers on the modem? in which state (PMIC?, CPU?) * On GT-I9100 it's connected to the ON1 modem pin and ON2 is not connected. |
||
| gpio_cp_reset | GT-I9300 | read + write | Resets the modem CPU? PMIC?: * ''check the reset timming with C2C connection'' : Here C2C probably means chip to chip Can also read the modem CPU? and/or PMIC? reset state? * Reads from the GPIO and ''CP not ready, Active State low'' comment Also used in umts_link_reconnect (todo: check firmware status) |
|
| gpio_reset_req_n | GT-I9300 (define) | It seems to reset the modem. On some device with an MSM SOC (modem? AP?) in the smdk4412 kernel, it resets the modem PMIC. It can also be used to keep the modem (SOC? PMIC? CPU?) in reset mode while powered on. It could very well be the PMIC with the GT-I9300 as we have the following sequence in xmm6262_on :
gpio_set_value(mc->gpio_reset_req_n, 0);
gpio_set_value(mc->gpio_cp_on, 0);
gpio_set_value(mc->gpio_cp_reset, 0);
msleep(100);
gpio_set_value(mc->gpio_cp_reset, 1);
/* If XMM6262 was connected with C2C, AP wait 50ms to BB Reset*/
msleep(50);
gpio_set_value(mc->gpio_reset_req_n, 1);
gpio_set_value(mc->gpio_cp_on, 1);
udelay(60);
gpio_set_value(mc->gpio_cp_on, 0);
msleep(20);
SOCs probably need to have a very specific voltage ramp up sequences to boot (voltage ramps and so on are described in the SOC datasheets, TODO: check with a specific example). If that's true it would mean that the CPU has to not be off at boot but still be in some reset mode to accept a firmware? In that case, once everything is off, the CPU power would be turned on first, then the PMIC, then the reset line for the firmware loading (way later) |
||
| gpio_pda_active | GT-I9300 | Tell the modem if the SOC CPUs are sleeping/active or not? * PDA == Application processor * ''PDA_ACTIVE, let cp know AP sleep'' comment in status gc1-gpio.c * PDA_ACTIVE set to 0 right after cpu_pm_enter() * PDA_ACTIVE set to 1 right before cpu_pm_exit() * GPIO direction is output on AP side and input on BP side, which is also confirmed by the pinout table in XDA Also indicates when the CPU is ready to process modem stuff: * set to 1 at the end of xmm6262_on in modem_modemctl_device_xmm6262.c * The CPU can't process stuff if the HSIC link is in low power mode, as shown in set_hsic_lpa_states in board-m0-modems.c so it sets gpio_pda_active to 0 in these cases. |
||
| gpio_phone_active | GT-I9300 | Seem the modem counterpart of gpio_pda_active: * See umts_link_reconnect in board-m0-modems.c * See also mc_work in the unused modemctl.c driver where that GPIO is used both to signal when the modem finished booting everything and is ready, and when the modem crashes or is reset * phone_active_irq_handler in modem_modemctl_device_xmm6262.c seem to be doing exactly the same thing. |
||
| gpio_cp_dump_int | GT-I9300 | Maybe used for crash dump. Reference: Presentation about exploiting XMM modems: The nonfree s-boot 4.0 bootloader can probably get the modem crashdump. (cp is the modem) | ||
| gpio_flm_uart_sel | Only used for the Galaxy Nexus in libsamsung-ipc | GT-I9300 | Modem download mode ? * FLM could be Firmware Load mode ? * On several devices, that GPIO seem to be used to switch between different UART, and the PMIC seem involved too in some devices. Not sure how it switches |
|
| gpio_cp_warm_reset | GT-I9300 | |||
| gpio_revers_bias_clear | GT-I9300 | |||
| gpio_revers_bias_restore | GT-I9300 | |||
| gpio_sim_detect | GT-I9300 (GPIO_SIM_DETECT is not set) | Detect SIM card presence ? | ||
| gpio_link_enable | GT-I9300 | power management | ||
| gpio_link_active | GT-I9300 (define) | set to 0 when the (HSIC) link is in low power and to 1 when it's back, like in set_hsic_lpa_states in board-m0-modems.c , power management | ||
| gpio_link_hostwake | GT-I9300 (define) | power management According to the code below in modem_link_device_hsic.c, it seems that the modem can tell the host to set the HSIC link to sleep when that GPIO is high, and to re-enable the link when it's low:
static irqreturn_t link_pm_irq_handler(int irq, void *data)
{
int value;
struct link_pm_data *pm_data = data;
#if defined(CONFIG_SLP)
pm_wakeup_event(pm_data->miscdev.this_device, 0);
#endif
if (!pm_data->link_pm_active)
return IRQ_HANDLED;
/* host wake up HIGH */
/*
resume usb runtime pm start
*/
/* host wake up LOW */
/*
slave usb enumeration end,
host can send usb packet after
runtime pm status changes to ACTIVE
*/
[...]
}
|
||
| gpio_link_slavewake | GT-I9300 (define) | power management According to the code in board-m0-modems.c, it seems to be used to wakup the modem or to make it exit low power mode by triggering a rising edge but I don't know why it checks the hostwake GPIO in the code below:
/* HSIC specific function */
void set_slave_wake(void)
{
if (gpio_get_value(modem_link_pm_data.gpio_link_hostwake)) {
pr_info("[MODEM_IF]Slave Wake\n");
if (gpio_get_value(modem_link_pm_data.gpio_link_slavewake)) {
pr_info("[MODEM_IF]Slave Wake set _-\n");
gpio_direction_output(
modem_link_pm_data.gpio_link_slavewake, 0);
mdelay(10);
}
gpio_direction_output(
modem_link_pm_data.gpio_link_slavewake, 1);
}
}
[...]
void set_hsic_lpa_states(int states)
{
int val = gpio_get_value(umts_modem_data.gpio_cp_reset);
mif_trace("\n");
if (val) {
switch (states) {
[...]
case STATE_HSIC_LPA_PHY_INIT:
gpio_set_value(umts_modem_data.gpio_pda_active, 1);
set_slave_wake();
pr_info(LOG_TAG "set hsic lpa phy init: "
"slave wake-up (%d)\n",
gpio_get_value(
modem_link_pm_data.gpio_link_slavewake)
);
break;
}
}
}
|
||
| gpio_ap_dump_int | GT-I9300 (define) | Maybe used for crash dump. Reference: Presentation about exploiting XMM modems: The nonfree s-boot 4.0 bootloader can probably get the modem crashdump. Here it would indicate that the host somehow can send crashdumps to the modem somehow? | ||
| gpio_sim_io_sel | GT-I9300 (define) | Seem to be used for some dual modem feature which is not present in any Replicant kernels (aries, crespo, espresso10, smdk4412, tuna) for Replicant 6 (or 4.2 for aries and crespo) | ||
| gpio_cp_ctrl1 | GT-I9300 (define) | |||
| gpio_cp_ctrl2 | GT-I9300 (define) |
| ioctl / function | Devices | |||||||
| GT-I9250 | GT-I9100 / GT-N7000 | GT-I9300 | GT-N5100 | GT-N7100 | GT-P3100 / GT-P5100 | Galaxy S (GT-I9000) / Galaxy Tab | Nexus S (GT-I902x) | |
| libsamsung-ipc driver | maguro | galaxys2 | i9300 | n5100 | n7100 | piranah | aries | crespo |
| open, close, read, write fmt/rfs gprs power |
Yes | |||||||
| boot_power status_online_wait |
Yes | No | No | |||||
| hci_power link_control_active link_connected_wait link_get_hostwake_wait |
No | Yes | No | |||||
| link_control_enable | Yes (ignored by Linux4[5][6]) | Yes (ignored by Linux1[2][3]) | ||||||
| psi_send | xmm626_mipi_psi_send | xmm626_hsic_psi_send | xmm626_mipi_psi_send | xmm616_psi_send | ||||
| firmware_send | xmm626_mipi_firmware_send | xmm626_hsic_firmware_send | xmm626_mipi_firmware_send | xmm616_firmware_send | ||||
| nv_data_send | xmm626_mipi_nv_data_send | xmm626_hsic_nv_data_send | xmm626_mipi_nv_data_send | xmm616_nv_data_send | ||||
| libsamsung-ipc | Kernel | |||
|---|---|---|---|---|
| Function using the ioctl | ioctl name | pointer signature | GPIO used | comment |
| xmm626_kernel_smdk4412_power | IOCTL_MODEM_ON IOCTL_MODEM_OFF |
int (*modem_on)(struct modem_ctl*); int (*modem_off)(struct modem_ctl*); |
gpio_cp_on gpio_cp_reset gpio_reset_req_n gpio_pda_active |
|
| gpio_phone_active | ||||
| gpio_cp_dump_int | ||||
| xmm626_kernel_smdk4412_boot_power | IOCTL_MODEM_BOOT_ON IOCTL_MODEM_BOOT_OFF |
int (*modem_boot_on)(struct modem_ctl*); int (*modem_boot_off)(struct modem_ctl*); |
gpio_flm_uart_sel | |
| gpio_cp_warm_reset | ||||
| gpio_revers_bias_clear | ||||
| gpio_revers_bias_restore | ||||
| gpio_sim_detect | ||||
| xmm626_kernel_smdk4412_status_online_wait | IOCTL_MODEM_STATUS | int phone_state; | gpio_cp_on gpio_cp_reset gpio_pda_active gpio_reset_req_n gpio_phone_active |
int phone_state get assigned the status computed from the various GPIO states xmm626_kernel_smdk4412_status_online_wait only waits for the online status |
| xmm626_kernel_smdk4412_link_control_enable | IOCTL_LINK_CONTROL_ENABLE | int (*link_ldo_enable)(bool); |
gpio_link_enable | on i9300: * link_ldo_enable only returns 0 and has a comment ("Exynos HSIC V1.2 LDO was controlled by kernel") * gpio_link_enable is set to 0 (so it's ignored) |
TODO: move in its own page and point to it
LPA: Low power mode active (Related to ULPI specs only?)
ULPI: Probably a USB PHY spec
Do we really want to check the SIM card presence?
Would it be possible not to for privacy reasons?
Example:From cpuidle-exynos4.c we have things like that:
cpu_pm_enter();
#if defined(CONFIG_INTERNAL_MODEM_IF) || defined(CONFIG_SAMSUNG_PHONE_TTY)
gpio_set_value(GPIO_PDA_ACTIVE, 0);
#endif
if (log_en)
pr_debug("+++lpa\n")
and:
if (log_en)
pr_debug("---lpa\n");
#if defined(CONFIG_INTERNAL_MODEM_IF) || defined(CONFIG_SAMSUNG_PHONE_TTY)
gpio_set_value(GPIO_PDA_ACTIVE, 1);
#endif
cpu_pm_exit();
Does it means that we are telling the modem about each time we go in suspend to RAM?
Devices affected or not affected:
| Device | Config |
|---|---|
| GT-I9300 | # CONFIG_INTERNAL_MODEM_IF is not set # CONFIG_SAMSUNG_PHONE_TTY is not set |
From ehci-s5p.c we have things like that:
#if defined(CONFIG_UMTS_MODEM_XMM6262)
if (pdata->get_cp_active_state && !pdata->get_cp_active_state()) {
s5p_ehci_port_control(pdev, CP_PORT, 0);
pr_err("mif: force port%d off by cp reset\n", CP_PORT);
}
#endif
Does it allows the modem to trigger a re-enumeration of the HSIC bus?
Devices affected or not affected:
| Device | Config |
|---|---|
| GT-I9300 | CONFIG_UMTS_MODEM_XMM6262=y .gpio_phone_active = GPIO_PHONE_ACTIVE |
According to the modem logs gathered with xgoldmon, on the Galaxy SII (GT-I9100) with Replicant 6.0, the Galaxy Nexus under Replicant 6.0 and the Galaxy SIII (GT-I9300) with the stock OS, the modem has a way to get information about the battery status.
Since libsamsung-ipc doesn't send that information, the modem probably is connected to a chip or resistance that can see get that information.
The XMMProtocolInterfaces article has an example of log for the Galaxy SII (GT-I9100) that has information about the battery voltage.
The modem also has an USB port that can be routed to the smartphone/tablet USB port.
To do that you first need to get a root shell in the device as the commands need to be executed as root.
Once this is done you need to switch the USB connector to the modem USB. This can be done with the following command:
echo MODEM > /sys/devices/virtual/sec/switch/usb_sel
Then nothing will happen, you will still be able to login through adb.
To make the device switch to the modem USB you then need to unplug and replug the USB cable between your computer and the device.
At this point, if the modem was booted, you'll see a new USB device appearing.
Some serial ports will also appear.
Tested on Replicant 6.0 0004 RC3
| Device | Distribution | Modem status | USB ids (lsusb from laptop) | tty |
| GT-I9100 | Replicant 6.0 0004 RC3 | Off | None | N/A |
| GT-I9100 | Replicant 6.0 0004 RC3 | Booted | 1519:0020 Comneon HSIC Device | /dev/ttyACM0 -> /dev/ttyACM6 |
| GT-I9300 | Replicant 6.0 0004 RC3 | Booted | 1519:0020 Comneon HSIC Device | /dev/ttyACM0 -> /dev/ttyACM6 |
When running lsusb on the SOC on the Replicant 11 kernel on a GT-I9300, we also see 1519:0020 Comneon HSIC Device once the modem is booted. Once powered on and before booting, the USB ids seen in lsusb with that kernel are these ones: 058b:0041 Infineon Technologies Flash Loader utility instead.
As the modem isn't visible either when not powered on, we need to look if it's possible to boot the modem from a laptop for instance.
| Device | State | UART | Protocol |
|---|---|---|---|
| GT-I9100 | modem booted | /dev/ttyACM0 | AT: GTI9100ModemTTYACM0 |
| GT-I9100 | modem booted | /dev/ttyACM1 | Compatible with xgoldmon |
| GT-I9300 | modem booted | /dev/ttyACM0 | AT: GTI9300ModemTTYACM0 |
| GT-I9100 | modem booted | /dev/ttyACM1 | With Replicant 6, Xgoldmon waits for messages but nothing arrives, we have some messages with the stock firmware though |
| GT-I9300 | modem booted | /dev/ttyACM3 | AT: GTI9300ModemTTYACM0 |
description: Xgoldmon is a software that can get some cellular protocol traces from some Samsung phones using the samsung-ipc protocol.
git: https://github.com/2b-as/xgoldmon.git
Xgoldmon seem to display things on the GT-I9100:
# ./xgoldmon -vvvv -i localhost -t s2 -l /dev/ttyACM1 LOG:>>[HIGH]oembatt.c,310,[DISP] Thermistor : measured_value=1630666778<< LOG:>>[HIGH]oembatt.c,137,[DISP] oem_set_batt_level : 4220<< LOG:>>[HIGH]oembatt.c,236,[DISP] BATT : measured_value_mv=4220, AvgBattVal_mv=4007, battery_level=5<< LOG:>>[LOW]oemdisplay.c,363,no change -> rssi:4, bat:5<< LOG:>>[HIGH]oembatt.c,310,[DISP] Thermistor : measured_value=1630666779<< LOG:>>[HIGH]oembatt.c,137,[DISP] oem_set_batt_level : 4225<< LOG:>>[HIGH]oembatt.c,236,[DISP] BATT : measured_value_mv=4225, AvgBattVal_mv=4026, battery_level=5<< LOG:>>[LOW]oemdisplay.c,363,no change -> rssi:4, bat:5<< LOG:>>[HIGH]oembatt.c,310,[DISP] Thermistor : measured_value=1630666778<< LOG:>>[HIGH]oembatt.c,137,[DISP] oem_set_batt_level : 4220<< LOG:>>[HIGH]oembatt.c,236,[DISP] BATT : measured_value_mv=4220, AvgBattVal_mv=4055, battery_level=5<< LOG:>>[LOW]oemdisplay.c,363,no change -> rssi:4, bat:5<<
And when calling an (inexisting/invalid) number, the frames appear in Wireshark.
However on the GT-I9300 it waits for messages that never arrive.
And on the GT-I9100 there seem to be very few messages.
I did some tests and compared a GT-I9100 with Replicant 6 and one with the stock distribution (rooted) and the one running Replicant outputed very few messages while the one running the stock OS outputed many messages.
Both had the same result when running AT+TRACE? on /dev/ttyACM0:
at+trace? +TRACE: 1,921600,"ap=1;st=1;db=1;pr=1;bt=1,lt=1;li=1;ga=1;ae=1","DTM",0
For more background on the values:
AT+TRACE=?
+TRACE: description START
at+trace=[<mode>],[<speed>],["<unit>=<umode>[,<unit>=<umode>[;...]]]",["<method>"],[PowerSavingCountdown]
<mode>:
-------------------------------------------------------------
0: sets all units OFF [param <unit> will be ignored !]
1: sets all units ON [param <unit> will be ignored !]
no param: 3rd param. <units> configures trace-units
-> trace? will then display 128 as <mode>
<speed>: (115200,230400,460800,921600,1843200,3000000,3250000,6000000)
<units>:
-------------
ap: apoxi
st: stack
db: debug
pr: printf
bt: bluetooth
lt: LLT
li: LwIP
gt: GATE
ae: AENEAS
<umode>:
-----------------
0: unit-trace OFF
1: unit-trace ON
<method>:
--------------------------------
"BTM": byte stuffing trace method
"DTM": direct trace method
"EBTM": extended byte stuffing trace method
<PowerSavingCountdown in msecs>: (0-30000)
i.e.:
--------------------------------------------------
at+trace=0
at+trace=,460800
at+trace=,115200,"st=1,pr=1,bt=1,ap=0,db=1,lt=0,li=0"
at+trace=,,"lt=1,db=1,ga=0"
at+trace=,,,"EBTM"
at+trace=,,,,2000
+TRACE: description END
OK
On the stock OS I most followed xmongold procedure:
To enable the logging mode ("diag mode") on the S2, S3 and Note2:
- Go to the Phone application, enter *#9900# and set "Debug Level
Enabled" to "HIGH". The phone will reboot.
- Go to the Phone application again, enter *#7284# and set "USB" to
"MODEM" and tap "SAVE and RESET". The phone will reboot again.
*#9900 thing as I didn't see any debug level.
I only had the following menu:
+-------------------------------------------------+ | Run dumpstate/logcat/modem log | +-------------------------------------------------+ | Delete dumpstate/logcat | +-------------------------------------------------+ | run dumpstate/local | +-------------------------------------------------+ | Copy kenrel log to the SD card | +-------------------------------------------------+ | Run modem log | +-------------------------------------------------+ | Copy to sdcard(include CP Ramdump) | +-------------------------------------------------+ | Disable fast dormancy (Current State: Enabled ) | +-------------------------------------------------+ | Ramdump Mode Enable/HIGH | +-------------------------------------------------+ | TCP DUMP START | +-------------------------------------------------+ | Enable SecLog (currently disabled) | +-------------------------------------------------+ | Exit | +-------------------------------------------------+
When using run modem log it did show the following popup:
+----------------------------+ | /!\ Dump Result | +----------------------------+ | GET MODEM LOG SUCCESS! | | Please copy to SDcard with | | other Menu button. | +----------------------------+ | OK | +----------------------------+
As for the following:
- Go to the Phone application again, enter *#7284# and set "USB" to "MODEM" and tap "SAVE and RESET". The phone will reboot again.
The setting stay across reboots (I still have 1519:0020 Comneon HSIC Device) and in the recovery I don't have any USB device (anymore?).
In the one running Replicant I did AT+TRACE=1.
On the GT-I9300, following this part:
- Go to the Phone application again, enter *#7284# and set "USB" to "MODEM" and tap "SAVE and RESET". The phone will reboot again.
I've also written a tool to diff the modem settings through AT commands, and it didn't find any difference beside with the AT+TRACE settings.
The goal was to find some differences after doing that:
- Go to the Phone application, enter *#9900# and set "Debug Level Enabled" to "HIGH". The phone will reboot.
Here I captured the settings with LOW and HIGH, and the only interesting difference is with AT+TRACE:
$ diff -u GT-I9300-main-stock-low-1.conf GT-I9300-main-stock-high-3.conf [...] -at+trace = ['+TRACE: 0,921600,"ap=0;st=0;db=0;pr=0;bt=0;lt=0;li=0;ga=0;ae=0","DTM",0'] +at+trace = ['+TRACE: 1,921600,"ap=1;st=1;db=1;pr=1;bt=1,lt=1;li=1;ga=1;ae=1","DTM",0'] [...]
Note that if we have +TRACE: 0,921600,"ap=0;st=0;db=0;pr=0;bt=0;lt=0;li=0;ga=0;ae=0","DTM",0, we can simply do AT+TRACE=1 to make it like it should (+TRACE: 1,921600,"ap=1;st=1;db=1;pr=1;bt=1,lt=1;li=1;ga=1;ae=1","DTM",0).
It seems that the bootloader is also involved here: Changing the settings result in modifications in the PARAM partition.
See GTI9300PARAM for more details on the research about it.
The upstream driver for the Galaxy SIII (GT-I9300) is in drivers/extcon/extcon-max77693.c
Once loaded we have:
[root@u-boot-i9300 ~]# uname -r 5.10.0-rc2+ [root@u-boot-i9300 ~]# cd /sys/class/extcon/extcon0 [root@u-boot-i9300 extcon0]# ls */ cable.0/: name state cable.1/: name state cable.2/: name state cable.3/: name state cable.4/: name state cable.5/: name state cable.6/: name state cable.7/: name state cable.8/: name state cable.9/: name state device/: driver driver_override extcon input modalias power subsystem uevent power/: async autosuspend_delay_ms control runtime_active_kids runtime_active_time runtime_enabled runtime_status runtime_suspended_time runtime_usage subsystem/: extcon0 [root@u-boot-i9300 extcon0]# grep . */name cable.0/name:USB cable.1/name:USB-HOST cable.2/name:SDP cable.3/name:DCP cable.4/name:FAST-CHARGER cable.5/name:SLOW-CHARGER cable.6/name:CDP cable.7/name:MHL cable.8/name:JIG cable.9/name:DOCK [root@u-boot-i9300 extcon0]# grep . */state cable.0/state:1 cable.1/state:0 cable.2/state:1 cable.3/state:0 cable.4/state:0 cable.5/state:0 cable.6/state:0 cable.7/state:0 cable.8/state:0 cable.9/state:0
I'm unsure if switching from userspace is implemented or not.
Though some part looks unimplemented.
In gpio-rev00-m0.h in the smdk4412 kernel we have:
#define GPIO_USB_SEL EXYNOS4212_GPJ0(1)
And the max77693-muic.c driver seems to use that to do the switch between the modem USB and the SOC USB.
And that seems to be used to switch to the modem USB.
These were cleaned up and ported from forkbomb's code:
b4c2df98ed6f misc: xmm6262: Add Samsung IPC USB modem firmware download module 77b55273bd6e net: usb: add Samsung IPC-over-HSIC driver f9ae2d1697fa net: add Samsung IPC interface driver 7806adad4507 HACK: usb: host: ehci-exynos: add ehci_power sysfs node 82c317b0da5e HACK: add modem power on/off driver 28e5b460f920 HACK: usb: ehci_exynos: enable OHCI_SUSP_LEGACY e7c122b770c1 ARM: dts: EXYNOS: add 3G modem nodes to midas boards c3201527f7ea ARM: dts: split Exynos 4412 N710x boards up 5b55f03cda8c ARM: dts: EXYNOS: add Samsung IPC modem support eca381876d5e ARM: dts: EXYNOS: enable HSIC0 on midas boards 7ec9129e3221 replicant_*_defconfig: extend cmdline to get IMSI and other information 54c196380507 replicant_*_defconfig: Add modem support [...] 0ecfebd2b524 Linux 5.2
If we look at the drivers only (not the dts or config changes, or hacks in pre-existing code, we are left with):
b4c2df98ed6f misc: xmm6262: Add Samsung IPC USB modem firmware download module 77b55273bd6e net: usb: add Samsung IPC-over-HSIC driver f9ae2d1697fa net: add Samsung IPC interface driver 82c317b0da5e HACK: add modem power on/off driver
We'd also need to find a way to fix these:
7806adad4507 HACK: usb: host: ehci-exynos: add ehci_power sysfs node 28e5b460f920 HACK: usb: ehci_exynos: enable OHCI_SUSP_LEGACYSo we'd probably need to have something like that instead:
So we have: Userspace <-> SIPC protocol <-> SIPC transport <-> HSIC
However I'm not sure about certain things:Also look at the motorolla cpcap driver for the droid4. The architecture is different though: While it uses USB, it's tied to Qualcomm modem drivers (CDC) which probably doesn't have a specific protocol beside the multiplexing of the UART lines and network interfaces, though CDC could be seen as a specific protocol
Linux has an API to ask userspace for a firmware, retrieve that firmware and so it can send it to the device afterward.
The issue is that this API typically expect files to be in /lib/firmware while here the data is on a dedicated partition like RADIO.
So we could for instance do something like that:
# echo 1 > /sys/class/firmware/<somename>/loading # cat /dev/block/by-partlabel/RADIO > /sys/class/firmware/<somename>/data # echo 0 > /sys/class/firmware/<somename>/loading
But the issue is that on GNU/Linux udev and/or systemd handles that and in Android there is also a dedicated daemon for firmware loading, and both probably expect file names that are provided by the kernel to know which file to cat in /sys/class/firmware/<somename>/data.
So while we could load the firmware, I don't know how the Android firmware loading code would be able to detect that it needs to cat a partition and not a file in /lib/firmware.
Maybe we could have a symlink to the partition in /lib/firmware?
Having that work on GNU/Linux is also extremely useful for testing so there we would have issues too to make it work fine.
The GPIOs are used during the firmware loading. But in the vendor kernel they also signal when the host goes in suspend, so we probably need to check how it's done and how to implement it in a way compatible with upstreaming.
TODO: Look how the channels are encoded in the USB transfer. Example with usb_to_sipc_format1.
+----------------+ +---------------+ +--------------+
| libsamsung-ipc | -----> | /dev/umts_ipc | -----> drivers/net/sipc/miscdev.c: .write -> sipc_misc_write( [...] ) { [...] // enqueue data to tx_queue_raw + add padding [....] } -> | tx_queue_raw |
+----------------+ +---------------+ +--------------+
+--------------+
| tx_queue_raw | -----> | dequeue in drivers/net/sipc/core.c in sipc_tx_work ( [...] ) { [...] sipc_do_tx( [...] ); [...] } -----> sipc_do_tx( [...] ep->transmit() [...] );
+--------------+
+-------------+
| .transmit() | -----> sipc_link_transmit( [...], struct sk_buff *skb ) { [...] // configure the USB as sndbulkpipe for sending a bulk pipe and sends the skb }
+-------------+ ^
|
|+--Setup in sipc_probe()
Here's a more data centric view:
| function | Content |
| sipc_link_transmit1 | Add USB headers only with usb_sndbulkpipe() and sends the data to the USB core |
| sipc_misc_write2 | Adds HDLC header and footer and sends the data to sipc_link_transmit |
| /dev/umts_ipc .write3 | function pointer to sipc_misc_write |
In wireshark we need to find out what fields of the urb struct usb_sndbulkpipe() populates, and find the payload in Wireshark.
Then we should see a 1 byte HDLC header and footer and the payload inside which should normally correspond exactly to what libsamsung-ipc sent (though the bytes may be encoded as big endian or little endian by the USB core).
According to sipc_receive_callback1 and to sipc_hdlc_header_check2, we should also see the HDLC headers for the frames being received in wireshark. The rest is most probably the payload like with the analysis above of what happens with a write.
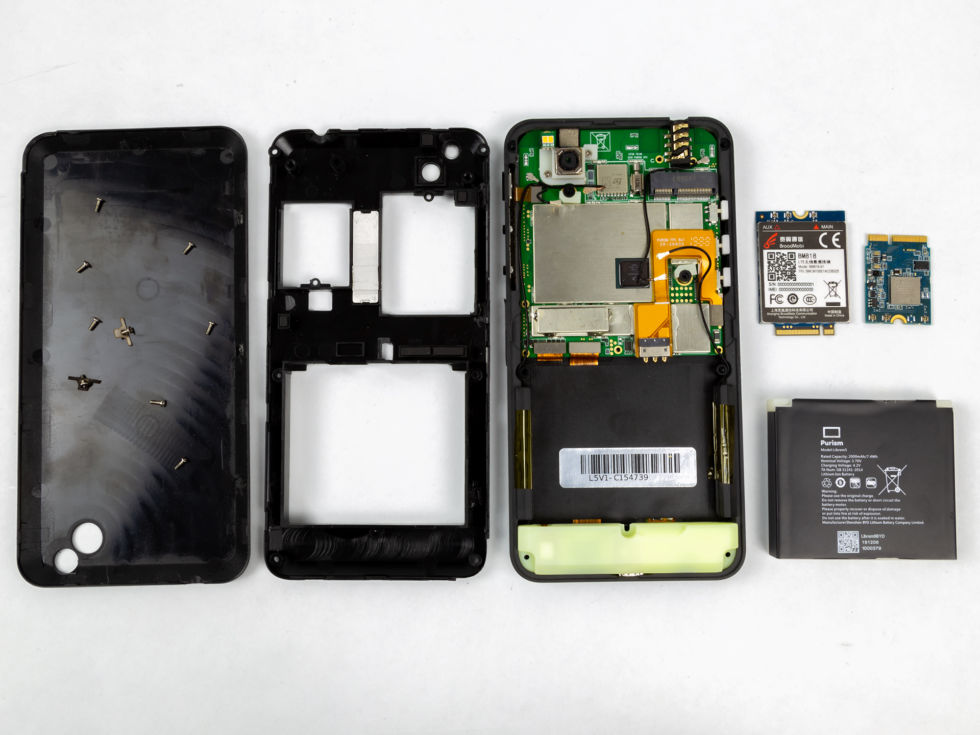